manuals.online logo
Brands
  1. Home
  2. •
  3. Brands
  4. •
  5. Shark
  6. •
  7. Steam Cleaner
  8. •
  9. Shark SC630 User manual

Shark SC630 User manual

OWNER’S GUIDE
SC630 series
TOLL FREE: 1-800-798-7398 www.sharkninjamanuals.com
IMPORTANT SAFETY INSTRUCTIONS
For Household Use Only
WHEN USING YOUR SHARK®PORTABLE
STEAM POCKET®, BASIC SAFETY
PRECAUTIONS SHOULD ALWAYS BE
FOLLOWED, INCLUDING THE FOLLOWING:
READ ALL INSTRUCTIONS BEFORE
USING YOUR SHARK® PORTABLE STEAM
POCKET®.
DANGER OF SCALDING.
Please use caution when using the steam
bottle directly or with the hose and tool
attachments and cleaning pockets. The steam
emitted is very hot.
IMPORTANT:
This appliance is not intended for use by persons
with reduced physical, sensory or mental
capabilities, or lack of experience and knowledge,
unless they have been given supervision or
instruction concerning use of the appliance by a
person responsible for their safety.
Children shall not use or play with this
appliance. Close supervision is necessary to
keep appliance out of reach of children during
use and cooling.
27. DO NOT leave unattended when the system is
connected to a power supply or electrical outlet.
Turn off all controls before unplugging the unit.
28. DO NOT store unit with damp or wet cleaning
pocket attached. Never leave the portable Steam
Pocket®in one spot on any surface for any period
of time with a damp or wet cleaning pocket
attached as this will damage your surface.
29. Always unplug and allow the portable Steam
Pocket®to cool before removing cleaning fabric or
changing cleaning tools and hose.
30. Make sure that the water tank door is closed when
using the appliance.
WARNING: Your portable Steam
Pocket®is designed to clean surfaces that will
withstand high heat. Do not use on unsealed
wood or unglazed ceramic surfaces. On surfaces
that have been treated with wax or some no wax
surfaces, the sheen may be removed by the heat
and steam action. It is always recommended to
test an isolated area of the surface to be cleaned
before proceeding. We also recommend that you
check the use and care instructions from the
surface manufacturer.
SAVE THESE
INSTRUCTIONS
15. DO NOT put hands or feet under the portable Steam
Pocket®. Unit gets very hot.
16. DO NOT use on leather, wax polished furniture or
floors, synthetic fabrics, velvet or other delicate,
steam sensitive materials.
17. Liquid or steam must not be directed towards
equipment containing electrical components, such as
the interior of ovens.
18. DO NOT add cleaning solutions, scented perfumes,
oils or any other chemicals to the water used in this
appliance as this may damage the unit or make it
unsafe for use. If you live in a hard water area, we
recommend using distilled water in your portable
Steam Pocket®.
19. When in use, NEVER turn the appliance over or
on its side. NEVER DIRECT STEAM TOWARDS
PEOPLE, ANIMALS OR PLANTS.
20. Carefully remove the cleaning pocket immediately
after you have unplugged and allowed the portable
Steam Pocket®to cool.
21. When cleaning the portable Steam Pocket®, unplug
the power cord from the electrical outlet and clean
with a dry or damp cloth. Do not pour water or use
alcohol, benzene or paint thinner on the unit.
22. Never use portable Steam Pocket®without the
cleaning pocket attached.
23. Keep your work area well lit.
24. Let the system cool completely before putting away.
Wrap cord loosely around system when storing, using
the cord clip to secure.
25. To avoid circuit overload, do not operate another
appliance on the same socket (circuit) as the steam
cleaner.
26. If an extension cord is absolutely necessary, an
extension cord rated a minimum of 15 ampere,
2.08mm2 (14 AWG) cord should be used. Cords
rated for less amperage may overheat. Care should
be taken to arrange cord so that it cannot be pulled
or tripped over.
WARNING:
TO REDUCE THE RISK OF FIRE, ELECTRIC
SHOCK OR INJURY:
1. Use the system only for its intended use.
2. DO NOT use outdoors.
3. DO NOT leave the appliance unattended when
plugged in. Always unplug the power cord from the
electrical outlet when not in use and before servicing.
4. DO NOT allow the appliance to be used by children.
Close attention is necessary when used near
children, pets or plants.
5. Use only as described in this manual.
6 . Use only manufacturer’s recommended accessories.
7. DO NOT use with damaged cord or plug.
8. DO NOT USE if the appliance is not working, has
been dropped, dropped into water, damaged or left
outdoors.
9. NO SERVICEABLE PARTS. Incorrect re-assembly
or repair can cause a risk of electrical shock or injury
to persons when the appliance is used. Contact
Customer Service.
10. To protect against a risk of electric shock, DO NOT
immerse the portable Steam Pocket®into water or
any other liquids.
11. DO NOT handle plug or portable Steam Pocket®with
wet hands or operate appliance without shoes.
12. DO NOT pull or carry by power cord, use power cord
as handle, close a door on the power cord, or pull
the power cord around sharp edges or corners. Keep
power cord away from heated surfaces.
13. DO NOT unplug by pulling on power cord. To unplug,
grasp the plug not the power cord. Do not use
extension cords or outlets with inadequate current
carrying capacity.
14. DO NOT put any objects into openings. Do not use
with any opening that is blocked.
1
TOLL FREE: 1-800-798-7398 www.sharkninjamanuals.com
Contents
GETTING STARTED ................................................................. 2
USING YOUR PORTABLE STEAM POCKET® .................4
CARE OF YOUR PORTABLE STEAM POCKET® ........... 9
SUGGESTED USES ................................................................ 10
TROUBLESHOOTING GUIDE ..............................................12
REPLACEMENT PARTS .........................................................13
Thank you for
purchasing
the Shark®
Portable
Steam
Pocket®
Cleaning
System.
TECHNICAL SPECIFICATIONS
Voltage: 220-240V., 50/60Hz.
Power: 1550 Watts
Water Capacity: 450 ml (15 fl. oz.)
THIS MANUAL COVERS MODEL NUMBER:
SC630***** 11
IPX4
This appliance complies with the WEEE-Directive 2012/96/EC on the disposal of electrical and electronic
equipment (WEEE).
This marking indicates that this product should not be disposed with other household wastes
throughout the EU. To prevent possible harm to the environment or human health from uncontrolled
waste disposal, recycle it responsibly to promote the sustainable reuse of material sources. To return
your used device, please use the return and collection systems or contact the retailer where this
product was purchased. They can take this product for environmental safe recycling.
This appliance complies with the European directives for electromagnetic compatibility (EMC) 2004/108/EC and its
revisions, as well as Low Voltage Directive (LVD) 2006/95/EC and its revisions.
Although the product is not provided with standby mode, it still fulfils the requirements of 1275/2008/EC - the
directive for Eco-Design requirements since according to technical justification, it is considered as inappropriate
to provide standby and off modes when connecting to mains. To reduce energy consumption be sure to unplug the
unit after use.
2 3
TOLL FREE: 1-800-798-7398 www.sharkninjamanuals.com
Getting Started
FIRST THINGS FIRST, YOU NEED TO KNOW
WHAT’S IN THE BOX YOU JUST OPENED:
a Steam Bottle
b Extension Hose (1035SO)
c Wedge Cleaning Tool (1037SO)
d Cylinder Cleaning Tool (1038SO)
e Detail Cleaning Handle
f 2 Detail Brush Accessories (1036SO)
g Garment Steamer Kit (1041SO)
h Garment Steamer Bonnet
i Shower Door Squeegee Attachment
(1047SO)
j Filling Flask (1039SO)
k Direct Steam Nozzle
l 2 All-Purpose Wedge Cleaning Pockets
(P106W)
m 2 All-Purpose Cylinder Cleaning Pockets
(P105W)
n Steam Duster Cylinder Cleaning Pocket
(P107W)
o Scrubbing Wedge Pocket (P109W)
p Squeegee Wedge Pocket (P108W)
q Nozzle Cleaner
ASSEMBLY & USE INSTRUCTIONS
1 Safely remove contents of the
portable Steam Pocket® cleaning
system and lay them out on a flat
surface to see that you have all
the components to complete the
assembly.
2 READ ALL INSTRUCTIONS BEFORE
USING YOUR PORTABLE STEAM
POCKET®.
IMPORTANT: Always make sure the
steam bottle is UNPLUGGED from
the electrical outlet when not in use.
Never fill the water reservoir when
the unit is plugged in.
3 Only use water. To extend the life
of your portable Steam Pocket®, we
recommend using distilled water.
If you live in an area with hard tap
water, we recommend using distilled
water.
4 Do not add cleaning solutions,
scented perfumes, oils, or any other
chemicals to the water used in
this appliance as this may damage
the unit or make it unsafe for use.
Use of any substances other than
manufacturer’s recommended
accessories will automatically void
your warranty.
a
3
c d
fg
i k
m
n
Your portable Steam Pocket® is
designed to clean surfaces that will
withstand high heat and moisture. Do
not use on unsealed wood surfaces
(especially wooden antique furniture),
unglazed ceramic tile, painted surfaces
or surfaces that have been treated with
wax, oils, varnishes, or shellac. The
sheen may be removed by the heat,
steam, and friction of the cleaning tools.
Lacquer and polyurethane coatings
provide a hard durable protective finish
that withstands moisture but it is always
recommended to test an isolated area
of the surface to be cleaned before
proceeding.
We also recommend you check the use
and care instructions from the surface
manufacturer.
When cleaning finished wood surfaces,
use broad, continuous cleaning strokes.
To prevent surface damage, avoid
focusing steam or alowing the cleaning
tools to sit in one spot for any amount
of time.
When assembling your portable Steam
Pocket®, there may be a little water in
the water tank. This is because we test
all our portable Steam Pocket® cleaning
systems 100% before you buy them, so
you get a quality Shark® steam product.
l
j
h
e
FILLING AND REFILLING THE WATER
TANK
1 Never fill the steam bottle while
plugged into an electrical outlet.
2 Disconnect the power cord before
filling the water tank.
3 Turn the water tank cap counter
clockwise and remove to fill, using
the filling flask provided. Be careful
not to overfill. Replace the cap by
turning clockwise.
b
o
p
q
4 5
TOLL FREE: 1-800-798-7398 www.sharkninjamanuals.com
Using Your Portable Steam Pocket®
DIRECT SPRAY STEAM BOTTLE USE
Cleaning Tip: Direct steam spray for
cleaning hard to reach nooks & crannies
and stubborn sticky messes where
focused steam power may be needed.
Direct steam spray can loosen and
dislodge compact dirt often found
in corners and tight places where
traditional methods and cleaning tools
tend to push dirt into, making it difficult
to reach and clean. Spray direct steam
and wipe clean with a cleaning cloth.
CAUTION: Direct steam spray
temperature is extremely hot
closest to the nozzle and can
damage surfaces if held directly
focusing in one spot too long. Be
sure to constantly move and adjust
the steam spray to avoid causing
damage.
1 Attach the Steam Bottle Nozzle.
Aligning the arrow located on
the Steam Bottle Nozzle with the
Un-Lock symbol located on the
Nozzle Connector. Press in and turn
clockwise to secure into place. The
arrow on the nozzle will align with the
Lock symbol.
2 To remove the Steam Bottle Nozzle,
turn counter-clockwise to unlock and
remove.
1 Attach the hose connector. Aligning
the arrow located on the hose
connector with the un-lock symbol
located on the nozzle connector.
Press in and turn clockwise to secure
into place. The arrow on the hose
connector will align with the lock
symbol.
2 To remove the hose, press in and
turn the hose connector counter-
clockwise to unlock and remove.
3 Select the desired cleaning tool
for use. Follow the cleaning tool
sub assembly instructions for the
selected tool.
4 Attach the cleaning tool by inserting
the hose stem into the handle of
the cleaning tool. Press in and
turn clockwise at the same time
1
5
6
3
4
WEDGE CLEANING TOOL ASSEMBLY
5 Slide the wedge shaped cleaning
pocket over the wedge cleaning tool
frame until it is completely on.
6 Secure the cleaning pocket onto the
frame. Close the cinch by pulling
on the elastic band and sliding the
locking bean to tighten.
Cleaning Tip: The wedge cleaning
pocket was designed for cleaning a
variety of surfaces and is exceptional
on those that are large and flat, both
horizontal and vertical. Broad cleaning
sides and super absorbent microfibre
fabrics loosen, lift, and lock in dirt and
grime while sanitising at the same time.
1
to secure and press in and turn
counter clockwise to release. Check
for proper connection by turning
the handle counter-clockwise a few
turns. The handle should remain
connected. (Note for reference:
This connection method is the
same design used with most over
the counter prescription bottles).
The design of this connection is to
prevent the hose from twisting and
kinking during use.
Cleaning Tip: The wedge tip and
squared edges reach into tight areas
often missed or difficult to reach with
traditional cleaning methods. The wedge
sides concave to wrap around sink and
faucet fixtures, door knobs, and other
small curved surfaces leaving them clean
all around. Multiple sides provide more
surface cleaning area and allow one to
clean with one side and finish with the
other for a “NOW YOU KNOW THAT’S
CLEAN” performance. Surface examples
for use are countertops, tabletops,
cabinets, walls, floor spot cleaning,
bathroom fixtures and more.
CAUTION: It is recommended that
you allow the cleaning pockets to
cool off before removing them from
the wedge or cylinder tools to avoid
possible scalding injury.
6 7
TOLL FREE: 1-800-798-7398 www.sharkninjamanuals.com
DETAIL SCRUBBING BRUSH
ATTACHMENT
1 Press fit the detail scrubbing brush
onto the detail cleaning handle.
GARMENT STEAMER ATTACHMENT
CAUTION: Always determine color
fastness of any fabric, especially with
reds or blues. Taking a clean, moist,
warm towel and gently rubbing a
small area on the fabric that is out of
sight and out of the way as possible.
If color bleeds onto the towel,
you may need to have the piece
professionally cleaned.
1 Press fit the garment steamer onto
the bottle nozzle
2 For garment steaming, stretch the
garment steamer bonnet over the
garment steamer diffuser
3 For garment brush, attach directly
onto the garment steamer diffuser by
aligning the bottom of the diffuser
with the back of the garment brush
attachment. Gently push the top
of the garment brush up into place
over the bonnet until the attachment
snaps into place.
Note: It is recommended that the
bonnet be used at all times to
assure a dry steam and prevent
condensation.
CYLINDER CLEANING
TOOL ASSEMBLY
1 Squeeze “chopsticks” together and
slide the cylinder shaped cleaning
pocket over the cylinder cleaning
tool frame until it is completely on.
2 Secure the cleaning pocket onto the
frame. Close the cinch by pulling
on the elastic band and sliding the
locking bean to tighten.
3
Using Your Portable Steam Pocket® - cont’d
Cleaning Tip: The thin cylinder shape
provides controlled cleaning and reaches
into narrow areas, around curved and
contoured surfaces for steam dusting
and fine cleaning activities. Specialised
dusting cleaning pockets provide gentle
cleaning of surfaces, objects, and
furniture while reaching into crevices
and corners. It is a great cleaning tool
for in and around window sills, door jams
and frames, exhaust and intake vents,
banisters, railings, spindles, furniture,
seating, patio furniture, and more.
1
2
Cleaning Tip: The scrubbing brush
attachment is great for hard to reach
areas and for breaking up heavily soiled
and dried on messes. Allow plenty of
time for steam heat and moisture to
penetrate the surface as it dislodges
the mess for wiping. It can be especially
useful in the bathroom and shower
area loosening scum build-up on tile
and grout. Select either of the cleaning
pocket tools to clean, sanitise, and wipe
up excess moisture and residue.
NOTE: The detail scrubbing brush is
most effective when applying light
pressure. Let the super heated steam
and the bristle tips do the work for you.
The sides of the bristles are not effective
for scrubbing. If you apply too much
force, you will bend and deform the
bristles.
Tip: For freshening upholstery and
removing wrinkles from clothing,
fabrics, and drapes.
1
1
SHOWER DOOR SQUEEGEE
Cleaning Tip: The shower door
squeegee provides a streak free clean.
Start at the top and gently glide
downward, wiping excess moisture and
dirt away.
1 Press fit the shower door squeegee
attachment onto the detail cleaning
handle.
HOSE & CLEANING TOOL
ATTACHMENT USE
Cleaning Tip: Versatile cleaning tools
provide multi-purpose and task specific
cleaning solutions for quick and easy
clean-up. Effortlessly interchange the
tools for on the go whole house cleaning
in areas missed and forgotten with the
power of super heated steam.
CAUTION: Always avoid any sudden
changes in temperature to prevent
breakage or cracks.
8 9
TOLL FREE: 1-800-798-7398 www.sharkninjamanuals.com
Using Your Portable Steam Pocket® - cont’d Care of Your Portable Steam Pocket®
GENERATING STEAM
1 Plug the unit in and wait about 30
to 45 seconds then press and hold
the steam trigger to activate the
pump. You will immediately hear
steam generating and begin to see
visible results either from the nozzle
or the attached cleaning tool. It is
recommended that you wait at least
30 seconds before pulling the trigger
as this will minimise water spitting.
2 Once you release the steam trigger,
the pump will stop delivering water
to the boiler and the steam will
reduce to a stop when the boiler
becomes empty.
3 For wedge and cylinder cleaning
pockets, allow the bottle to generate
enough steam to activate the
cleaning fabric. Once you see visible
steam emitting through the fabric,
your cleaning pocket is ready to
use. Some messes, particularly
those that are sticky may require
more moisture, so allow more steam
to generate and exhaust from the
cleaning pocket before cleaning.
CAUTION: Steam is hot and can
cause burns, so please use with
caution.
WARNING: Your portable Steam
Pocket® is designed to clean surfaces
that will withstand high heat and
moisture. Do not use on unsealed
wood surfaces (especially wooden
antique furniture), unglazed ceramic
tile, or surfaces that have been
treated with wax, oils, varnishes, or
shellac. The sheen may be removed
by the heat, steam, and friction of
the cleaning tools. Lacquer and
polyurethane coatings provide a
hard durable protective finish that
withstands moisture but it is always
recommended to test an isolated
area of the surface to be cleaned
before proceeding.
We also recommend you check the
use and care instructions from the
surface manufacturer.
IMPORTANT: Once plugged in, the
Blue LED will illuminate, and your
portable Steam Pocket® cleaning
system will be ready to use within 30
seconds.
NOTE: Make sure surfaces are free
of crumbs and debris before using
the portable steam pocket. Large
objects may not be picked up by
the Steam Pocket® and will only be
pushed around.
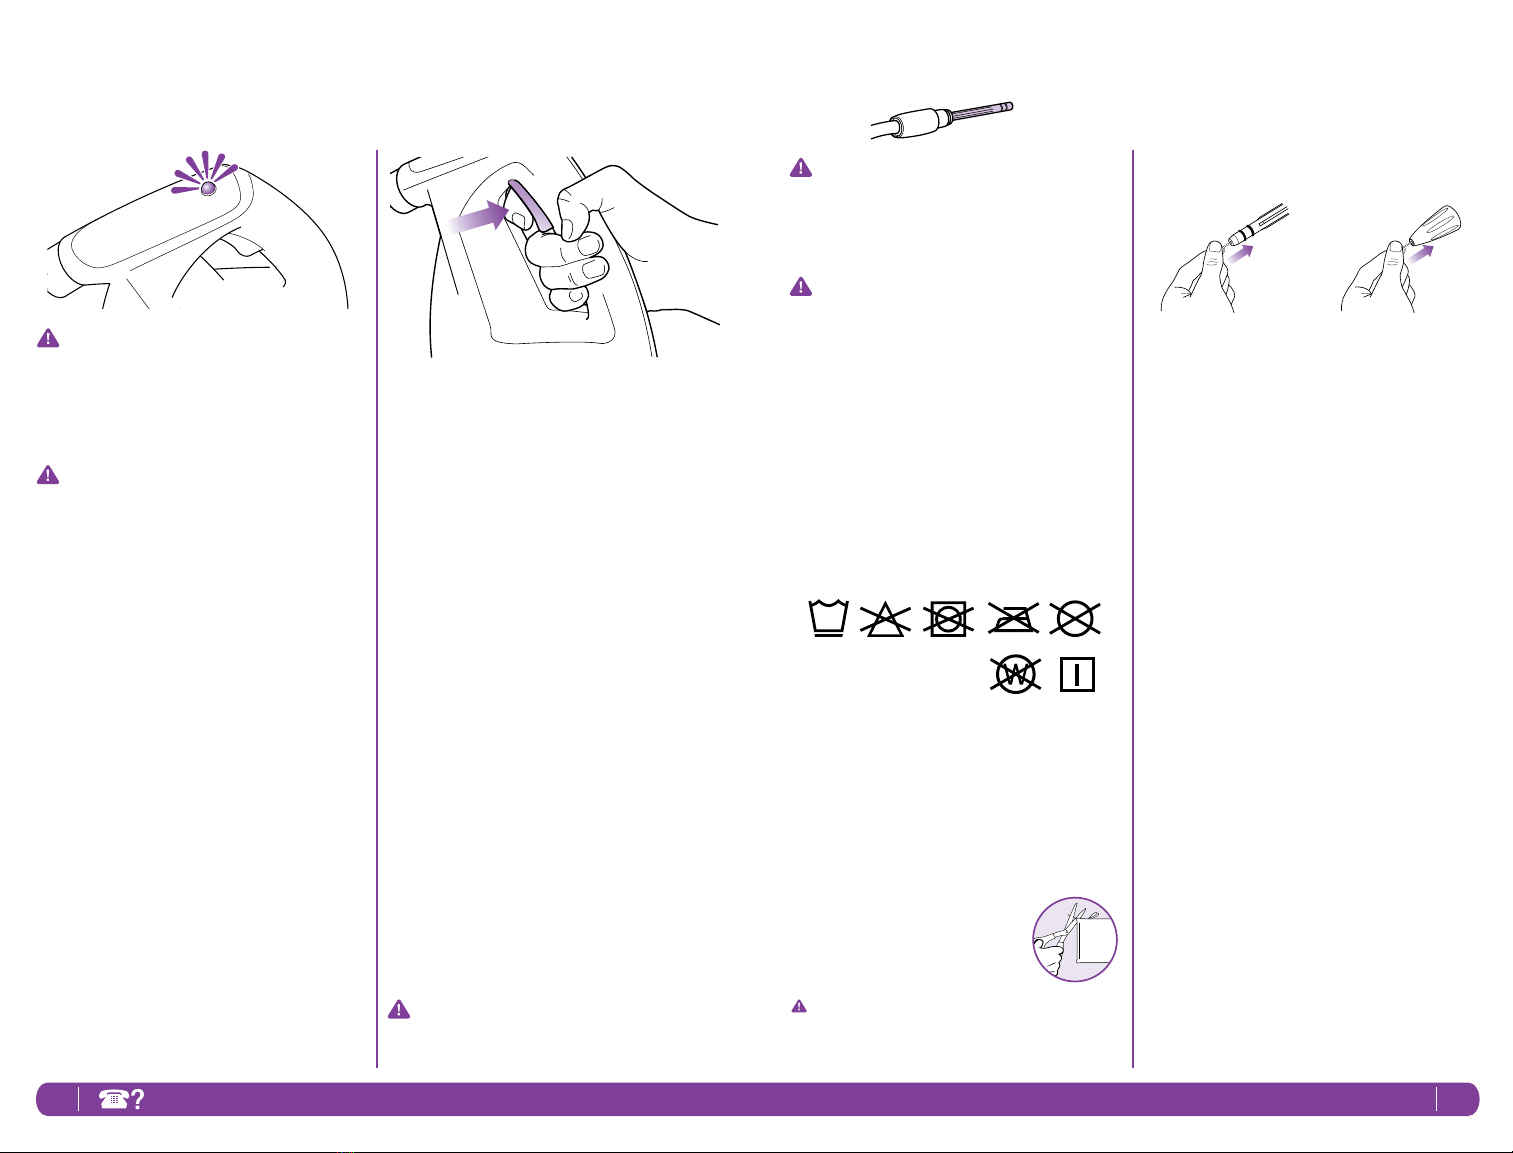
CLEANING THE NOZZLES
1 Your portable Steam Pocket® should
not normally require cleaning,
however, should you notice a
decrease in the steam output, it may
be necessary to remove mineral
deposits built up around the nozzles.
2 Unplug the cleaner from the
electrical outlet
3 Use the provided nozzle cleaner or a
small diameter stiff metal wire, such
as a straightened metal paperclip,
and carefully insert the end of the
wire into the nozzle orifice. See
illustrations below.
4 Move the wire back and forth several
times to remove any deposits.
5 Plug in the appliance to the power
outlet and test to note steam output.
WARNING: The hose stem becomes
very hot during operation and can
cause burns. Do not operate the
portable Steam Pocket® without
the proper cleaning tools attached
securely as instructed.
CAUTION: This appliance must be
unplugged from electrical outlet and
allowed to cool down before storage
or cleaning.
STORAGE
1 Let the appliance cool down before
cleaning or storing
2 Empty the water tank after each use
3 Store in a cool dry location
CLEANING THE STEAM BOTTLE
1 A periodic rinse of your steam
cleaner will help free it from normal
water deposits. This is recommended
every 10-15 fillings to free up any
scale deposit. Fill the reservoir with
water and secure the cap. Shake
vigorously for approximately 10-15
times and remove the cap to empty
the reservoir.
Cleaning tip: To prevent clogging, it
is recommended that you periodically
clean the Direct Steam Nozzle and the
extension hose stem with the cleaning
tool provided or a paper clip.
DECALCIFYING YOUR STEAM MOP
Calcium and mineral deposits can build
up and impact the performance of your
steam mop over time. To extend the life of
your product we recommend that you use
distilled water.
Cleaning tip: To prevent clogging, it
is recommended that you periodically
clean the Concentrator Nozzle and the
Accessory Hose stem with the cleaning
tool provided or a paper clip.
CARE OF YOUR CLEANING
POCKETS AND/OR PADS
1 We recommend washing your
pocket or pad separately from other
fabrics to avoid picking up lint. Only
use liquid detergent (no powder
detergent). Do not use any fabric
softeners or bleach. Line dry. Do not
tumble dry.
2 If there are loose threads
on the cleaning pad
carefully cut the thread
with scissors. Do not pull
on them or cut at the base.
IMPORTANT: The pocket or pad may
be very hot from the steam. Use
caution when removing. Let the unit
cool for 2-3 minutes.
40°
10 11
TOLL FREE: 1-800-798-7398 www.sharkninjamanuals.com
Suggested Uses
KITCHEN CLEANING
Clean and sanitise daily messes in your sinks, microwaves, refrigerators,
cookers, food prep areas like countertops and cutting boards.
BATHROOM CLEANING
Your portable Steam Pocket® can reduce common household bacteria and
odors from all corners and areas of your bathroom, from toilets, sinks, bathtubs,
showers, and floors. Wiping grime out of those impossible to reach spots
without harsh chemicals or perfumy residue. Clean all surfaces including glass,
mirrors and ceramic tiles.
12 13
TOLL FREE: 1-800-798-7398 www.sharkninjamanuals.com
PART PART NO.
1 All-Purpose Wedge P106W
Cleaning Pockets
2 All-Purpose Cylinder P105W
Cleaning Pockets
3 Steam Duster P107W
Cylinder Cleaning Pockets
4 Scrubbing Wedge P109W
Cleaning Pockets
5 Squeegee Wedge P108W
Cleaning Pocket
Trouble Shooting
PROBLEM POSSIBLE
REASONS SOLUTIONS
There is no
steam
The Steam Bottle is not
plugged in.
There is not enough
water in the unit.
Verify that the Blue light is on and
the product is plugged in correctly
into a working outlet.
Fill the steam bottle tank.
There is not
enough steam
Mineral build-up may be
clogging the nozzle.
Water level may be low.
Using the nozzle cleaner, carefully
clean the nozzle to remove debris.
Fill the steam bottle tank.
The cleaning
pockets are
streaking or
leaving dirt
behind
The microfibre fabrics
may be dirty and need
to be replaced or
washed.
The microfibre fabric
may be worn.
Use the other sides, if clean.
Replace with a clean cleaning
pocket.
Replace as needed.
The cleaning
tool handles
keep falling
off the hose
The connection may not
be secure.
Check the connection, making sure
you are pressing in and turning at
the same time.
Replacement Parts
ORDERING REPLACEMENT PARTS
To order additional parts and
accessories, feel free to contact us at
www.sharkninjamanuals.com or
call 1-800-798-7398.
1
2
3
4
5
14 15
TOLL FREE: 1-800-798-7398 www.sharkninjamanuals.com
Product Registration
Please visit www.sharkninjamanuals.com or call 1-800-798-7398 to register your new Shark®
product within ten (10) days of purchase. You will be asked to provide the store name, date of purchase and
model number along with your name and address.
The registration will enable us to contact you in the unlikely event of a product safety notification. By
registering you acknowledge to have read and understood the instructions for use, and warnings set forth in the
accompanying instructions.
ONE (1) YEAR LIMITED WARRANTY
EURO-PRO Operating LLC warrants this product to be free from material defects and workmanship for
a period of one (1) year from the date of purchase when utilized for normal household use, subject to the
following conditions, exclusions and exceptions.
The liability of EURO-PRO Operating LLC is limited solely to the cost of the repair or replacement of the
unit at our option. This Limited Warranty does not cover normal wear of parts and does not apply to any unit
that has been tampered with or used for commercial purposes. This Limited Warranty does not cover damage
caused by misuse, abuse, negligent handling or damage due to faulty packaging or mishandling in transit. This
Limited Warranty does not cover damage or defects caused by or resulting from damages from shipping or
repairs, service or alteration to the product or any of its parts, which have been performed by a repair person not
authorized by EURO-PRO Operating LLC.
If your appliance fails to operate properly while in use under normal household conditions within the warranty
period, return the complete appliance and accessories, freight prepaid. For assistance with warranty service
options or customer support, please call our customer care and product specialists at , call 1 (800) 798-7398 or
visit our website www.sharkninjamanuals.com.
If the appliance is found to be defective in material or workmanship, EURO-PRO Operating LLC will repair
or replace it free of charge. Proof of purchase is required and a fee of $19.95 will apply to cover the cost of
return freight. *
This Limited Warranty is extended to the original purchaser of the unit and excludes all other legal, implied and/
or conventional warranties. The responsibility of EURO-PRO Operating LLC if any, is limited to the specific
obligations expressly assumed by it under the terms of this Limited Warranty. In no event is EURO-PRO
Operating LLC liable for incidental or consequential damages to anyone of any nature whatsoever. Some
states do not permit the exclusion or limitation of incidental or consequential damages, so the above may not
apply to you.
This Limited Warranty gives you specific legal rights, and you may also have other rights which vary from state
to state or from province to province.
*IMPORTANT: Carefully pack item to avoid damage in shipping. Be sure to include proof of
purchase date and to attach tag to item before packing with your name, complete address
and phone number with a note giving purchase information, model number and what you
believe is the problem with the item. We recommend you insure the package (as damage
in shipping is not covered by your Limited Warranty). Mark the outside of your package
“ATTENTION CUSTOMER SERVICE”. We are constantly striving to improve our products,
therefore the specifications contained herein are subject to change without notice.
**THIS WARRANTY IS FOR ALL COUNTRIES EXCEPT GERMANY**
Product Registration
Please visit www.sharkninjamanuals.com or call 1-800-798-7398 to register your new Shark®
product within ten (10) days of purchase. You will be asked to provide the store name, date of purchase and
model number along with your name and address.
The registration will enable us to contact you in the unlikely event of a product safety notification. By
registering you acknowledge to have read and understood the instructions for use, and warnings set forth in the
accompanying instructions.
TWO (2) YEAR LIMITED WARRANTY
EURO-PRO Operating LLC warrants this product to be free from material defects and workmanship for
a period of two (2) years from the date of purchase when utilized for normal household use, subject to the
following conditions, exclusions and exceptions.
The liability of EURO-PRO Operating LLC is limited solely to the cost of the repair or replacement of the
unit at our option. This Limited Warranty does not cover normal wear of parts and does not apply to any unit
that has been tampered with or used for commercial purposes. This Limited Warranty does not cover damage
caused by misuse, abuse, negligent handling or damage due to faulty packaging or mishandling in transit. This
Limited Warranty does not cover damage or defects caused by or resulting from damages from shipping or
repairs, service or alteration to the product or any of its parts, which have been performed by a repair person not
authorized by EURO-PRO Operating LLC.
If your appliance fails to operate properly while in use under normal household conditions within the warranty
period, return the complete appliance and accessories, freight prepaid. For assistance with warranty service
options or customer support, please call our customer care and product specialists at , call 1 (800) 798-7398 or
visit our website www.sharkninjamanuals.com.
If the appliance is found to be defective in material or workmanship, EURO-PRO Operating LLC will repair
or replace it free of charge. Proof of purchase is required and a fee of $19.95 will apply to cover the cost of
return freight. *
This Limited Warranty is extended to the original purchaser of the unit and excludes all other legal, implied and/
or conventional warranties. The responsibility of EURO-PRO Operating LLC if any, is limited to the specific
obligations expressly assumed by it under the terms of this Limited Warranty. In no event is EURO-PRO
Operating LLC liable for incidental or consequential damages to anyone of any nature whatsoever. Some
states do not permit the exclusion or limitation of incidental or consequential damages, so the above may not
apply to you.
This Limited Warranty gives you specific legal rights, and you may also have other rights which vary from state
to state or from province to province.
*IMPORTANT: Carefully pack item to avoid damage in shipping. Be sure to include proof of
purchase date and to attach tag to item before packing with your name, complete address
and phone number with a note giving purchase information, model number and what you
believe is the problem with the item. We recommend you insure the package (as damage
in shipping is not covered by your Limited Warranty). Mark the outside of your package
“ATTENTION CUSTOMER SERVICE”. We are constantly striving to improve our products,
therefore the specifications contained herein are subject to change without notice.
**THIS WARRANTY IS FOR GERMANY ONLY**
IPX4
U.S.: EURO-PRO Operating LLC
Newton, MA 02459
Canada: Ville St. Laurent, Québec H4S 1A7
1-800-798-7398
www.sharkninjamanuals.com
Technical Details
Model number: SC630***** 11
Input: 1550 Watts
Main unit voltage: 220-240 V~, 50/60Hz
COPYRIGHT© EURO-PRO OPERATING LLC 2015
PRINTED IN CHINA
SC630*****.E.141229.1
Illustrations may differ from actual product.

Other manuals for SC630

1

Other Shark Steam Cleaner manuals

Shark Genius Spray Pocket S6002 User manual

Shark

Shark Genius Spray Pocket S6002 User manual

Shark KLIK N' FLIP S6003UKDB User manual

Shark

Shark KLIK N' FLIP S6003UKDB User manual

Shark Easy Spray SK140 User manual

Shark

Shark Easy Spray SK140 User manual

Shark S6002UK User manual

Shark

Shark S6002UK User manual

Shark GI460 Quick reference guide

Shark

Shark GI460 Quick reference guide

Shark PRO Steam & Spray User manual

Shark

Shark PRO Steam & Spray User manual

Shark S3401 User manual

Shark

Shark S3401 User manual

Shark V1950Q User manual

Shark

Shark V1950Q User manual

Shark S3901NZ User manual

Shark

Shark S3901NZ User manual

Shark S3101 series User manual

Shark

Shark S3101 series User manual

Shark EURO-PROX SC505 User manual

Shark

Shark EURO-PROX SC505 User manual

Shark STEAM POCKET S3601 User manual

Shark

Shark STEAM POCKET S3601 User manual

Shark S7001 Series User manual

Shark

Shark S7001 Series User manual

Shark S6003EU User manual

Shark

Shark S6003EU User manual

Shark S3973 Series User manual

Shark

Shark S3973 Series User manual

Shark S2901UK User manual

Shark

Shark S2901UK User manual

Shark STEAM LITE S3251UKJC User manual

Shark

Shark STEAM LITE S3251UKJC User manual

Shark LIFT-AWAY PRO STEAM POCKET S3901WM User manual

Shark

Shark LIFT-AWAY PRO STEAM POCKET S3901WM User manual

Shark GENIUS S6003C User manual

Shark

Shark GENIUS S6003C User manual

Shark S3901 Series User manual

Shark

Shark S3901 Series User manual

Shark STEAM & SPRAY SK410 User manual

Shark

Shark STEAM & SPRAY SK410 User manual

Shark LIGHT & EASY S3250W User manual

Shark

Shark LIGHT & EASY S3250W User manual

Shark SK115 User manual

Shark

Shark SK115 User manual

Shark S1000 Series User manual

Shark

Shark S1000 Series User manual

Popular Steam Cleaner manuals by other brands

NOERDEN LIZ user manual

NOERDEN

NOERDEN LIZ user manual

SteamandGo Housekeeper Pro Series instruction manual

SteamandGo

SteamandGo Housekeeper Pro Series instruction manual

Bissell Steam Mop 90T1 Series user guide

Bissell

Bissell Steam Mop 90T1 Series user guide

Philips StyleTouch GC440 user manual

Philips

Philips StyleTouch GC440 user manual

cecotec HydroSteam 1040 Active&Soap instruction manual

cecotec

cecotec HydroSteam 1040 Active&Soap instruction manual

Bosch Mini AirTurbo instruction manual

Bosch

Bosch Mini AirTurbo instruction manual

Philips FC7012/71 Important information

Philips

Philips FC7012/71 Important information

Tornado VS4 manual

Tornado

Tornado VS4 manual

SEVERIN 7181 instruction manual

SEVERIN

SEVERIN 7181 instruction manual

CANGAROO DQ-X2 manual

CANGAROO

CANGAROO DQ-X2 manual

Bissell Steam Mop 1867 SERIES user guide

Bissell

Bissell Steam Mop 1867 SERIES user guide

Sunbeam SG3000 user guide

Sunbeam

Sunbeam SG3000 user guide

Black & Decker FSH10SM Original instructions

Black & Decker

Black & Decker FSH10SM Original instructions

Haan Multiforce Plus SS-22 instruction manual

Haan

Haan Multiforce Plus SS-22 instruction manual

Marta MT-1192 user manual

Marta

Marta MT-1192 user manual

Fakir STEAM EXPERT instruction manual

Fakir

Fakir STEAM EXPERT instruction manual

pela tools 532267 manual

pela tools

pela tools 532267 manual

POLTI VAPORETTO SILVER instructions

POLTI

POLTI VAPORETTO SILVER instructions

manuals.online logo
manuals.online logoBrands
  • About & Mission
  • Contact us
  • Privacy Policy
  • Terms and Conditions

Copyright 2025 Manuals.Online. All Rights Reserved.