Sharp FO-130 User manual

..
.-

Congratulations on your purchase of the FO-130, and thank you for having chosen Sharp!
The FO-130 facsimile transceiver is G3 compatible, the most commonly used type of facsimile
machine today. In addition to the basic operations of sending and receiving documents, it provides
a variety of special features designed to increase the range and power of your communication.
These make it an ideal tool for the office, no matter how big or small the scale of operation.
i

This manual is intended to help you with the installation and operation of the FO-130. The
information is presented as follows:
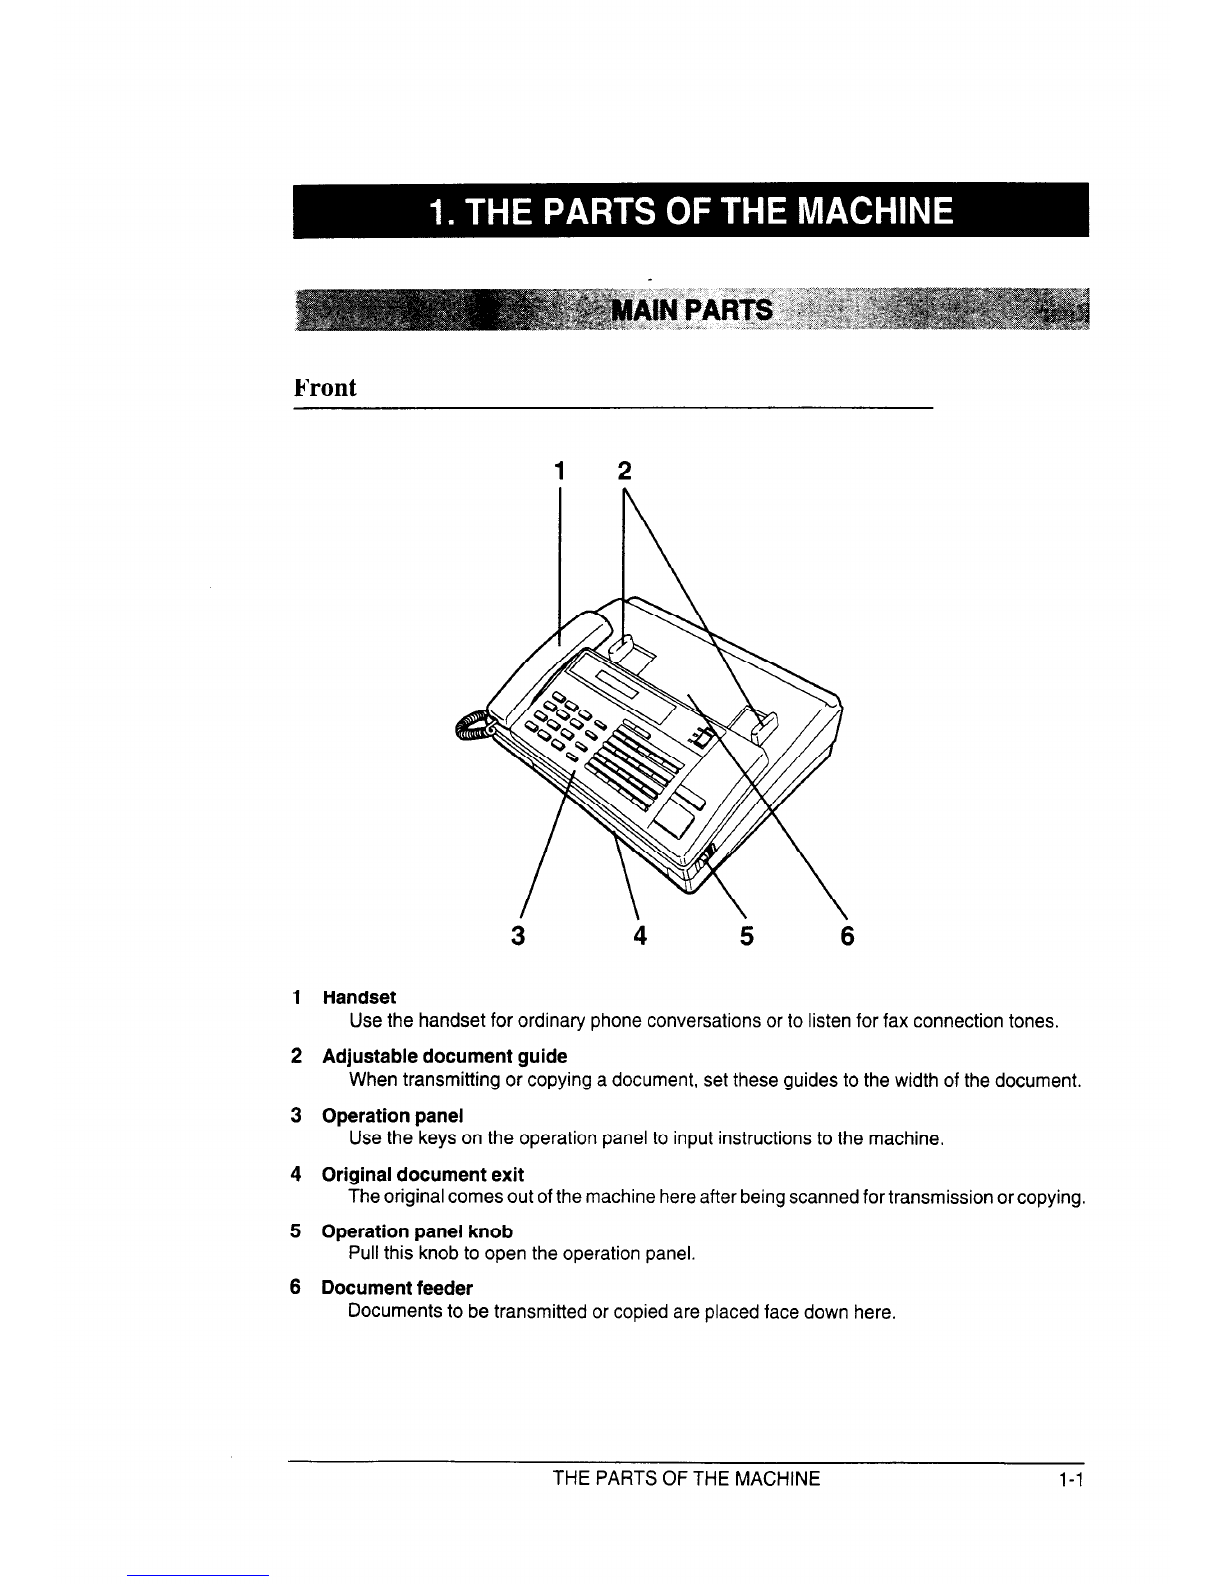
The parts of the machine:
The names, brief descriptions, and illustrations of the various parts of the machine are contained
in Chapter 1, “The parts of the machine”.
Unpacking and Setup:
Instructions for getting your fax machine installed are contained in Chapter 2, “Installation”. This
also contains guidelines on selecting a suitable location, electrical conditions, telephone
conditions, etc.
Basic operations:
Basic operations such as sending and receiving documents, copying, and using the machine
as a telephone are explained in Chapter 3, “Basic operations”. This chapter is particularly
important for beginners.
Connecting an answering machine or extension phone to your fax machine:
This is described in Chapter 4, “Using your fax with other devices”.
Optional settings and entry of telephone numbers, etc.:
Optional settings made with the User Switches and entry of telephone numbers for automatic
dialing, etc. are described in Chapter 5, “Optional settings and data entry”.
Reports and lists regarding the activity and settings of your machine:
The procedures for printing these out can be found in Chapter 6, “Printing out reports and lists”.
Maintenance and troubleshooting:
Basic maintenance procedures and troubleshooting are described in Chapters 7 and 8,
respectively.
The following conventions are used in this manual:
l Keys, switches, and labels on the machine are indicated in BOLD print.
l Messages appearing in the display are indicated in CAPITAL LETTERS.
If you have any questions or problems which cannot be solved by reading this manual, please
contact your Sharp dealer.
ii

.
GENERAL CAUTIONS
l Do not open the machine during operation (transmitting, receiving, or copying).
l Do not spill any liquids on the machine. These can damage the internal circuitry.
The Austel Registration
shown on the label on
numbers.
Your fax machine and the telephone system
Number and Ringer Equivalence Number (REN) for this equipment are
the back of the machine. The telephone company may require these
The sum of all Ringer Equivalence Numbers on your telephone line should be three or less in order
to assure proper service from the telephone company.
If any of your equipment is not operating properly, you should immediately remove it from your
telephone line, as it may cause harm to the telephone network. If the telephone company notes a
problem, they may temporarily disconnect service.
..
III

INTRODUCTION i
ABOUT THIS MANUAL ii
BEFORE USING YOUR FAX MACHINE ,..
Ill
TABLE OF CONTENTS iv
1. THE PARTS OF THE MACHINE l-l
MAIN PARTS .................................... l-l
Front ..................................... l-1
Rear ...................................... 1-2
Recording paper compartment ........................ 1-3
OPERATION PANEL ................................ l-4
2. INSTALLATION 2-1
SITE SELECTION .................................. 2-1
UNPACKING ..................................... 2-2
SETTING UP .................................... 2-3
Assembly and Connections .......................... 2-3
Loading the recording paper ......................... 2-4
ENTERING YOUR NAME AND FAX NUMBER ................... 2-6
3. BASIC OPERATIONS 3-l
PREPARING TO TRANSMIT A DOCUMENT .................... 3-1
About the original ............................... 3-1
Readable length and width .......................... 3-2
Using the document carrier .......................... 3-2
Loading the document ............................ 3-3
iv

--\
TABLE OF CONTENTS
Resolution and contrast ............................ 3-4
DIALING AND TRANSMISSION .......................... 3-6
Normal dialing ................................. 3-6
Direct Keypad Dialing ............................. 3-7
Using the Autodialer (automatic dialing) ................... 3-7
Redialing when the line is busy ........................ 3-8
RECEIVING A DOCUMENT ............................ .3-10
Modes of reception ............................. .3-l 0
Manual reception .............................. .3-l 1
Automatic reception ............................. .3-l 1
Automatic Fax/Phone Changeover ..................... .3-l 2
Paper cutting ................................ .3-l 3
COPYING ..................................... .3-14
VOICE COMMUNICATIONS ........................... .3-15
4. USING YOUR FAX WITH OTHER DEVICES 4-1
ANSWERING MACHINE .............................. 4-l
Connection and preparations ......................... 4-l
Using the answering machine hook-up .................... 4-2
Optional settings ............................... 4-5
EXTENSION TELEPHONE ............................. 4-9
5. OPTIONAL SETTINGS AND DATA ENTRY 5-l
LETTERS AND CHARACTERS FOR NAMES ................... 5-1
Entry .............................. : ...... 5-1
Deletions and changes ............................ 5-2
V

TABLE OF CONTENTS
FAX AND VOICE NUMBERS FOR AUTOMATIC DIALING ............. 5-3
USER SWITCHES .................................. 5-5
6. PRINTING OUT REPORTS AND LISTS 6-1
TELEPHONE LIST .................................. 6-l
PASSCODE LIST .................................. 6-2
USER SWITCH LIST ................................ 6-4
TRANSACTION REPORT .............................. 6-5
7. USER MAINTENANCE 7-1
RECORDING PAPER . . . . . . . . . . . . . . . . . . . . . . . . . . . . . . . 7-1
Recommended paper . . . . . . . . . . . . . . . . . . . . . . . . . . . . 7-l
Handling and storing recording paper .................... 7-1
Replacing the recording paper ........................ 7-2
CLEANING THE RECORDING HEAD ....................... 7-3
CLEANING THE READING GLASS AND ROLLERS ................ 7-4
CLEANING THE HOUSING ............................. 7-5
ABOUT THE LITHIUM BAITERY .......................... 7-6
8. TROUBLESHOOTING 8-1
GENERAL CORRECTIVE MEASURES ....................... 8-1
DISPLAY MESSAGES ............................... 8-4
ALARMS ....................................... 8-5
CLEARING A JAMMED DOCUMENT ........................ 8-6
CLEARING JAMMED RECORDING PAPER .................... 8-7
COMMUNICATION ERROR CODES ........................ 8-8
vi

TABLE OF CONTENTS
9. SPECIFICATIONS 9-1
QUICK REFERENCE GUIDE Quick-i
INDEX Index-i
vii

TABLE OF CONTENTS
Notes
...
VIII

3 4 5 6
Handset
Use the handset for ordinary phone conversations or to listen for fax connection tones.
Adjustable document guide
When transmitting or copying a document, set these guides to the width of the document.
Operation panel
Use the keys on the operation panel to input instructions to the machine.
Original document exit
The original comes out of the machine here after being scanned for transmission or copying.
Operation panel knob
Pull this knob to open the operation panel.
Document feeder
Documents to be transmitted or copied are placed face down here.
THE PARTS OF THE MACHINE l-l

MAIN PARTS
Rear
POWER switch
Turns the machine on and off.
Received document exit
Received documents and copies come out of the machine here
Monitor speaker
Voices or fax tones are heard from here when the SPEAKER key is pressed before dialing.
Handset jack
The handset cord is inserted into this jack.
Power cord
Connects the machine to a power outlet.
Telephone line jack (TEL. LINE)
The telephone line is inserted into this jack.
Ringing volume selector
Use this to adjust the ringing volume.
Speaker volume control
Use this to adjust the speaker volume.
Line selector
Use this to set the fax machine to the type of telephone line you are on.
l-2 THE PARTS OF THE MACHINE

MAIN PARTS
Recording paper compartment
2 3 4
1 Document rollers
These move the document through the machine during scanning.
2 Reading glass
This scans the document for transmission and copying.
3 Recording paper compartment
Holds the roll of recording paper.
4 Recording head
Applies heat to the recording paper to print out documents which have been received.
THE PARTS OF THE MACHINE 1-3

1 Liquid crystal display
Displays various messages during operation and programming.
2 SPEED DIAL key
Press this key to enter a 2-digit Speed Dial number.
3 REDIAL key
Press this key to automatically redial the last number dialed, or to enter a pause during
programming.
4 RESOLUTION key
Use this key to adjust the resolution and contrast for transmitting or copying a document.
5 FUNCTION key
Use this key to select various special functions and enter data. Prompts indicating selections
will appear on the display.
6 Reception mode switch
Use this key to select the mode of reception.
l-4 THE PARTS OF THE MACHINE

OPERATION PANEL
9 10 11
8 Numeric keys (0 to 9, *, #)
Use these keys to dial numbers and enter various kinds of data.
9 SPEAKER key
Press this key to dial a number without picking up the handset.
10 HOLD key
Press this key to put the other party on hold during a phone conversation.
11 Rapid Keys (01 to 20)
Use these keys to dial fax and voice numbers automatically.
12 STOP key
Use this key to terminate operations before they are completed. It also serves as a clear
key for programming and data entry.
13 START/COPY key
Use this key to start transmission, reception, or copying. It also serves as an entry key for
programming and data entry.
THE PARTS OF THE MACHINE l-5

OPERATION PANEL
Notes
1-6 THE PARTS OF THE MACHINE

Take the following points into consideration when selecting a site for your FO-130:
ENVIRONMENT
The machine must be installed on a level surface.
Keep the machine away from air conditioners, heaters, direct sunlight, and dust.
Provide easy access to the front, back, and sides of the machine. In particular, keep
the area in front of the machine clear, or the original document may jam as it comes
out after scanning.
The temperature should be between 5” and 35°C.
The humidity should be between 30% and 85% (without condensation).
ELECTRICITY
A 240 V, 50 Hz, grounded (3-prong) AC outlet is required.
J# Note:
l If your area experiences a high incidence of lightning or power surges, we recommend that you
install a surge protector for the power and telephone lines. Surge protectors can be purchased at
most telephone specialty stores.
TELEPHONE JACK
A standard telephone wall jack must be located near the machine.
INSTALLATION 2-1

Take the machine out of the box carefully, and remove all packing material. Make sure you have
all the items listed below. If any are missing, contact your dealer.
Document carrier +
Handset
Machine
Handset cord
Recording paper e
l In addition to the above items, you should have an F080TP adaptor (fin line cord). This is supplied
separately by your dealer.
2-2 INSTALLATION

Assembly and Connections
1. Insert one end of the handset cord into the jack at
the base ofthe handset, and the other end into the
jack on the left side of the machine. The ends are
identical, so they will go into either jack. Place the
handset on the handset rest.
2. Plug the F080TP adaptor into the telephone jack
on the wail. Insert the small modular plug which
terminates the adaptor line cord into the jack on
the back of the machine marked TEL. LINE.
3. Adjust the switches on the leftside ofthe machine:
l DIAL: This switch sets the mode of dial-
ing. Select T if you are on a touch-tone
line, or P ifyou are on a dial pulse (rotary)
line.
Note: If this setting is incorrect, you will
not be able to make a call.
l SPEAKER VOLUME: Adjust the setting
from high (H) to low (L) as desired.
l RINGING VOLUME: Set the switch at
high (H), medium (M), or low (L) as
desired.
RINGING SPEAKER
VOLUME VOLUME DIAL
INSTALLATION 2-3

4. Plug the power cord into a 240 V, 3-prong AC
outlet. Set the POWER switch to ON to turn on the
power.
Loading the recording paper
1.
2.
3.
Unwrap the roll of recording paper.
Pull the operation panel knob on the right side of I
~
the machine forward, and open the operation
panel. The buzzer will sound briefly.
l There is no need to turn the machine
power off before proceeding.
Place the roll of recording paper in the compart- I
ment so that the leading edge of the paper feeds 1
from the top of the roll. I
~
INSTALLATION

I SETTING UP
4.
5.
6.
7.
Pass the leading edge of the paper under paper
guide so that approximately 5 cm of the leading
edge is past the black rubber roller. ~
I
Close the operation panel by gently pushing down
on the center.
Press the START/COPY key. A short length of the ~
recording paper will be fed out. I
l Ifthis does not happen, repeat the loading
procedure.
Grasp the paper by the edge and pull upward to /
tear it off. I
I
INSTALLATION 2-5
Table of contents
Other Sharp Fax Machine manuals

Sharp
Sharp FO-80 User manual

Sharp
Sharp FO-4ML User manual

Sharp
Sharp FO-A650 User manual

Sharp
Sharp UX-B700 User manual

Sharp
Sharp UX-600M User manual

Sharp
Sharp UX-340LM User manual

Sharp
Sharp UX-A255U User manual

Sharp
Sharp UX-310 User manual

Sharp
Sharp UX-P880TH User manual

Sharp
Sharp UX-P410 User manual