Sharp UX-600M User manual

OPERATION MANUAL
MULTIFUNCTION
FACSIMILE
MODEL
1. Installation
2. Initial Settings
3. Sending Documents
4. Receiving Documents
5. Making Copies
6. Making Telephone Calls
7. Answering Machine Hookup
8. Special Functions
9. Optional Settings
10. Printing Reports and Lists
11. Maintenance
12. Troubleshooting
UX-600M
UX-600M MULTIFUNCTION FACSIMILE

UX600MU FCC-1Laser
WARNING FCC Regulations state that any unauthorized changes or modifications to this
equipment not expressly approved by the manufacturer could void the user’s authority to
operate this equipment.
FOR YOUR RECORDS
Please record the model numberand serial number below, foreasy reference, in case of loss
or theft. These numbers are located on the rear side of the unit.
Space is also provided for other relevant information.
Model Number____________________________________________________________
Serial Number ____________________________________________________________
Date of Purchase__________________________________________________________
Place of Purchase _________________________________________________________
Note: This equipment has been tested and found to comply with the limits for a Class B
digital device, pursuant to Part 15 of the FCC Rules.
These limits are designed to provide reasonable protection against harmful interference in
a residential installation.
Thisequipmentgenerates,usesandcanradiateradiofrequencyenergyand,ifnotinstalled
and used in accordance with the instructions, may cause harmful interference to radio
communications. However, there is no guarantee that interference will not occur in a
particular installation. If this equipment does cause harmful interference to radio or
television reception, which can be determined by turning the equipment off and on, the
user is encouraged to try to correct the interference by one or more of the following
measures:
Reorient or relocate the receiving antenna.
Increase the separation between the equipment and the receiver.
Connecttheequipmentintoanoutletonacircuitdifferentfromthattowhichthereceiver
is connected.
When connecting this facsimile equipment to a personal computer via the accompanying
PC Interface Box, onlythe provided RS232C cable andmodular jack cable areto be used.
ABOUT THE TELEPHONE CONSUMER PROTECTION ACT OF 1991
"The Telephone Consumer Protection Act of 1991 makes it unlawful for anyperson to use
a computer or other electronic device to send any message via a telephone facsimile
machine unless such message clearly contains in a margin at the top or bottom of each
transmitted page or on the first page of the transmission the following information:
(1) The date and time of transmission.
(2) Identification of either thebusiness, businessentity orindividual sendingthe message.
(3) Telephone number of either the sending machine, business, business entity or
individual.
In order to program this information into your facsimile machine, please refer to the
appropriate instructions in the operation manual."
As an ENERGY STAR®partner, SHARP has deter-
mined that this product meets the ENERGY STAR®
guidelines for energy efficiency.

UX600MU-QRQR
RT <P=001>
Installation
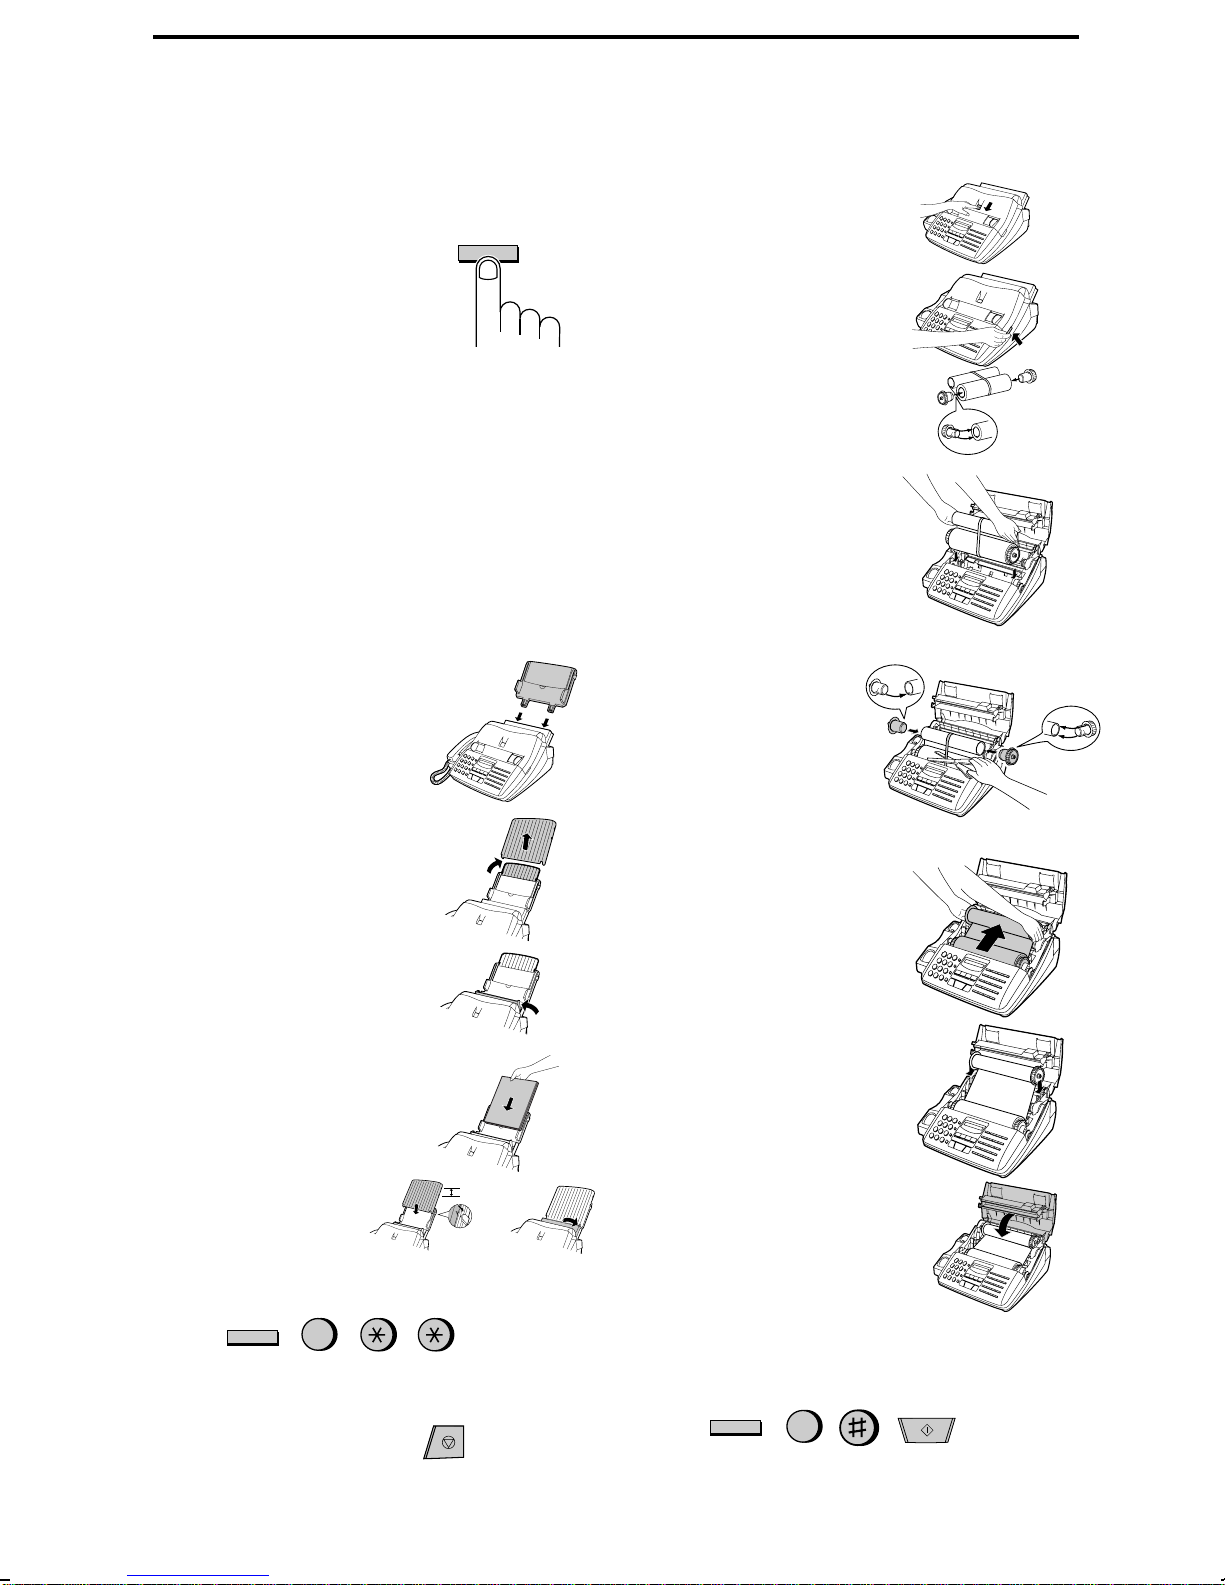
1. Connect the handset as shown.
2. Plug one end of the telephone line into the
TEL. LINE jack on the rear of the fax, and
the other end into your telephone wall jack.
3. Plug the power cord into a grounded, 120 V
outlet.
4
Installation with an answering machine
and/or extension telephone
4. Remove the seal covering the TEL. SET
jack on the rear of the fax. Connect an ex-
tension telephone or answering machine to
the TEL. SET jack.
5. If desired, connect an extension phone to
the answering machine.
Entering your name and
number
FCC regulations require your name and fax
number to appear on all documents you send.
To program your fax to do this automatically,
follow the steps below:
1.
Press the FUNCTION key and then press
"3":
TEL.
SET TEL.
LINE
TEL.
LINE
EXT.
PHONE
REDIAL
HOLD/
SEARCH
SPEAKER
123
456
789
0
GHI JKL MNO
TUV WXYZPQRS
SPEED
DIAL
ABC DEF
FUNCTION
3
ENTRY MODE will appear in the display.
2.
Press the "#" key twice:
OWN NUMBER SET will appear in the dis-
play.
3.
Press the START key:
4. Enter your fax number (max. of 20 digits)
by pressing the number keys.
♦If you make a mistake, press the
HOLD/SEARCH key to move the cursor
back to the mistake, then enter the correct
number or letter. (To move the cursor for-
ward, press the SPEAKER key.)
5.
Press the START key:
6. Enter your name by pressing the appropri-
ate number keys as shown below. Press
each key one or more times until the de-
sired letter appears in the display.
Deletes high-
lighted letter
Upper/lower
case shift key
Moves cursor to
the left.
Moves cursor to
the right.
Press either key one or more times to select
and enter a symbol.
♦Enter a space with the "1" key.
♦To enter two letters in succession which re-
quire using the same key, press the
SPEAKER key after entering the first let-
ter.
Example: To enter "ABZ Co.", press:
"2" twice for the letter A,
Press SPEAKER to move the cursor to the
right,
"2" three times for the letter B,
"9" five times for the letter Z,
"1" twice for a space,
"2" four times for the letter C,
Press REDIAL for a lower case letter,
"6" four times for the letter o,
"#" once for a period.
7. When finished, press the START key and
then the STOP key.
(See Pages 18-19 of your operation manual.)
START
START
START
STOP
Quick Reference Guide

<P=002>
Setting the date and time
To set the date and time, press the following
keys:
DATE & TIME SET will appear in the display.
Press the START key:
Enter two digits for the Month (01 through 12).
Enter two digits for the Day (01 through 31).
Enter two digits for the Year (00 through 99).
Enter two digits for the Hour (01 through 12).
Enter two digits for the Minute (00 through 59).
Press the "
*
" key for A.M. or the "#" key for
P.M.
When finished, press the START key and
then the STOP key:
(See Page 21 of your operation manual.)
FUNCTION
3
START
START
STOP
Storing and clearing numbers
for automatic dialing
To store a new number or change an existing
number, press the following sequence of keys:
FAX/TEL # MODE will appear in the dis-
play.
1.
Press the "1" key:
2. Enter a 2-digit number (from "01" to "99")
by pressing the number keys. This will be
the Speed Dial number.
3. Enter the full telephone/fax number.
4.
Press the START key:
5. Enter the name of the location by pressing
number keys (max. of 20 characters).
6.
Press the START key:
7. Return to Step 3 to store another number,
or press STOP to exit.
To clear a Speed Dial number, press the fol-
lowing sequence of keys:
Press "2" and then enter the 2-digit Speed
Dial number.
Press:
(See Pages 27-29 of your operation manual.)
START
STOP
Sending documents
Place your document
(up to 20 pages) face
down in the document
feeder.
Normal Dialing
1. Lift the handset or press
2. Dial the fax number by pressing the num-
ber keys.
3. Wait for the reception tone (if a person an-
swers, ask them to press their Start key).
4.
Press your START key and then replace
the handset.
Rapid Key Dialing
Press the appropriate Rapid Key (if the Rapid
Key is from 20 to 38, press the SHIFTkey
first). Transmission will begin.
Speed Dialing
1.
Press the SPEED DIAL key:
2. Enter the Speed Dial number by pressing
the number keys.
3. Press:
Direct Keypad Dialing
1. Enter the fax number by pressing the num-
ber keys.
2. Press:
SPEED
DIAL
START
START
SPEAKER
(See Pages 37-39 of your operation manual.)
FUNCTION
3
1
START
START
FUNCTION
3
Quick Reference Guide

<P=003>
Receiving Documents
Press the RECEPTION
MODE key until "AUTO"
or "MANU" appears in the
display.
RECEPTION
MODE
AUTO reception: The fax will automatically an-
swer after four rings and receive the incoming
document.
MANUAL reception: Lift the handset when the
fax rings. If you hear a fax tone, wait until
RECEIVING appears in the display, then hang
up (if RECEIVING doesn’t appear, press the
START key). If the calling party talks to you,
press your START key to begin reception.
(See Pages 42-43 of your manual.)
Loading paper
1. Insert the paper tray
into the fax if not yet in-
stalled.
2. Remove the paper
cover if it is on the tray.
(For legal paper, flip up
the tray externder.)
3. Pull the paper release
plate toward you.
♦If any paper remains
in the tray, take it out
and combine it into a
single stack with the
new paper.
4. Insert the stack of
paper into the tray.
Replace the tray
cover and then push
the paper release
plate back down.
5. Press the following sequence of keys:
Press "1" if you loaded letter size paper, or
"2" if you loaded legal size paper.
When finished, press:
(See pages 13-14 of your manual.)
Installing the imaging film
FUNCTION
STOP
6
1. Press the release
marked OPEN and
open the print com-
partment cover.
2. Insert two of the
gears into the ends
of the spool with film.
3. Hold the empty spool
so that the end with
only one slot is on the
left, and lower the
spools into the printing
compartment so that
the gears fit into the
slots on each side of
the compartment.
4. Cut the band holding
the spools together
with scissors, and re-
move it. Insert the re-
maining gear into the
right end of the
empty spool and the
flange into the left
end of the empty
spool.
5. Pull the empty spool to-
ward the back of the
compartment, unwind-
ing the leader from the
spool with film. Insert
the empty spool into
the compartment so
that the gear and spool
fit into the slots on
each side of the com-
partment.
6. Wind the film slightly
to remove slack and
then close the
printer compartment
cover.
7. If you replaced the film, press the following
sequence of keys (this is not necessary for
the sample film included with the fax):
(See Pages 2-5 of your operation manual.)
FUNCTION
6
START
LEGAL
LETTER
Quick Reference Guide

<P=004>
FUNCTION key menu
The following chart shows the layout of the functions and settings accessed by press-
ing the FUNCTION key. First press the FUNCTION key, the appropriate numeric key
as shown, and then "#" or "
*
" until the desired item appears.
Instructions for making each setting appear in the display. If you have any difficulty, re-
fer to the detailed instructions on the page shown below the setting.
Timer Mode
Send Mode
(67)
Poll Mode
(67)
Listing Mode
Activity Report
(78)
Timer List
(80)
Telephone
Number List
(81)
Passcode List
(81)
Option Setting
List
(81)
Anti Junk
Number List
(82)
Program and
Group List
(82)
Print Setup List
(83)
Entry Mode
FUNCTION
1234
Fax/Tel Num-
bers for Auto
Dialing
(27)
Own Number
and Name Set
(18)
Polling Secu-
rity Select
(65)
Passcode Num-
bers for Polling
(66)
Date and Time
Set
(21)
Daylight Saving
(22)
Store Junk
Number
(58)
Optional Settings
Fine Resolution
Priority
(74)
Number of
Rings in Auto
Mode
(74)
Recall Wait In-
terval
(75)
Recall Times
(75)
Tel/Fax Re-
mote Number
(75)
Remote Recep-
tion Select
(75)
Transaction Re-
port Print Select
(75)
Dial Mode
(75)
TAD Connected
(51, 76)
Quiet Detect
Time
(52, 56, 76)
Fax Reception
When TAD
Fails
(57, 76)
Distinctive Ring
(25, 76)
Fax Signal Re-
ceive
(76)
Junk Number
Check
(77)
Polling
(77)
Auto Cover
Sheet
(77)
Activity Report
Auto Print
(77)
ECM (77)
Quick Reference Guide

Cover Sheet
Cover Sheet
Header
(35)
Print Set-up
Initialize Film
(5)
Reception Ratio
(44)
2 in 1 Print
(44)
Paper Type Set
(14)
Paper Size Set
(14)
Copy Cut-off
(47)
Program/Group
Program Entry
Mode
(69)
Group Entry
Mode
(30)
567
Quick Reference Guide

UX600MU-INBU
<P=001>
Introduction
Welcome to the UX-600M and thank you for choosing Sharp! The UX-600M is
a multifunction facsimile machine that can also be used as convenience copier,
scanner, and printer for your computer. Fax operations can be performed either
from the operation panel of the UX-600M, or from your computer using the pro-
vided Multifunction Interface software.
This manual gives you easy-to-follow instructions for setting up the UX-600M,
installing the Multifunction Interface software in your personal computer, and
performing fax operations from the operation panel of the UX-600M. The Multi-
functon Interface operation manual on the CD-ROM gives you instructions for
performing scan, print and fax operations from your computer.
If you have any questions or problems which cannot be solved by reading this
manual, please contact Sharp’s Customer Assistance Center. The number is 1-
800-BE SHARP.
Important:
•This facsimile machine is not designed for use on a line which has call
waiting, call forwarding, or certain other special services offered by your
telephone company. If you attempt to use the fax machine in conjunction
with any of these services, you may experience errors during transmission
and reception of facsimile messages.
•This fax machine is not compatible with digital telephone systems. No other
fax machines may be connected to the same line.

<P=002>
Important safety information
•If your facsimile equipment is not operating properly, you should immediately
remove it from your telephone line, as it may cause harm to the telephone
network.
•The power outlet must be installed near the equipment and must be easily
accessible.
•Never install telephone wiring during a lightning storm.
•Never install telephone jacks in wet locations unless the jack is specifically
designed for wet locations.
•Never touch bare telephone wires or terminals unlessthe telephone line has been
disconnected at the network interface.
•Use caution when installing or modifying telephone lines.
•Avoid using a telephone (other than a cordless type) during an electrical storm.
There may be a remote risk of electric shock from lightning.
•Do not use a telephone to report a gas leak in the vicinity of the leak.
•Do not install or use the machine near water, or when you are wet. Take care
not to spill any liquids on the machine.
Trademark acknowledgements:
Microsoft, Windows, and Windows 95 are registered trademarks of Microsoft
Corporation. TextBridge is a registered trademark of Xerox Corporation.

UX600MU-TCTC
Table of Contents
1 Installation 1
Unpacking Checklist. . . . . . . . . . . . . . . . . . . . . . . . . . . . . . . . . . . . . . . . 1
Loading the Imaging Film . . . . . . . . . . . . . . . . . . . . . . . . . . . . . . . . . . . 2
Connections. . . . . . . . . . . . . . . . . . . . . . . . . . . . . . . . . . . . . . . . . . . . . . . 6
Installing the Multifunction Interface Software . . . . . . . . . . . . . . . . . . . 9
Attachments. . . . . . . . . . . . . . . . . . . . . . . . . . . . . . . . . . . . . . . . . . . . . . 12
Loading Printing Paper . . . . . . . . . . . . . . . . . . . . . . . . . . . . . . . . . . . . . 13
2 Initial Settings 15
Setup Guide. . . . . . . . . . . . . . . . . . . . . . . . . . . . . . . . . . . . . . . . . . . . . . 15
A Look at the Operation Panel . . . . . . . . . . . . . . . . . . . . . . . . . . . . . . . 16
Entering Your Name and Fax Number. . . . . . . . . . . . . . . . . . . . . . . . . 18
Entering Letters for Names. . . . . . . . . . . . . . . . . . . . . . . . . . . . . . . . . . 19
Setting the Date and Time. . . . . . . . . . . . . . . . . . . . . . . . . . . . . . . . . . . 21
Selecting the Reception Mode . . . . . . . . . . . . . . . . . . . . . . . . . . . . . . . 23
Distinctive Ring . . . . . . . . . . . . . . . . . . . . . . . . . . . . . . . . . . . . . . . . . . 25
Storing Numbers for Automatic Dialing . . . . . . . . . . . . . . . . . . . . . . . 27
Volume Adjustment . . . . . . . . . . . . . . . . . . . . . . . . . . . . . . . . . . . . . . . 31
3 Sending Documents 32
Transmittable Documents. . . . . . . . . . . . . . . . . . . . . . . . . . . . . . . . . . . 32
Loading the Document . . . . . . . . . . . . . . . . . . . . . . . . . . . . . . . . . . . . . 33
Optional Transmission Settings . . . . . . . . . . . . . . . . . . . . . . . . . . . . . . 34
Dialing and Transmission . . . . . . . . . . . . . . . . . . . . . . . . . . . . . . . . . . . 37
4 Receiving Documents 42
Using Auto Mode . . . . . . . . . . . . . . . . . . . . . . . . . . . . . . . . . . . . . . . . . 42
Using Manual Mode . . . . . . . . . . . . . . . . . . . . . . . . . . . . . . . . . . . . . . . 42
5 Making Copies 45
6 Making Telephone Calls 48

7 Answering Machine Hookup 50
Using the Hookup . . . . . . . . . . . . . . . . . . . . . . . . . . . . . . . . . . . . . . . . 50
Optional Hookup Settings . . . . . . . . . . . . . . . . . . . . . . . . . . . . . . . . . . 56
8 Special Functions 58
Blocking Reception of Unwanted Faxes . . . . . . . . . . . . . . . . . . . . . . . 58
Memory. . . . . . . . . . . . . . . . . . . . . . . . . . . . . . . . . . . . . . . . . . . . . . . . . 60
Broadcasting . . . . . . . . . . . . . . . . . . . . . . . . . . . . . . . . . . . . . . . . . . . . . 62
Polling (Requesting a Fax Transmission). . . . . . . . . . . . . . . . . . . . . . . 64
Timer Operations . . . . . . . . . . . . . . . . . . . . . . . . . . . . . . . . . . . . . . . . . 67
Entering and Using Programs. . . . . . . . . . . . . . . . . . . . . . . . . . . . . . . . 69
9 Optional Settings 74
10 Printing Reports and Lists 78
11 Maintenance 84
12 Troubleshooting 86
Problems and Solutions. . . . . . . . . . . . . . . . . . . . . . . . . . . . . . . . . . . . . 86
Messages and Signals . . . . . . . . . . . . . . . . . . . . . . . . . . . . . . . . . . . . . . 89
Clearing Paper Jams . . . . . . . . . . . . . . . . . . . . . . . . . . . . . . . . . . . . . . . 91
Specifications 93
FCC Regulatory Information 97
Guia de Consulta Rapida 98
Index 101


UX600MU-ISUN
RT <P=001>
Chapter
1
Installation
Unpacking Checklist
After unpacking your fax, make sure you have all the items shown below. If any
are missing, contact your dealer or retailer.
Handset
Handset cord
Telephone
line cord
Rapid key
labels
Operation manual
Paper tray
cover
Paper tray
3 gears and
1 flange
Sample
imaging film
Multifunction
Interface kit
(two cables, PC
Interface box,
CD-ROM)
Original document
support (located
between box and
packing case)
Points to keep in mind when setting up
♦The fax must be installed on a level surface.
♦Keep the fax away from air conditioners, heaters, direct sunlight, and dust.
♦Provide easy access to the front, back, and sides of the fax. In particular,
keep the area in front of the fax clear, or the original document may jam as
it comes out after scanning.
♦If the fax is moved from a cold to a warm place, it is possible that condensa-
tion may form on the reading glass, preventing proper scanning of docu-
ments for transmission. To remove the condensation, turn on the power and
wait approximately two hours before using the fax.
♦If your area experiences a high incidence of lightning or power surges, we
recommend that you install surge protectors for the power and telephone
lines. Surge protectors can be purchased at most telephone specialty stores.
1

UX600MU-ISIF
YF <P=001>
Loading the Imaging Film
The printer unit in your fax creates printed text and images by applying heat to
the imaging film, which causes ink to be transferred from the film to the page.
Follow the steps below to install or replace the imaging film.
1
Press the release marked OPEN and
open the print compartment cover.
•Caution! The printing head (the strip
of metal on the underside of the cover)
applies heat to the imaging film. It
may be hot if a document has just been
printed.
2
If you are replacing the imaging film,
take the old film out of the printing com-
partment and remove the three (3) green
gears and the green flange from the ends
of the spools.
DO NOT DISCARD THE GREEN
GEARS AND THE GREEN
FLANGE!
Chapter 1 Installation
2

<P=002>
3
Take the new film out of its package,
and insert two of the gears provided with
the fax into the ends of the spool with
film. Make sure that the two tabs on the
gears fit properly into the slots in the
ends of the spool.
•Do not yet remove the band which
holds the spools together.
4
Hold the empty spool so that the end
with only one slot is on the left, and
lower the spools into the front of the
printing compartment. The gears in the
ends of the spool with film should fit into
the slots on each side of the printing com-
partment.
5
Cut the band which holds the spools
together with scissors, and remove it.
Insert the remaining gear into the
right end of the empty spool and the
flange into the left end of the empty
spool. Make sure the tabs on the gear
and the flange fit into the slots in the
ends of the spool (the gear has two
tabs and the flange has one tab).
2 tabs
1 tab
Flange Gear
2 tabs
Chapter 1 Installation
3

<P=003>
6
Pull the empty spool toward the back of
the compartment, unwinding the film as
you pull.
7
Insert the empty spool into the back of
the compartment so that the gear and the
flange fit into the slots on the sides of the
compartment.
•Make sure that the gear engages with
the gear below it.
8
Wind the film slightly (rotate the gear on
the right side of the empty spool) so that
there is no slack in the film. Make sure
that both edges of the film wind onto the
spool evenly.
Chapter 1 Installation
4

<P=004>
9
Close the print compartment cover, mak-
ing sure it clicks into place.
•Caution! Close the cover slowly to
make sure it doesn’t pinch your fingers.
10
If you replaced the film, initialize the
new film by pressing the FUNCTION
key, the "6" key, and the "#" key on the
operation panel. Make sure that INITIAL-
IZE FILM appears in the display, and
then press the START key. (Do not per-
form this step if you installed the initial
sample roll of film.)
FUNCTION
6
START
When to replace the imaging film
The sample roll of imaging film provided with your fax is capable of printing ap-
proximately 65 pages of letter size paper. When it is used up, FILM END will
appear in the display. Replace it with the following imaging film, which is avail-
able at your dealer or retailer.
UX-15CR Imaging Film
One roll of UX-15CR imaging film is capable of printing approximately 500
pages of letter size paper when printed continuously.
Caution!
The text of documents printed with the imaging film is visible on the used
film. If confidential information has been printed, dispose of the film
appropriately.
Chapter 1 Installation
5

UX600MU-ISCO
DD <P=001>
Connections
Connect the power cord, telephone line cord, and handset as shown below. If de-
sired, you can also connect an answering machine or an extension telephone to
your fax.
♦Connecting an answering machine to the fax will allow you to receive both
voice and fax messages on the same line while you are out. For details on
using this feature, see Chapter 7. (Note: Do not connect an answering ma-
chine to your fax if you will be using the distinctive ring feature described
in Chapter 2.)
♦You can connect an extension phone to the fax to make and receive calls
like any other extension phone on your line. For details on receiving faxes
from an extension phone, see Chapter 4, "Receiving Documents".
1
Plug the power cord into a 120 V,
60 Hz, grounded (3-prong) outlet.
Caution: Do not plug the power
cord into any other kind of outlet.
This will damage the machine and
is not covered under the warranty.
2
To connect an answering machine
or extension phone to the fax, first
remove the seal covering the TEL.
SET jack on the fax, and then insert
the line for the answering machine
or the extension phone into the
TEL. SET jack. For an answering
machine, the other end of the line
should be connected to the answer-
ing machine’s telephone line jack,
not its extension phone jack.
TEL.
LINE
EXT.
PHONE
If desired, you can connect an answering
machine to the fax first, and then connect
an extension phone to the answering ma-
chine’s extension phone jack.
AC outlet
Answering
machine
Extension
telephone
Chapter 1 Installation
6

<P=002>
TEL.
SET TEL.
LINE
3
Connect the handset as shown and
place it on the handset rest.
4
Insert one end of the telephone line
cord into the TEL. LINE jack. In-
sert the other end into a standard
(RJ11C) single-line telephone wall
jack.
Be sure to insert the telephone line
cord into the TEL. LINE jack. Do
not insert it into the TEL. SET
jack.
Note: Your fax is set for touch-tone dialing. If you are on a pulse dial (rotary)
line, you must set the fax for pulse dialing by changing Option Setting 8. This
procedure is described in Chapter 9, "Optional Settings".
Handset
Wall jack
Chapter 1 Installation
7

<P=003>
Connecting the fax to your computer
The Multifunction Interface kit which comes with your fax machine allows you
to use your fax as a printer and scanner, and lets you perform fax operations
from your computer via the fax modem in your fax machine. Follow the steps
below to connect the PC Interface box and cables.
Important:
Use only the provided interface cable and modular plug cable.
1
Make sure that your fax is unplugged and the power switch is turned off on
your computer.
2
Insert the female end of the interface cable into the serial (RS232C) port on
your computer. Tighten the screws with a screwdriver.
3
Insert the male end of the interface cable into the port on the PC Interface
box. Tighten the screws with a screwdriver.
4
Insert one end of the modular plug cable into the jack on the PC Interface
box, and the other end into the jack on your fax as shown (the ends of the
cable are identical).
Modular
plug cable
PC Interface
box
Interface cable Computer
Chapter 1 Installation
8
Table of contents
Other Sharp Fax Machine manuals