Sharp EC-SA86B User manual

1
เครืองดูดฝุ่ น
คู่มือการใช้งาน
ขอขอบพระคุณทีท่านเลือกซื
อผลิตภัณฑ์จากชาร์ป
ก่อนเริมการใช้งานเครืองดูดฝุ่ นของชาร์ป โปรดอ่านคู่มือการใช้งานนี
อย่างละเอียด
เพือให้ได้รับประโยชน์อย่างสูงสุดจากการใช้งานเครืองดูดฝุ่ นนี
EC-SA86B
คําเตือน
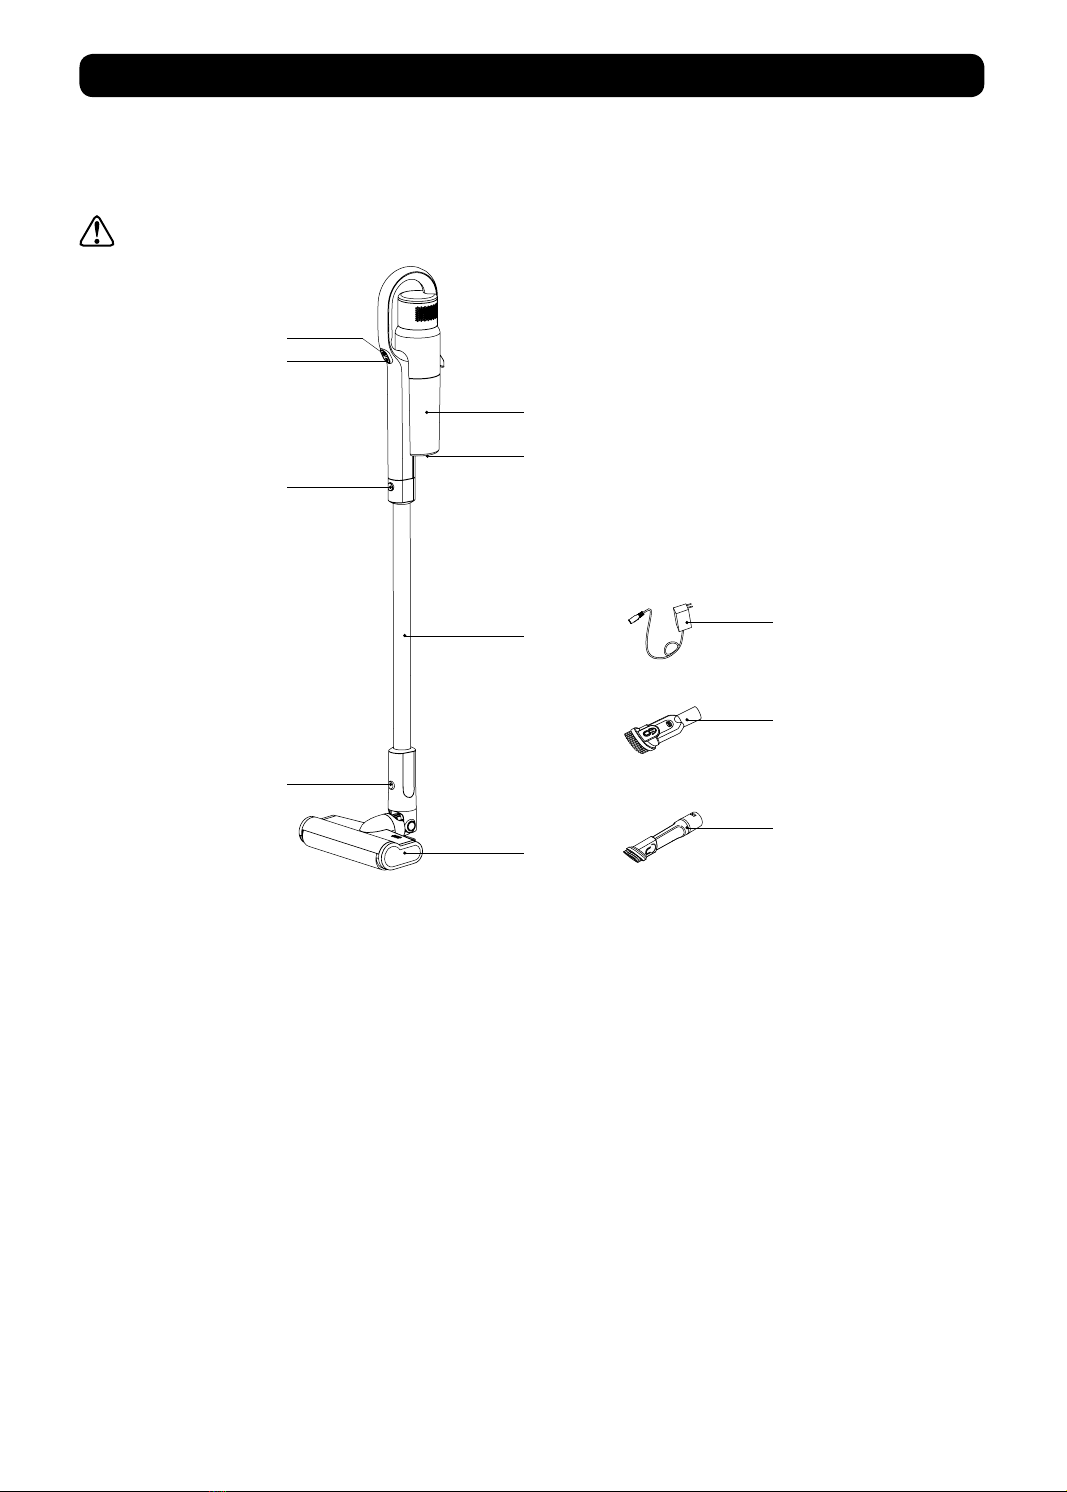
คู่มือการใช้งานของเครืองดูดฝุ่ นแบบด้ามจับ รุ่น EC-SA86B.
ก่อนใช้ผลิตภัณฑ์ โปรดอ่านคู่มือการใช้งานนี
อย่างละเอียด และเก็บรักษาไว้เป็ นอย่างดี
1 เครืองดูดฝุ่ นรุ่นนี
ถูกออกแบบมาสําหรับการใช้งานภายในบ้าน ห้ามนําไปใช้งานในเชิงพาณิชย์ หรือใช้งาน
เพือวัตถุประสงค์อืนๆ
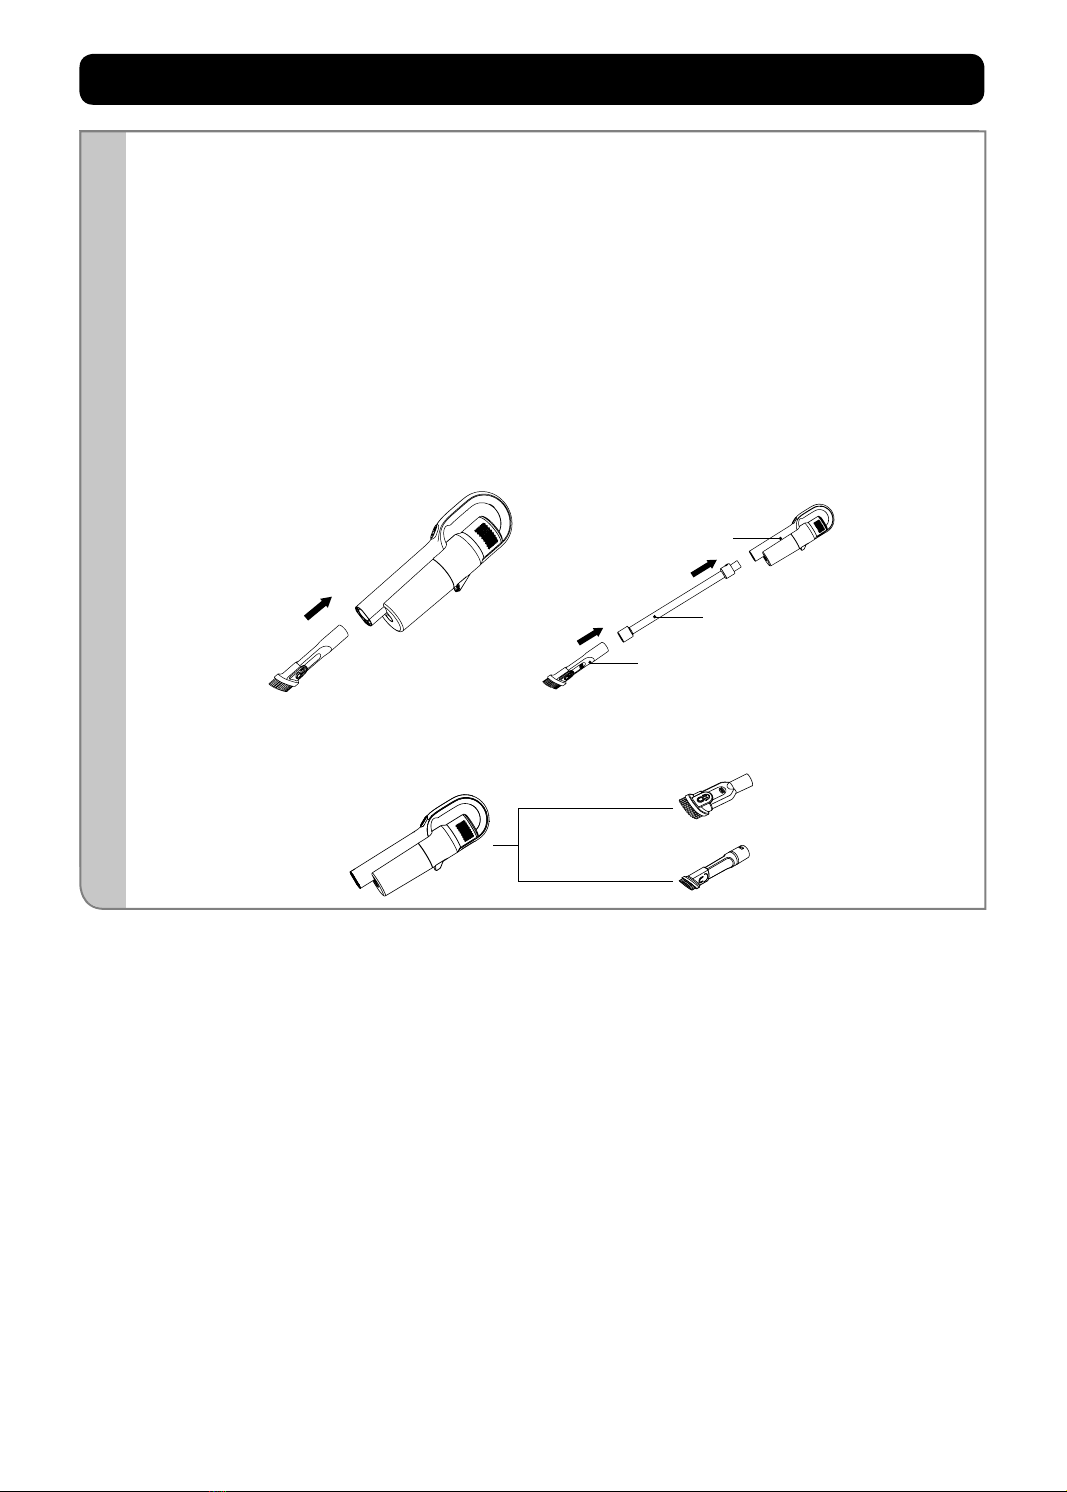
2 โปรดอ่านคู่มือการใช้งานนี
อย่างละเอียดก่อนใช้งาน และเก็บคู่มือนี
ไว้อย่างเหมาะสม เพือใช้สําหรับการ
อ้างอิงในภายหน้า
3 อย่าวางเครืองดูดฝุ่ นไว้ใกล้กับเปลวไฟ หรืออุปกรณ์อืนๆ ทีมีอุณหภูมิสูง
4 ห้ามใช้งาน หรือเก็บเครืองดูดฝุ่ นในสภาวะแวดล้อมทีไม่เหมาะสมอย่างรุนแรง เช่น อุณหภูมิสูงเกินไป
ขอแนะนําให้ใช้งานเครืองดูดฝุ่ นภายในอาคาร ทีอุณหภูมิระหว่าง 5 °C ถึง 40 °C รวมทังเก็บรักษาเครือง
ดูดฝุ่ นไว้ในทีแห้ง และหลีกเลียงแสงแดด
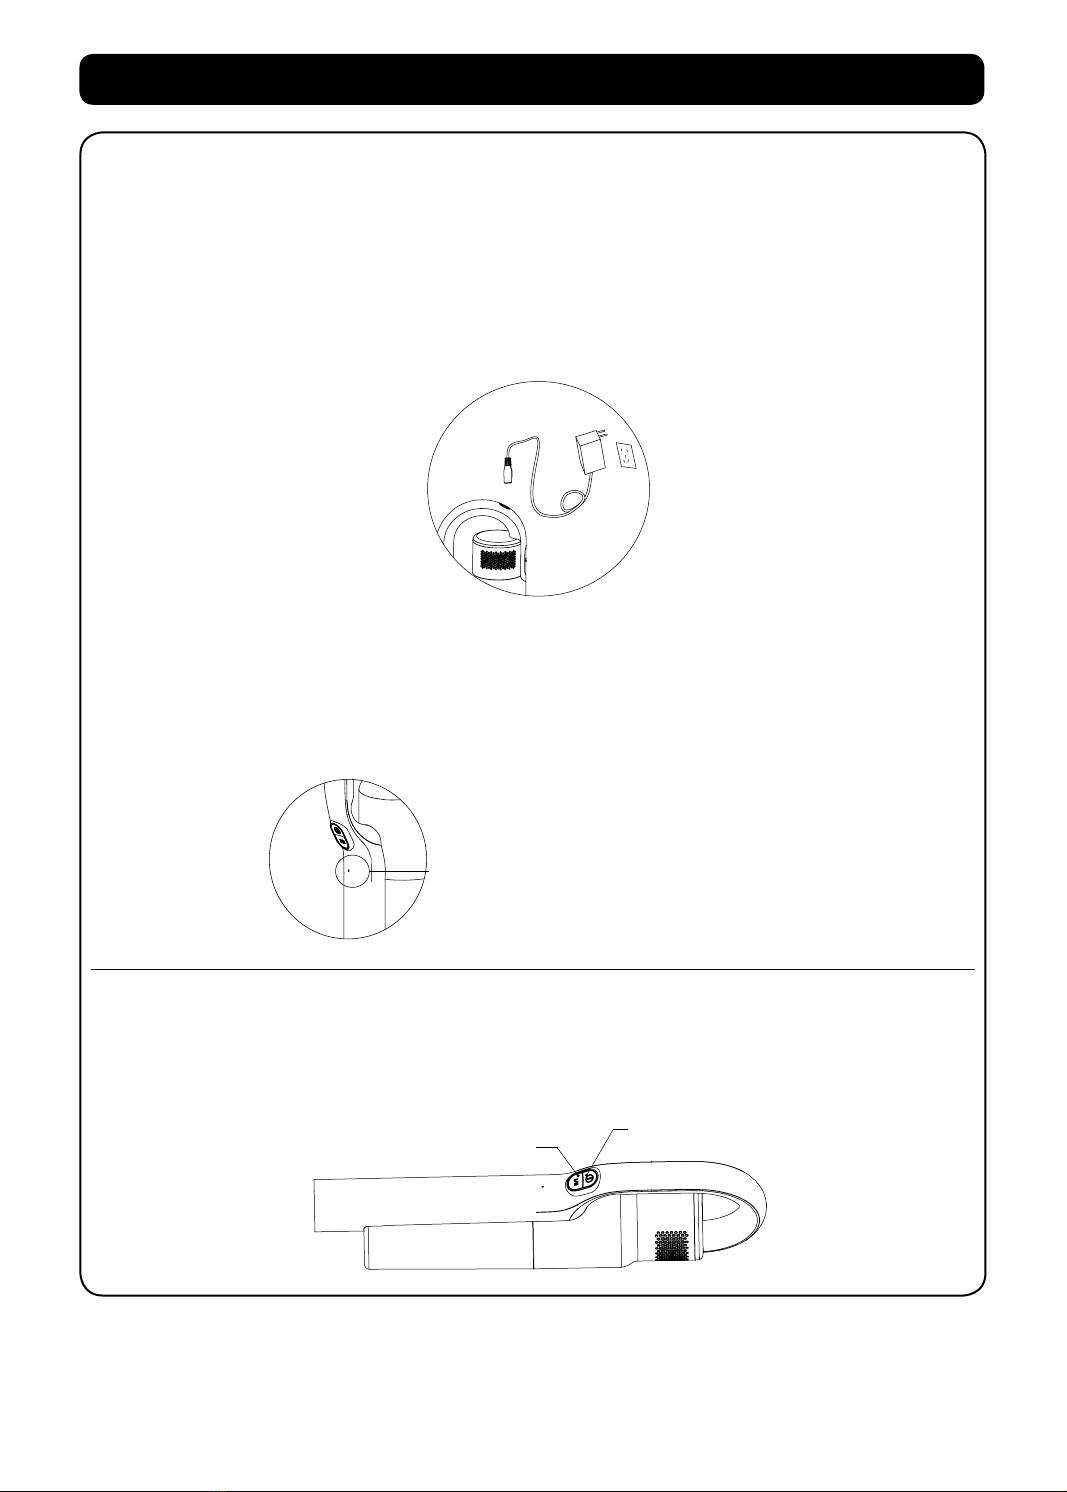
5 ชาร์จแบตเตอรีให้เต็มก่อนใช้งานครังแรก หรือหลังจากเก็บไว้เป็ นเวลานาน
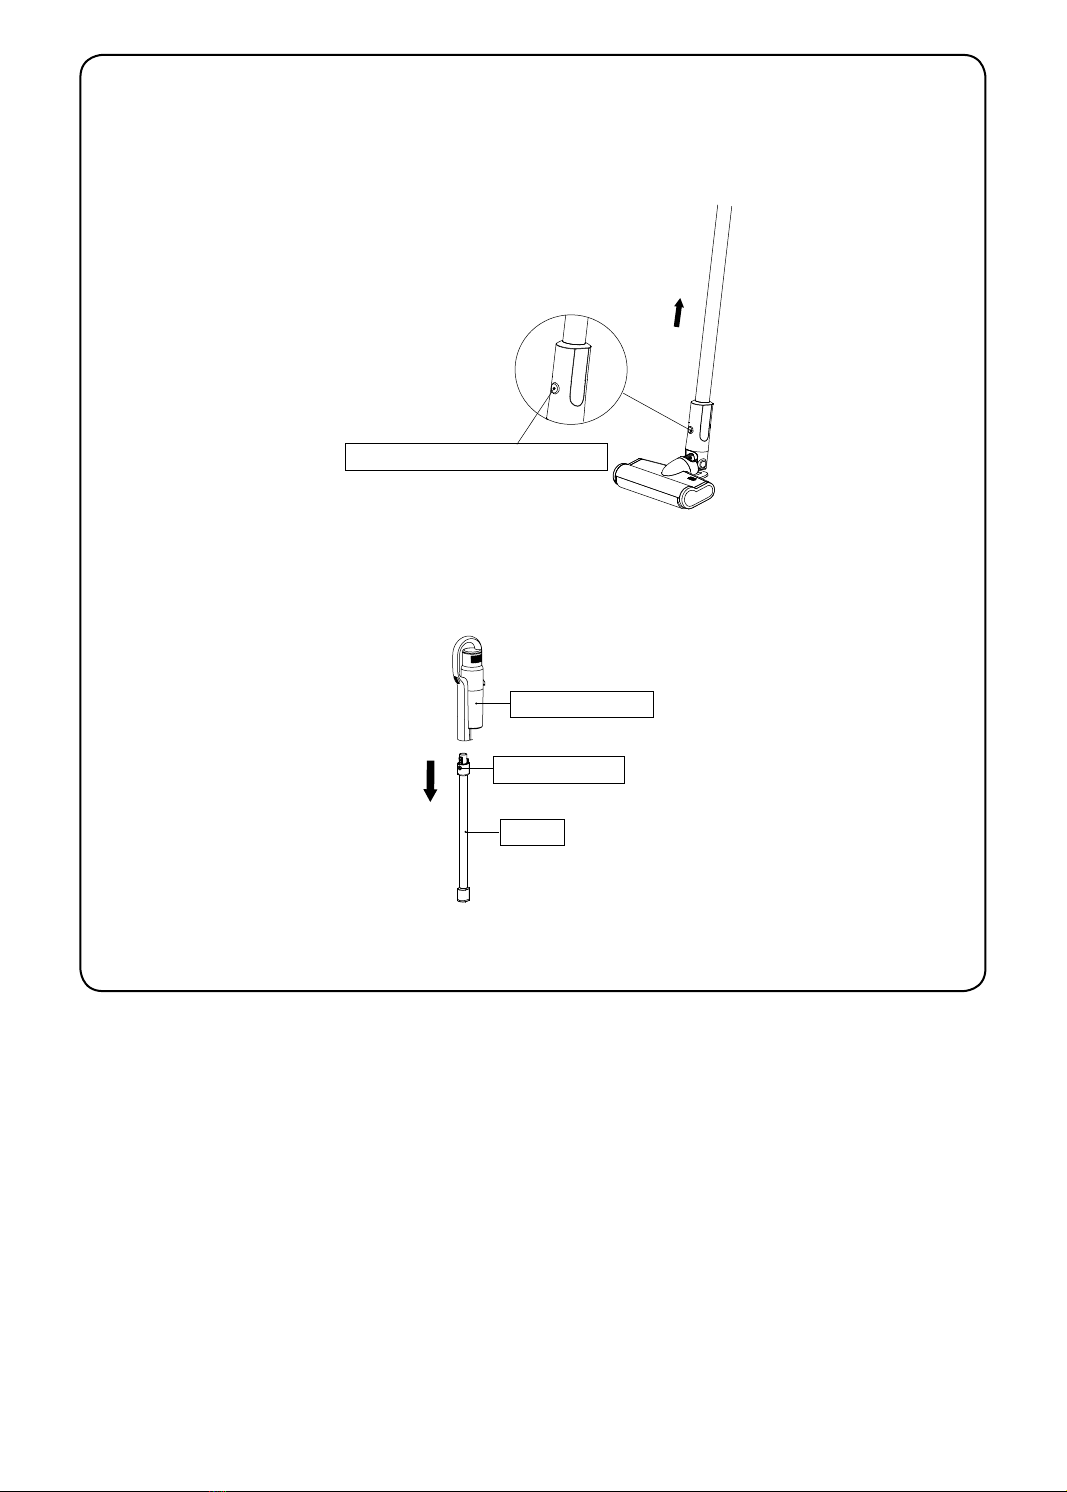
6 ก่อนเริมใช้งานเครืองดูดฝุ่ น ต้องติดตังแปรงลูกกลิ
งเข้ากับตัวเครืองให้เรียบร้อย ไม่เช่นนันอาจทําให้
มอเตอร์พัดลมอุดตัน ส่งผลให้มอเตอร์ไหม้ได้
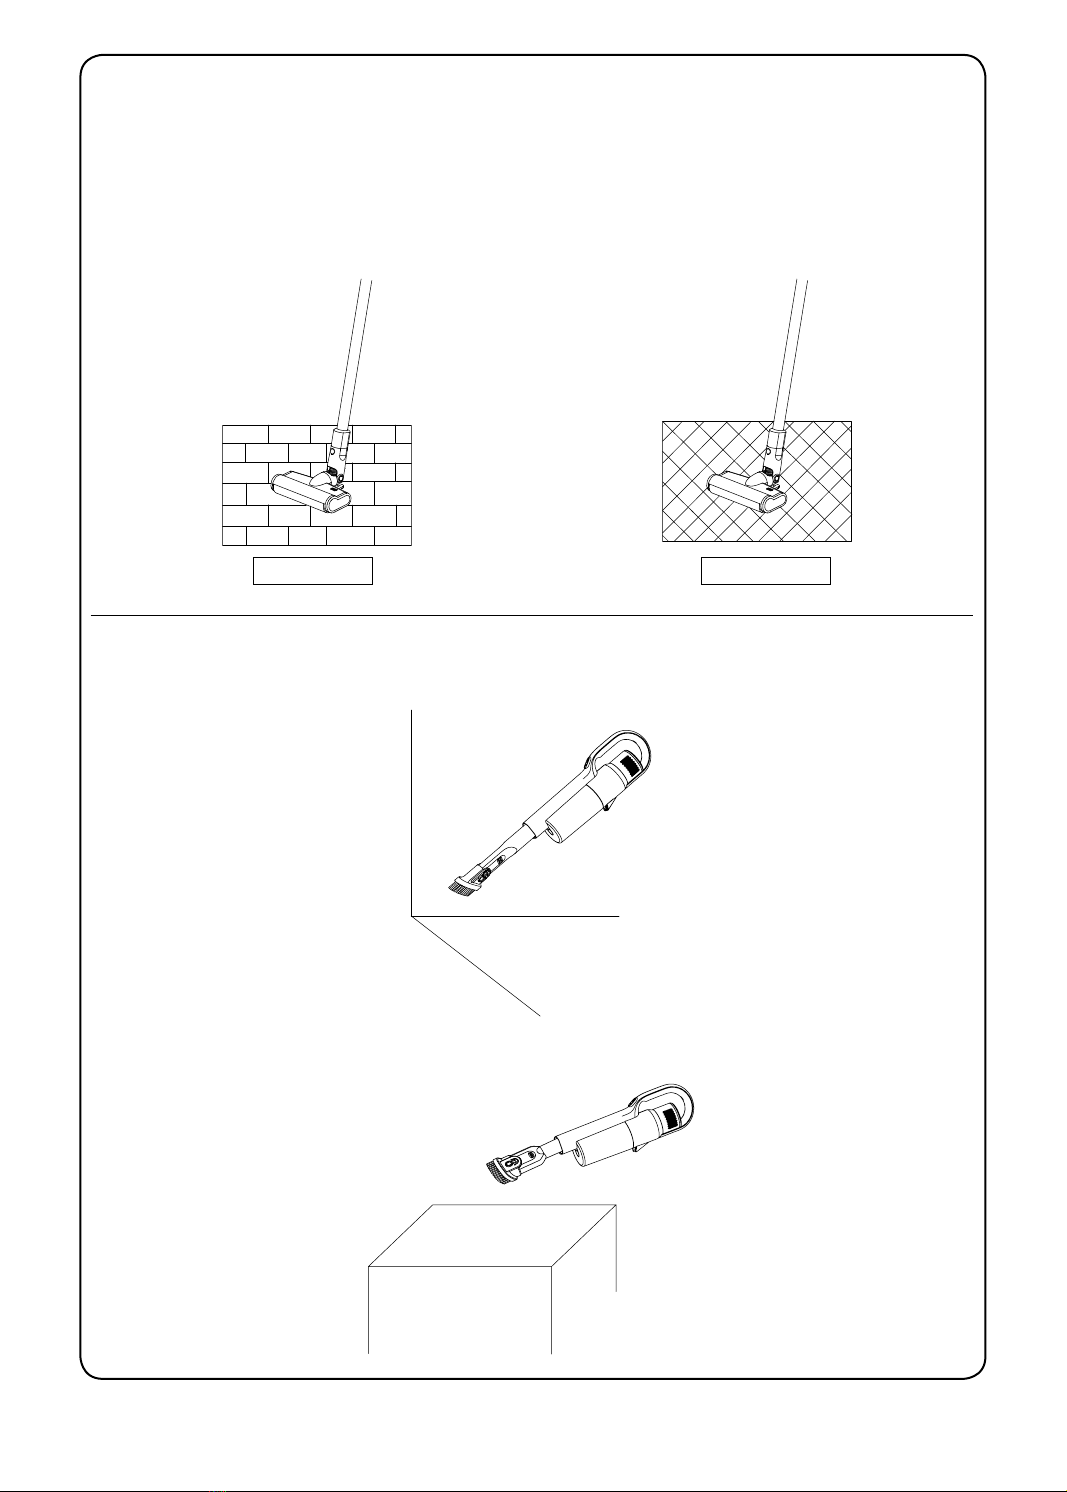
7 กรุณาอย่าใช้เครืองดูดฝุ่ นในการดูดผงซักฟอก, นํามัน, เศษแก้ว, เข็มเย็บผ้า, เถ้าบุหรี, ฝุ่ นทีเปี ยกชื
น, นํา,
ไม้ขีดไฟ หรืออืนๆ
8 กรุณาอย่าใช้เครืองดูดฝุ่ นในการดูดผงทีมีอนุภาคขนาดเล็ก เช่น ผงปูนซีเมนต์, ผงยิปซัม, ผงฝุ่ นจากผนัง
หรือวัตถุขนาดใหญ่ เช่น กระดาษทีขยําเป็ นก้อน ไม่เช่นนันจะทําให้เครืองทํางานผิดปกติ เช่น การอุดตัน
หรือมอเตอร์ไหม้
9 อย่าให้มีวัตถุใดๆ อุดตันช่องดูดอากาศเข้า หรือแปรงลูกกลิ
งไม่เช่นนันอาจทําให้มอเตอร์ทํางานขัดข้อง
10 อย่าเท หรือสาดนําหรือของเหลวอืนๆ ไปทีเครืองดูดฝุ่ น ไม่เช่นนันจะทําให้เกิดไฟฟ้าลัดวงจรและทําให้
เครืองไหม้
11 หากแปรงลูกกลิ
งไม่ทํางาน โปรดตรวจสอบว่าแปรงลูกกลิ
งมีเส้นผม หรือเส้นใยชนิดอืนๆ เข้าไปพันอยู่
หรือไม่ หากมีให้ทําความสะอาดทันที
12 เมือเก็บเครืองดูดฝุ่ นไว้เป็ นเวลานาน ควรนําเครืองออกมาชาร์จแบตเตอรีจนเต็มก่อนทีจะนําไปเก็บไว้
ตามเดิม ให้ทําการชาร์จอย่างน้อยทุกๆ 3 เดือน
13 ถอดปลั
กทีชาร์จแบตเตอรีก่อนทําความสะอาด หรือซ่อมเครือง ควรจับทีชาร์จแบตเตอรีขณะเสียบปลั
ก
หรือถอดปลั
กและห้ามถอดปลั
กโดยการดึงกระชากทีสายชาร์จ
14 ใช้ผ้าแห้งในการเช็ดทําความสะอาดเครืองดูดฝุ่ น ห้ามใช้ของเหลวประเภท นํามัน, แอลกอฮอล์, แลคเกอร์,
ทินเนอร์ ในการเช็ดทําความสะอาดเครือง เพราะจะทําให้พื
นผิวเป็ นรอย หรือสีหลุดลอก
15 หากเครืองไม่ทํางานแม้จะชาร์จแบตเตอรีจนเต็มแล้ว จะต้องนําเครืองไปตรวจสอบ และซ่อมแซมทีศูนย์
บริการของชาร์ป ห้ามแยกชิ
นส่วนของเครืองดูดฝุ่ นด้วยตัวเอง
16 หลีกเลียงการใช้เครืองดูดฝุ่ นในการดูดวัตถุทีสามารถเข้าไปอุดตันอยู่ภายในเครืองได้ง่าย เช่น: ถุงพลาสติก,
กระดาษห่อลูกอม, เศษกระดาษชิ
นใหญ่ ซึงอาจส่งผลกระทบต่อฟังก์ชั นการทํางาน และอาจทําให้เครือง
ดูดฝุ่ นไม่สามารถทํางานได้ ควรกําจัดวัตถุแปลกปลอมทีติดอยู่บนหัวแปรงทําความสะอาดพื
นทันที จากนัน
เครืองก็จะทํางานได้ตามปกติ
17 แบตเตอรีเก่าทีเลิกใช้งานจะต้องนําไปรีไซเคิลอย่างปลอดภัย ห้ามโยนทิ
งร่วมกับขยะทั วไป
18 หากสายไฟชํารุด จะต้องเปลียนสายไฟเส้นใหม่หรือซ่อมแซมสายไฟโดยบริษัทผู้ผลิต, ศูนย์บริการ หรือ
ช่างไฟทีมีความชํานาญ เพือป้องกันการเกิดอันตราย
19 ชิ
นส่วนบางอย่างของเครืองดูดฝุ่ นทํามาจากพลาสติกวิศวกรรม ABS ขันสูง พลาสติกวิศวกรรมของแท้จะมี
ผิวสัมผัสทีเกิดขึ
นตามธรรมชาติระหว่างกระบวนการหล่อ ซึงเป็ นลักษณะปกติ และไม่เป็ นอันตรายต่อการ
ใช้งาน
ข้อควรระวัง: หากสายไฟของเครืองนี
เกิดชํารุด จะต้องได้รับการเปลียนใหม่โดยทางศูนย์บริการทีได้รับการแต่ง
ตังโดยชาร์ป เพือป้องกันอันตรายทีอาจขึ
น

2
ส่วนต่างๆ ของตัวเครือง
การแกะกล่องบรรจุภัณฑ์
,
7
6
3
2
1
4
10
9
11
5
8
1 /
2
3
4
5
6
7
8
9
10 --
11 --

3
การติดตังอุปกรณ์
1
“”
ข้อควรทราบ: จัดให้ด้ามจับและหัวแปรงทําความสะอาดพื
นอยู่ในแนวเดียวกัน เพือให้ขัวตัวนําไฟฟ้าอยู่ในแนวเดียวกับ
เบ้าเสียบ
2
“”
3
EC-SA86B
--
--

4
การติดตังอุปกรณ์
--
--
ข้อควรทราบ: เครืองดูดฝุ่ นแบบมือถือสามารถเชือมต่อกับอุปกรณ์เสริมอืนๆ ดังต่อไปนี
: แปรงทําความสะอาดผ้าแบบ
ทู-อิน-วัน ซึงวิธีการเชือมต่อจะเหมือนกับการเชือมต่อกับหัวดูดฝุ่ นสําหรับซอกเล็กๆ แบบทู-อิน-วัน
“”
--:
--
ข้อควรทราบ: ท่อโลหะทีมีขัวตัวนําไฟฟ้าสามารถเชือมต่อกับอุปกรณ์เสริมอืนๆ ดังต่อไปนี
: แปรงทําความสะอาดผ้า
แบบทู-อิน-วัน ซึงวิธีการเชือมต่อจะเหมือนกับการเชือมต่อกับหัวดูดฝุ่ นสําหรับซอกเล็กๆ แบบทู-อิน-วัน
--

5
วิธีการใช้งาน
การชาร์จแบตเตอรีเครืองดูดฝุ่ น
ข้อควรทราบ: ไฟแสดงสถานะสีแดงจะสว่างขึ
นขณะชาร์จแบตเตอรี ไฟแสดงสถานะสีเขียวจะสว่างขึ
นเมือแบตเตอรีถูกชาร์จไฟ
จนเต็ม
3 4
/
/

6
การใช้งานหัวแปรงทําความสะอาดพื
นไฟฟ้า
,
ข้อควรทราบ: เวลาทีหัวแปรงทําความสะอาดพื
นไฟฟ้ากําลังทํางาน แล้วแปรงลูกกลิ
งเกิดหยุดหมุนเพราะมีวัตถุแปลกปลอม
เข้าไปอุดตัน หรือมีเส้นใยเข้าไปพันในแปรงมากเกินไป หรือเด็กแหย่มือเข้าไปในแปรงลูกกลิ
งหัวแปรงทําความ
สะอาดพื
นจะหยุดทํางาน เพือความปลอดภัย และป้องกันการเกิดความเสียหายต่อมอเตอร์ของหัวแปรงทําความ
สะอาดพื
น
--: ,
--: , ,

7
-- --:
, ,

8
การดูแลรักษา
การทําความสะอาด และการเปลียนชิ
นส่วนอุปกรณ์
ข้อควรทราบ: ขอแนะนําให้ทําความสะอาดกล่องเก็บฝุ่ นทุกครังหลังการใช้งาน เมือกล่องเก็บฝุ่ นเต็ม หรือแผ่นกรองอากาศ HEPA
อุดตัน จําเป็ นต้องทําความสะอาด และเปลียนใหม่ หากจําเป็ น แปรงลูกกลิ
งของหัวแปรงทําความสะอาดพื
นอาจ
มีเส้นผมพันอยู่หลังจากใช้งานไปนานๆ จึงควรทําความสะอาดอย่างสมําเสมอ เพือให้สามารถดูดฝุ่ นได้อย่างมี
ประสิทธิภาพยิงขึ
น
การทําความสะอาดกล่องเก็บฝุ่ น และระบบกรองอากาศ
การทําความสะอาดกล่องเก็บฝุ่น
การทําความสะอาดแผ่นกรองอากาศ
HEPA HEPA
Grade 1
HEPA, , Grade 2,
Grade 2 Grade 2
HEPA
Grade 2
Grade 2
Grade 2
Grade 1

9
ข้อควรทราบ: หลังจากล้างทําความสะอาดแผ่นกรอง HEPA และ แผ่นกรองอากาศแบบฟองนําจะต้องผึงให้แห้งสนิทก่อนทีจะ
นํามาใช้งานอีกครัง(การล้างบ่อยๆ จะส่งผลเสียต่อประสิทธิภาพการกรองอากาศของแผ่นกรอง HEPA
ขอแนะนําให้ท่านเคาะฝุ่ นออกจากอุปกรณ์ในส่วนนี
เป็ นหลักสําหรับการทําความสะอาดตามปกติ และล้าง
ทําความสะอาดเฉพาะในกรณีทีสกปรกมากเกินไปเท่านันหรืออาจเปลียนอุปกรณ์ใหม่ หากจําเป็ น) หลังจาก
ทําความสะอาด ให้ประกอบชิ
นส่วนอุปกรณ์ทังหมดตามลําดับของการถอดแบบย้อนลําดับขึ
นไป ท่านจะต้องผึง
แผ่นกรอง HEPA และแผ่นกรองอากาศแบบฟองนําให้แห้งสนิท ก่อนทีจะนําไปประกอบกลับเข้าเครือง
HEPA
HEPA
การทําความสะอาดแปรงลูกกลิ
งไฟ
ั
ฟา
การถอดแปรงลูกกลิ
งออกมาทําความสะอาด
1
2
3
““

10
z การเก็บรักษาเครืองดูดฝุ่ น
z การถอดส่วนของเครืองดูดฝุ่ นแบบมือถือออกจากท่อโลหะ
z การจัดเก็บเครืองดูดฝุ่ น

11
ก่อนติดต่อขอรับบริการ
อาการผิดปกติ สาเหตุทีเป็ นไปได้ วิธีแก้ปัญหา
มอเตอร์ไม่ทํางาน
,
,
เครืองมีกําลังในการดูดฝุ่ นน้อย
HEPA
ชาร์จแบตเตอรีแล้ว แต่แบตเตอรีหมด
เร็ว
ข้อควรทราบ: ในกรณีทีเกิดความเสียหายอืนๆ ทีจําเป็ นต้องใช้เครืองมือระดับมืออาชีพ จะต้องนําไปซ่อมแซม หรือเปลียนอะไหล่
โดยบริษัทผู้ผลิต, ศูนย์ซ่อม หรือศูนย์บริการของบริษัท ชาร์ป ไทย จํากัด เพือ ้ปองกันการเกิดอันตราย
ข้อมูลจําเพาะของผลิตภัณฑ์
ชือรุ่น EC-SA86B
แรงดันไฟฟ้า 21.6
กําลังไฟ
้
ฟาของตัวเครือง 300
แรงดันไฟ
้
ฟาขาเข้าของอะแด็ปเตอร์ 100 - 240 ~ 50 - 60
แรงดันไฟ
้
ฟาขาออกของอะแด็ปเตอร์ 25 600
กําลังไฟของหัวแปรงทําความสะอาด 30
ความจุแบตเตอรี 2000 mAh
ระยะเวลาการชาร์จ 3 - 4
การอนุรักษ์สิงแวดล้อม

1
VACUUM CLEANER
INSTRUCTION MANUAL
Thank you very much for buying SHARP product.
Before using the product, please read this instruction manual
carefully and keep it properly.
EC-SA86B
WARNING
Instruction Manual of Sharp handheld Vacuum Cleaner EC-SA86B.
Before using the product, please read this instruction manual carefully and keep it
properly.
1 This vacuum cleaner is designed for home use. Do not use it for commercial or
other purposes.
2 Please read this instruction manual carefully before use, properly save and
store it for future use.
3 Do not put the vacuum close to fire or other high temperature facility.
4 Do not use or store the machine under extreme bad conditions, for example,
extreme temperature. It is recommended to use it indoors between the
temperatures of 5 °C to 40 °C. Store the machine in dry place and avoid direct
sunlight.
5 Fully charge the battery before first use or after long storage
6 Before using the vacuum, make sure brushroll is assembled, otherwise, it may
lead to motor fan blockage, causing motor burn out.
7 Please do not use the vacuum to pick up detergent, oil, glass slag, needle,
cigarette ash, wet dust, water, matches, etc.
8 Please do not use the vacuum to pick up tiny particles such as cement, gypsum
powder, wall powder, or large objects such as paper balls, otherwise it will
cause malfunctions such as blockage and motor burnout.
9 Avoid blockage to air inlet or brushroll, it may cause motor failure.
10 Do not pour or splash water or other liquids into the machine to avoid short
circuit to burn out the machine.
11 If the brushroll is not working, please check whether the brushroll is entangled
with hair or other long fiber, clean it in time.
12 When storing the machine for a long time, ensure that the battery is fully
charged before storage and charge the machine at least every three months.
13 Unplug the charger to clean or repair the machine. Hold the charger when
plugging or unplugging it, and do not pull the charging cord.
14 Use a dry cloth to clean the machine. Liquids like gasoline, alcohol, lacquer
thinner will cause crack or colour fading and cannot be used.
15 If the machine is not working after fully charged, it must be checked and
repaired in our designated office, please do not dismantle the machine on your
own.
16 Avoid to use the vacuum cleaner to pick up easily blockable things such as:
plastic bags, candy paper, big scrap of paper, which might affect the function,
even cause failure of working. Please clean the foreign matter on the floor head
in time, then it will work normally.
17 The discarded battery pack shall be recycled safely, do not throw away casually.
18 If there is damage on power cord, to avoid danger, it should be replaced or
repaired by manufacturer, repairing agency or professional person.
19 Some parts of the cleaner are made of advanced ABS engineering plastics.
The real engineering plastics will have natural texture left during the casting
process.This texture is a normal phenomenon. Please feel free to use it.
Caution : If the cord of this appliances is damaged, it must only be replaced by the
repair shop appointed by SHARP in order to avoid hazard.

2
PRODUCT VIEW
UNPACKING
Open the package, take out the foam pad, all accessories and machine from the package, take off the
plastic bag and save them for the purpose of future maintenance and repair.
Do not switch on your cleaner until you have completely assembled it per the following instructions
and are familiar with all instructions and operating procedures.
7
6
3
2
1
4
10
9
11
5
8
1 On/off Button
2 Speed Control Button
3 Metal Tube Release Button
4 Floor Head Release Button
5 Dust Cup
6 Dust Cup Release Button
7 Metal Tube
8 Floor Head
9 Adaptor
10 2-in-1 Upholstery Tool
11 2-in-1 Crevice Tool

3
PART INSTALLATION
1Connect the electric floor head with metal tube
Hold the floor head with left hand, use right hand to insert the metal tube vertically into floor
head, press the handle until a “click” sound is heard.
Attention: Keep the handle and floor head in the same direction, conductive needle
shall align with the socket.
2Assemble the metal tube and handheld vacuum cleaner
Align the handheld vacuum cleaner with the conductive needle of the conductive metal tube,
push downwards until a “click” sound is heard.
3Accessories Assembly
For ease of different use, this product is specially equipped with accessories for the vacuum
cleaner. The accessories can be matched with the handheld part or connected to the
conductive metal tube. Please connect the accessories as needed.
Model
Name
EC-SA86B
2-in-1 Upholstery Tool
2-in-1 Crevice Tool

4
PART INSTALLATION
Connect handheld vacuum cleaner with 2-in-1 crevice tool
Insert 2-in-1 crevice tool connector into the handheld air inlet until it is tightly fitted.
Attention: The handheld vacuum cleaner can also connect the accessories such as:
2-in-1 upholstery tool, the connecting method is the same as 2-in-1 crevice
tool.
Connect handheld vacuum cleaner to accessories through conductive metal
tube
Align the conductive needle of the conductive metal tube with the hand-held vacuum cleaner,
press upwards until a “click” sound is heard.
Connect conductive metal tube with 2-in-1 crevice tool: Insert 2-in-1 crevice tool connector in
the direction shown on the picture until it is tightly fitted.
Attention: The conductive metal tube can also connect the accessories such as: 2-in-1
upholstery tool, the connecting method is the same as 2-in-1 crevice tool.
Handheld
vacuum cleaner
Metal tube
2-in-1 crevice tool
Accessories Assembly

5
OPERATION METHODS
Machine Charging
When using the machine for the first time, the battery capacity is not full, need to put the machine to
charge. The machine is able to be used after the battery is charged fully.
Connect the adaptor with the charging port of the handheld vacuum cleaner and insert the opposite
side into the outlet.
Attention: Red indicator lights up when charging. Green indicator lights up when fully
charged.
Charge the vacuum cleaner in time when battery power is insufficient. To protect the battery, the
vacuum will automatically turn off.
Charging time is 3 hours to 4 hours. When the charging indicator on the hand-held vacuum turns
from red to green, it means the vacuum cleaner is fully charged. We recommend continue charging
for half an hour to one hour, so that the charging effect is better.
Red indicator lights up when
charging.
Green indicator lights up
when fully charged.
Use of Handheld Vacuum Cleaner
Press the on/off button to turn on and turn off the vacuum. Green indicator lights up, it is normal
mode, press the speed control button to strong mode, the speed control button can switch between
strong mode and normal mode easily.
On/off button
Speed control button

6
Use of Electric Floor Head
Electric floorhead can clean short hair carpet, hardfloor or tile floor.
Attention: When the electric floorhead is running, if brushroll stopped running due to big
foreign object blockage or excessive fiber entangle, or the child accidentally
putting hand into brushroll, the floorhead will stop working to protect personal
safety and avoid damage to floorhead motor.
Clean the floor Clean the carpet
Use of Accessories
2-in-1 crevice tool: Suitable to clean crevices, corners and other narrow areas.
2-in-1 upholstery tool: Suitable to clean dust on closet, windowsill, sofa and table surface.

7
Metal tube assemble with 2 in-1 crevice tool or 2-in-1 upholstery tool: Suitable to clean dust on the
high place difficult to clean such as ceiling, curtains, air conditioning grille etc.

8
MAINTENANCE
Cleaning and Replacing Parts
Attention: It is recommended to clean the dust cup after each use; when the dust cup is full
or the HEPA filter is clogged, it needs to be cleaned and replaced if necessary.
Floorhead brushroll might be entangled with hair after long time use, it needs to be
cleaned in time to keep the vacuum working more efficiently.
Cleaning Dust Cup and Filtration System
Clean dust cup
Press the dust cup release button. Rotate in the direction of the arrow and remove the dust cup.
Release button of the dust cup
Turn up the dust cup handle and hold it, draw out cyclone assembly in the direction of the arrow,
then dump dust from dust cup.
Clean filter assembly
Hold the HEPA filter handle and rotate it in the direction shown on the picture. Take out the HEPA filter;
Rotate the Grade 1 cyclone assembly in the direction shown on the picture and take it out
downwards.
Then you can clean and wash HEPA filter, foam filter, cyclones, Grade 2 cyclones, Grade 2 dust
bucket and sealing ring of Grade 2 dust bucket.
HEPA filter
Cyclones
Grade 2 dust bucket
Foam filter
Grade 2 cyclones
Sealing ring of Grade 2 dust bucket
Grade 1 cyclone assembly

9
Attention: If HEPA filter and foam filter are washed, they need to be completely dried to be
used again. (Frequent washing will affect the filtering effect of HEPA filter. We
recommend that the mainly purpose of the usual cleaning should be knocking
off the dust and washing if it is too dirty. Replace if necessary). After cleaning,
assemble all parts in opposite sequence in order to be used again. HEPA filter and
foam filter need to be completely dry before assembly.
HEPA filter
HEPA filter
Foam filter
Foam filter
Washing with water
Drying
Cleaning Electric Brushroll
Take out the brushroll and clean it
1 Release the brushroll button in the direction of the arrow, the brushroll cover will pop up
automatically.
2 Take out one side of the brushroll in the same direction as shown on the picture, then brushroll
can be taken out to clean.
3 After cleaning and replacing, reassemble it in opposite sequence and press the brushroll cover
until a “click “sound is heard.
Release button of brushroll
Cover of brushroll
Table of contents
Languages:
Other Sharp Vacuum Cleaner manuals

Sharp
Sharp EC-S2142 User manual

Sharp
Sharp EC-C1219-S User manual

Sharp
Sharp EC-6312P User manual

Sharp
Sharp EC-A1RAS User manual

Sharp
Sharp EC-SC85H-H User manual

Sharp
Sharp EC-S5170 User manual

Sharp
Sharp EC-HX100M-S User manual

Sharp
Sharp EC-LH17-WH User manual

Sharp
Sharp EC-LS18 User manual

Sharp
Sharp EC-A1RHK User manual

Sharp
Sharp EC-CB18 User manual

Sharp
Sharp EP703C User manual

Sharp
Sharp EC-SC75H-H User manual

Sharp
Sharp EC-SC95U-H User manual

Sharp
Sharp EC-C1819-R User manual

Sharp
Sharp EC-A1RA User manual

Sharp
Sharp EC-T2860 User manual

Sharp
Sharp EC-T2840 User manual

Sharp
Sharp EC-SC95H-H User manual

Sharp
Sharp EC-NS16 User manual