Sharp VC-H818U User manual

1
Dimensions: 257 2182 mm
Printelligence (Malaysia) Sdn. Bhd.VC-H818U (01-10)
VIDEO CASSETTE RECORDER
OPERATION MANUAL
Please read this operation manual carefully
before using the VCR.
General
Information Setting Up Basic
Operations Special
Functions Helpful
Hints
Recording
MODEL
VC-H818U
[IMPORTANT] /
[IMPORTANTE]
EZ SET UP(AUTO CHANNEL /CLOCK SET UP)
EZ SET UP
(PROGRAMACIÓN AUTOMÁTICA DE CANAL/PUESTA EN HORA DEL RELOJ)
!Connect Antenna/Cable
to VCR first.
En primer lugar conecte
la antena/el cable a la
videograbadora.
@Then, plug into AC
Power Outlet.
A continuación,
enchúfelos al
tomacorriente de CA.
#Do not press the POWER
button until completion of
EZ SET UP.
No pulse el botón de
ALIMENTACIÓN
(POWER) hasta haber
terminado la EZ SET UP.
$EZ SET UP complete.
EZ SET UP completo.
Detail: Please see page 16
Detalle: véase la página 16
Current time will be displayed
and flashing.
La hora actual aparecerá
parpadeando en el visor.

Printelligence (Malaysia) Sdn. Bhd.
2
VC-H818U (01-10)
Dimensions: 257 2182 mm
This video cassette recorder (VCR) uses “ONLY” cassette
tapes, NTSC video signals (standard in US), and 120 V AC, 60 Hz
(standard US household current).
For future reference, record the model and serial number (located
on the rear of the VCR) in the space provided.
Model No.:—————————
Serial No.:—————————
WARNING:TO REDUCE THE RISK OF FIRE OR ELECTRIC SHOCK, DO NOT
EXPOSE THIS APPLIANCE TO RAIN OR MOISTURE.
RISK OF ELECTRIC SHOCK
DO NOT OPEN
CAUTION
This symbol warns the user of
uninsulated voltage within the
unit that can cause dangerous
electric shocks.
“WARNING—FCC Regulations state that any unauthorized changes or
modifications to this equipment not expressly approved by the manufacturer
could void the user’s authority to operate this equipment.”
Note to CATV system installer:
This reminder is provided to call the CATV system installer’s attention to Article 820-40 of the National
Electrical Code that provides guidelines for proper grounding and, in particular, specifies that the cable ground
shall be connected to the grounding system of the building, as close to the point of cable entry as practical.
CAUTION: TO REDUCE THE RISK OF
ELECTRIC SHOCK, DO NOT
REMOVE COVER. NO USER-
SERVICEABLE PARTS INSIDE.
REFER SERVICING TO
QUALIFIED SERVICE
PERSONNEL.
This symbol alerts the user that
there are important operating
and maintenance instructions in
the literature accompanying this
unit.
As an ENERGY STAR®Partner, SHARP has determined that this product meets the ENERGY STAR®
guidelines for energy efficiency. ENERGY STAR is a U.S. registered mark.
WHAT IS ENERGY STAR®
TVs and VCRs use energy both when they are on and when they are off. Americans spend more than $1 billion
a year on energy consumed by TVs and VCRs when they are not in use. The new ENERGY STAR®models will
reduce that energy "leakage" by up to 75 percent. Ultimately, this will mean more than $500 million a year in
energy savings for consumers.
The energy savings will help reduce the burning of fossil fuels and the related carbon dioxide pollution that
contributes to global warming. If every American family replaced their TVs and VCRs with ENERGY STAR®
models, it would reduce carbon dioxide emissions by five million tons every year -- equivalent to eliminating the
pollution from more than one million cars.
By using ENERGY STAR®products, you will save money on your electric bills and use less energy. That
makes good economic sense and its good for our environment.
WARNING OF DEW FORMATION
Whenever your VCR is moved from a cold to a warm environment, it is important that you plug the unit in, turn
the power on and allow it to sit for about 2 hours before attempting to play a tape. This period will allow any dew
formation to evaporate. Failure to do so may result in tape and/or video head damage.
After the 2 hour evaporation period, you may witness a “snowy” picture for the first few minutes of VCR
operation. This picture noise will disappear shortly thereafter.
WARNING—Keep your VCR away from electrical and magnetic appliances which could impair performance.
Be sure to position your VCR away from your TV or video monitor by at least 8(.

3
Dimensions: 257 2182 mm
Printelligence (Malaysia) Sdn. Bhd.VC-H818U (01-10)
IMPORTANT SAFEGUARDS AND PRECAUTIONS
CAUTION
READ THE SAFETY AND OPERATING INSTRUCTIONS before operating your VCR.
FOLLOW INSTRUCTIONS AND HEED ALL WARNINGS on your VCR and in this manual.
INSTALLATION
1. Operate only from a power source indicated on your VCR or in this manual. If you are
unsure of your power supply, ask your local power company.
2. As a safety feature, your VCR is equipped with either a 2-wire polarized plug (one
plug blade bigger than the other) or a 3-wire grounded plug (a third pin for
grounding). The 2-wire polarized plug will fit only one way into the power outlet. The
3-wire grounded plug will fit only into a grounding-type power outlet.
If the plug does not fit, ask your electrician to replace your obsolete outlet. Do not
modify the plug. To do so will void the safety feature.
3. Protect and route power cords so they will not be stepped on or pinched by anything
placed on or against them. Be especially careful at plug-ins, convenience
receptacles, or cord exit points from the VCR. Frayed power cords or damaged plugs
are hazardous. Have them replaced by a qualified service technician.
Overloaded wall outlets and extension cords may cause fire or electrical shock
hazards.
4. Do not cover or block ventilation holes in the VCR cabinet. Doing so may damage the
VCR or cassette, or cause fire.
Do not place your VCR on a soft surface which could block ventilation holes on the
bottom. Avoid enclosed installations such as bookshelves or racks unless ventilation
is adequate.
5. Avoid excessive humidity, sudden temperature changes, or temperature extremes.
Dew may form inside your VCR or on the cassette.
6. To avoid costly damage or injury, place your VCR flat on a solid, stable surface free
from vibrations; do not place any heavy objects on top of it. Use only a cart, stand,
tripod, bracket, or table recommended by the manufacturer; follow all instructions
regarding their use exactly.
7. An appliance and cart combination should be moved with care. Quick stops,
excessive force, and uneven surfaces may cause the appliance and cart combination
to overturn.
OPERATION/CLEANING
1. Keep your VCR away from electrical and magnetic appliances which could impair
performance. Be sure to position your VCR away from your TV or video monitor by at
least 8(.
2. Keep your VCR away from wet locations such as bathtubs, sinks, laundries, wet
basements, and swimming pools.
3. Use only accessories recommended by the manufacturer to avoid fire, shock or other
hazards.
4. If your VCR has been exposed to rain, moisture or strong impact, unplug it and have
it inspected by a qualified service technician before resuming use.
5. Unplug your VCR and disconnect it from the antenna and/or cable system during a
lightning storm or an extended period of discontinued use.
6. Unplug your VCR before cleaning. Use a damp cloth for cleaning. Do not use
cleaning fluids or aerosols which could enter the unit and cause damage, fire, or
electrical shock. These substances may also mar the finish of your VCR.
7. Never open or remove covers or make any adjustments not described in this manual.
Attempting to do so could expose you to dangerous electrical shock or other hazards.
It may also cause serious damage to your VCR.
2
3
4
6
7
6
5
1
General
Information

Printelligence (Malaysia) Sdn. Bhd.
4
VC-H818U (01-10)
Dimensions: 257 2182 mm
SERVICE
1. Do not attempt to service this VCR yourself. Instead, unplug it and contact a qualified service technician. (See
LIMITED WARRANTY at the end of this manual.)
2. Be sure the service technician uses authorized replacement parts or their equivalents. Unauthorized parts
may cause fire, electrical shock, or other hazards.
3. Following any service or repair, be sure the service technician performs safety checks to certify that your VCR
is in safe operating order.
OTHERS
1. It is the intent of Sharp that this product be used in full compliance with the copyright laws of the United States
and that prior permission be obtained from copyright owners whenever necessary.
2. Normally, your VCR does not require head cleaning. However, the heads may become clogged when an old
or damaged tape is used. If the playback picture becomes blurred, the heads may need cleaning. Head
cleaning should be performed by a qualified technician. Contact the nearest Sharp Factory Service Center or
Authorized Service Station. Do not use a cleaning tape unless it is new and of high quality. Excessive use of
cleaning tapes may also damage the heads.
8
8. Keep liquids and foreign objects away from your VCR. Never operate your VCR if
any liquid or foreign object has entered it. Electrical shorts could result and possibly
cause fire or shock hazards. Unplug your VCR immediately and have it inspected by
a qualified service technician.
IMPORTANT SAFEGUARDS AND PRECAUTIONS
OUTDOOR ANTENNA GROUNDING AND POWER LINES
1. If an outside antenna or cable system is connected to your VCR, be sure the antenna or cable system is
grounded, thus providing some protection against voltage surges and built-up static charges. Section 810 of
the National Electrical Code, ANSI/NFPA No.70-1984, provides information regarding proper grounding of the
mast and supporting structure, grounding of the lead-in wire to an antenna discharge unit, size of grounding
conductors, location of antenna-discharge unit, connection to grounding electrodes, and requirements for the
grounding electrode. See diagram below.
EXAMPLE OF ANTENNA
GROUNDING AS PER NATIONAL
ELECTRICAL CODE
NEC—NATIONAL ELECTRICAL CODE
ANTENNA LEAD-IN
WIRE
ELECTRIC
SERVICE
EQUIPMENT
ANTENNA
DISCHARGE
UNIT
(NEC SECTION
810–20)
GROUNDING
CONDUCTORS
(NEC SECTION
810–21)
GROUND CLAMPS
POWER SERVICE GROUNDING
ELECTRODE SYSTEM
(NEC ART 250, PART H)
GROUND CLAMP
2. An outside antenna system should not be located in the vicinity of overhead power lines or other electric light
or power circuits, or where it can come into contact with power lines or circuits. When installing an outside
antenna system, extreme care should be taken to keep from coming into contact with power lines or circuits;
contact with them might be fatal.

5
Dimensions: 257 2182 mm
Printelligence (Malaysia) Sdn. Bhd.VC-H818U (01-10)
CONTENTS
General Information
IMPORTANT SAFEGUARDS AND
PRECAUTIONS.................................................... 3
Features ................................................................. 6
Accessories ........................................................... 6
Major Components of Your VCR ......................... 7
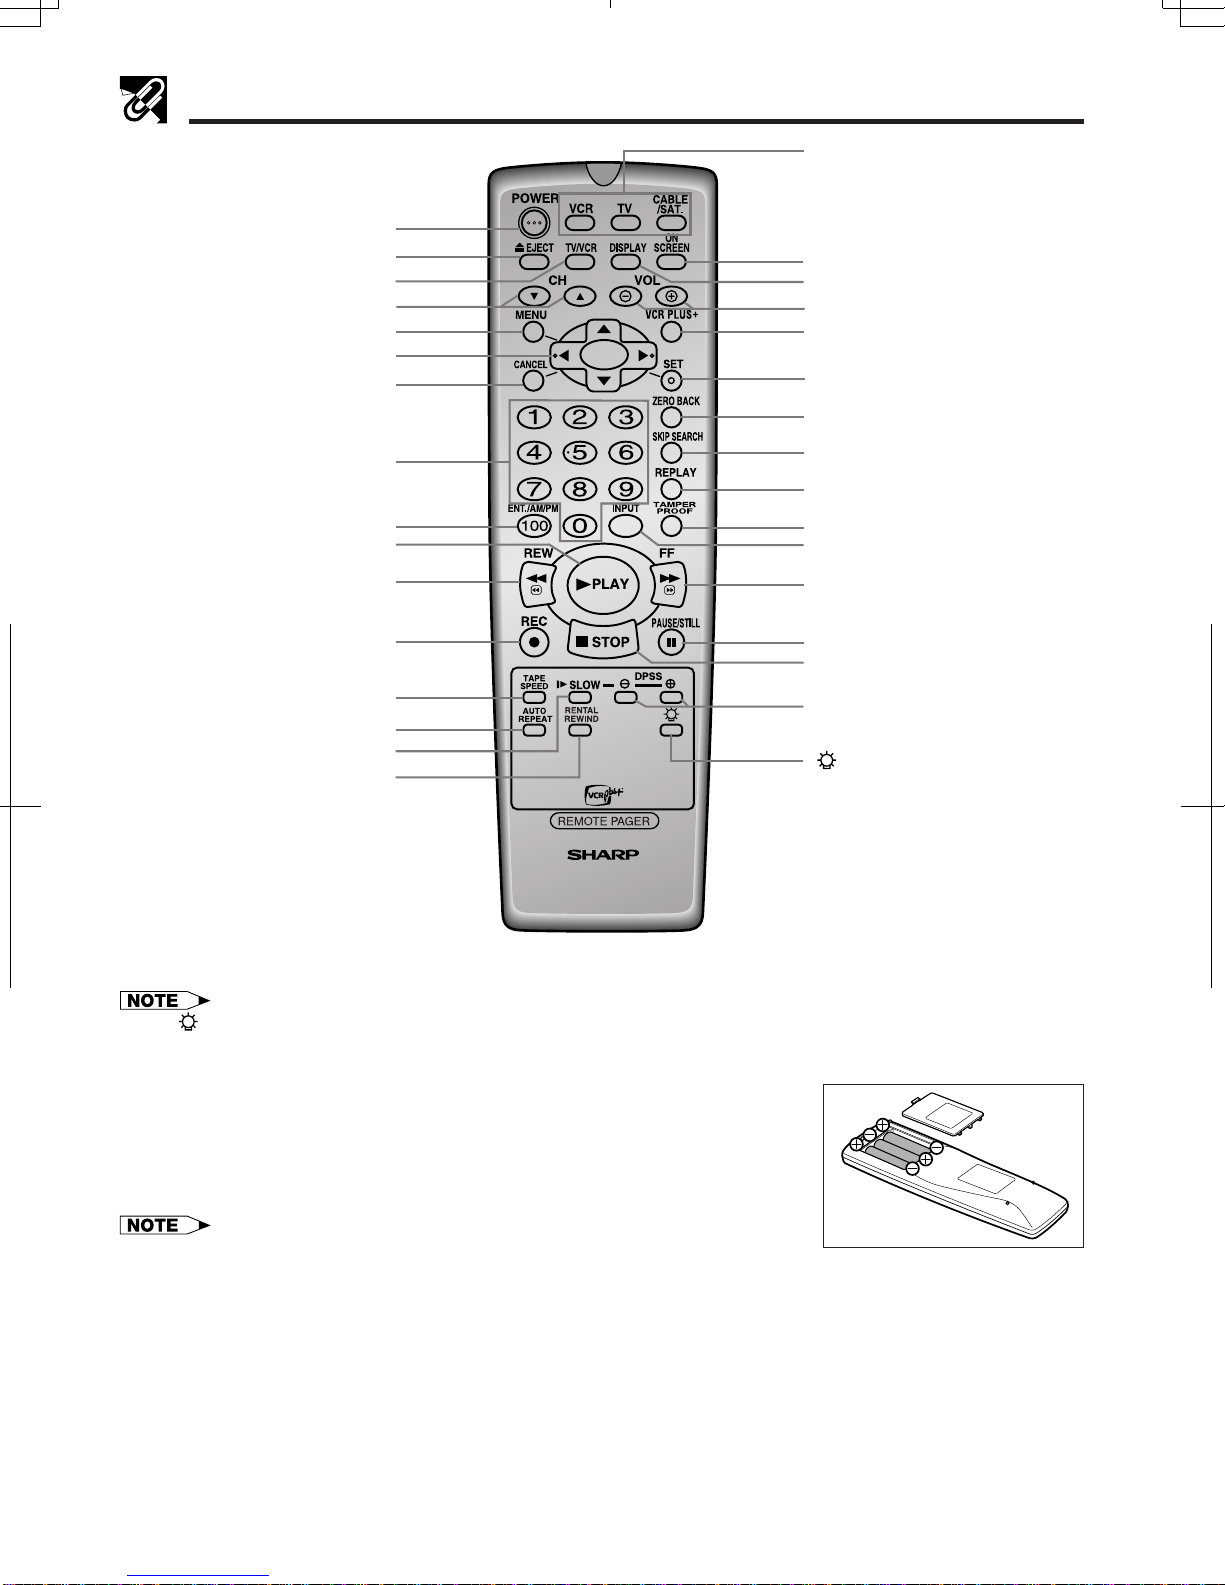
Remote Control ..................................................... 8
•Inserting the Batteries
Using the Universal Remote Control................... 9
•How to set the Universal Remote Control code
•How to operate the VCR, TV, Cable Box or
Digital Satellite Receiver
Recording a TV Program ...................................... 26
•Without a Cable Box or Digital Satellite
Receiver
•With a Cable Box or Digital Satellite Receiver
•To Watch Another TV Program While
Recording
•Cassette Erase Protection
•Recording Speeds
•Recording Hi-Fi Stereo Sound
•Recording MTS (Multi-channel TV Sound)
Broadcasts
•Monitor Output When Receiving a SAP
Broadcast
•Tape Dubbing Connection Instructions
Simple Recording Timer....................................... 29
•Changing the Contents of the Simple
Recording Timer
•Cancelling the Simple Recording Timer
Timer Recording with VCR Plus+ System .......... 30
Timer Recording
(without VCR Plus+ System)................................ 32
•Confirming Timer Programs
•Cancelling Timer Programs
Recording
Connecting the VCR ............................................. 10
•RF Connection
•AV Connection
•After the Connection
•Setting the 3 ↔4 Output Channel Selector
Cable TV Connections .......................................... 11
Menu Screen.......................................................... 15
OSD (On Screen Display) ..................................... 15
•How to Display Indicators
EZ Set Up (With Auto Clock Setting)................... 16
Setting the Language............................................ 17
Setting the Clock................................................... 17
•Auto Clock Setting
•Manual Clock Setting
•Automatic Daylight Saving-Time (D.S.T.)
Adjustment
Setting the Channels ............................................ 20
•Adding Channel Memory/Erasing Channel
Memory
Mode Selection...................................................... 22
Setting up
Playback................................................................. 23
•Inserting a Video Cassette
•Playback
•Fast Forward and Rewind
•Video Search
•Slow Motion Playback (only with the remote
control)
•Still Picture and Frame Advance
•Automatic Tracking Control System
•Manual Tracking Control
•Blue Screen Noise Elimination
•Quick Start with Full Loading Mechanism
•Full Automatic Playback
•Automatic Head Cleaning System
•Audio Output Mode
Basic Operations
Special Functions
Helpful Hints
Remote Pager ........................................................ 35
Sharp Super Picture.............................................. 35
Exact Rec ............................................................... 35
Tape Remaining .................................................... 36
Recorded Section Auto Repeat ........................... 36
Auto Zero Back...................................................... 36
DPSS (Digital Program Search System) ............. 37
Skip Search............................................................ 37
Instant Replay........................................................ 37
One-Touch Rental Rewind ................................... 38
Tamper Proof......................................................... 38
Specifications........................................................ 39
Troubleshooting.................................................... 40
Service Information (For the U.S.) ....................... 40
Quick Operation Guide for Spanish/
Guía de operación rápida en español.............. 41
CONSUMER LIMITED WARRANTY...................... 44

Printelligence (Malaysia) Sdn. Bhd.
6
VC-H818U (01-10)
Dimensions: 257 2182 mm
Features
Common Features
• Hi-Fi Stereo Sound
• Built-in MTS (Multi-channel TV Sound) Decoder
— Lets you record stereo or SAP (Separate Audio
Program) broadcasts.
•*The VCR Plus+ Programming System
• 400 Times Rewind Speed to Fast Forward and
Rewind.
• EZ Set Up — VCR tuner channels and clock are
automatically set for both Air and Cable channels.
• S-VHS Quasi Playback
Notes for S-VHS tape
• Playing back with S-VHS high quality picture is not
available.
• Picture noise or distortion may appear on the screen
during playback in the SLOW or STILL mode.
• S-VHS recording is not available.
• Double-Azimuth 4-Heads
•19
µ
Clear Picture System (in EP mode) — For
enhanced picture quality in EP (Extended Play)
mode.
•System for Better Resolution and Color Re-
production
• Multi-Language (English/Spanish/French) OSD
(On Screen Display) with Menu Screen Guidance
— On-screen setting and recording instructions.
• 181-channel PLL Quartz Synthesized Random
Access Tuner with Automatic Channel Setting
• Quick Start with Full Loading Mechanism
• 1-Year, 8-Event Programmable Timer
• Simple Recording Timer
• Universal Remote Control
— Operates the VCR and basic functions of various
TVs, Cable Boxes, and some Digital Satellite Re-
ceivers.
• Sharp Super Picture — Enhances picture quality
during playback.
• 60 seconds Timer Backup
• Field-Still/Variable Slow/Frame Advance
• Real-Time Counter — Displays accurate tape time
in hours, minutes and seconds.
• Automatic Daylight Saving-Time (D.S.T.) Ad-
justment — Automatically adjusts VCR clock to
daylight saving-time.
Be sure that the
following
accessories are
all included with
your VCR.
Accessories
Round coaxial cable
(75 Ohm, 1 m [3-1/4 ft.])
QCNW-0262AJZZ
or
QCNW-0298AJZZ
or
QCNW-0322AJZZ
or
QCNW-8115AJZZ
• Blue Screen Noise Elimination
• Auto Tracking Control System — Automatically
adjusts tracking during playback.
• Digital Program Search System (DPSS) — Quickly
locates the beginning of a specific recording.
• Skip Search — Quickly operates a forward video
search in 30 second intervals, then resumes play-
back.
• Instant Replay — Quickly operates a reverse video
search in 20 second intervals, then resumes
playback.
• Exact Rec — Automatically change from SP
(Standard Play) mode to EP (Extended Play) mode
to prevent termination of recording.
• Tape Remaining — Display the remaining amount
of tape.
• One-Touch Rental Rewind — Perform stop,
rewind, eject the tape then turn off the power
automatically.
• Auto Zero Back — Quickly finds “0:00.00” point
and stops there.
• Recorded Section Auto Repeat — Continually
plays back a recorded section of the tape.
• Full Automatic Playback
• Tamper Proof — Prevents accidental change of the
operation mode.
• Up to 8 Hours of Recording and Playback (with
T-160 cassette)
• Automatic Head Cleaning System — Cleans the
VCR video heads each time you insert and eject a
tape.
• Built-in Front AV Jacks — For easy connection of
audio/video equipment such as the Sharp Viewcam.
• Universal Remote Control with light up buttons
— Equipped with the light up buttons for easy
operation in the dark
— Remote Pager function
* VCR Plus+®and PlusCode®are registered
trademarks of Gemstar Development Corporation.
The VCR Plus+®system is manufactured under
license from Gemstar Development Corporation.
AA batteries for
the remote control unit
VIDEO CASSETTE RECORDER
Remote control unit
RRMCG1240AJSA

7
Dimensions: 257 2182 mm
Printelligence (Malaysia) Sdn. Bhd.VC-H818U (01-10)
POWER button
(When pressed to turn on the VCR, some indicators
on the Multi-Function display light up, and the Multi-
Function display brightens. When the power is turned off,
the Multi-Function display dims.)
Major Components ofYour VCR
[Front]
Multi-Function Display (explained throughout the operation instructions)
Cassette compartment (see Playback/Recording)
Basic function controls
(see Playback/Recording)
TIMER
REC
VCR
SPEP
Display Symbol Function Status
Stop
Play
Fast forward
Rewind
Cassette-in
Video Search, Slow,
Still, Frame Advance
Tamper Proof
Active Unit in
VCR mode
Record
VCR
Display Symbol Function Status
REC
REC
Rec Pause
• The display will return to the original mode (counter or clock display) 3 seconds after the
VCR enters the operation mode.
[Rear]
3 ↔4 OUTPUT CHANNEL selector
(see Setting the 3 ↔4 Output Channel Selector)
Connection terminals (see Tape Dubbing)
Connection terminals (see Connecting the VCR and
Cable TV Connections)
• Tape counter is displayed during playback, fast forward or rewind operation.
• When the power is turned off, the clock is displayed and the Multi-Function display becomes darker.
!Channel setting @Tape counter #Clock
When the power is on, each time DISPLAY is pressed,
the Multi-Function display changes as follows:

Printelligence (Malaysia) Sdn. Bhd.
8
VC-H818U (01-10)
Dimensions: 257 2182 mm
VIDEO CASSETTE RECORDER
Remote Control
MENU button (p. 15)
Remote Control Mode Select
buttons (VCR, TV, CABLE/SAT.)
• USED TO SELECT THE
COMPONENT (VCR, TV, CABLE
BOX/SAT.) TO BE OPERATED.
DISPLAY button (p. 7)
ON SCREEN button (p. 15)
SET button (p. 17)
VOL (VOLUME) j/kbuttons
VCR Plus+ button (p. 30)
ZERO BACK button (p. 36)
SKIP SEARCH button (p. 37)
REPLAY button (p. 37)
PAUSE/STILL button (p. 24)
TAMPER PROOF button (p. 38)
*STOP button (p. 23)
*FF button (p. 24)
POWER button (p. 17)
EJECT button (p. 23)
TV/VCR button (p. 17)
CH (CHANNEL) ∂/ƒbuttons (p. 29)
∂/ƒ/ß/©button (p. 17)
*REW button (p. 24)
REC button (p. 26)
TAPE SPEED button (p. 26)
*Numbered buttons (p. 19)
*PLAY button (p. 23)
j/kbuttons
(SLOW j/k, DPSS j/k) (p. 37)
*100, ENT. /AM/PM button (p. 19)
AUTO REPEAT button (p. 36)
CANCEL button (p. 30)
INPUT button (p. 28)
SLOW button (p. 24)
Inserting the Batteries
Make sure that the batteries have been properly installed first. Fit three
batteries type “AA”. If the remote control stops working, fit new batteries.
Ensure the batteries are fitted correctly, matching the polarities (j/k) indicated
in the remote control.
• After changing the batteries in the remote control, the code settings for the TV,
cable box and Digital Satellite Receiver must be re-entered.
• The operating life of the batteries will shorten if the Light Up function is frequently used.
• The operating life of the batteries will shorten if the Remote Pager function is frequently used.
• Do not subject the remote control to shock, water or excessive humidity.
• The remote control may not function if the VCR sensor is in direct sunlight or any other strong light.
• Incorrect use of batteries may cause them to leak or burst. Read the battery warnings and use the batteries properly.
• Do not mix old and new batteries, or mix brands in use.
• Remove the batteries if the remote control will not be operated for an extended period of time.
• If the remote control does not function properly when new batteries are installed, remove the batteries and keep pressing
any button for 10 seconds before re-installing them.
RENTAL REWIND button (p. 38) button
• Press the button to illuminate
the light up buttons (indicated
with the *mark) for 10
seconds
• If the button is pressed while the light up buttons are illuminated, they will remain illuminated for an additional 10
seconds.

9
Dimensions: 257 2182 mm
Printelligence (Malaysia) Sdn. Bhd.VC-H818U (01-10)
Using the Universal Remote Control
How to set the Universal Remote Control code
The Universal Remote Control may operate the basic functions of 20 different types of TVs, 18 different types of
Cable Boxes and 2 different types of Digital Satellite Receivers.
To enter the Universal Remote Control code for your TV, Cable Box or Digital Satellite Receiver, follow the in-
structions below.
For Cable Box or Digital Satellite Receiver Setting
Setting the Manufacturer’s Code Directly
!Press CABLE/SAT. and CH ∂on the remote
control simultaneously.
@Enter the 2-digit manufacturer’s code with the
numbered buttons (Ex. 02 4“0”, “2”) on the
remote control within 10 seconds after releasing
CABLE/SAT. and CH ∂.
#Point the remote control towards the device.
Press CABLE/SAT. and release. Press POWER.
If the device turns on/off, setup was successful.
If not, repeat the procedure using another code.
• Refer to the code list for the buttons which work with each
brand.
• SAT. stands for Digital Satellite Receiver.
There is no guarantee that the universal remote control will func-
tion with yourTV, cable box or digital satellite receiver.
For TV Setting
Setting the Manufacturer’s Code Directly
!Press TV and CH ∂on the remote control
simultaneously.
@Enter the 2-digit manufacturer’s code with the
numbered buttons (Ex. 02 4“0”, “2”) on the
remote control within 10 seconds after releasing
TV and CH ∂.
#Point the remote control towards the TV. Press TV
and release. Press POWER. If the TV turns on/off,
setup was successful. If not, repeat the
procedure using another code.
• Refer to the code list for the buttons which work with each
brand.
How to operate the VCR, TV, Cable Box or Digital Satellite Receiver
To operate the VCR, TV, Cable Box or Digital Satellite Receiver, first press VCR,TV or CABLE/SAT. to switch to
the desired mode, then press the button for the feature you wish to use.
• If the batteries in the remote control are changed, the code settings must be re-entered.
• Some brands have more than one remote code listed, due to changes in the remote codes. In such cases, try more than
one code to find the code that operates your TV, Cable Box or Digital Satellite Receiver.
EMERSON
FISHER
FUNAI
GE
GOLDSTAR
HITACHI
JVC
MAGNAVOX
MITSUBISHI
PANASONIC
RCA
SAMSUNG
SANYO
SHARP
SONY
TOSHIBA
ZENITH
18
16
05
06, 08
17
14
15
08
10
13
12, 20
06, 08
19
16
01
02
09
11
04
07
–
100
100
100
–
100
100
100
–
–
–
100
–
100
100
–
100/ENT.
100
ENT.
100/ENT.
X
X
X
X
X
X
X
X
X
X
X
X
X
X
X
X
X
TECHNOL ACE 03 –
X
X
X
–
–
X
X
–
X
X
X
–
X
X
X
X
X
X
X
–
XX
X
X
X
01, 04, 05, 06, 07
02, 03, 08
16
13
14
18
15
13
14
19
17
09, 10, 11
20
12
ENT.
–
ENT.
–
ENT.
–
ENT.
–
ENT.
–
–
–
ENT.
ENT.
X
X
X
X
X
X
X
X
X
X
X
X
X
X
JERROLD
OAK
PANASONIC
PHILIPS
PIONEER
RCA
*RCA (SAT.)
REGAL
SCIENTIFIC ATLANTA
SONY (SAT.)
ZENITH
* Only for RCA (SAT.)
POWER ON–CABLE/SAT. button
POWER OFF–POWER button

Printelligence (Malaysia) Sdn. Bhd.
10
VC-H818U (01-10)
Dimensions: 257 2182 mm
Connecting theVCR
The connection method differs depending on the type of TV.
If you have cable TV (CATV), see Cable TV Connections.
RF Connection (for connection to aTV without AV terminals)
!Disconnect the TV antenna from the TV.
@Connect the TV antenna cable to the ANTENNA IN terminal on the rear of the VCR.
#Connect the TV OUT terminal on the rear of the VCR with the antenna terminal on the TV using a coaxial
cable. Select the TV channel 3 or 4 corresponding to the 3 ↔4 output channel selector of the VCR. (See
Setting the 3 ↔4 Output Channel Selector below.)
AV Connection (for connection to aTV with AV terminals)
!Disconnect the TV antenna from the TV.
@Connect the antenna, VCR, and TV using the Audio/Video cable and coaxial cable (supplied) as shown.
#Select the video input mode or A/V input mode on your TV. (See the TV operation manual for details.)
•If your VCR is a monaural model, connect the audio cable to “AUDIO OUT” on the VCR.
Coaxial cable
Antenna
ANTENNA IN
(antenna or
cable input)
TV OUT
Coaxial cable (supplied)
Audio/Video
cable (not
supplied)
VCR Rear
TV
Setting the 3 ↔4 Output Channel Selector
The 3 ↔4 OUTPUT CHANNEL selector changes the VCR OUTPUT to standard
TV broadcasting signals. Both your TV and VCR must be set to the same
channel (i.e. TV on channel 3 and VCR OUTPUT CHANNEL selector on 3).
Your VCR is set to channel 3 at the factory, so your TV should be tuned to
channel 3 as well. If channel 3 is an active broadcast channel in your area, set
the VCR 3 ↔4 OUTPUT CHANNEL selector to 4 and tune your TV to channel 4.
After the Connection
Plug in the power cord of the TV. Then go to EZ Set Up.
3 ↔4 OUTPUT CHANNEL
selector
Rear of Your VCR
Connect the flat twin lead cable
to a transformer
(300 ohm to 75 ohm, not
supplied)

11
Dimensions: 257 2182 mm
Printelligence (Malaysia) Sdn. Bhd.VC-H818U (11-20)
CableTV Connections
Your VCR is capable of receiving the following non-scrambled channels.
•Scrambled channels can be received with the cable box supplied by your cable TV company.
Set the 3 ↔4 OUTPUT CHANNEL selector on the rear of the VCR to 3 or 4. (Factory preset: 3)
First check yourTV/CATV system
Step QIs your TV cable compatible with the VCR?
•YES →Go to Step W
•NO →Go to Step E
Step WDoes your CATV system have some or all channels scrambled?
•YES →Go to
•NO →Go to
Step EDoes your CATV system have some or all channels scrambled?
•YES →Go to
•NO →Go to Step R
Step RChoose the type below.
•Basic connection (only for
descrambled CATV signals.) →Go to -or
•To watch a CATV program while recording a TV program
by using the A/B switch. →Go to
Connection without a cable box
•Connect as shown. Then go to “After the Connection”.
Coaxial
cable
(Supplied)
ANT/CABLE
VCR Rear
TV Rear
From CATV system
Setting Up

Printelligence (Malaysia) Sdn. Bhd.
12
VC-H818U (11-20)
Dimensions: 257 2182 mm
Cable TV Connections
Connection with cable box
•Connect as shown. With this connection, it is possible to record descrambled CATV signals. Then go to “After
the Connection”.
ANT/CABLE
VCR Rear
From CATV system TV Rear
OUTIN
Cable Box
• If the cable box is turned off, it will not output any signals, thus making it impossible to record or view a program from the
CATV system.
• In the case of the above connections, it is not possible to change channels using the VCR remote control. Only the cable
box can be used to change channels.
• Only one channel at a time can be programmed for recording programs with the timer. It is not possible to watch a TV
program different from the one being recorded.
• Depending on which terminals the TV has, a separate combiner (mixer) or separator (splitter) may be necessary.
•Connect as shown. With this connection, it is not possible to record CATV programs which have been
scrambled, but is possible to record one channel and watch the other one. Then go to “After the
Connection”.
Coaxial cable
(Not supplied)
Coaxial cable
(Supplied)
Coaxial
cable
(Supplied)
• With the above connection, ∂/ƒof the VCR or the numbered buttons on the remote control can be used to select channels.
• Depending on which terminals the TV has, a combiner (mixer) or separator (splitter) may be necessary.
• To record one channel and watch another, the VCR must be set to the TV mode.
ANT/CABLE
VCR Rear
Cable Box
TV Rear
OUTIN
From
CATV
system
Coaxial cable
(Not supplied)

13
Dimensions: 257 2182 mm
Printelligence (Malaysia) Sdn. Bhd.VC-H818U (11-20)
ANT/CABLE
VCR Rear
From
CATV
system
A
B
OUTIN
Cable Box
Cable TV Connections
Connection with cable box, A/B switch and splitter
By using an A/B switch or splitter, it is possible to switch between the cable box and the VCR output.
For example, while recording a TV program with the VCR, it is possible to watch a CATV program (including
descrambled programs) using the A/B switch.
•Connect as shown. Then go to “After the Connection”.
Splitter
(Not supplied)
Coaxial cable
(Not supplied)
Coaxial cable
(Supplied)
TV Rear
Using the A/B Switch
1. Set the A/B switch to the “A” position in the following situations.
!To watch a cable TV program while recording another program.
@To watch a scrambled cable TV program.
#To watch a cable TV program when the VCR is turned off.
• Use the cable box to change channels.
• If you turn off the cable box, you cannot watch a CATV program.
2. Set the A/B switch to the “B” position in the following situations.
!To play back a cassette on the VCR.
@To watch a program which is being recorded with the VCR tuner.
#To watch a program using the VCR tuner.
A/B switch
(Not supplied)
Coaxial cable
(Not supplied)

Printelligence (Malaysia) Sdn. Bhd.
14
VC-H818U (11-20)
Dimensions: 257 2182 mm
VCR Rear
OUTIN
Cable Box 2
ANT/CABLE
From
CATV
system
A
B
OUTIN
Cable Box 1
Cable TV Connections
Connection with two cable boxes, A/B switch and splitter
The following connection is necessary to record a cable TV program (even those scrambled by a cable
company) while watching another cable TV program. The following connection requires two cable boxes, a 2-
way splitter and an A/B switch.
•Connect as shown. Then go to “After the Connection”.
Splitter
(Not supplied)
Coaxial cable
(Not supplied)
A/B switch
(Not supplied)
Coaxial cable
(Not supplied)
Coaxial cable
(Supplied)
TV Rear
Using the A/B Switch
1. Set the A/B switch to the “A” position in the following situations.
!To watch a cable TV program while recording another program.
@To watch a cable TV program when the VCR is turned off.
2. Set the A/B switch to the “B” position in the following situations.
!To play back a cassette on the VCR.
@To watch a program being recorded, or to change (or watch) channels with the cable box 2. The output
channel of the cable box 2 and the VCR must be the same.
• If you turn off the cable box, you cannot record or view a CATV program.
• If you have questions regarding any connection procedure, please contact your cable company or the nearest Sharp
Authorized Service.
After the Connection
Plug in the power cords of the TV and cable box.
Then go to EZ Set Up.

15
Dimensions: 257 2182 mm
Printelligence (Malaysia) Sdn. Bhd.VC-H818U (11-20)
• If the clock is not set, the time and date will not be displayed.
How to Display Indicators
Each time ON SCREEN is pressed, the screen changes as follows:
AUTO Display
When an operation button, numbered button, or CH ∂/ƒis pressed, the current function status or the number
of the channel will be displayed in the upper section of the TV screen for about 3 seconds.
• When the VCR power is turned off, the display mode is retained in memory.
• When you record a video signal output from this VCR on another VCR, press ON SCREEN to select Display Off. (If the
function status is displayed on the screen, it is also recorded on the tape.)
MENU screen is a home screen used to select various screen functions. A sub-
menu will appear once you select an item for the menu.
!Turn on the TV and select the video channel. (See Setting the 3 ↔4
Output Channel Selector on page 10.)
@Press POWER, and then TV/VCR to select “VCR” (“VCR” will light on the
multi-function display).
#Press MENU to display the MENU screen.
The following 6 items can be set by using the MENU screen.
VCR PLUS+...................... Setting a timer recording using VCR PLUS+ programming system. (see page 30)
TIMER............................... Setting a timer recording (and checking it). (See page 32.)
SET UP ............................. VCR operating conditions are set according to the broadcast reception and tape
playback conditions. (See page 22.)
CHANNEL PRESET .......... Setting the channels. (See page␣ 20.)
CLOCK ............................. Setting the present time. (See pages 17–19.)
LANGUAGE ..................... Selection of language to be used for the MENU screen. (See page 17.)
$Press ∂/ƒand then SET. The screen changes to the one which you have selected.
%To cancel the MENU screen, press MENU.
Menu Screen
To facilitate the operation and check the current VCR mode information, the following OSD (On Screen Display)
will appear on the TV screen when using this VCR.
OSD (On Screen Display)
Program channel position
Real time counter
Tape speed
Clock display
Calendar display
Simple Recording Timer
Display example
Sharp Super Picture
Tape remaining or DPSS
Audio Output mode
Stereo/SAP mode
- - - - - - - Function status
PLAY
FF
REW
STOP
REC
PAUSE
Play
Fast
forward
Rewind
Stop
Rec
Rec
pause
Recorded Section
Auto Repeat
PLAY
REC 09
(When you press
REC while you are
receiving CH 9.)
(When you press
PLAY)
!AUTO Display @FULL Display #COUNTER Display $Display off
SET UP
MENU
ENTER :SET EXIT :MENU
CHANNEL PRESET
SELECT :
CLOCK
LANGUAGE
TIMER
VCR PLUS+
STOP 123
S. PICTURE ON STEREO
10:00AM -1:59.59
SP STOP 11:30AM SAPSAP
L R
TUE 4/25 REM. 1:00
DPSS

Printelligence (Malaysia) Sdn. Bhd.
16
VC-H818U (11-20)
Dimensions: 257 2182 mm
EZ Set Up (With Auto Clock Setting)
The EZ Set Up function automatically sets the tuner channels and clock when the antenna cable is connected to
the rear of the VCR and the power plug is then connected to an AC outlet.
IMPORTANT:
When using a cable box:
• See Cable TV Connections.
• Leave POWER on the cable box turned on and select a channel that carries EDS signals.
IMPORTANT (Caution during EZ Set Up):
•Do not press the POWER button on the
VCR or remote control.
• Do not insert a video cassette into the VCR.
During Auto Channel Setting
EZ Set Up complete
!Make sure that the antenna cable is connected. For
connection configuration, refer to Connecting the
VCR.
@Connect the VCR power plug to an AC outlet.
#The tuner channels and clock will automatically be
set.
•This VCR can monitor and use time-signals (EDS
signals), which are provided by some TV stations, to
automatically adjust the VCR clock. This VCR
automatically searches EDS signals, but if you are in
a hurry to use timer recording or know the channel
of the EDS signal carrier in your area, follow the
procedure in Auto Clock Setting or Manual Clock
Setting.
• If power is supplied to the VCR before the cable is connected, EZ Set Up will not be able to preset the channels into
memory. If this occurs unplug the VCR from the power source and wait a few minutes. Check the cable/antenna connection
and supply power to the VCR. EZ Set Up will automatically begin again.
• If the power is turned on during EZ Set Up, the Auto Channel setting will be interrupted and the tuner channels will not be
able to be preset.
• Auto Clock Setting may take several minutes.
• If the Auto Clock Setting is not completed within 30 minutes, there may be no channels with EDS signals. In this case, set the
clock manually. (See Manual Clock Setting.)
• If the antenna signal is weak, the Auto Clock Setting function may not operate.
• During initial channel setting, the channels are set into the AIR channel setting. To watch a cable TV channel, select “CATV”
on the CHANNEL PRESET screen. (See Setting the Channels.)
During Auto Clock Setting
f
f

17
Dimensions: 257 2182 mm
Printelligence (Malaysia) Sdn. Bhd.VC-H818U (11-20)
Setting the Language
When you use the VCR for the first time or the power is
interrupted for more than 60 seconds (power failure, etc.),
you should set the language to be used for the MENU
screen.
•Turn on your TV and select the video channel.
(See Setting the 3 ↔4 Output Channel Selector.)
•Press POWER and then TV/VCR to select “VCR”.
(“VCR” will light on the multi-function display.)
g
!Press MENU.
LANGUAGE screen will appear.
@Select the language with ∂/ƒ.
Ex.: ENGLISH
#Press SET to enter. The screen returns to normal.
ESPANOL
LANGUAGE
ENTER :SET EXIT :MENU
FRANÇAIS
SELECT :
ENGLISH ∂
ƒ
Normal
Screen
g
Setting the Clock
Auto Clock Setting (If you DO know a channel that carries EDS signals)
•Make sure that the antenna cable is connected and connect the power cord.
•Turn on your TV and select the video channel. (See Setting the 3 ↔ 4 Output Channel Selector.)
•Press POWER and then TV/VCR to select “VCR”. (“VCR” will light on the multi-function display.)
IMPORTANT:
When using a cable box:
• See Cable TV Connections.
• Leave POWER on the cable box turned on and select a channel that carries EDS signals.
!Press MENU.
Select “CLOCK” with ∂/ƒand then press SET.
@Select “AUTO” with ∂/ƒand then press SET.
#Set EDS CH SET mode to “MANUAL” with ß/©and
then press ƒ.
MANUAL
CLOCK
AUTO
∂
ƒ
EDS CH SET AUTO MANUAL
EDS CH 02AL
ß
©g
g
ƒ
ƒ
∂
MENU
©
ß
SET
• If you press MENU to exit the LANGUAGE screen in Step #, the data will not be stored.
• You can also use the ∂(CHANNEL ∂), ƒ (CHANNEL ƒ), © (FF è), ß (REW È), MENU or SET buttons on the VCR to
set the On Screen Display (OSD).
(Remote Control)
g
∂
ƒ
g
SET UP
MENU
ENTER :SET EXIT :MENU
CHANNEL PRESET
SELECT :
CLOCK
LANGUAGE
TIMER
VCR PLUS+

Printelligence (Malaysia) Sdn. Bhd.
18
VC-H818U (11-20)
Dimensions: 257 2182 mm
Setting the Clock
$Select a channel that carries EDS signals with ß/©.
Ex.: 07
•The number of channels that can be selected depends
on the mode setting on the CHANNEL PRESET screen.
See NOTE.
When using a cable box:
Input the output channel (02, 03 or 04) of the cable box.
%Press SET to enter. The screen returns to normal.
Press POWER to turn off the VCR.
The Auto Clock Setting function will automatically set the
clock.
Normal
Screen
gg
• If the EDS CH SET mode is set to MANUAL mode in Step #and a channel that does not carry EDS signal is selected in
Step $, the Auto Clock Setting function will not operate.
• In Step $, the number of channels that can be selected depends on the mode setting on the CHANNEL PRESET screen.
See the table below.
• In Step !, if you press MENU when operating the screen setting for the first time or after a power failure of more than 60
seconds, the LANGUAGE screen will appear.
• If you entered incorrect data during the setting procedure, re-enter the correct data in the following manner:
1Use ß/©to select the data to be corrected.
2Set the correct data with ∂/ƒ.
3After correcting the data in Step 2, press SET to enter.
• If you press MENU in Step %, the data will not be stored.
• If a button is not pressed within 3 minutes during the setting procedure, the screen will return to the normal screen.
Manual Clock Setting
•Turn on your TV and select the video channel. (See Setting the 3 ↔4 Output Channel Selector.)
•Press POWER and then TV/VCR to select “VCR”. (“VCR” will light on the multi-function display.)
EDS CH SET AUTO MANUAL
EDS CH 07
ß
©
!Press MENU.
Select “CLOCK” with ∂/ƒand then press SET.
@Select “MANUAL” with ∂/ƒand then press SET.
∂
ƒ
g
SET UP
MENU
ENTER :SET EXIT :MENU
CHANNEL PRESET
SELECT :
CLOCK
LANGUAGE
TIMER
VCR PLUS+
g
∂
ƒg
SELECT :
MANUAL
CLOCK
ENTER :SET EXIT :MENU
AUTO
AIR/CATV Channels to be selected
AIR
CATV 02 03 04 68 69 02
01 02 03 124 125 01

19
Dimensions: 257 2182 mm
Printelligence (Malaysia) Sdn. Bhd.VC-H818U (11-20)
Setting the Clock
Automatic Daylight Saving-Time (D.S.T.) Adjustment
This VCR is equipped with an internal Automatic Daylight Saving-Time Adjustment function. In spring (first
Sunday in April) and autumn (last Sunday in October), the time is adjusted as shown below. This function has
been preset to ON at the factory. Set the D.S.T. mode in the clock setting screen.
Spring
Programmed timer recording set within this time frame (2:00
AM to 3:00 AM) will not be carried out.
First Sunday in April (D.S.T. is ON)
Autumn
Because there will be two time frames from 1:00 AM to 2:00
AM, timer programming set between these times will be
influenced by the time change.
Last Sunday in October (D.S.T. is ON)
The clock is automatically
advanced 1 hour.
v
vv
v
3:00 AM
1:00 AM 2:00 AM
4:00 AM
The clock is automatically
set back 1 hour.
v
vv
v
2:00 AM
2:00 AM1:00 AM
1:00 AM
• If the timer recording program is affected by the D.S.T. time change, check your TV listing and find out when it reflects the
time change. Some TV listings will indicate the time change in the same manner as is programmed in this VCR, but others
do not show the time change until the next morning. In that case, when programming a timer, use the CLOCK screen to set
the D.S.T. mode to OFF so the time change will not be carried out.
• In Step !, if you press MENU when operating the screen setting for the first time or after the power is interrupted for more
than 60 seconds, the LANGUAGE screen will appear.
• If you entered incorrect data during the setting procedure, re-enter the correct data in the following manner:
1Use ß/©to select the data to be corrected.
2Set the correct data with ∂/ƒ.
3After correcting the data in Step 2, press SET to enter.
• If you press MENU to exit the CLOCK screen in Step %, the data will not be stored.
• If a button is not pressed within 3 minutes during the setting procedure, the screen will return to the normal screen.
%If the data is correct, press SET to enter.
The screen returns to normal.
Normal
Screen
g
SELECT : CHANGE:
10:28AM 7/04TUE 00 ON
CLOCK
ENTER :SET EXIT :MENU
TIME DATE YEAR DST ß/©
and
∂/ƒ
#Select “TIME” with ß/©and set time by holding ∂/ƒ.
Ex.: 10:28 AM
Numbered buttons can be used instead of ∂/ƒto set
time and date. Press ENT./AM/PM (100) to select AM or
PM during time setting.
$Select and set “DATE”, “YEAR” and “DST” in turn, in the
same manner as in Step #.
• See Automatic Daylight Saving-Time (D.S.T.) Adjust-
ment.
Ex.: Jul. 4, 2000, DST: ON

Printelligence (Malaysia) Sdn. Bhd.
20
VC-H818U (11-20)
Dimensions: 257 2182 mm
Your VCR can receive a maximum of 181 channels as shown below by presetting the channels into memory.
(VHF: 2 to 13, UHF: 14 to 69, CATV: 1 to 125)
•Make sure that the cable (antenna or CATV) is connected to the IN terminal on the rear of the VCR.
Setting the Channels
SET UP
MENU
ENTER :SET EXIT :MENU
CHANNEL PRESET
SELECT :
CLOCK
LANGUAGE
TIMER
VCR PLUS+
g
∂
ƒ
g
!Press MENU.
Select “CHANNEL PRESET” with ∂/ƒand then press
SET.
@Select “AIR” or “CATV” with ß/©and then press ƒ.
Ex.: AIR
• To watch cable TV after EZ Set Up, select “CATV”,
press SET.
#Set “CH SET” to “AUTO” with ß/©and then press SET.
$The auto tuning will start.
The channel display will count up, and when finished, the
screen returns to normal.
AIR/CATV AIR CATV
CHANNEL PRESET
CHANNEL PRESET
CH SET AUTO MANUAL
ß
©gƒ
g
AIR/CATV AIR CATV
CH SET AUTO MANUAL
ß
©
gNormal
Screen
AUTOMATIC TUNING.
02
PLEASE WAIT.
• Automatic tuning will not start unless the arrow is at “CH SET-AUTO” position.
• If a button is not pressed within 3 minutes during the setting procedure, the screen will return to normal.
• If the power is interrupted for more than 60 seconds, AIR / CATV selection must be set again.
• Automatic tuning will be interrupted if PLAY, REC, MENU or DPSS j/kbuttons are pressed before the screen returns to
normal.
Table of contents
Other Sharp VCR System manuals

Sharp
Sharp VC-A598U User manual

Sharp
Sharp VC-6300G User manual

Sharp
Sharp VC-A410X User manual

Sharp
Sharp VC-M303HM User manual

Sharp
Sharp VC-H670X User manual

Sharp
Sharp VC-MH711GM User manual

Sharp
Sharp VC-H600X User manual

Sharp
Sharp VC-MH745SM User manual

Sharp
Sharp VC-A111S User manual

Sharp
Sharp VC-MH75HM User manual

Sharp
Sharp VC-V50S User manual

Sharp
Sharp VC-A400U User manual

Sharp
Sharp VC-GH60SM User manual

Sharp
Sharp VC-A240X User manual

Sharp
Sharp VC-H9888U User manual

Sharp
Sharp VC-A136X User manual

Sharp
Sharp VC-AA370 User manual

Sharp
Sharp VC-A250X User manual

Sharp
Sharp VC-M522HM User manual

Sharp
Sharp VC-GH611GM User manual