Shining 3D EinScan-SE User manual

Shining 3D EinScan SE/SP_User Manual_3.1.1
0
EinScan SE/SP
User Manual
V3.1.1

Shining 3D EinScan SE/SP_User Manual_3.1.1
1
Table of contents
1. Specification and System Requirements...................................................................................3
1.1. System Requirements ..............................................................................................................................3
1.2. Hardware Installation...............................................................................................................................4
2. Set Software ..............................................................................................................................7
2.1. Download the Software............................................................................................................................7
2.2. Install the Software ..................................................................................................................................7
2.3. Update the Software................................................................................................................................7
2.4. Activate the Scanner ................................................................................................................................8
2.5. Interface and Parameters.........................................................................................................................9
3. Calibrate the Scanner..............................................................................................................14
3.1. Precautions and Use...............................................................................................................................14
3.2. Operation ...............................................................................................................................................14
4. Before Scanning.......................................................................................................................19
4.1. Object.....................................................................................................................................................19
4.2. Preparation.............................................................................................................................................19
5. Scan .........................................................................................................................................21
5.1. Before Scanning......................................................................................................................................21
5.2. Turntable................................................................................................................................................23
5.3. Scan........................................................................................................................................................26
6. Project Group ..........................................................................................................................29
6.1. Create/Import Projects...........................................................................................................................29
6.2. Current Projects .....................................................................................................................................29
6.3. Rename a Project ...................................................................................................................................29
6.4. Remove/Delete ......................................................................................................................................30
6.5. Create/Split a Group...............................................................................................................................31
6.6. Edit Data.................................................................................................................................................31
6.7. Alignment...............................................................................................................................................32
7. Mesh........................................................................................................................................34
7.1. Create Mesh (Watertight/Unwatertight) ...............................................................................................34
7.2. Edit Mesh ...............................................................................................................................................35
7.3. Fill Holes .................................................................................................................................................36
7.4. Sharpen ..................................................................................................................................................37
7.5. Smooth...................................................................................................................................................37
7.6. Simplify...................................................................................................................................................38
7.7. Remap Texture.......................................................................................................................................38
8. Export Data..............................................................................................................................40
8.1. Data Formats..........................................................................................................................................40
8.2. Scale Data...............................................................................................................................................41
8.3. Measurement.........................................................................................................................................41

Shining 3D EinScan SE/SP_User Manual_3.1.1
2
9. Share Data ...............................................................................................................................48
10. Third-party Software ...........................................................................................................49
11. Preview Model.....................................................................................................................50
12. Others..................................................................................................................................51
12.1. FAQ.........................................................................................................................................................51
12.2. Safety Precautions..................................................................................................................................51
13. Support and Contact............................................................................................................52
13.1. Submit a Ticket.......................................................................................................................................52
13.2. Contact Us..............................................................................................................................................53

Shining 3D EinScan SE/SP_User Manual_3.1.1
3
1. Specification and System Requirements
1.1. Recommended System Configuration
Preparing a suitable computer will improve your scanning experience.
Handheld model
EinScan SE/SP
Recommended
Operating System
Win10,64bit
Graphics card
Integrated graphics & NVIDIA series
USB port
at least one USB2.0/3.0 port
(At least one USB 3.0 port when using discovery pack)
OS
win10 64bits
Video memory
> 4G
RAM
>32 GB
CPU
i7-8700 or higher
Screen resolution
1920*1080 DPI: 100%; 125%
3840*2106 DPI: 100%; 200%
RECOMMENDED PC MODEL (only for reference)
Dell G3 laptops, Core i7-9750H, NVIDIA GeForce RTX 2060 6GB GDDR6, 2x8GB, DDR4, 2666MHz
Asus ZenBook Flip, Core i7, Nvidia MX250 with 2Gb memory, solid state hard drive, 16gb ram
Lenovo Y520 15IKBM i7-7700hq, 16GB, gtx1060
Acer Predator PH317 i7, GTX1060, 16G RAM
MSI –GS63VR 7RF stealth pro RAM 32G
Alien ALW15M-R2726R
ASUS ROG STRIX
Shining 3D EinScan SE/SP_User Manual_3.1.1
4
1.2. Hardware Installation
Unpack and set up your scanner and software before getting started with scanning.
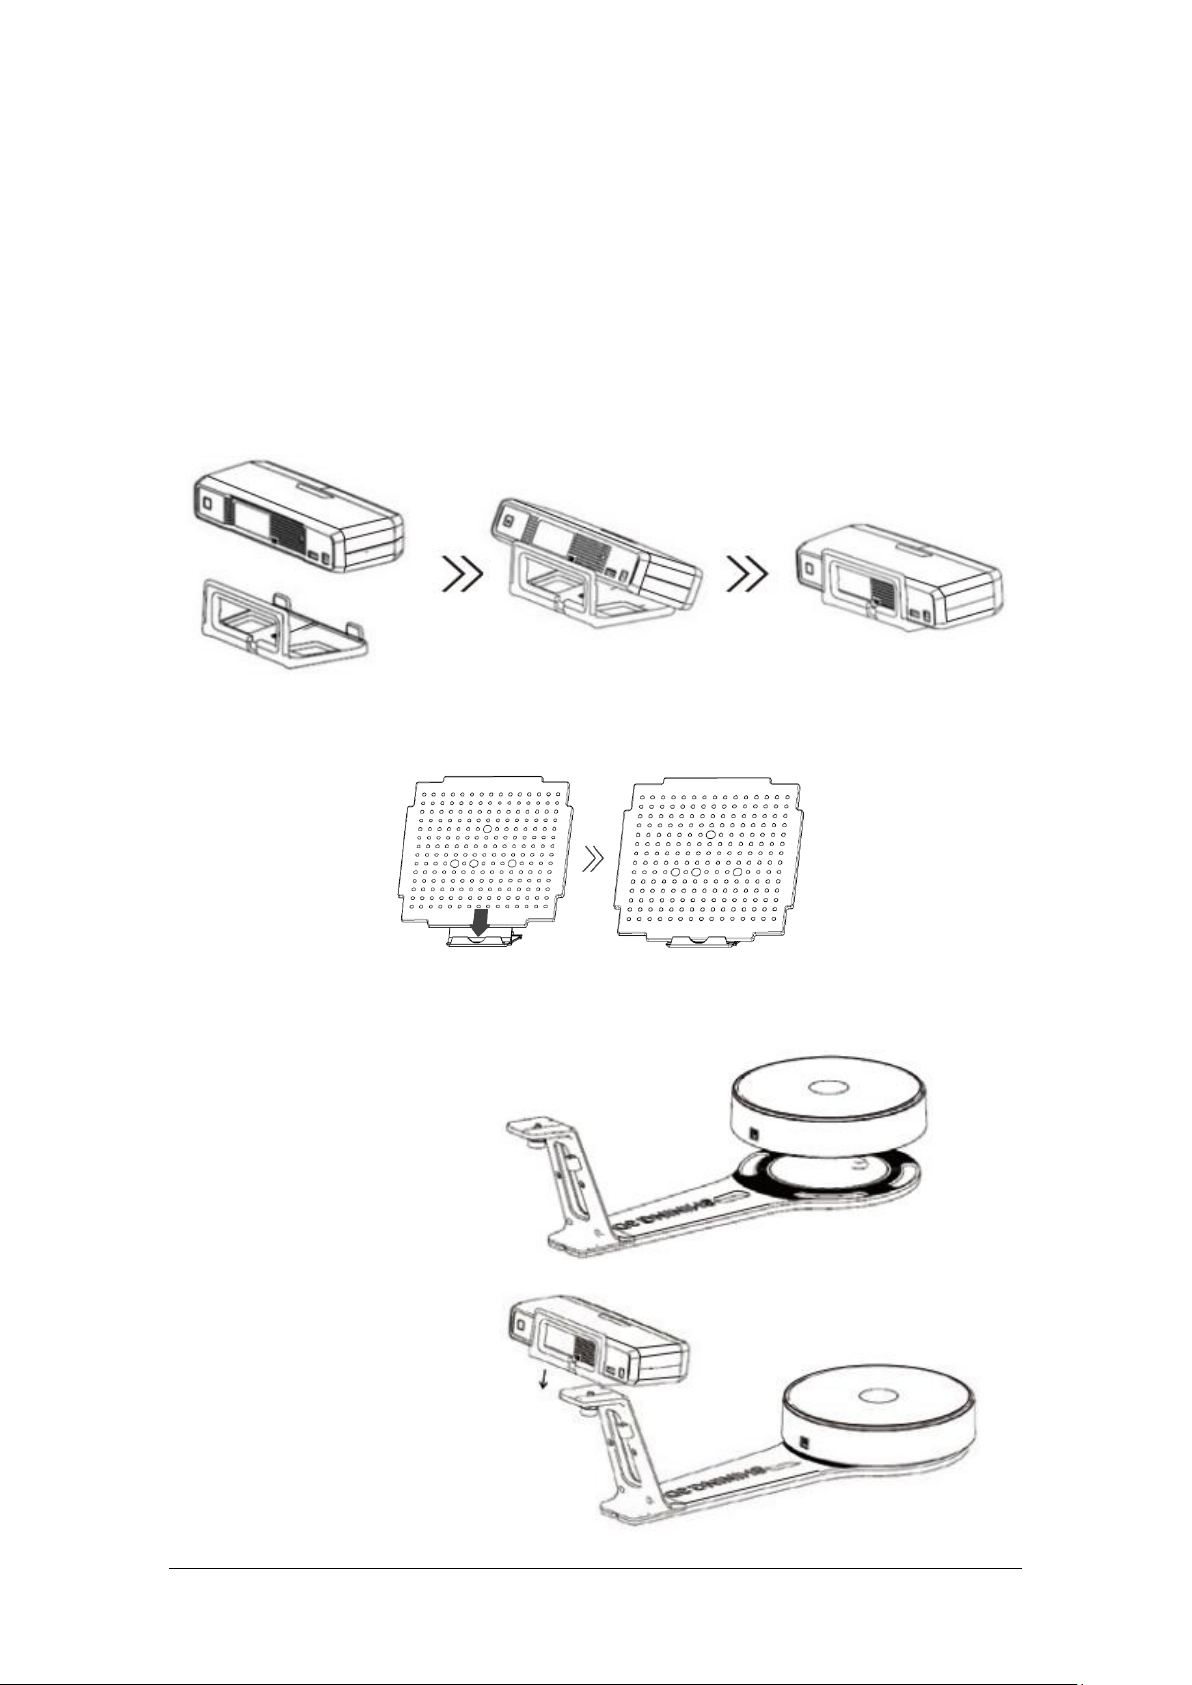
1.2.1. Set the Scanner
Step 1. Place the scanner head onto the bracket.
Step 2. Insert calibration board onto the board holder.
NOTE: Rotate the calibration board only while calibration.
Step 3-1. Turntable and Scanner installation.
1) Place the turntable onto
scanner stand
2) Screw the scanner into the
socket on the stand.

Shining 3D EinScan SE/SP_User Manual_3.1.1
5
3) Plug power cord into outlet and the back of scanner; Plug USB cable into back of scanner and
computer USB port; Plug USB cable into back of scanner, and turntable.
Step3-2. Setting scanner on tripod for fixed scan, turntable coded targets and markers align
mode.
1) Screw the scanner head onto tripod.
2)Plug power cord into outlet and the back of scanner; Plug USB cable into back of scanner and
computer USB port; Plug USB cable into back of scanner, and turntable.
1.2.2. Turn on/off the Scanner
Hold on the touch switch for about one second to turn the scanner on.

Shining 3D EinScan SE/SP_User Manual_3.1.1
6
Double-click on the touch switch and stay for one second each time to turn the scanner off.
If the device with mechanical ON/OFF switch, Press the power button to turn scanner on; press again,
then turn scanner off.
Shining 3D EinScan SE/SP_User Manual_3.1.1
7
2. Set Software
2.1. Download the Software
Step 1: Go to https://www.einscan.com/support/download/.
Step 2: Select your scanner model.
Step 3: Download the software to your operating computer.
Note: You are required to register before downloading.
2.2. Install the Software
1. Double click installation package, accept the modification on your computer.
2. Follow the instructions to complete the software installation.
After the software is installed, a shortcut will be created on your desktop. Double click to
open the software.
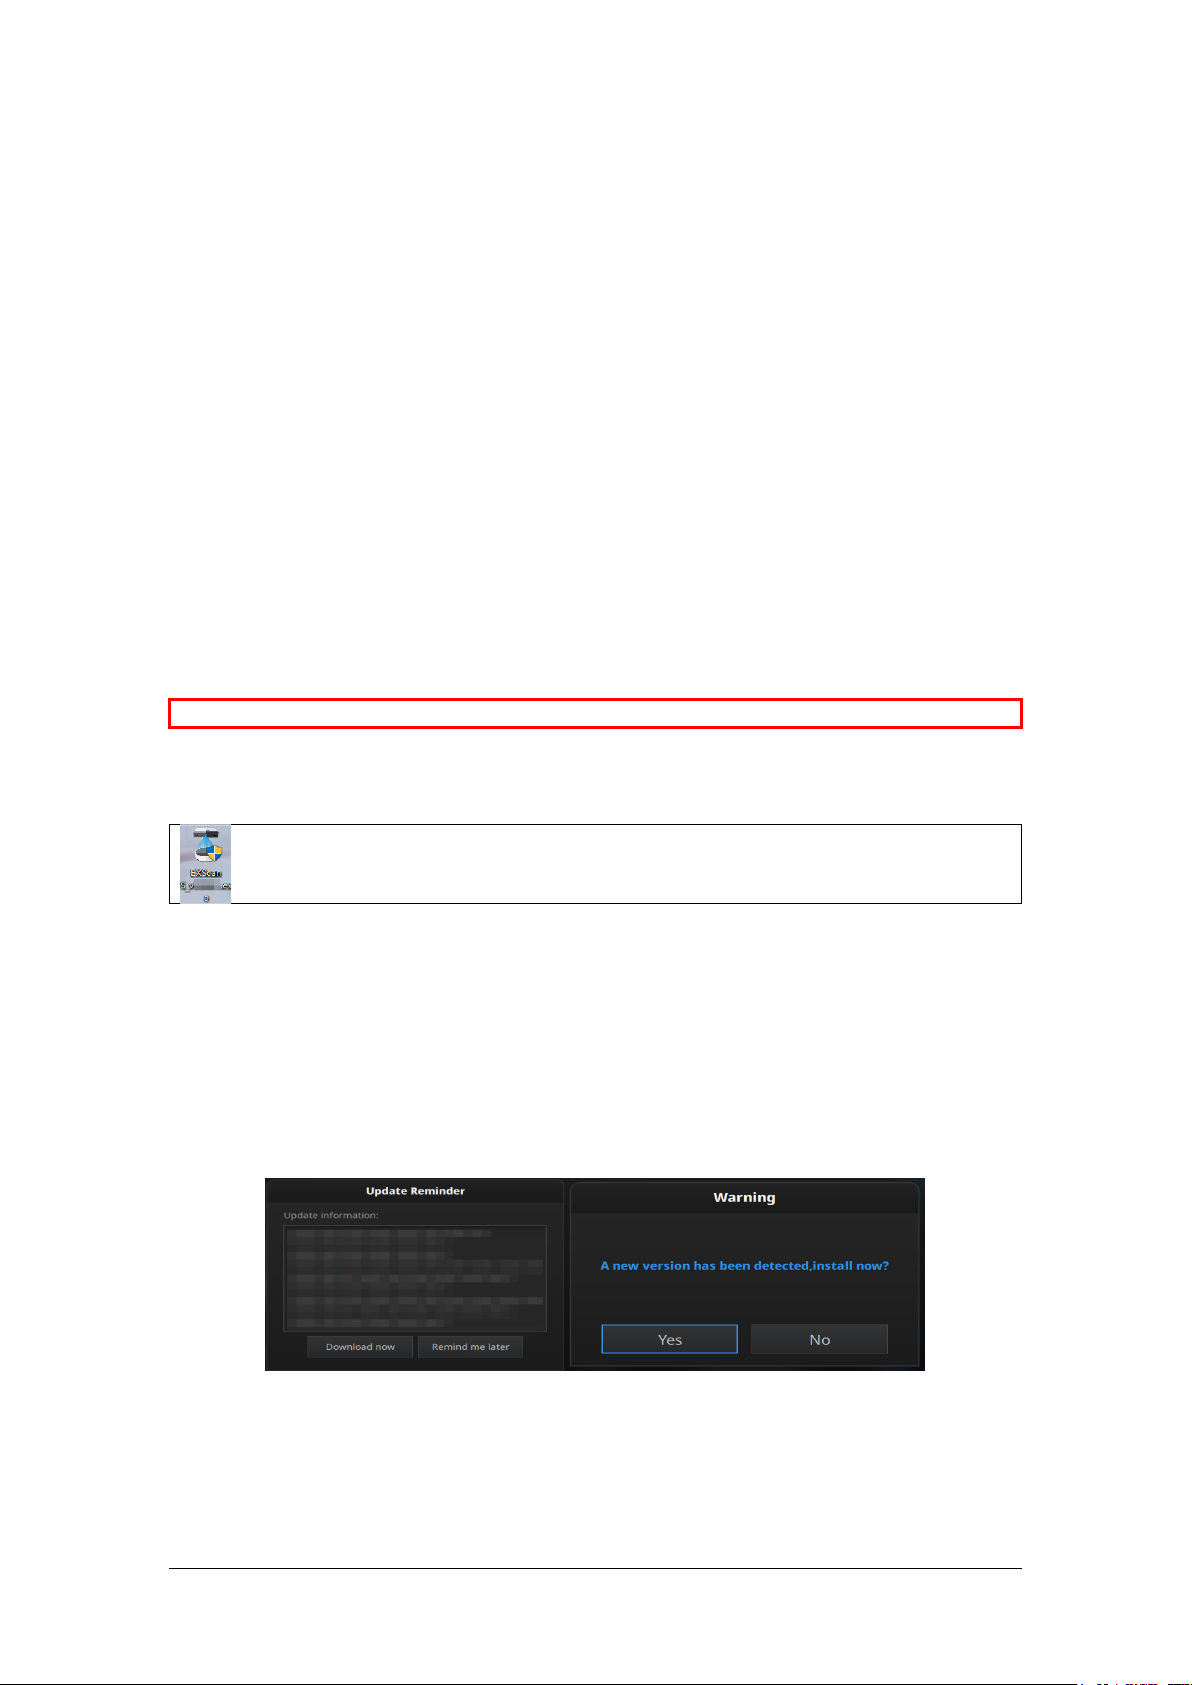
2.3. Update the Software
When a new version is available, a pop-up will show when you start the software to remind you
update your software to the latest version.
Click Yes to update.
Update Reminder
Note before installation: Administrator rights are required for the installation of the software only.
Shining 3D EinScan SE/SP_User Manual_3.1.1
8
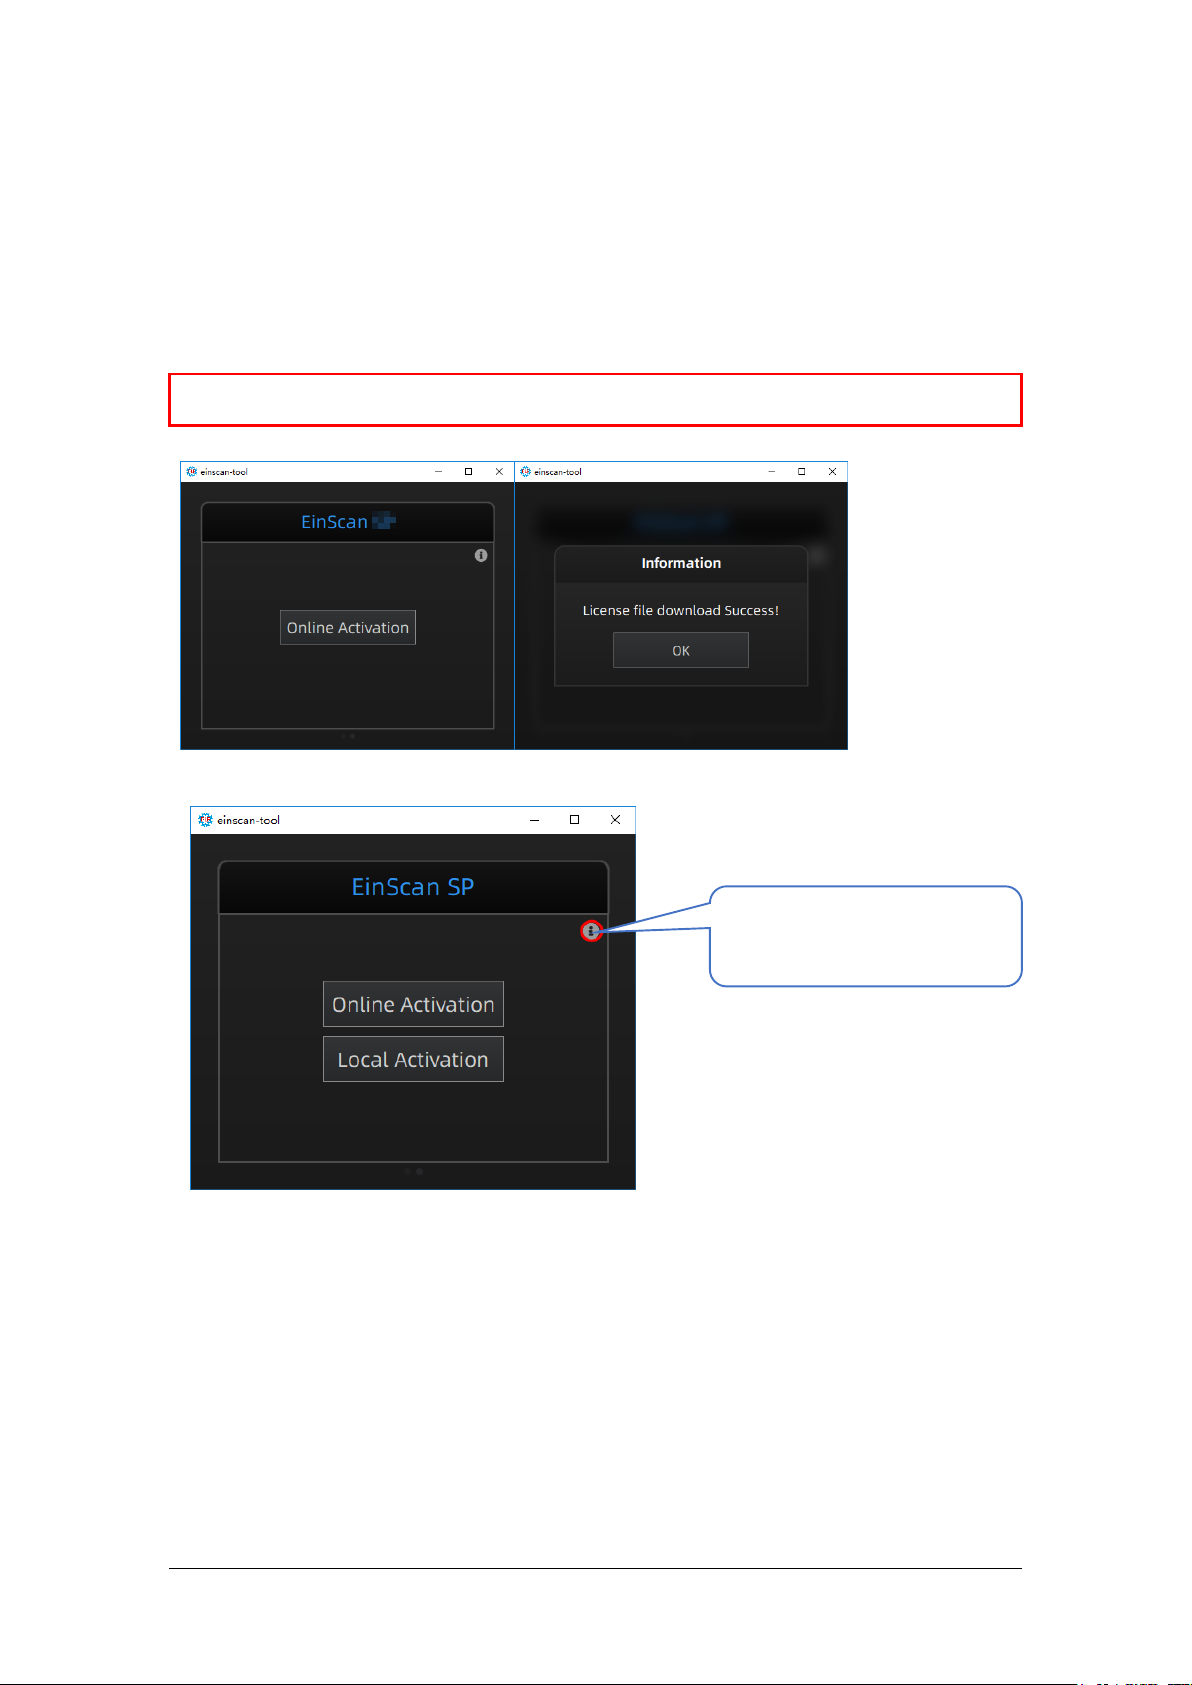
2.4. Activate the Scanner
Device activation is required in your initial use. There are 2 ways:
1. Online activation is recommended if your computer is connected to the internet.
2. If there is an issue with network connection, choose Local activation to save the .ple license file
on your computer, under the activation menu. (.ple file can be found in the USB drive.)
Online Activation
Local activation
When install Discovery Pack, you need to download the pack license, or import the file
with .encode suffix in the USB disk.
Note: If the activation fails, send a request for activation file to einscan_supp[email protected] with
your serial number.
Click this button to reveal
the Local Activation

Shining 3D EinScan SE/SP_User Manual_3.1.1
9
Discovery Pack license tool
2.5. Interface and Parameters
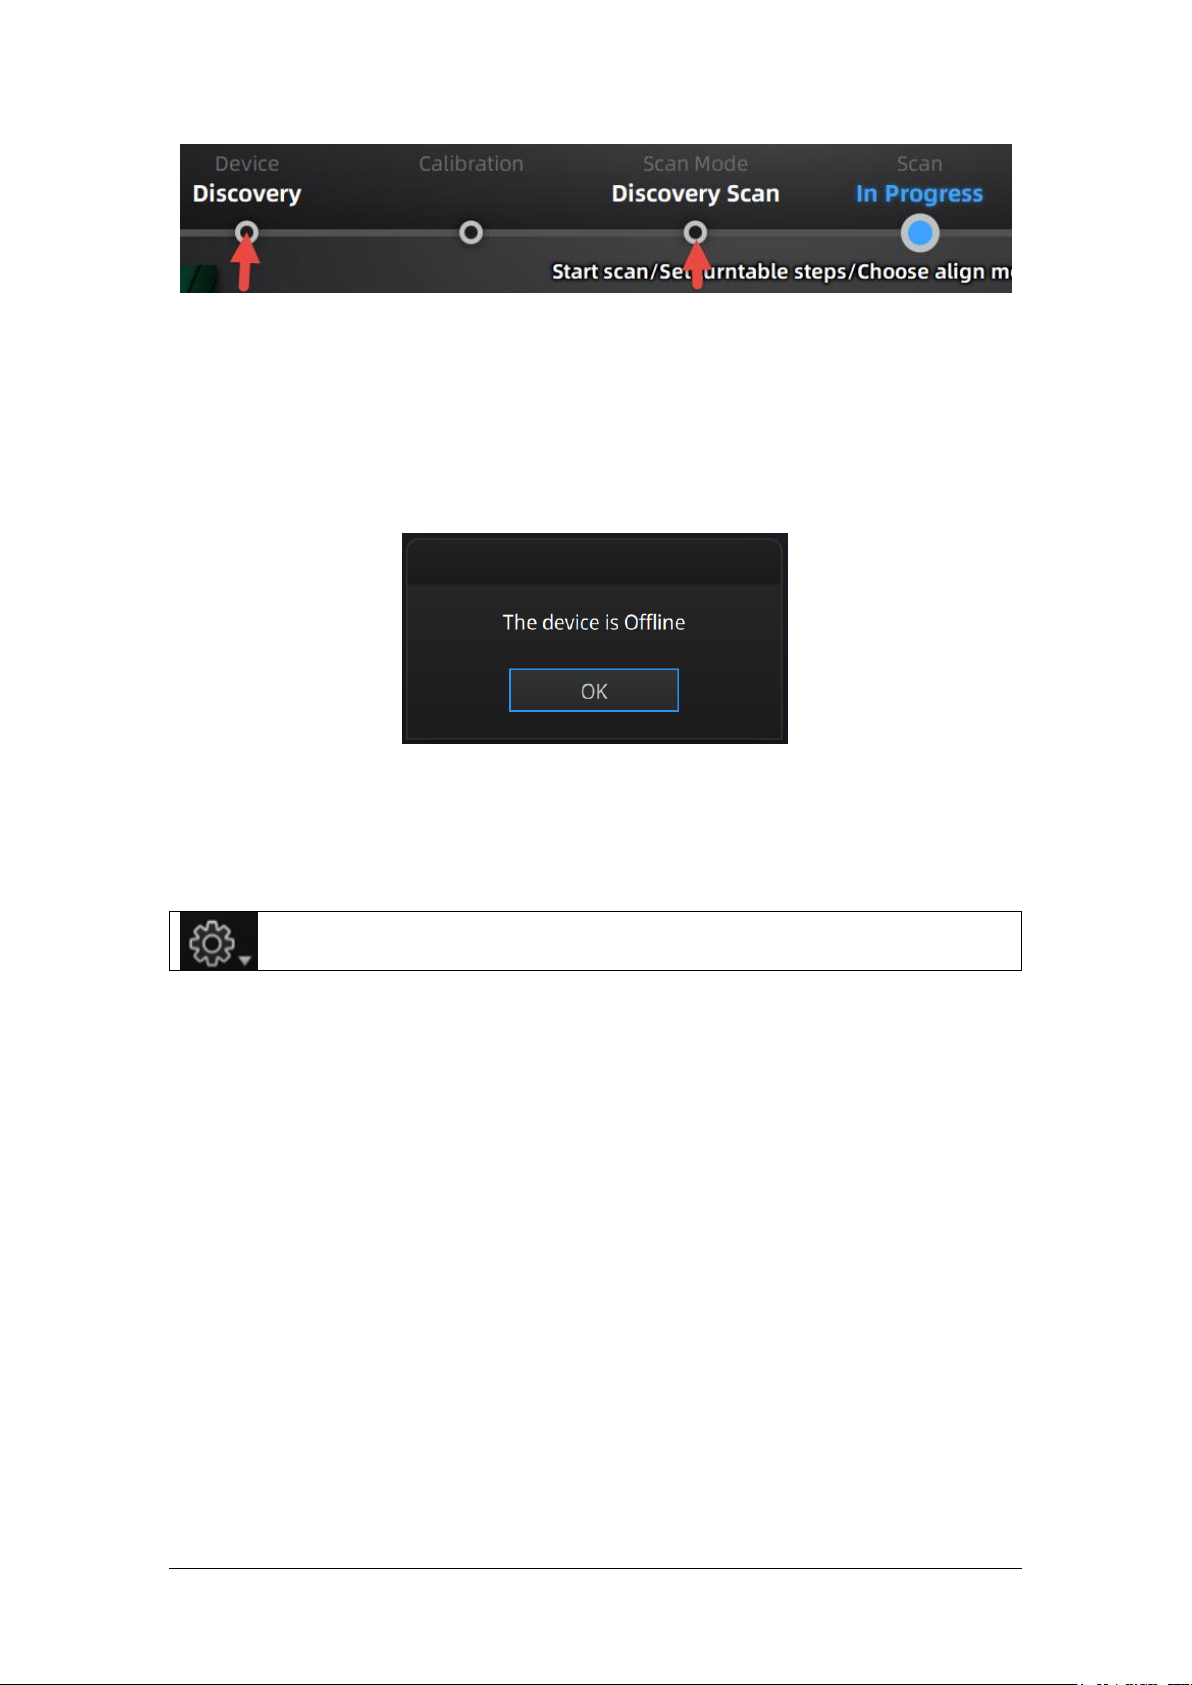
2.5.1. Navigate
Interface navigation
Left mouse: rotate
Middle mouse: move the data
Scroll up and down: zoom in or out
Navigate between different menu by click on the circle. Choose different scan modes if Discovery Pack
is connected.
Shining 3D EinScan SE/SP_User Manual_3.1.1
10
Navigation bar
2.5.2. Reconnect the Scanner
When the device is offline, meaning the scanner is not connected to PC, please check the connection
and restart the software.
Device offline or connection loose
2.5.3. Settings
Click the settings logo from the upper right to open the drop down menu.
3.5.3.1 User Experience
To help us improve the quality and user experience of EinScan SE&SP, we hope to be allowed to
collect usage experience information. This information will not contain your personal information or
scanned data, and will not be accessible to any third party. This checkbox is selected by default, and
we strongly recommend you keep it checked. As a reward, the User Experience Enhancement
Program will continuously keep you informed with the newest software update information, to assure
you get free software updates and enjoy the latest improvements based on your collective feedback.
If you close the User Experience Enhancement Program, you might not be informed with software
updates automatically.
3.5.3.2 Factory Default
All settings modifications will go back to the original settings.
Shining 3D EinScan SE/SP_User Manual_3.1.1
11
3.5.3.3 Language
Select the language for the interface, click apply to change, restarting the software is not needed.
3.5.3.4 About
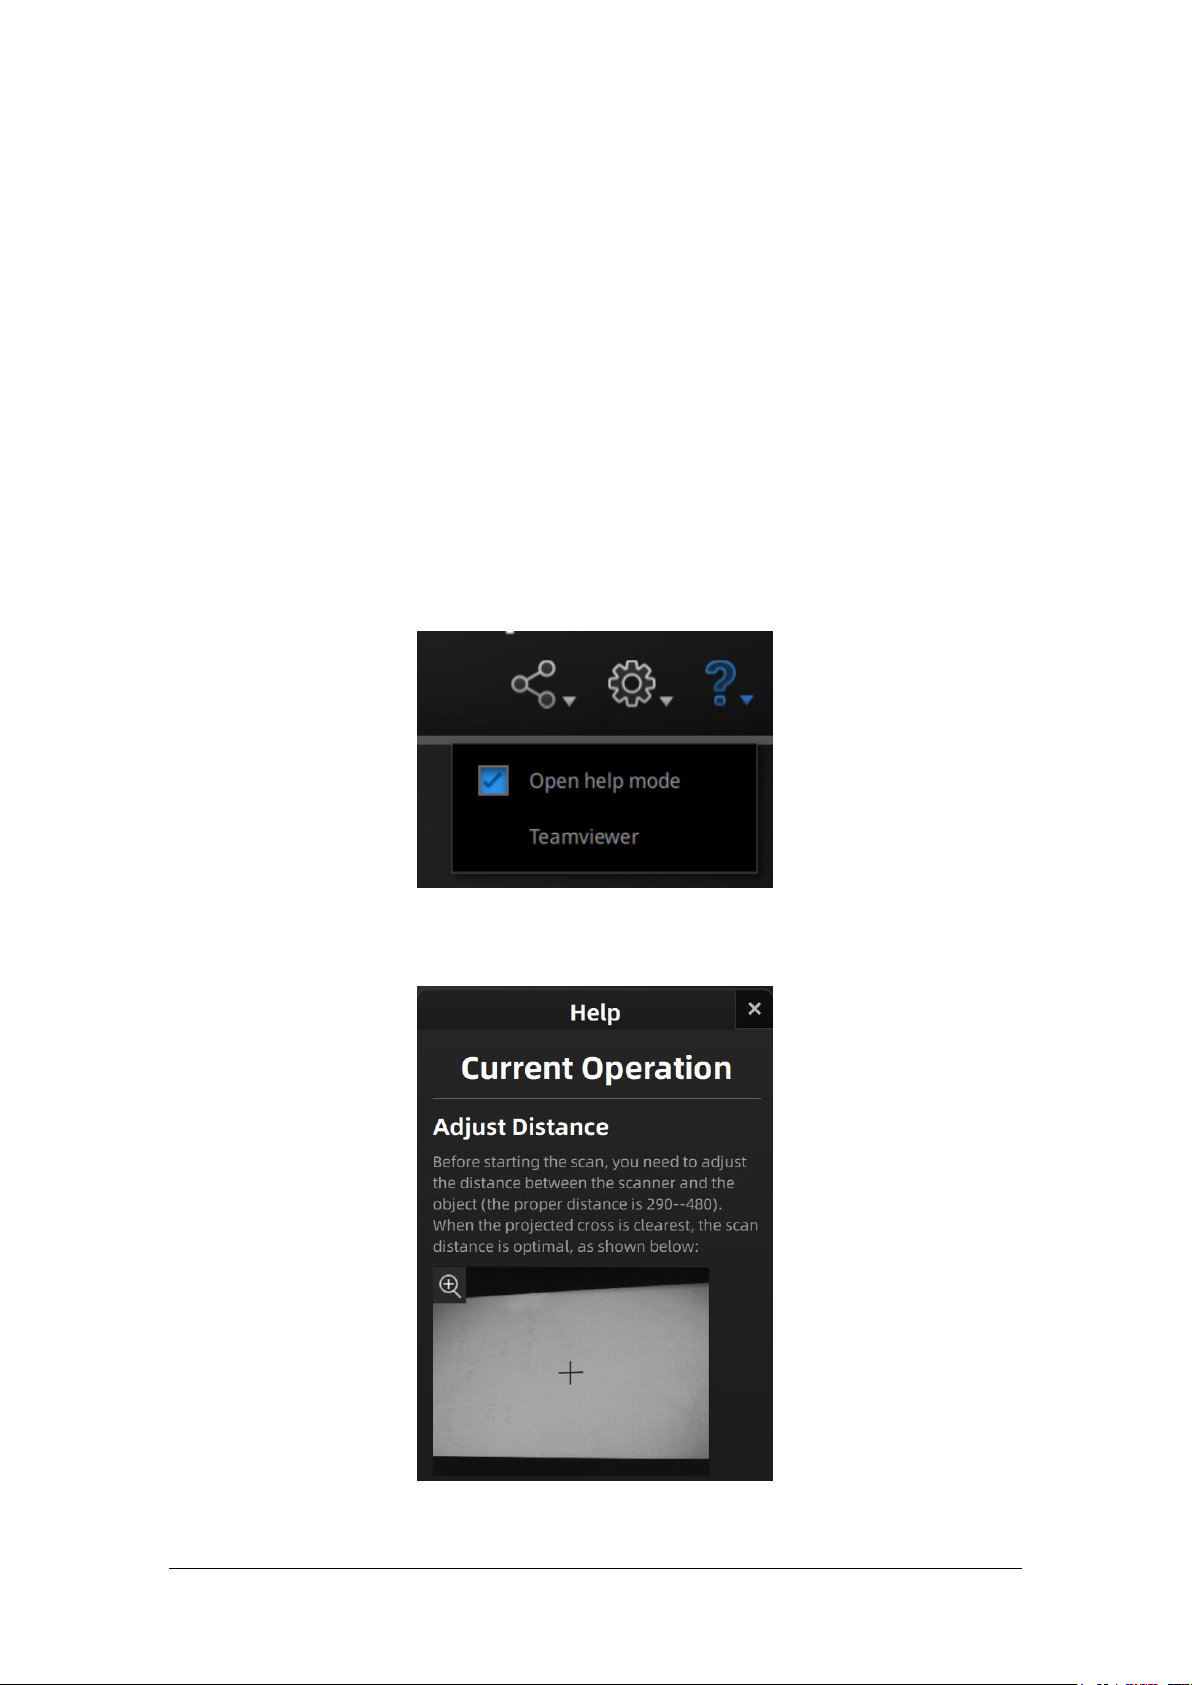
2.5.4. Help Mode
Open Help Mode
Click the question mark in the upper right bar, and open the help mode from the drop-down menu.
Drop down menu
Display the help tool related to the current interface.
Help window

Shining 3D EinScan SE/SP_User Manual_3.1.1
12
Teamviewer
It opens S3D_teamviewer.exe, for online customer support access or display to other screen or
portable screen. Share your ID and password to allow our technicians to remote control of your
computer during online technical support
Share the Your ID and password to allow access
2.5.5. Alerts
A pop-up alert will notify the user of a hardware or configuration issue. Check and restart the
Fail to activate
For activation failure, make sure the scanner is well connected. Redo the activation.
Device fails to activate
Incorrect configuration
try another USB port and update your graphics card drivers and restart the software.
Graphics card incompatible
Shining 3D EinScan SE/SP_User Manual_3.1.1
13
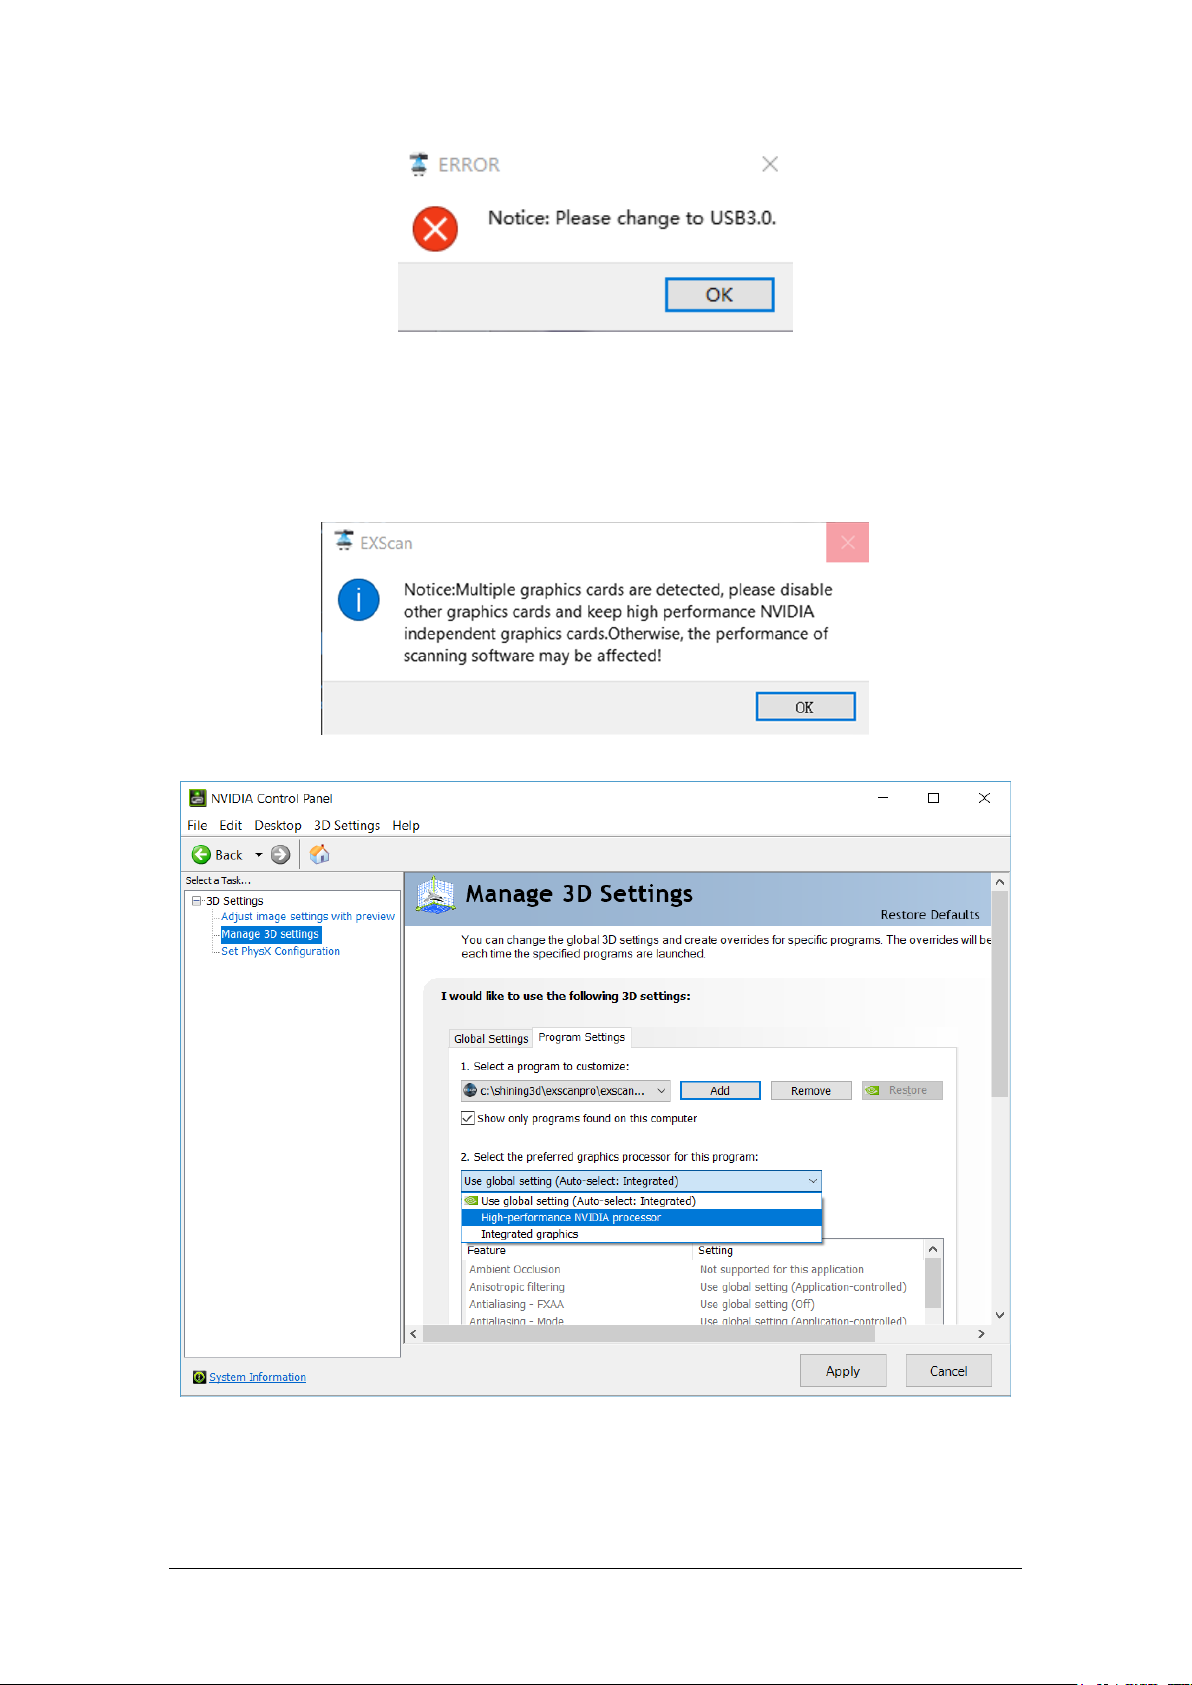
USB not 3.0
If the computer has multiple graphic card, access to the NVIDIA Control Panel (right click on the
desktop). In Manage 3D Settings > Program Settings, Add EXScan S software. Then change the
preferred graphic processor for this program. Select NVIDIA processor. Click Apply to save the
settings.
Multiple graphic card detected
Change graphic card preferences for EXScan S

Shining 3D EinScan SE/SP_User Manual_3.1.1
14
3. Calibrate the Scanner
3.1. Precautions and Use
Calibration is the process to ensure the device will scan with the optimal accuracy and scan quality.
Each EinScan 3d scanner was factory-tested and achieved, at least, the listed accuracy from the
technical specification according to VDI/VDE 2634 standards.
Besides factory tested guarantee of accuracy, to assure high scanning accuracy, each EinScan is also
coming with a calibration board for customer calibration. This customer calibration is not required
daily often. Only when the first time after scanner and software are installed. Or, when you are in the
following situations, you should calibrate the device:
When the scanner is used for the first time or after long time without using.
When there is strong vibration during the transportation.
When alignment mistake or failure frequent appear during the scanning.
When scanning data is incomplete and quality is much worse during the scanning.
3.2. Operation
After installation, when you open the software for the first time, choose device type and it will enter
the calibration interface automatically. You can also choose Calibration on the navigation bar to enter
calibration process later. If there is no calibration data, click “quit”, the software will prompt “No
calibration data, please calibrate”.
Note:
1. Calibrate the Scanner twice a week for accurate scanning.
2. Make sure to protect the calibration board and keep it clean, no scratches or stains on the black
surface with white circles.
3. The Calibration board is matched to the Device with same Serial Number. Doing the calibration
with an incorrect calibration board will fail to generate good scan data or optimum accuracy.
4. Clean with clear water only, do not use alcohol or chemical liquid to clean the calibration board

Shining 3D EinScan SE/SP_User Manual_3.1.1
15
Calibration interface
3.2.1. Camera Calibration
Place calibration panel in different orders for scanner’s comprehensive data collection. By collecting
calibration panel data, the Scanner gets cameras’ precise parameters and uses those parameters to
implement precise scanning.
Step 1: Place calibration panel and its bracket at the turntable center. Face calibration panel to
scanning head. Move calibration panel (leftward or rightward, forward or backward) to get the cross
located at the calibration panel’s central area (and meanwhile you can see calibration panel’s whole
image in the camera windows).
Step 2: Click “Capture”. The calibration panel will turn a circle. Do not touch calibration panel.
On-screen instruction during calibration step 1
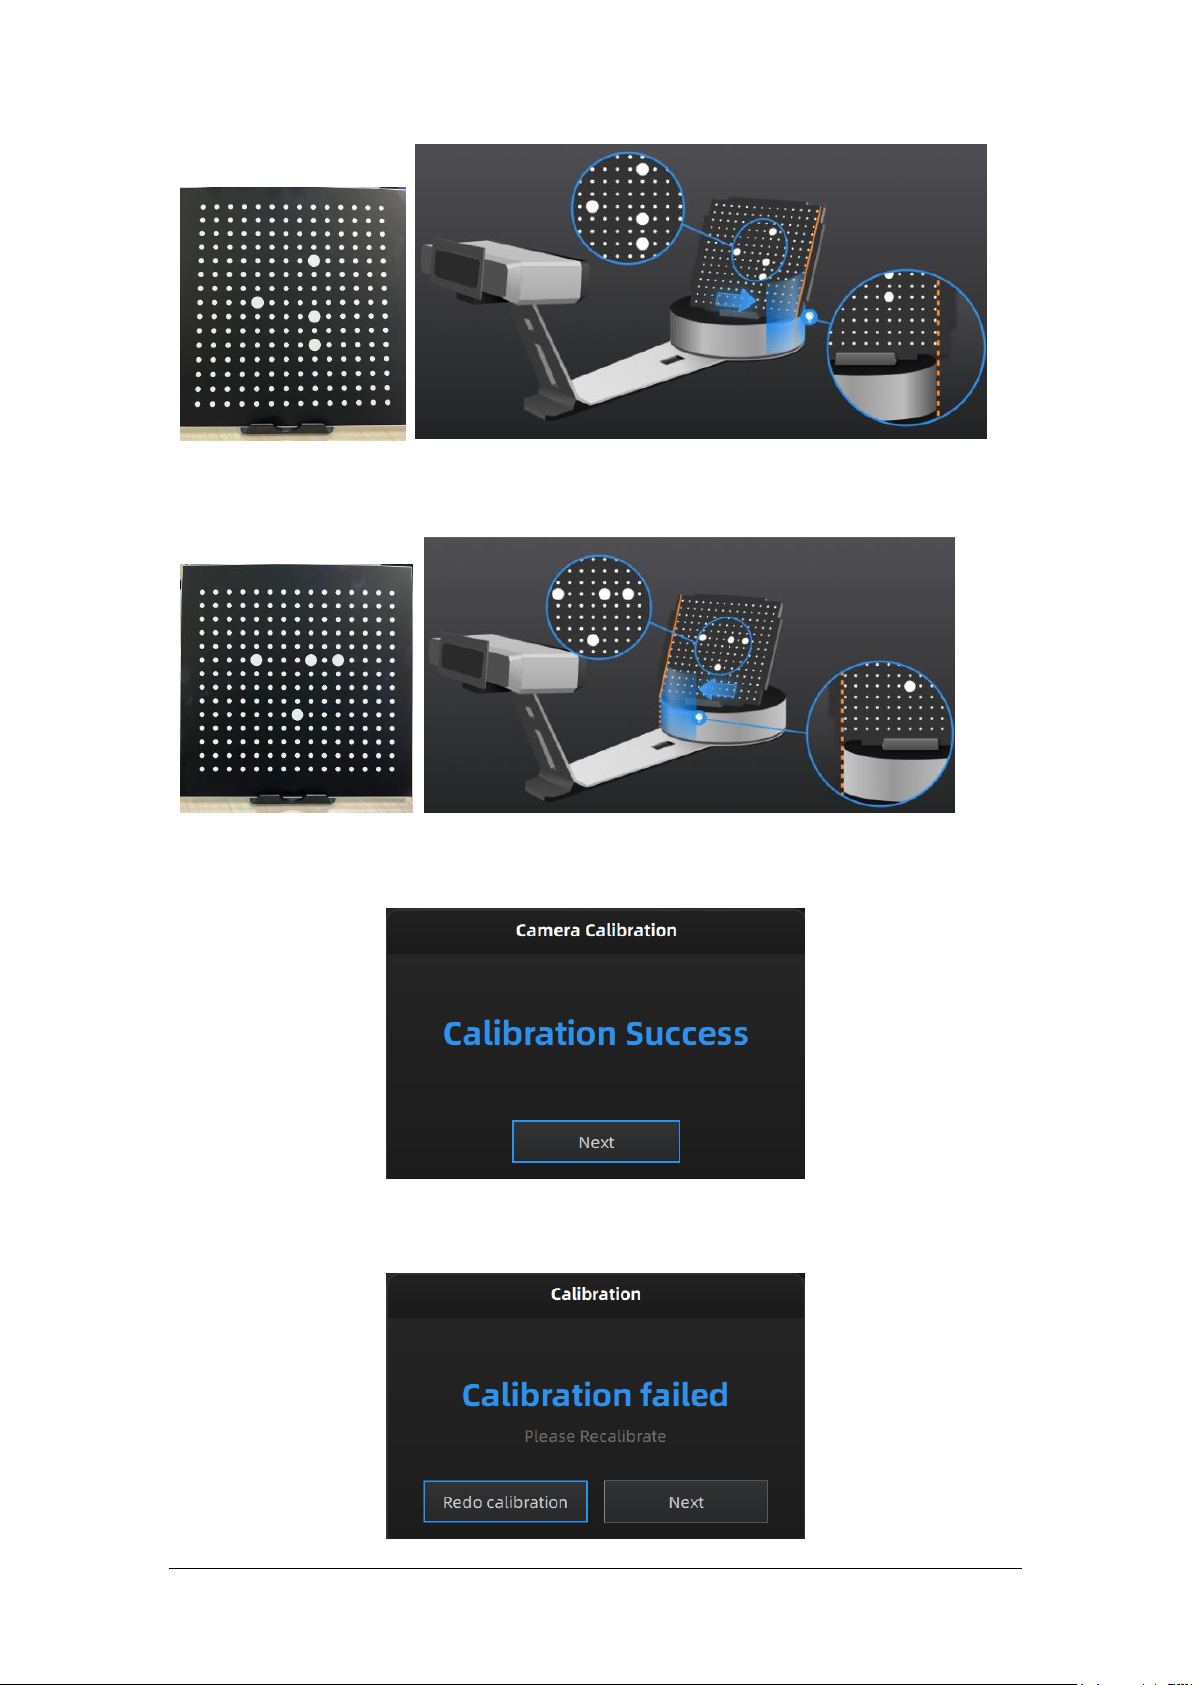
Step 3: Turn calibration panel 90°counterclockwise as guided in software. Move bracket with panel
to the turntable right side (until the calibration board white edge is aligned with the yellow line shown
on the image).
Shining 3D EinScan SE/SP_User Manual_3.1.1
16
Step 4: Turn calibration panel 90°counterclockwise after step 2 as guided in software. Move bracket
with panel to the turntable left side (until the calibration board white edge is aligned with the yellow
line shown on the image).
After collecting calibration panel data, the software will calibrate the camera automatically. You will
see the result as below. Calibration will take longer or fail if you did not follow all instructions properly.
When calibration succeeds, click “Next” to move on to the White Balance as the software indicates.
Camera calibration result
If calibration fails, click “Redo calibration” to start the same calibration again from the beginning.
Shining 3D EinScan SE/SP_User Manual_3.1.1
17
Calibration failed
Click “Next” to perform white balance as the software indicates.
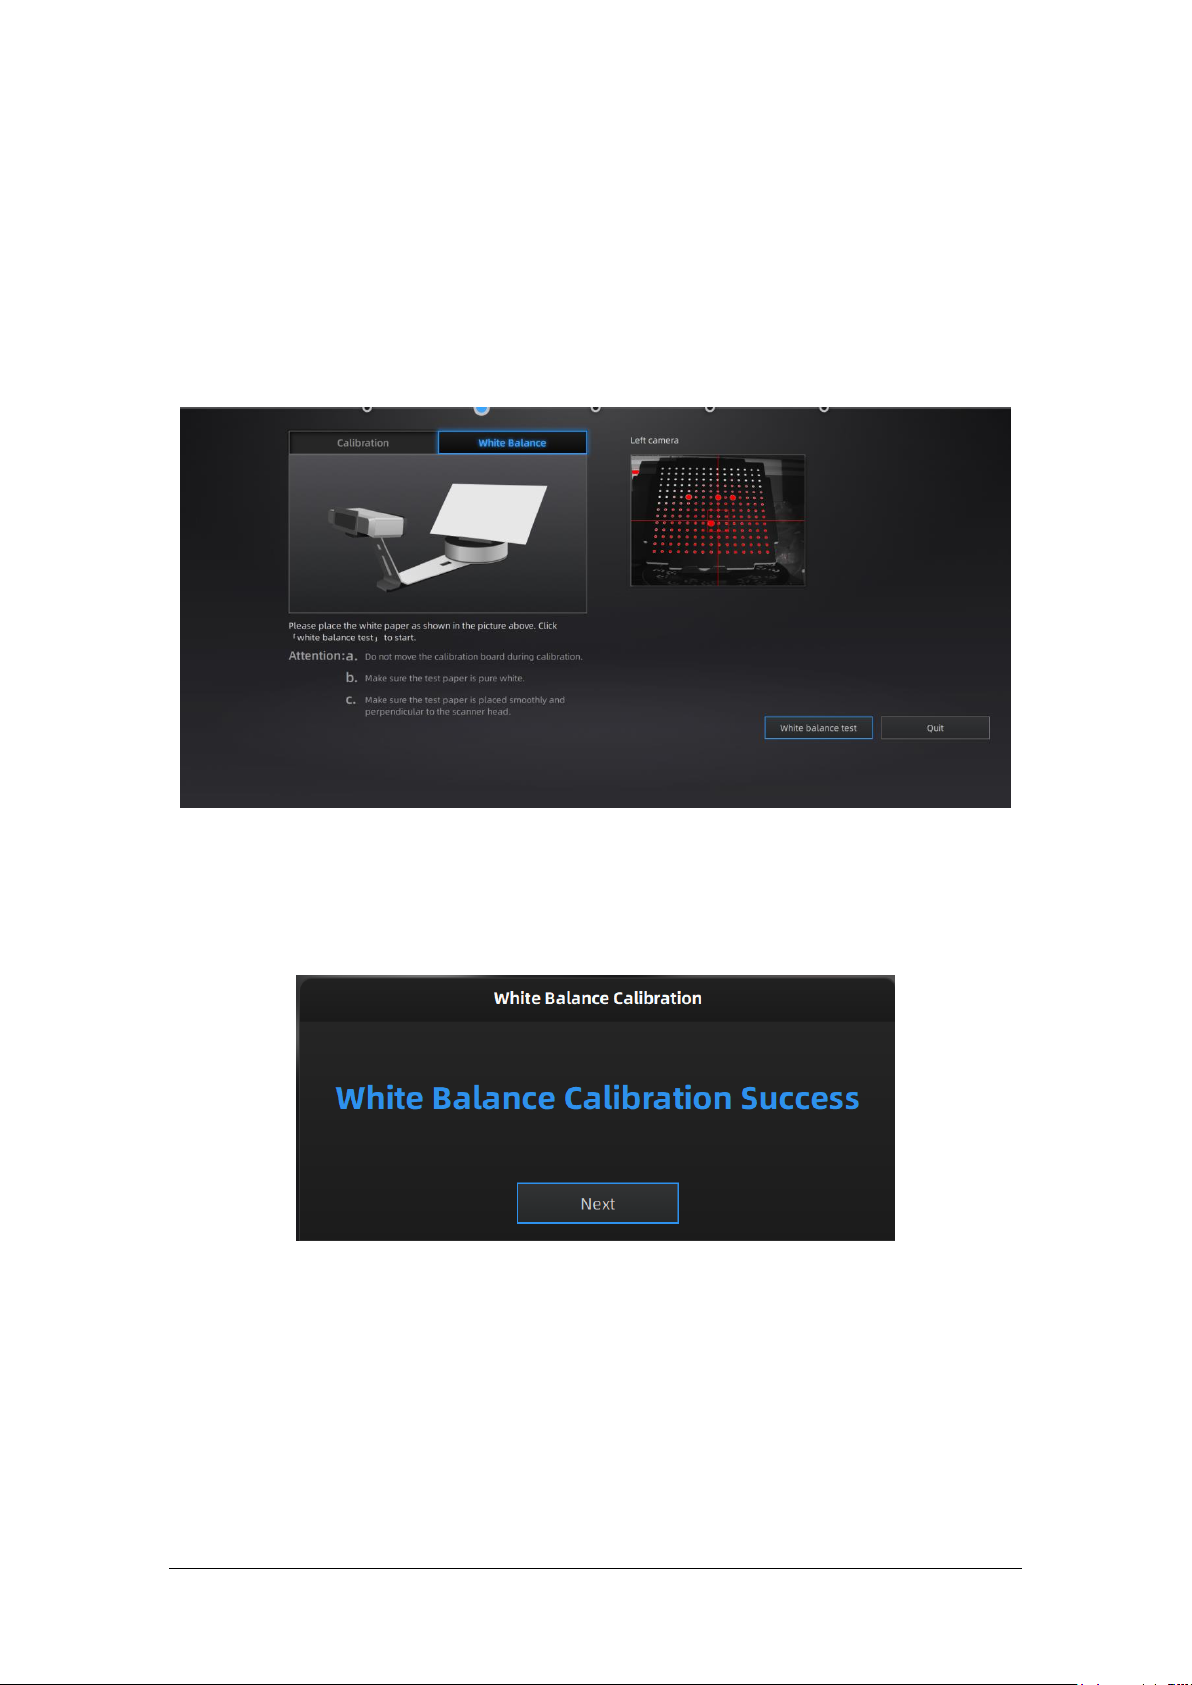
3.2.2. White Balance
To capture an accurate color texture, White Balance calibration should be done every time when the
lighting environment is changed.
Place a sheet of white paper as shown below on the calibration plate and click “white balance test”.
White Balance calibration interface
To guarantee a good texture, the white paper must be kept clean.
If the texture doesn’t give you satisfaction, please optimize the lighting environment and redo White
balance.
You will see the result as below. Click “Next”to new a scan project.
White Balance result
Place a white paper at a proper distance(290mm - 480mm), adjust the brightness according to the
camera view, click “white balance test”to start.

Shining 3D EinScan SE/SP_User Manual_3.1.1
18
After white balance, check the color of object in the camera view is the same as the real object. If not,
adjust the brightness again and re-calibrate; If yes, click “Quit”to exit calibration interface.
Note:
Only devices with Discovery module have light box.

Shining 3D EinScan SE/SP_User Manual_3.1.1
19
4. Before Scanning
4.1. Object
EXScan S can scan objects from 30*30*30mm ^3 to 200*200*200mm ^3 with turntable or scan
objects from 30*30*30mm ^3 to 700*700*700mm ^3 without turntable.
We do not recommend scanning:
moving or vibrating objects, which cause the shape of object changed during scanning process.
Soft material object
lattice structures with many small deep holes
During scanning the shape of the object needs to be maintained without any changes (human bodies
must be held still, for example).
Example of object that is difficult to scan
4.2. Preparation
To align data if geometry features are not sufficient, you need to stick markers or pieces of clay on the
surface of scanned objects to create extra “features”.
When you stick markers on the surface of the object, you need to follow the following rules:
Make sure sticking at least 4 markers in each frame (one scanning field of view). Control the
number of markers seen on the camera view.
Stick markers in a random, non-linear pattern (see example below).
Markers should be stuck on the flat surface area and keep the marker surface flat.
Use the markers provided with the device only. Other markers can result bad accuracy or not to
be seen.
The pure black letters are hard
to be seen by the scanner.
The silver bottom is highly
reflective, so it also hard to be
seen by the scanner.
The can is symmetrical
and has no geometry
features on the surface.
It is difficult for the
software to align the
scanned data.
Other manuals for EinScan-SE
1
This manual suits for next models
1
Table of contents
Other Shining 3D 3D Printer manuals

Shining 3D
Shining 3D AccuFab-L4D User manual

Shining 3D
Shining 3D AccuFab-L4D User manual

Shining 3D
Shining 3D Transcan-C User manual

Shining 3D
Shining 3D AccuFab-D1s User manual

Shining 3D
Shining 3D einstart-c User manual

Shining 3D
Shining 3D einstart-c User manual

Shining 3D
Shining 3D AccuFab-D1s User manual

Shining 3D
Shining 3D Einstart User manual

Shining 3D
Shining 3D einstart-c User manual

Shining 3D
Shining 3D AccuFab L4D User manual


