ShowPro UniFog DMX User manual
UniFog DMX
User Manual

WELCOME TO USE THE SMOKE MACHINE
Products Description:
UniFog DMXis a well-designed smoke machine which user angle control of the smoke output.
With on Board DMX 512 and wired or wireless control options supplied with the machine provides flexibility for
permanent or mobile use.
This machine will operate on Jem Fog or ShowPro Fog fluids.
NOTES:
-The maintenance cycle for the machine is 1-2 months. Method: 20% white vinegarplus 80% distilled water, and then
work 3-5 times after heating!
-Only use Jem Pro-Fog fluid in this machine (JEMJCE051)
It is HIGHLY recommended that this smoke machine is not hung above or near areas
that may have people below it. There is a significant risk of hot liquid or vapor falling
and potentially harming any individuals below. We understand the need for a hanging
bracket and the applications and should only be hung by experienced personal to
ensure that risk is well managed. Please adhere to your local safety guidelines when
hanging this unit.
NOTES BEFORE USE:
1 Place the smoke machine horizontally and check for any damage or leaks. If damaged, please contact your
supplier at once. Loosen the lid of the fluid tank to pour in the high-quality smoke fluid, and then fasten the lid.
2 Before power on, please verify that the supply voltage is in conformity with the rated voltage of the smoke
machine. When the power is on, the indicator light will turn on, and the smoke machine will begin to operate
once heat up procedure is complete.
3 At first, it is normal if the smoke machine creates just a little smoke please be patient the machine will need to be
fully primed to output to its full capacity.
4 Please ensure the smoke machine is in a well-ventilated area. Don’t place the machine in a small non-vented
location as the over temperature protection will disable the machine from heating.
5 Never hang the smoke machine in areas where people could be under the machine this will avoid any risk
of injury.
6 Please ensure the fluid bottle is always to capacity this will avoid the pump failure due to low fluid.
7 Never operate the smoke machine on low fluid. If you need to prime the machine, please only use short burst until machine is
fully primed holding the machine at full with no fluid will cause pump failure
8 Never leave the smoke machine powered and unattended always keep clear of children as the output nozzle is of high temp.
9 Due to condensation, vapor or moisture might gather around the nozzleof machine. There might be some
surplus smoke ejected from any smoke machine during operation or after shutdown.
10 Please make sure there is no liquid and metals inside machine before turning on the power Each time.
Do not modify or repair the machine by yourself. If there is any problem, please contact the supplier.

1. Introduction
•Important environmental information about this product.
- Do not dispose of the unit ( or batteries) as unsorted municipal waste; it should be taken to a specialized
company for recycling.
- This device should be returned to your distributor or to a local recycling service.
- Respect the local environmental rules.
- If in doubt, contact your local waste disposal authorities.
- Thank you for choosing this machine. If the device was damaged in transit, don' t install or use it and
contact your dealer.
2. Safety Instruction
- Do not touch the device during operation as the housing heats up.
- Keep this device away from rain and moisture.
- Unplug the mains lead before opening the housing.
- Damage caused by disregard of certain guidelines in this manual is not covered by the warranty and the
dealer will not accept responsibility for any ensuing defects or problems.
- A qualified technician should install and service this device.
- Do not switch the device on immediately after it has been exposed to changes in temperature. Protect the
device against damage by leaving it switched off until it has reached room temperature.
- Make sure that the available voltage does not exceeds the voltage stated in the specification of this
manual.
- Do not crimp the power cord and protect it against damage. Have an authorized dealer replace it if
necessary.
- Disconnect the device from the mains to clean it or when it is not in use. Handle the power cord by the
plug only.
- Note that damage caused by user modification to the device is not covered by the warranty.
- Keep the device away from children and unauthorized users.

3. General Guidelines
- This device is designed for professional use on the stage, in disco, theaters, etc. The device should only
be used indoors with an alternating current of max 230 V AC/ 50 HZ.
- Do not shake the device. Avoid brute force when installing or operating the device.
- Select a location where the device is protected against extreme heat, dust and moisture.
- Familiarize yourself with the functions of the device before actually using it. Do not allow operation by
unqualified people. Any damage that may occur will most probably be due to unprofessional use of the
device.
- Use the original packaging if the device is to be transported.
- All modifications of the device are forbidden for safety reasons.
- Only use the device for its intended purpose. All other users may lead to short circuits, burns,
electroshocks, crash, etc. Using the device in an unauthorized way will void the warranty.
- This device is not suited for permanent operation. Frequent operation breaks will protect the life span of
your smoke machine.
4.
Installation
- Have the device installed by a qualified person, respecting local laws and EN 60598-2–17.
- Never stand directly below the device when it is being mounted, removed, or serviced.
- Have a qualified technician check the device once a year at a minimum.
- Install the device in a location with few passers-by that is inaccessible to
unauthorized persons.
- Adjust the desired inclination angle via the mounting bracket and tighten the bracket screws.
- Make sure there is no flammable material with a 50CM radius of the device.Connect
the device to the mains with the power plug.
- The installation must be approved by an expert before the device is taken into service.
5.
Use
- Add fluid carefully to the liquid tank. Do not overfill the tank.
- Plug the remote-control cord into the slot marked remote control on the back ofthe
machine.
-
Plug the power cord into an electrical outlet. Turn the power switch to "ON"
on the back of
the machine. The red light on the remote will turn ON.
The unit
will take around 6
minutes to warm up the heater. During this time the machine cannot generate smoke.
The green light on the remote will turn ON once the machine is ready to produce smoke.
-
For detailed instruction on the various functions on operating your UniFog,
see the section
titled "Remote Control Operation".
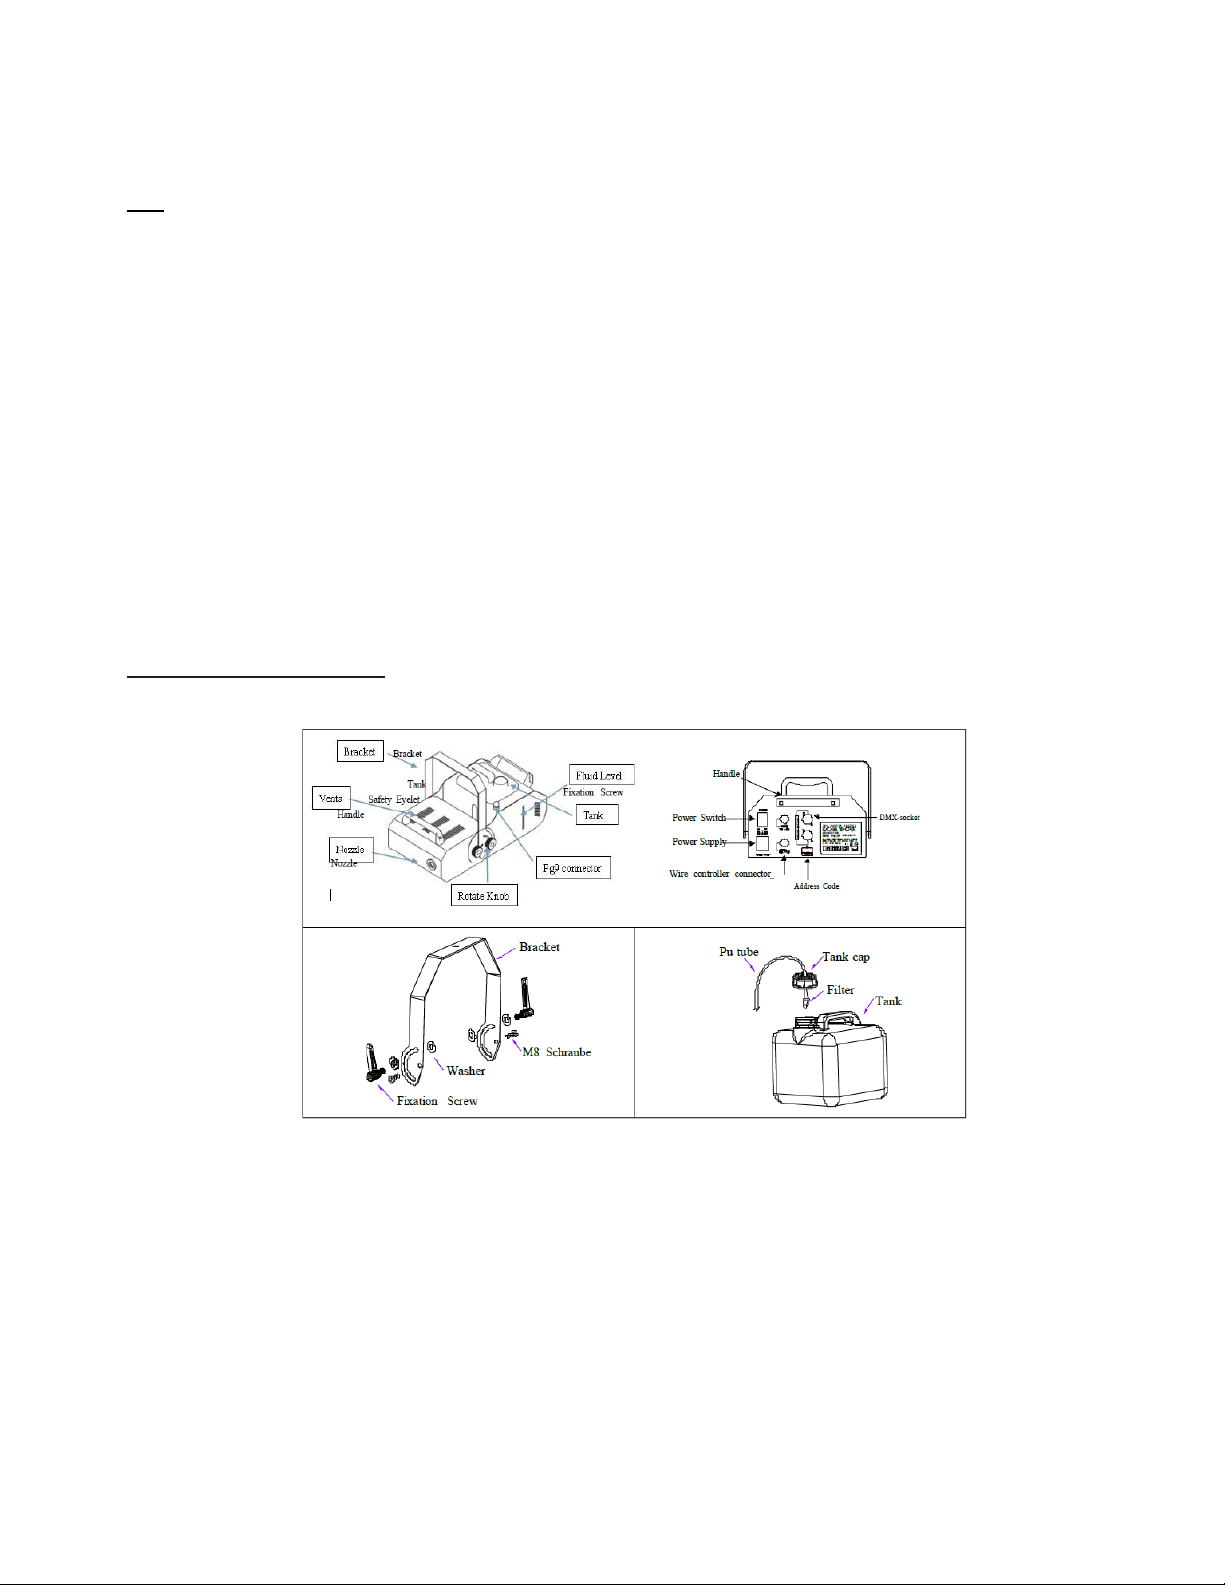
6.
UniFog DMX Description

7.
CAUTION:
"Visibility during operation is reduced".
- Important: Always monitor tank fluid level as you are fogging. Running any smoke
machine with no fluid can permanently damage the unit.
8.
Remote Control Operation
-
D-2: 25 feet wired multi-function remote control with 5-PIN plug for Fog
the UniFog DMX.
- The Interval knob adjusts the time between discharges when the timer function is
engaged. The range is from 1min to 30min.
-
The Volume knob controls the volume of the fog produced. The range is from 0 %- 100 %
of
maximum output.
-
Adjust the Duration control knob of each fog emission (within the range of 1 to 20
seconds).
- The yellow TIMER button controls the timer function. Depress the button to activate.
When activated, the yellow light will turn ON. Adjusting the interval
knob will determine
the time between fog output (1 - 30 min). The duration of
output is set at 20 seconds. The
volume can be adjusted using the volume knob tocontrol the amount of fog produced.
- The red CONTINUOUS button sets the machine to constant fog production. To activate
this function, depress the red button. The volume knob can be used toregulate the volume
of the steady stream of fog produced.
- The green MANUAL button will produce a continuous blast at maximum volume whilethe
button is held down. When released, the manual function stops and the machinewill
return to the previous setting, timer, continuous, or stationary.
-
Note: The continuous function will override the timer function. Therefore, if
both buttons
have been depressed the UniFog will output continuously. The manual function overrides
all functions. When depressed and held down the UniFog will output
g at maximum volume
for as long as the button is held down, regardless of the machine's setting at the time.
9.
Onboard DMX
Channel A
250-255
MAX
VOLUME
6-249
VOLUME
CONTROL
0-5
OFF
These models use 1 channel to control volume output operation. Each channel has a value range of 0 to
255.
Timer functions such as duration and interval can be programmed usingthe DMX controller or the DMX
control software being used by lightingand effects operator.
If Channel A has a value between 0 and 5, the unit is OFF.
Between the values 6 and 249 the volume of fog output is regulated.
With 6 being the minimum volume of fog produced and 249 approaching themaximum. The volume
output rises as the DMX value is increased.
If Channel A has a value between 250 and 255, the machine will operate at maximum output.
Note: in the example above, if the machine were assigned the DMX address of 124, Channel A would
correspond to DMX address 124.
In general, Our smoke machines with onboard DMX conform to the following performance
specifications;
•Each device occupies 1 channel. To ensure that the control signals areproperly directed to
each device, they require addressing. This is to be adjusted for every single device by
changing the DIP-switches.
•The starting address is defined as the first channel from which the device will respond to the
controller.
•Please make sure that you do not have any overlapping channels in orderto control each device
correctly and independently from any other fixture on the DMX data link. If two, three or more
devices are addressed similarly, they will work similarly.
•Please make sure that you do not have any overlapping channels in orderto control each device
correctly and independently from any other fixture on the DMX data link. If two, three or more
devices are addressed similarly, they will work similarly.
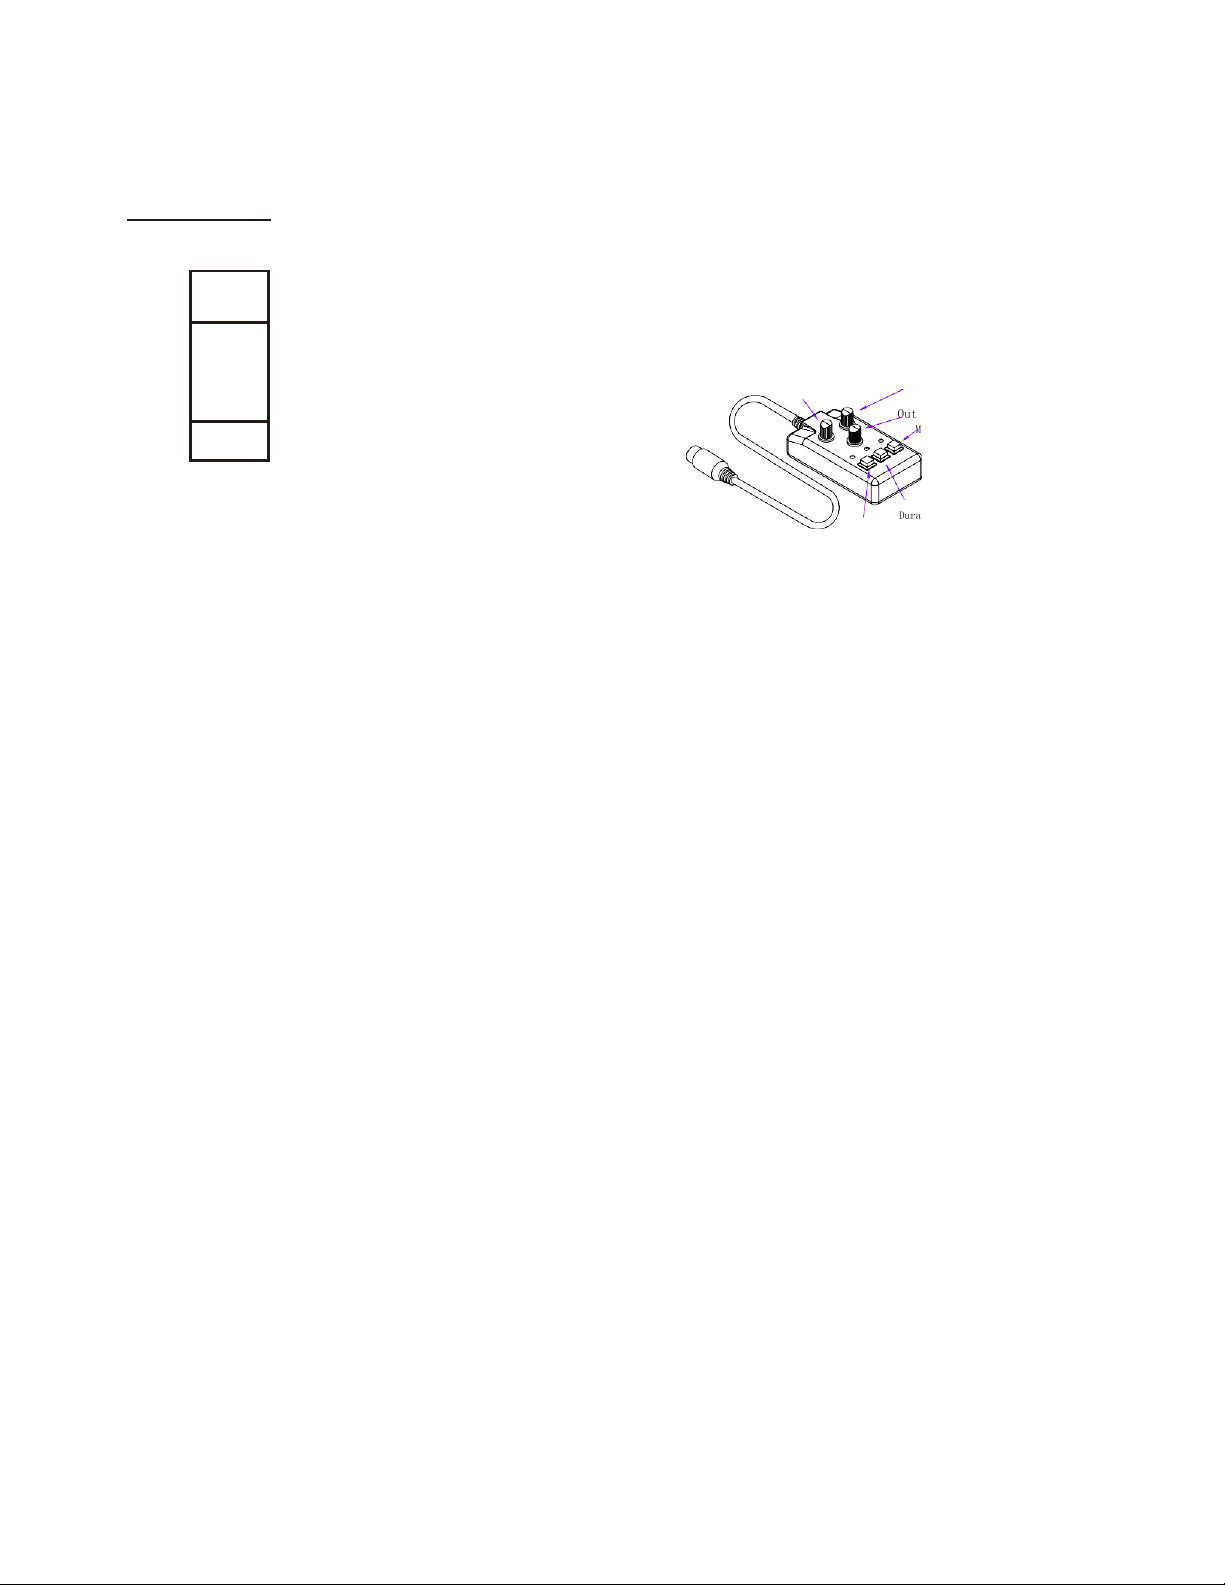
D- 2timing controller
Wire Length: 3 m connector: 5 - Pin XLR
Function: ON/ OFF, Set output interval, output time, output volume, force output
Interval (1 - 30 min) Duration(1 -
20s)
Output adjustment
Manual
Duration
Timing switch

PRODUCTS WARRANTY INSTRUCTIONS
1. . Warranty period: maintenance free within one year (The warranty is valid from the date of
purchase.) Please keep a copy of your invoice for proof of purchase.
A. .The warranty is void when:
• Incorrect fluid is used;
• The device has physical damage;
• The fault caused by use in an incorrect environment.
• The product has been altered.
• The machine has been poorly maintained
2. . Exclusions: Packaging materials, casing & bracket of the product and battery inside wireless
remote controller.
3. . We reserve the right of final explanation for the content of the warranty repair. If there is
anything unclear, please contact the dealer.
Included accessories
Table of contents
Other ShowPro Lighting Equipment manuals

ShowPro
ShowPro MoonLite 150 HEX User manual

ShowPro
ShowPro MoonLite 80 HEX User manual

ShowPro
ShowPro K65 IP User manual

ShowPro
ShowPro ProShop LED PAR Hex-7 User manual

ShowPro
ShowPro H1 PROFILE User manual

ShowPro
ShowPro X-Blinder User manual

ShowPro
ShowPro LED UP Quad-4 User manual

ShowPro
ShowPro Dreampix Driver 1800 IP User manual

ShowPro
ShowPro NITEC photon multi LEDNIT141 User manual

ShowPro
ShowPro Venue Haze 1200 User manual


