ShowPro Venue Haze 1200 User manual
Venue Haze 1200
User Manual

1. Introduction
Thank you for choosing the Venue Haze 1200. To make our products more convenient and safer for customers,
please read the instruction manual and observe the regulations of this manual before using this product.
2. Package contents
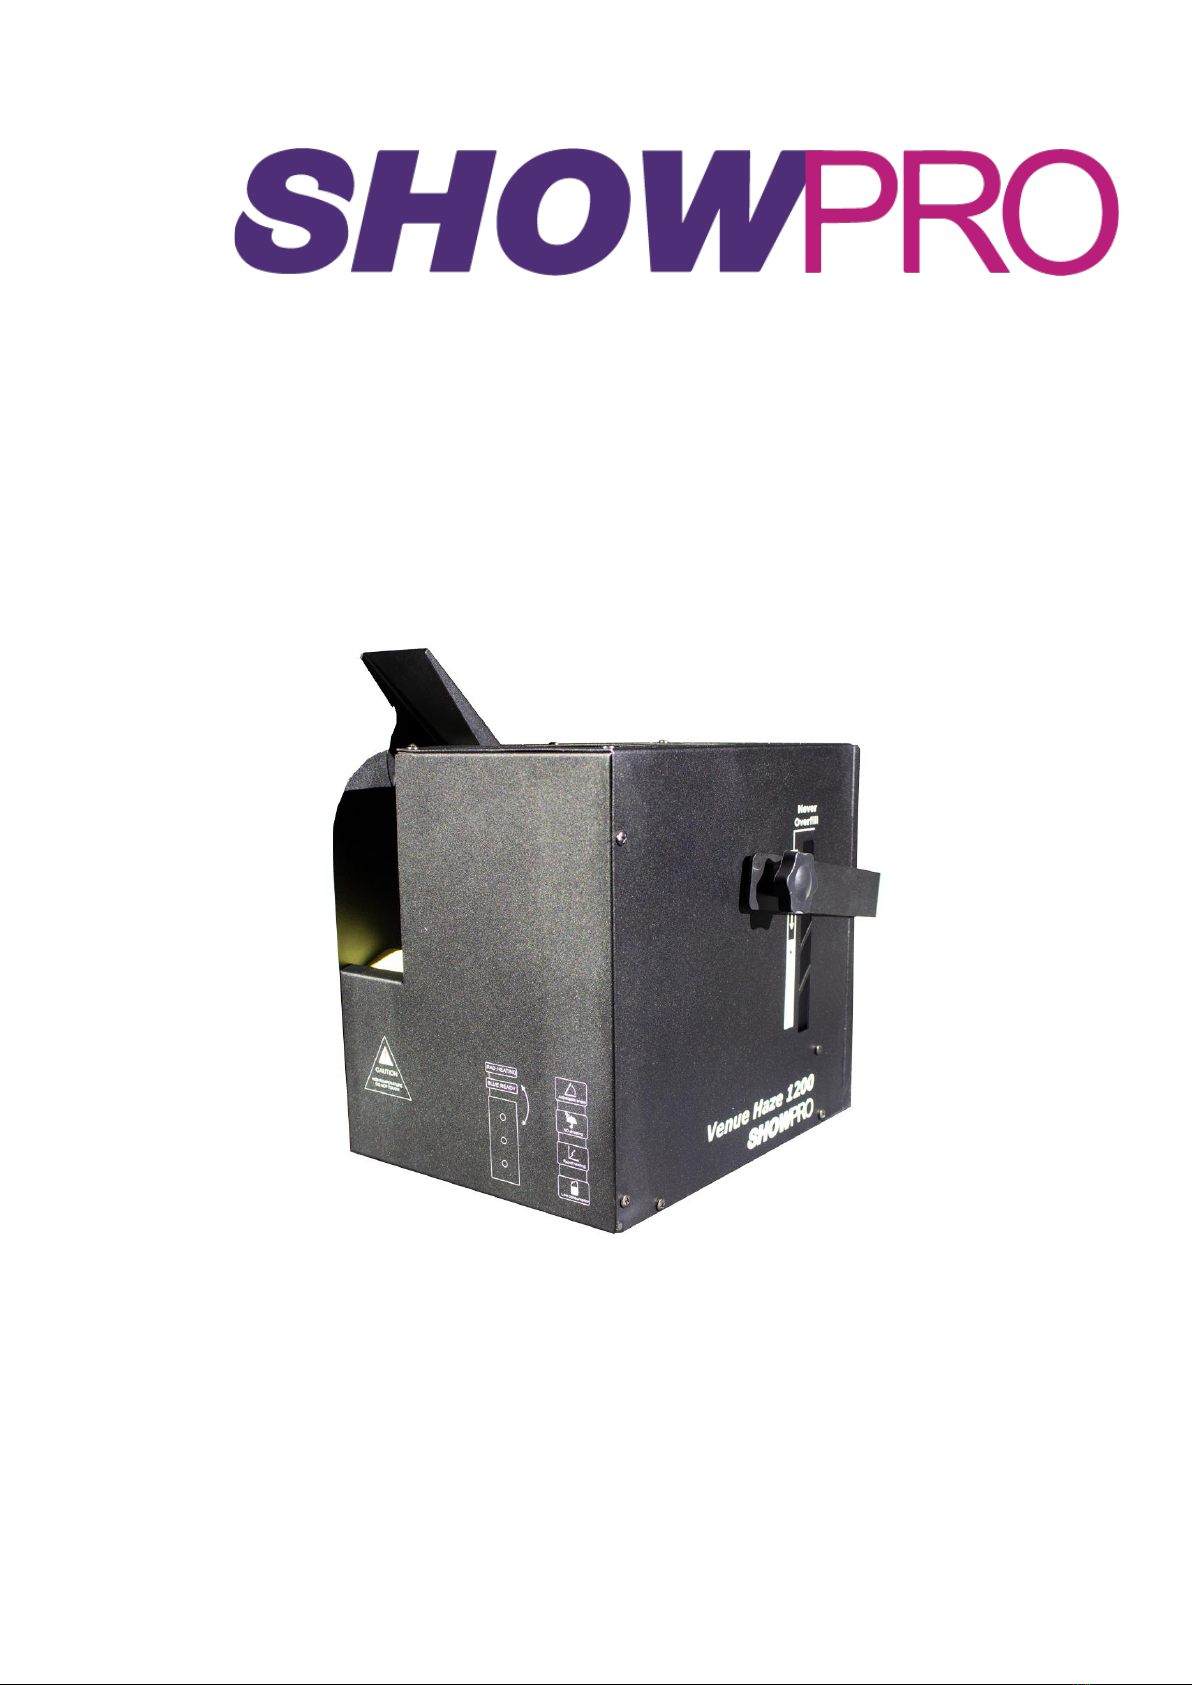
•1x Venue Haze 1200 machine
•1x User manual
•1x Power cable
•1x D-800 timing controller (Optional)
After receiving the machine, please carefully unpack and check everything to ensure that all parts are complete
and in good condition. If the outer packaging is damaged and any parts are damaged or missing due to
transportation, please contact the dealer or carrier immediately and return it in the original packaging.
3. Product description
Venue Haze 1200 is a haze machine with a large output, which can quickly produce a lot of thin smoke to float in
the air. It adopts a remote controller, which can adjust the smoke output. It can also be controlled using a DMX
console.
4. Product features:
•Low noise and environmental protection that doesn’t produce scorch marks.
•Low fuel consumption, compact and light.
•Supports DMX-512.
•No-fluid protection function to ensure a longer service life.

5. Safety instructions
•Do not touch the device during operation as the housing heats up.
•Keep this device away from rain and moisture.
•Unplug the mains lead before opening the housing.
•Damage caused by disregarding the guidelines in this manual is not covered by the warranty and the dealer will
not accept responsibility for any ensuing defects or problems.
•A qualified technician should install and service this device.
•Do not switch the device on immediately after it has been exposed to changes in temperature. Protect the device
against damage by leaving it switched off until it has reached room temperature.
•Make sure that the available voltage does not exceed the voltage stated in the specification of this manual.
•Do not crimp the power cord and protect it against damage. Have an authorized dealer replace it if necessary.
•Disconnect the device from the mains to clean it or when it is not in use. Handle the power cord by the plug only.
•Note that damage caused by user modification to the device is not covered by the warranty.
•Keep the device away from children and unauthorized users.
6. Important guidelines
6.1. Environment
•Do not dispose of the unit (or batteries) as unsorted municipal waste. It should be taken to a specialized
company for recycling
•This device should be returned to your distributor or to a local recycling service.
•Respect the local environmental rules.
•If in doubt, contact your local waste disposal authorities.
Thank you for choosing this machine. If the device was damaged in transit, don' t install or use it and contact your
dealer.
6.2.Installation guide:
•Have the device installed by a qualified person, respecting local laws and EN 60598 - 2 – 17.
•Never stand directly below the device when it is being mounted, removed, or serviced.
•Have a qualified technician check the device once a year at a minimum.
•Install the device in a location with few passers- by that is inaccessible to unauthorized persons.
•Adjust the desired inclination angle via the mounting bracket and tighten the bracket screws.
•Make sure there is no flammable material with a 50 CM radius of the device. Connect the device to
the mains with the power plug.
•The installation must be approved by an expert before the device is taken into service.

7. Operation instructions
•Place the machine flat in a dry and stable position, check and confirm that the appearance and accessories of
the machine are undamaged, and check that the power cord is in good condition without damage or extrusion
deformation.
•Take out the haze fluid bottle, remove the fluid cap, and add high-quality haze fluid. Close the cap and tighten
it and return to the machine. The use of haze fluid from other manufacturers will cause the machine to become
blocked and damaged, and the machine will not be covered by the warranty.
•Confirm that the power specification is consistent with the rated voltage of the machine, connect the power plug,
and plug the power cord into the grounded socket.
•If the temperature has not reached operating levels, the display will show “UP”. When the display shows "READ",
it means that the heating of the machine has been completed. Only when the machine has completed the
warmup cycle can it be operated.
•If the machine cannot sense the presence of fluid in the tube, it will display "disc XXX” (XXX indicates the DMX
512 address). In this instance, press and hold the “manual” key of D-800 Timing Controller or the “down” button
on the unit to draw fluid into the tube. All other controls are disabled.
•According to the operation instructions of the control panel, set the fixture parameters as required. If you do not
provide input for 5 seconds, you will exit to the main interface and save the current settings.
•In standard mode, the controls of the machine include the on-board panel, D-800 Timing control, and DMX. The
priority order is: DMX > D-800 Timing control > on-board panel.
7.1 Control Board:
7.2 DMX:
This machine has two channels.
•Channel 1: Controls fan speed. DMX: 0 is off, 1-255 increases the output gradually.
•Channel 2: Controls smoke volume. DMX: 0 is off, 1-255 increases the output gradually.
•NOTE: When channel 2 is greater than 0, even if channel 1 is set to 0, the fan will work at the minimum
speed to ensure smoke is pushed from the unit.
•If DMX signal is detected, the machine will default to DMX control. When DMX is connected, press UP or
DOWN to adjust the DMX address.
MENU
VALUE
DESCRIPTION
d***
d001-d511
DMX ADD Setting
h***
h001-h005
Fog output:min-max
f***
f001-f005
Fan speed:min-max

8. Product Diagram
9. Maintenance
•Please use our high-quality haze fluid to extend the life of the machine. Non-professionals do not
disassemble the machine and do not modify the machine to avoid danger.
•After using the machine, please turn off the power and unplug it. Use a damp cloth to clean the dust and
fluid stains on the machine. Excessive dust and residual fluid on the machine will reduce performance and
may cause poor heat dissipation from the nozzle, which can damage the machine.
•It is recommended to run the machine at least once a month to maintain the best performance and output
condition.
• Blockages in the heating pipe can occur due to the use of low-quality haze fluid or frequent long-term
use. Therefore, regular maintenance can improve the performance of the machine. After the haze machine
has been used continuously for 40 hours or three months, clean using a mixture of 35% white vinegar + 65%
distilled water. After heating the machine, run the output at full for 3-5 minutes, and repeat using distilled water
for 3-5 minutes.
1.Safety eyelet
2.Handle
3.Nozzle
4.Vent
5.Fixation Screw
6.Adjustable angle
7.Bracket
8.Control Board
9.DMX-socket
10.Wire controller connector
11.Power supply
12.Bracket
13.Washer
14.Fixation Screw
15.Tube
16.Tank cap
17.Filter
18.Tank
19.Interval(1-30s)
20.Duration(1-20s)
21.Output adjustment
22.Manual
23.Duration
24.Timer

10. Product Warranty Instructions
Proof of purchase must be presented when the product requires warranty service. The warranty instructions are as
follows.
Warranty period: Free maintenance within one year (from the date of purchase) This product will not be considered
in warranty under the following circumstances:
•The product has been used incorrectly or negligently, such as: overloading and overvoltage.
•It has been broken due to careless handling.
•Failures caused by use in poor environments, such as high humidity, unstable voltage, etc.
•The product has been modified by non-factory personnel.
•The product does not use the factory-produced high-quality haze fluid for use
The items not covered by the warranty include packaging, product shell and bracket, battery in remote control.
If the product complies with the warranty terms, the factory does not charge maintenance fees and accessories
costs.
If you have any questions or issues, please consult your local dealer.
11. Technical Specifications
Voltage required:
AC220-230V /AC110-120V
Power consumption:
600W
Fuse:
5A/10A
Initial Warm-up Time
Approx. 3 min
Temperature control
Electronic Thermo-Control
Adjustable Output
YES
Hazer Output Volume
3900Cu ft/min
Continuous Output
Yes
Fluid Consumption @ full volume
Approx 140min/L
No-Fluid Protection
Support
Fluid
Pro C Fluid - DJPJCE110
Fluid tank
2.5L
Adjustable Fan Speed
YES
Adjustable Angle
YES
On-device Manual Control
Digital Display Board
Controller included
D-800 Timer Controller
Control Protocol
DMX512
DMX Channel
2 CH
DMX Data Connectors
3-pin XLR
Net Weight
7.8kg
Gross Weight
9kg
Machine Dimensions(L*W*H)
260*280*275MM
Packing Dimensions(L*W*H)
470*320*270MM

12. D-800 Timing Controller (Optional):
To use the controller, please connect the 5pin plug at the end of the wired controller to the machine.
There are three rotary knobs and Timer, Continuous and Manual buttons on the controller, which allow the operator
to set and adjust the timer, interval and output.
Timer: Start the Timer function
Interval: Adjust the interval between haze output (10s-250s)
Duration: Adjust the continuous haze time (1s-20s)
Output: Volume output adjustment (10%-100%)
Continuous: Runs the machine at a constant rate set by the Output knob.
Manual: Overrides all other settings and outputs haze at 100% while the button is depressed.
Table of contents
Other ShowPro Lighting Equipment manuals

ShowPro
ShowPro ProShop LED PAR Hex-7 User manual

ShowPro
ShowPro DIAMONDBACK LEDDIA100 User manual

ShowPro
ShowPro MoonLite 150 HEX User manual

ShowPro
ShowPro Dreampix Driver 1800 IP User manual

ShowPro
ShowPro MoonLite 80 HEX User manual

ShowPro
ShowPro LED UP Quad-4 User manual

ShowPro
ShowPro PLUTO 600 PROFILE User manual

ShowPro
ShowPro NITEC photon multi LEDNIT141 User manual

ShowPro
ShowPro UniFog DMX User manual

ShowPro
ShowPro PLUTO 250 User manual


