Shure AXT900 User manual

General Description
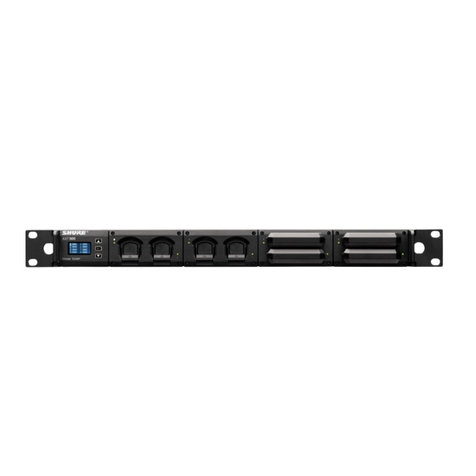
The AXT900 charges up to 8 Shure rechargeable batteries in a single, com-
pact rackmount housing. Interchangeable charging modules accommodate
any combination of handheld and bodyback transmitter batteries. The front
panel display provides easy metering of all battery parameters, including
charge status, time to full, battery health, and battery temperature. When
connected to a network, parameters can be monitored remotely using Wireless
Workbench.
Features
•Touring-ready battery charging and storage solution with comprehensive
status display
• Configurable bays for mixing and matching 8 bodypack and handheld
transmitter batteries
• Fully networkable for monitoring of all charging status parameters in
Wireless Workbench 6
• Storage mode for charging or discharging batteries to optimal storage
voltage
• Tracks battery health using charging cycle count and percentage of
original capacity as metrics
• Charges batteries to 50% capacity within 1 hour
• Charges batteries to full capacity in 3 hours
• Simple 3-button interface control
Mounting Instructions
This component is designed to fit into an audio rack.
WARNING: To prevent injury this apparatus must be securely attached to
the rack.
Batteries
This charger is only for use with Shure lithium-ion rechargeable batteries,
such as the AXT910, AXT920, or AXT920SL.
AXT910 Bodypack Battery
AXT920 Handheld Battery
Charging Modules
Bodypack Charging Module
Handheld Charging Module
Handheld and bodypack charger modules may be installed interchangeably
into the charger.
Caution! Remove AC power and batteries when installing charger modules.
• To remove a module, remove the four (4) mounting screws and pull.
• To install, slide the module into the housing (noting the orientation of the
guide rails) until it is flush with the housing.
• Replace the screws.
1/7©2017 Shure Incorporated
AXT900
Rack Mount Charging Station

Charge Status LED
Each charger bay has an LED to indicate the status of the battery.
battery chargingRed
charging completeGreen
battery inserted incorrectly or battery depleted below
3.0 volts.
Off
charging stopped at reduced capacity (not less than
75% capacity) because the battery is too warm. To reach
100% capacity, a battery must be cooled to below 45°C.
Amber
Inserting Batteries into the Charging Bay
Slide the battery into the charging bay until it locks into place. The charge
LED illuminates and the charge cycle begins.
Recovering a Battery from Deep Discharge
A deeply discharged battery is one that has been discharged to less than
3.0 volts. When the charger detects a deeply discharged battery, it automat-
ically enters recovery mode, which charges the battery using a reduced cur-
rent. The Recovery icon is displayed next to the bay number on the home
screen. If recovery is successful, the charger exits recovery mode and charges
the battery to capacity. If the battery cannot be recovered in less than 30
minutes, an error message is displayed and charging stops.
Storage Mode
When set to storage mode (Storage Mode =Store at 3.8V), all batteries are
charged or discharged to 3.8 volts, which is ideal for long-term storage.
The charge status LEDs indicate the voltage state:
• Red flashing = battery charging or discharging to 3.8 volts.
• Amber flashing = battery voltage at 3.8 volts.
The following indicators appear on the home screen next to each bay number:
battery at 3.8 V, ready for storageRdy
battery coldCold
battery warmWrm
battery hotHot
Error, press SET key for infoErr
percentage of charge%
Charging or discharging may take several hours. The remaining time is dis-
played as Time to 3.8 V in the battery monitoring menu (instead of Time to
Full).
To exit storage mode:
1. Enter the utility menu by holding both arrow keys.
2. Navigate to the Storage Mode menu and press the SET key.
3. Use the arrow keys to select Off.
4. Press the SET key to exit.
When batteries are ready for storage, they should be removed from the
charger and placed into a temperature controlled area. Recommended battery
storage temperature is 0°C (10°F) to 25°C (77°F).
Controls And Connectors
① LCD screen
Displays battery status and menu settings
② Control keys
For navigating the LCD screen. Press and hold both arrow keys to enter or exit the utility menu.
③ Charging module
Interchangeable modules for handheld and bodypack batteries.
④ Charge Status LED
Indicates battery charge status
⑤ Monitoring Selection LED
This white LED shows which battery is selected in the monitoring menu.
⑥ AC power in
Connect to AC mains with supplied power cable.
⑦ AC power cascade
Powers additional units.
Shure IncorporatedAXT900 Rack Mount Charging Station
2017/10/102/7

⑧ Ethernet ports (2)
Connect to an Ethernet network to enable remote control and monitoring.
⑨ Network status LED (green)
Off = No network link
On = Network link active
Flashing = Network link active, flash rate corresponds to traffic volume.
⑩ Network speed LED (amber)
Off = 10 Mbps
On = 100 Mbps
⑪ Cooling fan vent
Clean fan screen as needed to maintain airflow.
⑫ Power switch
Powers the unit on and off.
Charger System
SET
AXT 900
AXT900
ௗ
Controls
1. Use the arrow keys to scroll to the desired menu.
2. Press the SET key to enter the selected menu item.
3. Use the arrow keys to change a menu parameter.
4. Press SET to save the setting.
Ÿ
Ÿ
SET
Press and hold both arrow keys to enter or exit the Utility menu.
Tip: Press and hold the SET button for 1 second to activate the Hardware Identify feature in Wireless Workbench.
Home Screen
When powered on, the charger displays the home screen. Icons indicate the charge level of each battery, and the display alternates to show approximate hours
and minutes remaining until the battery is fully charged.
The numbers on the screen correspond to the charging bays 1 through 8 from left to right.
Shure IncorporatedAXT900 Rack Mount Charging Station
3/72017/10/10

Ÿ
Ÿ
SET
4
3
2
1
8
7
6
5
The following messages may be display next to the bay number to indicate battery status:
calculating time to fullCALC
battery coldCOLD
battery warmWARM
battery hotHOT
recovery mode activeRecovery
error - press SET key for infoError
Time to Full
Displays the time remaining until the battery is fully charged.
IMPORTANT: Battery might not be charged to full capacity if any of the fol-
lowing status indicators appear:
Cold
Charging stopped because battery temperature is too cold. Charging will re-
sume when battery temperature increases.
Warm
Battery charging to less than full capacity (not less than 75%) because of
elevated temperature. The amber LED will illuminate when charging has
stopped.
Hot
Charging stopped because battery temperature is too hot.
Battery Health
This displays the health of a selected battery as a percentage of the charge
capacity of a new battery. Charge capacity (battery life when fully charged)
will decline as a result of repeated charge cycles, age, or storage conditions.
Cycle Count
Displays the total number of times that the battery has undergone one full
count of discharge and charge. Recharging after discharging half way counts
as one half of a cycle. Recharging after discharging a quarter of the way
counts as one quarter of a cycle.
Charge Status
Displays charge as a percentage of the total battery capacity. Also displays
charge in milliampere-hours (mAh).
Batt.Temp. (Battery Temperature)
Displays both the battery temperature (in Celsius and Fahrenheit) and the
status, as follows:
[Normal]
Battery temperature = 0°C to 45°C (32°F to 113°F).
[Cold]
Battery temperature = 0°C (32°F) or lower.
[Warm]
Battery temperature = 45°C to 60°C (113°F to 140°F) .
[Hot]
Battery temperature = 60°C (140°F) or higher.
Note:If warm or hot, try setting the fan to Always On or increasing ventilation
to the rack.
Network Status
Active
Indicates connectivity with other devices on the network.
Inactive
No connectivity with other devices on the network.
Note: IP address must be valid to enable networked control.
Utility Menu
Press and hold both arrow keys to enter and exit the utility menu, which is
used to access network and display settings.
SET hold both arrow keys
Device ID
This eight-character name is displayed when this device is detected on other
network devices or in WWB software.
1. Press SET key to enable editing.
2. Use the arrow keys to change the characters.
3. To finish editing, press the SET key until none of the characters are
highlighted.
IP Address Mode: Automatic
This is the default setting for use with a DHCP server, which automatically
assigns an IP address.
1. Navigate to the IP Mode menu and press the SET key.
2. Use the arrow keys to highlight Automatic.
3. Press the SET key.
Shure IncorporatedAXT900 Rack Mount Charging Station
2017/10/104/7

4. Use the arrow keys to move the ► to select OK to save or Cancel to
discard, and then press the SET key.
IP Address Mode: Manual
Use manual IP addressing to set the IP address and subnet mask when a
DHCP server is not available.
1. Navigate to the IP mode menu and press the SET key.
2. Use the arrow keys to highlight Manual.
3. Press the SET key to enable editing of the IP address and the subnet
mask.
4. Use the arrow keys to move the ► to select IP: or Sub:
5. Use the arrow keys and the SET key to edit the IP address and subnet
mask.
6. Use the arrow keys to move the ► to select OK to save or Cancel to
discard, and then press the SET key.
MAC (MAC Address)
Displays the MAC address, which is an embedded, uneditable identification
number unique to each device. Used by the network and WWB software to
identify components.
Display Invert
This changes the LCD menu from white text on dark background to dark text
on a light background.
Firmware
Displays the version of firmware installed on this device.
Fan (Cooling Fan Mode)
Automatic
The fan is enabled and adjusts speed based on the internal temperature of
the unit.
Always on
The fan runs continuously at maximum speed to provide maximum cooling
in warm environments.
Serial Number
Displays the serial number.
Brightness
Sets the brightness of the LCD to low, medium, or high.
Storage Mode
OFF
Normal charge.
Store at 3.8V
Charges or discharges all batteries to bring them to a 3.8 volts, ideal for long
term storage.
Troubleshooting
Battery is inserted incorrectly or battery cannot
accept a charge. Check battery temperature.
Charge status LED does not
illuminate.
Battery discharged below 3.0 volts. Try another
battery.
Battery does not charge
Service Fans Maintenance Message
The charger displays the Service Fans message when the fans are unable
to cool efficiently.
• Press any key to suppress the message for 20 seconds.
• Service the fans or increase ventilation to the unit to clear the message.
Ÿ
Ÿ
SET
Service
Fans
Firmware Updates
Firmware is embedded software in each component that controls functional-
ity. Periodically, new versions of firmware are developed to incorporate addi-
tional features and enhancements. To take advantage of design improve-
ments, new versions of the firmware can be uploaded and installed using
the Firmware Update Manager tool available in WWB6 software. Firmware
is available for download from .
Specifications
Battery Type
Up to 8 rechargeable Li-Ion batteries (AXT910/920/920SL)
Charge Time
50%=1 hour; 100%=3 hours
Charging Module Type
Up to 4 charging modules (AXT901 or AXT902) in any combination
Operating Temperature Range
-18°C (0°F) to 63°C (145°F)
Battery Charging Temperature Range
0°C (32°F) to 60°C (140°F)
Shure IncorporatedAXT900 Rack Mount Charging Station
5/72017/10/10
Other manuals for AXT900
2
Table of contents
Other Shure Batteries Charger manuals

Shure
Shure AXT900 User manual

Shure
Shure SBC450 User manual

Shure
Shure SBC840M User manual

Shure
Shure SBC200 User manual

Shure
Shure AXT900 User manual

Shure
Shure Axient AXT903 User manual

Shure
Shure Axient AXT903 User manual

Shure
Shure SBC200 User manual

Shure
Shure SBC210LM User manual

Shure
Shure SBC840 User manual