manuals.online logo
Brands
  1. Home
  2. •
  3. Brands
  4. •
  5. Shure
  6. •
  7. Microphone
  8. •
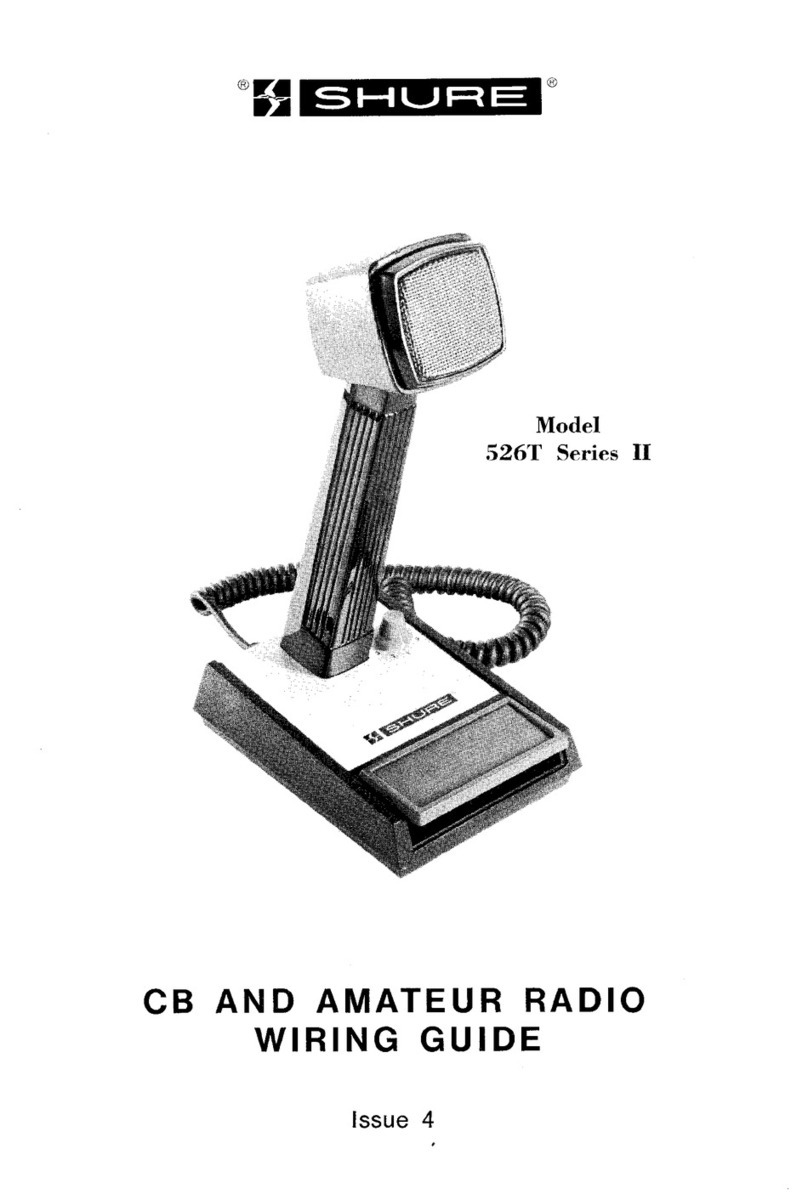
  9. Shure Microflex MX400D Series User manual

Shure Microflex MX400D Series User manual

GENERAL
Shure MicroflexMX400D Series microphones are miniature
electret condenser gooseneck microphones with a desktop base
and attached 3 m (approximate)/10 ft cable. The desktop base al-
lows these microphones to be used in multi-purpose rooms where
quickset-upisrequired,orwherepermanentinstallationisimpracti-
cal.
FEATURES
•
Wide dynamic range and frequency
response for accurate
sound reproduction across the audio spectrum
•
Interchangeable cartridges provide the right polar pattern
for any application
•
Balanced, transformerless output for increased immunity to
noise over long cable runs
•
Programmable on/off switch and LED on/off indicator
•
Logic input and output terminals for remote control or use
with automatic microphone mixers
•
Snap-fit foam windscreen
MODEL VARIATIONS
•MX412D: 304.8 mm (12 in.) desktop mini-condenser,
gooseneck-mounted microphone.
•MX418D:457.2mm(18in.)desktopmini-condenser,goose-
neck-mounted microphone.
SELECTING A POLAR PATTERN
All Microflexmicrophones are available with any one of three
interchangeable cartridges. The polar pattern of the cartridge is
indicated by the model number suffix:
/C = Cardioid, /S = Supercardioid, /O= Omnidirectional
Cardioid (C). Recommended for general sound reinforcement
applications. Pickup angle (–3 dB) = 130°.
Supercardioid (S). Recommended for sound reinforcement
applications requiring narrower or more distant coverage. Pickup
angle (–3 dB) = 115°.
Omnidirectional(O). Recommended forrecordingorremote
monitoring applications. Pickup angle = 360°.
GENERAL INSTALLATION GUIDELINES
1. Aim the microphone toward the desired sound source,
such as the talker, and away from any unwanted sound
source, such as a loudspeaker.
2. Place the microphone cartridge within 15 to 30 cm (6 to 12
in.) of the desired sound source.
3. Always use the supplied windscreen or the optional metal
windscreen to control breath noise.
4. If four or more microphones will be on at the same time, use
of an automatic mixer, such as the Shure SCM810 or
FP410, is recommended to minimize feedback and noise.
MICROPHONE INSTALLATION
Securing a Microphone to a Mounting Surface (Figure 1)
1. InstalltwoNo.6 woodscrews,50.8mm(2in.)apart, onthe
mounting surface.
2. Placethekey holesoverthescrew headsandpushthe mi-
crophone into position. Adjust the height of the screws as
necessary to secure the microphone.
Installing the Foam Windscreen (Figure 2)
1. Press the foam windscreen onto the microphone until it
snaps into the groove located below the cartridge.
2. To remove the windscreen, spread the slot in its mounting
ringwitha screwdriver or thumbnail and pull the windscreen
off carefully.
INTERNAL DIP SWITCH FUNCTIONS
All MX400D models have internal DIP switches that allow the
user to program the On/Off switch for a variety of applications. To
gain access to the DIP switches, remove the bottom plate.
LOGIC TERMINAL DEFINITIONS
LOGIC GND Terminal: Connectsto the logic ground of an auto-
matic mixer, switcher, or other equipment. Can be modified to pre-
vent ground loops. Refer to the
Logic Modifications
paragraph.
SWITCH OUT Terminal: Provides a TTL logic low (0 Vdc)
whenthemembraneswitchispressed. ProvidesTTLlogichigh
(5 Vdc) otherwise. This signal is available at all times for all
switch settings. The Switch Out function provides momentary
closure when S1 is Off and latching closure when it is On.
LOGIC MODIFICATIONS
Isolating Logic Ground from Audio Ground (Figure 6)
1. Remove jumper R40 from the top of the circuit board.
2. Make sure LOGIC GND terminal connects to the logic ground
of the automatic mixer, switcher, or other equipment.
Changing SWITCH OUT Terminal to Momentary,
Independent of S1 position. (Figure 6)
To accommodate interface equipment requiring momentary
closure of the microphone (even when the desired microphone
function is latching on/off), proceed as follows:
1. Remove R45 from the top of the circuit board.
2. Reinstall R45 at location R46 on the top of the circuit board.
Shure Brothers Incorporated
222 Hartrey Avenue
Evanston IL 60202-3696 U.S.A.
MicroflexRMX400D Series User Guide
Desktop Microphones
27D2831 (SF)
E1999, Shure Brothers Incorporated Printed in U.S.A.
2
Custom Switch Modifications
S4 is available for custom logic modifications. When S4 isin
the ON position, pad W4 is connected to pad W5.
NOTE: For technical data by Fax, phone 1-800-488-3297 and
followtherecordedinstructions. Foradditional technical assis-
tance, phone Shure at (847) 866-2200. In Europe, phone
49-7131-72140.
SHURE, the Shure logo, and MICROFLEX are registered trade-
marks of Shure Brothers Incorporated.
REPLACEMENT PARTS AND ACCESSORIES
Snap-Fit Foam Windscreen (4 per pkg.) RK412WS. . . . . . .
Foam Ball Windscreen A99WS. . . . . . . . . . . . . . . . . . . . . . . . .
Locking Metal Windscreen A412MWS. . . . . . . . . . . . . . . . . . .
Replacement 3 m (10 ft) XLR Cable C120. . . . . . . . . . . . . . .
Custom Logic Cable (specify length) 15A523/1. . . . . . . . . . .
Omnidirectional Cartridge R183B. . . . . . . . . . . . . . . . . . . . . .
Supercardioid Cartridge R184B. . . . . . . . . . . . . . . . . . . . . . . .
Cardioid Cartridge R185B. . . . . . . . . . . . . . . . . . . . . . . . . . . . .
Base Plate Bumpers 80A8053A. . . . . . . . . . . . . . . . . . . . . . . .
DESIRED MICROPHONE FUNCTION USER ACTION/LED DISPLAY DIP SWITCH SETTINGS
Push to Mute (As Shipped) Press and hold switch to temporarily mute micro-
phone; release switch to unmute
LED turns on when microphone is active
S1 = OFF
S2 = OFF
S3 = OFF
Push to Talk Press and hold switch to activate microphone; re-
lease switch to mute
LED turns on when microphone is active
S1 = OFF
S2 = ON
S3 = OFF
Push On/Push Off Press switch to toggle microphone on or off
LED turns on when microphone is active S1 = ON,
S2 = ON for muted initial state
S2 = OFF for active initial state
S3 = OFF
Switch Deactivated, Mic Always Active No action, LED Always OFF S3 = ON
Switch Deactivated, Mic Always Active Short LED IN terminal to LOGIC GROUND terminal
LED Always ON S3 = ON
Automatic Mixer Mode If S1=OFF, SWITCH OUT signal will be momentarily
logic low when switch is pressed
If S1=ON, SWITCH OUT signal will be latching logic
low when switch is pressed
Connect SWITCH OUT signal to various logic inputs
of automatic mixer for custom functions
Connect mixer channel GATE OUT to microphone
LED IN. LED on microphone turns on when its
channel is gated on
S1 = ON or OFF
S3 = ON
SPECIFICATIONS
Frequency Response (Figure 3)
50 to 17,000 Hz
Polar Pattern (Figure 4)
Output Impedance (at 1000 Hz)
Rated at 150 Ω (180 Ω actual)
Open Circuit Sensitivity
At 1 kHz, ref. 1 V per microbar*
Cardioid: –53.5 dBV (2.11 mV)
Supercardioid: –52.5 dBV (2.37 mV)
Omnidirectional: –48.0 dBV (3.98 mV)
*1 microbar = 74 dB SPL
At 1 kHz, ref. 1 V per Pascal*
Cardioid: –33.5 dBV (21.1 mV)
Supercardioid: –32.5 dBV (23.7 mV)
Omnidirectional: –28.0 dBV (39.8 mV)
*1 Pascal = 94 dB SPL
Maximum SPL (1 kHz at 1% THD, 1 kΩload)
Cardioid: 123.0 dB
Supercardioid: 122.0 dB
Omnidirectional: 117.5 dB
Equivalent Output Noise (A-weighted)
Cardioid: 29.0 dB SPL
Supercardioid: 28.0 dB SPL
Omnidirectional: 23.5 dB SPL
Signal to Noise Ratio (referenced at 94 dB SPL)
Cardioid: 65.0 dB
Supercardioid: 66.0 dB
Omnidirectional: 70.5 dB
Dynamic Range with 1 kΩLoad
94.0 dB
Common Mode Rejection
45.0 dB minimum
Mute Switch Attenuation
50.0 dB minimum
Preamplifier Output Clipping Level (1% THD)
–6.0 dBV (0.5 V)
Polarity
Positive sound pressure on diaphragm produces
positive voltage on pin 2 relative to pin 3 of XLR
output connector.
Power Requirements
11 to 52 Vdc phantom, 2.0 mA
Environmental Requirements
Operating Temperature Range: –18°to 57°C (0°
to 135°F)
Relative Humidity: 0 to 95%
Dimensions (Figure 5)
Weight
MX412D: 0.81 kg (1.80 lbs) net, 1.63 kg (3.62 lbs)
packaged
MX418D: .82 kg (1.82 lbs) net, 1.64 kg (3.64 lbs)
packaged
Cable Type (Figure 7)
The attached custom cable contains a shielded audio
pairand three unshielded conductors for logic control.
Overall diameter = 0.6 mm (0.165 in.)
Certification
ConformstoEuropeanUniondirectives,eligibleto
bear CE marking; meets European Union EMC
Immunity Requirements (EN 50 082–1, 1992).
11
150o
120o
150o
120o
180o
30o
60o
90o
30o
60o
0
150o
120o
150o
120o
180o
30o
60o
30o
60o
–5 dB
0
90o
–5 dB
–10 dB
–15 dB
90o90o
500 1,000 2,000 5,000 10,000 20,000
50 100 20020
0
+10
–10
500 1,000 2,000 5,000 10,000 20,000
50 100 20020
0
+10
–10
500 1,000 2,000 5,000 10,00050 100 20020
0
+10
–10
250 Hz
500 Hz
1000 Hz
2500 Hz
6400 Hz
10000 Hz
250 Hz
500 Hz
1000 Hz
2500 Hz
6400 Hz
10000 Hz
250 Hz
500 Hz
1000 Hz
2500 Hz
6400 Hz
10000 Hz
150o
120o
150o
120o
180o
30o
60o
90o
30o
60o
0
150o
120o
150o
120o
180o
30o
60o
30o
60o–10 dB
–15 dB
0
90o
–10 dB
–15 dB
–20 dB
90o
150o
120o
150o
120o
180o
30o
60o
90o
30o
60o
0
90o
150o
120o
150o
120o
180o
30o
60o
90o
30o
60o
0
–5 dB
–10 dB
–15 dB
90o
90o
20,000
–20 dB
–5 dB
–10 dB
–15 dB
–20 dB
–5 dB
–20 dB
–5 dB
–20 dB –20 dB
–15 dB
–10 dB
FIGURE 3 •FIGURE 3 •ABBILDUNG 3 •FIGURA 3 •FIGURA 3 FIGURE 4 •FIGURE 4 •ABBILDUNG 4 •FIGURA 4 •FIGURA 4
SUPERCARDIOID
SUPERCARDIOÏDE
SUPERKARDIOID SUPERCARDIOIDE
SUPERCARDIOIDE
CARDIOID
CARDIOÏDE
KARDIOID CARDIOIDE
CARDIOIDE
OMNIDIRECTIONAL
OMNIDIRECTIONNELLE
ALLE RICHTUNGEN OMNIDIRECCIONAL
OMNIDIREZIONALE OMNIDIRECTIONAL
OMNIDIRECTIONNELLE
ALLE RICHTUNGEN OMNIDIRECCIONAL
OMNIDIREZIONALE
CARDIOID
CARDIOÏDE
KARDIOID CARDIOIDE
CARDIOIDE
SUPERCARDIOID
SUPERCARDIOÏDE
SUPERKARDIOID SUPERCARDIOIDE
SUPERCARDIOIDE
Hz
Hz
Hz
TYPICAL FREQUENCY RESPONSE
COURBE DE RÉPONSE TYPIQUE
TYPISCHER FREQUENZGANG
RESPUESTA DE FRECUENCIA TIPICA
RISPOSTA IN FREQUENZA TIPICA
TYPICAL POLAR PATTERNS
COURBES DE DIRECTIVITÉ TYPIQUES
TYPISCHE POLARMUSTER
PATRONES DE CAPTACION POLAR TIPICOS
DIAGRAMMI POLARI TIPICI
AB
50.8 mm
(2 in.)
FIGURE 1 •FIGURE 1 •ABBILDUNG 1 •FIGURA 1 •FIGURA 1 FIGURE 2 •FIGURE 2 •ABBILDUNG 2 •FIGURA 2 •FIGURA 2
Á
FENTE
GORGE D’ENCLIQUETAGE
COUPE–VENT
STECKRASTRILLE KERBE
WINDSCHIRM
RANURA PARA ANILLO ELASTICO SEPARACION
PANTALLA
SCANALATURA PER MONTAGGIO ASCATTO
APERTURA
SCHERMO PARAVENTO
SLOT
WINDSCREEN
SNAP-FIT GROOVE
12
102.1 mm
(4 9/16 in.) 50.8 mm
(2 1/32 in.)
161.9 mm
(6 3/8 in.)
MX412D: 355.4 mm (14 in.)
MX418D: 501.7 mm (19 3/4in.)
approximately 3 m
(10 ft)
FIGURE 5 •FIGURE 5 •ABBILDUNG 5
•FIGURA 5 •FIGURA 5
FIGURE 6 •FIGURE 6 •ABBILDUNG 6
FIGURA 6 •FIGURA 6
FIGURE 9 •FIGURE 9 •ABBILDUNG 9 •FIGURA 9 •FIGURA 9
RED (+)
ROUGE
ROT
ROJO
ROSSO
SHIELD
BLINDAGE
SCHILD
BLINDAJE
SCHEMATURA
BLACK-
NOIR
SCHWARZ-
NEGRO
NERO
ORANGE NARANJA ARANCIA
LED IN S ENTREE DEL SLED EIN
ENTRADA DE LED SINGRESSO LED
WHITE SBLANC SWEISS-
BLANCOS BLANCA
SWITCH OUT SCOUPURE
AUSCHLATER AUS
SALIDAD DE INTERUPTER
USCITA INTERUTORE
GREEN SVERT SGRUN SVERONE
LOGIC GROUND SMASSE LOGIQUE SLOGISCHE ERDE
STIERRA DE CIRCUITOS LOGICOS SMASSA LOGICA
CABLE TYPE STYPE DE CABLE SKABLTYP STIPO DE CABLE
TIPO DE CAVO
FIGURE 7 •FIGURE 7 •ABBILDUNG 7
FIGURA 7 •FIGURA 7
MIC
ELEMENT
220 pF
220 pF
FET
86E8958 W1
W2
W3
SHIELD BLINDAGE SCHILD BLINDAJE SCHERMATURA
RED ROUGE ROT ROJO ROSSO
BLACK NOIR SCHWARZ NEGRO NERO
FIGURE 8 •FIGURE 8 •ABBILDUNG 8
FIGURA 8 •FIGURA 8
MICROPHONE WIRING DIAGRAM
RED ROUGE ROT ROJO ROSSO
BLACK NOIR SCHWARZ NEGRO NERO
WHITE/SHIELD BLANC/BLINDAGE WEIß/SCHILD
BLANCO/BLINDAJE BIANCO/SCHERMATURA
BLACK NOIR SCHWARZ NEGRO SCHEMATURA
RED ROUGE ROT ROJO ROSSO
A.C. Voltage
D.C. Voltage A.C. Voltage, Mic Off
D.C. Voltage, Mic Off Printed Clrcuit Ground
Case Ground
(+)/(–)indicateA.C.polarityrelativetoinputtestsignal.
NOTES:
3. 1. All resistors1/10 Watt, 1%, 0805 unless. . . . .
otherwise specified.
4. 2. Electrolytic capacitors shown in µF, ±10%,. . . . .
50V or more, unless otherwise specified.
5. 3. The elements U1E and U2C designate Pow-. . . . .
er (+Vcc) and Ground Terminals only the corresponding
ICs.
6. 4. The following symbols denote:. . . . .
7. 5. All voltages measured with a meter or oscilli-. . . . .
scope having 10 megaohm or greater input impedance with
preamp input driven by a 0.1 Vrms, 1kHz signal through the
test circuit shown below. A Shure M367 mixer or equivalent,
with 48 V phantom power switched on, supplies the required
power and load to the preamp. Values shown may vary +/–
20%.
8. 6. Standard symbols indicate voltages for mic on.. . . .
Symbolswithdarkedgesindicatevoltagesformicoff(seenote
4). Note: Mic is truned off by holding the membrane switch
closed, shorting J4.
0.1 Vrms
1 kHz
TEST CIRCUIT
W2
W3
W1
30.1 K
1.82 K
10 µF, 10V
+Vcc
+Vcc
+Vcc
+Vcc
+Vcc+Vcc
+Vcc
+Vcc
+Vcc
+Vcc
+Vcc
+Vcc +Vcc +Vcc NOT INSTALLED
Logic Ground

Other manuals for Microflex MX400D Series

3

This manual suits for next models

2

Other Shure Microphone manuals

Shure BETA 58A User manual

Shure

Shure BETA 58A User manual

Shure 527A User manual

Shure

Shure 527A User manual

Shure MV5 User manual

Shure

Shure MV5 User manual

Shure Microflex MX400D Series User manual

Shure

Shure Microflex MX400D Series User manual

Shure BETA 58A User manual

Shure

Shure BETA 58A User manual

Shure KSM42 User manual

Shure

Shure KSM42 User manual

Shure 520DX User manual

Shure

Shure 520DX User manual

Shure KSM141 User manual

Shure

Shure KSM141 User manual

Shure 515BSLG24F User manual

Shure

Shure 515BSLG24F User manual

Shure 562 User manual

Shure

Shure 562 User manual

Shure KSM27 User manual

Shure

Shure KSM27 User manual

Shure CVGD User manual

Shure

Shure CVGD User manual

Shure WL183 User manual

Shure

Shure WL183 User manual

Shure Microflex MX300 series User manual

Shure

Shure Microflex MX300 series User manual

Shure Microflex MX202B/C User manual

Shure

Shure Microflex MX202B/C User manual

Shure PGA 56 User manual

Shure

Shure PGA 56 User manual

Shure Commando 430SL User manual

Shure

Shure Commando 430SL User manual

Shure PSM400 Wireless Personal User manual

Shure

Shure PSM400 Wireless Personal User manual

Shure Microflex MX400SE Series User manual

Shure

Shure Microflex MX400SE Series User manual

Shure AMS22 User manual

Shure

Shure AMS22 User manual

Shure Microflex MX395 User manual

Shure

Shure Microflex MX395 User manual

Shure MXA710 Series User manual

Shure

Shure MXA710 Series User manual

Shure SM94 User manual

Shure

Shure SM94 User manual

Shure Conference Phone User manual

Shure

Shure Conference Phone User manual

Popular Microphone manuals by other brands

Radio Shack 21-1177 user manual

Radio Shack

Radio Shack 21-1177 user manual

Syska SmartMeeting user manual

Syska

Syska SmartMeeting user manual

Earthworks P30/HC owner's manual

Earthworks

Earthworks P30/HC owner's manual

AKG C400BL Specifications

AKG

AKG C400BL Specifications

Zhihuiwa Electronic Q6 operating instructions

Zhihuiwa Electronic

Zhihuiwa Electronic Q6 operating instructions

Redback A 4660 installation manual

Redback

Redback A 4660 installation manual

Synco CMic-V2 user manual

Synco

Synco CMic-V2 user manual

Electro-Voice 671A Specification sheet

Electro-Voice

Electro-Voice 671A Specification sheet

Sennheiser Evolution E865 quick guide

Sennheiser

Sennheiser Evolution E865 quick guide

Audix MGN Series manual

Audix

Audix MGN Series manual

Senal MS-66-K user guide

Senal

Senal MS-66-K user guide

CAD Audio MB-18 Specifications

CAD Audio

CAD Audio MB-18 Specifications

Yamaha YVC-MIC1000EX user manual

Yamaha

Yamaha YVC-MIC1000EX user manual

TIE TG11 user manual

TIE

TIE TG11 user manual

Beyerdynamic M PRO X Series user manual

Beyerdynamic

Beyerdynamic M PRO X Series user manual

AKG SOLIDTUBE Specifications

AKG

AKG SOLIDTUBE Specifications

Avee Avee325 Setup Instructions & User Guide

Avee

Avee Avee325 Setup Instructions & User Guide

Sony ECM-TS125 Service manual

Sony

Sony ECM-TS125 Service manual

manuals.online logo
manuals.online logoBrands
  • About & Mission
  • Contact us
  • Privacy Policy
  • Terms and Conditions

Copyright 2025 Manuals.Online. All Rights Reserved.