Sicce BLAGDON PHOTECH AMPHIBIOUS User manual

Established over 40 years ago, Blagdon are
committed to producing a comprehensive
range of high quality, easy to use, pond
equipment. An ongoing programme of
research and development ensures
excellent performance and value for all
their customers. This product excellence is
demonstrated by Blagdon’s award winning
range of water gardening equipment. As
a result Blagdon’s reputation for quality is
unrivalled amongst experienced pond
gardeners and retailers alike.
Blagdon -The Pond Masters
The name you can rely on
Interpet
Dorking, Surrey, RH4 3YX
Leaflet Code: POS 0008
THE POND MASTERS GUIDE TO
PHOTECH
AMPHIBIOUS
PA35/PA320/PA520
Photech Instructions AW 23/3/06 10:12 am Page 1

Congratulations on buying a Blagdon Photech light.
Photech Amphibious garden and pond lighting
creates beautiful lighting effects.
Quick and easy to install with a wide range
of versatile installation options.
IMPORTANT
Please attach proof of purchase to this manual
and file in a safe place.
Getting to know your Photech Amphibious Lighting system ........................ 2
Spare parts ................................................................................................... 2-3
Technical Specification .................................................................................... 3
Installation ..................................................................................................... 4
Electrical installation ........................................................................................ 4
Location ........................................................................................................... 5
Adjusting the spotlights ................................................................................. 6-7
Maintenance ................................................................................................... 8
Faults - Problems Procedure ........................................................................... 9
Consumer Advice Contact Details .................................................................... 9
Guarantee ....................................................................................................... 9
1. CONTENTS
1
THE POND MASTERS GUIDE TO
PHOTECH
AMPHIBIOUS
PA35/PA320/PA520
Photech Instructions AW 23/3/06 10:12 am Page 3
GETTING TO KNOW YOUR PHOTECH
AMPHIBIOUS LIGHTING SYSTEM GETTING TO KNOW YOUR PHOTECH
AMPHIBIOUS LIGHTING SYSTEM
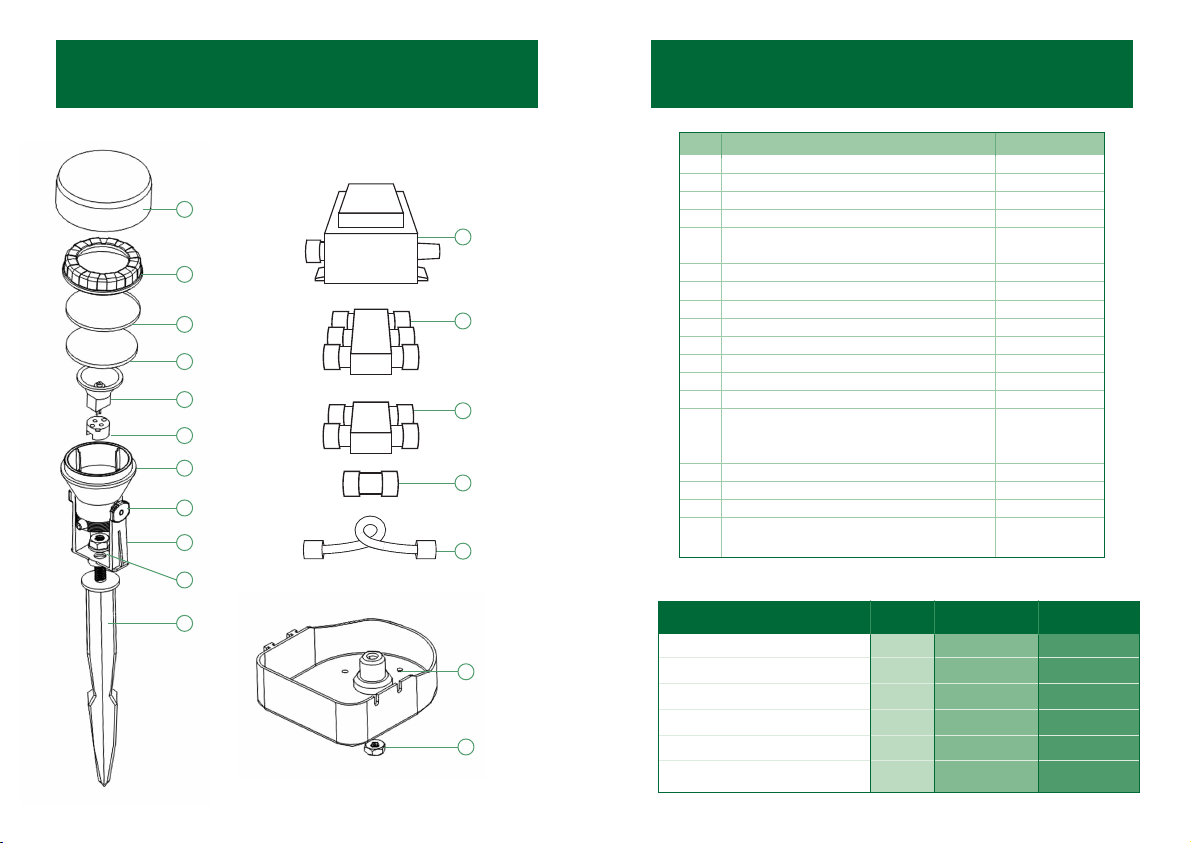
No. Photech Amphibious Parts Description Spare Code
1. Coloured lenses set of 4 1021289
2. Lamp cover 1021296
3. Glass lens 1021302
4. Lens ‘O’ ring 1021319
5. Lamp 20w 1021326
Lamp 35w (single set only) 1021333
6. Lamp fitting -
7. Lamp housing -
8. Oval locking washer 1021340
9. ‘U’ Bracket 1021357
10. Fixing nut and washers 1021364
11. Garden spike 1021371
12. Pond light support base 1021388
13. Fixing nut and washers 1021364
14. Weatherproof transformer, single 35w 1021395
3 x 20w 1021401
5 x 20w 1021418
15. 5 way connector 1021425
16. 3 way connector 1021432
17. Extension cable connector 1021449
18. 5 meter extension cable with connector 1021456
10 meter extension cable with connector 1021463
Technical Specification
Photech Amphibious Light PA35 PA320 PA520
Cable Mains 3m 3m 3m
Cable Low Voltage 10m 5m + 3x 5m 5m + 5x 5m
Transformer Voltage 230V 230V 230V
Transformer Hertz 50Hz 50 Hz 50 Hz
Low voltage 12V 12V 12V
Lamp Wattage 35w 20W 20W
3Glass lens
4‘O’ ring
5Lamp
6Lamp fitting
7Lamp housing
8Oval locking
washer
9‘U’ bracket
10 Fixing nut
and washers
11 Garden
spike
14 Transformer
1Coloured
lenses
2Lamp cover
15 5 way
connector
(PA520 pack
only)
16 3 way
connector
(PA320 pack
only)
17 Extension cable
connector
(PA35 pack only)
18 Extension
cable
12 Pond light
support
base
13 Extension
cable
2 3
Photech Instructions AW 23/3/06 10:12 am Page 5
INSTALLATION INSTALLATION
4 5
Electrical installation
The power supply must meet the specifications on the product.
The transformer is intended to be used with either a weatherproof
switchbox cable connector or permanently connected to the fixed
wiring in the main system other than by means of a plug and socket.
The cores in the supply cable are coloured in accordance with the following
code: Brown = Live, Blue = Neutral, Green/Yellow = Earth.
The electric cable is permanently connected and sealed in the transformer
body. If the supply cable is damaged the transformer must not be used.
Do not use the supply cable to lift the transformer as this may cause damage.
WARNING - THIS PRODUCT MUST BE EARTHED
A Residual Current Device (RCD), also know as the Residual
Current Circuit Breaker (RCCB), with a tripping current not
exceeding 30mA must be installed in the supply circuit.
A means of disconnection from the supply having a contact separation
of at least 3mm in all poles must be incorporated in the fixed wiring.
For permanent installations to the mains supply, it is necessary to conform to
the regulations of the local electricity authority and this would include the use
of a metal or plastic conduit to protect the cable.
Attention has been drawn to the fact that special rules may exist concerning
the installation of your transformer (i.e. local building regulations).
Always disconnect the mains electricity supply whilst the equipment is being
installed, repaired, maintained or handled. Consult a qualified electrician if in
any doubt about wiring this product to the main supply.
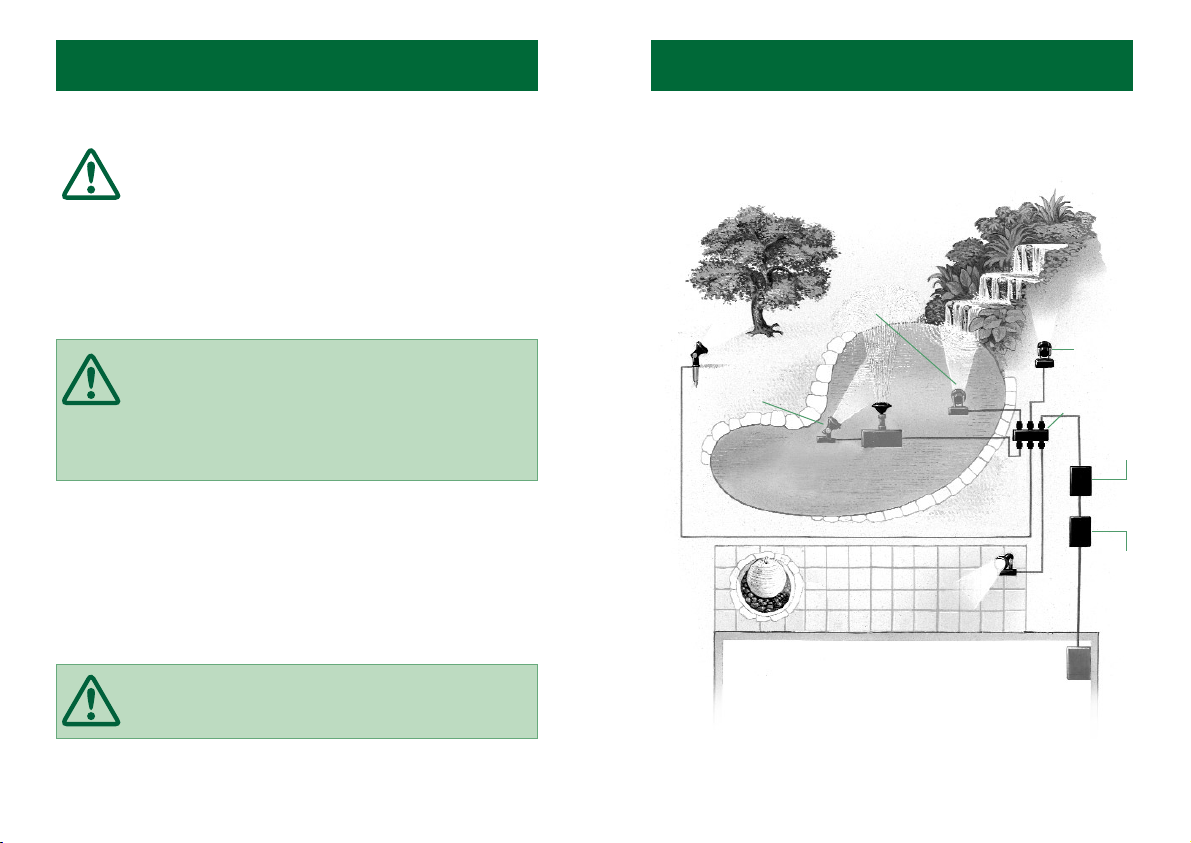
Warning - This transformer must not be used in ponds.
For external installation only.
OUTDOOR
SWITCH BOX
LOW VOLTAGE
CONNECTOR
EXTERNAL
WATERFALL
LIGHTING
EXTERNAL PATIO
& PATH LIGHTING
EXTERNAL
UPLIGHTING OF
TREES & SHRUBS
UPLIGHTING
A WATERFALL
(SUBMERGED)
UPLIGHTING
A FOUNTAIN
(SUBMERGED)
OUTDOOR
WEATHERPROOF
TRANSFORMER
MAINS POWER
SUPPLY (HOUSE,
SHED or GARAGE)
EXAMPLE SHOWN: PA520
(5x 20W LAMP SET)
Photech Instructions AW 23/3/06 10:12 am Page 7
INSTALLATIONINSTALLATION
6 7
GARDEN SPIKE:
Insert the garden spike
into soil or gravel for
external installation.
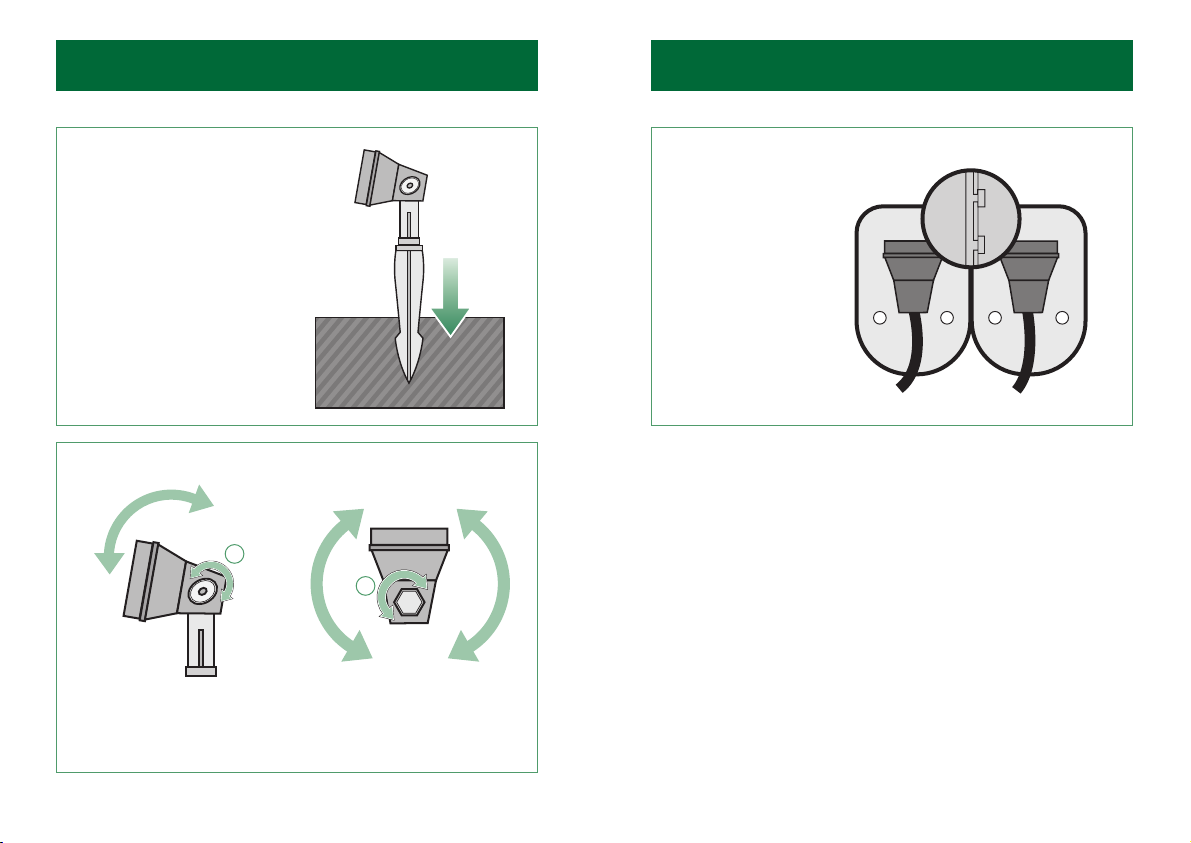
POND LIGHT BASE:
The light bases can be
linked and weighted
with stones or gravel
for stability.
SPOTLIGHT ADJUSTMENT:
1. Release the oval
locking washer and
tighten when in position.
2. Release the fixing
nut and tighten
when in position.
2
1
Photech Instructions AW 23/3/06 10:12 am Page 9

8
FAULTS - PROBLEMS PROCEDURE
Before returning your Photech Amphibious pond and garden lighting system to
your dealer or contacting our Consumer Advice Department, please carry out
the following steps. This will solve most problems quickly and easily.
1. Ensure electrical procedure has been followed fully. Check fuse and any
cable connectors/switch boxes.
2. Return light to point of purchase for inspection and advice (you may
need proof of purchase).
Consumer Advice contact details
Interpet (Blagdon) Consumer Advice Department
Vincent Lane, Dorking, Surrey RH4 3YX
Telephone: 0845 226 7437
(Monday to Friday 10am to 4pm except Bank Holidays - Times may vary)
Fax: 01306 876712 E-mail: [email protected]
This guarantee is offered as an extra benefit and does not affect your statutory
rights as a consumer in any way. This product is guaranteed against defects in
material and workmanship for 2 years from the date of purchase, under normal
usage. The guarantee DOES NOT APPLY in case of improper use, negligence,
lack of maintenance or accidental damage either to the lights, transformer or to
the replaceable parts. If the lights or transformer fail due to a manufacturing
fault within this period it will be either repaired or replaced free of charge.
Liability is limited to replacement of the faulty product only, no other costs will
be reimbursed. This guarantee is not transferable and does not affect your
statutory rights. This guarantee does not confer any rights other than those
expressly set out above. Excludes lamps, O rings, coloured lenses or washers.
GUARANTEE
IMPORTANT
MAINTENANCE
9
Before any operation, turn off the spotlight and disconnect the mains
from the power socket. The spotlight can now be removed from the
pond. If you have used the coloured lens (1), you must remove it,
after which you can unscrew the lamp cover (2) to remove the
transparent glass (3) and associated O ring (4).
When the spotlight has been dismantled in this way, the halogen
lamp (5) can be removed and replaced.
Reassemble in the reverse order.
1
2 3
4 5
Photech Instructions AW 23/3/06 10:12 am Page 11
This manual suits for next models
3
Table of contents
Other Sicce Swimming Pool Lighting manuals

Popular Swimming Pool Lighting manuals by other brands

Steinbach
Steinbach 060060 instructions

Hidrotermal
Hidrotermal HIDRO-SPOT60H Installation and maintenance manual

Pentair Pool Products
Pentair Pool Products FIBERworks 20100100 owner's manual

GSC
GSC 201400008 instructions

Halco
Halco ProLED Pool Lamp Installation and operation guide

Hayward
Hayward ColorLogic owner's manual

Pentair
Pentair Amerlite Installation procedures

ACIS
ACIS weltico 65035TW30 manual

Aqua Quip
Aqua Quip AQUA-STAR installation instructions

J&J Electronics
J&J Electronics ColorSplash XG LPL-F2C Series Installation and operation guide

Intermatic
Intermatic PX Series Installation, operation & service manual

Jandy
Jandy Jandy Pro Series owner's manual


