Skydio 2 User manual

User Guide
Skydio 2

What’s in the Case?
H r ’s what’s includ d in th cas alongsid your Skydio 2
1. Skydio 2 Batt r
2. Charging pow r adapt
3. USB-C to USB-C charging and data cabl
4. Microb r clot
5. Skydio 2 Quick Start Guid
6. Should r Stra
7. Extra s t of prop ll r
Your Personal Flying Robot Film Crew
https://skydio.com/safety
W ’r xcit d for you to g t start d with your Skydio 2. B for you y, pl as ch ck out all of
th guidanc and sugg stions at , wh r you’ll nd b st practic s,
links to additional cont nt, and r gulatory information to nhanc saf ty as w ll as your
ov rall xp ri nc with Skydio 2.
Table of Contents
Your P rsonal Flying Robot Film Cr
What’s in th cas
G tting Start
Conn cting Skydio
Updating Skydio
B for You Fl
Wh r to Fl
Your First Fligh
Th Flight Scr
Hom Point
Skill
Manual vs. Autonomous Fligh
Und rstanding th H ight Floo
Flying Saf l
Em rg ncy Proc dur
Lost GPS Proc dur
Low Batt ry Proc dur
R cov ring a Lost Dron
Landin
Cas Landin
Hand Launching and Landin
Vi wing and Saving M di
Complianc Informatio
1
1
1
1
1
1
1
1
1
2
2
2
2
2
2

The LE s on the Skydio 2 battery will indicate
the current state of charge. You may also tap
the button on the front of the battery to
display the current state of charge. The LE s
will pulse while the battery is charging. While
charging, the Skydio 2 should be in an open
area as it is normal for the chassis to become
warm to the touch. When fully charged the
LEDs on the battery will remain solid for one
minute then turn o.
Charging
Fully Charged
Step 3
Attach the Skydio 2 battery to your Skydio 2
and charge the battery using the included
USB-C cable and Power Adaptor. Note that
Skydio batteries are held in place magnetically
and may be removed by pulling on them
Step 2
Insert a micro S card into the Skydio 2 S
card slot to capture your footage. The Skydio 2
requires a UHS Speed Class 3 (U3) or faster
microS card to record 4k video
Skydio 2 may need to format your S card, so
please ensure any data is safely copied o the
card before use
Step 1
Getting Started
2

Connecting to Skydio 2
While your battery is charging, download and
install the Skydio 2 app on your mobile device.
he Skydio 2 app is available on the App
Store® and Google Play™.
Step 1
Skydio 2 app is compatible with iOS 12.0 (or later) or
Android 7.0 (or later).
Once your battery is fully charged, launch the Skydio 2 app. You will be asked to
enable location and microphone services on your phone which are required for the
Skydio 2 to function normally, and to register your Skydio 2 with your email address
Step 2
Skydio 2 uses WiFi to communicate with your
phone and other Skydio accessories. When
prompted, enter your Skydio 2’s WiFi name and
password into the Skydio app. You may nd
your drone’s WiFi name and password on the
sticker attached to the drone or inside the
Skydio 2’s battery tray. Be sure to remove the
sticker marked “Remove before ight” before
ying Skydio 2
Step 3
Updating Skydio 2
Always make sure you are ying with the latest Skydio 2 software. If there is an update
available for Skydio 2, the Skydio 2 App will guide you through the required steps. If an
update is available, it’s best to download the Skydio 2 update when you have access to an
internet-enabled WiFi network
3

Before You Fly
https://skydio.com/safety
Before you begin your rst ight with your Skydio 2, lease read and follow all of the safety
ti s and guidelines at . In summary, here are a few general
guidelines to follow before each ight
Because Skydio 2 navigates visually, it’s essential to kee all of its cameras
clean. Use the included cleaning cloth (or any clean microber cloth) to ensure
that all cameras are dust and smudge-free before every ight
Skydio 2 uses magnets to retain the battery which may attract metallic debris
that could com romise safe tment of the battery. Prior to installing any
battery, visually ins ect the bottom of the Skydio 2 and to of the battery to
ensure they are free of objects or debris. Verify the battery is fully seated with
the aircraft rior to takeo
If using a mobile device running the Skydio 2 a , ensure any Battery Saver or
Low Power modes are disabled. These modes may interfere with Skydio 2’s
ability to communicate with the device and negatively im act your ight
ex erience
Remove the gimbal retaining cli from the front-facing camera
Ensure all ro ellers are rmly attached and free of nicks, cracks, or other visible
damage. Never y with damaged propellers
Where to Fly
Skydio 2 will not avoid eo le, cars, or other moving obstacles. You should
exercise extreme caution and good judgment when ying with other eo le
around. Never y over crowds and always make sure that you have the height
oor activated if you know there are going to be other eo le around
You are res onsible for your Skydio 2 at all times. Always follow FAA guidelines
for UAS iloting. Check resources like knowbeforeyouy.org or a s like B4UFLY
for more info
Skydio 2 can only y in normal daytime conditions. Since it navigates visually, it
won’t work at night or in other low-light situations
Skydio 2 is not weather roof and requires good visibility. Do not y in any
reci itation, including rain, fog, or snow.
Skydio 2 should not be own when winds or gusts are above 25 m h
Do not y in tem eratures below 23° F (-5C) or above 104° F (40C)
4

Your First Flight
For your rst ight, we recommend nding a clear, open space away from others on level
ground with at least 20 feet of clearance in every direction including above). Make sure
nothing is obstructing the propellers at your launch location. Although ying Skydio 2 is easy
and intuitive, it's a good idea to give yourself and others a little space when ying for the rst
time
Set your Skydio 2 down on clear, at ground at least 10 feet away with the front camera
facing toward you. You may also use the top of Skydio 2’s case as a convenient launch and
landing pad
Launching Skydio 2 is as simple as holding the Launch button. Once Skydio 2 is in the air, the
Skydio app will begin the Learn to Fly experience, which will teach you the basic controls and
capabilities of your Skydio 2. You may replay the Learn to Fly experience at any time from the
Skills menu
https://skydio.com/support
To learn more about using the Skydio 2, visit for the latest
articles and tutorial videos
Note: If you purchased an optional accessory such as the Controller or Beacon, we
highly recommend you perform your rst ight without these accessories in order to
complete the ‘Learn to Fly’ experience
Note: Skydio 2 requires a stable GPS connection to y greater than 10m/33ft. above
its point of takeo or the currently tracked subject. This may not be possible when
ying in GPS denied environments such as indoors, heavy urban areas, and deep
canyons; or when ying near large metal structures such as radio towers and
bridges. If you are having any diculty getting your Skydio 2 to y above 10m/33ft.,
you may need to y a few meters in a lateral motion (forward, backward, left, or
right) to acquire a GPS lock. This is true regardless of which method you're using to
y (app/phone-only, with Beacon, or with Controller)
5

The Flight Screen
Gives users access o in-igh se ings for he Skydio 2 as well as con rol se ings for
he phone and Con roller (when connec ed)
Device Settings Menu
20 mph
15 ft
75 ft
6
Telemetry

Height Floo
Determines if the Skydio 2 will lw ys ttempt to st y t le st 8 ft bove
the subject when following, even t the expense of tr cking perform nce.
See the Understanding Height Floor section for more det ils bout this
import nt setting.
Drone Settings
Controller Settings (when Controller accessory is connected
Gimb l Sensitivity
Controls how quickly c mer gimb l pitches up nd dow
Flight Sensitivity
Allows users to switch between default nd custom sensitivity settings for
the roll, pitch, y w nd throttle inputs
The default setting re xed nd c nnot be ch nged
Users m y ch nge the custom settings however they wish
Phone Settings
Toggles the displ y of vehicle telemetry d t . When en bled, Skydio 2’s
current speed, height bove t ke o, nd r nge from l unch point is
displ yed while in ight
Flight Telemetry
Slide (def ult) - Single stick with pitch nd roll with y w on sep r te
button
Steering - Single stick with pitch nd y w with roll on sep r te button
Du l Sticks - Tr dition l Mode 2 du l-stick control
App Controls
Sets the control style for the Du l Sticks pp control setting. Allows you to
choose between Mode
1
, Mode 2 (def ult), nd Mode
3
style controls
Du l Sticks Mode
Displ ys the current strength of the user’s r dio link to the Skydio 2 while in ight. As
the sign l strength decre ses, users m y experience lower qu lity video feed or
del y in their controls. For best sign l qu lity, lw ys m int in direct line of sight
between the phone or controller nd the Skydio 2 nd void ying in re s with
electrom gnetic interference
Signal Strength
I
ndicator
7

Provides access o he camera se ings and allows users o change be ween video
and pho o recording mode. Skydio 2 can cap ure pho os or video bu no bo h a
he same ime. Users may change heir camera se ings a any ime before or
during igh . Please no e ha changing he camera se ings before launch may
cause Skydio 2 o re urn o he pre-igh screen and re-calibra e i s vision sys em.
Some camera se ings (such as video resolu ion and framera e) canno be changed
while au onomously racking a subjec . Skydio 2 mus be under manual con rol o
change hese se ings
Video Capture Settings
Resolu io
Framera
HDR On/O
Au o / Manual Recordin
Video Codec*
Whi e Balanc
Shu er Spee
IS
Exposur
Camera Capture Settings
Pho o In erval**
O / 1s or 2s**** / 5s / 10
HDR On/O
JPG / JPG+DNG****
Whi e Balanc
Shu er Spee
Exposur
Camera Settings
8
Displays he curren ba ery level of he Skydio 2 drone.
Battery Indicator
* HDR is not supported in all video resolutions and framerates
** Skydio 2 can record video in either AVC (H.264) or HEVC (H.265). Dierent mobile devices and
personal computers have dierent compatibilities with these encoding standards. Be sure to choose
the encoding standard that is best suited to your desired workow

While the Skydio 2 is ying autonomously, such as following a subject or ying to a
waypoint, the user may tap the red stop button to cancel the current action and
place the drone into manual control mode
While the Skydio 2 is in manual control mode the land button is available. The user
may press and hold the land button for 3 seconds to command the drone to land at
its current location
Land button during autonomous igh
Land button during manual igh
Stop/Land Button
The blue & white ‘+’ icon indicates a person or vehicle the Skydio 2 is capable of
tracking. Tapping the indicator will command the Skydio 2 to enter autonomous
ight mode with the selected object as the tracking subject
Subject Indicator
Subject available for tracking Subject being actively tracke
9
*** When Photo Interval is enabled Skydio 2 will continuously capture photos at the specied time
interval until the setting is disabled or the ight ends
**** The fastest interval photo setting when capturing in raw DNG is two seconds. Users may capture
a photo every one second when capturing in JPG mode
***** DNG photos are not displayed in the media tab of the Skydio 2 app and may be retrieved
directly from the microSD card

The Skydio 2 can only track people and vehicles, not pets or other animals
The subject you ish to track must be visible in the camera vie in order to
become available for tracking.
The closer the Skydio 2 is to the subject, the better the tracking ill perform. If
the indicator is not appearing for the subject you ish to track, try moving the
Skydio 2 closer and ensure they are framed in the center of the camera vie
Tracking orks best hen Skydio 2 is 16-22ft (5-7m) a ay from the subject
If you are in an open area ith no other moving objects nearby, turning o the
Height Floor setting may improve tracking performance. See the
Understanding the Height Floor section of this guide for more details
Tips for Best Tracking Performance
The on-screen ight controls are the primary method for controlling Skydio 2 during
both autonomous and manual ight. Manual ight controls are the same in all skills
and may be customized by the user in the “Phone” tab of the device menu hile
autonomous controls are unique for each skill
Flight Controls
See the Manual vs. Autonomous Flight section of
this guide for more details
The skills menu gives access to Skydio 2’s library of cinematic skills. Each skill is a
dierent cinematic style of lming and capturing a subject. See the Cinematic
Skills section of this guide for more details
Skills Menu
Each skill may have its o n custom settings that only aect that skill hile it is
selected. Users may tap the skill settings button to customize each cinematic skill’s
behavior to suit their needs
Skills Settings
10

Recording Indicator
Recording Video: Auto
AUT
REC RD
Recording Video: Manual
Recording Paused: Manual
Photo Button
Interval Photos
Sec.
Tapping the Return to Home button gives you the ability to have Skydio 2
automatically return to either the launch location or your current location.
If a Home Point has been set for this ight, the
“Launch Point” option will be replaced with “Home
Point”
Return to Home
11

Drone Location
User Location
Beacon Location
Home Point
Launch Point
Users may y to a specic GPS location by long-pressing on the map and selecting
“Fly Here Now” from the menu. Skydio 2 will warn the user if the selected destination
is far away or outside the vehicle’s expected battery range
Fly to Waypoint
Users may create a Home Point (or move the existing Home Point) by long-pressing
on the map and selecting “Set Home Point” from the menu. Home points are
optional and must be set at the beginning of each ight, they are not saved
between ights.
Home Points
Tap the map icon to enter the map view. The location of your phone, Skydio 2, and
Skydio 2’s launch location are all indicated on the map. To exit the map view, tap
the map icon again
Maps
12
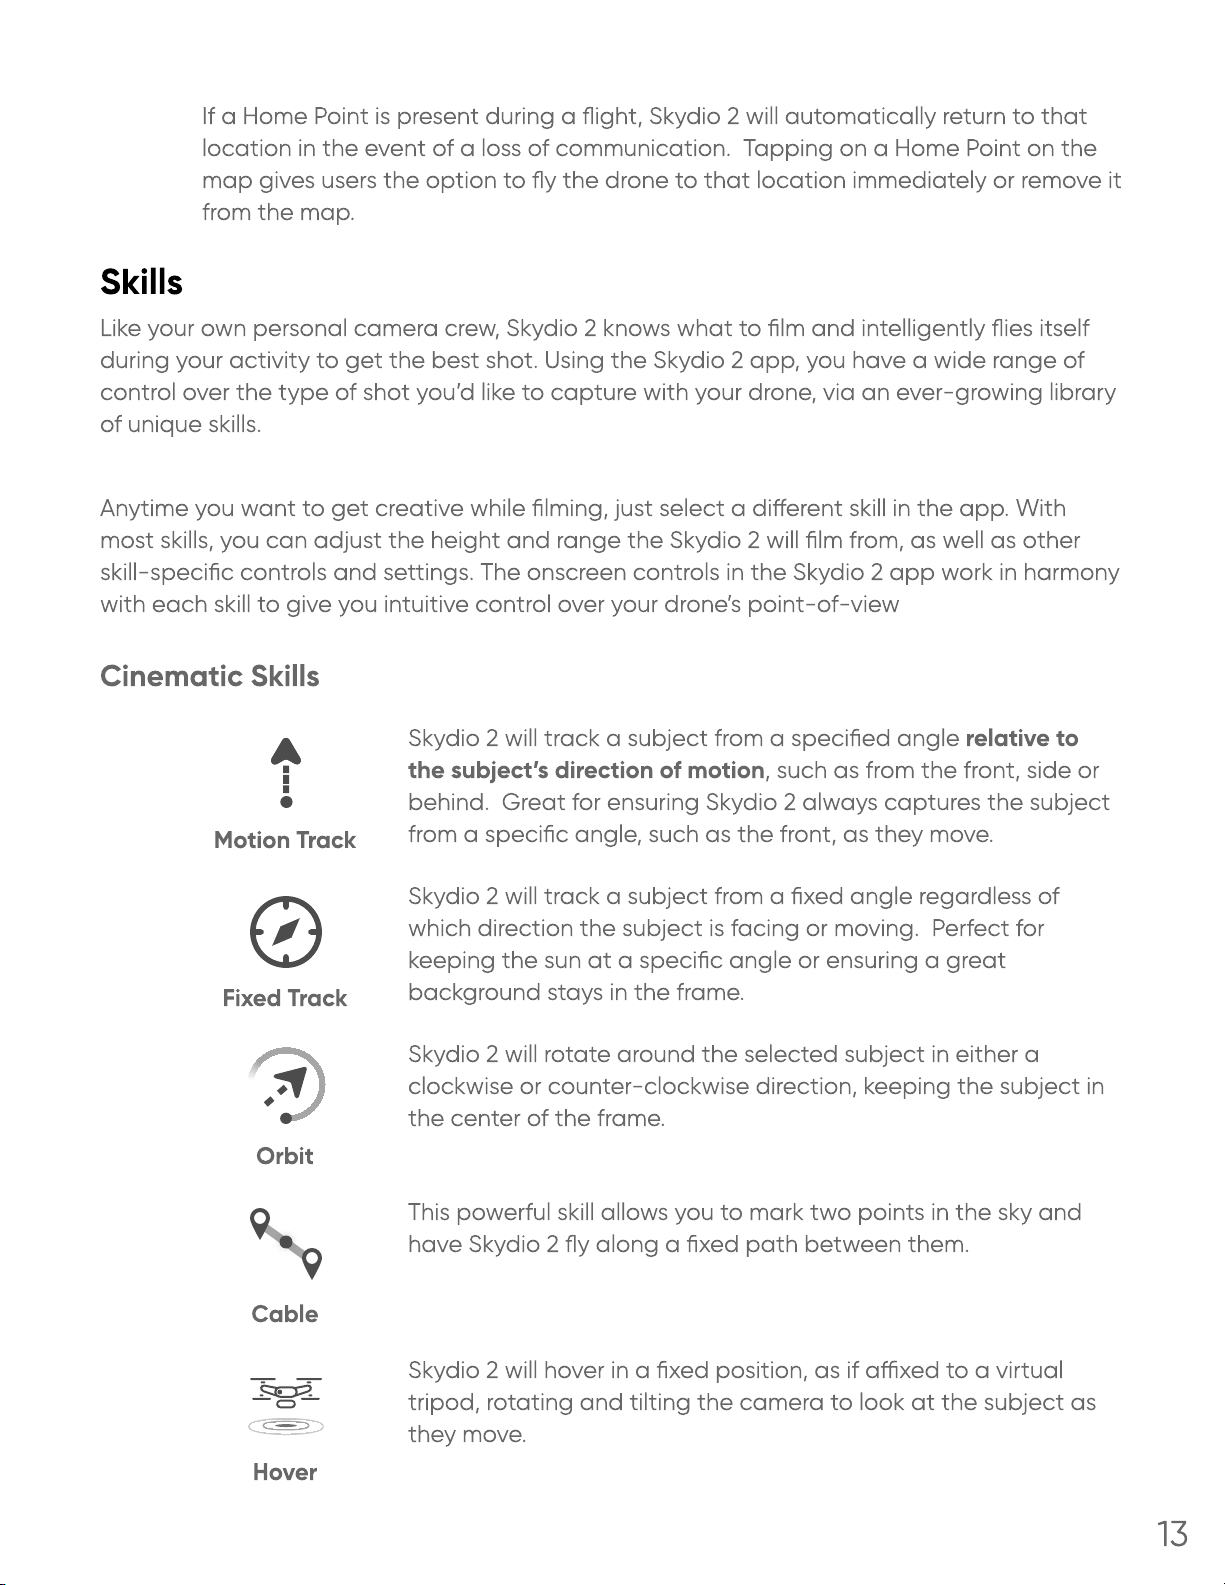
Skills
Like your own personal camera crew, Skydio 2 knows what to lm and intelligently ies itself
during your activity to get the best shot. Using the Skydio 2 app, you have a wide range of
control over the type of shot you’d like to capture with your drone, via an ever-growing library
of unique skills
Anytime you want to get creative while lming, just select a dierent skill in the app. With
most skills, you can adjust the height and range the Skydio 2 will lm from, as well as other
skill-specic controls and settings. he onscreen controls in the Skydio 2 app work in harmony
with each skill to give you intuitive control over your drone’s point-of-view
Skydio 2 will track a subject from a specied angle relative to
the subject’s direction of motion, such as from the front, side or
behind. Great for ensuring Skydio 2 always captures the subject
from a specic angle, such as the front, as they move.
Motion Track
Skydio 2 will track a subject from a xed angle regardless of
which direction the subject is facing or moving. Perfect for
keeping the sun at a specic angle or ensuring a great
background stays in the frame
Fixed Track
Skydio 2 will rotate around the selected subject in either a
clockwise or counter-clockwise direction, keeping the subject in
the center of the frame.
Orbit
his powerful skill allows you to mark two points in the sky and
have Skydio 2 y along a xed path between them.
Cable
Skydio 2 will hover in a xed position, as if axed to a virtual
tripod, rotating and tilting the camera to look at the subject as
they move
Hover
Cinematic Skills
If a Home Point is present during a ight, Skydio 2 will automatically return to that
location in the event of a loss of communication. apping on a Home Point on the
map gives users the option to y the drone to that location immediately or remove it
from the map
13

One-Shots are special skills that perform a specic maneuver (such as a dronie)
and then end, returning to the previously selected skill once the shot is complete
Skydio 2 will y up and outward, increasing in range, while
continuing to track the subject.
Dronie
Skydio 2 will y straight up to capture a bird’s eye overhead view
of the subject.
Rocket
Skydio 2 rotates once around the subject, beginning close, ying
outward, and nally returning close to the subject.
Boomerang
Skydio 2 will y up and outward while rotating around the
subject.
Vortex
One-Shots
Learn the basics of how to track subjects and control your Skydio
2. Only available when using the Phone.
Learn to Fly
Specialty Skills
14

n addition to being a fully autonomous ying camera with predictive subject
tracking, Skydio 2 can also be own manually while retaining full obstacle
avoidance.
When you are not following a subject or using a specic skill in ight, the app can
be used to manually y Skydio 2.
You may customize these controls by opening
the Device Settings menu and selecting the
‘Phone’ ta
Manual Controls: Defaul
Subject Selected
Manual vs. Autonomous Flight
While in manual ight, you may double-tap anywhere on the ight screen to y
directly towards that spot
Obstacle avoidance is always active when ying manually. Skydio 2 will smoothly
route itself around obstacles, ignoring any commands that could potentially cause a
collision
15

To enable autonomous ight, choose a subject you would like the drone to follow by
tapping the ‘+’ icon
To stop following a subject in any skill, tap the St p butt n at the top of the screen.
Note that the STOP butt n will change to a Land butt n after the Skydio 2 stops
following a subject
Understanding the Height Fl r
The Height Floor setting can have a signicant impact on Skydio 2’s tracking performance. As
such, it is important for all pilots to understand how this setting works as well as how and
when it is safe to disable it.
The Height Floor setting is enabled by default on all Skydio 2 drones. While this
setting is enabled, Skydio 2 will attempt to remain at least 8 ft above the tracked
subject while in any autonomous follow mode. This helps create a buer of space
between the Skydio 2 and any moving objects, such as people, pets or vehicles.
While enabled, the Height Floor setting may aect your ight in a number of ways
It is important to note that the Height Floor setting only applies while a subject is
being tracked. If Skydio 2 is in manual ight mode with no subject selected, you
always have full control over the vehicle’s height
While following a subject, Skydio 2 may become “trapped” by obstacles
and unable to continue following due to the height restriction, even though
the space underneath the drone is clear
You will be prevented from lowering Skydio 2 below the 8 ft height oor any
time a subject is being tracked, such as when using the on-screen controls
to set the desired follow height or using the Beacon’s Wand feature
H w It W rks
The Height Floor setting is available both pre- and in-ight through the
D
rone tab in
the
D
evice Settings menu.
D
isabling the Height Fl r
R
estricti
16

To enable autonomous ight, choose a subject you with the drone to follow by
tapping the ‘+’ icon
Disabling the Height Floor setting may increase tracking performance by allowing
Skydio 2 to y under low-lying obstacles, such as tree branches and overhangs, to
maintain visual line of sight. It also allows users to set the preferred follow height low
to the ground, capturing high-energy shots from a unique ground-hugging
perspective. As stated in the Safety and Operating Guide, the Skydio 2 only avoids
obstacles that are not in motion. Cars, balls, animals, other drones, other people, or
similar moving objects will not be avoided if they’re moving faster than walking
speed.
The combination of low elevation ight and high speed tracking presents an
increased risk of collision with moving objects. Skydio, Inc strongly recommends
users only disable the Height Floor setting when operating in wide open, outdoor
spaces with no other people, animals, or other moving objects nearby. Pilots
maintain full responsibility for the safe operation of their Skydio 2 drone at all times
during ight.
Height Floor setting enabled (default
Height Floor setting disabled
Flying Safely
The Skydio 2 only avoids obstacles that are not in motion. Cars, boats, balls,
animals, other drones, other people, or similar moving objects may not be
avoided if they’re moving. You should exercise extreme caution and good
judgment when ying with other people around. If you know that you’ll be
around others in motion, we suggest you leave the Height Floor setting enabled
to ensure Skydio 2 maintains a safe elevation.
17

Keep your ngers away from the propellers anytime they’re spinning such as
during launch, ight, and landing
Avoid launching and landing directly on sand, pebbles, or gravel as small
particles may get stuck in exposed areas and cause malfunctions
When landing, Skydio 2 descends straight down and does not avoid obstacles.
Ensure your landing area is at and clear of obstacles
Do not intentionally try to crash Skydio 2
When following a car or other vehicle, follow while o-road or on a closed
course. Never use Skydio 2 over public roadways
The Skydio 2’s metal frame may become hot to the touch in high-temperature
environments or direct sunlight, even if powered o. The metal frame may also
become hot if powered on while on the ground for long periods of time
Do not y over bodies of water more than 30 ft. across if Skydio 2 indicates a
GPS quality warning.
Skydio 2 can’t see certain visually challenging obstacles. Do not y around thin
branches, telephone or power lines, ropes, netting, wires, chain link fencing or
other objects less than ½ inch in diameter
Do not y around transparent surfaces like windows or reective surfaces like
mirrors greater than 60cm wide
f your Skydio 2 does hit an obstacle it can’t see, it will do its best to stabilize
itself and continue the ight
When the sun is low on the horizon, it can temporarily blind Skydio 2’s cameras
depending on the angle of ight. Your drone may be cautious or jerky when
ying directly toward the sun
Your Skydio 2 can y up to 36 mph under most conditions
f your Skydio 2 can’t see you, it may stop following you temporarily. t will wait
until it reacquires you visually or use your Beacon’s GPS (if using the Beacon
accessory) to nd you
Skydio 2 may instruct you to land if it encounters an error or determines the
environment is not safe for ying. When instructed to do so, immediately y
Skydio 2 to the safest area nearby and land
Flying at high altitudes may signicantly increase the time required to return
and safely land the Skydio 2. The pilot is responsible for managing the vehicle’s
altitude, range and battery level at all times
Be sure to watch the ight tutorials in the app and pay attention to any in-app
messages
https://skydio.com/safety https://skydio.com/support
Check out and for more information
and helpful tips, videos, articles. Contact us at help@skydio.com to speak with our support
team if you need any help
18

Emergency Procedures
Note: Throughout the following ection the term “controller” refer to the phy ical device
controlling the Skydio 2, which may be the u er’ mobile phone, Beacon acce ory or
Controller acce ory a appropriate.
In the event of a link lo or failure of the controlling device (app or Beacon), Skydio
2 will automatically perform the following maneuver :
Link Loss & Device Failure Procedure
All location pecied above (launch point, home point and la t known ubject
location) may all be viewed on the map in the Skydio 2 app. U er have acce the
map at all time from one of the following three location
If the vehicle i following a tracked ubject and ying autonomou ly at the time
of link lo , it will continue to follow the ubject for 30 econd while attempting
to regain connection. If connection doe not return after 30 econd , Skydio 2
will automatically return to the Home Point (if one wa pecied) or the la t
known location of the tracked ubject (if no Home Point wa pecied)
If vehicle wa in manual ight mode (not following a ubject) at the time of link
lo , Skydio 2 will automatically return to the Home Point (if one wa pecied)
or the original launch point (if no Home Point wa pecied)
In Flight: Tapping the Map button in the bottom right corner of the creen
Disconnected Screen: Tapping the “View Map” button
App Home Screen: Selecting the “Di cover” tab, then electing their Skydio 2
from the li t of device and electing “Find <vehicle name>”.
If at any time Skydio 2 regains connection it will continue the current action, but
the u er i given the opportunity to cancel it
In the event that the Skydio 2’
G
PS ignal i lo t, the operator will be notied of
G
PS lo and
the ability to y to
G
PS waypoint on the map will be di abled
Lost
G
PS Procedure
If a Home Point wa pecied for the ight, The Skydio 2 will notify the u er and o
er to return
to the Home Point
w
hen its
b
attery reaches the level
w
here the Home Point is at the edge o
f
its e
x
pected
ight range
.
Thi notication may be ignored by the operator if they wi h to
continue ying. The Skydio 2 will not automatically return to the home point
Lo
w
B
attery Procedure
19
Other manuals for 2
6
Other Skydio Drone manuals


