SKYLUX Cintralux Alu EP 10/10 User manual

BARREL VAULTS
Cintralux Alu EP 10/10
Mounting instructions
EN
Art.N° 43984
E_MH_Mounting_instructions_Skylux_Cintralux_Alu_EP10-10 01/09/2020
2/18
Safety
Take the necessary and required safety precautions, such as safety nets and lifelines when installing from the
outside, safety goggles, gloves, hard hat, etc.
Do not step on the glass.
Falling from height
• When using ladders to go on the roof:
- Ladder in good condition?
- Set up correctly at an angle of 75°?
- Secured below and on top against moving?
- Don’t take heavy material with you on the ladder (3-point contact rule)! If possible,
use a crane to lift the material.
• Do not lift material over the roof edge; use a crane to put the material on the roof.
• Roof zone: make sure the part of the roof where the skylight/barrel vault will be installed is
safe enough, e.g. secure the edge (support system in the roof gutter that supports against the
outer wall of the building, with suitable A B C category depending on the roof pitch) or use a
scaffold so no one can fall off the roof. If the roof is not safe enough, always use a harness with
lifeline (adapted to the fall height), attached to a suitable attachment point.
•Make sure the roof is stable and does not have dangerous openings or insufficient secure parts
(e.g. corrugated sheets, …). Take the necessary measures if this is not the case: strengthen,
use suitable safety nets below the danger zones, …
• Before making the roof opening for the skylight/barrel vault: make sure there are safety nets
conform to the current legislation. The nets must be attached firmly and sufficiently to the
building.
•When using an aerial work platform: always wear and secure your harness (mandatory)! Leaving
the cage is forbidden.
• Never walk backwards on a roof, always walk forwards.
• Make sure there’s enough light in the working zone.
Low-hanging obstacles and falling loads
• Forbidden to walk under or within a radius of 1 m of a hanging or lifted load.
• Demarcate the danger zone below the skylight/barrel vault, in the building as well as on the
outside near the outer walls (in case material slides off the roof). If the zone is demarcated,
people cannot be hit by any falling loads. It’s prohibited to enter these danger zones during
construction.
Crushing hazard
• All working tools are in good condition, provided with a valid CE label and all necessary safety
regulations. These cannot be removed.
• People who use these working tools are educated for this purpose. Protections are always
present on all working tools. They are in good condition and need to be set correctly.
Tripping/falling
•Safety is key and it begins with order and tidiness. Clean everything immediately, leave nothing
lying around.
• Trash needs to be sorted.
• Be cautious with electric cables (danger of tripping/falling). Never walk backwards!
• Make sure there’s enough light in the working zone.

01/09/2020 3/18
E_MH_Mounting_instructions_Skylux_Cintralux_Alu_EP10-10
Sharp objects
• Make sure your fingers/hands are not pinched and watch out for cuts while handling skylights
or barrel vaults.
• Be careful where you put your hands during the installation.
• Wearing cut-resistant gloves is mandatory.
Ergonomics
• Always lift loads correctly: bend your knees, move your feet instead of forcing your spine, lift
as close to your body as possible.
• Parts of more than 25 kg must be lifted with at least 2 persons.
Personal protective equipment
• Work clothes, safety shoes and helmet are mandatory for everyone.
• Lifeline and harness are mandatory if the edge is not secured enough or if there are no safety nets below the
roof opening. They are also necessary when using an aerial working platform.
• Use gloves when handling skylight or barrel vault parts.
• Safety glasses and hearing protection are mandatory when using saws / grinders.
Always perform a Last Minute Risc Analysis!
If in doubt: STOP! Do not take unnecessary risks. Ask your supervisor if needed.

E_MH_Mounting_instructions_Skylux_Cintralux_Alu_EP10-10 01/09/2020
4/18
SAFETY p. 2
TABLE OF CONTENTS p. 4
OVERVIEW PROFILES AND
SUPPLIES p. 5
SAFETY AND WARNINGS p. 6
PRIOR INSPECTION p. 6
ASSEMBLY SEQUENCE OF FIXED AND
OPENING PARTS p. 8
OUTLINE DRAWING CINTRALUX
ALU EP10/10 FIXED PARTS p. 8
ASSEMBLY SEQUENCE OF FIXED PARTS p. 9
ASSEMBLY CINTRALUX ALU EP10/10
FIXED PARTS p. 9
INSTALLATION OF THE END PROFILE
AND LATERAL PROFILE p. 9
INSTALLATION OF THE LOWER ARCH
PROFILES AND THE INNER SHEETS p. 11
INSTALLATION OF THE INTERMEDIATE
ARCHES p. 12
INSTALLATION OF THE OUTER
SHEETS p. 12
INSTALLATION OF THE UPPER
ARCHES p. 13
TIGHTEN THE BOLTS P. 14
INSTALLATION OF THE OUTER END
SHEETS P. 14
FINISH WITH ALUMINUM STRIPS P. 16
CHECK THE ARCH TENSIONS P. 16
FINISH THE SEAMS OF THE LATERAL
PROFILES P. 17
CONTINUE FINISHING THE OPENING
PARTS, IF ANY P. 17
MAINTENANCE P. 17
SNOW AND WIND LOAD P. 17
DISCLAIMERS P. 17
Table of contents

01/09/2020 5/18
E_MH_Mounting_instructions_Skylux_Cintralux_Alu_EP10-10
Overview profiles and supplies
LP511 light lower arch
LP533 heavy lower
arch
LP97 intermediate
arch
LP512
lateral arch
(upper arch with
bottom flange)
LP502 upper arch
LP528 lower end
profile
LP505 aluminium draft
strip
LP210- lateral profile
LP623 upper end
profile
LT545 corner profile
PVC tube
Ø 16 x 500 mm
22433
self-drilling
screw
4.2 x 16 mm
15441 hexagonal bolt
M8 x 60
36187
screw with
neoprene seal
Ø 6.5 x 50 mm
wooden curb
36164
self-drilling
hexagonal
collar screw
metal curb

E_MH_Mounting_instructions_Skylux_Cintralux_Alu_EP10-10 01/09/2020
6/18
Safety and warnings
See page 18 in this manual.
Prior inspection
Curb
Before installing the barrel vault, the customer must provide a solid timber or metal curb that must be non-
deformable (can be reinforced with tie rods if necessary). The maximum roof pitch is 5°. Before starting the
installation, please check if following specifications are met:
• Material: wood / galvanised steel min. 3 mm thick
In case of a concrete curb, you first need to anchor a
wooden bar of at least 44 mm thick into the concrete
with suitable countersunk screws. Cover the wooden bar
with the roof covering too. Strictly respect the determined sizes.
• Min. height (above the finished roof): 150 mm
• Min. finished thickness: 65 mm
• Max. finished thickness: 80 mm
• The upper flange and the curb must be equally thick. The
insulation cannot protrude or be thinner than the upper flange.
• Upper flanges of all 4 sides must be on the same surface!
• The curb construction must be free all-round: none of the curbs
may continue at the angle of the lateral side and the front side.
• Pitch of the upper flange:
- barrel vault crosswise on the roof ridge: perpendicular to the roof surface (follow the roof
pitch)
- barrel vault parallel to the roof ridge, 2 possibilities:
o horizontal: both sides must be equally high and levelled (the lowest side of the curb must rise
higher above the roof surface than the highest side). The upper flange can slightly lean
outwards, max. 2°.
o It’s also possible to follow the roof pitch (up to max. 5°).
• Sturdiness: must be able to resist the horizontal and vertical load. See Eurocodes and our technical file for the
determination of the maximum forces on the curb. If any doubt, please consult your architect or research
bureau.
• Deformation: max. 5 mm in case of maximum horizontal load on the curb. Provide enough tie rods at the top of
the curb. If any doubt, please consult your architect or research bureau.
min. 150
min. 100
min. 65
max. 80
min. 3min. 300
max. 5°
01/09/2020 7/18
E_MH_Mounting_instructions_Skylux_Cintralux_Alu_EP10-10
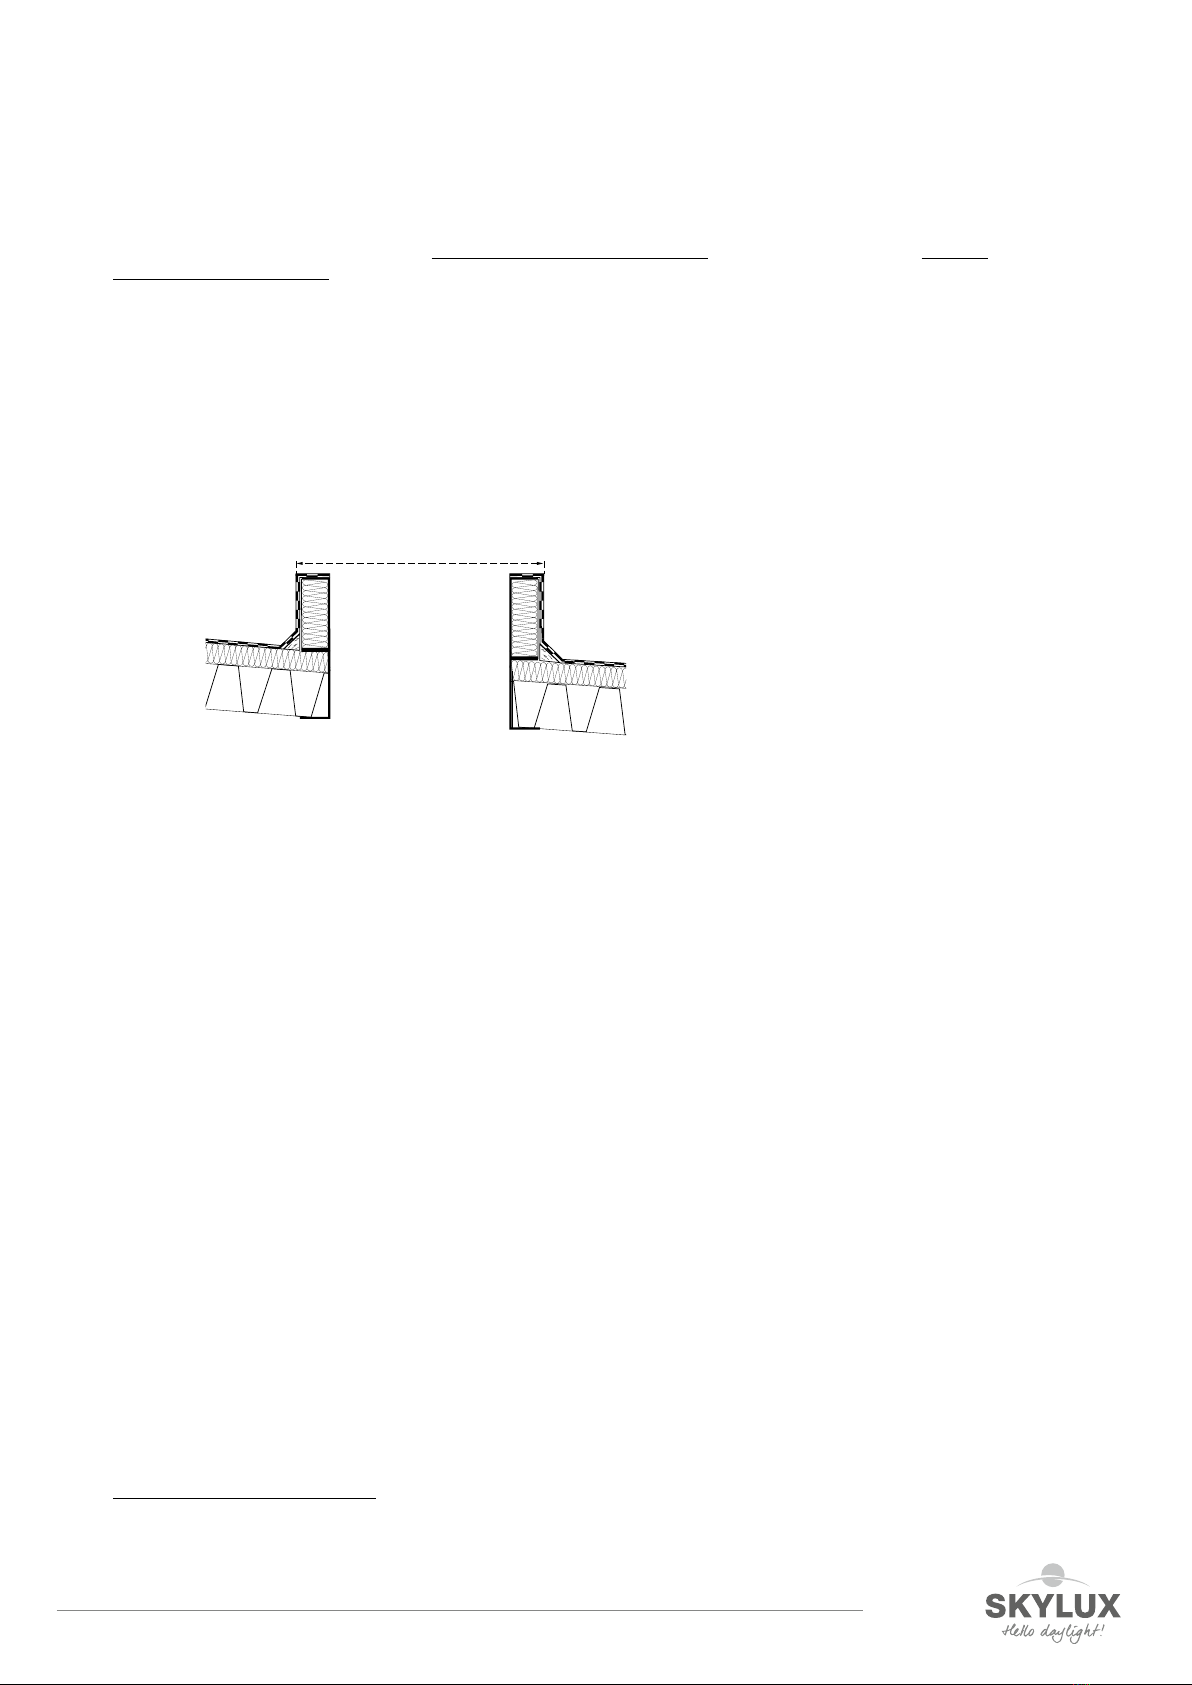
Sizes
Since the barrel vault is made to size, the overall length and widht of the curb (roofing included) must be equal to
the ordered size dimensions of the barrel vault. Look for the narrowest and widest spaces* and measure the min.
and max. overall width:
Permissible tolerances regarding the ordered size:
Width: min: -2 cm
max: +1 cm
Length: ± 0,05%
(about 5 cm in a length of 100 m)
The length of the barrel vault
can be shortened at site,
but we advise not to do this.
• Check the straightness* (±1cm/5m), parallelism* (±1 cm/5m) and perpendicularity (±1°).
* Tighten a rope on both sides of the curb (or use lasers). Look for the average position of
the curb edge to tighten the rope. This rope will also be used to install the lateral profiles
nicely in line
Glazing and arches
The glass sheets are only clamped to allow expansion and contraction in function of temperature fluctuations.
The system is conceived in a way that silicone and rubber sealings between the aluminium and the glazing are
unnecessary (and even forbidden).
All profiles and glass sheets (except the end sheets and the end sheet divisions) are cut to size, pre-curved, pre-
drilled and provided with screw thread.
Respect the exposed UV protected top side of the sheets (glazing).
Always apply the bolts by hand before using a screwing machine to have two full rotations in the arch
profiles provided with screw thread. Otherwise you risk damaging the screw thread.
Do not forget to remove the protective film from the sheets (glazing) after installation.
Sealing
When using roof covering, apply it correctly until it covers the curb. The curb must be covered entirely up until the
daylight size. If the barrel vault is not detached and it borders 1 or several walls, the connection must be vertically
and smooth. This is possible e.g. by using a lead flashing. Please clean, remove sawdust, irregularities, … before the
installation.
Control of the upstand
Check previously the agreed correct sizes of the upstand (overall size – roofing included). Check if the upstands
are parallel with each other. Check the right angles and make sure the top side is smooth and equal. Clean it if
necessary before installation and remove sawing pieces, irregularities, etc.
The installation cannot be started if one of these conditions has not been respected! If you do start installation,
this can lead to negative consequences on several parameters (stability, air and water tightness, …). In this case,
the guarantee will no longer be valid.
A
max + 1 cm
min - 2 cm

E_MH_Mounting_instructions_Skylux_Cintralux_Alu_EP10-10 01/09/2020
8/18
Assembly sequence fixed and opening parts
1 Install the end profiles and lateral profiles. See first step
in this manual (see further).
2 Then, install the reference profiles of the opening parts (see
mounting instructions of the Cintramax opening parts).
3 Finish the fixed part as described further in this manual.
1 or 2 arches are not installed where the opening parts will
come, depending if the opening part consists of 2 modules
(2010 mm) or 3 modules (3082 mm).
4 Last step is finishing the opening parts as described in
the separate manual of the Cintramax opening parts.
Tip: (only in combination with opening parts): make sure the position of the power supply (electric or pneumatic)
corresponds to the position of the opening part.
Outline drawing of the fixed parts Cintralux Alu EP10/10
2x10 mm (= EP 10/10):
Illustration: cross section of Cintralux alu EP10/10 structure
1. end profile and lateral profile
3. fixed part
2. reference profile
4. opening part
upper arch
outer sheet
PC multi-walled sheet 10 mm
intermediate arch
inner sheet
PC multi-walled sheet 10 mm lower arch
outer sheet
PC multi-walled sheet 10 mm
inner sheet
PC multi-walled sheet 10 mm
upper arch
outer sheet
PC multi-walled sheet 10 mm
draft strip
bolt M8x60
lateral profile
roofing
(not included in delivery)
intermediate arch
inner sheet
PC multi-walled sheet 10 mm
lower arch
foam
curb excluded

01/09/2020 9/18
E_MH_Mounting_instructions_Skylux_Cintralux_Alu_EP10-10
Assembly sequence for fixed parts
1. Installation of the end profile and lateral profile
2. Installation of the lower arches and inner sheets
3. Installation of the intermediate arch profiles and the spacer profiles
4. Installation of the outer sheets
5. Installation of the upper arch profiles
6. Tighten the bolts
7. Installation of the outer end sheets
8. Finish with aluminium draft strips
9. Check the arch tensions
10. Finish the seams of the lateral profiles
11. Continue finishing the opening parts, if any
Installation of the fixed parts Cintralux EP10/10 mm
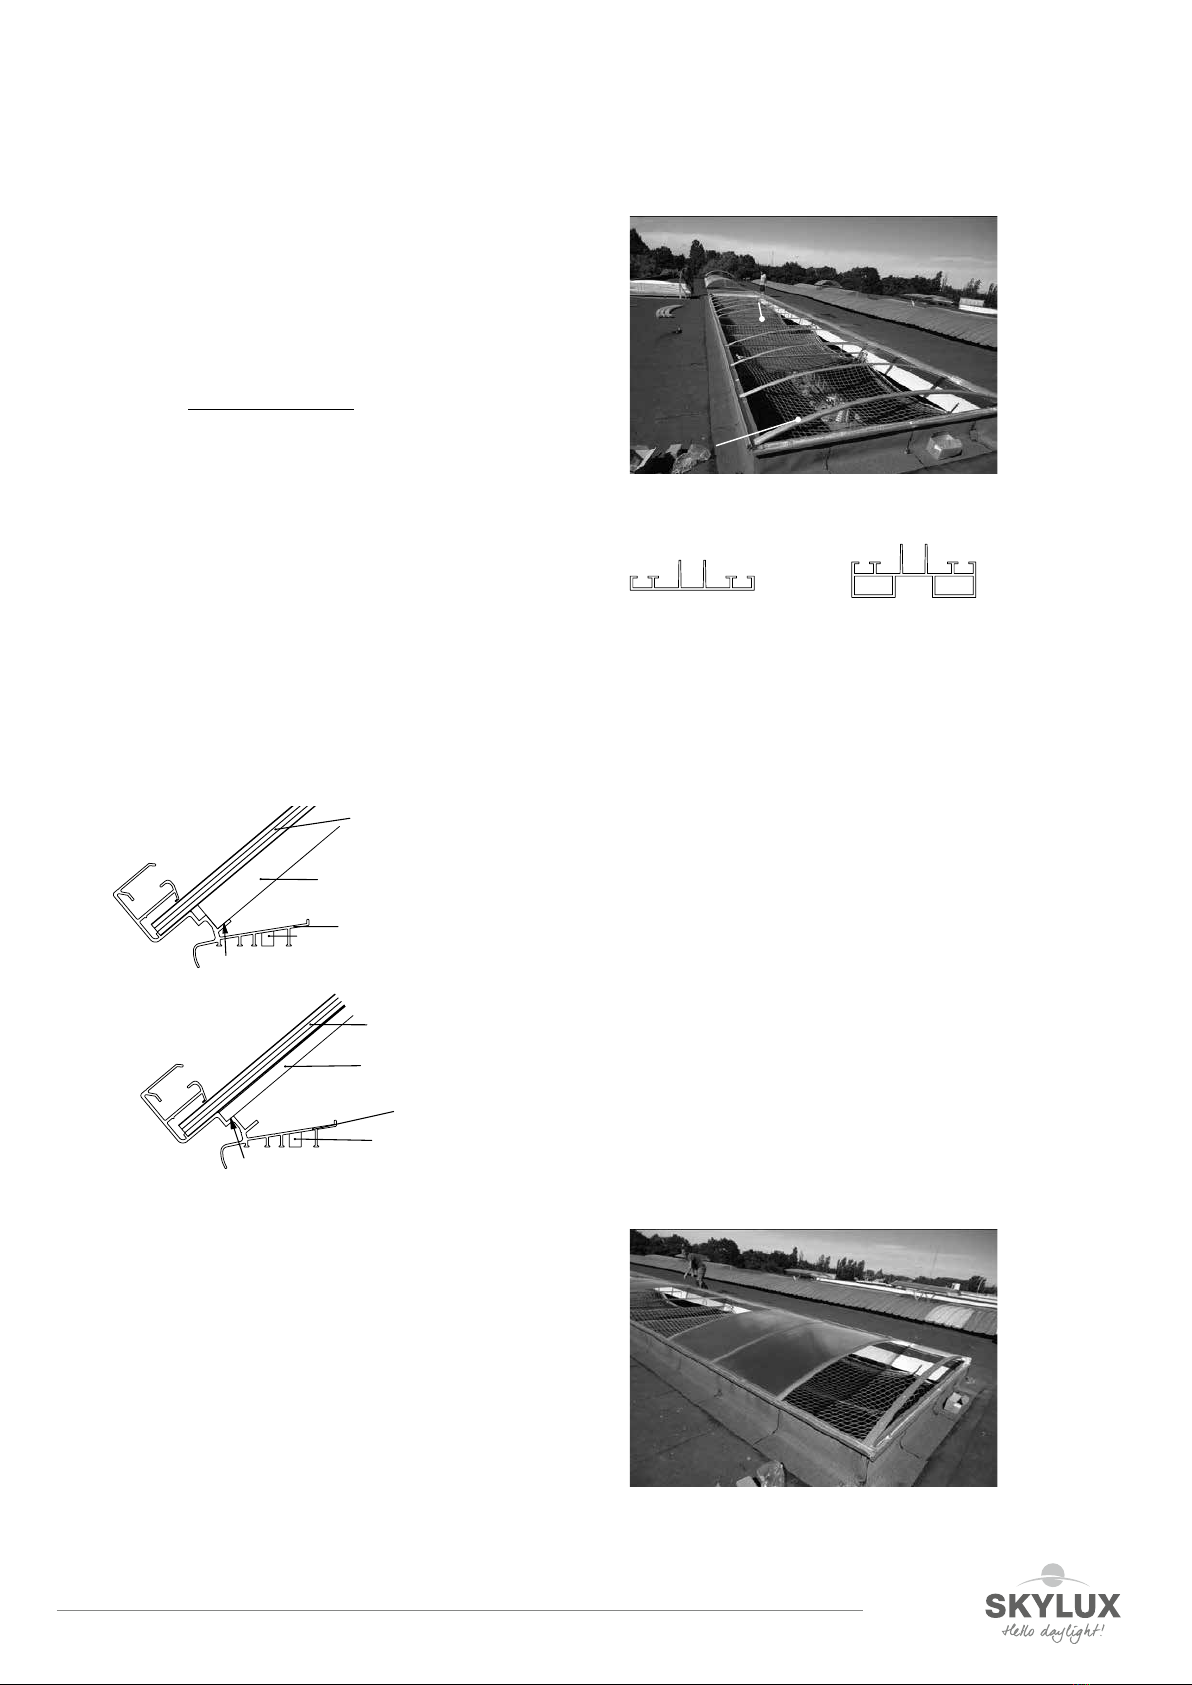
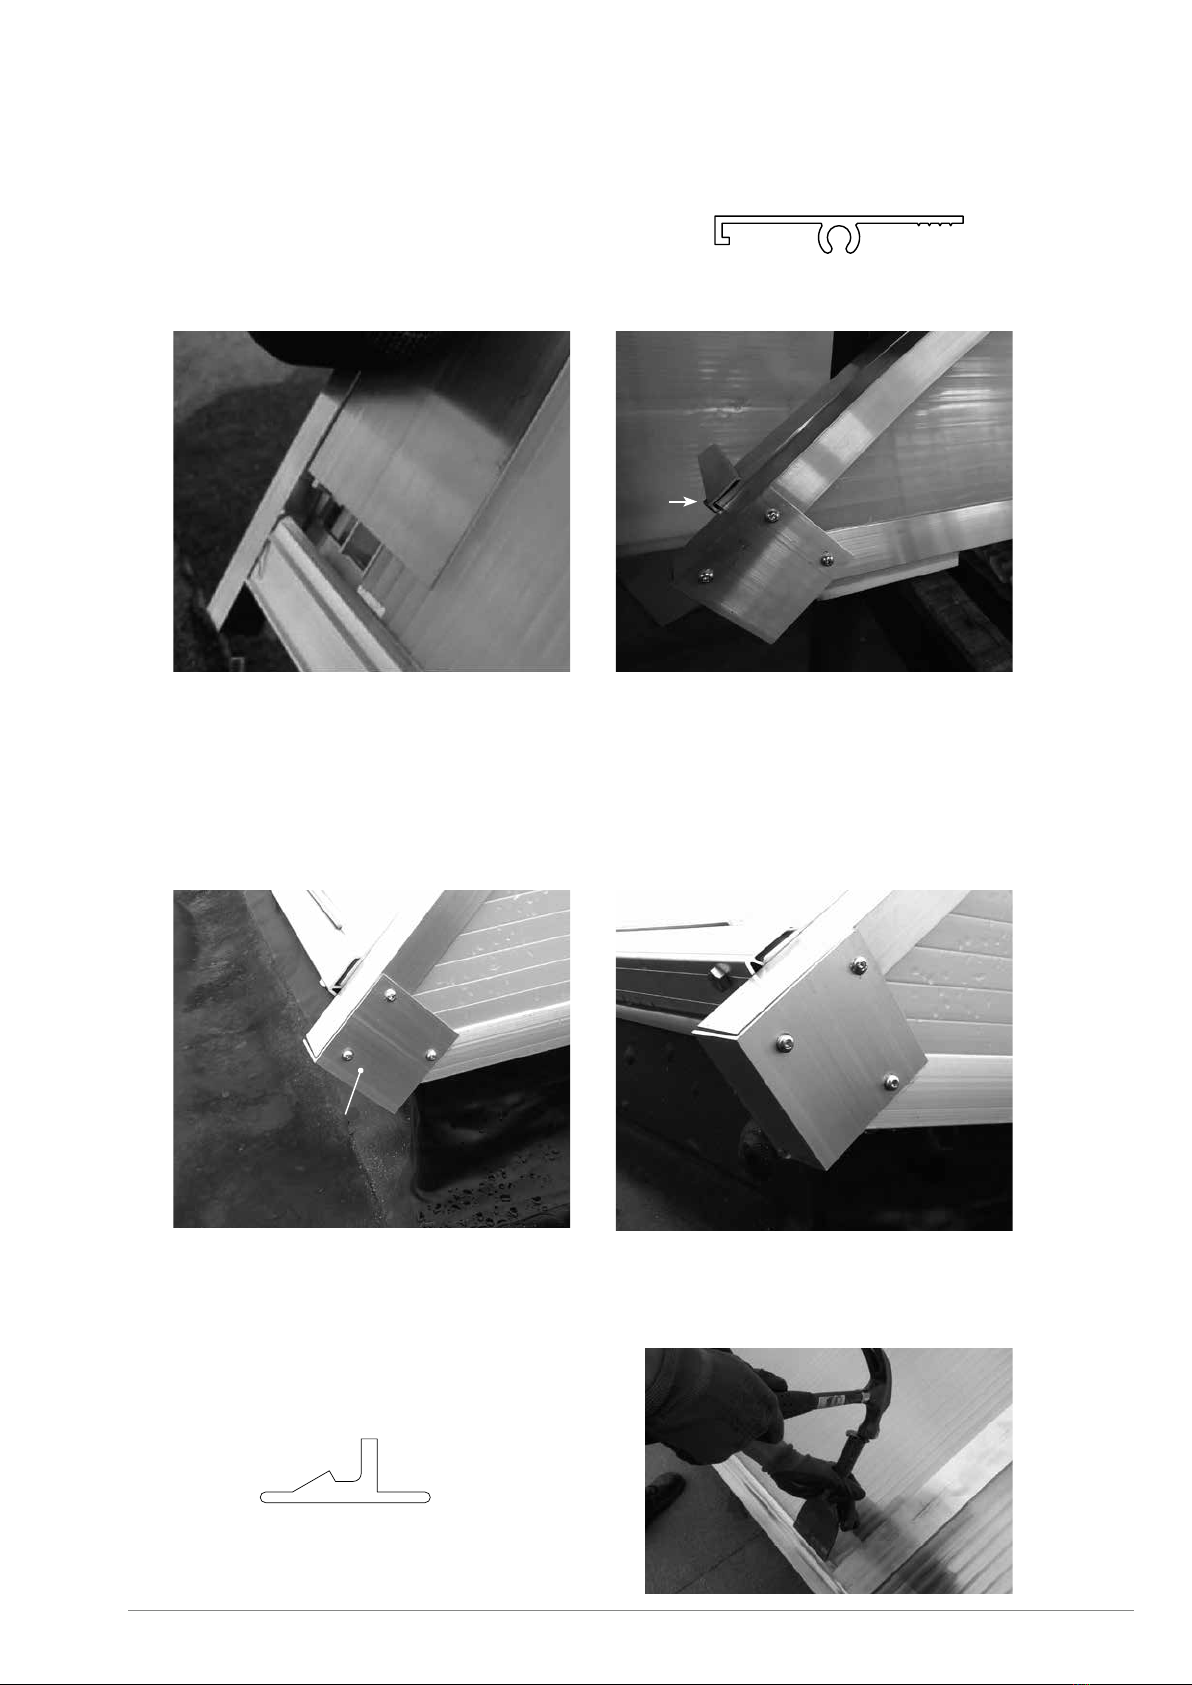
1. Installation of end profile and lateral profile
Position the lateral profiles LP210- around the curb according to
the enclosed scheme.
Install the end profile LP528 first and then the lateral
profile LP210-.
(The lateral profiles are to be installed on the ends on top of the
end profiles - the lateral profiles for barrel vaults larger than
4 m long exist of multiple parts and are packaged per
reference, together with the draft strips.)
Make sure the lateral profile just reaches the end sheet.
Fix the end profile on the curb with the supplied screws with
neoprene seal.
Provide a screw every 50 cm, in the provided screw zone. Always use the right screws (metal screws for metal
curb, wood screws for timber, etc.). Tighten the screws so the washer connects perfectly to the profile.
Seal o the corners.
end profile

E_MH_Mounting_instructions_Skylux_Cintralux_Alu_EP10-10 01/09/2020
10/18
Install all lateral profiles on one side of the curb nicely in line
(use the rope).
We advise you NOT to position the seams of the lateral profiles
opposite of the Cintramax opening parts. Make sure the seams
are next to the opening parts to avoid incorrect alignment of the
opening parts.
Leave a clearance of each time 5 mm (± 2 mm) between the
lateral profiles. Position the lateral profiles evenly on the length
of the curb so all clearances are about the same size. This way,
a small inaccuracy in the curb length can be eliminated.
Tip:
If the curb is a little too long, then the end pieces can be moved
outwards 2 cm each to compensate the dierence.
Tighten the lateral profile on the curb with the supplied screws
with neoprene seal.
Provide a screw every 50 cm in the provided screw zone.
Always use adapted screws (metal screws for metal curb, wood
screws for timber etc.). Tighten the screws so the washer
connects perfectly to the profile.
Carefully seal o the seams below so water from the lateral
profile cannot trickle in.
Seal o the seams on the end profile too.
Now install the lateral profiles on the other side of the curb.
The lateral profiles must be perfectly parallel and attached
to each other at the correct distance, especially with the
opening parts (same daylight size).
Tip:
Use the reference profiles of an opening part to maintain the
right distance.
lateral profile
5 mm
reference profile
01/09/2020 11/18
E_MH_Mounting_instructions_Skylux_Cintralux_Alu_EP10-10
2. Installation of the lower arches and inner sheets
In case there are Cintramax opening parts in the barrel vault:
Install the reference profiles of the opening parts first (see
separate manual for the Cintramax opening parts).
Finish the fixed part afterwards as described further in this
manual.
1 or 2 arches are not installed where the opening parts will
come, depending if the opening part consists of 2 modules
(2010 mm) or 3 modules (3082 mm).
‘light’ or ‘heavy’ lower arches
Now install the lower arches of the fixed part.
Installation of the lower arches depends on the type:
Tip:
Only in combination with opening parts: make sure the position of the power supply (electric or pneumatic)
corresponds to the position of the opening part.
Installation of the lower arches:
The light lower arches are placed on the uppermost edge.
The heavy lower arches are placed on the lowest edge of the lateral profile.
Installation of the inner sheet:
Remove the protective film right before the installation to
avoid scratches. Install the inner multi-walled 10 mm sheets
with the UV side up.
Install the sheet on one side in the lateral profile and bend it
over the lower arch. Push the plate a bit so it can slide into the
matching groove.
Tip:
There’s a small print on the UV side (side that must be faced
outwards/upwards) that can serve as a verification after
removing the protective film.
reference profiles
lower arches
inner sheet
PC multi-walled sheet 10 mm
heavy lower arch
lateral profile
lowest edge of lateral profile
inner sheet
PC multi-walled sheet
light lower arch
lateral profile
foam
foam
uppermost edge of lateral profile

E_MH_Mounting_instructions_Skylux_Cintralux_Alu_EP10-10 01/09/2020
12/18
3. Installation of the intermediate arches
Install the intermediate arch above the lower arch, according to the image.
Insert the M8x60 bolts in the pre-drilled holes in the lateral profile in the
intermediate arch.
Do not tighten the bolts yet.
4. Installation of the outer sheets
The outer wall/outer sheet is installed and slid into the
groove of the lateral profile.
Pay attention to the correct side of the sheets!
intermediate arch
intermediate arch
bolt M8x60
outer sheet
PC multi-walled sheet 10 mm
outer sheet
PC multi-walled sheet 10mm

01/09/2020 13/18
E_MH_Mounting_instructions_Skylux_Cintralux_Alu_EP10-10
5. Installation of the upper arches
Make sure the lower profiles in the middle of the bottom side
of the upper arch profile fit into the notch of the intermediate
arch profile.
Fix the upper arch profiles by hand with the stainless-steel
bolts M6 or M8. Do not tighten yet and make sure you do
not block everything as the aluminium draft strips still must
be installed and the arch profiles must be able to “expand”.
upper arch
lower arch
M8x60 bolts
do not tighten yet!

E_MH_Mounting_instructions_Skylux_Cintralux_Alu_EP10-10 01/09/2020
14/18
6. Tighten the bolts
You can now tighten the bolts to fix the intermediate arches
and the upper arches.
7. Installation of the outer end sheets
Install a PVC tube on both sides between the lower arch and the intermediate arch.
Detailed image of the end pieces, with specific end profiles:
M8x60
bolts
end profile
lateral upper arch
outer sheet
PC multi-walled sheet 10 mm
intermediate arch
inner sheet
PC multi-walled sheet 10 mm lower arch
roofing
(not included in delivery)
curb lowest end profile
multi-walled polycarbonate sheet
32 mm
PVC tube
intermediate arch
PVC tube
PVC tube
PVC tube
01/09/2020 15/18
E_MH_Mounting_instructions_Skylux_Cintralux_Alu_EP10-10
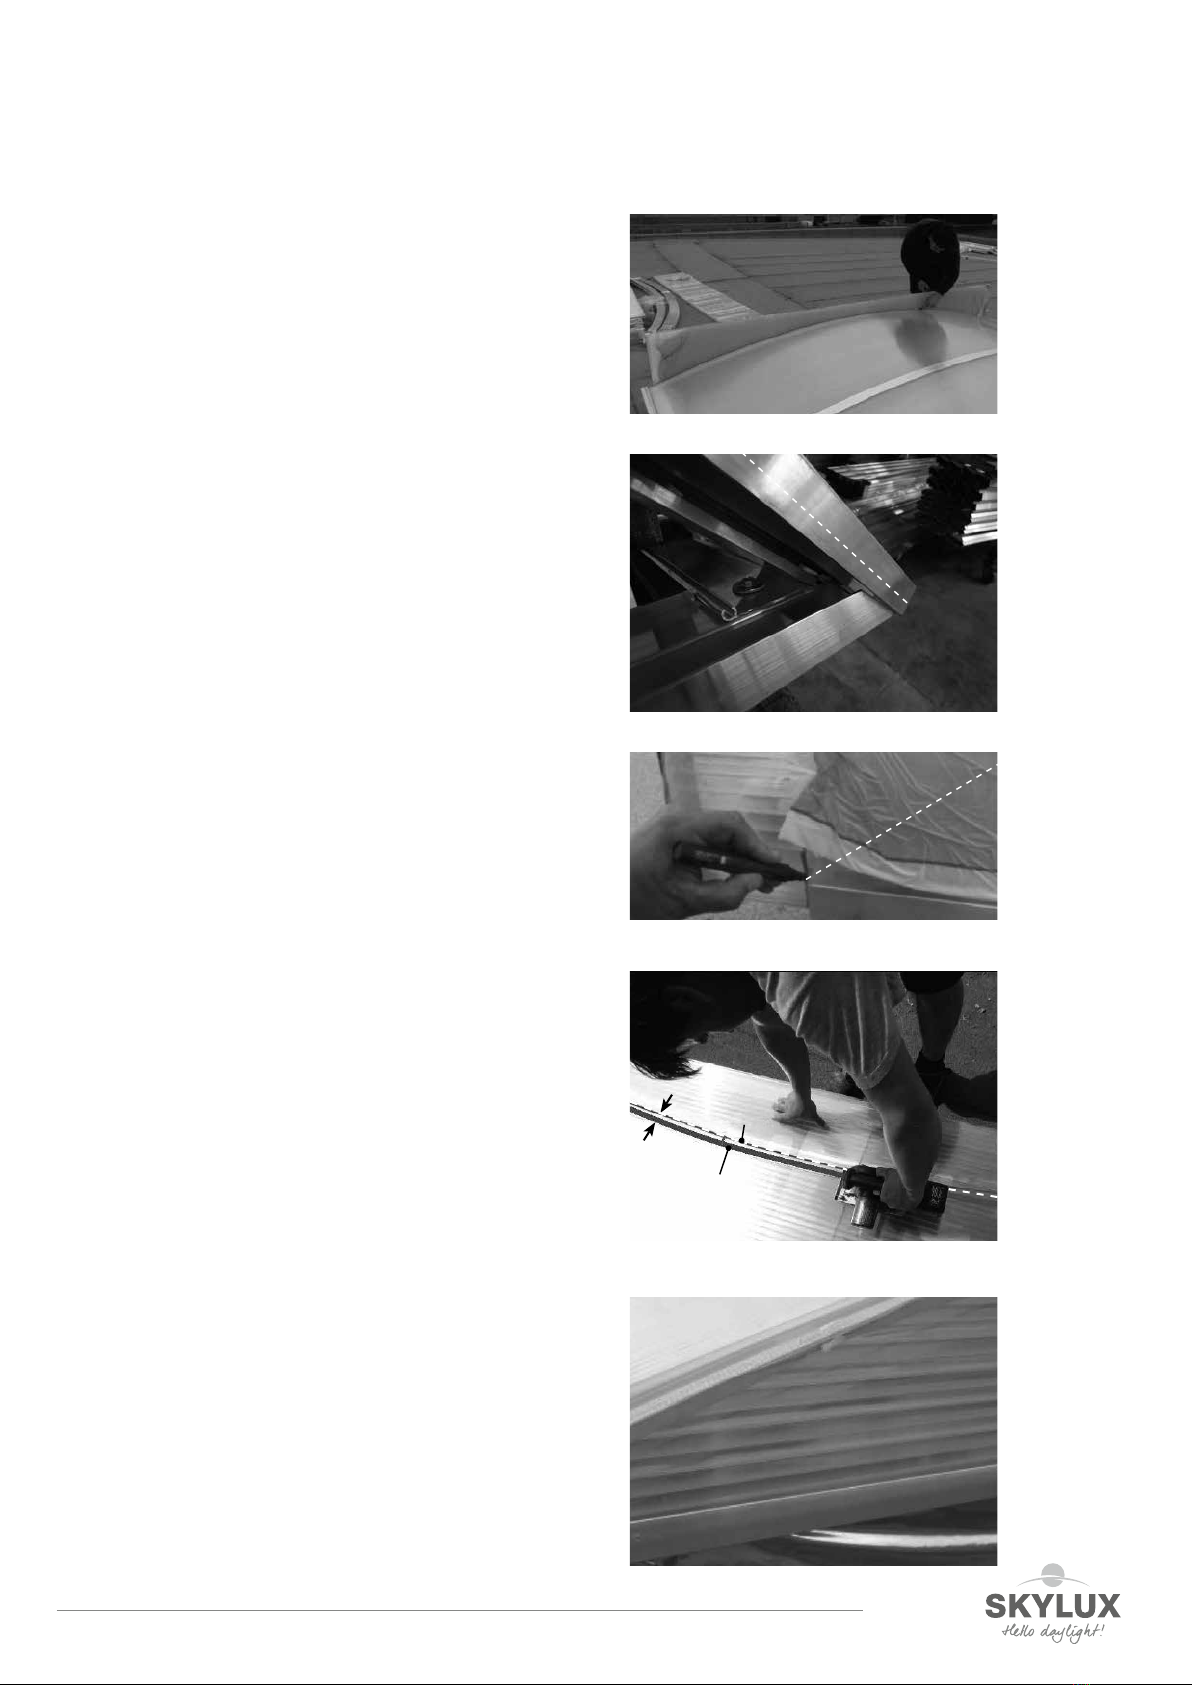
Install the entire 32 mm end sheet in the lowest end
profile and mark the top side of the intermediate
arch on the protective film.
The UV side must face outwards.
Mark until the ends of the lowest end profile for the
correct sheet length.
Take out the sheet from the lowest end profile again.
Saw o the sheet 3 mm BELOW the marked line, in arch form.
Blow away all the saw dust and tape o the sawn edges
with the supplied BB32 tape.
Now reinstall the 32 mm sheet back into the lowest end profile.
marked line
(upper side of the
intermediate arch)
3 mm
saw line
E_MH_Mounting_instructions_Skylux_Cintralux_Alu_EP10-10 01/09/2020
16/18
Tighten the lateral arch (= upper arch with downward flange)
with the uppermost end profile. Use the M8 x 60 mm bolts.
Finish the 4 corners by installing the corner profile
on the lowest and uppermost end profile (on the ends
of the barrel vault):
8. Finish with aluminum strips
Clamp the sheets into the lateral profile by installing the draft
strips below the edge of the lateral profile. Start at one side,
press and tap the strips carefully in their positions.
Do not damage the sheets!
corner profile
01/09/2020 17/18
E_MH_Mounting_instructions_Skylux_Cintralux_Alu_EP10-10
9. Check the arch tensions
Check if the lower and upper arches are equally tightened everywhere on the sheets. Adjust if necessary (it’s not
necessary to tighten very firmly, we even advise against it).
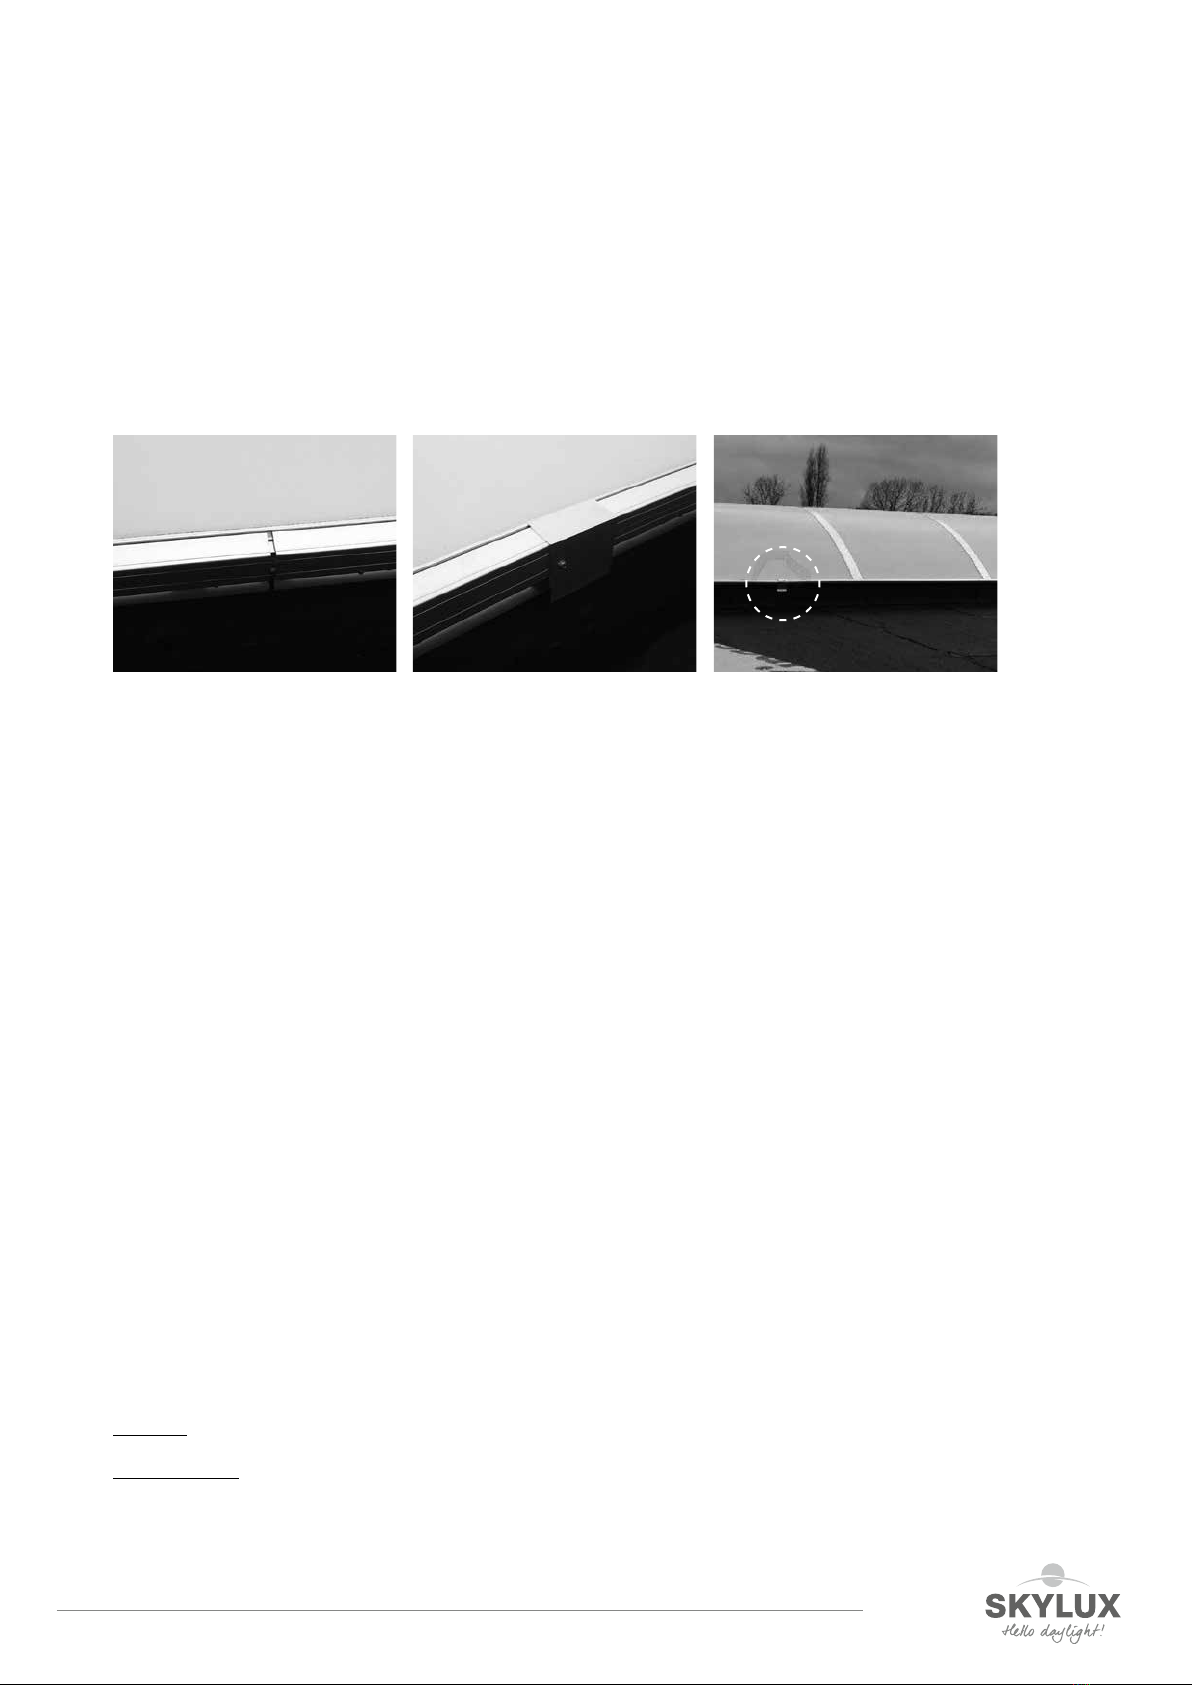
10. Finish the seams of the lateral profiles
Finish the seams of the lateral profiles with the finishing profiles.
Screw the finishing profile on the lateral profile.
11. Continue finishing the opening parts, if any
In case of a combination with Cintramax opening parts, these parts must be finished. See separate manual of the
Cintramax opening parts.
Maintenance
The owner of the building must schedule a yearly maintenance on the Cintramax opening parts and the fixed parts
of the barrel vault. The maintenance should include at least the cleaning of the sheets with water and light and
neutral soap. All attachments must be inspected and loose or damaged parts of the Cintramax must immediately
be fixed or replaced by original parts as described in the ETA Cintralux.
Clean the condensation drain holes (in the lateral profile, etc.) and the inside of the lateral profile at least once a
year.
Snow and wind load
The barrel vaults are resilient to normal wind and snow loads. For specific locations (near the sea or in case of very
tall building > 12 m), reinforcement profiles can be provided with surcharge (only on customer’s request).
Disclaimers
Warnings
Installers: installation must be performed by trained technicians with sucient knowledge of and experience in the
installation of barrel vaults.
Fixing materials: use suitable fixing material depending on the surface and the load. If any doubt, contact the
screw supplier or a specialised engineering firm. We supply fixing material that is suitable for most metal or
wooden surfaces, but this needs to be checked before starting the installation. Skylux is not responsible for the
fixing materials used.

E_MH_Mounting_instructions_Skylux_Cintralux_Alu_EP10-10 01/09/2020
Attention: the CE certification is only valid if the composition, execution and the installation regulations are respected.
Skylux guarantees the CE conformity as described in the documentation and according the plant regulations of the
appliances. Every variance, cancels the CE conformity.
CE according to EN 14963
ONLY USE ORIGINAL PARTS SUPPLIED BY SKYLUX. FAILURE TO USE ORIGINAL PARTS VOIDS THE GUARANTEE.
SKYLUX®IS A REGISTERED BRAND OF SKYLUX
SPINNERIJSTRAAT 100 B8530 STASEGEM
T +32 056 20 00 00 F +32 056 21 95 99
INFO@SKYLUX.BE
WWW.SKYLUX.BE
Compatibility: only use polycarbonate-friendly materials. Avoid using silicone, polyurethane foam, detergents,
paints, varnishes, timber protectants, lubricants, insecticides, etc. A lead flashing may not come into contact with
the multi-layered sheets.
Covering: cover the barrel vault (e.g. heat-deflecting eect) only with a cloth that does not contain softening
agents. It is not recommended to cover acrylic or polycarbonate with a coating or paint. In this case, our guarantee
will no longer apply. It is in your interest that the manufacturer of the coating or paint provides guarantee on
compatibility with acrylic and polycarbonate.
Dust: in the event that there are still certain works to be carried out that entail the release of dust particles (such
as grinding, drilling, plaster work, etc.), then the opening under the barrel vault must be hermetically sealed,
for example with a PVC film. The dust can accumulate on, in, or between the plastic sheets. The grooves of the
multi-layered sheets are sealed o with tape. When sawing multi-layered sheets at the project site, all grooves
must be carefully blown out and sealed o with suitable tape. Before assembly, double check that the grooves are
properly taped and adjust where necessary. Make sure the tape has not been damaged during assembly. There is
no warranty for dust inclusion.
UV side and scratches: always mount the multi-layered sheets with the UV protective side facing up. This ‘sunny
side’ is indicated on the protective film. Remove the protective film just before installation to avoid scratches.
Point load: avoid point load on multi-layered sheets as this can cause permanent imprints. Never lean or walk on
the multi-layered sheets.
Snow accumulation: do not mount barrel vaults in places where snow can slide from a higher structure and fall on
the barrel vault.
Original parts: only use original parts and install them according to the assembly instructions.
Skylux reserves the right to modify this product or these instructions without prior notice. Changes to the
assembly instructions or to the product carry no right to compensation or exchange of parts. The most recent
version of these instructions can be consulted at any time at www.skylux.be.
Safety during assembly
Take the necessary and required safety precautions, such as safety nets in the roof opening(s), fall protection,
protection of the roof edge, safety shoes, safety goggles, gloves, hard hat, etc.
An opening part of a barrel vault (Cintramax CE) has moving parts. It is necessary to open and close the Cintramax
(partially or entirely) during installation. Make sure there are no persons near the near the moving parts.
Pneumatic Cintramax:
can be opened and closed manually, without compressed air.
Attention: once the Cintramax passes the balance point, it opens by itself because of the gas springs.
Make sure there are no persons near the moving parts.
Physical properties multi-layered sheets
Expansion: acrylic and polycarbonate sheets are plastic sheets and will expand and contract in case of temperature
fluctuations. The profile system allows this expansion and contraction. This might cause some noise but will not
influence the stability of the construction.
Condensation: acrylic and polycarbonate sheets are very little permeable to damp, which can cause condensation
in the hollow canals of the sheets. This could mostly happen at the beginning of the installation because there is a
lot of construction liquid that must evaporate. This is a physical phenomenon and disappears after some time. The
condensation has no influence on the characteristics of the plastic sheets or on the guarantee.
Reflection: in some cases, acrylic and polycarbonate sheets can reflect the sunlight to the inside or outside,
depending on orientation and pitch.
Table of contents
Other SKYLUX Industrial Equipment manuals

Popular Industrial Equipment manuals by other brands

SCHNIER
SCHNIER 810477 operating manual

Emerson
Emerson Rosemount IK220 quick start guide

Xylem
Xylem Flygt 2860.180 Installation, operation and maintenance manual

Yost Vises
Yost Vises 10904 manual

Hydac
Hydac PTK Series Operating and maintenance instructions

TOYOTA ADVANCED LOGISTICS
TOYOTA ADVANCED LOGISTICS Bastian SOLUTIONS BSBAC 1 HP Installation and maintenance manual


