SMA Sunny Island 4248U Manual

SI4248U Installation Guide
i
SOLARTECHNOLOGY
Battery Inverter/Charger for
Stand-Alone and Back-up Applications
Sunny Island 4248U
Installation & Operating Instructions

SI4248U Installation Guide
ii

SI4248U Installation Guide
iii
Copyright © 2004 SMA America, Inc. All rights reserved.
All rights reserved. No part of this document may be reproduced, stored in a retrieval
system or transmitted in any form or by any means, electronic, mechanical,
photographic, magnetic or otherwise, without the prior written permission of SMA
America, Inc.
SMA America makes no representations, express or implied, with respect to this
documentation or any of the equipment and/or software it may describe, including
(with no limitation) any implied warranties of utility, merchantability or fitness for any
particular purpose. All such warranties are expressly disclaimed. Neither SMA America
nor its distributors or dealers shall be liable for any indirect, incidental or consequential
damages under any circumstances.
(The exclusion of implied warranties may not apply in all cases under some statutes, and
thus the above exclusion may not apply.)
Specifications are subject to change without notice. Every attempt has been made to
make this document complete, accurate and up-to-date. Readers are cautioned,
however, that SMA America reserves the right to make changes without notice and shall
not be responsible for any damages, including indirect, incidental or consequential
damages, caused by reliance on the material presented, including, but not limited to,
omissions, typographical errors, arithmetical errors or listing errors in the content
material.
SMA America, Incorporated
12438-C Loma Rica Drive
Grass Valley, California 95945
Tel 530.273.4895
Fax 530.274.7271
www.sma-america.com
Revision History
Rev.
No.
Date By Description
0.1 Feb. 2, 2004 Jeffrey Philpott Alpha draft
1.0 Sept. 24, 2004 Jeffrey Philpott Preliminary Release
1.1 Feb. 25, 2005 Yvonne Siebert New chapter: “Split-phase“
1.2 Sep. 13, 2005 Jeffrey Philpott Generator Update/Com. Update

SI4248U Installation Guide
iv
IMPORTANT SAFETY INSTRUCTIONS
*SAVE THESE INSTRUCTIONS*
This manual contains important instructions for the Sunny Island SI4248U that must be followed
during the installation, operating and maintenance of the inverter.
The Sunny Island 4248U is designed and tested according to international safety requirements,
but as with all electrical and electronic equipment, certain precautions must be observed when
installing and/or operating the Sunny Island 4248U. To reduce the risk of personal injury and
to ensure the safe installation and operation of the Sunny Island 4248U, you must carefully
read and follow all instructions and warnings in this Installation Guide.
Safety and Hazard Symbols
This symbol is used to call attention to important information that you must have
when installing and/or operating the Sunny Island 4248U. Failure to read and
follow instructions marked with this symbol could result in serious injury and/or
damage to the equipment.
This symbol appears beside instructions and warnings that deal with dangerous
voltages that can injure people who come in contact with them.
Warnings
WARNING: A Warning describes a hazard to equipment or personnel. It calls
attention to a procedure or practice, which, if not correctly performed or adhered
to, could result in damage to or destruction of part or all of the SMA equipment
and/or other equipment connected to the SMA equipment or personal injury.
Warnings may also be accompanied by one or more of the safety and hazard symbols
described above to indicate the type of hazard described therein.
Other Symbols
In addition to the safety and hazard symbols described previously, the following symbol is also
used in this Installation Guide:
This symbol accompanies notes that call attention to supplementary information
that you should know to ensure optimal operation of the system.

SI4248U Installation Guide
v
Warranty
All Sunny Island 4248U inverters sold in the USA have a five-year warranty, as indicated on
the warranty card included in the shipping container. For warranty coverage, or if you have
questions about the Sunny Island 4248U warranty, contact SMA America at the address,
telephone number or Web site listed on page iii (to send E-mail, see the Contact section of the
SMA America Web site: www.sma-america.com).
WARNING: All electrical installation must be done by qualified personnel and
in accordance with the National Electrical Code ANSI/NFPA 70, local
building codes and the requirements of the authority having jurisdiction.
WARNING: The Sunny Island 4248U contains no user serviceable parts.
Always contact an SMA authorized service center for repairs and
maintenance.
WARNING: Other than the cooling fans, the Sunny Island 4248U contains no
user-serviceable parts. Always contact an SMA authorized Service Center for
repairs and maintenance other than those detailed in this manual.
WARNING: Before installing or using the Sunny Island 4248U, read all of the
instructions and warnings on the Sunny Island 4248U and in this Installation
Guide.
WARNING: Do NOT connect the AC OUPUT of the Sunny Island 4248U to the
utility grid. Doing so will damage the inverter and void the warranty.
WARNING: The Sunny Island 4248U is designed for use in Negative Ground
DC systems only.
WARNING: Always wait a minimum of 5 minutes for any stored potentials in
the Sunny Island 4248U to discharge completely before opening the
enclosure.
WARNING: This device is not intended for use with emergency systems or
essential equipment such as fire pumps, operating room or life support
equipment. See NEC 700/701.

SI4248U Installation Guide
vi

SI4248U Installation Guide
1
Installation Manual 1
Introduction . . . . . . . . . . . . . . . . . . . . . . . . . . . . . . . . . . . . . 1
Specifications . . . . . . . . . . . . . . . . . . . . . . . . . . . . . . . . 2
Safety . . . . . . . . . . . . . . . . . . . . . . . . . . . . . . . . . . . . . . . . . 4
Preparation . . . . . . . . . . . . . . . . . . . . . . . . . . . . . . . . . . . . . 6
Installation . . . . . . . . . . . . . . . . . . . . . . . . . . . . . . . . . . . . . 11
Mounting . . . . . . . . . . . . . . . . . . . . . . . . . . . . . . . . . . 12
System Configuration . . . . . . . . . . . . . . . . . . . . . . . . . . 18
Conductor Types and Sizes . . . . . . . . . . . . . . . . . . . . . 20
Auxiliary Wiring . . . . . . . . . . . . . . . . . . . . . . . . . . . . . 24
Wiring Instructions . . . . . . . . . . . . . . . . . . . . . . . . . . . . 28
Split-Phase . . . . . . . . . . . . . . . . . . . . . . . . . . . . . . . . . . . . . 36
Commissioning . . . . . . . . . . . . . . . . . . . . . . . . . . . . . . . . . . 38
Generator Set Up . . . . . . . . . . . . . . . . . . . . . . . . . . . . 42
Sunny Boy Set Up . . . . . . . . . . . . . . . . . . . . . . . . . . . . 45
Sunny Island 4248U Menu Tree . . . . . . . . . . . . . . . . . . . . . . 47
Installer Level Menu Guide . . . . . . . . . . . . . . . . . . . . . . . . . 48
Meters . . . . . . . . . . . . . . . . . . . . . . . . . . . . . . . . . . . . 48
Settings . . . . . . . . . . . . . . . . . . . . . . . . . . . . . . . . . . . . 50
Diagnose . . . . . . . . . . . . . . . . . . . . . . . . . . . . . . . . . . 55
Operation . . . . . . . . . . . . . . . . . . . . . . . . . . . . . . . . . . 56
Troubleshooting . . . . . . . . . . . . . . . . . . . . . . . . . . . . . . . . . 58
Battery Management . . . . . . . . . . . . . . . . . . . . . . . . . . . . . . 60
Charging Operations used by the Sunny Island . . . . . . . 60
Generator, Load Shedding Control and Battery State of Charge 62
How to set up State of Charge Limits . . . . . . . . . . . . . . . 64
User Manual 67
Introduction . . . . . . . . . . . . . . . . . . . . . . . . . . . . . . . . . . . . 67
User Interface Overview . . . . . . . . . . . . . . . . . . . . . . . . . . . 68
Options . . . . . . . . . . . . . . . . . . . . . . . . . . . . . . . . . . . 68
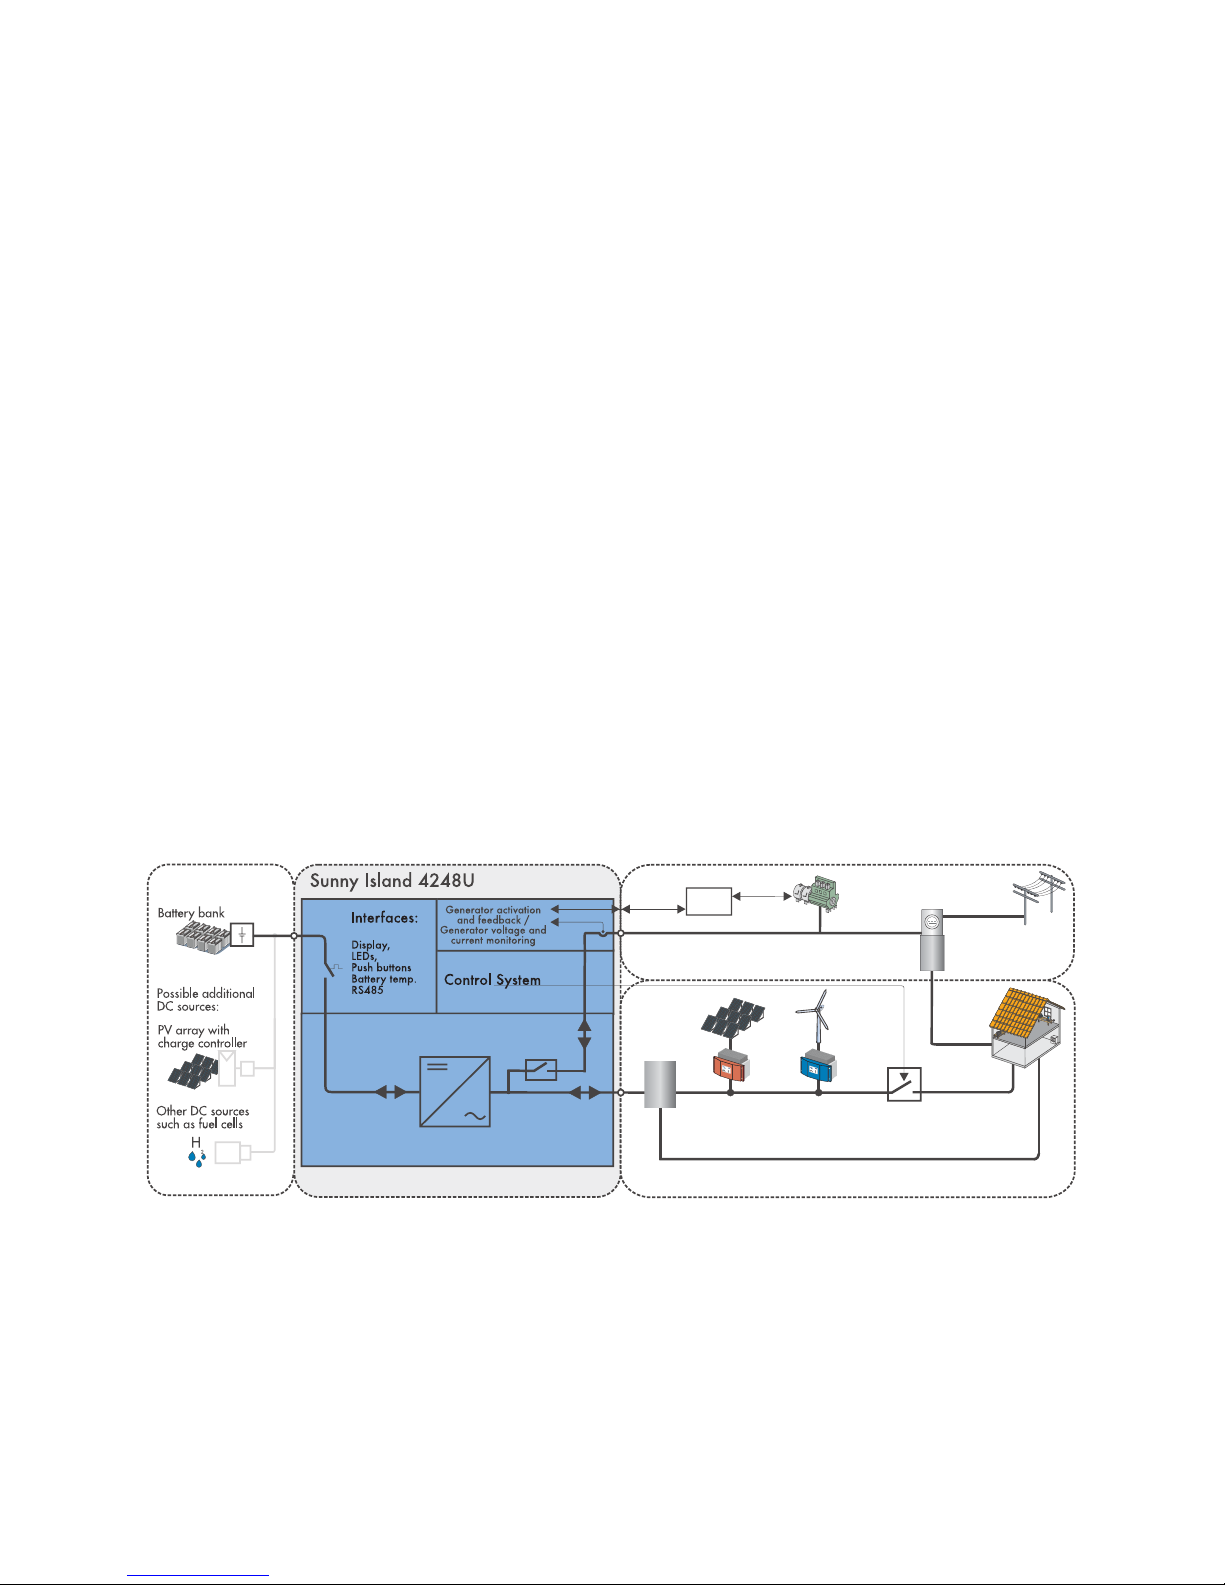
Sunny Island Applications . . . . . . . . . . . . . . . . . . . . . . . . . . 69
Off-Grid / Stand Alone Systems . . . . . . . . . . . . . . . . . . 69
Back-Up Systems . . . . . . . . . . . . . . . . . . . . . . . . . . . . . 69
Generators . . . . . . . . . . . . . . . . . . . . . . . . . . . . . . . . . 70
Safety . . . . . . . . . . . . . . . . . . . . . . . . . . . . . . . . . . . . . . . . 71
User Interface Functionality . . . . . . . . . . . . . . . . . . . . . . . . . 72
Changing Parameters . . . . . . . . . . . . . . . . . . . . . . . . . 73
How Information is Displayed . . . . . . . . . . . . . . . . . . . . 73
Home Screen . . . . . . . . . . . . . . . . . . . . . . . . . . . . . . . . 74
Sunny Island 4248U User Menu Tree . . . . . . . . . . . . . . . . . . 77
User Menu Guide . . . . . . . . . . . . . . . . . . . . . . . . . . . . . . . . 78
Meters . . . . . . . . . . . . . . . . . . . . . . . . . . . . . . . . . . . . 78
Settings . . . . . . . . . . . . . . . . . . . . . . . . . . . . . . . . . . . . 81
Diagnose . . . . . . . . . . . . . . . . . . . . . . . . . . . . . . . . . . 83

SI4248U Installation
2
Operation . . . . . . . . . . . . . . . . . . . . . . . . . . . . . . . . . . 84
Start Up . . . . . . . . . . . . . . . . . . . . . . . . . . . . . . . . . . . . . . . 85
Maintenance . . . . . . . . . . . . . . . . . . . . . . . . . . . . . . . . . . . 86
Battery Management . . . . . . . . . . . . . . . . . . . . . . . . . . . . . . 88
Charging Operations used by the Sunny Island . . . . . . . 88

SI4248U Manual Installation Manual
1
Section 1:
Installation Manual
Introduction
Features
Congratulations! You’ve purchased the finest inverter/charger available today. Over twenty
years of inverter manufacturing experience has gone into the design of the Sunny Island
4248U. As a result, the Sunny Island 4248U represents state-of-the-art technology, high
reliability and overall ease of use, all the things you’ve come to expect from SMA, the industry
leader in inverter manufacturing. Some of the features included are:
• Optimized for high ambient temperature operation
• Very high efficiency
• Integrated DC breaker
• Near silent operation
• Non-volatile memory
• Compatible with all Sunny Boy and SMA Control products
• Advanced battery management system
• Sealed electronics compartment
• Generator overload protection
• Generator reactive power compensation
Figure 1-1 Sunny Island 4248U System Block Diagram
Optional
GenMan
Main
Service Panel
Secondary
Panel
Critical Loads
Internal
Gen/Grid
Iso-Relay
OR
Loads
Generator Utility Grid
Bi-directional Inverter
Sunny Boy
AC Input
AC Coupling on Output Side
DC Input
Windy Boy Load - Shed
Relay

Introduction SI4248U Manual
2
Code Compliance
The Sunny Island 4248U has been tested and listed by ETL to meet the requirements of UL 1741
Static Inverters and Charge Controllers for use in Photovoltaic Power Systems. The Sunny
Island 4248U also meets all RFI/EMI requirements of FCC Part 15, part b.
Specifications
DC Nominal Voltage 48 V DC
DC Input Voltage Range
(With Full Power Output)
43 to 63 V DC
DC Maximum Output Voltage 63 V DC (67 V DC for max. 100 ms)
DC Minimum Output Voltage 41 V DC
AC Nominal Output Voltage 120 V AC
AC Maximum Input Voltage 150 V AC
AC Minimum Input Voltage 80 V AC
THD of Output Voltage < 3 %
AC Nominal Output Frequency 60 Hz
AC Maximum Input Frequency 66 Hz
AC Minimum Input Frequency 54 Hz
AC Maximum Input Current
(Battery Charging)
40 A @ 77 °F (25 °C)
28 A @ 113 °F (45 °C)
DC Maximum Charge Current 100 A
AC Maximum Continuous Out-
put Current
35 A @ 77 °F (25 °C)
AC Maximum Pass-Through Cur-
rent
56 A
Idle Power Consumption approx. 22 W
Standby Power Consumption approx. 4 W
Enclosure NEMA 1(Indoor Installation) / IP30
Weight 86 lbs. (39 kg)
Dimensions H 23 x W 15.25 x D 8.75 inches
Operating Temperature -4 to +113 °F (-20 to +45 °C)
Cooling Low noise temperature controlled fan

SI4248U Manual Installation Manual
3
Table 1-1: Sunny Island 4248U Specifications
Figure 1-2 Sunny Island 4248U Efficiency Curve
Figure 1-3 Sunny Island 4248U Output Power Curves
Interfaces 2 LEDs, 2-line LCD, 4 Buttons, Serial Port (optional),
Generator Request (N.O. dry contact), Generator
Ready (isolated input), Load Shed (N.C. dry contact)
Max. Voltage G_Req / Load_S see Figure 1-14
Max. Current G_Req / Load_S see Figure 1-14
4000 W3000 W2000 W1000 W
Output Power [Pac]
Efficiency [%]
50
0
100
150W 86%
300W 91%
1000W 95%
2500W 94%
4200W 91%
Efficiency
continuous30 min1 min100ms
Output Power [kW]
Output Power
10
5
0
7.1
5.4
4.1 4.2
3.4
2.6
50 °C
45 °C
25 °C

Safety SI4248U Manual
4
Safety
Safety Features
The Sunny Island 4248U is equipped with several safety related components. Some of the
safety features included are:
• Built in DC disconnect
• AC input current limiting to protect generator
• Automatic fan control
• Over and under-voltage monitoring of both AC and DC voltages
• Input and output AC frequency monitoring
• Generator relay failure detection
• Over-temperature protection
WARNING: There is an inherent risk of electrical shock or injury to personnel, or
potential damage to the components of the system when working on and around
electrical equipment. Be sure that you have read and understand the safety
instructions in the front section of this manual and any other safety documentation
provided with other equipment in your system before beginning installation.
Battery Safety
Special care should be taken when working around batteries. Battery banks have the potential
to deliver extremely large amounts of current when shorted. Wires can melt, tools can be
welded, fires can start. Even small battery banks deserve your utmost respect.
• Read, understand and follow the battery manufacturer’s safety and installation instruc-
tions.
• Always wear protective clothing and eye protection when working with the batteries.
• Be sure that the battery enclosure is made from a dielectric, corrosion resistant material
and is well ventilated.
• Use the correct cable size for your system. Using cables that are too small will create a fire
hazard.
• Ensure that an approved DC disconnect and over-current protection is installed between
the batteries and inverter(s), if the inverter is located more than 5 ft. away from the batter-
ies.

SI4248U Manual Installation Manual
5
RFI/EMI
The Sunny Island 4248U has been tested and complies with the requirements of FCC part 15
rules for Class B digital devices. FCC part 15 was written to provide reasonable protection
against harmful interference caused by electronic devices in a residential installation.
The Sunny Island 4248U generates and can radiate radio frequency energy that can cause
interference to radio communications if the inverter is not installed according to these
instructions. Even so, there is no way to guarantee that radio interference will not be generated
in a given installation.
If the inverter is found to be causing harmful radio or television interference, (easily verified by
switching the inverter on and off), the situation can usually be corrected by implementing one
or more of the following:
• Move the equipment being effected further from the inverter
• Ensure that all conduit runs and the inverter enclosure are grounded
• Move or relocate the receiving antenna
• Connect the equipment to a different receptacle on a different circuit
• Secure the services of an experienced radio/TV technician for assistance

Preparation SI4248U Manual
6
Preparation
Lifting/Moving
The Sunny Island 4248U weighs 86 lbs. (39 kg) Be sure to use proper lifting techniques and
secure the help of someone to assist in the installation of the inverter.
Unpacking
Retain the shipping container in case it becomes necessary to ship the inverter.
Before installing the Sunny Island 4248U, carefully unpack it and make sure that all of the
following items are included. If anything is missing or if the inverter has been damaged in
shipping, contact SMA America immediately. Contact information is located in the front and
back of this manual.
• Closely inspect the shipping container and inverter for any damage
• Verify that the mounting bracket, manual and warranty card are all present
• Fill out the warranty card with the model number and serial number of the unit
• Keep all receipts together for future reference
The lid of the Sunny Island 4248U is not mounted when you receive the device. The lid is
packed in a bag to prevent damages during shipping. You have to unpack the lid and fasten
it to the enclosure of the Sunny Island 4248U after the installation.
Bottom Mounting Tab
The tab on the bottom of the inverter is installed upside down to prevent damage during
transport. This tab needs to be removed and remounted so that the flange points downward
and is flush with the back of the inverter. See illustration below.
Figure 1-4 Mounting Tab Orientation
-OUNTING4AB
"OTTOM6IEW 3IDE6IEW
-OUNTWITH
FLANGEDOWN
7ALL 7ALL

SI4248U Manual Installation Manual
7
Removing the Cover
WARNING: Care should be taken when removing the front cover. See
illustration below.
It is important when removing the cover to make sure that you swing
the bottom of the cover out far enough to clear the DC breaker on the
front of the inverter (step 1) before lifting the cover off (step 2). Failure
to do so can result in the DC breaker being accidentally switched on.
Figure 1-5Proper Cover Removal
The cover of the Sunny Island 4248U is not mounted at the factory. Mount the cover once in-
stallation is complete. To mount the cover, install the four screws in the bottom of the inverter
as shown below.
Figure 1-6 Bottom View with Location of Cover Mounting Screws
1
2

Preparation SI4248U Manual
8
Mounting Location
The Sunny Island 4248U must be mounted indoors in an area where it is easily accessible and
out of the elements. It is important that the Sunny Island 4248U not be mounted directly over
the battery bank for corrosion and safety reasons. Mount the inverter off to one side of the
battery bank or perhaps on the other side of the same wall if convenient. The following
diagram shows possible mounting locations.
WARNING: NEC Article 110.26 clearance requirements may be violated if
the inverter is mounted directly over the battery enclosure.
WARNING: If the inverter is mounted in a separate room from the batteries,
there must be an additional DC disconnect mounted inside the room
containing the batteries. Over-current protection (at the battery location) for
the cable between the batteries and the inverter is also required when the
batteries are in a separate room from the inverter or more than about 5 feet
away.
Figure 1-7 Mounting Locations
%.4%2%3# %.4%2%3#
"ATTERY"ANK
$O.OT-OUNT(ERE
-AYVIOLATE.%#
/+ /+
"ATTERY"ANK
"ATTERY2OOM
$#$ISCONNECT
/VERCURRENT0ROTECTION
3)5
7ALL
-OUNTINGINSAMEROOMWITHTHEBATTERYBANK
-OUNTINGONOPPOSITESIDEOFTHEWALLFROMTHEBATTERYBANK

SI4248U Manual Installation Manual
9
Mounting Method
The Sunny Island 4248U was designed to be wall-mounted in a vertical position. Drywall, or
“wallboard”, is not strong enough to support the weight of the Sunny Island 4248U by itself.
Do not attempt to install the inverter on wallboard without additional support. The inverter can
be mounted on a single wall stud provided that three 1/4 inch lag bolts with washers are used
and provided that the lag screws are long enough to penetrate the stud to a depth of 1 1/2
inches. For additional support, the Sunny Island 4248U may be mounted to 2 x 4 braces, Uni-
Strut or a sheet of plywood that is secured to the building support structure.
Clearances
Air is drawn into the bottom of the inverter and exits through the sides near the top of the
enclosure. To maintain proper air flow, a distance of 6 inches must be maintained on the sides
of the inverter and a distance of 4 inches should be maintained on top of the inverter. All wire
terminations will be made through the bottom of the enclosure, therefore a minimum of 3 feet
of clearance should be maintained below the inverter. For best viewing of the LCD display,
mount the inverter so that the display will be near eye-level. (To help accomplish this, position
the mounting bracket so that the top edge is approximately 8” above eye-level.)
Figure 1-8 Recommended Clearances for the Sunny Island 4248U
%.4%2%3#
g
h
&LOOR

Preparation SI4248U Manual
10
User Interface Overview
The following illustration shows the names and locations of the components that make up the
Sunny Island 4248U’s user interface.
%.4%2%3#
$#$ISCONNECT
,INE$ISPLAY
RED
GREEN
)NDICATOR
,IGHTS
.AVIGATION+EYS

SI4248U Manual Installation Manual
11
Installation
WARNING: The Sunny Island 4248U is extremely heavy and it is recommended
that the installer obtain assistance from another person when mounting the
inverter.
Special Tools
It is helpful to have a laptop on hand with the Sunny Data software installed, a communication
cable and an RS232 Piggy-Back module for communication with the Sunny Island 4248U (but
is not required to complete installation).
Hardware
The type of hardware required to mount the inverter will vary depending upon the mounting
method used. See the Mounting Method section for details on recommended mounting options
for the inverter.
The Mounting Bracket
The mounting bracket provided has an assortment of holes and slots punched in it for various
mounting needs. Horizontally, there are 5 slots to be used for mounting to wall studs when the
stud spacing is appropriate. There are also several holes along the vertical portion of the
bracket for use in single stud mounting and in conjunction with the other holes when needed.

Installation SI4248U Manual
12
Mounting
Single Stud Mounting
The Sunny Island 4248U can be mounted to a single wall stud if necessary. It must be mounted
with the holes centered on the stud and the lag bolts must penetrate the stud to a depth of at
least 1 1/2”.
• Locate the center of the wall stud and mark its location on the wall
• Locate desired height of inverter remembering to keep the user interface near eye level
• Place the mounting bracket in position and using the bracket as a template, making sure
the bracket is level, mark the mounting holes for the bracket on the wall
• Drill 3/16” pilot holes in the wall and stud to a depth of 1 1/2”
• Mount the bracket to the wall using at least three 1/4” lag bolts with washers that are
long enough to penetrate the stud to a depth of 1 1/2”
• Verify that the threaded screw at the bottom of the bracket is removed
• With assistance, lift the inverter onto the mounting bracket and secure it by fastening the
threaded screw through the tab on the bottom edge of the inverter
• Verify that the inverter is securely mounted in place before proceeding
Other manuals for Sunny Island 4248U
1
Table of contents
Other SMA Batteries Charger manuals
Popular Batteries Charger manuals by other brands

Somogyi
Somogyi home SA 1000MU instruction manual

Anton/Bauer
Anton/Bauer Dionic 26V LP4 Gold Mount Plus user guide

GRAUPNER
GRAUPNER LiPo BALANCER CHARGER 3-4S manual

Würth
Würth BLG 12/24 V - 35 A Translation of the original operating instructions

Electro
Electro BC-1205 user manual

ReSound
ReSound Azure AZ60 user guide