SmartGyro Raptor User manual
Vídeos
tutoriales
Ficha Técnica
y Faqs
potente, cómodo, funcional... todo un all-road
Manual de uso
52V 1000W
muy potente
hasta 50 Km
de autonomía
Batería de litio
de 52V
Luces LED, intermitentes
frontales, base y traseras
LED
Ruedas Allroad
neumáticas 10”
Display
a color
Estructura
plegable 3 modos
de velocidad
1
2
3
Frenos Hidráulicos
delanteros y traseros Sistema de amortiguación por
Brazos de suspensión

Importante:
1. Esta guía proporciona conocimientos del patín eléctrico
smartGyro, por favor, atiende a las instrucciones de seguridad y
sea responsable con el uso de este vehículo eléctrico.
2. Este patinete y todos sus componentes cumplen con todas las
normativas de seguridad europeas, pero te recomendamos usar
protecciones y hacer una conducción responsable.
3. Cada ciudad tiene sus propias normativas de circulación, le
recomendamos consultarlas antes de su uso
GARANTÍA.
Este producto cuenta con dos años de garantía, consulte las
condiciones completas en nuestra web www.smartgyro.es
1. Antes del primer uso, cargue la batería al máximo de su capaci-
dad. Solo hay que fijarse en el led indicador del transformador:
Rojo=cargando //// Verde= carga completa
2. Encienda su Smartgyro presionando el botón de encendido
situado en el panel de control durante unos segundos
3. Seleccione una velocidad entre las 3 disponibles con una sola
pulsación del botón de encendido
4. Por seguridad, tiene que iniciar la marcha con el pie y después
presionar el acelerador
5. El dispositivo tiene la función de arranque CERO; coloque un pie
sobre la base del patín y el otro pie en el suelo hasta que accio-
ne muy suavemente el acelerador y el patín comience a fun-
cionar.
Utilización:
ES
1
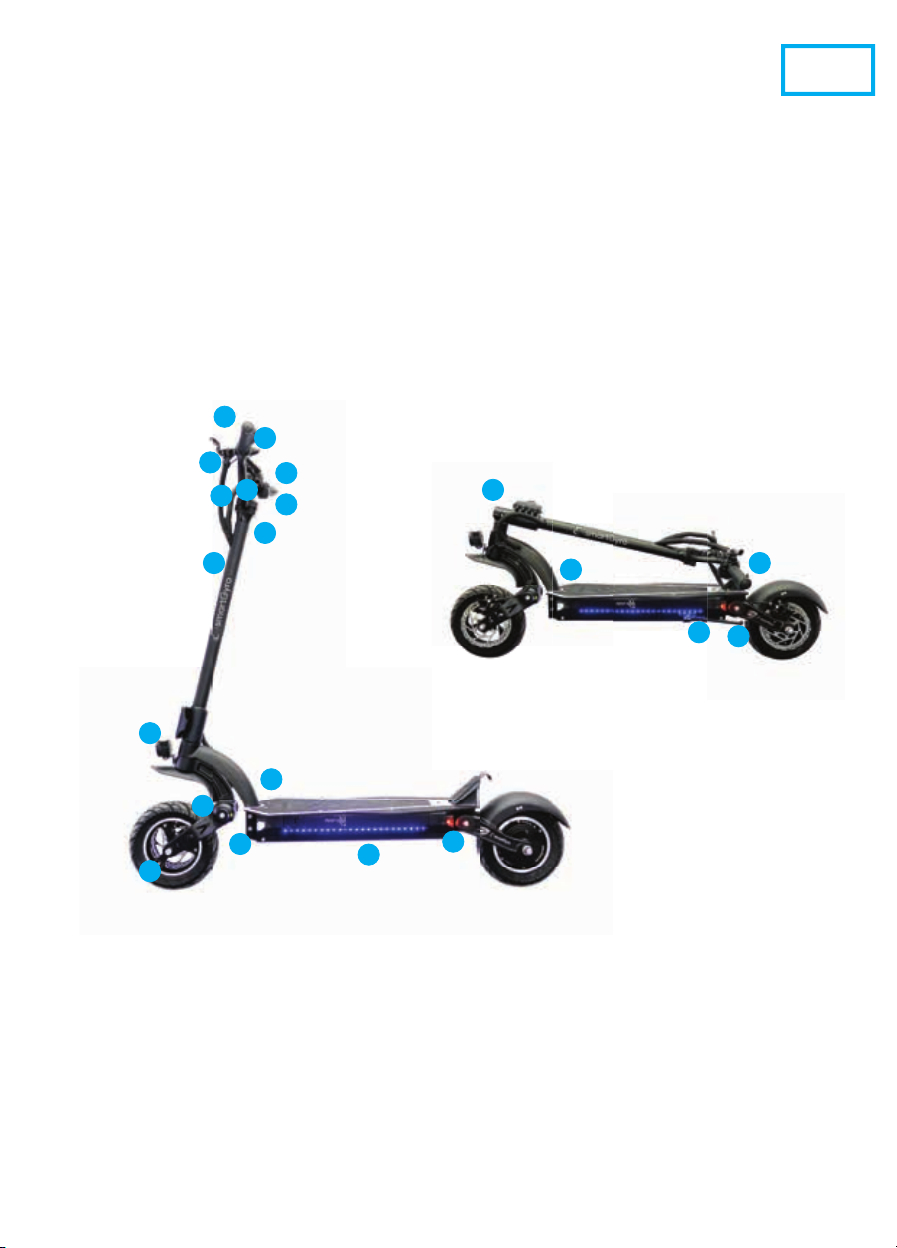
Esquema de la unidad:
ES
1. Manillar * 2. Manguitos antideslizantes * 3. Manillar * 4. Tubo
frontal * 5. Ajuste del manillar * 6. Display y acelerador * 7.
Maneta de freno * 8. Mando de luces y timbre * 9. Soporte para
pie * 10. Freno hidráulicos *11. Foco de led *12 Leds base
* 13. Amortiguadores * 14. Puerto de carga * 15. Pata de cabra
* 16. Luz de freno * 17. Palanca para plegar la estructura *
18. Botón selector del intermitente * 19. Luz intermitente
2
El patinete tiene leds de foco frontal, base, freno e intermitentes,
podrán activarse desde su mando de control. Vea la sección de
Panel de control.
1
2
3
7
4
8
9
10
12
13
14
18
15
16
16
19
17
11
19
5
6

Soporte:
Si tiene cualquier problema con el funcionamiento,
uso o montaje del producto puede contactar con
+34 91 642 95 20
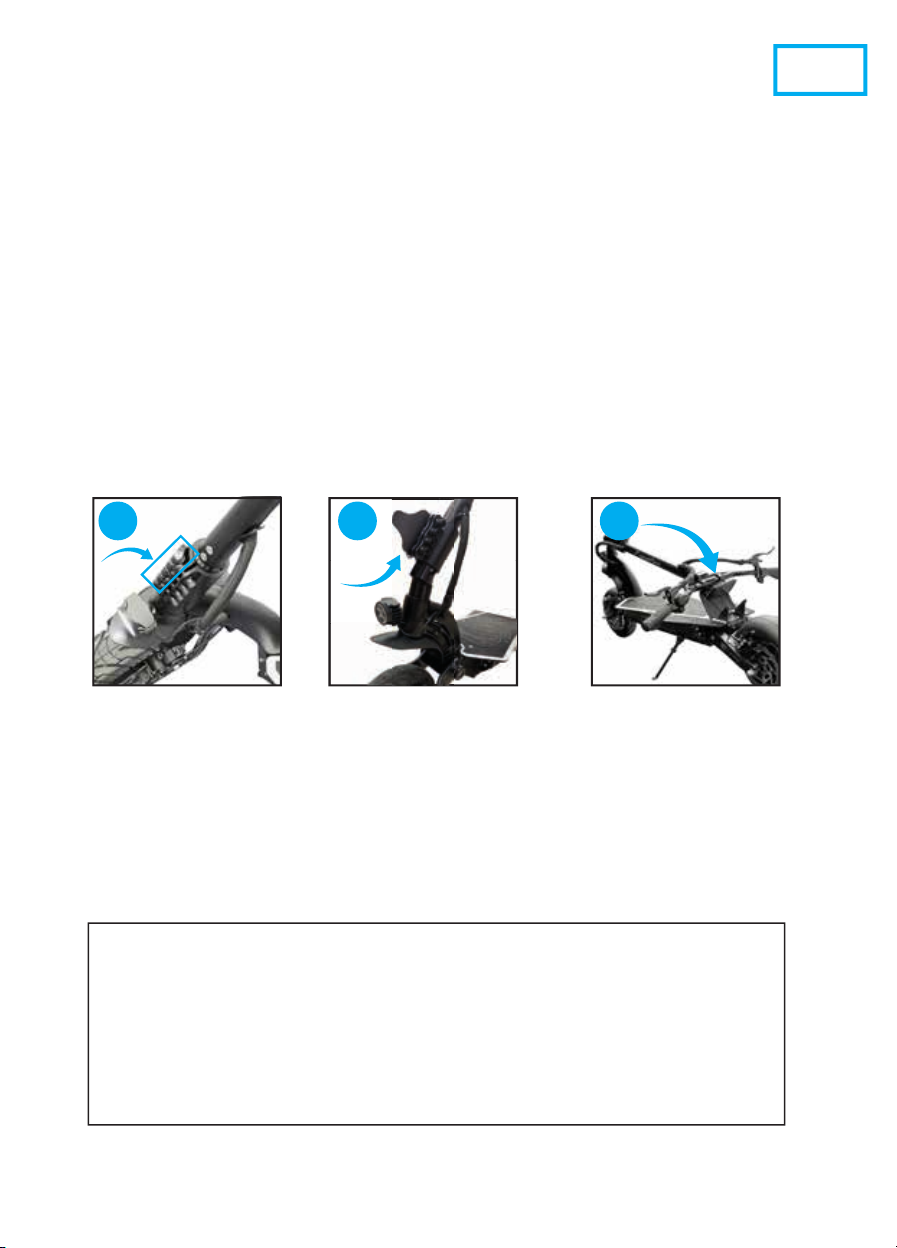
Cómo desplegar su patín Smartgyro:
ES
3
smartGyro Raptor posee un sistema de bloqueo especial de segu-
ridad, por eso el proceso para plegar y desplegar la unidad debe
realizarse con fuerza, firmeza y seguridad.
Paso 1:
a) Abra la maneta (ver imagen 1) y el sistema de plegado se
desbloqueará.
Paso 2:
b) Una vez aflojado, suba la pieza de anclaje hasta que pueda
mover la barra (ver imagen 2). Puede ser necesario mover la
barra frontal para buscar el juego.
Paso 3: Mueva el manillar hasta la base y acople la estructura de
cierre al manillar. Cuando tenga fijada la estructura, ya podrá
levantar el patín.
Nota: Para desplegar el patín realice todos los pasos en orden
inverso. Es importante comprobar que los tornillos estén bien
fijados antes de emprender la marcha.
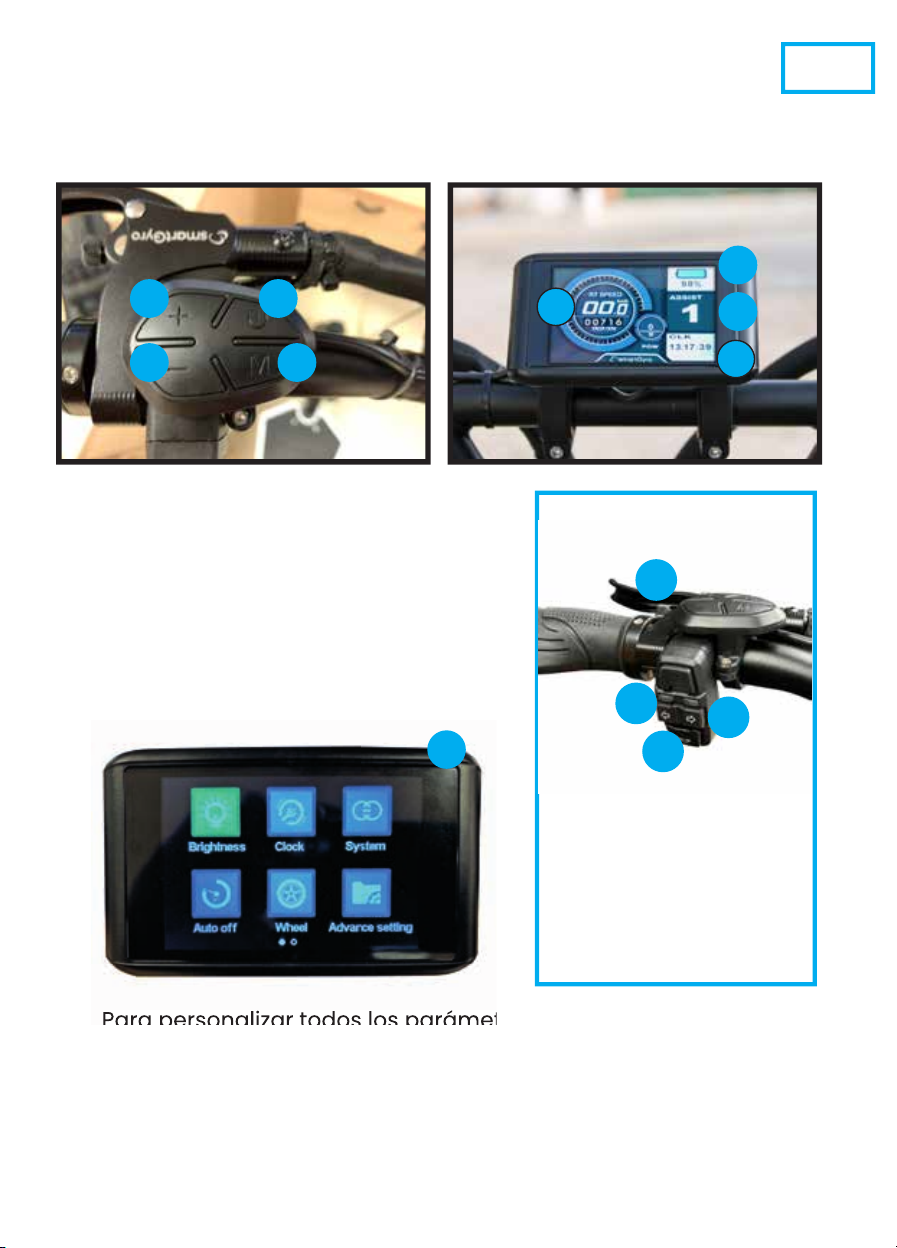
Panel de Control:
1 2 3

Para personalizar todos los parámetros del display, pulse
2 veces a la tecla -M-.
Panel de Control:
ES
4
1. Botón de encendido
2. Subir modo de velocidad
3. Bajar modo de velocidad
4. Cambio de Modo / Enter
5. Marcha seleccionada
6. Batería restante
7. Distancia recorrida
8. Reloj
Podrás ajustar el brillo, el reloj, parámetros del display y muchas
más funciones.
M
2 veces
1
1. Intermitente derecho
2. Intermitente izquierdo
3. Bocina
4. Dureza de la maneta
12
3
4
5
6
7
8
2
3 4

ES
5
Iniciar la marcha:
1 Botón de encendido
Con el patín apagado, presione el botón de encendido / apagado
durante 3 segundos y el patinete se encenderá.
2. Modos de funcionamiento
Con el patín encendido presione el botón “+ y -” para cambiar entre
los 3 niveles de funcionamiento.
3. Control de frenos
El freno hidráulico corta la potencia del motor. Cuando necesite
frenar o detener el dispositivo, puede hacerlo mediante las manetas
de freno que acciona los discos de freno.
4. Si quieres utilizar los intermitentes, presione el switch situado en el
manillar hacia un la do u otro.
Batería y Cargador:
Cada smartGyro está equipado con una batería de litio y con su
cargador, además cuenta con su propio número de serie. No reem-
place la batería ni su cargador, podría ser peligroso.
Batería de Litio
Por favor, cargue completamente la batería antes de usar su smart-
Gyro Raptor.
Cargue la batería cuando su nivel sea a la mitad de la barra de
energía para evitar que influya en su conducción.
Cargador
La función de protección de sobrecarga del cargador detendrá
automáticamente el proceso de carga cuando la batería esté llena
al 100%.
Instrucciones para su carga:
1. Conecte el enchufe del cargador a la red.
2. Importante: enchufe el cargador a una toma de corriente de
100V-240V.
3. Luz roja: en proceso de carga. Luz verde: proceso de carga com-
pletado. Por favor, guarde siempre el cargador en un ambiente seco
y ventilado.
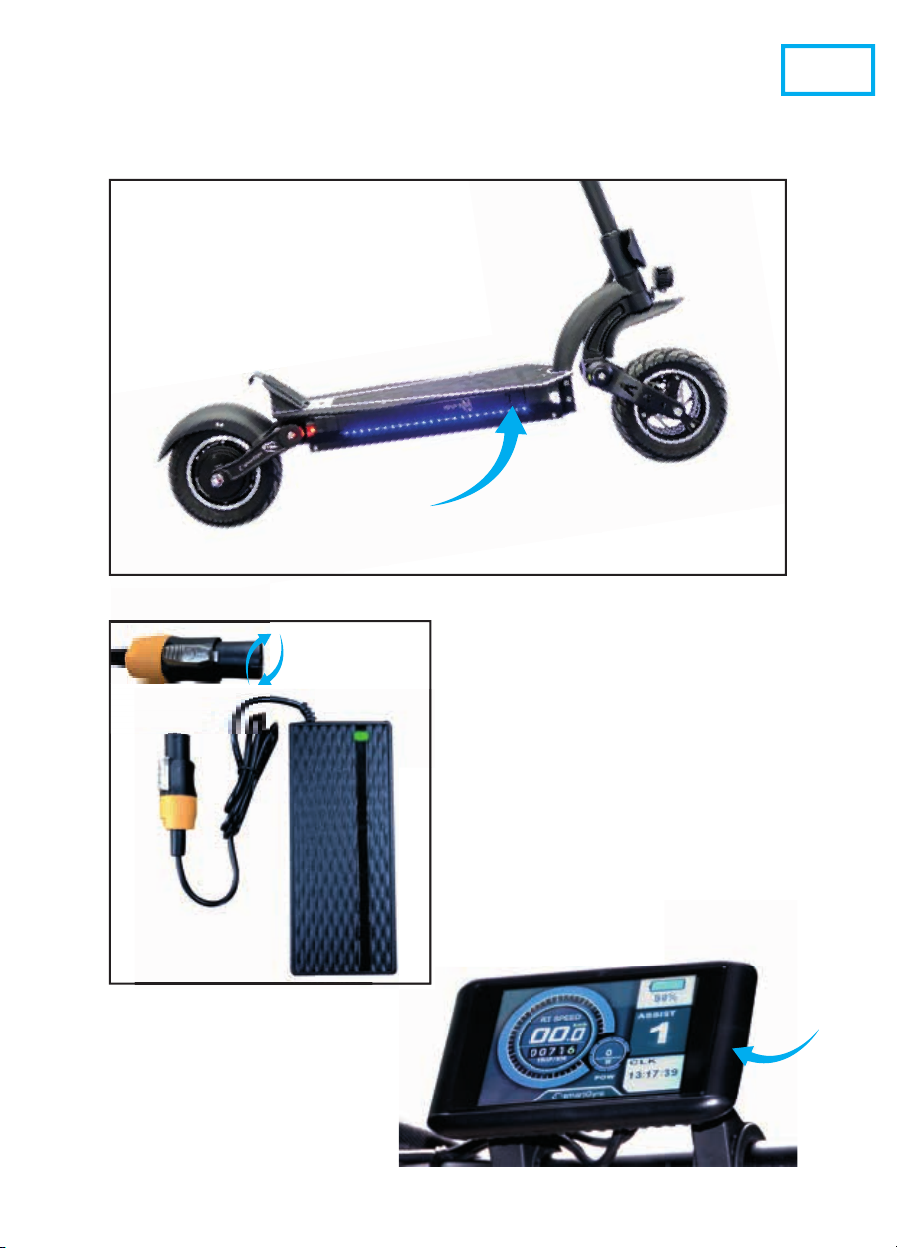
Nota; para poder realizar la
carga, introduce la conexión
y gírala en sentido contrario
a las agujas del reloj.
Para utilizar la toma USB
como carga, deberá habili-
tar el modo carga presio-
nando el botón -M-
durante más de
3 segundos.
Durante el proceso de carga:
Rojo=cargando
Verde= carga completa
Toma USB
Proceso de Carga y toma USB
ES
6
Toma de carga, abra la tapa de seguridad
e introduce la conexión del cargador

Almacenamiento
Guarda tu smartGyro en zonas interiores, que sean lugares
secos y en condiciones adecuadas. Si la temperatura ambiente
del lugar de almacenamiento está por debajo de los 0 ºC o por
encima de los 55 , escoja otra localización. Para prevenir la
entrada de polvo y de partículas, almacene su smartGyro
dentro de su embalaje original.
Si va a almacenar su smartGyro durante un período largo de
tiempo, comprueba que la batería del producto esté en niveles
mínimos. Le recomendamos recargar la batería cada 3 meses
para asegurarse que está listo para conducirse después de
haber sido almacenado.
Requisito técnico de seguridad
El adaptador de alimentación es el dispositivo de desconexión
de equipo. La base de toma de corriente debe estar cerca del
equipo y ser fácilmente accesible.
Reciclar su dispositivo
Los productos eléctricos o electrónicos, las baterías, acumula-
dores y otros accesorios necesariamente han de ser objeto de
una recogida selectiva. Cuando haya finalizado la vida útil de
su aparato eléctrico o electrónico extraiga las baterías y depo-
sítelo, separadamente, en el contenedor correcto para su ade-
cuada gestión. Ten en cuenta que las baterías no puede depo-
sitarlas indiscriminadamente junto con desechos domésticos.
Considera su reciclaje siguiendo las pautas del fabricante. Con
este gesto, ayudará a reducir los riesgos para su salud y a
preservar el medioambiente. Si tiene cualquier duda, consulte
con su ayuntamiento o distribuidor para solicitar las precisiones
esenciales en materia de reciclaje de su antiguo dispositivo.
Nº REI- RPA 1201-RD.106/2008.
Importante
- Siempre debe llevar casco y protectores de seguridad para
evitar caidas y daños personales.
ES
7
ES
8
AVISO AVISO AVISO
- Toda manipulación o modificación del patín
o alguna de sus partes tanto de software
como de hardware implicará la perdida de
garantía.
- La manipulación para modificar las presta-
ciones del patín está expresamente prohibi-
da por la ley y puede tener consecuencias
legales para el usuario.
- Respete las normas que afectan al uso de su
patín, en especial las de circulación, es su
responsabilidad.
IMPORTANTE:
- Es importante hacer una comprobación general de la
fijación de la estructura.
- Comprueba la presión de las ruedas y rellénalas en caso
necesario.
- Cada cierto tiempo es muy aconsejable mirar la fijación
de las tuercas. Debido al movimiento y a continuos baches,
estas tienden a aflojarse.

Important:
1. This guide provides you with knowledge of the smartGyro elec-
tric skateboard, please heed the safety instructions and be res-
ponsible with the use of this electric vehicle.
2. This scooter and all its components comply with all European
safety regulations, but we recommend using protections and
driving responsibly.
3. Each city has its own traffic regulations, we recommend that
you consult them before use.
WARRANTY.
This product has a two-year warranty, see the complete condi-
tions on our website www.smartgyro.es
1. Before first use, charge the battery to its maximum capacity.
You just have to look at the indicator led of the transformer:
Red = charging //// Green = full charge
2. Turn on your Smartgyro by pressing the power button located
on the control panel for a few seconds
3. Select a speed from the 3 available with a single press of the
power button
4. For safety, you have to start off with your foot and then press
the accelerator (A)
5. The device has ZERO start function; Place one foot on the
base of the skate and the other foot on the ground until you
apply the accelerator very gently and the skate begins to work.
Use:
EN
9

10
The scooter has front focus, base, brake and turn signal LEDs, it
can be activated from its control knob. See the Control Panel
section.
Unit Scheme:
1. Handlebar * 2. Non-slip grips * 3. Handlebar * 4. Tube
front * 5. Handlebar adjustment * 6. Display and accelerator * 7.
Brake lever * 8. Light and bell control * 9. Foot support * 10.
Hydraulic brakes * 11. Led spotlight * 12 Base LEDs * 13. Shock
absorbers * 14. Charging port * 15. Kickstand * 16. Brake light * 17.
Lever to fold the frame * 18. Indicator selector button * 19. Blin-
king light
1
2
3
7
4
8
9
10
12
13
14
18
15
16
16
19
17
11
19
5
6
EN
Support:
If you have any problem with the operation, use or
assembly of the product, you can contact us at:
How to unfold your Smartgyro:
EN
11
smartGyro Raptor has a special safety locking system, so the
process to fold and unfold the unit must be done with force, firm-
ness and security.
Step 1:
a) Open the handle (see image 1) and the folding system will
unlock.
Step 2:
b) Once loosened, raise the anchor piece until you can move the
bar (see image 2). It may be necessary to move the front bar to
search for the game.
Step 3: Move the handlebar to the base and attach the locking
frame to the handlebar. When you have the structure fixed, you
can lift the skid.
Note: To unfold the skid, perform all steps in reverse order. It is
important to check that the screws are securely fastened before
setting off.
1 2 3
Para personalizar todos los parámetros del display, pulse
Twice to the -M- key.
Control Panel:
EN
12
1. Power button
2. Up speed mode
3. Lower speed mode
4. Mode Change / Enter
5. Selected gear
6. Remaining battery
7. Distance traveled
8. Clock
Para personalizar todos los parámetros del display, pulse
You can adjust the brightness, clock, display parameters and
many more functions.
M
twice
15
6
7
8
2
3 4
1. Intermitente derecho
2. Intermitente izquierdo
3. Bocina
4. Lever hardness
12
3
4

EN
13
Start the march:
1 Power button
With the skateboard off, press the on / off button for 3 seconds and
the scooter will turn on.
2. Operating modes
With the skate on press the "+ and -" button to switch between the 3
operating levels.
3. Brake control
The hydraulic brake cuts off the power to the motor. When you need
to brake or stop the device, you can do so by using the brake levers
that actuate the brake discs.
4. If you want to use the turn signals, press the switch located on the
handlebar to one side or the other.
Battery and Charger:
Each smartGyro is equipped with a lithium battery and its charger, it
also has its own serial number. Do not replace the battery or its
charger, it could be dangerous.
Lithium battery
Please fully charge the battery before using your smartGyro Raptor.
Charge the battery when its level is in the middle of the power bar to
avoid influencing your driving.
Charger
The charger's overcharge protection function will automatically stop
the charging process when the battery is 100% full.
Instructions for loading:
1. Connect the plug of the charger to the mains.
2. Important: Plug the charger into a 100V-240V outlet.
3. Red light: charging process. Green light: charging process comple-
ted. Please always store the charger in a dry and ventilated environ-
ment.

Note; To be able to charge,
insert the connection and
turn it anticlockwise.
To use the USB socket for
charging, you must enable
the charging mode by
pressing the -M- button for
more than 3 seconds.
During the charging process:
Red = charging
Green = full charge
USB socket
Charging process and USB socket
EN
14
Charging socket, you have to open the safety
cover and insert the connection

Storage
Store your smartGyro indoors, which are dry places and in
suitable conditions. If the ambient temperature of the storage
place is below 0 ºC or above 55, choose another location. To
prevent ingress of dust and particles, store your smartGyro in its
original packaging.
If you are going to store your smartGyro for a long period of
time, check that the battery in the product is at minimum levels.
We recommend recharging the battery every 3 months to
ensure it is ready to ride after being stored.
Technical safety requirement
The power adapter is the equipment disconnect device. The
socket outlet must be close to the equipment and easily acces-
sible.
Recycle your device
Electrical or electronic products, batteries, accumulators and
other accessories must necessarily be subject to separate
collection. When the useful life of your electrical or electronic
device has ended, remove the batteries and deposit it, separa-
tely, in the correct container for proper management. Please
note that batteries cannot be indiscriminately disposed of with
household waste. Consider recycling by following the manufac-
turer's guidelines. With this gesture, you will help reduce the risks
to your health and preserve the environment. If you have any
questions, check with your town hall or distributor to request the
details
essential when it comes to recycling your old device. Nº REI- RPA
1201-RD.106 / 2008.
Important
- You should always wear a helmet and safety protectors to
avoid falls and personal injury.
EN
15

EN
16
NOTICE NOTICE
- Any manipulation or modification of the
skate or any of its software or hardware parts
will result in the loss of warranty.
- Manipulation to modify the skate's perfor-
mance is expressly forbidden by law and
may have legal consequences for the user.
- Respect the rules that affect the use of your
skate, especially those of circulation, it is your
responsibility.
IMPORTANT:
- Make a general check of the frame fastening.
- Check the tire pressure and top up if necessary.
- From time to time it is highly recommended to check the
fastening of the nuts. Due to movement and continuous
bumps, they tend to loosen.

Wichtig:
1. Diese Anleitung vermittelt Ihnen Kenntnisse über das smartGyro
Elektro-Skateboard. Bitte beachten Sie die Sicherheitshinweise
und gehen Sie verantwortungsbewusst mit diesem Elektrofahr-
zeug um.
2. Dieser Roller und alle seine Komponenten erfüllen alle europäis-
chen Sicherheitsvorschriften, wir empfehlen jedoch, Schutzvorri-
chtungen zu verwenden und verantwortungsbewusst zu fahren.
3. Jede Stadt hat ihre eigenen Verkehrsregeln, wir empfehlen
Ihnen, diese vor der Nutzung zu konsultieren.
GARANTIE.
Dieses Produkt hat eine zweijährige Garantie, die vollständigen
Bedingungen finden Sie auf unserer Website www.smartgyro.es
1. Laden Sie den Akku vor dem ersten Gebrauch bis zur maximalen
Kapazität auf. Sie müssen nur auf die Transformatoranzeige-LED
schauen:
Rot = wird geladen //// Grün = volle Ladung
2. Schalten Sie Ihren Smartgyro ein, indem Sie den Netzschalter
auf dem Bedienfeld einige Sekunden lang drücken
3. Wählen Sie eine der 3 verfügbaren Geschwindigkeiten mit
einem einzigen Druck auf den Netzschalter
4. Zur Sicherheit müssen Sie mit dem Fuß anfahren und dann das
Gaspedal (A) drücken.
5. Das Gerät verfügt über eine NULL-Startfunktion; Stellen Sie einen
Fuß auf die Basis des Skates und den anderen Fuß auf den Boden,
bis Sie das Gaspedal ganz sanft betätigen und der Skate zu
arbeiten beginnt.
Utilización:
DE
17

18
Der Roller verfügt über Frontfokus-, Basis-, Brems- und
Blinker-LEDs und kann über seinen Steuerknopf aktiviert werden.
Siehe Abschnitt Systemsteuerung.
Einheitsübersicht:
1. Lenker * 2. Rutschfeste Griffe * 3. Lenker * 4. Rohr
vorne * 5. Lenkereinstellung * 6. Display und Gas * 7. Bremshebel
* 8. Licht- und Klingelsteuerung * 9. Fußstütze * 10. Hydraulische
Bremsen * 11. LED-Scheinwerfer * 12 Basis-LEDs * 13. Stoßdämpfer
* 14. Ladeanschluss * 15. Ständer * 16. Bremslicht * 17. Hebel zum
Zusammenklappen des Rahmens * 18. Blinkerauswahltaste * 19.
Blinklicht
1
2
3
7
4
8
9
10
12
13
14
18
15
16
16
19
17
11
19
5
6
DE

Mittel:
Wenn Sie Probleme mit dem Betrieb, der Verwendung
oder der Montage des Produkts haben, können Sie uns
+34 91 642 95 20
So falten Sie Ihren Smartgyro-Skate auf:
DE
19
smartGyro Raptor verfügt über ein spezielles Sicherheitsverriege-
lungssystem, daher muss der Vorgang zum Auf- und Zusam-
menklappen der Einheit mit Kraft, Festigkeit und Sicherheit erfol-
gen.
Schritt 1:
a) Öffnen Sie den Griff (siehe Bild 1) und das Faltsystem wird
entriegelt.
Schritt 2:
b) Heben Sie das Ankerstück nach dem Lösen an, bis Sie die
Stange bewegen können (siehe Bild 2). Möglicherweise muss die
vordere Leiste verschoben werden, um nach dem Spiel zu suchen.
Schritt 3: Bewegen Sie den Lenker zur Basis und befestigen Sie den
Verriegelungsrahmen am Lenker. Wenn Sie den Rahmen befestigt
haben, können Sie die Kufe anheben.
Hinweis: Um die Kufe aufzuklappen, führen Sie alle Schritte in um-
gekehrter Reihenfolge durch. Es ist wichtig, vor Fahrtantritt den
1 2 3
This manual suits for next models
2
Table of contents
Languages:
Other SmartGyro Scooter manuals

SmartGyro
SmartGyro XL1 Street User manual

SmartGyro
SmartGyro Speed Way User manual

SmartGyro
SmartGyro e-Xplorer User manual

SmartGyro
SmartGyro Xtreme Seat User manual

SmartGyro
SmartGyro Speedway 2.0 User manual

SmartGyro
SmartGyro ziro pro User manual

SmartGyro
SmartGyro RockWay User manual

SmartGyro
SmartGyro AVANZA M10 User manual

SmartGyro
SmartGyro Xtreme Pro SG27-121 User manual

SmartGyro
SmartGyro CROSSOVER DUAL MAX LR User manual


