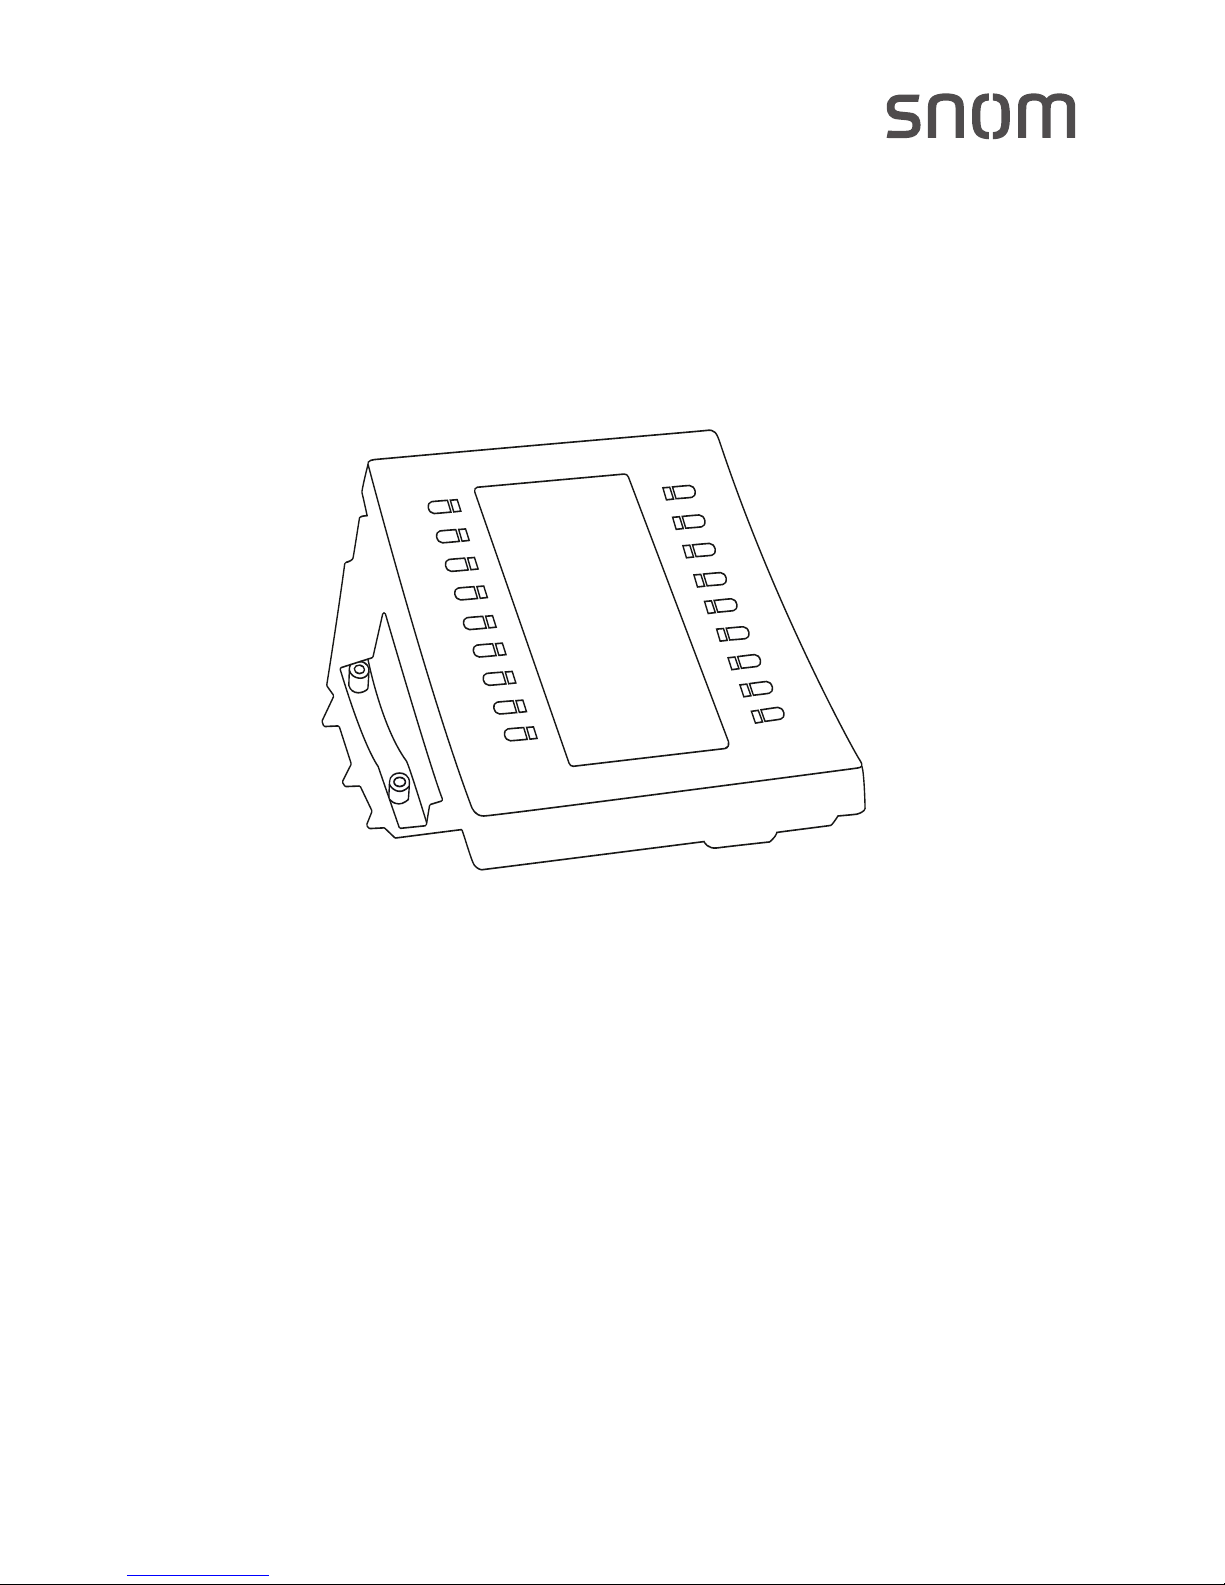
Snom D315 User manual

© 2017 Snom Technology GmbH
Snom Technology GmbH
Wittestr. 30 G
13509 Berlin, Deutschland
Tel. +49 30 39 83 3 0
Fax +49 30 39 83 31 11
Snom, Inc.
2603 Camino Ramon, Suite 420
San Ramon, CA 94583, USA
Tel. +1 339 227 6160
Fax +1 339 227 6180
Snom Technology GmbH
The Courtyard, High Street
Ascot
Berkshire SL5 7HP, UK
Tel. +44 161 348 7500
Fax +44 169 348 7509
Snom Technology GmbH
6 Parc des fontenelles
78870 Bailly, France
Tel. +33 1 80 87 62 87
Fax +33 1 80 87 62 88
Snom Technology GmbH
Via Milano 1
20020 Lainate, Italia
Tel. +39 02 00611212
Fax +39 02 93661864
Snom Technology Ltd.
Rm. 828, 5F, No. 285, Sec. 4
Zhongxiao E. Rd., Da‘an Dist.
Taipei City 10692, Taiwan
Tel. +886 2 8751 1120
Fax +886 2 8751 1130
Your specialist retailer - Ihr Fachhändler -
Votre distributeur - Su distribuidor - Il tuo rivenditore:
v1.01
D3 Expansion Module
for D3xx phones with USB port
User Manual

2
TABLE OF CONTENTS
Copyright, Trademarks, Legal Disclaimers ....................................................................3
Important information ......................................................................................................4
Safety instructions .................................................................................................................4
Standards conformance ........................................................................................................4
SELV (Safety Extra Low Voltage) compliance ..............................................................5
Product specifications ........................................................................................................... 5
Disposal of the device ............................................................................................................ 5
Cleaning ....................................................................................................................................5
Setting up the expansion module ....................................................................................6
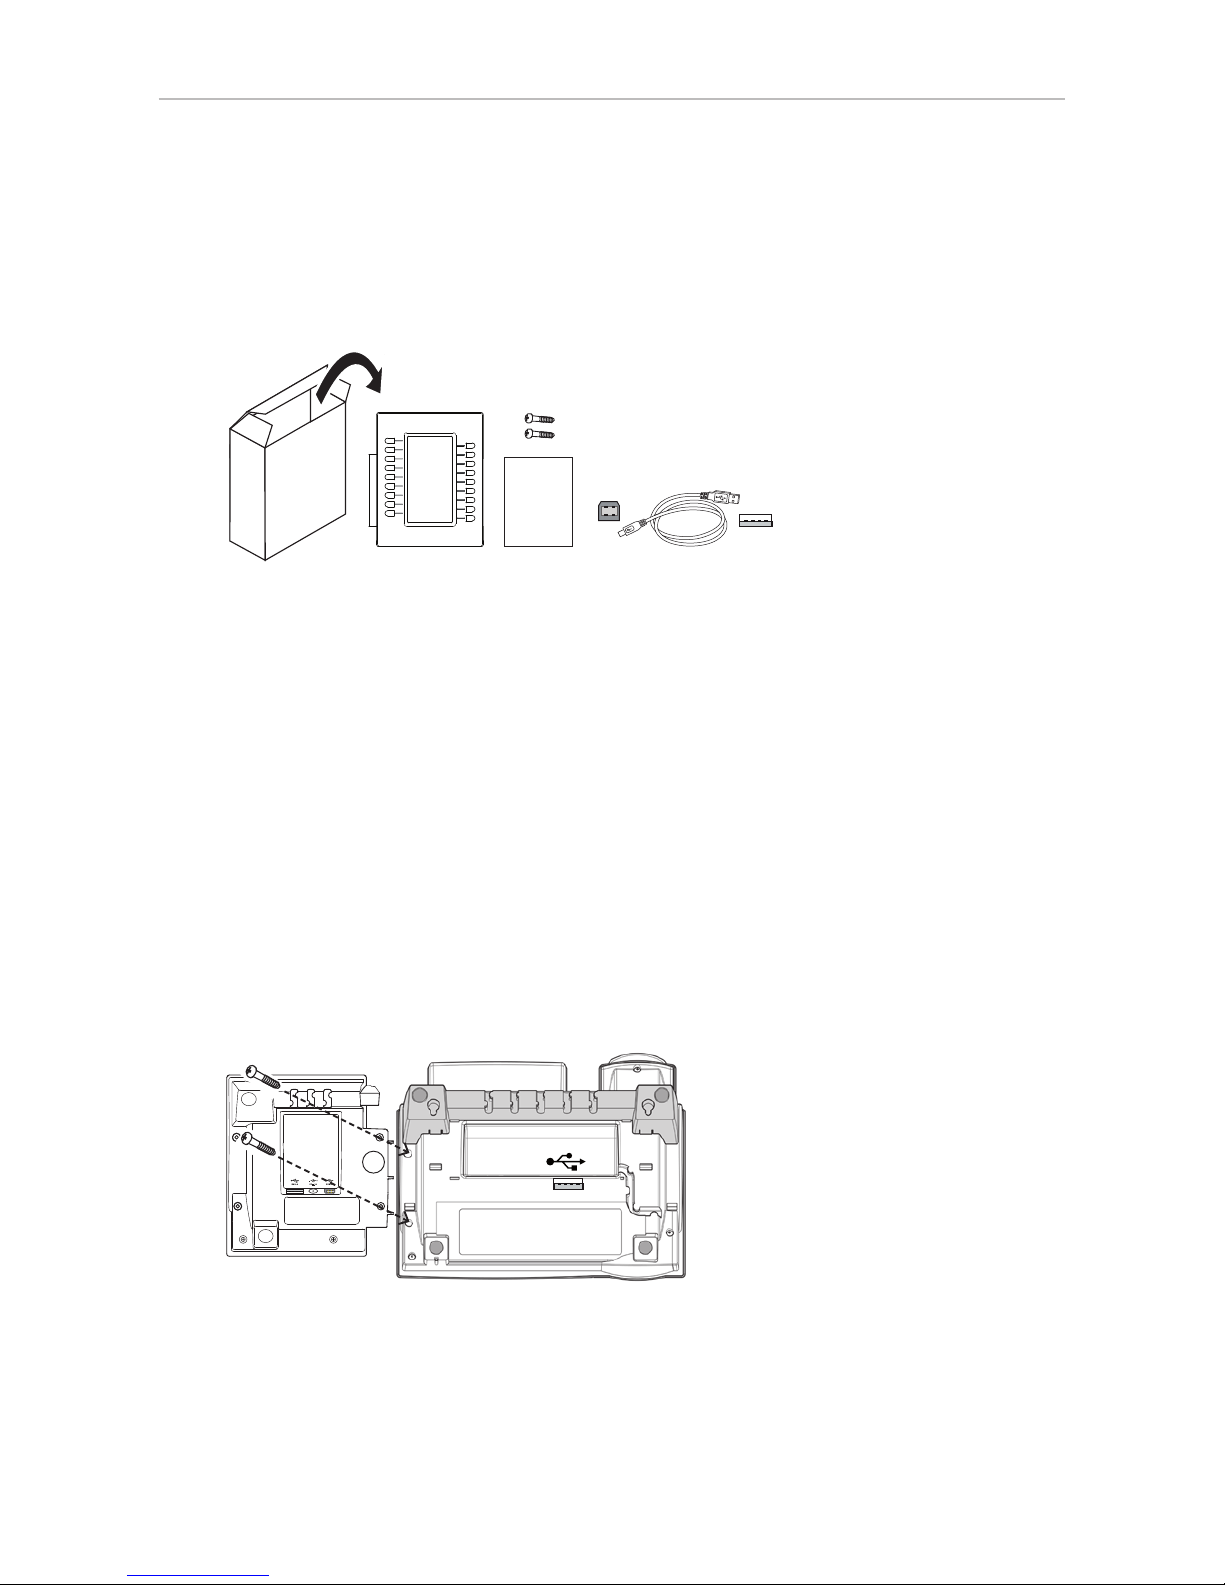
Delivery Content ......................................................................................................................6
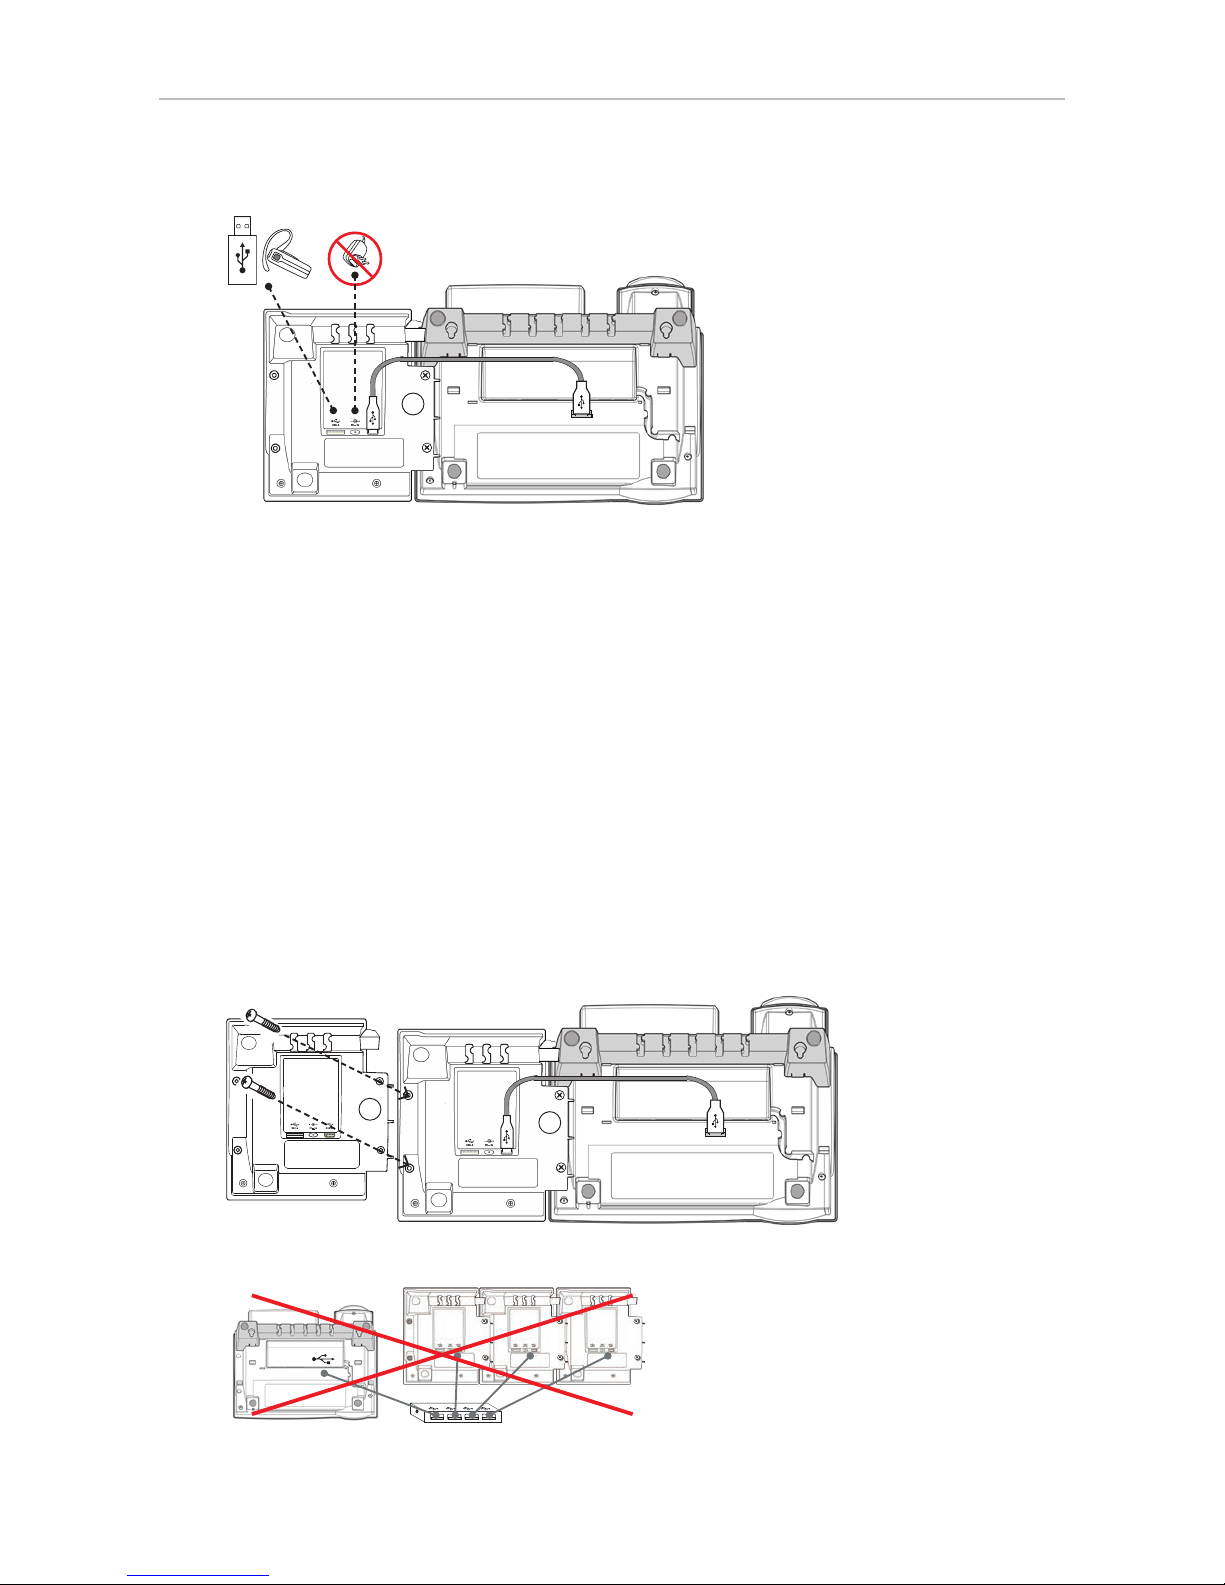
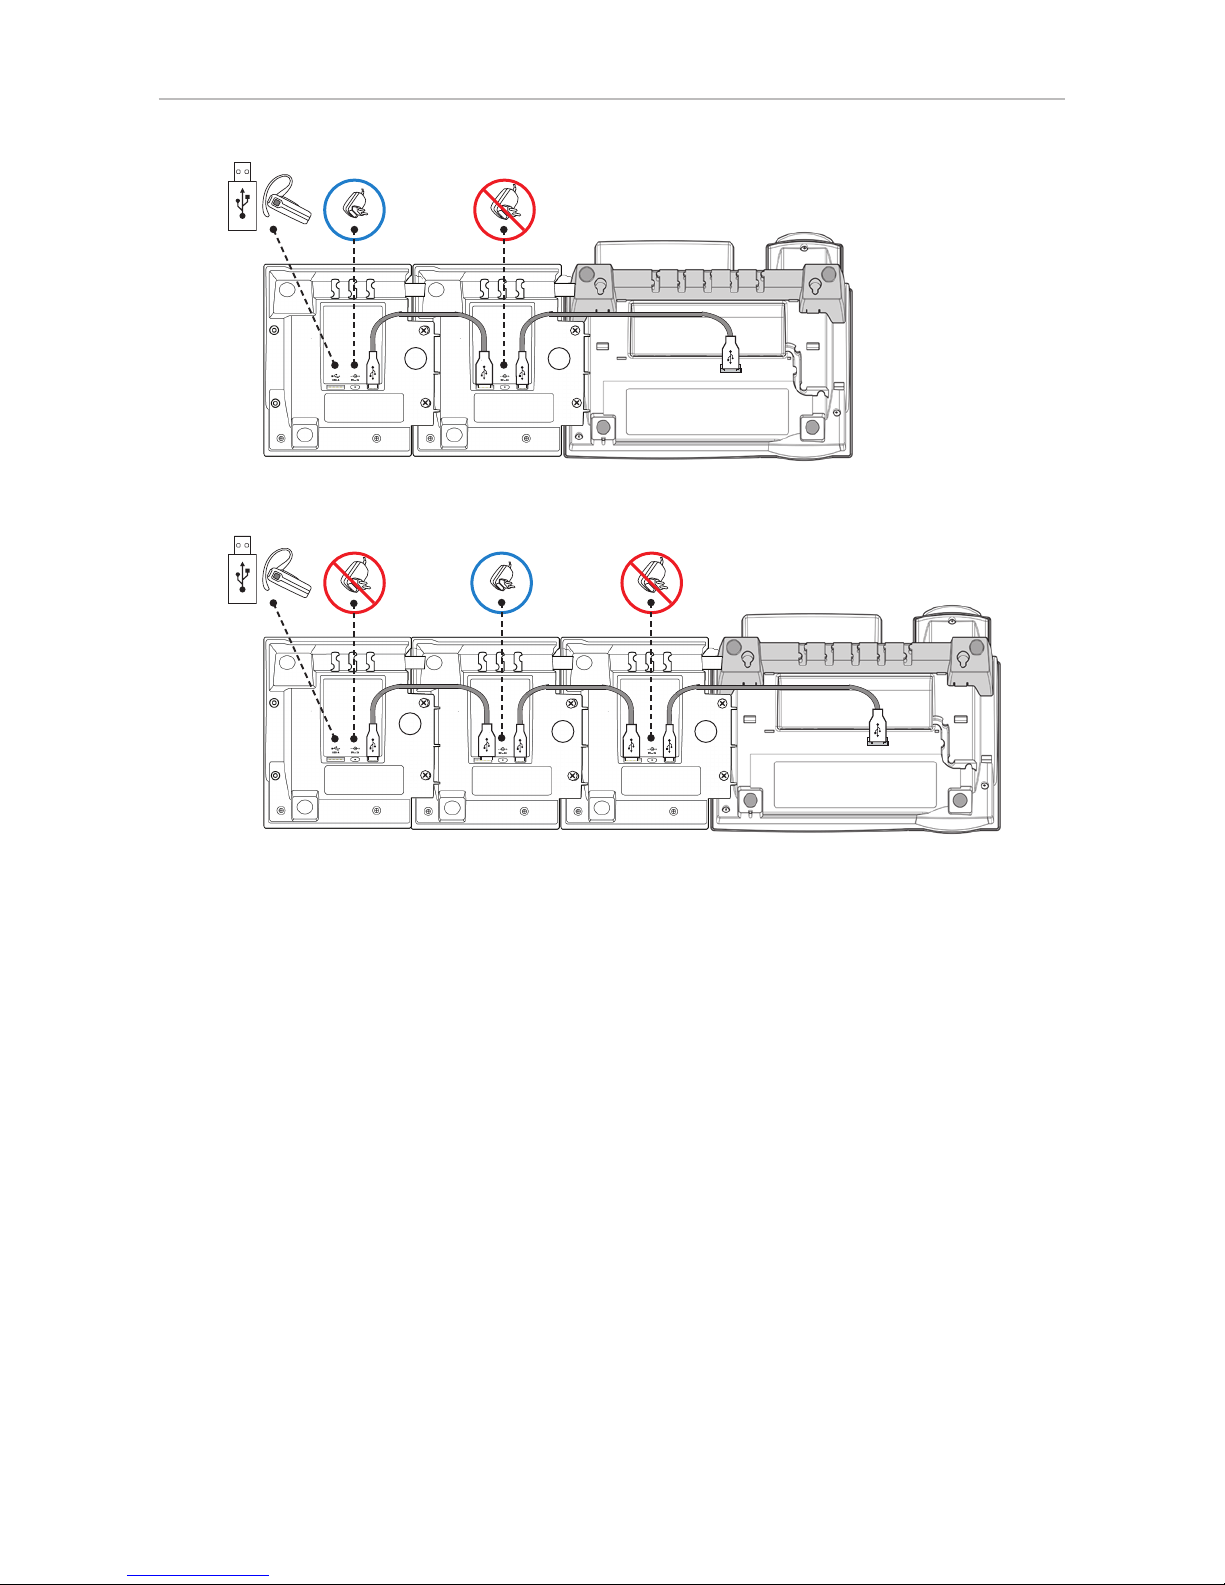
Connecting the D3 to the Snom phone ............................................................................... 6
Connecting one D3 ............................................................................................................ 6
Connecting a second and third D3 ................................................................................. 7
Connecting a wireless USB headset to the phone ............................................................8
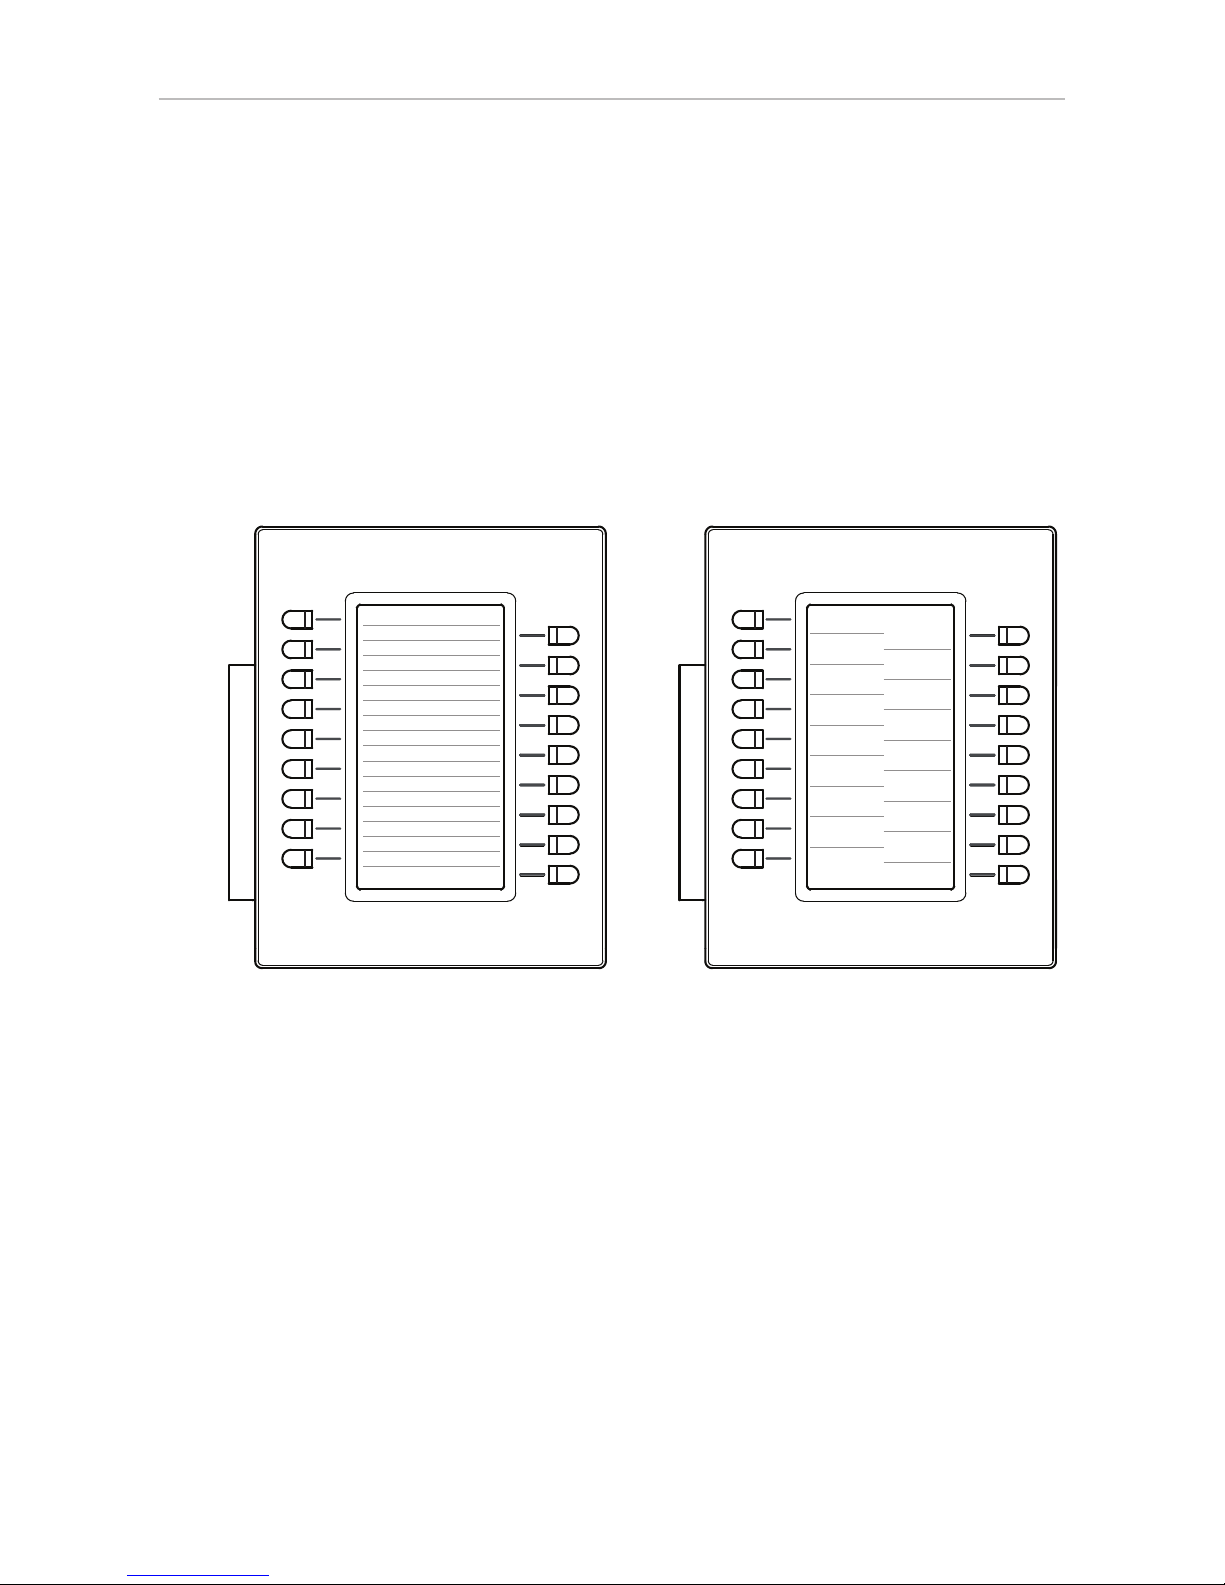
Getting to Know Your Expansion Module ........................................................................9
Display Layout ......................................................................................................................... 9
Function key content ............................................................................................................10
Function key LEDs ................................................................................................................10
Function Key Page on Phone's Web User Interface .......................................................10
Configuring the Function Keys ...................................................................................... 12
Function Key Layout .............................................................................................................12
Setting on the phone .......................................................................................................12
Setting on the Web Interface of the Phone .................................................................12
Backlight and Contrast Settings ........................................................................................13
Programming ........................................................................................................................14
Programming Function Keys on the Phone ................................................................14
Programming Function Keys on the Phone's Web User Interface .........................15
XML provisioning of settings ..............................................................................................17
Function Key Numbering System .................................................................................18
Function Key Index Ranges ...........................................................................................21
D315 ........................................................................................................................21
D345 ........................................................................................................................21
D375 ........................................................................................................................21

3
D3 User Manual Copyright, Trademarks, Disclaimers
Copyright, Trademarks, Legal Disclaimers
© 2017 Snom Technology GmbH
All Rights Reserved.
Snom, the names of Snom products, and Snom logos are trademarks owned by Snom Technology
GmbH. All other product names and names of enterprises are the property of their respective
owners.
Product specifications are subject to change without notice.
Snom Technology GmbH reserves the right to revise and change this document at any time, without
being obliged to announce such revisions or changes beforehand or after the fact.
Texts, images, and illustrations and their arrangement in this document are subject to the protection
of copyrights and other legal rights worldwide. Their use, reproduction, and transmittal to third
parties without express written permission may result in legal proceedings in the criminal courts as
well as civil courts.
When this document is made available on Snom’s web page, Snom Technology GmbH gives its
permission to download and print copies of its content for the intended purpose of using it as a
manual. No parts of this document may be altered, modified or used for commercial purposes without
the express written consent of Snom Technology GmbH.
Although due care has been taken in the compilation and presentation of the information in this
document, the data upon which it is based may have changed in the meantime. Snom therefore
disclaims all warranties and liability for the accurateness, completeness, and currentness of the
information published, except in the case of intention or gross negligence on the part of Snom or
where liability arises due to binding legal provisions.

4
D3 User Manual Safety, Disposal, Cleaning of Product
Important information
Please read the instructions on safety and disposal and on how to set up and use the device before
using it and also give them to other users to read or inform those users of their contents. Save this
manual and do not give the device to third parties without it.
Safety instructions
Follow the instructions in this manual and other applicable documentation of the device.
• For use with Snom D3xx phones with USB ports only. Do not connect the device to a PC or to other
phones!
• If the device is not supplied with power via the USB cable, use only a power adapter expressly
recommended by Snom Technology. Other power supplies may damage or destroy the device,
aect its behavior, or induce noise.
• Avoid placing the cables where people may trip over them or where they may be exposed to
mechanical pressure as this may damage them.
• This device is for indoor use only! NOT FOR OUTDOOR USE!
• Do not install the device in rooms with high humidity (for example, in bathrooms, laundry rooms,
damp basements). Do not immerse the device in water and do not spill or pour liquids of any kind
onto or into the device.
• Do not install the device in surroundings at risk for explosions (paint shops, for example). Do not
use the device if you smell gas or other potentially explosive fumes.
• Do not use the device during thunderstorms. Lightning striking the power grid may cause electric
shocks.
Standards conformance
This device complies with the essential health, safety, and environmental requirements
of all relevant European directives. The declaration of conformity can be requested from
Snom,
Snom Technology GmbH
Wittestr. 30G
13509 Berlin
This devicee is FCC Class B certified and meets US health, safety, and environmental
standards.
Unauthorized opening, changing, or modifying the device will cause the warranty to lapse
and may also result in the lapse of the CE and FCC certifications. In case of malfunction
contact authorized service personnel, your seller, or Snom.

5
D3 User Manual Safety, Disposal, Cleaning of Product
SELV (Safety Extra Low Voltage) compliance
Safety status of Input/Output connections comply with SELV requirements.
Product specifications
• Safety: IEC 60950
• Connectors: 1 USB port, type A, USB 2.0;
1 USB port, type B, USB 2.0;
1 x 5V DC jack
• Power: Via USB cable (included in delivery); if more than one module is attached to one phone,
the separately available power adapter A6, Phihong model number PSM10R-050, is
needed for the second module in the chain:
◦With EU clip: A6, Snom PN 00004325
◦With US clip: A6, Snom PN 00004326
Disposal of the device
This device is subject to European Directive 2012/19/EU and may not be disposed of with
general household garbage.
If you do not know where you may dispose of the device at the end of its lifespan, contact
your municipality, your local waste management provider, or your seller.
Cleaning
To clean the device, use an anti-static cloth. Please avoid cleaning liquids as they might damage the
surface or internal electronics of the device.

6
D3 User Manual Setting up the Expansion Module
Setting up the expansion module
Delivery Content
Quick
Installation
Guide
D3 USB-A
USB-B
◦Base unit
◦2 (two) screws
◦USB cable type A/type B
◦Quick Installation Guide
Connecting the D3 to the Snom phone
You can connect one, two, or three D3s to any phone of the D3xx series with a USB port. The first
expansion module is supplied with power by the phone via the USB cable included in the delivery.
The second module requires the separately available power adapter A6, Snom PN 00004325 (EU) or
00004326 (US). The third expansion module is supplied with power by the second module via the
included USB cable.
Connecting one D3
1
Fig. 1
1. Turn the phone and the D3 upside down, with the D3 to the left of the phone. Put them on a soft
cloth so that their displays will not get scrached or otherwise damaged.
2. Place the two screw holes on the right side of the D3 over the two screw holes on the left side of
the phone.
3. Insert the two screws included in the delivery (Fig. 1) and tighten them.

7
D3 User Manual Setting up the Expansion Module
4. Insert the type A plug of the included USB cable into the type A USB connector on the Snom phone
and the type B plug into the type B USB connector on the D3 (Fig. 2)
1
Fig. 2
5. Turn the phone and the connected D3 module right side up.
The LEDs on the D3 will light up briefly if or when the phone is connected to power, then turn o,
indicating that the function keys are now ready for configuration and/or use. If the D3 is not listed in
Settings > 1 Preferences > 6 Fkeys > [3-8] Keys on UXM [1-3], reboot the phone.
Connecting a second and third D3
Very important when two or three expansion modules are connected to the phone:
◦The modules must be daisy-chained, as shown in Fig. 3. If they are not, the phone will not be
able to find and identify the function keys, and you will not be able to use them. Do not use a
USB hub (Fig. 4).
◦The separately available power adapter A6 (see "Product specifications" on page 5) must
be attached to the second module in the chain, as shown in Fig. 5 and 6.
1
2
Fig. 3
Fig. 4

8
D3 User Manual Setting up the Expansion Module
21
Fig. 5
32 1
Fig. 6
1. Connect the second D3 to the first one, as shown in Fig. 3 and 5.
2. Attach the power supply to the second module, as shown in Fig. 5 and 6.
3. Connect the third D3 to the second one (Fig. 6).
4. Connect the power supply to the wall outlet.
The LEDs on the D3 expansion modules will light up briefly, then turn o, indicating that the function
keys are now ready for configuration and/or use. If necessary, reboot the phone. If the D3s are not
listed in Settings > 1 Preferences > 6 Fkeys > [4-8] Keys on UXM [1-3], reboot the phone.
Connecting a wireless USB headset to the phone
The USB port type A on the expansion module (see Fig. 2 on page 7) or, when there are two or
three D3s connected to the phone, the type A USB port on the last module in the daisy-chain (Fig. 5
and 6, above) can be used to connect a wireless headset via its USB adapter.

9
D3 User Manual Getting to Know your Expansion Module
Getting to Know Your Expansion Module
The function keys on the expansion module(s) are configured and work like function keys with LEDs
on the phone itself. The settings are stored on the phone and will remain stored there when the
expansion module is disconnected; if the expansion module is replaced by another module, the
settings will by used by that module. For more information on the available functions and on how to
program and use the keys, please refer to the phone's manual, chapter "Programming the Function
Keys". You can download the manual at http://wiki.snom.com.
Display Layout
10
11
12
13
14
15
16
17
18
1
2
3
4
5
6
7
8
9
10
11
12
13
14
15
16
17
18
1
2
3
4
5
6
7
8
9
Fig. 1 - line layout Fig. 2 - tile layout
Function keys 1 to 9 are situated on the left, 10 to 18 on the right side of the display. A portion of the
display area is allocated to each key, either arranged in lines, as shown in Fig. 1, or in tiles, as shown
in Fig. 2, above. The default setting is lines.
Settings: See "Function Key Layout" on page 12.

10
D3 User Manual Getting to Know your Expansion Module
Function key content
When the key is idle, its allocated area will show the content entered as Short Text. If there is no
entry, the number is shown on the display.
10
11
12
13
14
15
16
17
18
1
2
3
4
5
6
7
8
9
10
11
12
13
14
15
16
17
18
1
2
3
4
5
6
7
8
9
Fig. 3
Depending on the function mapped onto the key, its allocated display area will show the context
information when the key event occurs or when the key is pressed; it will revert to the idle content
when the key event has ended or when the key is pressed again.
Function key LEDs
Depending on the function mapped onto the key, the LEDs on the key will light up when the key event
occurs or when the key is pressed; they will go out when the key event has ended or when the key is
pressed again. Examples:
◦Forwarding all calls: When the key is pressed, its LED will light up and remain on until call
forwarding is turned o.
◦Extension monitoring: When the monitored extension is busy, the LED will remain on until the
extension is not busy anymore.
The indications of the LED associated with each key also depend on the type of phone the D3 is
connected to and on the firmware running on the phone. For more information on the available
functions, please refer to the phone's manual, chapter "Programming the Function Keys".
Function Key Page on Phone's Web User Interface
The function keys on the D3 are added to the Function Keys page of the web user interface of the
phone the D3 is connected to. Depending on the phone type and firmware and whether there are
any other expansion modules connected to the phone, the content of the page will dier. For more
information on the available functions and on how to program and use the keys, please refer to the
phone's manual, chapter "Programming the Function Keys". You can download the manual at
http://wiki.snom.com.
1. Open the connected phone's web interface.
2. Click on Function Keys in the menu on the left side.

11
D3 User Manual Getting to Know your Expansion Module
Fig. 4
The D3 function keys are located beneath the function keys of the phone itself and any Expansion
Modules V2.0 that may also be connected to the phone.
◦The function keys of the phone itself are numbered P1 - P12 on the D375 (Fig. 5) , P1 - P48
on the D345 (Fig. 6), and P1 - P5 on the D315, respectively. The 48 keys on the D345 are
subdivided into the four "pages" that can be viewed on the second display.
Fig. 5
Fig. 6
◦The function keys on the Expansion Module V2.0 are numbered EK1 - EK42.
Fig. 7
◦The function keys on each D3 Expansion Module are numbered 1 - 18.
Fig. 8

12
D3 User Manual Configuring the Function Keys
Configuring the Function Keys
Function Key Layout
Two layout types, line and tile, are available. The setting can be changed on the phone the D3 is
connected to and on the phone's web user interface.
Setting on the phone
1. Open the Settings menu of the phone that the module is connected to.
2. Press "1" to open the Preferences menu.
3. Press "5" to open the Display menu.
4. On the D375 and D315 press "3", on the D345 press "5" to open the Expansion Modules menu.
5. Press "1" to open Appearance.
6. Press "1", "2", or "3" to change the display layout of the respective expansion module.
◦For example, if the display layout for module 1 is indicated as "lines" (Fig. 1), pressing "1" will
change and save the display layout for module 1 as "tiles" (Fig. 2).
Fig. 1
Fig. 2
◦Alternative method: Use the up/down / arrows on the navigation key to select the
expansion module and press to change it and save the change simultaneously.
7. Press for 3 seconds to return to the idle screen.
Setting on the Web Interface of the Phone
1. Open the phone's web interface and click on Function Keys in the menu on the left side (see Fig. 4
on page 11.
2. Select tile or line layout from the drop-down menu of the respective expansion module.

13
D3 User Manual Configuring the Function Keys
Fig. 3
3. Click on Apply to save.
Backlight and Contrast Settings
Backlight and contrast of the D3 can be adjusted indepently from the phone settings. If more than one
D3 is connected to the phone, the settings apply to all of them.
Note: The number of seconds after which the expansion module(s) will switch from
activity to idle backlight is the number set for the phone display's backlight.
1. Open the Settings menu of the phone that the module is connected to.
2. Press "1" to open the Preferences menu.
3. Press "5" to open the Display menu.
4. On the D375 and the D315 press "3", on the D345 press "5" to open Expansion Modules(Fig. 4).
5. Press 2, 3, or 4, respectively (Fig. 4), to adjust the backlight on activity (Fig. 5) or when idle or the
contrast setting (Fig. 7).
Alternative method: Use the up/down / arrows on the navigation key to adjust
backlight and contrast and press to change the setting and save the change
simultaneously.
6. Press the right or left arrow, respectively, on the navigation key to increase ( ) or decrease ( )
backlight/contrast.
Fig. 4
Fig. 5 Fig. 6 Fig. 7
7. Press to save and return to the Expansion Modules menu.

14
D3 User Manual Configuring the Function Keys
Programming
Programming Function Keys on the Phone
When an expansion module is connected to the phone, its freely programmable function keys are
shown in the Keys on UXM [1-3] submenu to the Fkeys submenu of the Preferences menu. For more
information on the available functions and on how to program and use the keys, please refer to the
connected phone's manual, chapter "Programming the Function Keys". You can download the manual
at http://wiki.snom.com.
Note: The settings are stored on the phone, not on the expansion module. They are
not erased or deleted when the expansion module is disconnected, but they are no
longer shown in the phone's settings or on the function keys page of the phone. They
will remain available for use with any other D3 expansion module you connect to the
phone.
If you want to delete the settings, you can only do so while an expansion module is
attached. For example, if you wish to delete the stored settings for a third expansion
module, but you only have two expansion modules connected to the phone, you must
temporarily connect a third module until you have deleted the settings on the phone's
Function Keys page.
If there are any Expansion Modules V2.0 connected to the phone, they are listed in the
Fkeys menu as Keys on SXM 1-3 before the first D3. Depending on the number of
Expansion Modules V2.0 connected to the phone, i.e., 0, 1, 2, or 3, the D3 Expansion
Modules on the Function Keys page will be listed as follows:
D375 and D315
Number of Expansion
Modules V2.0 First D3 Second D3 Third D3
0 3 Keys on UXM 1 4 Keys on UXM 2 5 Keys on UXM 3
1 4 Keys on UXM 1 5 Keys on UXM 2 6 Keys on UXM 3
2 5 Keys on UXM 1 6 Keys on UXM 2 7 Keys on UXM 3
3 6 Keys on UXM 1 7 Keys on UXM 2 8 Keys on UXM 3
D345
Number of Expansion
Modules V2.0 First D3 Second D3 Third D3
0 6 Keys on UXM 1 7 Keys on UXM 2 8 Keys on UXM 3
1 7 Keys on UXM 1 8 Keys on UXM 2 9 Keys on UXM 3
2 8 Keys on UXM 1 9 Keys on UXM 2 10 Keys on UXM 3
3 9 Keys on UXM 1 10 Keys on UXM 2 11 Keys on UXM 3
1. Open the Settings menu of the phone that the module is connected to.
2. Press "1" to open the Preferences menu.
3. Press "6" to open the Fkeys menu.

15
D3 User Manual Configuring the Function Keys
4. Press the corresponding number to open the submenu Keys on UXM 1, 2, or 3, or scroll to it and
press .
5. Enter the number of the key [1 - 18] on the keypad or scroll down to it and press . The screen
Function for key opens.
NOTE: When a key has been selected, its serial number is shown in the info bar. The
serial number count includes the serial numbers reserved for the Expansion Modules
V2.0 even when none are connected to the phone. See also "Function Key Numbering
System" on page 19.
6. Select the function for the key Function for key [1 - 18] by entering its number on the keypad or
scroll down to it and press .
a. If you have selected Extension, for example, you will first be prompted to enter the number of
the extension. Enter the number and press .
b. You will then be prompted to enter a Short Text which is the label that will be shown on the
display of the expansion module. Enter the text and press to save the setting and return to
the Keys on UXM menu.
Note: If you do not enter a Short Text, the content of Number will be shown on the
display. For example, if you do not enter a name to go with an extension or speed dial
number, the display will show the number of the extension or the speed dial number,
respectively.
Programming Function Keys on the Phone's Web User Interface
1. Open the phone's web interface and click on Function Keys in the menu on the left side (see
"Function Key Page on Phone's Web User Interface", Fig. 4, on page 11).
2. Select Context and Type from the respective drop-down menus of the key you want to configure.
3. Enter the number or other value in the text field of Number.
4. Enter a name or other descriptive text in the text field of Short Text. This is the data displayed in
the key label on the expansion module's display.
5. Click on Apply at the bottom of the page to save the settings.
Fig. 1 - web user interface of connected phone Displays of D3s

16
D3 User Manual Configuring the Function Keys
10
11
12
13
14
15
16
17
18
1
2
3
4
5
6
7
8
9
10
11
12
13
14
15
16
17
18
1
2
3
4
5
6
7
8
9
Fig. 2 - key mapping on expansion modules 1 and 2
Expansion module 1 Expansion module 2
1 1
10 10
2 2
11 11
3 3

17
D3 User Manual Configuring the Function Keys
XML provisioning of settings
The XML tags of the function keys are an exception from the general rules for XML mass provisioning
of settings for Snom phones because the tag for each key specifies the exact settings for that
particular key. The format is as follows:
<fkey idx="1" context="1" label="x" default_text="$name $state" perm="">argument</fkey>
•Parameter fkey idx. The unique identifier of the function key when connected to a particular
phone model.
NOTE: The fkey idx of a particular key depends on the number of function keys on the
phone, the number of expansion modules connected to the phone, and the position of
the module in the daisy chain. For your convenience, we have prepared a table of the
numbering system; please see "Function Key Numbering System" on page 18.
•Parameter context. This setting specifies the identity (account) that can use the key.
◦All active identities (accounts) registered on the phone: Setting "active"
◦One identity specified by its number. Example: Setting "1" for Identity 1
• Parameter label. The label (name, etc.) to be shown on the expansion module's display. On the
Function Keys page of the phone's web interface this is the string entered in the text field of
Short Text.
•Parameter default_text. Optional attribute that can be any string. When the parameter label is
not set for a key, the value of default_text will be displayed as the key's label on the display of
the D3 (see "Function key content" on page 10). You can define an arbitrary fixed text or use
$name, $state, and $type to insert dynamic information. The default value is "$name $state".
◦$name: Inserts the label or, if label is not set, the extension/phone number supplied as the
key's argument.
◦$state: Inserts the key's state (free, busy, etc.) when functions like line or extension are
mapped onto the key.
◦$type: Inserts the key type.
• Parameter perm. Valid values are:
-perm="!": The settings of the key can be changed by mass provisioning, but only if the
end user has not made changes to the configuration on the phone itself or on its web
interface.
-perm="&", perm="R", perm=" ": The settings of the key are Read Only and cannot be
changed by the end user.
-perm="$", perm="RW", perm="": The settings of the key can be changed by the end user
but will be overwritten by mass provisioning.
• Argument.
◦The default is line. Example:
<fkey idx="19" context="active" label="line" default_text="$name $state" perm="">line</
fkey>.
◦Examples for other functions:
NOTE: The functions must be supported by your installation/PBX.
-Extension: <fkey idx="19" context="1" label="Mary" default_text="$name $state"
perm="">dest sip:[email protected];user=phone</fkey>

18
D3 User Manual Configuring the Function Keys
-Speed dial: <fkey idx="20" context="1" label="Mary/cell" default_text="$name $state"
perm="">speed 9175550240</fkey>
-Multicast: <fkey idx="21" context="1" label="Announcements 2nd floor" default_
text="$name $state" perm="">multicast 239.255.255.232:5555</fkey>
-Intercom: <fkey idx="22" context="1" label="Intercom Mary" default_text="$name $state"
perm="">icom sip:[email protected]om;user=phone</fkey>
-Forwarding all incoming calls: <fkey idx="23" context="1" label="Fwd all to Mary"
fkey>
-Transferring call: <fkey idx="24" context="1" label="Transfer" default_text="$name
$state" perm="">transfer</fkey>
Function Key Numbering System
PUI: Phone user interface (Settings > 1 Preferences > 6 Fkeys). See also the NOTE on the
next page.
WUI: Web user interface (phone's web interface > Function Keys page)
fkey idx: XML mass provisioning. See also "Function Key Index Ranges" on page 21
D315 D375 D345
PUI WUI fkey idx PUI WUI fkey idx PUI WUI fkey idx
1 P1 0 1 P1 0 1 P1 0
2 P2 1 2 P2 1 2 P2 1
.... ... ... ... ... ... ... ... ...
5 P5 4 12 P12 11 48 P48 47
Reserved for
Expansion Module
V2.0
(SXM
1-3)
(EM. 1-3
(EK
keys))
(5-130) (SXM
1-3)
(EM. 1-3
(EK
keys))
(12-137) (SXM
1-3)
(EM. 1-3
(EK
keys))
(48-173)
First D3
(UXM1)
132 1 131 139 1 138 1 1 174
133 2 132 140 2 139 2 2 175
134 3 133 141 3 140 3 3 176
135 4 134 142 4 141 4 4 177
136 5 135 143 5 142 5 5 178
137 6 136 144 6 143 6 6 179
138 7 137 145 7 144 7 7 180
139 8 138 146 8 145 8 8 181
140 9 139 147 9 146 9 9 182
141 10 140 148 10 147 10 10 183
142 11 141 149 11 148 11 11 184
143 12 142 150 12 149 12 12 185
144 13 143 151 13 150 13 13 186
145 14 144 152 14 151 14 14 187
146 15 145 153 15 152 15 15 188
147 16 146 154 16 153 16 16 189
148 17 147 155 17 154 17 17 190
149 18 148 156 18 155 18 18 191

19
D3 User Manual Configuring the Function Keys
D315 D375 D345
PUI WUI fkey idx PUI WUI fkey idx PUI WUI fkey idx
Second D3
(UXM2)
150 1 149 157 1 156 193 1 192
151 2 150 158 2 157 194 2 193
152 3 151 159 3 158 195 3 194
153 4 152 160 4 159 196 4 195
154 5 153 161 5 160 197 5 196
155 6 154 162 6 161 198 6 197
156 7 155 163 7 162 199 7 198
157 8 156 164 8 163 200 8 199
158 9 157 165 9 164 201 9 200
D315 D375 D345
PUI WUI fkey idx PUI WUI fkey idx PUI WUI fkey idx
Second D3 cont'd 159 10 158 166 10 165 202 10 201
160 11 159 167 11 166 203 11 202
161 12 160 168 12 167 204 12 203
162 13 161 169 13 168 205 13 204
163 14 162 170 14 169 206 14 205
164 15 163 171 15 170 207 15 206
165 16 164 172 16 171 208 16 207
166 17 165 173 17 172 209 17 208
167 18 166 174 18 173 210 18 209
Third D3
(UXM3)
168 1 167 175 1 174 211 1 210
169 2 168 176 2 175 212 2 211
170 3 169 177 3 176 213 3 212
171 4 170 178 4 177 214 4 213
172 5 171 179 5 178 215 5 214
173 6 172 180 6 179 216 6 215
174 7 173 181 7 180 217 7 216
175 8 174 182 8 181 218 8 217
176 9 175 183 9 182 219 9 218
177 10 176 184 10 183 220 10 219
178 11 177 185 11 184 221 11 220
179 12 178 186 12 185 222 12 221
180 13 179 187 13 186 223 13 222
181 14 180 188 14 187 224 14 223
182 15 181 189 15 188 225 15 224
183 16 182 190 16 189 226 16 225
184 17 183 191 17 190 227 17 226
185 18 184 192 18 191 228 18 227
NOTE: In the submenus Keys on UXM [1-3] the keys are numbered the same way as
on the WUI, i.e., 1-18 (Fig. 1). When a key has been selected, its serial number is shown

20
D3 User Manual Configuring the Function Keys
in the info bar (Fig. 2). In the following example, key 9 on the first D3 is connected to a
D375.
Fig. 1 Fig. 2
Other manuals for D315
1
This manual suits for next models
2
Table of contents
Other Snom IP Phone manuals