Snom m9r User manual

ENGLISH
DEUTSCH
FRANÇAIS
ITALIANO
ESPAÑOL
www.snom.com
Quick Start Guide

2
Wall Mounting - Wandmontage - Fixation murale -
Montaje en pared - Montaggio a parete - Montagem na parede
Distance to wall
Abstand zur Wand
Distance au mur
Distanza dalla parete
Distancia a la pared
Distância à parede
a6 mm (0.236")
ø max
8 mm
(0.315")
ø max
5 mm
(0.197")
2 x
Not included in delivery:
Nicht im Lieferumfang enthalten:
Non inclus:
No incluidos:
Non inclusos:
Não incluído:
123 mm

3
v1.2.1
ENGLISH .................................................................................... 5
Safety Information & Warranty USA ............................ 23
Safety Information & Warranty Australia ..................... 37
Safety Information & Warranty New Zealand ............ 41
DEUTSCH .................................................................................... 45
FRANÇAIS .................................................................................... 65
ITALIANO .................................................................................... 85
ESPAÑOL .................................................................................... 105
APPENDIX · ANHANG · ANNEXE · APENDICE · ANEXO
GNU General Public Licence ............................................................ 124

4
snom m9r Quick Start Guide
E
N
G
L
I
S
H

5
snom m9r Quick Start Guide
v1.3.0
E
N
G
L
I
S
H
This is the Quick Start Guide to the installation, setup, and
operation of the base station and the phone. For further
information please refer to the manual at http://wiki.snom.com.
DELIVERY CONTENT
Complete
Set
Handset
Kit
1. Base station 1 x -
2. Base station power adapter (5 V,
DC plug inner Ø 2.1 mm, outer Ø
5.5 mm)
1 x -
3. Network cable 1 x -
4. Handset 1 x 1 x
5. 3.7 V Lithium-Ion rechargeable
battery pack
1 x 1 x
6. Handset charger 1 x 1 x
7. Handset charger power adapter (5.9
V, DC plug inner Ø 1.35 mm, outer
Ø 3.5 mm)
1 x 1 x
8. Belt clip 1 x 1 x
You will also need:
Data received from your service provider or administrator:
1. Account (usually the phone number) (required)
2. Registrar (required)
3. Password, authentication name, outbound proxy (may be required,
mailbox account (if available)
4. If DHCP is not available for automatic initialization, you will also need
the IP address, the IP gateway and the DNS server. Press >
(Settings menu) > Network > enter PIN > select IP Gateway
and DNS Server, respectively, with OK.

6
snom m9r Quick Start Guide
E
N
G
L
I
S
H
COPYRIGHT, TRADEMARKS, GPL, LEGAL DISCLAIMERS
© 2014 snom technology Aktiengesellschaft
All Rights Reserved.
snom, the names of snom products, and snom logos are trademarks
owned by snom technology AG. All other product names and names of
enterprises are the property of their respective owners.
snom technology AG reserves the right to revise and change this document
at any time, without being obliged to announce such revisions or changes
beforehand or after the fact.
Texts, images, and illustrations and their arrangement in this document are
subject to the protection of copyrights and other legal rights worldwide.
Their use, reproduction, and transmittal to third parties without express
written permission may result in legal proceedings in the criminal courts
as well as civil courts.
When this document is made available on snom’s web page, snom
technology AG gives its permission to download and print copies of its
content for the intended purpose of using it as a manual. No parts of
this document may be altered, modified or used for commercial purposes
without the express written consent of snom technology AG.
Although due care has been taken in the compilation and presentation
of the information in this document, the data upon which it is based may
have changed in the meantime. snom therefore disclaims all warranties
and liability for the accurateness, completeness, and currentness of the
information published, except in the case of intention or gross negligence
on the part of snom or where liability arises due to binding legal provisions.
Our firmware includes some source code that may be used and modified
by anyone and everyone under the GNU Public License (GPL) (see
Appendix on page 124), provided they, in turn, make it available to everyone
else with the same licensing agreement. Please go to http://www.snom.
com/en/support/download/gpl-quellcode/ for the original GPL license
and the source code of components licensed under GPL and used in
snom products.

7
snom m9r Quick Start Guide
v1.3.0
E
N
G
L
I
S
H
Standards Conformance
This phone is CE and FCC-certified and meets European and
US health, safety, and environmental standards.
Unauthorized opening, changing, or modifying the phone will
cause the warranty to lapse and may also result in the lapse of
the CE and FCC certifications. In case of malfunction contact
authorized service personnel, your seller, or snom.
Base ID: YDBM9BS1
Handset ID: YDBM9HS2

8
snom m9r Quick Start Guide
E
N
G
L
I
S
H
SAFETY PRECAUTIONS
Please read these precautions and the instructions on how to set up and
use the base and the phone thoroughly before using the devices. Save
this Quick Start Guide and do not give the device to third parties without
it. See also separate general safety information and country-specific
safety and warranty information for the USA, Australia, and New Zealand.
Power supplies/adapters, rechargeable battery
• Use only the power converters (AC/DC adapters) delivered with
the base station and the phone or those power supplies expressly
recommended by snom. Other power power supplies may damage or
even destroy the device(s).
Elementech Power Adapters, Model No.
Base station Handset charger
Europe without UK AU1050507e AU1050607e
UK, Australia (Complete Set)* AU10505050 AU10506050
UK (Extension Set)* AU1050607b
Australia (Extension Set)* AU1050607s
USA/Canada AU1050507u AU1050607u
* Extension Set contains different power adapter for handset charger than Complete Set
• Use only the rechargable battery pack delivered with the handset or
those rechargable battery packs expressly recommended by snom.
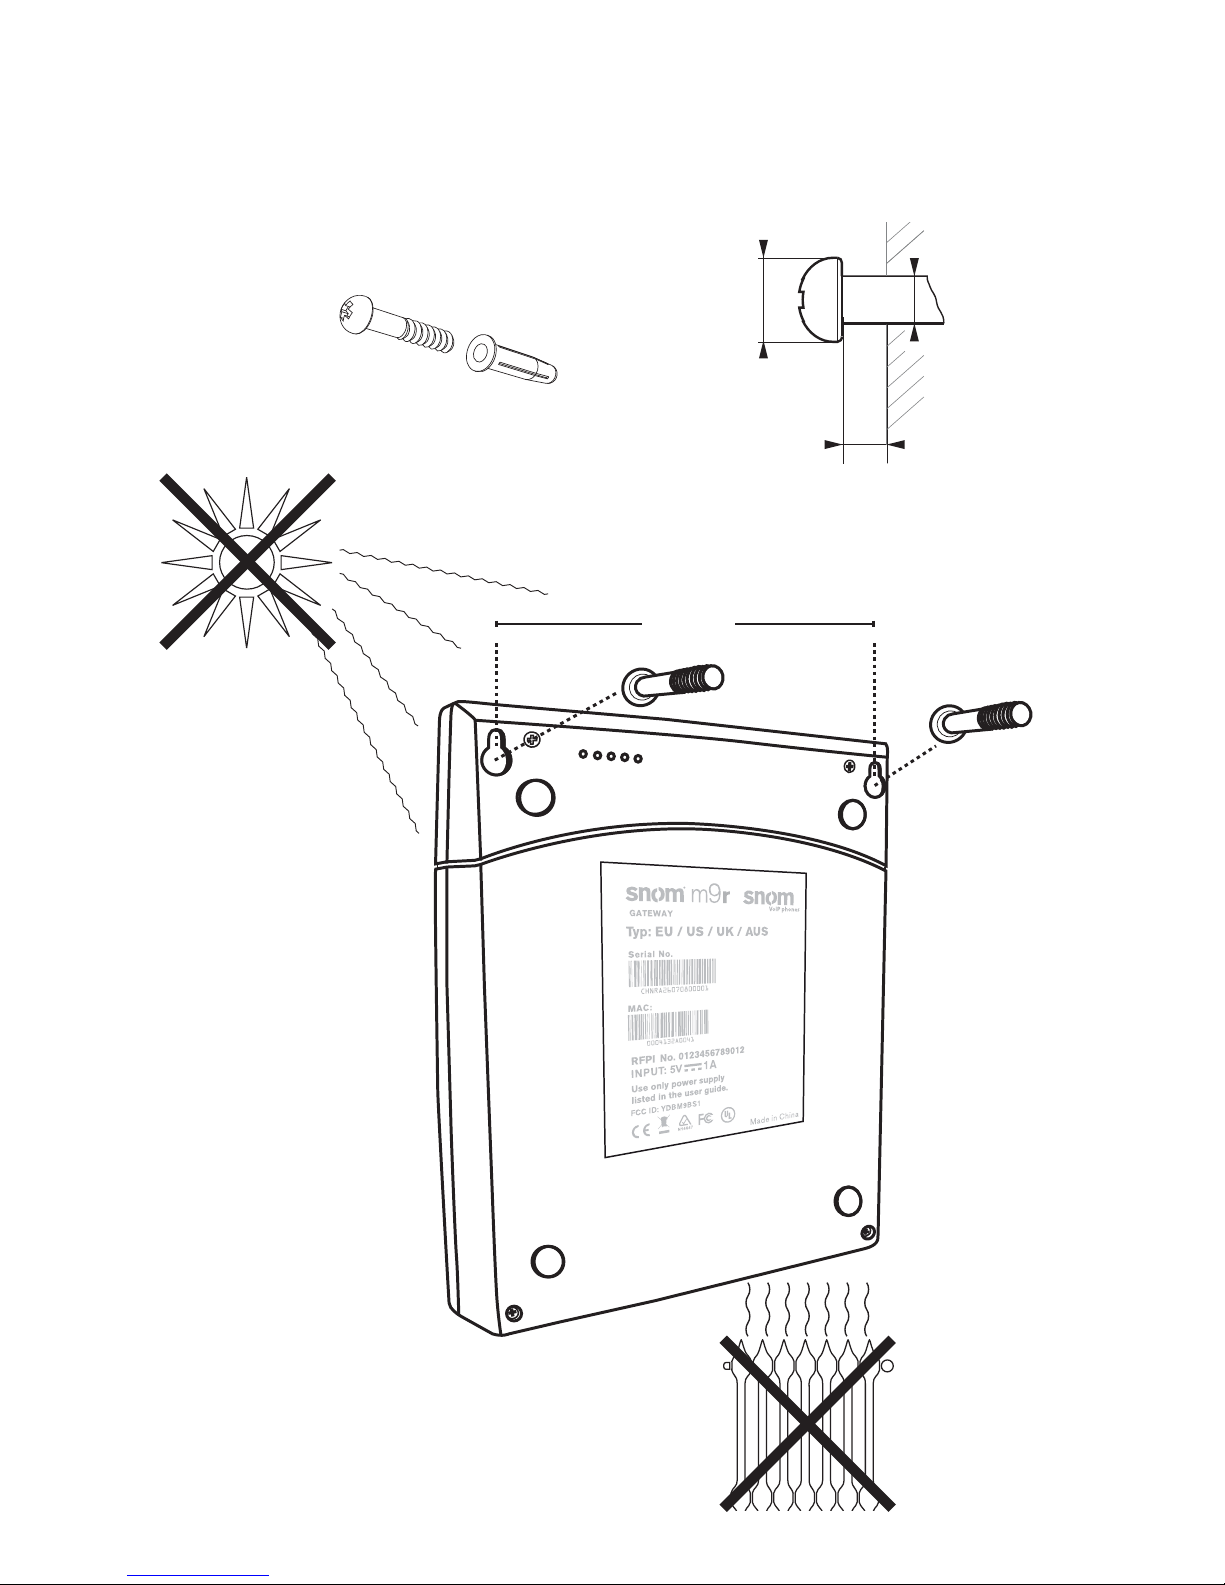
Placement of base, charger, cables, cords
• Avoid placing the devices' cables and cords where people may trip
over them. Avoid placing the cables and cords where they may be
exposed to mechanical pressure as this may damage them. If the
power supply cord or the plug is damaged, disconnect the device and
contact qualified service personnel.
• Base station, chargers, handsets, power adapters, and cables are
for indoor installation with a temperature range between +5°C and
+45°C. Not for outdoor installation!
• Do not install product in rooms with high humidity (for example, in
bathrooms, laundry rooms, damp basements). Do not immerse product
in water and do not spill or pour liquids of any kind onto or into any
parts of it.

9
snom m9r Quick Start Guide
v1.3.0
E
N
G
L
I
S
H
• Do not install product in surroundings at risk for explosions and do
not use the handset in such surroundings (paint shops, for example).
Do not use the phone if you smell gas or other potentially
explosive fumes!
• Medical devices might be adversely affected. Please consider the
technical ramifications when installing the devices in a doctor's office,
for example.
• FOR THE USA: Do not use near medical equipment or if you have a
pacemaker.
If you have an implanted pacemaker
• FOR THE USA: Do not use if you have a pacemaker.
• Do not use if you have an implanted pacemaker unless the pacemaker
manufacturer's directions expressly permit the use of devices emitting
pulsating radio frequency signals. Always follow the manufacturer's
directions!
• Recommended MINIMUM distance to the handset: 20 cm (7.9").
• Do not carry the handset in a breast pocket.
• Hold the handset to the ear opposite the medical device to minimize
the potential for interference.
• Turn the handset off immediately if there is any reason to suspect that
interference is taking place.
Other health risks
Do not hold the loudspeaker at the back of the handset against your ear
when the phone is ringing or when speakerphone is switched on. Danger
of serious, irreversible damage to your hearing!
If you are wearing a hearing aid
Please note that the handset may cause an annoying background noise.
ADDITIONAL SAFETY INFORMATION
Small children:
Your device and its enhancements may contain small parts. Keep them out
of the reach of small children.

10
snom m9r Quick Start Guide
E
N
G
L
I
S
H
Operating environment:
• Remember to follow any special regulations in force in any area, and
always switch off your device when its use is prohibited or when it
may cause interference or danger. Use the device only in its normal
operating positions. Do not place credit cards or other magnetic
storage media near the device, because information stored on them
may be erased.
• WARNING: The handpiece contains magnets and the earpiece or
mouthpiece may attract and hold small dangerous objects such as
pins. Please ensure no such objects are present before each use.
Medical devices
Operation of any equipment emitting radio frequency signals may interfere
with the functionality of inadequately shielded medical devices. Consult a
physician or the manufacturer of the medical device to determine if they
are adequately shielded from external RF energy or if you have any other
questions concerning this topic. Switch off your device in health care
facilities when signs posted in these areas instruct you to do so. Hospitals
or health care facilities may be using equipment that could be sensitive to
external RF energy.
Implanted medical devices
Manufacturers of medical devices recommend that a minimum distance
of 20 centimeters (7.8 inches) should be maintained between a wireless
device and an implanted medical device, such as pacemakers or
cardioverter defibrillators, to avoid potential interference with the medical
device. Persons who have such devices should:
• Always keep the wireless device more than 20 centimeters (7.8 inches)
from the medical device when the wireless device is turned on.
• Not carry the wireless device in a breast pocket.
• Hold the wireless device to the ear opposite the medical device to
minimize the potential for inter-ference.
• Turn the wireless device off immediately if there is any reason to
suspect that interference is taking place.
• Read and follow the directions of the medical device‘s manufacturer.

11
snom m9r Quick Start Guide
v1.3.0
E
N
G
L
I
S
H
If you have any questions about using your wireless device with an
implanted medical device, consult your health care provider.
SELV (Safety Extra Low Voltage) Compliance
Safety status of Input/Output connections comply to SELV requirements.
Warning: To avoid electric shock, do not connect safety extra-
low voltage (SELV) circuits to telephone-network voltage (TNV)
circuits. LAN ports contain SELV circuits, and PSTN ports
contain TNV circuits. Some LAN and PSTN ports both use RJ-
45 (8P8C) connectors. Use caution when connecting cables.
Potentially explosive environments
Switch off your device when in any area with a potentially explosive
atmosphere and obey all signs and instructions. Sparks in such areas
could cause an explosion or fire resulting in bodily injury or even death.
Switch off the device at refuelling points such as near gas pumps at
service stations. Observe restrictions on the use of radio equipment in fuel
depots, storage, and distribution areas; chemical plants; or where blasting
operations are in progress. Areas with a potentially explosive atmosphere
are often but not always clearly marked. They include below deck on boats,
chemical transfer or storage facilities, vehicles using liquefied petroleum
gas, and areas where the air contains chemicals or particles such as grain,
dust, or metal powders.
Sensitive Electronic Equipment
The current state of research concludes that operational DECT phones
normally do not adversely affect electronic equipment. Nevertheless, you
should take some precautions if you want to operate DECT phones in the
immediate vicinity of such equipment like sensitive laboratory equipment.
Always keep a minimum distance of 10 cm (3.94") to the equipment even
when the phone is in standby.
Electrical Surges
We recommend the installment of an AC surge arrester in the AC outlet to
which this device is connected to avoid damage to the equipment caused
by local strikes of lightening or other electrical surges.

12
snom m9r Quick Start Guide
E
N
G
L
I
S
H
IMPORTANT BATTERY INFORMATION
This product uses a rechargeable Lithium-Ion battery 3.7V, 650mAh. Only
use batteries that came with the handset or replacement batteries with
"snom" brand and snom PN 00002758 or batteries expressly approved
by snom technology AG. Do not use any other type of battery, since this
may lead to leakage, fire, explosion, or other dangerous situations. In order
to replace or remove the battery, you must first remove the battery cover
of the handset. Never disassemble, alter, or short-circuit batteries or use
them for purposes other than the intended one. Charge battery only within
the snom m9 handset placed in the snom m9 charger that came with the
product.
Charging and discharging, storage
The handset is powered by a rechargeable battery. The full performance
of a new battery is achieved only after two or three complete charge and
discharge cycles.
The battery can be charged and discharged hundreds of times, but it will
eventually wear out. Use only snom technology AG approved batteries.
If left unused, a fully charged battery will lose its charge over time. If the
battery is completely discharged, it may take a few minutes before the
charging indicator appears on the display.
Use the battery only for its intended purpose. Do not short-circuit the
battery. Short-circuiting the terminals may damage the battery or the
connecting object. Do NOT use a damaged charger or battery. Using a
damaged battery may cause it to explode.
Do not place or store the battery, inside or outside the handset, in the
immediate vicinity of open fire or other heat sources. Leaving the battery
in hot or cold places will reduce its capacity and lifetime. Charge batteries
within an ambient temperature range of 0° C to 40° C (32° F to 104° F). A
device with a hot or cold battery may not work temporarily, even when the
battery is fully charged.
Avoid overcharging. Repeated overcharging can lead to deterioration in
battery performance. Never attempt charging the battery with reversed
polarity as this may cause the gas pressure inside the battery to rise and
lead to leakages. For short-term storage store batteries in a dry location
with low humidity, no corrosive gases, and at a temperature range of -20°

13
snom m9r Quick Start Guide
v1.3.0
E
N
G
L
I
S
H
C to 45° C (-4° F to 113° F). Long-term storage: Store at a temperature
range between +10° C and +30° C (50° F to 86° F).
Battery Disposal
Defective or exhausted batteries should never be disposed of as municipal
waste. Return old batteries to the battery supplier, a licensed battery
dealer or a designated collection facility. Do not incinerate batteries.
CLEANING
Use an anti-static cloth. Please avoid water and liquid or solid cleaning
products as they might damage the surface or internal electronics of the
base, charger, and handset.
DISPOSAL
Disposal of phone
This product is subject to European Directive 2002/96/EC
and may not be disposed of with general household garbage.
If you do not know where you may dispose of the device at the
end of its lifespan, contact your municipality, your local waste
management provider, or your seller.
Battery disposal
This battery is subject to European Directive 2006/66/EC and
may not be disposed of with general household garbage.
If you do not know where you may dispose of the battery at the
end of its lifespan, contact your municipality, your local waste
management provider, or your seller.
For countries outside the European Union:
Disposal of electrical and electronic products in countries outside the
European Union should be done in line with local regulations. Please
contact local authorities for further information.

14
snom m9r Quick Start Guide
E
N
G
L
I
S
H
INSTALLATION
Before first use, the handset battery should be charged
fully. This will take approximately 8 hours.
PREPARATION OF HANDSET
1. Lift off the battery cover.
2. Insert the battery pack with the electrodes in the top left corner.
Replace the cover.
3. Connect the 5.9 V power supply of the charger to the wall outlet
first, then to the charger, and place the handset in the charger.
3.1. 2.
snom
rechargeable
Lithium-Ion
battery
BASE STATION
Power LED
– lit when on
Call LED
– flashes during firmware update
– lit when call in progress
– blinks slowly when waiting for
handset registrations
Registration LED
– lit when the base
station is registered
N
etwork LED
– flashes during boot,
indicating that the base
station has received an IP
address

15
snom m9r Quick Start Guide
v1.3.0
E
N
G
L
I
S
H
1. When the handset is ready for use, connect one end of the network
cable with the NET port on the back of the base station and the
other end to a LAN port in your network (switch, router, etc.).
2. Connect the 5 V power converter to the wall outlet first, THEN to
the base station.
NET
RESET 5V DC NE
T
5V DC
Power
connector
Reset
button
Net port
3. The power indicator comes on and the base station begins to boot.
4. When the base station has booted up, the "Call" LED will start
to blink, indicating that the base station is waiting for handset
registration.
HANDSET OVERVIEW
Side view
Belt clip
Volume adjust key+-
Adjust volume
• of ringer when call is ringing
• of speaker when in call
Headset jack connector 2.5 mm
Speakerphone key (on/off)
Back view Loudspeaker
of
speakerphone
Battery cover

16
snom m9r Quick Start Guide
E
N
G
L
I
S
H
Front view
Navigation key
In idle mode, press top/bottom/right/left edge (depicted in this
guide by K/L/J/I, respectively)or the button in the center (c)
to open the following menus or functions:
cMain menu
LDirectory
IIntercom
JSettings menu
KPreferences menu
In other contexts press Kor Lto navigate in menus and lists.
Green phone key
Accept calls
Dial number
Confirm actions
Left function key
In idle mode:
Call lists
Right function key
In idle mode:
RSS Feed
Red phone key
Terminate calls
Cancel actions
Power on/off
Earpiece
Color display
Alphanumerical
keypad
R key
Lock/unlock keypad
Star key
Change input mode
(numbers, small/
capital letters)

17
snom m9r Quick Start Guide
v1.3.0
E
N
G
L
I
S
H
DISPLAY LAYOUT, IDLE SCREEN
Battery charging
status
Red=critical
Yellow=under 50%
Green=over 50%
Preferences
Menu
Select RSS feeds
Function key line
with context-sensitive
symbols
Time and Date
Handset ID:
Call lists:
Missed
Received
Dialled
Signal strength:
High=green
Low=gray
Status line
Handset registration
1. Press (red phone key). The display will show: "Searching for
Base". Once the handset has found the base station, it will display
the PIN prompt.
2. Enter the default PIN "0000".
3. Press "OK".
Note: If the handset fails to register automatically, a manual
registration can also be performed. Press "->" to enter the
Settings menu. Enter the Handset menu and press "Register
Handset". Select "Base 1". Enter PIN and press "OK" to
register the handset.
4. Once the handset has registered with the base, the idle screen will
be displayed:

18
snom m9r Quick Start Guide
E
N
G
L
I
S
H
Configuration of a VoIP account
1. Press Jand Kon the navigation key and "OK" to show the
--Network-- page under Settings > System Info. The IP address of
the base station is displayed on the screen. Write it down.
2. Press KK on the navigation key (see page 16) to show --Handset--
page. Write down the Handset ID, for example: 00FEA101C0
(without the "h" at the end, if visible).
3. Open a browser window, type http://<IP address> in the address
bar, and press ENTER to open the base station's web interface.
Default user name: admin
Default password: password
4. Click on "Identity 1" in the menu on the left.
5. Enter the SIP account information you received from your system
administrator or VoIP provider. The display name is freely
selectable.
6. Click on the "Handsets" tab. Select the handset ID from
the "Handset ID (IPUI)" drop-down list. Click on "Save".
7. Your snom m9r is now ready for use.
PHONE MENUS
1. Press center of navigation key to open top-level menu.
Settings
Name of marked menu
item
Current function of
function key underneath
Directory
Preferences
Alarm Clock
Office Tools
Intercom

19
snom m9r Quick Start Guide
v1.3.0
E
N
G
L
I
S
H
2. Press top/bottom/right/left edge of navigation key (indicated in this
guide by KLJI) to navigate on display.
3. Press function key "OK" to open submenu/function. Press function
key "Cancel" to return to idle screen.
DIRECTORY
Use KL to select existing entry or <New Item>.
New item: Follow the prompts to enter name and number and select
ringer. Press OK.
Press (green phone key) to dial number, press to Ieave
directory.
OFFICE TOOLS
Stopwatch, Calculator, Notepad, Calendar, RSS Reader, Voicemail
SETTINGS MENU
Network
VoIP
Display
Name
Account
Password
Mailbox
Registrar
Outbound
Proxy
Date/
Time Handset
Time Zone
Time Server
Format
Date
Format
Time
Format
VLAN
DHCP
Register
handset
Select
base
Deregister
handset
Reset
handset
FW
Update
Version
Reset
base
Change
PIN
System
Info
New PIN:
IP address,
MAC address,
firmware
version,
IDs of base
and handset

20
snom m9r Quick Start Guide
E
N
G
L
I
S
H
PREFERENCES MENU
“OK” >
Select
language with
LK and press
“OK”
Language
Select with
LK and press
“OK”
Auto
Answer
Display
Screen
Saver
Wallpaper
Contrast
Backlight
Incoming
calls are not
announced
DND
Select event
when calls
are to be
forwarded and
press“OK”
Select target
phone number
for forwarding
calls and press
“OK”
Audio
Settings
Ringer
Settings
Internal*
calls
External
calls
Key
Tones
Charging
Tones
Low
Battery
MWI
Confirma-
tion Tone
Advisory
Tones Select ringto-
ne and volume
with IJ and
press “OK”
Select “Activate” with LK
and press “OK”
* Internal calls: From
handsets registered at the
same base station
Always
Call
Forward
Never
When
busy
Timeout/
sec.
Fwd.
target
ALARM CLOCK
Activate | Time | Alarm Ringer
INTERCOM
Page All | Handset: Page all handsets or selected handset registered
with same base station
PHONE OPERATION
Make and answer calls
Make a call: Enter number > press OK or
Answer a call: Press
Terminate call: Press
Table of contents
Languages:
Other Snom IP Phone manuals