SolarEdge Home EV User manual

Installation Guide
SolarEdge Home EV Charger
Installation Guide
with SetApp Configuration
For Australia

Revision History
Version 1.1 October 2022
Product name changed from Smart EV Charger to SolarEdge Home EV Charger
Version 1.0 July 2022
Initial release
SolarEdge Home EV Charger Installation Guide
2 Revision History

Contents
Revision History 2
HANDLING AND SAFETY INSTRUCTIONS 5
Safety Symbols Information 5
IMPORTANTSAFETYINSTRUCTIONS 6
EV Charging Safety Instructions 9
Chapter 1: Introduction to SolarEdge Home EV Charger 10
Packages Contents and Required Equipment 11
Chapter 2: Connectors and Interfaces 12
Buzzer 13
Main Procedures 15
Chapter 3: Qualified Electrician - Connecting the AC Wire to the SolarEdge
Home EV Charger 18
Required Equipment 18
Main Procedure 18
Grid Connection Guidelines 18
Removing the SolarEdge Home EV Charger Covers 18
Setting the Circuit Breaker Ratings 19
Directly Connecting the AC Grid to the SolarEdge Home EV Charger 20
Connecting RS485 between Inverters and the SolarEdge Home EV Charger 22
RS485 Bus Configuration 26
Creating an RS485 Bus Connection to SolarEdge Inverter or Gateway 26
Closing the SolarEdge Home EV Charger Covers 27
Setting the Circuit Breaker Limit Value 29
Verifying that the EV is Charging 29
Chapter 4: Configuring and Using SolarEdge Home EV Charger with
mySolarEdge 30
Using mySolarEdge 30
Chapter 5: Charging Instructions 32
Chapter 6: Qualified Electrician - Setting Up Communication 33
Communication Options 33
Communication Connectors 34
Creating an Ethernet (LAN) Connection 35
Verifying the Connection to the Monitoring Platform 38
Chapter 7: Qualified Electrician - Configuring and Using SolarEdge Home EV
Charger with SetApp 39
Configuring the SolarEdge Home EV Charger 39
Configuring Communication Options 39
Viewing Communication Status 40
3
SolarEdge Home EV Charger Installation Guide

Chapter 8: Errors and Troubleshooting 41
Appendix A: Qualified Electrician - Connecting the SolarEdge Home EV
Charger to an Energy Meter 46
Energy Meter DIPSwitches 46
Mechanical Specifications 49
Technical Specifications - SolarEdge Home EV Charger (Australia and New
Zealand) 50
Support Contact Information 52
SolarEdge Home EV Charger Installation Guide
4

HANDLING AND SAFETY INSTRUCTIONS
Safety Symbols Information
The following safety symbols are used in this document. Familiarize yourself with the
symbols and their meaning before installing or operating the system.
WARNING!
Denotes a hazard. It calls attention to a procedure that, if not correctly
performed or adhered to, could result in injury or loss of life. Do not proceed
beyond a warning note until the indicated conditions are fully understood and
met.
AVERTISSEMENT!
Dénote un risque: il attire l'attention sur une opération qui, si elle n'est pas
faite ou suivi correctement, pourrait causer des blessures ou un danger de
mort. Ne pas dépasser une telle note avant que les conditions requises soient
totallement comprises et accomplies.
CAUTION!
Denotes a hazard. It calls attention to a procedure that, if not correctly
performed or adhered to, could result in damage or destruction of the
product. Do not proceed beyond a caution sign until the indicated conditions
are fully understood and met.
ATTENTION!
Dénote un risque: il attire l'attention sur une opération qui, si elle n'est pas
faite ou suivi correctement, pourrait causer un dommage ou destruction de
l'équipement. Ne pas dépasser une telle note avant que les conditions requises
soient totallement comprises et accomplies.
NOTE
Denotes additional information about the current subject.
IMPORTANTSAFETYFEATURE
Denotes information about safety issues.
HANDLING AND SAFETY INSTRUCTIONS5
SolarEdge Home EV Charger Installation Guide

IMPORTANTSAFETYINSTRUCTIONS
SAVETHESEINSTRUCTIONS
Warning!
When using electric products, basic precautions should always be followed,
including the following. This manual contains important instructions that shall
be followed during installation, operation and maintenance of the unit.
a. Read all the instructions before using this product.
b. This device should be supervised when used around children.
c. Do not put fingers into the electric vehicle connector.
d. Do not use this product if the flexible power cord or EV cable is frayed, has
broken insulation, or any other signs of damage.
e. Do not use this product if the enclosure or the EV connector is broken,
cracked, open, or shows any other indication of damage.
1. The grounding connector shall be connected to the main earth terminal in
the MSB.
WARNING!
Before operating the SolarEdge Home EV Charger, ensure that the SolarEdge
Home EV Charger grounded properly. This product must be connected to a
grounded, metal, permanent wiring system, or an equipment-grounding
conductor must be run with the circuit conductors and connected to the
equipment grounding terminal or lead on the product.
NOTE
Use only copper conductors rated for a minimum of .
NOTE
The symbol appears at grounding points on the SolarEdge equipment. This
symbol is also used in this manual.
SolarEdge Home EV Charger Installation Guide
6 IMPORTANTSAFETYINSTRUCTIONS

NOTE
The following warning symbols appear on the inverter warning label:
Risk of electric shock
Risk of electric shock from energy stored in the capacitor. Do
not remove cover until 5 minutes after disconnecting all
sources of supply.
Hot surface – To reduce the risk of burns, do not touch.
Caution, risk of danger
WARNING!
The SolarEdge Home EV Charger must be connected to a dedicated AC branch
circuit with a maximum Overcurrent Protection Device (OCPD) of 50A.
IMPORTANTSAFETYINSTRUCTIONS 7
SolarEdge Home EV Charger Installation Guide

CAUTION!
This unit must be operated according to the technical specification datasheet
provided with the unit.
NOTE
This SolarEdge Home EV Charger s provided with an IMI (Isolation Monitor
Interrupter) for ground fault protection
NOTE
The SolarEdge Home EV Charger is rated. Unused conduit entry and glands
should be sealed with appropriate seals.
WARNING!
Risk of electric shock. Do not remove cover. No user serviceable parts inside.
Refer servicing to qualified service personnel.
Grounding Instructions
This product must be grounded. If it should malfunction or break down,
grounding provides a path of least resistance for electric current to reduce the
risk of electric shock. This product is equipped with a cord having an equipment
grounding conductor and a grounding plug. The plug must be plugged into an
appropriate outlet that is properly installed and grounded in accordance with all
local codes and ordinances.
WARNING!
Improper connection of the equipment-grounding conductor might result in a
risk of electric shock. Check with a qualified electrician or serviceman if you are
in doubt as to whether the product is properly grounded. Do not modify the
plug provided with the product – if it will not fit the outlet, have a proper outlet
installed by a qualified electrician.
NOTE
The following warning symbols appear on the inverter warning label:
Risk of electric shock
Risk of electric shock from energy stored in the capacitor. Do
not remove cover until 5 minutes after disconnecting all
sources of supply.
Hot surface – To reduce the risk of burns, do not touch.
Caution, risk of danger
SolarEdge Home EV Charger Installation Guide
8 IMPORTANTSAFETYINSTRUCTIONS

EV Charging Safety Instructions
WARNING!
Do not charge a vehicle indoors if it requires ventilation. Contact your EV
service representative for information.
WARNING!
Automatic CCID (charge circuit interrupting device) reset provided.
CAUTION!
Do not use this product if there is any damage to the unit.
CAUTION!
Do not use an extension cord between the SolarEdge Home EV Charger Cable
and the SolarEdge Home EV Charger. You may use a conversion adapter only if
it has been approved by SolarEdge.
EV Charging Safety Instructions9
SolarEdge Home EV Charger Installation Guide
Chapter 1: Introduction to SolarEdge Home EV
Charger
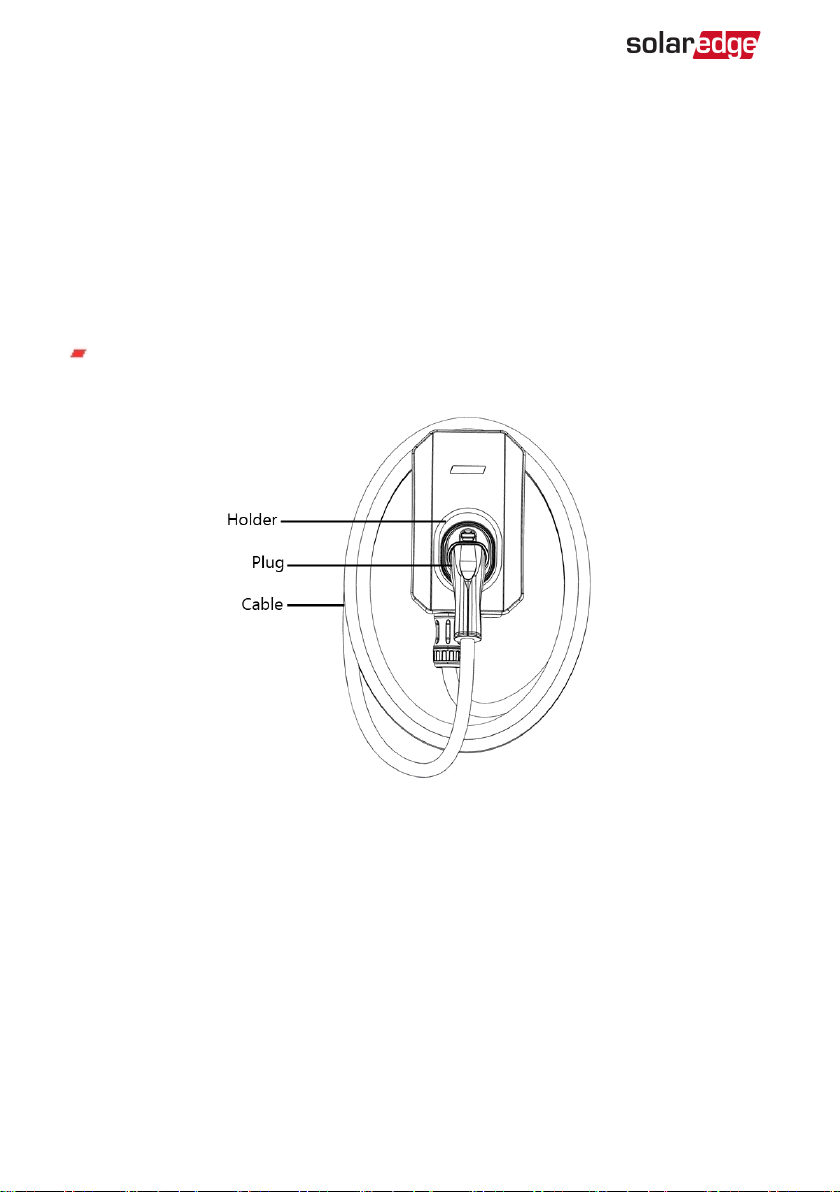
The SolarEdge Home EV Charger is designed to provide reliable and economical
charging of an electric vehicle (EV). EV Connector IEC 62196 (Type 2).
The SolarEdge Home EV Charger is also used for hanging the SolarEdge Home EV
Charger cable, protecting the plug from rain when not plugged into the vehicle.
The SolarEdge Home EV Charger offers the following connection options to the grid:
Direct AC connection to the SolarEdge Home EV Charger. To be performed only by a
qualified electrician.
Figure 1: SolarEdge Home EV Charger
SolarEdge Home EV Charger Installation Guide
10 Chapter 1: Introduction to SolarEdge Home EV Charger

Packages Contents and Required Equipment
SolarEdge Home EV Charger Package
SolarEdge Home EV Charger Station
SolarEdge Home EV Charger mounting bracket and tightening screws
EV Cable Package
EV Cable
EVCable Locker
Required Equipment
Screwdriver
Drill
Crimper
10 mm CSA Bootlace Ferrule
Chapter 1: Introduction to SolarEdge Home EV Charger 11
SolarEdge Home EV Charger Installation Guide

Chapter 2: Connectors and Interfaces
Figure 2: SolarEdge Home EV Charger connectors and interfaces
SolarEdge Home EV Charger cable connector: Used for connecting the cable to the
SolarEdge Home EV Charger
SolarEdge Home EV Charger push button: Pressing the button has the following
functionality:
Press Description
Short press
In case of malfunction resets errors and starts charging.
In case the SolarEdge Home EV Charger is on scheduling mode
press to immediately start charging.
Long press Turns on the Wi-Fi to enable pairing with the smartphone
Communication gland - for professional installer:
For connection of SolarEdge Home EV Charger communication options, refer to
Qualified Electrician - Setting Up Communication
on page 33 for more information.
SolarEdge Home EV Charger Installation Guide
12 Chapter 2: Connectors and Interfaces

Plug holder: Holds the plug when not being used.
SolarEdge Home EV Charger LED ring indicator: Indicates the SolarEdge Home EV
Charger statuses as described in the following table:
LED Ring Color Indication Description
Off Off No power
Red On Error
Green On - Charging
- Connected to the Internet
Green Blinking - Connected to EV
- Connected to Internet
Green Pulsating(1) - Not connected to EV
- Connected to the Internet
Orange On - Charging
- Not connected to the Internet
Orange Blinking
- Connected to EV
-Not connected to the Internet
Orange Pulsating(1) - Not connected to EV
- Not connected to the Internet
Purple Blinking fast
Ready to connect to your smartphone for direct
setting of SolarEdge Home EV Charger via
smartphone app.
Purple Momentary
On
Connected to your smartphone for direct setting
of SolarEdge Home EV Charger via smartphone
app.
Buzzer
The SolarEdge Home EV Charger includes a buzzer with the following indications:
(1)The light switches on slowly and gradually increases up to maximum and then slowly decreases back to
off
Chapter 2: Connectors and Interfaces13
SolarEdge Home EV Charger Installation Guide

Event Buzzer Indication
Connected to EV 1 short beep
Charging starts 2 short beeps + 1 long beep
Error 5 beeps
SolarEdge Home EV Charger Installation Guide
14 Buzzer
Main Procedures
The SolarEdge Home EV Charger is supplied with a mounting bracket kit.
1. Mount the SolarEdge Home EV Charger bracket
2. Mount the SolarEdge Home EV Charger on the bracket
3. Connect the SolarEdge Home EV Charger cable to the SolarEdge Home EV Charger
4. Set the circuit breaker rating DIP switches
Follow the detailed procedures in the following sections to mount and connect the
SolarEdge Home EV Charger
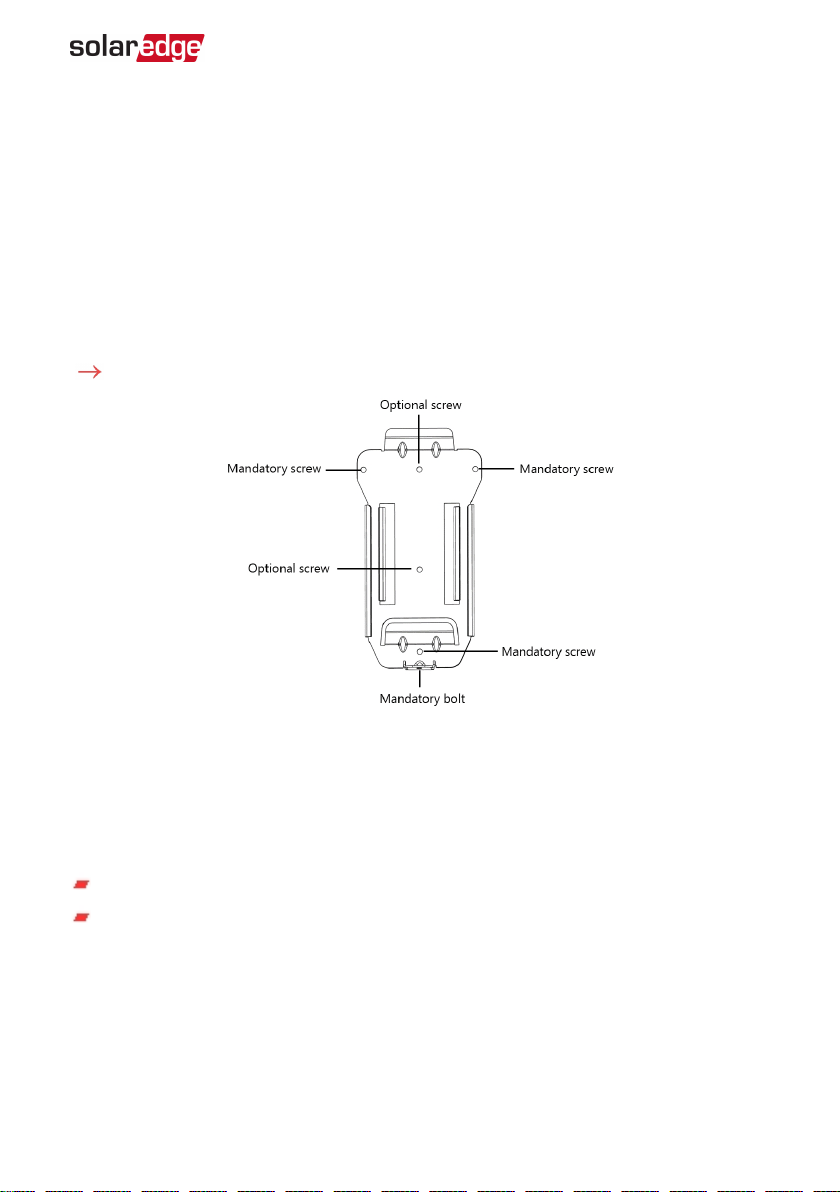
To mount the SolarEdge Home EV Charger bracket:
Figure 3: Mounting bracket
1. Determine the SolarEdge Home EV Charger mounting location, on the mounting
surface.
2. Maintain the following minimum clearance areas between the SolarEdge Home EV
Charger and other objects:
from the top and sides of the SolarEdge Home EV Charger
At least from the bottom of the SolarEdge Home EV Charger if installing it indoors,
if outdoors.
3. Position the mounting bracket against the mounting surface and mark at least three
drilling hole locations (refer to
Mechanical Specifications
on page 49 for mounting
bracket dimensions). Drill holes in the locations you marked and mount the bracket.
Verify that the bracket is firmly attached to the mounting surface.
Chapter 2: Connectors and Interfaces15
SolarEdge Home EV Charger Installation Guide
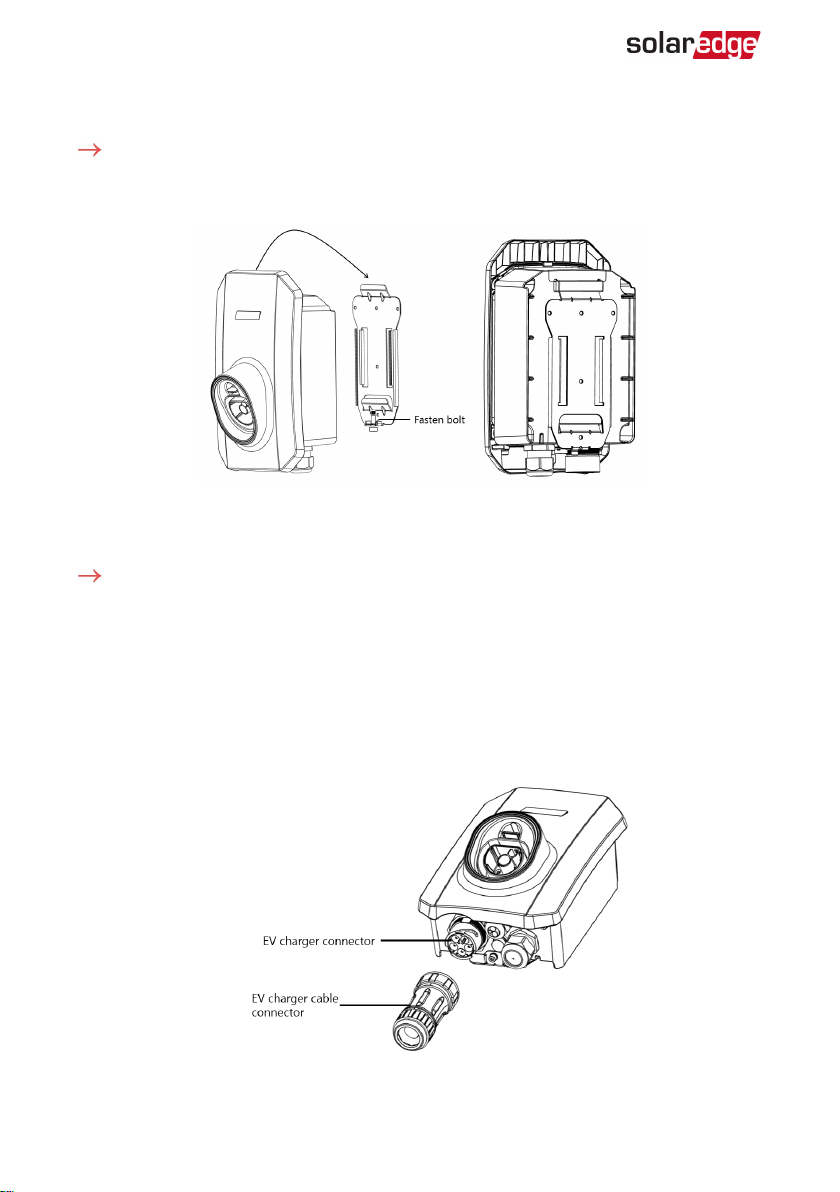
To mount the SolarEdge Home EV Charger on the bracket:
1. Lift and hang the SolarEdge Home EV Charger on the mounted bracket (see the
following figure).
Figure 4: Mounting the SolarEdge Home EV Charger
2. Fasten the supplied bolt to the SolarEdge Home EV Charger.
To connect the SolarEdge Home EV Charger cable:
1. Align the two white arrows on the SolarEdge Home EV Charger cable connector with
the white dot on the SolarEdge Home EV Charger connector located at the bottom
of the SolarEdge Home EV Charger. The dot should be between the two arrows (see
the following figure).
2. Plug the cable connector into the SolarEdge Home EV Charger connector (see the
following figure).
SolarEdge Home EV Charger Installation Guide
16 Main Procedures

Figure 5: SolarEdge Home EV Charger connectors
3. Rotate the cable connector clockwise to fasten it (see the following figure).
Figure 6: SolarEdge Home EV Charger cable connection
4. Assemble the two parts of the cable lock around the cable connector. Push the parts
together until they click to lock (see the following figure).
Figure 7: Cable lock
Chapter 2: Connectors and Interfaces17
SolarEdge Home EV Charger Installation Guide
Chapter 3: Qualified Electrician - Connecting
the AC Wire to the SolarEdge Home EV
Charger
This chapter describes how to connect the AC to the SolarEdge Home EV Charger.
Required Equipment
Open ended 36 mm wrench
4 mm Allen Key
Screwdriver
Main Procedure
1. Remove the SolarEdge Home EV Charger covers
2. Set the circuit breaker rating DIP switches
3. Directly connect the AC to the SolarEdge Home EV Charger
4. Close the SolarEdge Home EV Charger
Grid Connection Guidelines
The conduits, hubs and fittings must be suited for field wiring systems.
Use only copper conductors rated for a minimum of .
Use the conduit and wiring appropriate for the installation location per the NEC.
Outdoor installations must use components that are rated IP65.
NOTE
For more wiring information refer to the
SolarEdge
Recommended AC Wiring Application Note
, available on the
SolarEdge website at
https://www.solaredge.com/sites/default/files/application-note-
recommended-wiring.pdf
Removing the SolarEdge Home EV Charger Covers
The SolarEdge Home EV Charger has two covers: a top cover and a bottom cover. You
must remove both covers to open the SolarEdge Home EV Charger.
To remove the SolarEdge Home EV Charger covers:
1. Loosen the screws on the top cover (see the following figure) and remove it.
SolarEdge Home EV Charger Installation Guide
18 Chapter 3: Qualified Electrician - Connecting the AC Wire to the
SolarEdge Home EV Charger
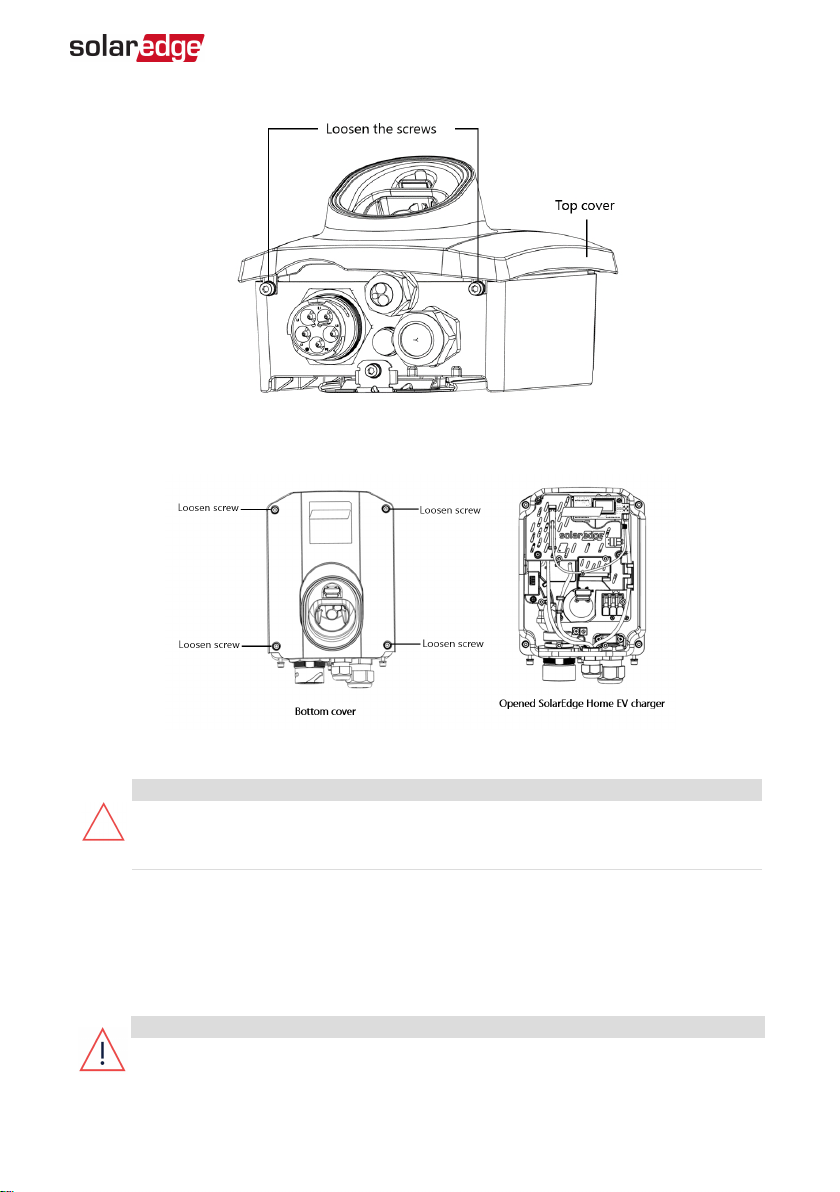
2. Loosen the screws of the bottom cover (see the following figure)and remove it as
well.
Figure 8: SolarEdge Home EV Charger top cover
CAUTION!
When removing the covers, make sure not to damage the internal components.
SolarEdge will not be held responsible for any components damaged as a result
of incautious cover removal.
Setting the Circuit Breaker Ratings
DIPSwitches
Set the circuit breaker rating DIP switches as shown in the following figure and table.
WARNING!
Before changing the DIP Switches, turn off the ACto the SolarEdge Home EV
Charger.
Chapter 3: Qualified Electrician - Connecting the AC Wire to the SolarEdge
Home EV Charger 19
SolarEdge Home EV Charger Installation Guide
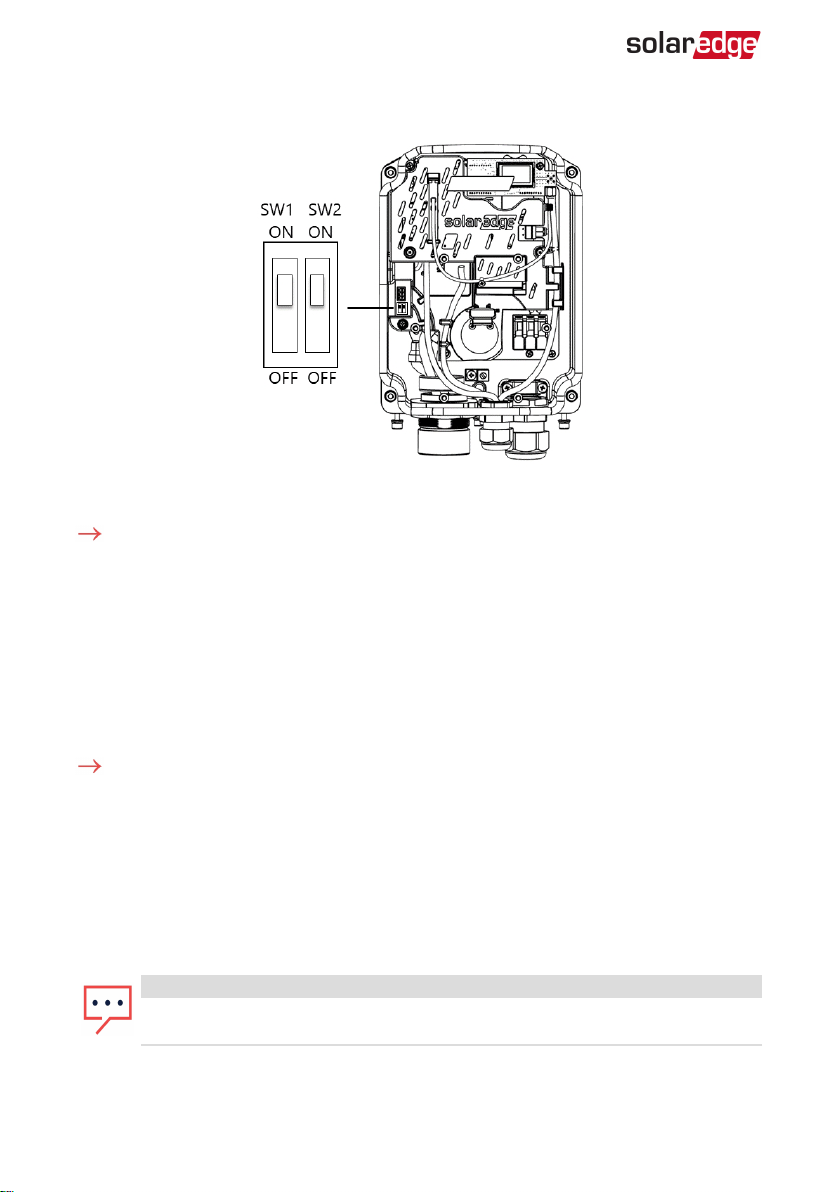
Figure 9: SolarEdge Home EV Charger DIP switch interface
To set the circuit breaker ratings:
Adjust the SolarEdge Home EV Charger DIP switches according to your circuit breaker
rating to set maximum allowed AC current from the grid.
By default, the DIP switch is set to the 32A which is the maximum allowed AC current.
Directly Connecting the AC Grid to the SolarEdge
Home EV Charger
To directly connect the AC grid to the SolarEdge Home EV Charger:
1. Strip 12mm of the 6mm-10mm CSA cable.
2. Attach 12mm wire ferrules to the bare wire (end of wire)of the G,L1, N wires:
a. Twist the bare wires.
b. Put the wire ferrule on the bare wires. Ensure you can see the end of the wire
through the wire ferrule .
c. Crimp the wire ferrule with a crimper. Repeat for all three wires.
NOTE
Connect the equipment grounding before connecting the AC wires to the AC
terminal block.
SolarEdge Home EV Charger Installation Guide
20 Directly Connecting the AC Grid to the SolarEdge Home EV Charger
Other manuals for Home EV
1
Table of contents
Other SolarEdge Batteries Charger manuals


