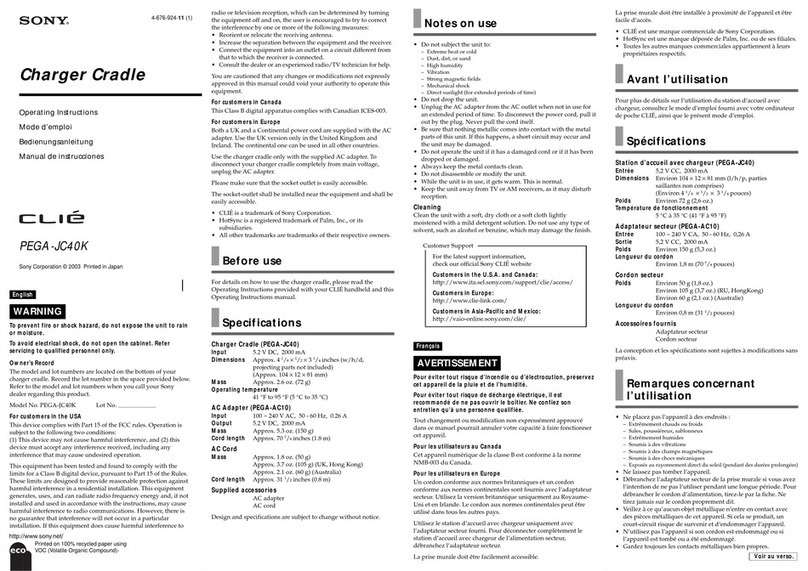
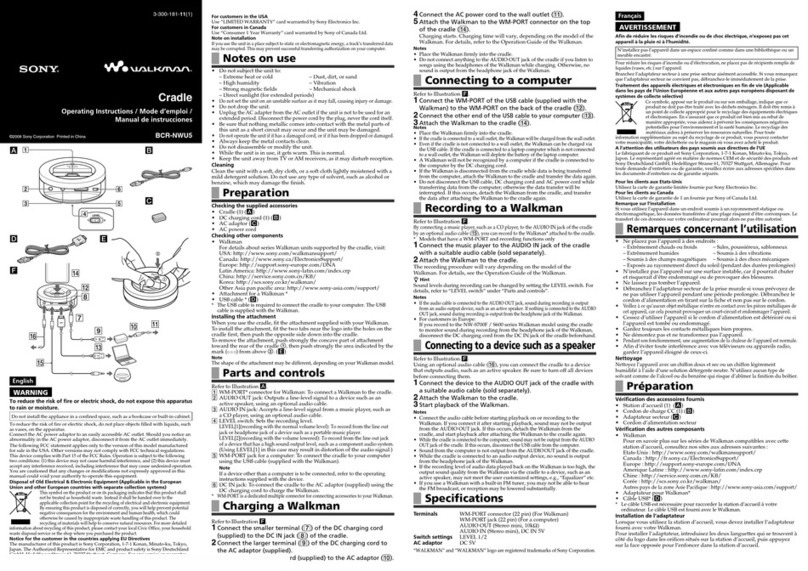
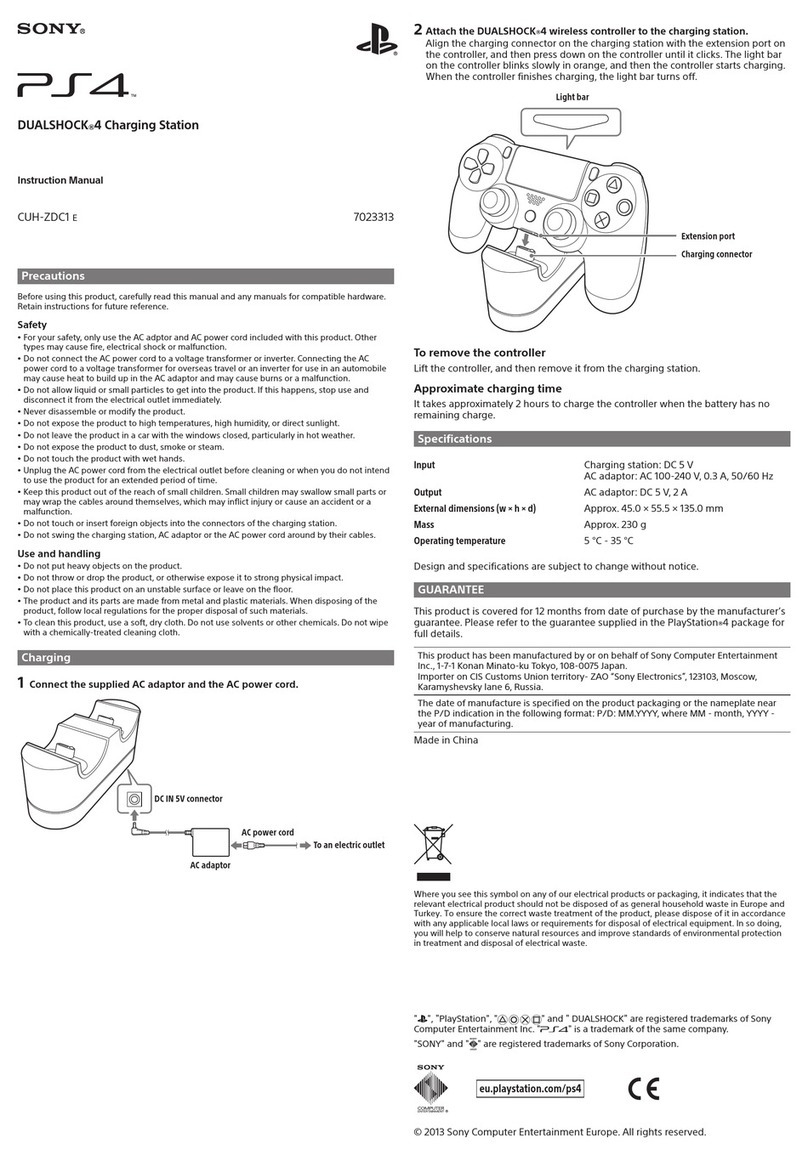
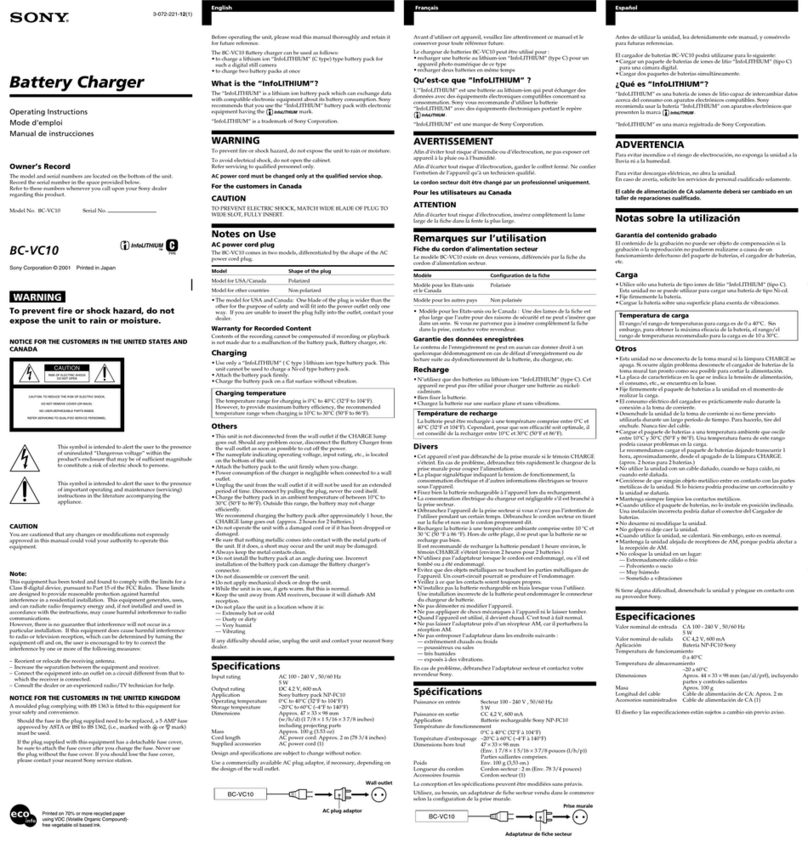
Sony BC-L500 User manual

BATTERY CHARGER
BC-L500
電気製品は、安全のための注意事項を守らないと、
火災や人身事故になることがあります。
このオペレーションマニュアルには、事故を防ぐための重要な注意事項と製品
の取り扱いかたを示してあります。このオペレーションマニュアルをよくお読
みのうえ、製品を安全にお使いください。 お読みになったあとは、いつでも見
られるところに必ず保管してください。
OPERATION MANUAL
[Japanese/English/French/German/Italian/Spanish]
1st Edition (Revised 2)

2
安全のために
電気製品は、安全のための注意事項を守らないと、火災や感電などにより死亡や
大けがなど人身事故につながることがあり、危険です。
事故を防ぐために次のことを必ずお守りください。
安全のための注意事項を守る
4 〜 7 ページの注意事項をよくお読みください。製品全般の注意事項が記されて
います。
定期点検をする
長期間安全に使用していただくために、定期点検を実施することをおすすめしま
す。点検の内容や費用については、ソニーのサービス担当者または営業担当者に
ご相談ください。
故障したら使用を中止する
ソニーのサービス担当者、または営業担当者にご連絡ください。
万一、異常が起きたら
m
a電源を切る。
bバッテリーパックをはずし、電源コードを抜く。
cソニーのサービス担当者、または営業担当者に連絡する。
・ 煙が出たら
・ 異常な音、においがしたら
・ 内部に水、異物が入ったら
・ 製品を落としたり、キャビネットを破損したときは
警告表示の意味
オペレーションマニュアルおよび
製品では、次のような表示をして
います。表示の内容をよく理解し
てから本文をお読みください。
この表示の注意事項を守らないと、破
裂・発火・発熱・液漏れなどにより死
亡や大けがになることがあります。
この表示の注意事項を守らないと、
火災や感電などにより死亡や大け
がなど人身事故につながることが
あります。
この表示の注意事項を守らないと、
感電やその他の事故によりけがを
したり周辺の物品に損害を与えた
りすることがあります。
注意を促す記号
行為を禁止する記号
行為を指示する記号
日本語

目次 3
目次
警告....................................................................................................................4
注意....................................................................................................................5
その他の安全上のご注意 ..........................................................................................6
概要...........................................................................................................................7
特長 ...............................................................................................................7
使用上のご注意.........................................................................................................7
各部の名称と働き .....................................................................................................8
充電する ...................................................................................................................9
主な仕様 .................................................................................................................10
JP

4
油煙、湯気、湿気、ほこりの
多い場所では設置・使用しな
い
上記のような場所で設置・使用すると、
火災や感電の原因となることがありま
す。オペレーションマニュアルに記され
ている使用条件以外の環境での使用は、
火災や感電の原因となることがありま
す。
指定のバッテリーパック以外
の充電はしない
指定以外のバッテリーパックを充電する
と、発火、発煙、感電の原因となること
があります。
内部に水や異物を入れない
水や異物が入ると火災や感電の原因とな
ることがあります。
万一、水や異物が入ったときは、すぐに
電源を切り、電源コードを抜いて、お買
い上げ店またはソニーのサービス担当者
にご相談ください。
電源コードを傷つけない
電源コードを傷つけると、火災や感電の
原因となります。
•電源コードを加工したり、傷つけたり
しない。
•重いものをのせたり、引っ張ったりし
ない。
•熱器具に近づけたり、加熱したりしな
い。
•電源コードを抜くときは、必ずプラグ
を持って抜く。
万一、電源コードが傷んだら、ソニーの
サービス窓口に交換をご依頼ください。
分解や改造をしない
分解や改造をすると、火災や感電、けが
の原因となることがあります。内部の点
検や修理は、お買い上げ店またはソニー
のサービス窓口およびサービス担当者に
ご依頼ください。
電源コードのプラグ及びコネ
クターは突き当たるまで差し
込む
真っすぐに突き当たるまで差し込まない
と、火災や感電の原因となります。
警告

5
付属の電源コードを使う
付属以外の電源コードを使うと、感電や
故障の原因となることがあります。
高温下では使用しない
高温の場所で本機を使用すると、火災、
発火、発煙の原因となることがありま
す。周囲の温度は 45 ℃以下で使用して
ください。長時間、直射日光のあたる場
所に放置しないでください。
通風孔をふさがない
通風孔をふさぐと内部に熱がこもり、火
災や故障の原因となることがあります。
風通しをよくするために次の項目をお守
りください。
•壁から 10cm 以上離して設置する。
•密閉された狭い場所に押し込めない。
•毛足の長い敷物 ( じゅうたんや布団な
ど ) の上に設置しない。
•布などで包まない。
•あお向けや横倒し、逆さまにしない。
傾いた場所に設置しない
バッテリーパックを取り出す際に、落下
する恐れがあります。
高所に設置しない
バッテリーパックの着脱の際に、落下す
る恐れがあります。
バッテリーパックを装着した
まま運搬しない
運搬の振動・衝撃によりバッテリーパッ
クが落下し、けがの原因となることがあ
ります。
安全アースを接続する
安全アースを接続しないと、感電の原因
となることがあります。次の方法でアー
スを接続してください。
•電源コンセントが 3 極の場合
付属の電源コードを使用することで安
全アースが接続されます。
•電源コンセントが 2 極の場合
付属の 3 極 t2 極変換プラグを使用
し、変換プラグから出ている緑色の
アース線を建物に備えられているアー
ス端子に接続してください。
安全アースを接続できない場合は、ソ
ニーのサービス担当者または営業担当者
にご相談ください。
変換プラグ
アース線
注意

6
電池の使い方を誤ると、液漏れ・発熱・破裂・発火・誤飲
による大けがや失明の原因となるので、次のことを必ず
守ってください。
万一、異常が起きたら
•煙が出たら
a機器の電源スイッチを切るか、バッテリーチャー
ジャーの電源プラグを抜く。
bソニーのサービス窓口に連絡する。
•電池の液が目に入ったら
すぐきれいな水で洗い、直ちに医師の治療を受ける。
•電池の液が皮膚や衣服に付いたら
すぐにきれいな水で洗い流す。
•バッテリー収納部内で液が漏れたら
よくふきとってから、新しい電池を入れる。
ここでは、本機で使用可能なソニー製リチウムイオン電池
についての注意事項を記載しています。
•充電には、ソニーの専用バッテリーチャージャーを使用
する。
•火の中に投げ入れたり、加熱、半田付け、分解、改造を
しない。
•直射日光の当たるところ、炎天下の車内、ストーブのそ
ばなど高温の場所で、使用・放置・充電をしない。
•ハンマーでたたくなどの強い衝撃を与えたり、踏みつけ
たりしない。
•接点部や 3極と #極をショートさせたり、金属製のもの
と一緒に携帯・保管をしない。
•所定の充電時間を超えても充電が完了しない場合は、充
電をやめる。
•電池使用中や充電、保管時に異臭がしたり、発熱・液漏
れ・変色・変形などがあったときは、すぐに使用や充電
をやめる。
•水や海水につけたり、濡らしたりしない。
•充電のしかたについてはバッテリーチャージャーの取扱
説明書をよく読む。
その他の安全上のご注意
警告
設置の際には、容易に抜き差しできる、機器に近いコンセ
ントに電源プラグを接続してください。
万一、異常が起きた際には、電源プラグを抜いてください。
警告
•直射日光の下や火気の近くなど、高温のところにバッテ
リーを置かないでください。
•アースの接続は、必ず電源プラグを電源コンセントへ接
続する前に行ってください。
アースの接続を外す場合は、必ず電源プラグを電源コン
セントから抜いてから行ってください。
gocyuui
•機器は主電源コンセントの近くに設置し、遮断装置へ容
易に手が届くようにしなければならない。
•機器を水滴のかかる場所に置かないこと。及び水の入っ
た物、花瓶などを機器の上に置かないこと。
電池についての安全上のご注意
ご注意
電池についての安全上のご注意 / その他の安全上のご注意

概要/使用上のご注意 7
概要
BC-L500は、ソニーリチウムイオンバッテリーパック専用
の同時充電 4 連式据え置き型のバッテリーチャージャーで
す。
gocyuui
ニッケル水素バッテリーパック BP-M50/M100 およびニカ
ドバッテリーパック BP-90A/NP-1B は、本機では充電でき
ません。
特長
同時に 4 本のバッテリーパックを充電可能
最大 4 本のバッテリーパックを取り付けて同時に充電する
ことができます。
高速同時充電
バッテリーパック 4 本を1本分の充電時間で充電できます。
バッテリーパックのフロント着脱
前面からバッテリーパックの取り付け、取りはずしができ
ます。
棚置きや二段重ねにして使用できるため、スペースを有効
に活用することができます。
ソニー製リチウムイオンバッテリーパック
に対応
BP-GL65/GL95/L60S のほかに、既存のリチウムイオン
バッテリーパック BP-IL75/L40A/L60A/L90A も充電可能
です。
自己診断機能
取り付けたバッテリーパックが正常であるかどうかを診断
する機能を備えています。バッテリーパックが正常に充電
されないときは、充電インジケーターがオレンジ色と緑色
に交互に点滅して異常を知らせます。
充電量表示
バッテリーパックの充電量が 80% 未満か 80% 以上かを、
充電インジケーターの色で表示します。
gocyuui
使用上のご注意
バッテリーチャージャーについてのご注意
•周囲の温度が 0℃〜 45℃の範囲でお使いください。温度
が低いと充電しにくくなりますので、10℃〜 30℃での
充電をおすすめします。
•ほこりや腐食性ガスがある場所でのご使用、保管は避け
てください。
•直射日光があたる場所でのご使用、保管は避けてくださ
い。
•通気孔をふさがないでください。
•傾いた場所に設置しないでください。
•本機を積み重ねる場合は、2 段まででご使用ください。
バッテリーパックについてのご注意
•充電してあっても、自然に放電します。また、寿命の面
からも使用直前に充電し直してください。
•なるべく涼しいところ(0 ℃〜 23 ℃)で保管し、充電は周
囲の温度が 10℃〜 30℃の所で行ってください。
•周囲の温度が低い(5℃以下)と、バッテリーパックの
性能が低下し、バッテリーパックを使用できる時間が短
くなります。より長い時間ご使用になるために、ご使用
前にバッテリーパックを室温(約 20℃)に戻しておいて
ください。
•バッテリーパックについて詳しくは、お使いのバッテ
リーパックの取扱説明書をご覧ください。
•予備のバッテリーパックを準備しておくことをおすすめ
します。
バッテリーパックを使用できる時間が大幅に短くなった場
合は、寿命と思われます。新しいバッテリーパックをお買
い求めください。
ご注意
リチウムイオン電池は充電記憶メモリーの効果を持っていないの
で、充電の前に使いきったり放電したりする必要はありません。

各部の名称と働き
8
各部の名称と働き
aPOWER(電源)インジケーター
本機の電源が入ると点灯します。
b充電インジケーター
充電インジケーターが緑色とオレンジ色に点灯、点滅する
ことによって、充電の進行状況や結果を表示します。
オレンジ色に点滅:80% 未満の充電中
緑色に点滅:80%から 100%までの充電中
緑色に点灯:充電完了
オレンジ色と緑色に点滅:充電中に異常を検出
cスロット
バッテリーパックを差し込みます。
◆ バッテリーパックの取り付け、取りはずしについて詳しくは、
「充電する」(9 ページ)をご覧ください。
d取りはずしボタン
装着したバッテリーパックを取りはずすときに押します。
前面
後面
1POWER インジケーター
3スロット
4取りはずしボタン
6〜 ACIN 端子
7プラグホルダー受け
8POWER スイッチ
2充電インジケーター
5充電モード切り換えスイッチ

9
充電する
e充電モード切り換えスイッチ
f〜 ACIN(電源入力)端子
付属の AC電源コードを使って、電源コンセントと接続し
ます。
gプラグホルダー受け
AC 電源コードがはずれないように、付属のプラグホル
ダーを使って下図のように固定します。
hPOWER(電源)スイッチ
スイッチの ?側を押すと電源が入り、前面の POWER イン
ジケーターが点灯します。電源が入ると、スロットに装着
されているバッテリーパックの充電を開始します。
充電する
1
付属の AC電源コードを〜 ACIN端子に接続し、他端
を電源コンセントに接続する。
2
POWER スイッチの ?側を押して電源を入れる。
3
バッテリーパックを取り付ける。
充電したいバッテリーパックを下図のように取り付け
ます。4 つのスロットすべてに取り付けると、4 本の
バッテリーパックを同時に充電できます。
スロットより幅の狭いバッテリーパックを装着すると
きは、スロットの中央とバッテリーパックの中央を合
わせて差し込みます。
充電中は、充電量に応じて充電インジケーターが点滅
します。バッテリーパックを装着したスロット上部の
充電インジケーターが緑色に点灯したら、充電完了で
す。
充電が終了したら
バッテリーパックを取りはずし、POWER スイッチの a側
を押して電源を切ります。
スイッチの位置 充電モード
H フル充電する。
L フル充電時に比べて充電量は減るが、
バッテリーパックの寿命を延ばすこと
が可能。
電源コンセントへ
AC 電源コード(付属)
プラグホルダー(付属)
はずすときは
BP-GL65/GL95/L60S
カチッと音がするまで
矢印の方向に差し込む。
バッテリーパックに手を添
えながら取りはずしボタ
ンを押し、バッテリー
パックを引き抜く。

主な仕様
10
充電時間について
完全に放電したバッテリーパックのフル充電までの所要時
間は、以下のとおりです(気温 25℃で充電する場合)。
上記の充電時間で、バッテリーパック 4 本を同時に充電で
きます。
充電インジケーターについて
充電中のバッテリーパックの状態を、以下のように表示し
ます。
充電中に異常を検出すると
下記の異常が検出された場合、充電インジケーターがオレ
ンジ色と緑色に交互に点滅し、バッテリー保護のため充電
を中止します。
•充電開始後、バッテリー充電用 DC 出力電圧が規定以下に
なった(6V 以下)。
•充電開始後、バッテリー充電用 DC出力電圧が規定以上
になった(17.5V 以上)。
•充電開始後、規定時間内(2時間)にバッテリーの電圧
が規定の電圧に達しなかった。
異常が検出された場合、バッテリーパックの不良が考えら
れますので、使用を中止してください。
また、ファンが停止した場合も、同時にすべての充電イン
ジケーターがオレンジ色と緑色に交互に点滅します。
充電インジケーターは、POWERスイッチの a側を押す
か、AC 電源コードをはずすか、バッテリーパックを取り
はずすまでは点滅したままになります。
•本機で充電可能なバッテリーパック以外を取り付けても、
充電は始まりません。
•ニッケル水素バッテリーパック BP-M50/M100は、本機
では充電できません。
バッテリーパックについてのご注意
本機の性能は、適用バッテリーパック(BP-GL65/GL95/
L60S/IL75/L40A/L60A/L90A)に対してのみ保証されてい
ます。
主な仕様
一般
電源電圧 AC100V、50/60Hz
消費電力 480VA
動作温度 0 ℃〜 45 ℃
質量 5.6kg
外形寸法 435 × 124 × 235mm(幅×高さ×奥行
き)(突起、付属部含まず)
入出力
入力電力(AC) 480VA
充電電圧(DC) 16.4V(5A/3A)/16.8V(5A/3A)
( 角型 5 ピンコネクター )
付属品
オペレーションマニュアル(1)
AC 電源コード(1)
3 極→ 2 極変換プラグ(1)
プラグホルダー(1)
本機は「高調波電流規格 JISC61000-3-2 適合品」です。
本機の仕様および外観は、改良のため予告なく変更するこ
とがありますが、ご了承ください。
バッテリーパック フル充電までの所要時間
BP-GL65 約 155 分
BP-GL95 約 145 分
BP-L60S 約 150分
インジケーターの状態 充電状態
オレンジ色に点滅 充電中(充電量 80%未満)
緑色に点滅 充電中(充電量 80%以上 100%未満)
緑色に点灯 充電完了
インジケーターがオレンジ
色と緑色に交互に点滅
(「充電中に異常を検出すると」( 下記)
を参照)
ご注意
お使いになる前に、必ず動作確認を行ってください。故
障その他に伴う営業上の機会損失等は保証期間中および
保証期間経過後にかかわらず、補償はいたしかねますの
でご了承ください。

11
Before operating the unit, please read this manual
thoroughly and retain it for future reference.
Important Safety Instructions
• Read these instructions.
• Keep these instructions.
• Heed all warnings.
• Follow all instructions.
• Do not use this apparatus near water.
• Clean only with dry cloth.
• Do not block any ventilation openings. Install in
accordance with the manufacturer's instructions.
• Do not install near any heat sources such as radiators,
heat registers, stoves, or other apparatus (including
amplifiers) that produce heat.
• Do not defeat the safety purpose of the polarized or
grounding-type plug. A polarized plug has two blades
with one wider than the other. A grounding type plug
has two blades and a third grounding prong. The wide
blade or the third prong are provided for your safety. If
the provided plug does not fit into your outlet, consult an
electrician for replacement of the obsolete outlet.
• Protect the power cord from being walked on or pinched
particularly at plugs, convenience receptacles, and the
point where they exit from the apparatus.
• Only use attachments/accessories specified by the
manufacturer.
• Use only with the cart, stand, tripod, bracket,
or table specified by the manufacturer, or sold
with the apparatus. When a cart is used, use
caution when moving the cart/apparatus
combination to avoid injury from tip-over.
• Unplug this apparatus during lightning storms or when
unused for long periods of time.
• Refer all servicing to qualified service personnel.
Servicing is required when the apparatus has been
damaged in any way, such as power-supply cord or plug
is damaged, liquid has been spilled or objects have fallen
into the apparatus, the apparatus has been exposed to
rain or moisture, does not operate normally, or has been
dropped.
To reduce the risk of fire or electric shock,
do not expose this apparatus to rain or
moisture.
To avoid electrical shock, do not open the
cabinet. Refer servicing to qualified
personnel only.
WARNING
THIS APPARATUS MUST BE EARTHED.
WARNING
When installing the unit, connect the power cord to socket-
outlet which must be provided near the unit and easily
accessible.
If a fault should occur during operation of the unit,
disconnect the power cord.
WARNING
Batteries shall not be exposed to excessive heat such as
sunshine, fire or the like.
WARNING: THIS WARNING IS APPLICABLE FOR
USA ONLY.
If used in USA, use the UL LISTED power cord specified
below.
DO NOT USE ANY OTHER POWER CORD.
Using this unit at a voltage other than 120V may require
the use of a different line cord or attachment plug, or both.
To reduce the risk of fire or electric shock, refer servicing
to qualified service personnel.
WARNING: THIS WARNING IS APPLICABLE FOR
OTHER COUNTRIES.
1. Use the approved Power Cord (3-core mains lead) /
Appliance Connector / Plug with earthing-contacts that
conforms to the safety regulations of each country if
applicable.
WARNING
This symbol is intended to alert the user to
the presence of uninsulated “dangerous
voltage” within the product’s enclosure
that may be of sufficient magnitude to
constitute a risk of electric shock to
persons.
This symbol is intended to alert the user to
the presence of important operating
andmaintenance (servicing) instructions
in the literature accompanying the
appliance.
Plug Cap Parallel blade with ground pin (NEMA 5-15P
Configuration)
Cord Type SJT, three 16 or 18 AWG wires
Length Minimum 1.5m (4 ft .11in.), Less than 2.5 m
(8 ft .3 in.)
Rating Minimum 10A, 125V
English
GB

12
2. Use the Power Cord (3-core mains lead) / Appliance
Connector / Plug conforming to the proper ratings
(Voltage, Ampere).
If you have questions on the use of the above Power Cord
/ Appliance Connector / Plug, please consult a qualified
service personnel.
CAUTION
The apparatus shall not be exposed to dripping or
splashing and no objects filled with liquid, such as vases,
shall be placed on the apparatus.
CAUTION
The unit is not disconnected from the AC power source
(mains) as long as it is connected to the wall outlet, even if
the unit itself has been turned off.
For the customers in the U.S.A.
This equipment has been tested and found to comply with
the limits for a Class B digital device, pursuant to Part 15
of the FCC Rules. These limits are designed to provide
reasonable protection against harmful interference in a
residential installation. This equipment generates, uses,
and can radiate radio frequency energy and, if not installed
and used in accordance with the instructions, may cause
harmful interference to radio communications. However,
there is no guarantee that interference will not occur in a
particular installation. If this equipment does cause
harmful interference to radio or television reception,
which can be determined by turning the equipment off and
on, the user is encouraged to try to correct the interference
by one or more of the following measures:
– Reorient or relocate the receiving antenna.
– Increase the separation between the equipment and
receiver.
– Connect the equipment into an outlet on a circuit
different from that to which the receiver is connected.
– Consult the dealer or an experienced radio/TV
technician for help.
You are cautioned that any changes or modifications not
expressly approved in this manual could void your
authority to operate this equipment.
For the customers in Europe
This product with the CE marking complies with both the
EMC Directive (89/336/EEC) and the Low Voltage
Directive (73/23/EEC) issued by the Commission of the
European Community.
Compliance with these directives implies conformity to
the following European standards:
• EN60065 : Product Safety
• EN55103-1 : Electromagnetic Interference(Emission)
• EN55103-2 : Electromagnetic Susceptibility(Immunity)
This product is intended for use in the following
Electromagnetic Environment(s):
E1 (residential), E2 (commercial and light industrial), E3
(urban outdoors), E4 (controlled EMC environment, ex.
TV studio).

Table of Contents 13
Table of Contents
Overview......................................................................................... 14
Features................................................................................................ 14
Precautions.................................................................................... 14
Location and Function of Parts.................................................... 15
Charging......................................................................................... 16
Specifications ................................................................................ 17

14 Overview / Precautions
Overview
The BC-L500 Battery Charger is a tabletop-type charger
for Sony lithium-ion battery packs. It is capable of
simultaneous charging of four battery packs.
The BP-M50/M100 (nickel metal hydride battery packs)
and the BP-90A/NP-1B (nickel-cadmium battery packs)
cannot be charged with the BC-L500.
Features
Simultaneous charging of up to four
battery packs
Up to four battery packs can be inserted and charged
simultaneously.
High-speed and simultaneous charging
Four battery packs can be charged in the same amount of
time for charging only one battery pack.
Front-loading mechanism
Battery packs can be inserted and removed from the front
side of the BC-L500.
Therefore, it can be placed on the shelf, and even can be
stacked over another BC-L500.
Charging Sony lithium-ion battery packs
Besides the BP-GL65/GL95/L60S, the BC-L500 can be
used to charge the BP-IL75/L40A/L60A/L90A battery
packs.
Diagnostics functions
The BC-L500 checks inserted battery packs for
abnormalities. The charge indicator will flash in orange
and green alternately if a battery pack cannot be charged
normally.
Charge indicator
During charging, the charge indicator changes its color
according to charge amount. The color changes when
charge amount reaches 80% of full capacity.
Precautions
On the battery charger
• Use the BC-L500 in an operating environment of 0°C to
45°C (32°F to113°F). Since charging is difficult at low
temperatures, we recommend that battery packs be
charged at temperatures between 10°C and 30°C (50°F
and 86°F).
• Avoid using or storing the BC-L500 in dusty places or
places with corrosive gases.
• Avoid using or storing the BC-L500 in places exposed to
direct sunlight.
• Do not cover the ventilation holes.
• Do not place the BC-L500 on an inclined surface.
• When you place a BC-L500 on top of another BC-L500,
do not stack them over two layers.
• Place the BC-L500 at least 10 cm (4 inches) apart from
the wall.
On battery packs
• Even when fully charged, battery packs gradually lose
their charge over time. To avoid shortening the life of
battery packs, recharge them fully right before use.
• To prolong the life of battery packs, store them in a cool
place (about 0°C to 23°C (32°F to 73°F)), and charge in
a place with an ambient temperature between 10°C and
30°C (50°F and 86°F).
• When ambient temperatures are 5°C (41°F) or lower, the
performance of a battery pack suffers and the usable time
of a battery pack becomes shorter. To get the longest
usable time, warm the battery packs to room temperature
(about 20°C (68°F)) before use.
• For more information on the battery pack, refer to the
Operating Instructions supplied with the battery pack.
• Carrying a spare battery pack is recommended.
If the usable time of a battery pack becomes noticeably
short, it is time to replace it with a new one.
Note
Lithium-ion battery packs are free from memory effect.
There is no need to discharge them fully before
recharging.

15
Location and Function of Parts
aPOWER indicator
Lights up when the BC-L500 is turned on.
bCharge indicators
Indicate the progress or result of charging by flashing or
lighting in orange or green.
Flashing in orange: Charge in progress (charged less
than 80%)
Flashing in green: Charge in progress (charged 80% or
more)
On in green: Charging completed
Flashing in orange and green alternately: An
abnormality has been detected during charging.
cSlots
Insert the battery packs.
For details on inserting/removing the battery packs, see
“Charging” (page 16).
dRelease buttons
Press to remove the inserted battery packs.
eCharge mode selector
f-AC IN (AC power input) connector
Used to connect the charger to an AC outlet via the AC
power cord.
Front
Rear
1POWER indicator
2Charge indicators
3Slots
4Release buttons
5Charge mode selector
6-AC IN connector
7Plug holder receptacle
8POWER switch
Selector position Charge mode
H Batteries are charged to their full
capacity.
L Charge amount is reduced, but it
prolongs battery life.
AC power
cord
To an AC outlet

16 Charging
gPlug holder receptacle
Secure the AC power cord with the supplied plug holder as
illustrated below so that the cord will not come loose from
the charger.
hPOWER switch
Press the ?side of this switch to turn on the battery charger.
When the charger is turned on, the POWER indicator
lights up and the charging starts when the battery packs are
inserted.
Charging
1
Connect the AC power cord to the -AC IN
connector, then connect the other end of the cord to an
AC power outlet.
2
Press the ?side of the POWER switch to turn on the
battery charger.
3
Insert the battery pack.
Insert the battery pack into the slot as illustrated
below. When battery packs are inserted into all slots,
you can charge four battery packs simultaneously.
When the width of the battery pack is narrower than
the slot, be sure to match the center line of the battery
pack with that of the slot.
During charging, the charge indicator above the slot
flashes according to the charging process. When the
charge indicator lights up in green, charging is
completed.
When charging is completed
Remove the battery pack from the slot as illustrated below,
then press the aside of the POWER switch to turn off the
battery charger.
Plug holder
(supplied)
To remove the AC power cord
Insert in the direction of the
arrow until you hear a click.
BP-GL65/GL95/L60S
Press the release button
while supporting the battery
pack by hand, then pull out
the battery pack.

17
Specifications
Charging time
The time to charge a completely exhausted battery pack to
its full capacity is shown in the table below (when charging
a battery pack at a temperature of 25°C (77°F)).
Up to four battery packs can be charged simultaneously in
the amount of time shown in the table.
About the charge indicators
The charge indicators show the charging status of the
inserted battery packs, as shown in the table below.
When an abnormality is detected while
charging
When one of the following conditions is detected while
charging, the charge indicator flashes in orange and green
alternately, and charging is canceled to protect the battery
pack.
• After the start of charging, the voltage of the DC output
for battery charging has dropped below the specified
level (6 V).
• After the start of charging, the voltage of the DC output
for battery charging has exceeded the specified level
(17.5 V).
• The battery voltage did not rise to the specified level
within a specified period of time (2 hours).
When an abnormality is detected, the battery pack may be
defective. Do not use that battery pack.
When the internal fan has stopped, all charge indicators
also flash in orange and green alternately at the same time.
The charge indicator remains flashing until the aside of
the POWER switch is pressed, the AC power cord is
disconnected, or the battery pack is removed.
• When a battery pack that is not chargeable with the BC-
L500 is connected, charging does not take place.
• The BP-M50/M100 (nickel metal hydride battery packs)
cannot be charged with the BC-L500.
Note on the battery packs
Performance of the BC-L500 is guaranteed only for the
applicable battery packs (BP-GL65/GL95/L60S/IL75/
L40A/L60A/L90A).
Specifications
General
Voltage source 100-240V AC, 50/60 Hz
Current drain 480 VA
Peak inrush current
(1)Power ON, current probe method:
15 A (100 V)/34 A (240 V)
(2)Hot switching inrush currentmeasured
in accordance with European standard
EN55103-1: 18 A (230 V)
Operating temperature
0°C to 45°C (32°F to 113°F)
Mass Approx. 5.6 kg (12 lb 6 oz)
Dimensions (w/h/d)
435 × 124 × 235 mm (171/4× 5 × 93/8
inches) (excluding projecting parts)
Input/Output
Current input (AC)
480 VA
Voltage output (DC)
16.4 V (5 A/3 A)/16.8 V (5 A/3 A)
(square-shaped 5-pin connector)
Supplied accessories
Operation manual (1)
AC power cord (U.S.A. only) (1)
Plug holder (1)
Designs and specifications are subject to change without
notice.
Battery pack Charging time to full capacity
BP-GL65 About 155 minutes
BP-GL95 About 145 minutes
BP-L60S About 150 minutes
Indicator status Charging status
Flashing in orange In progress (charged less than
80%)
Flashing in green In progress (charged 80% or
more)
On in green Charging completed
Flashing in orange and
green alternately An abnormality has been
detected during charging. (For
details, see “When an
abnormality is detected while
charging” below.)
Notes

18 Specifications
Note
Always verify that the unit is operating properly before
use. SONY WILL NOT BE LIABLE FOR DAMAGES
OF ANY KIND INCLUDING, BUT NOT LIMITED
TO, COMPENSATION OR REIMBURSEMENT ON
ACCOUNT OF THE LOSS OF PRESENT OR
PROSPECTIVE PROFITS DUE TO FAILURE OF
THIS UNIT, EITHER DURING THE WARRANTY
PERIOD OR AFTER EXPIRATION OF THE
WARRANTY, OR FOR ANY OTHER REASON
WHATSOEVER.

19
Avant d’utiliser l’appareil, veuillez lire attentivement ce
manuel et le conserver pour future référence.
Afin de réduire les risques d’incendie ou
d’électrocution, ne pas exposer cet
appareil à la pluie ou à l’humidité.
Afin d’écarter tout risque d’électrocution,
garder le coffret fermé. Ne confier
l’entretien de l’appareil qu’à un personnel
qualifié.
AVERTISSEMENT
CET APPAREIL DOIT ÊTRE RELIÉ À LA
TERRE.
AVERTISSEMENT
Lors de l’installation de l’appareil, brancher le cordon
d’alimentation dans une prise murale proche de l’appareil
et facilement accessible.
En cas de problème lors du fonctionnement de l’appareil,
débrancher le cordon de la prise.
AVERTISSEMENT
Les batteries ne doivent pas être exposées à une chaleur
excessive telle qu’aux rayons du soleil, au feu, etc..
AVERTISSEMENT:
1. Utilisez un cordon d’alimentation (câble secteur à 3
fils)/fiche femelle/fiche mâle avec des contacts de mise
à la terre conformes à la réglementation de sécurité
locale applicable.
2. Utilisez un cordon d’alimentation (câble secteur à 3
fils)/fiche femelle/fiche mâle avec des caractéristiques
nominales (tension, ampérage) appropriées.
Pour toute question sur l’utilisation du cordon
d’alimentation/fiche femelle/fiche mâle ci-dessus,
consultez un technicien du service après-vente qualifié.
ATTENTION
Eviter d’exposer l’appareil à un égouttement ou à des
éclaboussures et ne placer aucun objets rempli de liquide,
comme un vase, sur l’appareil.
ATTENTION
Cet appareil n’est pas déconnecté de la source
d’alimentation secteur tant qu’il est raccordé à la prise
murale, même si l’appareil lui-même a été mis hors
tension.
Pour les clients européens
Ce produit portant la marque CE est conforme à la fois à la
Directive sur la compatibilité électromagnétique (EMC)
(89/336/CEE) et à la Directive sur les basses tensions (73/
23/CEE) émises par la Commission de la Communauté
Européenne.
La conformité à ces directives implique la conformité aux
normes européennes suivantes :
• EN60065 : Sécurité des produits
• EN55103-1 : Interférences électromagnétiques
(émission)
• EN55103-2 : Sensibilité électromagnétique (immunité)
Ce produit est prévu pour être utilisé dans les
environnements électromagnétiques suivants :
E1 (résidentiel), E2 (commercial et industrie légère), E3
(urbain extérieur) et E4 (environnement EMC contrôlé, ex.
studio de télévision).
AVERTISSEMENT
Français
FR

20 Table de matières
Table de matières
Description générale .....................................................................21
Caractéristiques ................................................................................... 21
Précautions ....................................................................................21
Emplacement et fonction des pièces...........................................22
Charge ............................................................................................23
Spécifications ................................................................................24
Table of contents
Languages:
Other Sony Batteries Charger manuals