Sony XAV-W650BT User manual

XAV-W650BT/XAV-V630BT
4-577-696-12(1)
AV Center
Owner’s Record
The model and serial numbers are located on the bottom of the
unit.
Record these numbers in the space provided below.
Refer to these numbers whenever you call upon your Sony dealer
regarding this product.
Model No.
Serial No.
To cancel the demonstration (Demo) display, see page 20.
For the connection/installation, see page 33.
Pour annuler l’affichage de demonstration (Demo), reportez-
vous a la page 22.
Pour le raccordement/l’installation, reportez-vous à la page 37.
Para cancelar la pantalla de demostracion (Demostración),
consulte la página 22.
Para la conexión/instalación, consulte la página 36.
Operating Instructions GB
Mode d’emploi FR
Manual de instrucciones ES

2GB
The nameplate indicating operating voltage, etc., is
located on the bottom of the chassis.
Warning
To prevent fire or shock hazard, do not
expose the unit to rain or moisture.
To avoid electrical shock, do not open the
cabinet. Refer servicing to qualified personnel
only.
This device complies with Part 15 of the FCC Rules
and Industry Canada’s licence-exempt RSSs.
Operation is subject to the following two
conditions:
(1) This device may not cause interference; and
(2) This device must accept any interference,
including Interference that may cause undesired
operation of the device.
This transmitter must not be co-located or operated
in conjunction with any other antenna or
transmitter.
This equipment complies with FCC/IC radiation
exposure limits set forth for an uncontrolled
environment and meets the FCC radio frequency
(RF) Exposure Guidelines and RSS-102 of the IC
radio frequency (RF) Exposure rules. This
equipment has very low levels of RF energy that is
deemed to comply without maximum permissive
exposure evaluation (MPE). But it is desirable that it
should be installed and operated keeping the
radiator at least 20 cm or more away from person’s
body.
CAUTION
The use of optical instruments with this product will
increase eye hazard. As the laser beam used in this
CD/DVD player is harmful to eyes, do not attempt
to disassemble the cabinet. Refer servicing to
qualified personnel only.
For the State of California, USA only
Perchlorate Material – special handling may apply,
See
www.dtsc.ca.gov/hazardouswaste/perchlorate
Note on the lithium battery
Do not expose the battery to excessive heat such as
direct sunlight, fire or the like.
Disclaimer regarding services offered by third
parties
Services offered by third parties may be changed,
suspended, or terminated without prior notice.
Sony does not bear any responsibility in these sorts
of situations.
For safety, be sure to install this unit in the
dashboard of the car as the rear side of the unit
becomes hot during use.
For details, see “Connection/Installation”
(page 33).
This manual contains instructions for XAV-
W650BT and XAV-V630BT.
XAV-W650BT is the model representatively used
for illustration purposes.
FOR THE CUSTOMERS IN THE USA. NOT
APPLICABLE IN CANADA, INCLUDING IN THE
PROVINCE OF QUEBEC.
POUR LES CLIENTS AUX ÉTATS-UNIS. NON
APPLICABLE AU CANADA, Y COMPRIS LA
PROVINCE DE QUÉBEC.
This equipment has been tested and found to
comply with the limits for a Class B digital device,
pursuant to Part 15 of the FCC Rules. These limits
are designed to provide reasonable protection
against harmful interference in a residential
installation. This equipment generates, uses, and
can radiate radio frequency energy and, if not
installed and used in accordance with the
instructions, may cause harmful interference to
radio communications. However, there is no
guarantee that interference will not occur in a
particular installation. If this equipment does
cause harmful interference to radio or television
reception, which can be determined by turning
the equipment off and on, the user is
encouraged to try to correct the interference by
one or more of the following measures:
Reorient or relocate the receiving antenna.
Increase the separation between the
equipment and receiver.
Connect the equipment into an outlet on a
circuit different from that to which the receiver
is connected.
Consult the dealer or an experienced radio/TV
technician for help.
You are cautioned that any changes or
modifications not expressly approved in this
manual could void your authority to operate this
equipment.
Warning if your car’s ignition has no ACC
position
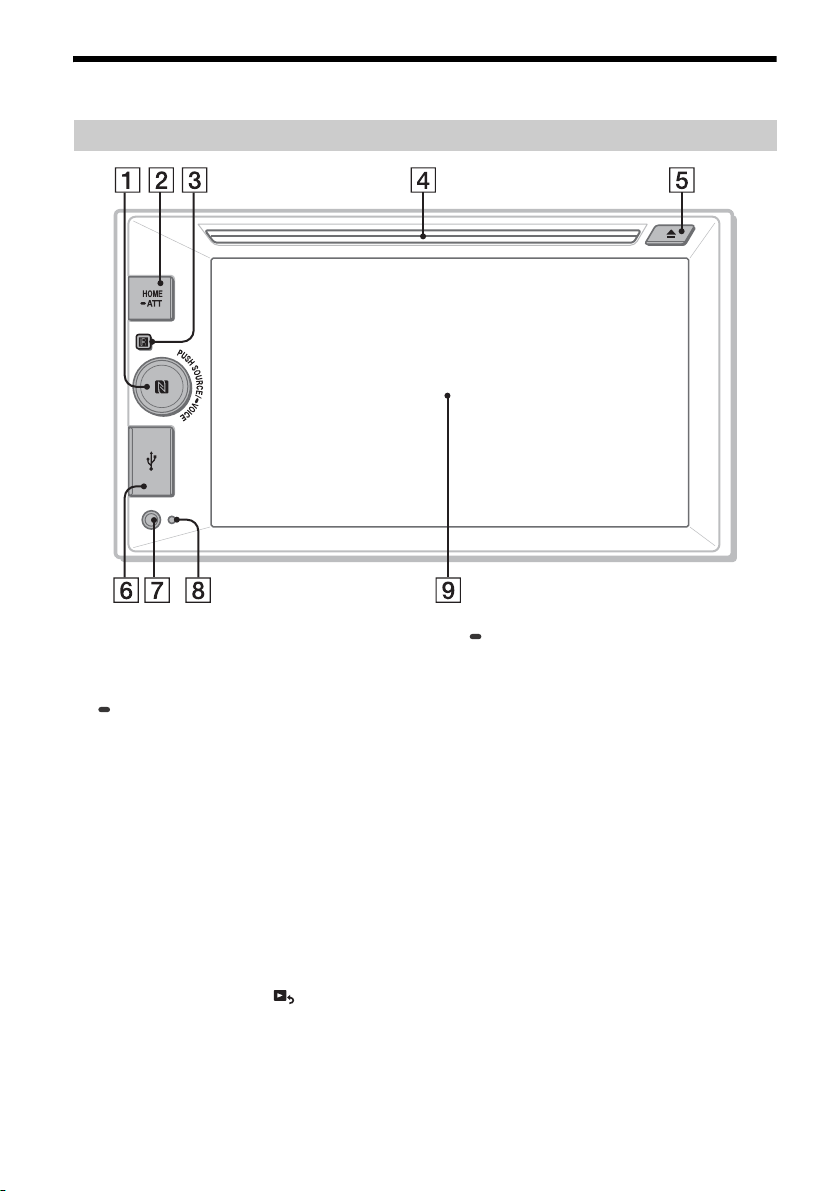
After turning the ignition off, be sure to press
and hold HOME on the unit until the display
disappears.
Otherwise, the display does not turn off and this
causes battery drain.

3GB
Caution
IN NO EVENT SHALL SONY BE LIABLE FOR ANY
INCIDENTAL, INDIRECT OR CONSEQUENTIAL
DAMAGES OR OTHER DAMAGES INCLUDING,
WITHOUT LIMITATION, LOSS OF PROFITS, LOSS OF
REVENUE, LOSS OF DATA, LOSS OF USE OF THE
PRODUCT OR ANY ASSOCIATED EQUIPMENT,
DOWNTIME, AND PURCHASER’S TIME RELATED TO
OR ARISING OUT OF THE USE OF THIS PRODUCT, ITS
HARDWARE AND/OR ITS SOFTWARE.
Dear customer, this product includes a radio
transmitter.
Please check your vehicle operation manual or
contact the manufacturer of your vehicle or your
vehicle dealer, before you install this product into
your vehicle.
Emergency calls
This BLUETOOTH car handsfree and the electronic
device connected to the handsfree operate using
radio signals, cellular, and landline networks as well
as user-programmed function, which cannot
guarantee connection under all conditions.
Therefore do not rely solely upon any electronic
device for essential communications (such as
medical emergencies).
On BLUETOOTH communication
Microwaves emitting from a BLUETOOTH device
may affect the operation of electronic medical
devices. Turn off this unit and other BLUETOOTH
devices in the following locations, as it may cause
an accident.
where inflammable gas is present, in a hospital,
train, airplane, or petrol station
near automatic doors or a fire alarm
This unit supports security capabilities that
comply with the BLUETOOTH standard to provide
a secure connection when the BLUETOOTH
wireless technology is used, but security may not
be enough depending on the setting. Be careful
when communicating using BLUETOOTH wireless
technology.
We do not take any responsibility for the leakage
of information during BLUETOOTH
communication.
If you have any questions or problems concerning
your unit that are not covered in this manual,
consult your nearest Sony dealer.
Important notice

4GB
Table of Contents
Warning . . . . . . . . . . . . . . . . . . . . . . . . . . . . . . . . . . . 2
Guide to Parts and Controls . . . . . . . . . . . . . . . . . . . 5
Getting Started
Resetting the Unit . . . . . . . . . . . . . . . . . . . . . . . . . . . 7
Setting the Clock . . . . . . . . . . . . . . . . . . . . . . . . . . . . 7
Preparing a BLUETOOTH Device. . . . . . . . . . . . . . . . 7
Connecting a USB Device . . . . . . . . . . . . . . . . . . . . . 9
Connecting Other Portable Audio/Video
Devices. . . . . . . . . . . . . . . . . . . . . . . . . . . . . . . . . 9
Connecting Rear View Camera . . . . . . . . . . . . . . . . 9
Listening to the Radio
Listening to the Radio. . . . . . . . . . . . . . . . . . . . . . . 10
Using Radio Data System (RDS) . . . . . . . . . . . . . . . 11
Playback
Playing a Disc (XAV-W650BT). . . . . . . . . . . . . . . . . 11
Playing a USB Device . . . . . . . . . . . . . . . . . . . . . . . 12
Playing a BLUETOOTH Device. . . . . . . . . . . . . . . . . 13
Searching and Playing Tracks. . . . . . . . . . . . . . . . . 13
Other Settings During Playback. . . . . . . . . . . . . . . 14
Listening to Pandora®
Setting Up Pandora®. . . . . . . . . . . . . . . . . . . . . . . . 14
Streaming Pandora® . . . . . . . . . . . . . . . . . . . . . . . . 14
Available Operations in Pandora® . . . . . . . . . . . . . 15
Handsfree Calling (via BLUETOOTH
only)
Receiving a Call . . . . . . . . . . . . . . . . . . . . . . . . . . . . 15
Making a Call . . . . . . . . . . . . . . . . . . . . . . . . . . . . . . 15
Available Operations During a Call . . . . . . . . . . . . 16
Useful Functions
SongPal with Android Phone . . . . . . . . . . . . . . . . . 17
Using Siri Eyes Free . . . . . . . . . . . . . . . . . . . . . . . . . 18
Settings
Basic Setting Operation . . . . . . . . . . . . . . . . . . . . . 19
General Settings . . . . . . . . . . . . . . . . . . . . . . . . . . . 19
Sound Settings . . . . . . . . . . . . . . . . . . . . . . . . . . . . 20
Screen Settings . . . . . . . . . . . . . . . . . . . . . . . . . . . . 20
Visual Settings. . . . . . . . . . . . . . . . . . . . . . . . . . . . . 20
Additional Information
Precautions . . . . . . . . . . . . . . . . . . . . . . . . . . . . . . . 21
Maintenance (XAV-W650BT) . . . . . . . . . . . . . . . . . 24
Specifications . . . . . . . . . . . . . . . . . . . . . . . . . . . . . 25
Troubleshooting . . . . . . . . . . . . . . . . . . . . . . . . . . . 27
Language Code List (XAV-W650BT) . . . . . . . . . . . 32
Connection/Installation
Cautions . . . . . . . . . . . . . . . . . . . . . . . . . . . . . . . . . 33
Parts List for Installation . . . . . . . . . . . . . . . . . . . . 33
Connection . . . . . . . . . . . . . . . . . . . . . . . . . . . . . . . 34
Installation . . . . . . . . . . . . . . . . . . . . . . . . . . . . . . . 36

5GB
Guide to Parts and Controls
SOURCE
Change the source. Each time it is pressed, it
displays a selectable source in a popup on the
current display.
VOICE
Press and hold to activate the voice command
function.
To assign the DSPL function to this button,
select [DSPL] in [SOURCE Key Func.] (page 20).
Volume control dial
Rotate to adjust the volume.
N-Mark
Makes a BLUETOOTH connection when touched
with an Android™ phone.
HOME
Turn on the power.
Open the HOME menu.
Press to pause playback when Disc (XAV-
W650BT), iPod/USB, BT Audio or Pandora
source is selected.
To resume playback, touch .
Press and hold for more than 2 seconds to turn
off the unit. When the unit is turned off, remote
commander operation is not available (XAV-
W650BT).
ATT (attenuate)
Press and hold for a second, but less than 2
seconds, then rotate the volume control dial to
attenuate the sound.
Receptor for the remote commander
Disc slot (XAV-W650BT)
(disc eject) (XAV-W650BT)
USB port
AUX input jack
Reset button
Display/touch panel
Main unit

6GB
The remote commander can be used to operate the
audio controls. For menu operations, use the touch
panel.
OFF
Turn the source off.
Press and hold for 2 seconds to turn off the
power and display.
MONITOR OFF
Turn off the monitor and button illumination.
To turn back on, press again.
POSITION
This button is not supported.
(return)
Return to the previous display.
Return to the menu on a Video CD (VCD) (XAV-
W650BT).
EQ (equalizer)
Select an equalizer curve.
Number buttons (0 – 9)
CLEAR
(play/pause)
/(previous/next)
/(fast-reverse/fast-forward)
DVD playback setting buttons (XAV-W650BT)
ZAP (ZAPPIN™) (page 10)
///
Select a setup item, etc.
ENTER
Enter the selected item.
MODE
Select the radio band.
VOL (volume) +/–
Remove the insulation film before use.
Playback screen:
Home screen:
RM-X170 remote commander
(XAV-W650BT)
Screen displays

7GB
Status indication
(Mega Bass)
Touch to select the Mega Bass setting; [1], [2],
[off].
(sound setting menu)
Access the sound setting menu directly
(page 20).
(option)
Open the option menu. The available items
differ depending on the source.
Clock (page 7)
When the AUX or Rear Camera source is
selected, the clock is not displayed.
Application specific area
Display playback controls/indications or show
the unit’s status. Displayed items differ
depending on the source.
(return to the playback screen)
Switch from the HOME screen to the playback
screen.
/
Move to the next/previous page (This does not
necessarily appear on the screen).
Sources and Settings select keys
Change the source or make various settings.
Resetting the Unit
You must reset the unit before operating the unit
for the first time, after replacing the car battery, or
changing connections.
Note
Pressing the reset button will erase the clock setting
and some stored contents.
Setting the Clock
1Press HOME, then touch [Settings].
2Touch , then touch [Clock Adjust].
The setting display appears.
3Touch /to set the hour and minute.
4After setting the hour and minute, touch
[Set].
The setting is complete and the clock starts.
Preparing a BLUETOOTH Device
You can enjoy music or perform handsfree calling
depending on the BLUETOOTH compatible device
such as smartphones, cellular phones, and audio
devices (hereafter “BLUETOOTH device” if not
otherwise specified). For details on connecting,
refer to the operating instructions supplied with the
device.
Before connecting the device, turn down the
volume of this unit; otherwise, a loud sound may
result.
Lights up when the sound is attenuated.
Lights up when the “SongPal”
connection is established between this
unit and your Android phone.
Lights up when the BLUETOOTH signal is
on. Flashes when the connection is in
progress.
Lights up when the audio device is
playable by enabling the A2DP
(Advanced Audio Distribution Profile).
Lights up when handsfree calling is
available by enabling HFP (Handsfree
Profile).
Indicates the signal strength status of
the connected cellular phone.
Indicates the remaining battery status of
the connected cellular phone.
Getting Started

8GB
By touching the N-Mark on the unit with an NFC*
compatible smartphone, the unit is paired and
connected with the smartphone automatically.
* NFC (Near Field Communication) is a technology
enabling short-range wireless communication
between various devices, such as mobile phones and
IC tags. Thanks to the NFC function, data
communication can be achieved easily just by
touching the relevant symbol or designated location
on NFC compatible devices.
For a smartphone with Android OS 4.0 or lower
installed, downloading of the app “NFC Easy
Connect” available at Google Play™ is required. The
app may not be downloadable in some countries/
regions.
1Activate the NFC function on the
smartphone.
For details, refer to the operating instructions
supplied with the smartphone.
2Touch the N-Mark part of the unit with
the N-Mark part of the smartphone.
Make sure that lights up on the status bar of
the unit.
To disconnect by One touch
Touch the N-Mark part of the unit with the N-Mark
part of the smartphone again.
Notes
When making the connection, handle the
smartphone carefully to prevent scratches.
One touch connection is not possible when the unit is
already connected to another NFC compatible device.
In this case, disconnect the other device, and make a
connection with the smartphone again.
When connecting a BLUETOOTH device for the first
time, mutual registration (called “pairing”) is
required. Pairing enables this unit and other devices
to recognize each other.
1Place the BLUETOOTH device within 1 m
(3 ft) of this unit.
2Press HOME, then touch [Settings].
3Touch .
4Touch [Bluetooth Connection], then set
the signal to [ON].
The BLUETOOTH signal is turned on and
lights up on the status bar of the unit.
5Touch [Pairing].
flashes while the unit is in pairing standby
mode.
6Perform pairing on the BLUETOOTH
device so it detects this unit.
7Select [XAV-xxxx] (your model name)
shown in the display of the BLUETOOTH
device.
If your model name does not appear, repeat
from step 5.
8If passkey* input is required on the
BLUETOOTH device, input [0000].
* Passkey may be called “passcode,” “PIN code,”
“PIN number,” “password,” etc., depending on the
BLUETOOTH device.
When pairing is made, stays lit.
Connecting with a smartphone by One
touch (NFC)
Pairing and connecting with a
BLUETOOTH device
[0000]
Input passkey

9GB
9Select this unit on the BLUETOOTH device
to establish the BLUETOOTH connection.
or lights up when the connection is made.
Note
While connecting to a BLUETOOTH device, this unit
cannot be detected by another device. To enable
detection, enter the pairing mode and search for this
unit from another device.
To start playback
For details, see “Playing a BLUETOOTH Device”
(page 13).
To cancel pairing
Perform step 5 to cancel the pairing mode after this
unit and the BLUETOOTH devices are paired.
To use a paired device, connection with this unit is
required. Some paired devices will connect
automatically.
1Press HOME, then touch [Settings].
2Touch [Bluetooth Connection], then
touch [ON].
Make sure that lights up on the status bar of
the unit.
3Activate the BLUETOOTH function on the
BLUETOOTH device.
4Operate the BLUETOOTH device to
connect to this unit.
or lights up on the status bar.
To connect the last-connected device from
this unit
When the ignition is turned to on with the
BLUETOOTH signal activated, this unit searches for
the last-connected BLUETOOTH device, and
connection is made automatically.
If it does not work, touch [Reconnect] to search for
the last-paired device again. If the problem is not
solved, follow the pairing procedure.
Note
While streaming BLUETOOTH audio, you cannot
connect from this unit to the cellular phone. Connect
from the cellular phone to this unit instead.
To install the microphone
For details, see “Installing the microphone”
(page 35).
Connecting a USB Device
1Turn down the volume on the unit.
2Connect the USB device to the unit.
To connect an iPod/iPhone, use the USB
connection cable for iPod (not supplied).
Connecting Other Portable
Audio/Video Devices
1Turn off the portable audio/video device.
2Turn down the volume on the unit.
3Connect the portable audio/video device
to the AUX input jack on the unit with a
connecting cord (not supplied).
4Press HOME, then touch [AUX].
To match the volume level of the connected
device to other sources
Start playback of the portable audio/video device
at a moderate volume and set your usual listening
volume on the unit:
Touch , then set [Input Level] between –10 and
+15.
To set to the device type manually
Touch , then set [AUX Input] to [Audio], [Video],
or [Auto].
Connecting Rear View Camera
By connecting the optional rear view camera to the
CAMERA IN terminal, you can display the picture
from the rear view camera. For details, see
“Connection/Installation” (page 33).
Connecting with a paired BLUETOOTH
device

10GB
Listening to the Radio
To listen to the radio, press HOME then touch
[Tuner].
Reception controls/indications
Current band
Opens the band list.
Current frequency, program service name*,
RDS indication*
* During RDS reception.
PTY (program types) (FM only)
Opens the PTY list (page 11).
ZAP (ZAPPIN)
Helps to find a desired station by listening to
preset stations for a few seconds.
(option)
Opens the option menu.
–SEEK/SEEK+
Tunes in automatically.
/
Tunes in manually.
Touch and hold to continuously skip
frequencies.
Preset numbers (1 to 6)
Selects a preset station.
Touch and hold to store the current frequency in
that preset.
1Select the desired band (FM1, FM2, FM3,
AM1, or AM2).
2Touch .
3Touch [BTM], then [Search].
The unit stores stations in order of frequency on
the preset numbers (1 to 6).
1Touch the current band.
The band list appears.
2Touch the desired band (FM1, FM2, FM3,
AM1, or AM2).
3Perform tuning.
To tune automatically
Touch –SEEK/SEEK+.
Scanning stops when the unit receives a station.
To tune manually
Touch and hold /to locate the approximate
frequency, then touch /repeatedly to fine
adjust to the desired frequency.
1While receiving the station that you want
to store, press and hold the desired
preset number (1 to 6).
1Select the band, then touch the desired
preset number (1 to 6).
Tuner Preset ZAPPIN helps you to find a desired
station by listening to preset stations for a few
seconds.
1During radio reception, touch [ZAP].
Tuner Preset ZAPPIN starts, and subsequent
stations are received in sequence.
2Touch [ZAP] again when the desired
station is received.
Listening to the Radio
Storing automatically (BTM)
Tuning
Storing manually
Receiving stored stations
Searching for the desired station from
preset stations (Tuner Preset ZAPPIN)

11GB
Using Radio Data System (RDS)
1During FM reception, touch [PTY].
To scroll the list, touch /.
2Touch the desired program type.
The unit searches for a station broadcasting the
selected program type.
To close the PTY list
Touch .
Type of programs
The CT data from the RDS transmission sets the
clock.
1Set [Clock Time] to [ON] in [General
Settings] (page 19).
Playing a Disc (XAV-W650BT)
Depending on the disc type, some operations may
be different or restricted.
1Insert the disc (label side up).
Playback starts automatically.
If a DVD menu appears
Touch the desired item in the DVD menu.
You can also use the menu control panel, which can
be displayed by touching the screen anywhere
except the DVD menu items. Touch ///to
move the cursor, then touch [ENTER] to confirm.
If the menu control panel does not appear by
touching the display, use the remote commander.
Example of playback indications (DVD)
Current source icon, format
Playback status, elapsed playback time
Chapter/title number, audio format
Touch the display if the indications are not
displayed.
For audio discs, some indications are always
displayed during playback.
Selecting program types (PTY)
News (News), Information (Information), Sports
(Sports), Talk (Talk), Rock (Rock), Classic Rock
(Classic Rock), Adult Hits (Adult Hits), Soft Rock
(Soft Rock), Top 40 (Top 40), Country (Country),
Oldies (Oldies), Soft (Soft), Nostalgia (Nostalgia),
Jazz (Jazz), Classical (Classical), Rhythm and Blues
(Rhythm and Blues), Soft R & B (Soft Rhythm and
Blues), Foreign Language (Foreign Language),
Religious Music (Religious Music), Religious Talk
(Religious Talk), Personality (Personality), Public
(Public), College (College), Weather (Weather)
Setting clock time (CT)
Playback

12GB
The PBC menu interactively assists with operations
while a PBC-compatible VCD is played.
1Start playing a PBC-compatible VCD.
The PBC menu appears.
2Touch .
The menu control panel appears.
3Touch the number keys to select the
desired item, then touch [ENTER].
4Follow the instructions in the menu for
interactive operations.
To return to the previous display
Touch .
To deactivate PBC functions
Set [Video CD PBC] to [OFF] (page 20).
Notes
During PBC playback, the track number, playback
item, etc., do not appear on the playback display.
Resume playback is unavailable during playback with
PBC.
Changing the audio language/format
When playing a DVD video, the audio language can
be changed if the disc is recorded with multilingual
tracks. You can also change the audio format when
playing a disc recorded in multiple audio formats
(e.g., Dolby Digital).
During playback, touch the screen, then .
Touch repeatedly until the desired audio
language/format appears.
Example: Dolby Digital 5.1 ch
Audio language
Audio format/channel numbers
If the same language is displayed two or more
times, the disc is recorded in multiple audio
formats.
Changing the audio channel
When playing a VCD, you can listen to both left and
right channels, right channel only or left channel
only, via both right and left speakers.
During playback, touch repeatedly until the
desired audio channel appears.
The options are indicated below.
[Stereo]: Standard stereo sound (default)
[Left]: Left channel sound (monaural)
[Right]: Right channel sound (monaural)
Playing a USB Device
In these Operating Instructions, “iPod” is used as a
general reference for the iPod functions on the iPod
and iPhone, unless otherwise specified by the text
or illustrations.
For details on the compatibility of your iPod, see
“About iPod” (page 24) or visit the support site on
the back cover.
MSC (Mass Storage Class) and MTP (Media Transfer
Protocol) type USB devices (such as a USB flash
drive, digital media player, Android phone)
compliant with the USB standard can be used.
Depending on the digital media player or Android
phone, setting the USB connection mode to MTP is
required.
Notes
For details on the compatibility of your USB device,
visit the support site on the back cover.
Playback of the following files is not supported.
MP3/WMA/AAC/FLAC:
copyright-protected files
DRM (Digital Rights Management) files
Multi-channel audio files
MP3/WMA/AAC:
lossless compression files
WAV:
Multi-channel audio files
1Connect the USB device to the USB port.
Playback starts.
If a device is already connected, press HOME
then touch [iPod/USB] to start playback.
2Adjust the volume on this unit.
To stop playback
Press SOURCE repeatedly until [OFF] appears.
To remove the device
Stop playback, then remove the device.
Caution for iPhone
When you connect an iPhone via USB, the phone
call volume is controlled by the iPhone, not the unit.
Do not inadvertently increase the volume on the
unit during a call, as a sudden loud sound may
result when the call ends.
Using PBC (playback control) functions
Configuring audio settings

13GB
Playing a BLUETOOTH Device
You can play contents on a connected device that
supports BLUETOOTH A2DP (Advanced Audio
Distribution Profile).
1Make a BLUETOOTH connection with the
audio device (page 9).
2Press HOME, then touch [BT Audio].
3Operate the audio device to start
playback.
4Adjust the volume on this unit.
Notes
Depending on the audio device, information such as
title, track number/time, and playback status may not
be displayed on this unit.
Even if the source is changed on this unit, playback of
the audio device does not stop.
To match the volume level of the BLUETOOTH
device to other sources
You can reduce the volume level differences
between this unit and the BLUETOOTH device:
During playback, touch , then set [Input Level]
between –10 and +15.
Searching and Playing Tracks
1During playback, touch (repeat) or
(shuffle) repeatedly until the desired play
mode appears.
Playback in the selected play mode may take
time to start.
Available play modes differ depending on the
selected sound source.
Note
Repeat play and shuffle play are not available for
version 2.0 VCD with the PBC function.
1During disc or USB playback, press the
number buttons on the remote
commander to enter an item (e.g., track)
number, then press ENTER on the remote
commander.
Playback starts from the beginning of the
selected point.
Note
During VCD playback, this function is available only
when playing a VCD without PBC functions.
1During disc (XAV-W650BT) or USB
playback, touch .
The list screen from the currently played item
appears.
Furthermore, touch (audio), (video), or
(photo) to list up by file type.
2Touch the desired item.
Playback starts.
Repeat play and shuffle play
Direct search play (XAV-W650BT)
Searching for a file from the list screen

14GB
Other Settings During Playback
Further settings are available in each source by
touching . The available items differ depending
on the source.
Picture EQ
Adjusts the picture quality to suit the interior
brightness of the car: [Dynamic], [Standard],
[Theater], [Sepia].
(Available only when the parking brake is
applied, and iPod/USB, Disc (XAV-W650BT), or
AUX source is selected).
Aspect
Selects an aspect ratio for the screen of the unit.
(Available only when the parking brake is
applied, and iPod/USB, Disc (XAV-W650BT), or
AUX source is selected).
Normal
Displays a picture in the 4:3 aspect ratio (regular
picture).
Wide
Displays a picture in the 4:3 aspect ratio
enlarged to the left and right edges of the
screen with overflowing parts of the top and
bottom cut off to fill the screen.
Full
Displays a picture in the 16:9 aspect ratio.
Zoom
Displays a picture in the 4:3 aspect ratio
enlarged to the left and right edges of the
screen.
DVD Audio Level (XAV-W650BT)
Adjust the audio output level between –10 and
+10 for a DVD recorded in Dolby Digital format to
balance the volume level between discs.
(Available only when Disc source is selected.)
Pandora® is available to stream music through your
iPhone and Android phone.
You can control Pandora® on a USB-connected
iPhone or BLUETOOTH-connected Android phone
from this unit.
Pandora® is only available in certain countries.
Please visit
http://www.pandora.com/legal
for more information.
Setting Up Pandora®
1Check the compatibility of your mobile
device by visiting the support site on the
back cover.
2Download the latest version of the
Pandora® application from your
smartphone’s app store. A list of
compatible devices can be found at:
www.pandora.com/everywhere/mobile
Streaming Pandora®
1Launch the Pandora® application on your
mobile device.
2Connect the mobile device with this unit.
In the case of an iPhone, connect via USB
(page 9).
In the case of Android phone, connect via the
BLUETOOTH function (page 7).
3Press HOME, then touch [Pandora].
If the device number appears
Make sure that the same numbers are displayed
(e.g., 123456) in this unit and mobile device, then
touch [OK] on this unit and confirm on the mobile
device.
To change the playback device
Touch , then select [USB] (iPhone) or [BT]
(Android phone).
Listening to Pandora®

15GB
Available Operations in
Pandora®
“Thumbs Up” or “Thumbs Down” feedback allows
you to personalize stations.
1During playback, touch (Thumbs up)
or (Thumbs down).
The station list allows you to easily select a desired
station.
1During playback, touch .
The station list appears.
2Touch the desired station name.
Playback starts.
To change the sorting order
Touch or .
To scroll the list
Touch /.
The track currently being played can be
bookmarked and stored in your Pandora® account.
1During playback, touch .
To use a cellular phone, connect it with this unit. For
details, see “Preparing a BLUETOOTH Device”
(page 7).
Receiving a Call
1Touch when a call is received.
The phone call starts.
Note
The ringtone and talker’s voice are output only from the
front speakers.
To reject/end a call
Touch .
Making a Call
1Press HOME, then touch [Phone].
2Touch one of the call icons on the
BLUETOOTH phone display.
(call history)*1
Select a contact from the call history list. The
unit stores the last 20 calls.
(redial)
Make a call automatically to the last contact
you made.
“Thumbs” feedback
Using the station list
Bookmarking
Handsfree Calling (via BLUETOOTH
only)

16GB
(phonebook)*1
Select a contact from the name list/number
list in the phonebook. To search the desired
contact in alphabetical order from the name
list, touch .
(voice command)*2*3
Say a voice tag stored on the cellular phone.
(phone number input)
Enter the phone number.
Preset numbers (1 to 6)
Select the stored contact.
To store the contact, see “Presetting phone
numbers” (page 16).
*1 The cellular phone needs to support PBAP
(Phone Book Access Profile).
*2 Do not use the voice command function on the
cellular phone while it is connected to this unit.
*3 Voice command may not work depending on the
recognition specification of the cellular phone.
For details, visit the support site on the back
cover.
3Touch .
The phone call starts.
You can store up to 6 contacts in the preset list.
1In the phone screen, select a phone
number that you want to store in the
preset dial from the phonebook, call
history, or by inputting the phone
number directly.
The confirmation display appears.
2Touch [Preset], then the desired preset
number (1 to 6).
The contact is stored to the selected preset
number.
Available Operations During a
Call
To adjust the ringtone volume
Rotate the volume control dial while receiving a call.
To adjust the talker’s voice volume
Rotate the volume control dial during a call.
To adjust the volume for the other party (Mic
gain adjustment)
During a handsfree call, touch , then set [MIC
Gain] to [Low], [Middle], or [High].
To switch between handsfree mode and
handheld mode
During a call, touch to switch the
phone call audio between the unit and cellular
phone.
Note
Depending on the cellular phone, this operation may
not be available.
To answer an incoming call automatically
Touch , then set [Auto Answer] to [ON].
Presetting phone numbers

17GB
SongPal with Android Phone
Downloading the “SongPal”
application (version 3.0 or later)
is required from Google Play.
Notes
For your safety, follow your local
traffic laws and regulations, and
do not operate the application
while driving.
Connecting an Android phone
while “SongPal” is installed to
this unit allows you to receive
notifications of your SMS or
calendar, etc. through the car speakers and control
the unit by voice command.
What you can control with “SongPal” varies
depending on the connected device.
To make use of “SongPal” features, see the details on
your Android phone.
Display images of the “SongPal” application used in
this Operating Instruction may differ with the actual
ones.
Messages of the “SongPal” application that appear on
this unit and your Android phone may differ.
For further details on “SongPal,” visit the following
URL:
http://rd1.sony.net/help/speaker/songpal/
1Make the BLUETOOTH connection with
Android phone (page 9).
2Launch the “SongPal” application.
3Press HOME, then touch [Settings].
4Touch , then set [SongPal] to
[Connect].
Connection to Android phone starts.
For details on the operations on an Android
phone, see the help section of the application.
If the device number appears
Make sure that the number is displayed (e.g.,
123456), then select “Yes” on the Android phone.
To terminate connection
Set [SongPal] to [Disconnect] in [General Settings].
Selecting the source or application
You can select a source or application not only on
your Android phone but also on this unit by
operating the Android phone.
1Show the source list of this unit on your Android
phone.
For details, refer to the operating instructions
supplied with the Android phone.
2Touch the desired source.
Announcement of various information by
voice guide
When SMS, Twitter/Facebook/Calendar
notifications, etc., are received, they are
automatically announced through the car speakers.
For details on settings, refer to the help section of
the application.
Useful Functions
Establishing the SongPal connection

18GB
Activating voice recognition
By registering applications, you can control an
application by voice command. For details, refer to
the help section of the application.
To activate voice recognition
1Press and hold VOICE to activate voice
recognition.
2Say the desired voice command into the
microphone when [Say Source or App] appears on
the Android phone.
Notes
To use this function, VOICE need to be assigned the
voice command function by selecting [Voice] in
[SOURCE Key Func.] (page 20).
Voice recognition may not be available in some cases.
Voice recognition may not work properly depending
on the performance of the connected Android phone.
Operate under conditions where noise such as engine
sound is minimized during voice recognition.
Replying a message of SMS
You can reply a message by voice recognition.
1Activate voice recognition, then input “Reply
(Reply).”
The message input display appears on the “SongPal”
application.
2Input a reply message by voice recognition.
The list of message candidates appears on the
“SongPal” application.
3Touch /to select the desired message, then
touch [Enter].
The message is sent out.
Using Siri Eyes Free
Siri Eyes Free allows you to use an iPhone
handsfree by simply speaking into the microphone.
This function requires you to connect an iPhone to
the unit via BLUETOOTH. Availability is limited to
iPhone 4s or later. Make sure that your iPhone is
running the latest iOS version.
You must complete BLUETOOTH registration and
connection configurations for the iPhone with the
unit in advance. For details, see “Preparing a
BLUETOOTH Device” (page 7).
1Activate the Siri function on the iPhone.
For details, refer to the operating instructions
supplied with the iPhone.
2Press and hold SOURCE.
The voice command display appears.
3After the iPhone beeps, speak into the
microphone.
The iPhone beeps again, then Siri starts
responding.
To deactivate Siri Eyes Free
Touch [Close].
Notes
The iPhone may not recognize your voice depending
on usage conditions. (For example, if you are in a
moving car.)
Siri Eyes Free may not function properly, or the
response time may lag in locations where iPhone
signals are difficult to receive.
Depending on the iPhone’s operating condition, Siri
Eyes Free may not function properly, or may quit.
If you play a track with an iPhone using the
BLUETOOTH audio connection, when the track starts
playback via BLUETOOTH, Siri Eyes Free automatically
quits and the unit switches to the BLUETOOTH audio
source.
When Siri Eyes Free is activated during audio
playback, the unit may switch to the BLUETOOTH
audio source even if you do not specify a track to play.
When connecting the iPhone to the USB port, Siri Eyes
Free may not function properly, or may quit.
When connecting the iPhone to the unit via USB, do
not activate Siri with the iPhone. Siri Eyes Free may
not function properly, or may quit.
There is no audio sound while Siri Eyes Free is
activated.

19GB
Basic Setting Operation
You can set items in the following setup categories:
General Settings
Sound Settings
Screen Settings
Visual Settings
1Press HOME, then touch [Settings].
2Touch one of the setup category icons.
The items that can be set differ depending on
the source and settings.
3Touch /to select the desired item.
To return to the previous display
Touch .
To switch to the playback screen
Touch .
General Settings
Language
Selects the display language: [English],
[Español], [Русский].
Time Format
Changes the time format: [12-hour], [24-hour].
Clock Time
Sets the clock time by the RDS data: [OFF], [ON].
Clock Adjust
Sets the clock time manually.
(Available only when [Clock Time] is set to [OFF].)
Beep
Activates the operation sound: [OFF], [ON].
Dimmer
Dims the display: [OFF], [ON], [Auto].
([Auto] is available only when the illumination
control lead is connected, and works when the
head light is turned on.)
Dimmer Level
Adjusts the brightness level when the dimmer is
activated: –5 to +5.
Touch Panel Adjust
Adjusts the touch panel calibration if the
touching position does not correspond with the
proper item.
Output Color System
Changes the color system according to the
connected monitor (SECAM is not supported):
[NTSC], [PAL].
(Available only when no source is selected.)
Camera Input
Selects the image from the rear view camera:
[Normal], [Reverse] (mirror image), [OFF].
Steering Control
Selects the input mode for the connected
remote control. To prevent a malfunction, be
sure to match the input mode with the
connected remote control before use.
Custom
Input mode for the steering wheel remote
control (Automatically selected when [User
Defined] is complete.).
Preset
Input mode for the wired remote control
excluding the steering wheel remote control.
User Defined
The steering button panel appears.
Press and hold the button you want to assign
to the steering wheel.
The button on the panel lights up (standby).
Press and hold the button on the steering
wheel you want to assign the function to.
The button on the panel changes to blue
(registration complete).
To register other functions, repeat steps
and .
(Available only when [Steering Control] is set to
[Custom].)
Notes
While making settings, only button operation on
the unit is available. For safety, park your car
before making this setting.
If an error occurs while registering, all the
registered information is cleared. Restart
registration from the beginning.
This function may not be available on some
vehicles. For details on the compatibility of your
vehicle, visit the support site on the back cover.
Bluetooth Connection
Activates the BLUETOOTH signal: [OFF], [ON],
[Pairing] (enters into pairing standby mode).
Bluetooth Device Info
Displays the information of the device
connected to the unit by touching [Open].
(Available only when [Bluetooth Connection] is
set to [ON])
Bluetooth Reset
Initializes all BLUETOOTH-related settings such
as pairing information, call history, preset dial,
history of connected BLUETOOTH devices, etc.
Settings

20GB
SongPal
Establishes or terminates the “SongPal” function
(connection): [Connect], [Disconnect].
SOURCE Key Func.
Assigns the voice command function or the
display menu to the SOURCE button: [Voice],
[DSPL].
Rear View Camera (XAV-W650BT)
Adjusts the length and/or position of the marker
lines on the picture from the rear view camera
by touching [Line Edit].
Sound Settings
Mega Bass
Reinforces bass sound in synchronization with
the volume level: [1], [2], [OFF].
EQ5/Subwoofer
Selects an equalizer curve and adjusts the
subwoofer level.
EQ5
Selects the equalizer curve: [Country], [Soul],
[Electronica], [R&B], [Pop], [Rock], [Hip-Hop],
[Jazz], [Dance], [Custom], [OFF].
[Custom] adjusts the equalizer curve: –8 to +8.
Subwoofer
Adjusts the volume level of the subwoofer:
[OFF], –10 to +10.
Balance/Fader
Adjusts the balance/fader level.
Balance:
Adjusts the sound balance between the left and
right speakers: L15 to R15.
Fader:
Adjusts the sound balance between the front
and rear speakers: Front 15 to Rear 15.
Crossover
Adjusts the cut-off frequency and subwoofer
phase.
High Pass Filter
Selects the cut-off frequency of the front/rear
speakers: [63Hz], [100Hz], [120Hz], [150Hz],
[180Hz], [OFF].
Low Pass Filter
Selects the cut-off frequency of the subwoofer:
[OFF], [55Hz], [85Hz], [120Hz], [160Hz].
Subwoofer Phase
Selects the subwoofer phase: [Normal],
[Reverse].
Screen Settings
Demo
Activates the demonstration: [OFF], [ON].
Wallpaper
Changes the basis color of the background by
touching the desired color.
Visual Settings
Available only when no source is selected.
DVD Menu Language (XAV-W650BT)
Selects the default language for the disc’s
menu: [English], [Chinese], [German], [French],
[Italian], [Spanish], [Portuguese], [Dutch],
[Danish], [Swedish], [Finnish], [Norwegian],
[Russian], [Other].
DVD Audio Language (XAV-W650BT)
Selects the default language for the soundtrack:
[English], [Chinese], [German], [French], [Italian],
[Spanish], [Portuguese], [Dutch], [Danish],
[Swedish], [Finnish], [Norwegian], [Russian],
[Other].
DVD Subtitle Language (XAV-W650BT)
Selects the default subtitle language for DVD:
[English], [Chinese], [German], [French], [Italian],
[Spanish], [Portuguese], [Dutch], [Danish],
[Swedish], [Finnish], [Norwegian], [Russian],
[Other].
Monitor Type
Selects an aspect ratio suitable for the unit and
connected monitor.
(Available only while the source is off and the
clock is displayed.)
16:9
Displays a wide picture. Suitable when
connecting to a wide-screen monitor or a
monitor with a wide mode function.
Letterbox
Displays a wide picture with bands on the upper
and lower positions of the screen. Suitable when
connecting to a 4:3 screen monitor.
Pan Scan
Displays a wide picture on the entire screen and
automatically cuts off the portions that do not
fit.
Video CD PBC (XAV-W650BT)
Activates PBC functions when playing back a
VCD: [OFF], [ON].
Other manuals for XAV-W650BT
4
This manual suits for next models
1
Table of contents
Languages:
Other Sony Media Player manuals

Sony
Sony XDS-PD1000C User manual

Sony
Sony NSP-1 Operation instructions

Sony
Sony Network Walkman NW-HD3 User manual

Sony
Sony HAP-Z1ES User manual

Sony
Sony DSX-A400BT User manual

Sony
Sony LocationFree LF-PK1 User manual

Sony
Sony VAIO Music Clip MC-P10 User manual

Sony
Sony HCD-C450 - Bookshelf System User manual

Sony
Sony WALKMAN NW-ZX507 User manual

Sony
Sony DSX-A55BT User manual