This
instruction
manual
covers
the
P'S-LX55
and
the
PS-LX55C.
The
PS-LX55
is
not
supplied
with
a
cartridge,
while
the
PS-LX55C
is
supplied
with
a
VL-45G
cartridge.
When
differences
occur,
they
are
clearly
described
in
the
ap-
propriate
section.
OWNER’S
RECORD
The
model
and
serial
numbers
are
located
at
the
rear.
Record
these
numbers
in
the
spaces
proviced
below.
Refer
to
them
whenever
you
call
upon
your
Sony
dealer
regarding
this
product.
Model
No.
Serial
No.
WARNING
To
prevent
fire
or
shock
hazard,
do
not
ex-
pose
the
unit
to
rain
or
moisture.
RISK
OF
ELECTRIC
SHOCK
DO
NOT
OPEN
CAUTION:
TO
REDUCE
THE
RISK
OF
ELECTRIC
SHOCK,
DO
NOT
REMOVE
COVER
(OR
BACK).
NO
USER-SERVICEABLE
PARTS
INSIDE.
REFER
SERVICING
TO
QUALIFIED
SERVICE
PERSONNEL
This
symbol
is
intended
to
alert
the
user
to
the
presence
of
uninsulated
“dangerous
voltage”
within
the
2roduct’s
enclosure
that
may
be
of
sufficient
magnitude
to
constitute
a
risk
of
elec-
x
tric
shock
to
persons.
This
symbol
is
intended
to
alert
the
user
to
the
presence
of
important
operating
and
mainte-
nance
(servicing)
instructions
in
the
literature
\
accompany
ng
the
appliance.
TABLE
OF
CONTENTS
Features
Ati
ced
evscistniuneestees
cian
ised
a
ealahoe
mee
un
ee
od
3
Precautions:
.acteseo-viotitaeurdes
iata
lweiostvcn
acd
deus
deeds
Sea
hls
3
Cartridge
Installation:
.oncccscisssnagsievecsaeed
epeses
teuciecdssbgemcangea
ts
4
TUrntable
ASSEMBLY
woes
sccsc
svese
cy
eeawee
den
caetes
sesmaerae
vaneed
oederas
4
Location
and
function
of
ControlS
00.0.0...
cece
cece
cence
nent
eee
ee
es
5
GONMECTIONS
feo
ste
fase
faite
caentaas
sate
be
cust
ennae
manda
nel
cd
pageey
aie
6
Record:
playing
asi
css
oc
sciieint
vaduoaa
eich
isa
unea
eles
tana
seeder
a
ena
thes
7
Preparation
Auto
play
To
begin
record
play
at
a
particular
point—Manual
play
To
move
to
a
different
part
of
a
record
while
the
record
is
playing
To
lift
up
the
stylus
during
play
To
stop
during
play
To
repeat
play
TIPS
ON
rECOrd
NANGING
ee
eee
eee
e
eee
e
et
eens
eee
ee
ete
cette
nee
ees
8
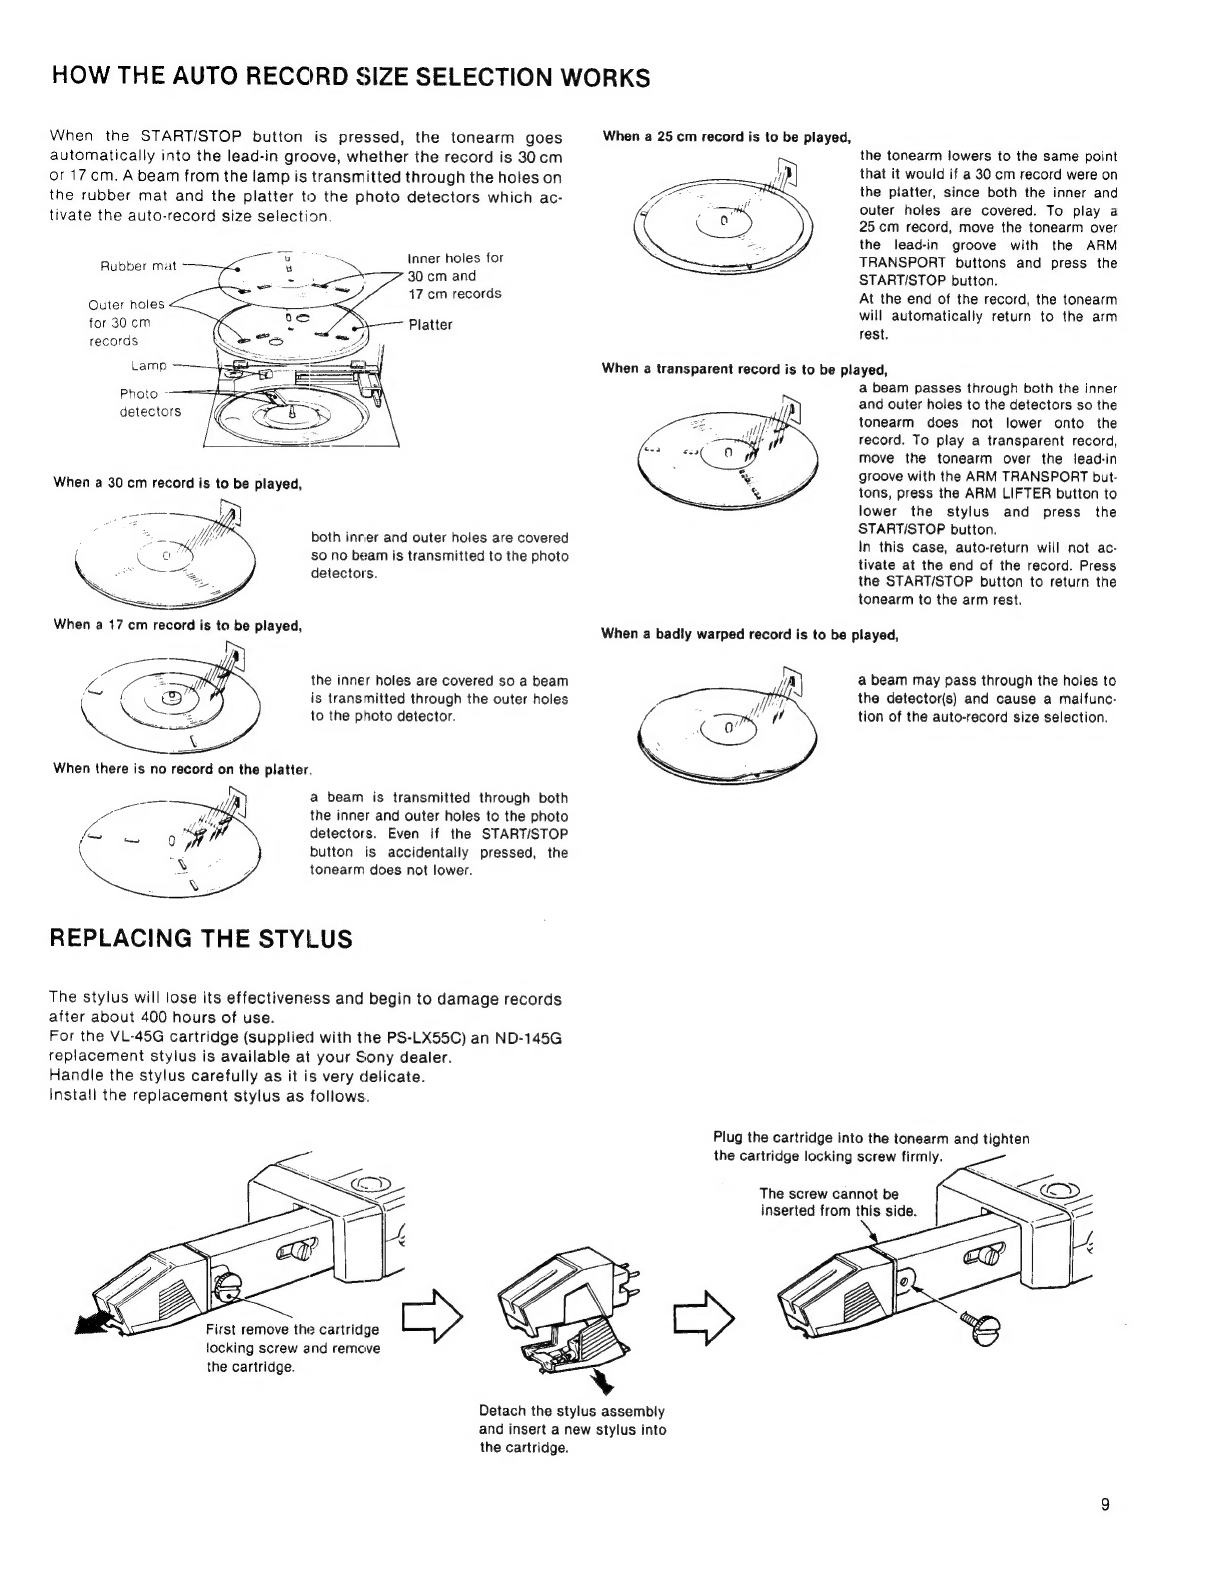
How
the
auto
record
size
selection
WOrKS
.............ececeeeeneeeee
ees
9
Replacingthe
stylus:
cceq
a.
cotssanetcsanedsasana
et
cee
hanna
anieiaas
353
9
Tracking
force
fine
adjUStMeNt
...........
cee
ceceseee
eens
teen
enea
snes
10
Synchronized
play
of
the
turntable
and
a
cassette
deck
............
10
Maintenance
cd
di
sngeceniiancuaass
ches
centouaeineasaeseeae
soutien
1
SPECIFICATIONS
sh2
ges
ci
seks
vices
vcasie
Stvale
uceriit
caleiceteras
etineaanag
v4
tetia
cies
a
Trouble
Checks:
siscvlencicuoctiale
sain
deco
icaede
ev
hee
barnees
back
cover