Sony TU-1040E User manual

English Français Deutsch Español Italiano 中文
TVTuner Unit
TU-1040E
3-757-924-44 (1)
1993 Sony Corporation
Operating Instructions
Before operating the unit, please read this manual
thoroughly and retain it for future reference.
Mode d’emploi
Avant la mise en service de cet appareil, prière de lire
attentivement ce mode d’emploi et de le conserver pour
toute référence ultérieure.
Bedienungsanleitung
Vor lnbetriebnahme des Geräts lesen Sie bitte diese
Anleitung aufmerksam durch und bewahren Sie sie zum
späteren Nachschlagen gut auf.
Manual de instrucciones
Antes de emplear la unidad, lea detenidamente este manual
de instrucciones, y consérvelo para futuras referencias.
Istruzioni per l’uso
Prima di usare l’apparecchio, leggere con attenzione questo
manuale e conservarlo per riferimenti futuri.

2
Precautions
On safety
• Operate the unit on 110-240 V AC or 12 V DC.
For the battery operation, use only the Sony NP-1B battery pack
(not supplied). Do not use any other batteries.
• Should any solid object or liquid fall into the cabinet, unplug the
unit and have it checked by qualified personnel before operating
it further.
• Unplug the unit from the wall outlet if it is not to be used for
several days or more.
• To disconnect the AC power cord, pull it out by grasping the
plug. Never pull the cord itself.
On installation
• Allow adequate air circulation to prevent internal heat build-up.
Do not place the unit on surfaces (rugs, blankets, etc.) or near
materials (curtains, draperies) that may block the ventilation
holes.
• Do not install the unit in a location near heat sources such as
radiators or air ducts, or in a place subject to direct sunlight,
excessive dust, mechanical vibration or shock.
On cleaning
Clean the unit with a slightly dampened soft cloth. Use a mild
household detergent. Never use strong solvents such as thinner or
benzine as these might damage the finish of the cabinet.
As a safety precaution, unplug the unit before cleaning it.
On repacking
Retain the original carton and packing materials for safe transport
of this unit in the future.
If you have any questions about this unit, contact your authorized
Sony dealer.
Features ........................................................................................ 2
Locations and Functions of Parts and Controls ..................... 3
Front ....................................................................................... 3
Rear......................................................................................... 4
Side ......................................................................................... 4
Power Sources ............................................................................. 5
Presetting Channels.................................................................... 6
Specifications ............................................................................... 7
Table of ContentsWARNING
To prevent fire or shock hazard, do not
expose the unit to rain or moisture.
To avoid electrical shock, do not open the cabinet. Refer
servicing to qualified personnel only.
For the customers in Europe
This product with the CE marking complies with both the
EMC Directive (89/336/EEC) and the Low Voltage
Directive (73/23/EEC) issued by the Commission of the
European Community.
Compliance with these directives implies conformity to the
following European standards:
• EN60065: Product Safety
• EN55103-1: Electromagnetic Interference (Emission)
• EN55103-2: Electromagnetic Susceptibility (Immunity)
This product is intended for use in the following
Electromagnetic Environment(s):
E1 (residential), E2 (commercial and light industrial), E3
(urban outdoors) and E4 (controlled EMC environment, ex.
TV studio).
This product is designed for operation in the
environments E1 to E4. During EMC stress at 34 – 38
MHz and 54 – 61 MHz, the performance (evaluated
according to ITU/R 562-3 and ITU/R 500-4) may
degrade from Level 5 toLevel 1.
Without the EMC Stress, all performance will recover to
full function.
English
Features
Automatic programming
You can automatically preset all receivable channels in your area
with the automatic programming function. Manual programming is
also available (See page 6).
Combined with a monitor
By using the Sony MB-512 bracket (not supplied), the tuner can be
easily combined with a Sony video monitor (9 inch or 6 inch). For
details, see the instruction manual of the MB-512.
Battery operation
The tuner can operate with a battery pack (See page 5).
Remote contorol
The tuner allows you to control your TV and other Sony equipment
with one remote commander via the CONTROL S jacks.
EIA standard 19-inch rack mounting
By using the Sony MB-510 mounting bracket (not supplied), the
tuner can be mounted in EIA standard 19-inch rack. For details on
mounting, see the instruction manual of the MB-510.

3
English
Front
Location and Function of Par
ts and Controls
1Programme indicator
Indicates the selected channel number.
2AFT indicator
When the AFT (automatic fine tuning) circuit is
activated, the indicator lights up.
3POWER indicator
When the tuner is turned on, the indicator lights up. The
POWER indicator also functions as the battery indicator.
When the internal battery becomes weak, the indicator
flashes.
4MEMORY button
Use this button to add or erase a channel in the channel
scan memory.
5FINE button
Press this button for a few seconds to fine tune the
channel.
6SYSTEM button
Use this button to select the TV system.
7CATV button
Press this button to select CATV.
80-9 buttons
Use these buttons to select a channel.
9ENTER button
Press this button to decide the selected channel.
To select channel 14, for example, press 1n4nENTER.
!º PROGRAM +/–
MEMORY ADD/ERASE buttons
Use these buttons to scan channels, to add/erase
channels in the channel scan memory, or to adjust the
fine tuning.
!¡ POWER switch
Depress to turn the tuner on.
1
4
7
0
3
6
9
ENTER
2
5
8
ADD
MEMORY
ERASE
POWER
AFT
CATV
SYSTEM
MEMORY
PROGRAM POWER
ON
OFF
FINE
POWER

4
Rear
Connections
to video input
to audio input
to TV
antenna
TV antenna
Although you can use either an indoor or outdoor antenna
with the tuner, an outdoor antenna will provide you with
better picture quality. You can receive cable TV by
connecting a cable supplied by your local cable company.
Side
DC 12 V IN jack (XLR, 4pin)
Connect the Sony AC-550CE AC adaptor (not supplied).
Location and Function of Par
ts and Controls
1BATTERY compartment
Insert the NP-1B battery pack (not supplied).
2EJECT button
Push the button to remove the battery pack.
3AC IN socket
Connect the AC power cord (supplied) to the socket and
to a wall outlet.
4VIDEO output connector (BNC)
Connect to the video input of a monitor.
5CONTROL S IN/OUT connectors (stereo mini jack)
IN: To control the tuner with the remote commander
of other Sony equipment. Connect the CONTROL
S output of the equipment to this jack.
OUT: To control other Sony equipment with the tuner's
remote commander. Connect the CONTROL S
input of the equipment to this jack.
Note
Be sure to use stereo mini plug cables for CONTROL S
connection. Other types of cables may prevent correct
control.
6AUDIO output connector (phono jack)
Connect to the audio input of a monitor.
7(VHF/UHF) antenna connector
Connect the antenna cable.
DC 12 V IN jack
DC 12V IN
to CONTROL S output
to CONTROL S input
BATTERY
EJECT AC IN
VIDEO AUDIO
LINE OUT
CONTROL S
IN OUT
BATTERY
EJECT
AC IN
VIDEO AUDIO
LINE OUT
CONTROL S
IN OUT

5
English
Power Sources
House Current
Connect the AC power cord (supplied) to the AC IN socket
and to a wall outlet.
When the AC power cord is plugged into the AC IN socket,
the battery pack (if installed) will automatically be
disconnected.
Slide the AC plug holder over the cord until it connects
with the attached holder.
Plug the power cord into the AC IN socket. Then, attach the
AC plug holder (supplied) on top of the AC power cord.
12
AC plug
holder
EJECT button
SONY mark downwards
NP-1B
(not supplied)
to a wall outlet
to AC IN
To connect the AC power cord securely with the AC plug holder
To remove the AC power cord
Pull out the AC plug holder by squeezing the left and right sides.
Rechargeable Battery
The tuner can operate with the NP-1B battery pack (not
supplied).
AC power plug
To conserve the battery
While pressing the MEMORY button, press the 2 button.
The channel number on the program indicator disappears
and the tuner goes into the energy saving mode.
To return to the normal mode, repeat the same procedure.
Notes
•Make sure that the AC power cord is disconnected from
the tuner. Otherwise, the tuner cannot operate on the
battery pack.
•The tuner can not charge the battery. For charging, use the
battery charger (not supplied).
DC 12V IN jack
Connect DC 12V power source to the DC 12V IN jack.
Use AC-550CE AC adaptor (not supplied) to connect this
jack to a wall outlet.
BATTERY
EJECT
AC IN
VIDEO AUDIO
LINE OUT
CONTROL S
IN OUT
VIDEO AUDIO
LINEOUT
CONTROL S
IN OUT
ACIN
EJECT
BATTERY
VIDEO
LINEOUT
CONTROL S
IN OUT
ACIN
EJECT
BATTERY
AUDIO
VIDEO AUDIO
LINEOUT
CONTROL S
IN
OUT
AC IN
EJECT
BATTERY

6
Presetting Channels
Automatic and manual programming are available.
Automatic programming presets receivable channels
automatically from the lowest frequency to the highest.
With manual programming, the active channels can be
preset in any desired sequence.
Automatic Programming
While pressing the MEMORY button, press the 1 button.
All receivable channels will be tuned in and memorized
automatically from the lowest-frequency channel to the
highest. When no more channels can be found, the
programming mode will be automatically released and the
lowest channel number will appear on the programme
indicator.
Notes
• The channels previously preset will not remain in the
tuner’s memory.
• Do not press the MEMORY ADD/ERASE buttons or turn
the tuner off while automatic programming. The channel
scan memory may be erased.
Manual Programming
To add desired channels
1Press the 0-9 buttons and ENTER to select the channel
you want to add in the channel scan memory.
For example, to select channel 25, press 2, 5 and ENTER.
2While pressing the MEMORY button, press the ADD
button.
“Add” appears on the programme indicator and the
channel is added in the channel scan memory.
Repeat steps 1 and 2 to add other channels.
To erase unnecessary channels
1Press the PROGRAM +/– buttons to select the channel
you want to erase.
2While pressing the MEMORY button, press the ERASE
button.
“---” appears on the programme indicator and the
channel is erased from the channel scan memory. The
next time you press the PROGRAM +/– buttons, the
channel you erased will be skipped.
To erase other channels, repeat steps 1 and 2.
To clear the channel settings
While pressing the MEMORY button, press the 3 button.
The tuner will restore the factory settings.
Fine Tuning
If the picture of a particular channel is not clear, fine-tuning
of the channel may improve it.
1Keep pressing the FINE button for a few seconds.
The AFT indicator flashes.
2Keep pressing the PROGRAM + or – button until the
picture and sound becomes clearer.
3Press the FINE button.
The next time you select this channel, the AFT will be
disactivated and the AFT indicator will not light up.
Notes
• If you do not press the PROGRAM +/– button within a
few seconds after step 2, the tuner will return to its status
in step 1.
• To reset a manually tuned channel to automatic fine
tuning, following “Manual Programming” on this page,
erase the channel once and add the channel again.
Selecting the TV system
Select the proper TV system that can be received in your
area. Each time you press the SYSTEM button, “S-1” - “S-
6” appears on the programme indicator.
System Selector
S-1
S-2
S-3
S-4
S-5
S-6
TV System
B/G/H
L
I
D/K
D/K
B/G
Countries
Germany, Italy, Spain,
Belgium, Switzerland,
Austria, Netherlands,
Sweden, Denmark, Norway,
Finland, etc. (West Europe)
Iran, Iraq, Saudi Arabia, etc.
(Middle East)
Indla, Indonesia, Malaysia,
Singapore, etc.
France, Luxemburg, etc.
United Kingdom, Ireland,
Hong Kong, South Africa,
etc.
Russia, Ukraine, Slovak
Republic, Poland, Hungary,
etc. (East Europe)
China
Australia, New Zealand
Notes
•If more than one TV system can be received in your area,
select the main TV system of the area. All receivable
channels can be preset in the selected TV system.
•Wrong setting of the TV system causes the distorted, or
noisy sound, or abnormal color.

7
English
Specifications
Television system B/G, D/K, I, L
Channel coverage See “Receivable Channels and
Channel Displays” below.
Antenna 75 - Ωexternal antenna terminal for
VHF/UHF
VIDEO output BNC connector
1 V p-p, 75 Ω, sync negative
AUDIO output phono jack
less than 5 kΩ, –5 dBu
CONTROL S IN/OUT connectors
stereo mini jacks
Power consumption 15 W at AC operation
10 W at DC operation
Power requirements 110 – 240 V AC, 50/60 Hz
12 V DC with AC-550CE AC adaptor
(not supplied),
NP-1B battery pack (not supplied)
Peak inrush current
(1) Power ON, current probe method: 4.8A (230V)
(2) Hot switching inrush current, measured in
accordance with European standard
EN55103-1: 4.7A (230V)
Operating temperature
0 – 35°C
Storage temperature –10 – +40°C
Humidity 0 – 90 %, without condensation
Dimensions 212 x 49.3 x 361 mm (w/h/d)
(8 3/8x 2 x 14 1/4inches)
Mass 2.05 kg (4 lb 8 oz)
Supplied Accessories AC power cord (1)
AC plug holder (1)
Operating Instructions (1)
Accessories (not supplied)
Battery Case DC-640
Battery Pack BP-90A
(used with DC-640)
VHF/UHF Indoor Antenna kit
AN-1040E
Mounting Bracket MB-510/512
Battery Pack NP-1B
Car Battery Cord DCC-XLR4
Design and specifications are subject to change without
notice.
Receivable Channels and Channel Displays
Receivable channels Indication on the screen
PAL B/G/H E2..12 21..69 2 3 4..12 21..69
CABLE TV (1) S1..41 C1 C2..C41
CABLE TV (2) S01..S44 C1..C44
ITALIA A B C D E F G H 13..20
SECAM D/K R01..R12 R21..R60 2..12 21..60
SECAM L F2..F10 F21..F69 1..12 21..69
PAL I IRE A..IRE I UK21..UK69 1..9 21..69

2
Caractéristiques .......................................................................... 2
Emplacement et fonctions des pièces et des commandes..... 3
Avant ...................................................................................... 3
Arrière .................................................................................... 4
Côté......................................................................................... 4
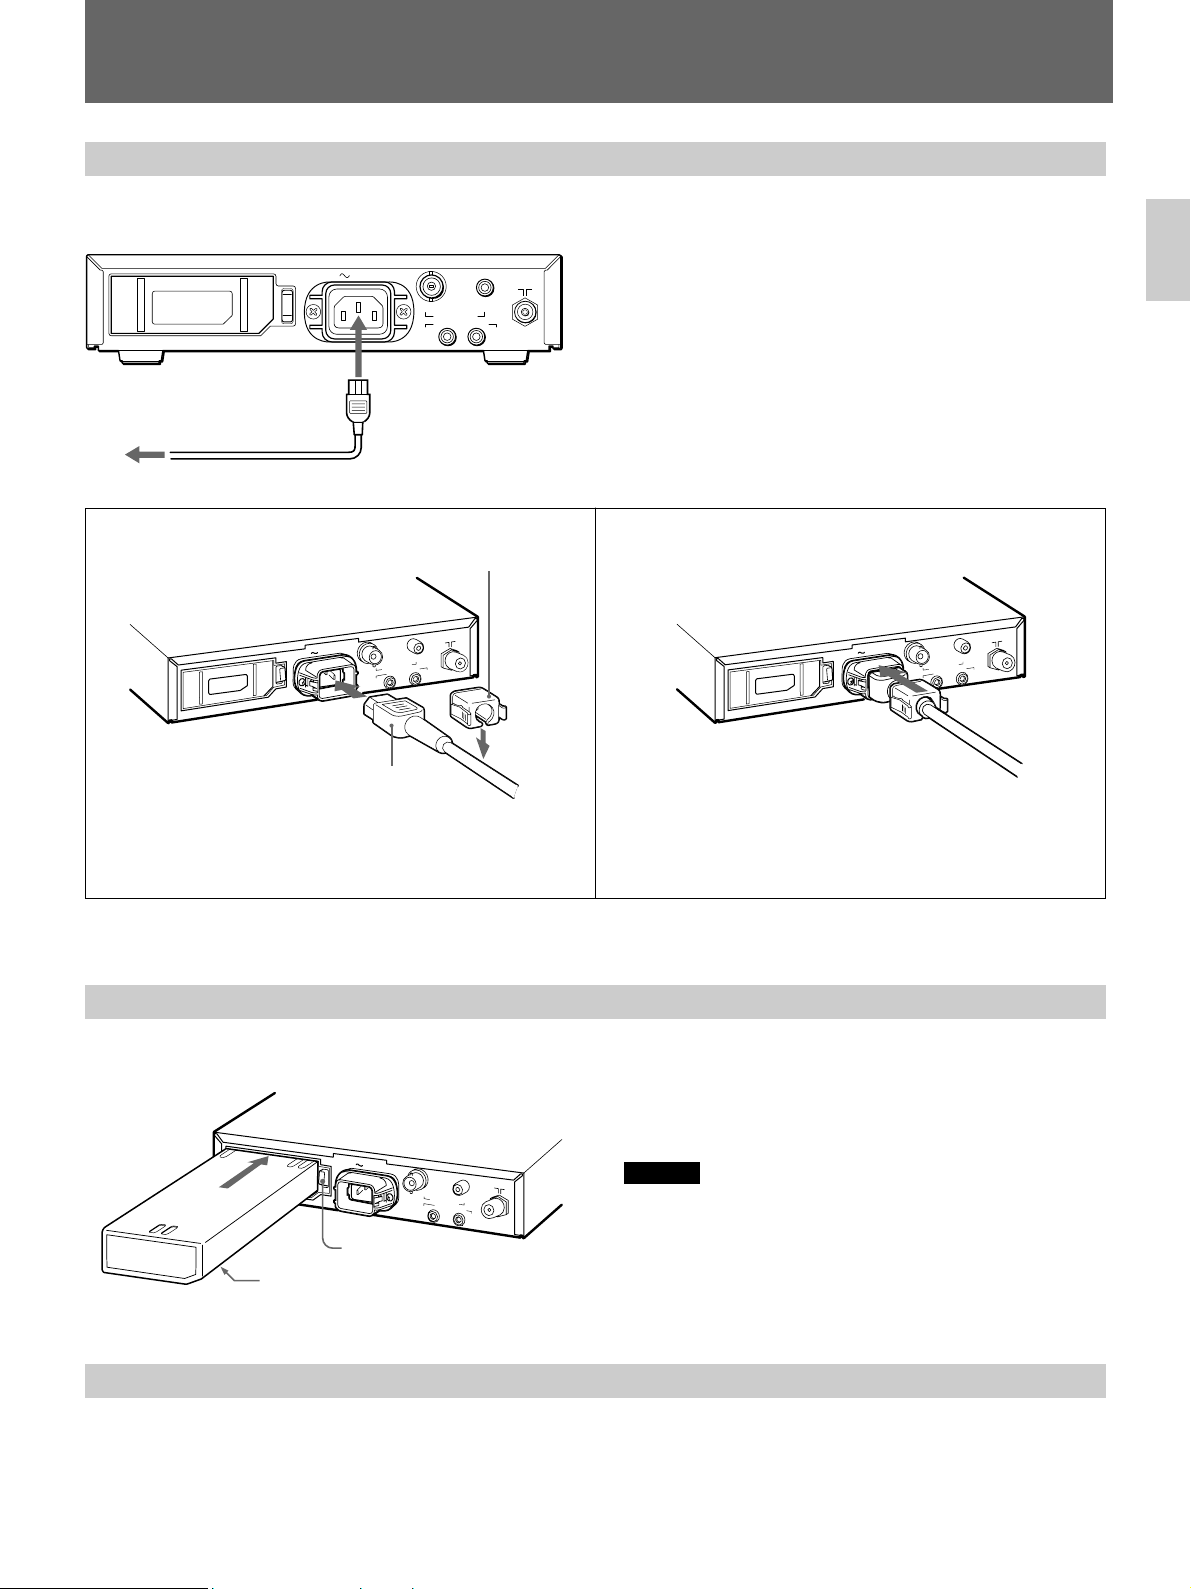
Alimentations .............................................................................. 5
Réglage des canaux .................................................................... 6
Spécifications ............................................................................... 7
Table des matières
AVERTISSEMENT
Précautions
Sécurité
•L’appareil utilise une alimentation 110 - 240 V CA ou 12 V CC.
Pour une alimentation sur piles, employez uniquement le bloc de
piles Sony NP-1B (non fourni). N’employez pas d’autres piles.
•Si un liquide ou un corps solide venait àpénétrer dans le boîtier,
débranchez l’appareil et faites-le contrôler par un personnel
qualifiéavant de continuer àl’utiliser.
•Débranchez l’appareil de la prise murale s’il reste inutilisé
pendant plusieurs jours ou plus longtemps.
•Pour débrancher l’appareil, tirez sur la fiche, jamais sur le cordon
d’alimentation.
Installation
•Prévoyez une circulation d’air suffisante pour éviter une
augmentation de la température interne. N’installez pas l’appareil
sur des surfaces (tapis, couvertures, etc.) ni près de matériaux
(rideaux, tentures) susceptibles d’obturer les orifices de
ventilation.
•N’installez pas l’appareil àproximitéde sources de chaleur
comme des radiateurs, des bouches de chauffage ou dans un
endroit exposéàla lumière directe du soleil, àune poussière
excessive, àdes vibrations ou des chocs mécaniques.
Nettoyage
Nettoyez l’appareil avec un linge doux légèrement humidifié.
Utilisez un détergent ménager doux. N’employez jamais de
solvants puissants comme du diluant ou de l’essence, car ceux-ci
risquent d’endommager la finition du boîtier.
Par mesure de précaution, débranchez l’appareil avant de le
nettoyer.
Réemballage
Conservez le carton et le matériau d’emballage d’origine pour un
transport ultérieur sûr de l’appareil.
Si vous avez des questions àpropos de cet appareil, consultez votre
revendeur Sony agréé.
Français
Carac téristiques
Programmation automatique
Vous pouvez prérégler automatiquement tous les canaux captables
dans votre région avec la fonction de programmation automatique.
La programmation manuelle est aussi possible (voir p.6).
En combinaison avec un moniteur
En utilisant le support Sony MB-512 (non fourni), le tuner peut
facilement être associéàun moniteur vidéo Sony (9 ou 6 pouces).
Pour plus de détails, voyez le mode d’emploi du MB-512.
Fonctionnement sur piles
Le tuner peut être alimentépar un bloc de piles (voir p.5).
Télécommande
Le tuner vous permet de commander votre téléviseur et un autre
appareil Sony àl’aide d’une télécommande via les prises
CONTROL S.
Montage en rack standard 19 pouces EIA
Avec le support de fixation Sony MB-510 (non fourni), le tuner peut
être montédans un rack standard de 19 pouces EIA. Pour plus de
détails sur le montage, voyez le mode d’emploi du MB-510.
Afin d‘éviter tout risque d‘incendie ou
d‘électrocution, ne pas exposer cet appareil à
la pluie ou àl‘humidité.
Afin d‘écarter tout risque d‘électrocution, garder le coffret
fermé. Ne confier l‘entretien de l‘appareil qu‘à un personnel
qualifié.
Pour les clients européens
Ce produit portant la marque CE est conforme àla fois àla
Directive sur la compatibilitéélectromagnétique (EMC) (89/
336/CEE) et àla Directive sur les basses tensions (73/23/
CEE) émises par la Commission de la Communauté
européenne.
La conformitéàces directives implique la conformitéaux
normes européennes suivantes:
•EN60065: Sécuritédes produits
•EN55103-1: Interférences électromagnétiques (émission)
•EN55103-2: Sensibilitéélectromagnétique (immunité)
Ce produit est prévu pour être utilisédans les
environnements électromagnétiques suivants:
E1 (résidentiel), E2 (commercial et industrie légère), E3
(urbain extérieur) et E4 (environnement EMC contrôléex.
studio de télévision).
Ce produit est conçu pour une utilisation dans les
environnements E1 àE4. En cas de sollicitation CEM de
34-38MHz et 54-61MHz, il est possible que les
performances (mesurées conformément àl’ITU/R 562-3
et l’ITU/R 500-4) régressent du niveau 5 au niveau 1.
Une fois la sollicitation CEM terminée, toutes les
performances redeviennent normales.

3
Français
Avant
1Indicateur de programme
Indique le numéro de canal sélectionné.
2Témoin AFT
Quand le circuit AFT (syntonisation fine automatique)
est activé, cet témoin est allumé.
3Témoin POWER
Quand le tuner est branché, le témoin est allumé. Le
témoin POWER sert aussi de témoin de piles. Lorsque
les piles internes sont faibles, le témoin clignote.
4Touche MEMORY
Utilisez cette touche pour ajouter ou effacer un canal
dans la mémoire des programmes.
5Touche FINE
Appuyez sur cette touche pendant quelques secondes
pour régler finement le canal.
6Touche SYSTEM
Utilisez cette touche pour sélectionner le système TV.
7Touche CATV (de télédistribution)
Appuyez sur cette touche pour sélectionner la
télédistribution.
8Touches 0-9
Utilisez ces touches pour sélectionner un canal.
9Touche ENTER
Appuyez sur cette touche pour confirmer le canal
sélectionné.
Pour sélectionner le canal 14, par exemple, appuyez sur
1n4nENTER
!º Touches PROGRAM +/–
MEMORY ADD/ERASE
Utilisez ces touches pour scanner les canaux, pour
ajouter/supprimer des canaux dans la mémoire des
programmes ou pour ajuster la syntonisation fine.
!¡ Commutateur POWER
Enfoncez-le pour brancher l’alimentation.
Emplacement et fonction des pièces et des commandes
1
4
7
0
3
6
9
ENTER
2
5
8
ADD
MEMORY
ERASE
POWER
AFT
CATV
SYSTEM
MEMORY
PROGRAM POWER
ON
OFF
FINE
POWER

4
Arrière
vers l’entrée vidéo
vers l’entrée audio
vers
l’antenne
TV
1Compartiment BATTERY
Introduisez le bloc de piles NP-1B (non fourni).
2Touche EJECT
Appuyez sur cette touche pour retirer le bloc de piles.
3Prise AC IN
Raccordez le cordon d’alimentation secteur (fourni) à
cette prise et àune prise secteur murale.
4Connecteur de sortie VIDEO (BNC)
A raccorder àl’entrée vidéo d’un moniteur.
5Connecteurs CONTROL S IN/OUT (miniprise
stéréo)
IN : Pour commander le tuner avec la télécommande
de l’autre appareil Sony . Raccordez la sortie
CONTROL S de l’appareil àcette prise.
OUT : Pour commander l’autre appareil Sony avec la
télécommande du tuner. Raccordez l’entrée
CONTROL S de l’appareil àcette prise.
Remarque
Veillez àutiliser des câbles miniprise stéréo pour la
connexion CONTROL S. D’autres types de câbles
pourraient empêcher une commande correcte.
6Connecteur de sortie AUDIO (prise phono)
A raccorder àla prise d’entrée audio d’un moniteur.
7Connecteur d’antenne (VHF/UHF)
A raccorder au câble d’antenne.
Emplacement et fonction des pièces et des commandes
Côté
Prise DC 12 V IN (XLR, 4 broches)
Pour raccorder l’adaptateur Sony AC-550CE (non fourni).
DC 12V IN
Prise DC 12 V IN
Antenne TV
Bien qu’il soit possible d’utiliser une antenne intérieure ou
extérieure avec le syntoniseur, une antenne extérieure
donne une image de meilleure qualité. Vous pouvez aussi
recevoir la télédistribution en branchant un câble fourni par
votre sociétéde télédistribution.
vers la sortie CONTROL S
vers l'entrée CONTROL S
Raccordements
BATTERY
EJECT AC IN
VIDEO AUDIO
LINE OUT
CONTROL S
IN OUT
BATTERY
EJECT
AC IN
VIDEO AUDIO
LINE OUT
CONTROL S
IN OUT

5
Français
Alimentations
Raccordez le cordon d’alimentation secteur (fourni) àla
prise AC IN et àune prise de courant murale.
Quand la fiche du cordon d’alimentation secteur est
enfoncée dans la prise AC IN, l’alimentation du bloc de
piles (s’il est installé) est automatiquement coupée.
Faites glisser l’attache de fiche secteur sur le cordon
d’alimentation jusqu’à ce qu’elle touche l’attache fixée.
Enfoncez la fiche du cordon d’alimentation dans la prise
AC IN, puis fixez l’attache de prise CA (fournie) sur le
cordon d’alimentation.
12
Attache de
fiche CA
Fiche du cordon
d’alimentation
Vers AC IN
Pour brancher convenablement le cordon d’alimentation secteur avec l’attache de fiche
Touche EJECT
NP-1B
(non fourni)
Pour retirer le cordon d’alimentation
Retirez l’attache de fiche d’alimentation en pressant les côtés gauche et droit.
Piles rechargeables
Le tuner peut être alimentépar le bloc de piles NP-1B (non
fourni). Pour prolonger la charge des piles
Appuyez simultanément sur la touche MEMORY et sur le
bouton 2. Le numéro de canal de l’indicateur de programme
disparaît et le tuner passe en mode veille. Pour revenir au
mode normal, répétez la même procédure.
Remarques
•Assurez-vous que le cordon d’alimentation est débranché
de la prise du tuner, sinon celui-ci ne peut pas fonctionner
avec le bloc de piles.
•Le tuner n’assure pas la recharge des piles. Pour les
recharger, utilisez un chargeur (non fourni).
Vers une prise murale
Marque SONY vers le bas
Courant secteur
Prise DC 12V IN
Branchez la source d’alimentation DC 12V àla prise DC 12V
IN.
Utilisez l’adaptateur AC-550CE (non fourni) pour raccorder
cette prise àune prise secteur.
BATTERY
EJECT
AC IN
VIDEO AUDIO
LINE OUT
CONTROL S
IN OUT
VIDEO AUDIO
LINEOUT
CONTROL S
IN OUT
ACIN
EJECT
BATTERY
VIDEO
LINEOUT
CONTROL S
IN OUT
ACIN
EJECT
BATTERY
AUDIO
VIDEOAUDIO
LINEOUT
CONTROLS
IN
OUT
ACIN
EJECT
BATTERY

6
Réglage des canaux
La programmation des canaux peut se faire
automatiquement ou manuellement. Avec la
programmation automatique, tous les canaux captables sont
mémorisés automatiquement par ordre de fréquence
croissante.
Avec la programmation manuelle, les canaux actifs peuvent
être mémorisés selon l’ordre voulu.
Programmation automatique
Appuyez simultanément sur la touche MEMORY et la
touche 1.
Tous les canaux captables sont mémorisés automatiquement
par ordre de fréquence croissante. Quand tous les canaux
ont ététrouvés, le mode de programmation s’interrompt
automatiquement et le plus petit numéro de canal est affiché
par l’indicateur de programme.
Remarques
•Les canaux précédemment mémorisés sont effacés de la
mémoire du tuner.
•N’appuyez pas sur les touches MEMORY ADD/ERASE et
ne mettez pas le syntoniseur hors tension en cours de
programmation automatique. La mémoire des
programmes risque d’être effacée.
Programmation manuelle
Pour ajouter les canaux voulus
1Appuyez sur les touches 0-9 et puis sur ENTER pour
sélectionner le canal àajouter àla mémoire des
programmes.
Par exemple, pour sélectionner le canal 25, appuyez sur
2, 5 et ENTER.
2Appuyez simultanément sur la touche MEMORY et la
touche ADD.
“Add”apparaît sur l’indicateur de programme et le
canal est ajoutéàla mémoire des programmes.
Répétez les étapes 1 et 2 pour ajouter d’autres canaux.
Pour effacer les canaux inutiles
1Appuyez sur les touches PROGRAM +/–pour
sélectionner le canal àeffacer.
2Appuyez simultanément sur la touche MEMORY et la
touche ERASE.
“– ––” apparaît sur l’indicateur de programme et le
canal est effacéde la mémoire des programmes. La
prochaine fois que vous appuierez sur les touches
PROGRAM +/–, le canal effacésera sauté.
Pour effacer d’autres canaux, répétez les étapes 1 et 2.
Pour effacer les réglages des canaux
Appuyez simultanément sur la touche MEMORY et sur la
touche 3. Le tuner rétablira les réglages d’usine.
Réglage fin
Si l’image d’un canal donnén’est pas claire, procédez au
réglage fin pour essayer de l’améliorer.
1Maintenez la touche FINE enfoncépendant quelques
secondes.
Le témoin AFT clignote.
2Continuez d’appuyer sur les touches PROGRAM + ou –
jusqu’à ce que l’image et le son deviennent plus nets.
3Appuyez sur la touche FINE.
La prochaine fois que vous sélectionnerez ce canal, l’AFT
sera désactivéet le témoin AFT ne s’allumera pas.
Remarques
•Si vous n’appuyez pas sur la touche PROGRAM +/–dans
un délai de quelques secondes après l’étape 2, le
syntoniseur retournera àsa situation àl’étape 1.
•Pour ramener un canal syntonisémanuellement en
syntonisation fine automatique, suivant la
“Programmation manuelle”décrite àcette page,
supprimez le canal une seule fois et rajoutez le canal.
Sélection du système TV
Sélectionnez le système TV correct qui peut être captédans
votre région. A chaque pression du touche SYSTEM, “S-
1”–“S-6”apparaît sur l’indicateur de programme.
Remarques
•Si, dans votre région, vous pouvez recevoir plusieurs
systèmes TV, sélectionnez le principal système TV. Tous
les canaux captables du système TV sélectionnépeuvent
être préréglés.
•La sélection d’un système TV incorrect provoque un son
bruyant et déformé, ou des couleurs anormales.
Sélecteur
S-1
S-2
S-3
S-4
S-5
S-6
système
B/G/H
L
I
D/K
D/K
B/G
Pays du système TV
Allemagne, Italie, Espagne,
Belgique, Suisse, Autriche,
Pays-Bas, Suède, Danemark,
Norvège, Finlande, etc.
(Europe occidentale)
Iran, Iraq, Arabie Saoudite,
etc. (Moyen Orient)
Inde, Indonésie, Malaisie,
Singapour, etc.
France, Luxembourg, etc.
Royaume-Uni, Irlande,
Hong Kong, Afrique du
Sud, etc.
Russie, Ukraine, République
slovaque, Pologne, Hongrie,
etc. (Europe de l’Est)
Chine
Autriche, Nouvelle Zélande

7
Français
Spécifications
Système de télévision B/G, D/K, I, L
Couverture des canaux
Voir “Canaux captables et affichage
des canaux”ci-dessous
Antenne 75 Ω; prise d’antenne externe pour
VHF/UHF
Sortie VIDEO Connecteur BNC
1 V p-p, 75 Ω, sync négative
Sortie AUDIO prise phono
moins de 5 kΩ, –5 dBu
Connecteurs CONTROL S IN/OUT
miniprises stéréo
Consommation électrique
15 W avec alimentation secteur
10 W avec alimentation par piles
Alimentation 110 –240 V CA, 50/60 Hz
12 V CC avec un adaptateur secteur
AC-550CE (non fourni)
le bloc de piles NP-1B (non fourni)
Appel de courant de crête
(1) Mise sous tension (ON), méthode de sondage du
courant: 4.8A (230V)
(2) Mesuréconformément àla norme européenne
EN55103-1: 4.7A (230V)
Température de fonctionnement
0 –35ºC
Température de stockage
–10 –+40ºC
Humidité0 –90 %, sans condensation
Dimensions 212 ×49,3 ×361 mm (l/h/p)
(8 3/8×2 ×14 1/4pouces)
Poids 2,05 kg (4 lb 8 oz)
Accessoires fournis Cordon d’alimentation secteur (1)
Attache de fiche CA (1)
Mode d’emploi (1)
Accessoires (non fourni)
Boîtier àpiles DC-640
Batterie BP-90A
(utilisée avec DC-640)
Kit d’antenne intérieure VHF/UHF
AN-1040E
Support de montage MB-510/512
Bloc de piles NP-1B
Cordon de batterie de voiture
DCC-XLR4
La conception et les spécifications sont sujettes à
modifications sans préavis.
Canaux captables et affichage des canaux
Canaux captables Indication àl’écran
PAL B/G/H E2..12 21..69 2 3 4..12 21..69
CABLE TV (1) S1..41 C1 C2..C41
CABLE TV (2) S01..S44 C1..C44
ITALIA A B C D E F G H 13..20
SECAM D/K R01..R12 R21..R60 2..12 21..60
SECAM L F2..F10 F21..F69 1..12 21..69
PAL I IRE A..IRE I UK21..UK69 1..9 21..69

2
Funktionen
Automatisches Programmieren
Mit der automatischen Programmierfunktion können Sie alle
Sender, die an Ihrem Wohnort zu empfangen sind, automatisch
speichern. Manuelles Programmieren ist ebenfalls möglich (siehe
Seite 6).
Kombination mit einem Videobildschirm
Mit Hilfe einer Sony MB-512-Klammer (nicht mitgeliefert) kann der
Tuner problemlos mit einem Sony-Videobildschirm (9 Zoll oder 6
Zoll) kombiniert werden. Einzelheiten finden Sie in der
Bedienungsanleitung zur MB-512.
Akkubetrieb
Der Tuner kann auch mit einem Akku betrieben werden (siehe Seite
5).
Fernbedienung
Der Tuner ermöglicht das Steuern des Fernsehgeräts und anderer
Geräte von Sony mit einer einzigen Fernbedienung über die
Buchsen CONTROL S.
EIA-Standardregal (19 Zoll)
Mit Hilfe einer Sony MB-510-Befestigungsklammer (nicht
mitgeliefert) kann der Tuner in ein EIA-Standardgehäuse (19 Zoll)
eingesetzt werden. Einzelheiten dazu finden Sie in der MB-510-
Bedienungsanleitung.
Funktionen................................................................................... 2
Lage und Funktion der Teile und Bedienelemente ............... 3
Vorderseite ............................................................................ 3
Rückseite ................................................................................ 4
Seitlich .................................................................................... 4
Stromversorgung ........................................................................ 5
Programmieren von Sendern .................................................... 6
Technische Daten ........................................................................ 7
InhaltACHTUNG
Um Feuergefahr und die Gefahr eines
elektrischen Schlages zu vermeiden, darf das
Gerät weder Regen noch Feuchtigkeit
ausgesetzt werden.
Um einen elektrischen Schlag zu vermeiden, darf das Ge-
häuse nicht geöffnet werden. Überlassen Sie Wartungsar-
beiten stets qualifiziertem Fachpersonal.
Für Kunden in Europa
Dieses Produkt besitzt die CE-Kennzeichnung und erfüllt
sowohl die EMV-Direktive (89/336/EEC) als auch die
Direktive Niederspannung (73/23/EEC) der EG-
Kommission.
Die Erfüllung dieser Direktiven bedeutet Konformität für
die folgenden Europäischen Normen:
•EN60065: Produktsicherheit
•EN55103-1: Elektromagnetische Interferenz (Emission)
•EN55103-2: Elektromagnetische Empfindlichkeit
(Immunität)
Dieses Produkt ist für den Einsatz unter folgenden
elektromagnetischen Bedingungen ausgelegt:
E1 (Wohnbereich), E2 (kommerzieller und in beschränktem
Maße industrieller Bereich), E3 (Stadtbereich im Freien) und
E4 (kontrollierter EMV-Bereich, z.B. Fernsehstudio).
Dieses Produkt ist für den Einsatz in Umgebungen
vorgesehen, die den Normen E1 bis E4 entsprechen. Bei
EMV-Belastung mit 34-38 MHz und 54-61 MHz kann die
Leistung (bewertet nach ITU/R 562-3 und ITU/R 500-4)
von Stufe 5 auf Stufe 1 abfallen.
Bei Wegfall der EMV-Belastung steigt die Leistung
wieder auf den vollen Wert an.
Vorsichtsmaßnahmen
Sicherheitshinweise
•Betreiben Sie das Gerät nur mit 110-240 V Wechselstrom oder 12
V Gleichstrom.
Wenn Sie das Gerät mit einem Akku betreiben möchten,
verwenden Sie ausschließlich den Akku Sony NP-1B (nicht
mitgeliefert). Arbeiten Sie auf keinen Fall mit anderen
Akkutypen.
•Wenn ein fester Gegenstand oder Flüssigkeit in das Innere des
Geräts gelangt ist, ziehen Sie den Netzstecker heraus, und lassen
Sie das Gerät von qualifiziertem Fachpersonal überprüfen, bevor
Sie es weiterverwenden.
•Wenn das Gerät längere Zeit nicht benutzt werden soll, ziehen Sie
den Netzstecker aus der Steckdose.
•Ziehen Sie beim Herausziehen des Netzkabels nie am Kabel
selbst, sondern immer am Stecker.
Hinweise zum Aufstellen
•Achten Sie darauf, daßdas Gerät frei steht, um eine überhitzung
zu vermeiden.
Achten Sie beim Aufstellen des Geräts darauf, daßdie
Lüftungsschlitze nicht durch Gardinen, Vorhänge etc. verdeckt
werden.
•Stellen Sie das Gerät niemals in der Nähe von Heizkörpern und
anderen Wärmequellen oder an Orten auf, an denen es direktem
Sonnenlicht, Staub, Vibrationen oder starken Erschütterungen
ausgesetzt ist.
Hinweise zum Reinigen
Reinigen Sie das Gehäuse mit einem weichen Tuch, das Sie auch
leicht mit einem milden Haushaltsreiniger anfeuchten können.
Verwenden Sie auf keinen Fall scharfe, lösungsmittelhaltige
Reiniger wie Verdünner oder Benzin, da diese das Gehäuse
angreifen können.
Ziehen Sie vor dem Reinigen des Geräts das Netzkabel aus der
Steckdose.
Hinweis zum Auspacken
Bewahren Sie den Karton und die Verpackungsmaterialien auf,
damit Sie das Gerät auch später sicher transportieren können.
Wenn Sie Fragen zu diesem Gerät haben, setzen Sie sich mit Ihrem
Sony-Händler in Verbindung.
Deutsch

3
Deutsch
Vorderseite
1Programmanzeige
Zeigt die Nummer des ausgewählten Senders an.
2Anzeige AFT
Diese Anzeige leuchtet auf, wenn die AFT-Funktion
(automatic fine tuning, automatische Feineinstellung)
aktiviert wurde.
3Anzeige POWER
Diese Anzeige leuchtet auf, sobald Sie den Tuner
einschalten. Die Anzeige POWER fungiert auch als
Batterieanzeige. Wenn die eingebaute Batterie
schwächer wird, beginnt sie zu blinken.
4Taste MEMORY
Mit dieser Taste können Sie dem Senderspeicher einen
Sender hinzufügen oder einen Sender daraus löschen.
5Taste FINE
Drücken Sie diese Taste ein paar Sekunden lang, wenn
Sie einen Sender feinabstimmen wollen.
6Taste SYSTEM
Mit dieser Taste wählen Sie die Fernsehnorm aus.
7Taste CATV
Mit dieser Taste wählen Sie CATV aus.
8Tasten 0-9
Mit diesen Tasten wählen Sie einen Kanal bzw. Sender
aus.
9Taste ENTER
Mit dieser Taste bestätigen Sie die Auswahl eines
Senders.
Wenn Sie beispielsweise Sender 14 auswählen wollen,
drücken Sie 1n4nENTER.
!º Tasten PROGRAM +/–
MEMORY ADD/ERASE
Mit diesen Tasten können Sie einen bestimmten Sender
suchen, einen Sender zum Senderspeicher hinzufügen
bzw. einen Sender daraus löschen und die
Feinabstimmung vornehmen.
!¡ Schalter POWER (Netzschalter)
Mit diesem Schalter schalten Sie den Tuner ein.
Lage und Funktion der Teile und Bedienelemente
1
4
7
0
3
6
9
ENTER
2
5
8
ADD
MEMORY
ERASE
POWER
AFT
CATV
SYSTEM
MEMORY
PROGRAM POWER
ON
OFF
FINE
POWER

4
Rückseite
Anschlüsse
an Videoeingang
an Audioeingang
an TV-
Antenne
1Fach BATTERY
Setzen Sie hier den Akku NP-1B (nicht mitgeliefert) ein.
2Taste EJECT
Drücken Sie diese Taste, um den Akku
herauszunehmen.
3AC IN-Buchse
Schließen Sie hier das mitgelieferte Netzkabel an.
Stecken Sie den Netzstecker in eine Netzsteckdose.
4VIDEO-Ausgangsanschluß(BNC)
Verbinden Sie diesen Anschlußmit dem Videoeingang
eines Videobildschirms.
5Anschlüsse CONTROL S IN/OUT
(Stereominibuchse)
IN: Zum Steuern des Tuners mit der Fernbedienung
eines anderen Sony-Geräts. Verbinden Sie den
CONTROL S-Ausgang des anderen Geräts mit
dieser Buchse.
OUT: Zum Steuern eines anderen Sony-Geräts mit der
Fernbedienung des Tuners. Verbinden Sie den
CONTROL S-Eingang des anderen Geräts mit
dieser Buchse.
Hinweis
Für die CONTROL S-Anschlüsse benötigen Sie Kabel
mit Stereoministeckern. Bei anderen Kabeltypen lassen
sich die Geräte möglicherweise nicht richtig über die
Fernbedienung steuern.
6AUDIO-Ausgangsanschluß(Cinchbuchse)
Verbinden Sie diesen Anschlußmit dem Audioeingang
eines Videobildschirms.
7Antennenanschluß(VHF/UHF)
Schließen Sie hier das Antennenkabel an.
Lage und Funktion der Teile und Bedienelemente
Seitlich
DC 12 V IN-Buchse
DC 12 V IN-Buchse (XLR, 4polig)
Schließen Sie hier das Sony-Netzteil AC-550CE (nicht
mitgeliefert) an.
TV-Antenne
Obwohl Sie für den Tuner sowohl eine Innen- als auch eine
Außenantenne verwenden können, erhalten Sie durch die
Außenantenne eine bessere Bildqualität. Wenn Sie Kabel-TV
empfangen möchten, müssen Sie einen Kabelanschlußlegen
lassen.
DC 12V IN
an CONTROL S OUT
an CONTROL S IN
BATTERY
EJECT AC IN
VIDEO AUDIO
LINE OUT
CONTROL S
IN OUT
BATTERY
EJECT
AC IN
VIDEO AUDIO
LINE OUT
CONTROL S
IN OUT

5
Deutsch
Stromversorgung
Netzstrom
Schließen Sie das mitgelieferte Netzkabel an die AC IN-
Buchse und an eine Netzsteckdose an.
Sobald Sie das Netzkabel an die AC IN-Buchse
angeschlossen haben, wird die Stromversorgung durch den
Akku, falls installiert, automatisch unterbrochen.
Schieben Sie den Netzsteckerhalter über das Kabel, bis Sie
ihn mit dem angebrachten Halter verbinden können.
Schließen Sie das Netzkabel an die AC IN-Buchse an.
Befestigen Sie danach den mitgelieferten Netzsteckerhalter
am Netzkabel.
12
an AC IN
an Netzsteckdose
Sicheres Anschließen eines Netzkabels mit einem Netzsteckerhalter
Taste EJECT
NP-1B (nicht
mitgeliefert)
Entfernen des Netzkabels
Ziehen Sie den Netzsteckerhalter heraus, indem Sie ihn an beiden Seiten zusammendrücken.
Akku
Der Tuner kann auch mit dem Akku NP-1B betrieben
werden (nicht mitgeliefert). Schonen des Akkus
Halten Sie die Taste MEMORY gedrückt, und drücken Sie
die Taste 2. Die Kanalnummer auf der Programmanzeige
erlischt, und der Tuner wechselt in den Energiesparmodus.
Wenn Sie in den Normalmodus zurückkehren möchten,
wiederholen Sie das beschriebene Verfahren.
Hinweise
•Achten Sie darauf, daßdas Netzkabel nicht an den Tuner
angeschlossen ist. Er kann sonst nicht mit dem Akku
betrieben werden.
•Der Tuner kann den Akku nicht selbst aufladen.
Verwenden Sie dazu ein Akkuladegerät (nicht
mitgeliefert).
Markierung SONY nach
unten
Netzstecker
Netzsteckerhalter
DC 12V IN-Buchse
Schließen Sie eine 12-V-Gleichstromquelle an die DC 12V
IN-Buchse an.
Schließen Sie diese Buchse über das Netzteil AC-550CE
(nicht mitgeliefert) an eine Netzsteckdose an.
BATTERY
EJECT
AC IN
VIDEO AUDIO
LINE OUT
CONTROL S
IN OUT
VIDEO AUDIO
LINEOUT
CONTROL S
IN OUT
ACIN
EJECT
BATTERY
VIDEO
LINEOUT
CONTROL S
IN OUT
ACIN
EJECT
BATTERY
AUDIO
VIDEOAUDIO
LINEOUT
CONTROLS
IN
OUT
ACIN
EJECT
BATTERY

6
Programmieren von Sendern
Sie können TV-Sender sowohl automatisch als auch manuell
programmieren. Beim automatischen Programmieren
werden die Kanäle automatisch von der niedrigsten bis zur
höchsten Frequenz abgespeichert. Beim manuellen
Programmieren können Sie die Sender in der von Ihnen
gewünschten Reihenfolge speichern.
Automatisches Programmieren
Halten Sie die Taste MEMORY gedrückt, und drücken Sie
die Taste 1.
Alle empfangbaren Sender werden automatisch eingestellt
und gespeichert, angefangen vom Kanal mit der niedrigsten
Frequenz bis zum Kanal mit der höchsten Frequenz. Wenn
keine weiteren Sender mehr gefunden werden können, wird
der Programmiermodus automatisch verlassen. Auf der
Programmanzeige erscheint die kleinste Sendernummer.
Hinweise
•Die vorher programmierten Sender werden aus dem
Speicher gelöscht.
•Drücken Sie während des automatischen Programmierens
nicht die Tasten MEMORY ADD/ERASE, und schalten
Sie den Tuner nicht aus. Andernfalls wird der
Senderspeicher möglicherweise gelöscht.
Manuelles Programmieren
Hinzufügen der gewünschten Sender
1Drücken Sie eine der Tasten 0-9 und anschließend
ENTER, um den Sender auszuwählen, den Sie
abspeichern möchten.
Wenn Sie z. B. Kanal 25 auswählen wollen, drücken Sie
2, 5 und anschließend ENTER.
2Halten Sie die Taste MEMORY gedrückt, und drücken
Sie die Taste ADD.
In der Programmanzeige erscheint „Add“, und der
Sender wird dem Speicher hinzugefügt.
Wiederholen Sie die Schritte 1 und 2, wenn Sie weitere
Sender hinzufügen wollen.
Löschen nicht mehr benötigter Sender
1Wählen Sie mit den Tasten PROGRAM +/–den zu
löschenden Sender bzw. Kanal aus.
2Halten Sie die Taste MEMORY gedrückt, und drücken
Sie die Taste ERASE.
In der Programmanzeige erscheint „– ––“, und der
Sender wird aus dem Speicher gelöscht. Wenn Sie das
nächste Mal die Tasten PROGRAM +/–drücken, wird
der gelöschte Kanal übersprungen.
Wiederholen Sie die Schritte 1 und 2, wenn Sie weitere
Sender löschen wollen.
Zurücksetzen der Kanaleinstellungen
Halten Sie die Taste MEMORY gedrückt, und drücken Sie
die Taste 3. Der Tuner kehrt zu den werkseitigen
Einstellungen zurück.
Feinabstimmung
Wenn das Bild eines bestimmten Senders verschwommen
ist, kann es durch Feinabstimmung der Sendereinstellung
verbessert werden.
1Halten Sie die Taste FINE ein paar Sekunden lang
gedrückt.
Die Anzeige AFT blinkt.
2Drücken Sie die Taste PROGRAM + oder –, bis die Bild-
und Tonqualität besser wird.
3Drücken Sie die Taste FINE.
Wenn Sie diesen Sender das nächste Mal einschalten, ist die
AFT-Funktion deaktiviert, und die Anzeige AFT leuchtet
nicht auf.
Hinweise
•Wenn Sie nach Schritt 2 nicht innerhalb von ein paar
Sekunden die Taste PROGRAM +/–drücken, wechselt
der Tuner wieder in den in Schritt 1 beschriebenen Status.
•Wenn Sie für einen von Hand eingestellten Sender die
automatische Feinabstimmung vornehmen möchten,
müssen Sie den Sender zunächst wie unter „Manuelles
Programmieren”beschrieben löschen und wieder neu
programmieren.
Auswählen der Fernsehnorm
Wählen Sie die Norm, die in Ihrem Land gilt. Mit jedem
Drücken der Taste SYSTEM erscheint in der
Programmanzeige eine Angabe von „S-1“bis „S-6“.
Hinweise
•Können in Ihrer Region Sender in verschiedenen Normen
empfangen werden, wählen Sie die Hauptnorm für Ihre
Region. Alle in der gewählten Norm verfügbaren Sender
können programmiert werden.
•Ist die Fernsehnorm falsch eingestellt, ist der Ton verzerrt
oder durch Rauschen gestört, oder die Farben
entsprechen nicht den normalen Werten.
Anzeige
S-1
S-2
S-3
S-4
S-5
S-6
Länder
Deutschland, Italien,
Spanien, Belgien, Schweiz,
Österreich, Niederlande,
Schweden, Dänemark,
Norwegen, Finnland usw.
(Westeuropa)
Iran, Irak, Saudi-Arabien
usw. (Naher Osten) Indien,
Indonesien, Malaysia,
Singapur usw.
Frankreich, Luxemburg
usw.
Großbritannien, Irland,
Hongkong, Südafrika usw.
Rußland, Ukraine,
Slowakische Republik,
Polen, Ungarn usw.
(Osteuropa)
China
Australien, Neuseeland
Norm
B/G/H
L
I
D/K
D/K
B/G

7
Deutsch
Technische Daten
Fernsehnorm B/G, D/K, I, L
Senderbereiche Siehe „Verfügbare Sender und
Senderanzeigen“unten.
Antenne Externer 75-Ω-Antennenanschluß
für VHF/UHF
Ausgang VIDEO BNC-Anschluß
1 Vss, 75 Ω, sync-negativ
Ausgang AUDIO Cinchbuchse
unter 5 kΩ, –5 dBu
Anschlüsse CONTROL S IN/OUT
Stereominibuchsen
Leistungsaufnahme 15 W bei Wechselstrombetrieb
10 W bei Gleichstrombetrieb
Betriebsspannung/Stromversorgung
110 –240 V Wechselstrom, 50/60 Hz
12 V Gleichstrom mit Netzteil AC-
550CE (nicht mitgeliefert),
Akku NP-1B (nicht mitgeliefert)
Spitzenstrom
(1) Einschaltstrom, Stromsonde: 4.8A (230V)
(2) Gemessen in EN55103-1: 4.7A (230V)
Betriebstemperatur 0 –35 ºC
Lagertemperatur –10 –+40 ºC
Luftfeuchtigkeit 0 –90 %, nicht kondensierend
Abmessungen 212 ×49,3 ×361 mm (B/H/T)
Gewicht 2,05 kg
Mitgeliefertes Zubehör
Netzkabel (1)
Netzsteckerhalter (1)
Bedienungsanleitung (1)
Zubehör (nicht mitgeliefer)
Addugehäuse DC-640
Akku BP-90A (für DC-640)
VHF/UHF-Zimmerantennensatz
AN-1040E
Befestigungsklammer MB-510/512
Akku NP-1B
Autobatterieadapterkabel DCC-XLR4
Änderungen, die dem technischen Fortschritt dienen,
bleiben vorbehalten.
Verfügbare Sender und Senderanzeigen
Verfügbare Sender Anzeige auf dem Bildschirm
PAL B/G/H E2..12 21..69 2 3 4..12 21..69
CABLE TV (1) S1..41 C1 C2..C41
CABLE TV (2) S01..S44 C1..C44
ITALIA A B C D E F G H 13..20
SECAM D/K R01..R12 R21..R60 2..12 21..60
SECAM L F2..F10 F21..F69 1..12 21..69
PAL I IRE A..IRE I UK21..UK69 1..9 21..69

2
Funciones ..................................................................................... 2
Ubicación y funciones de componentes y controles .............. 3
Panel frontal .......................................................................... 3
Panel posterior ...................................................................... 4
Panel lateral ........................................................................... 4
Fuentes de alimentación ............................................................ 5
Sintonía de canales ..................................................................... 6
Especificaciones .......................................................................... 7
ContenidoADVERTENCIA
Para evitar incendios o el riesgo de
electrocución, no exponga la unidad a la
lluvia ni a la humedad.
Para evitar descargas eléctricas, no abra la unidad. En caso
de avería, solicite los servicios de personal cualificado.
Para los clientes en Europa
Este producto con la marca CE cumple con las Directivas
EMC (89/336/CEE) y de Baja Tensión (73/23/CEE)
emitidas por la Comisión de la Comunidad Europea.
El cumplimiento de estas directivas implica la conformidad
con los siguientes estándares europeos:
•EN60065: Seguridad del producto
•EN55103-1: Interferencias electromagnéticas (Emisión)
•EN55103-2: Susceptibilidad electromagnética (Inmunidad)
Este producto estádestinado a emplearse en los siguientes
entornos electromagnéticos:
E1 (residenciales), E2 (comerciales e industria ligera), E3
(exteriores urbanos) y E4 (entornos con control EMC, por
ejemplo, estudios de TV).
Este producto estádiseñado para utilizarse en los
entornos E1 a E4. Durante la prueba de fatiga EMC a 34-
38MHz y 54-61MHz, el rendimiento (evaluado de
acuerdo con ITU/R 562-3 e ITU/R 500-4) puede
degradarse del Nivel 5 al 1.
Sin la prueba de fatiga EMC, el rendimiento recupera su
funcionalidad total.
Español
Funciones
Programación automática
Esta función permite sintonizar de forma automática todos los
canales que se reciben dentro de su área. También dispone de una
función de programación manual (consulte la p.6).
Combinación con un monitor
El sintonizador puede combinarse fácilmente con un monitor de
video Sony (9 o 6 pulgadas) mediante un soporte Sony MB-512 (no
incluido). Para más información, consulte el manual de
instrucciones de MB- 512.
Pilas
El sintonizador admite el funcionamiento con un paquete de pilas
(consulte la p.5).
Mando a distancia
El sintonizador le permite controlar su televisión y otros equipos
Sony con un mando a distancia a través de los conectores
CONTROL S.
Bastidor de montaje de 19 pulgadas norma EIA
El sintonizador puede montarse en un bastidor de 19 pulgadas
norma EIA utilizando un soporte de montaje Sony MB-510. Para
más información sobre el montaje, consulte el manual de
instrucciones de MB-510.
Precauciones
Seguridad
•La unidad funciona a 110–240 V CA o 12 V CC.
Utilice sólo el paquete de pilas Sony NP-1B (no suministrado). No
emplee otras pilas.
•Si dentro de la unidad cae algún objeto o se vierte algún líquido,
desénchufela de la red y haga que sea revisada por personal
especializado antes de utilizarla nuevamente.
•Cuando no vaya a emplear la unidad durante varios días,
desenchúfela de la toma de corriente.
•Para desconectar el cable de alimentación tire del enchufe, nunca
del propio cable.
Instalación
•Coloque la unidad en un lugar debidamente ventilado para evitar
el recalentamiento interno.
No sitúe la unidad sobre superficies (alfombras, mantas, etc.) o
cerca de materiales (cortinas, tapices) que puedan bloquear los
orificios de ventilación.
•No coloque la unidad cerca de fuentes de calor, como radiadores
o acondicionadores de aire, no la exponga a la luz solar directa ni
al polvo y no la sitúe en lugares en los que se vea expuesta a
vibraciones o golpes.
Limpieza
Limpie la unidad con un paño suave ligeramente humedecido en
una solución limpiadora. No utilice ningún tipo de disolventes
abrasivos, como alcohol o bencina, ya que pueden dañar su
acabado. Como medida de precaución, desenchufe la unidad antes
de limpiarla.
Embalaje
Conserve el embalaje original para asegurar en el futuro el
transporte de la unidad sin daños.
Si tiene cualquier duda sobre esta unidad, póngase en contacto con
su distribuidor autorizado de Sony.
Table of contents
Languages:
Other Sony TV Tuner manuals