Use and Care of the COBRA CAM
• Do not operate the COBRA CAM unless this Operator’s Manual has been
read and understood completely.
• Do not submerge the hand-held display unit in water. Store in a dry place.
The camera head and cable are water resistant when the unit is
assembled, but the video display unit is susceptible to water inltration.
• Do not use the camera if condensation forms inside the lens. Place in a
dry area and let the water evaporate before operating.
• Do not use the unit if the ON/OFF switch is not working properly. Any unit
that cannot be controlled with the switch needs to be repaired.
• Store spare equipment in the carrying case provided.
• Maintain the COBRA CAM with care. Properly maintained units last longer,
are easier to work with and are less likely to cause injury.
Fully charge your COBRA CAM before rst use.
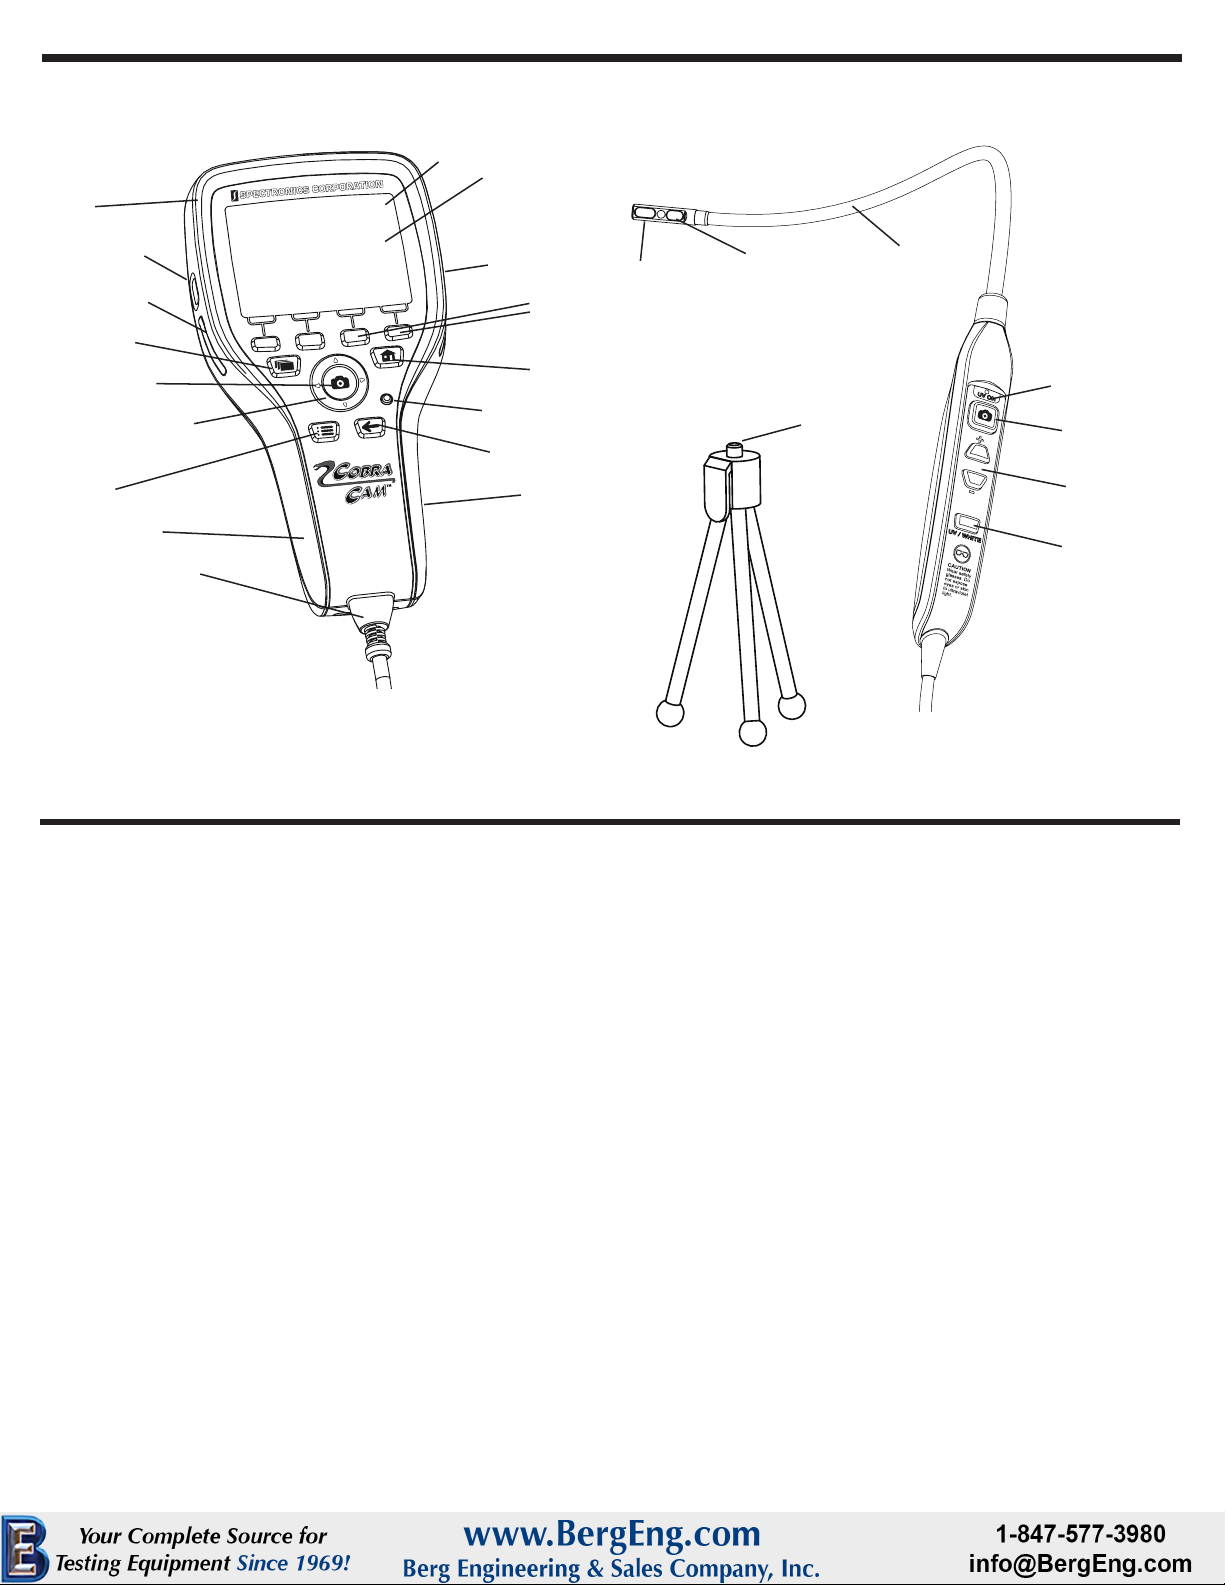
Numbers refer to the Video Display Unit (VDU) diagram.
1. Insert the SD card into the slot (12) on the video display unit.
2. Plug the data cord (9) from the wand into the VDU at the heel of the handle.
Be careful to insert it correctly with the widest side up.
3. Press the power button (2) and allow 30 seconds for the power up process.
4. Use the UV LEDs for dye inspection, plus many other applications. Use
the white light LEDs for normal inspection (24–ON/OFF switch).
5. Insert the camera cable into the inspection area.
6. Once the inspection area is found, you may press the “Image Capture”
button (5on the VDU or 22 on the wand handle), to capture the image.
7. Captured images can be viewed, rotated, zoomed and panned on the
VDU screen. (Images will not be captured to memory without the
SD card inserted, but will be viewable.)
8. Images can be transferred by SD card or through the USB port.
9. Upon completion of operations, disassemble the unit and store in its
case. Recharge the battery if needed.
Operating Instructions
How to Transfer Pictures
Numbers refer to the Camera Wand and Controller diagram.
From the SD Card: Push the card once into the slot (12). It will release
from the camera. Take the card and insert it into your SD card reader.
Follow the directions below to transfer image les.
From the Camera: To a computer using Windows OS and a USB cable
(not included).
• Connect the USB mini-B end of the connector to the left side of the camera (3).
• Connect the USB A connector to a USB port on the target computer.
• Press the IMAGE FILES button (4) to put the camera in playback mode.
• Press the MORE menu key (shown on the video screen).
• Press the TRANSFER menu key. (In Transfer mode, the camera will
appear as an external drive to the target computer.)
• Using the Windows browser, open the external drive, and copy or move
the .jpg picture les from the DCIM\100SPEC directory to the desired
location on the target computer.
• Press the STOP menu item on the camera video screen to leave transfer
mode.
• Disconnect the USB cable from the camera, and the target computer.
Camera Safety
• Do not submerge any portion of the COBRA CAM into any liquid. See
“Preventive Maintenance” for appropriate cleaning uids.
• Do not insert the COBRA CAM wand into anything or anywhere that may
contain a live electrical charge.
• WALLS: Shut off the circuit breaker to the whole house before using the
COBRA CAM to inspect inside walls that may contain live electrical circuitry.
• PIPES: If you suspect a metal pipe could contain an electrical charge,
have a qualied electrician check the pipe before using the COBRA CAM.
Ground circuits, in some cases, can be returned to cast iron pipes and
cause them to be charged.
• AUTOMOBILES: Be sure the automobile is not running during inspection.
Do not get oil or gas on the imager head. Exposure to petroleum-based
substances will eventually degrade the camera lens covering.
• GENERAL USE: Do not use anywhere the unit may come into exposure
with hazardous chemicals, electrical charges or moving parts. Such
situations may result in serious injury or death. Use good judgment!
Charging the NiMH Battery
The COBRA CAM battery must be charged before rst use.
•
Remove the battery from its compartment (17 on the diagram) and press it into the
battery cradle.
•
Connect the battery charger to the battery cradle and plug the charger into a
properly regulated AC plug.
•
The indicator light on the end of the cradle will shine green while the battery is
charging. The light will go off when the charge is complete (approximately
one hour).
•
When the charge is complete, rst unplug the charger from the outlet, then unplug
it from the cradle.
•
The COBRA CAM can operate for approximately one hour after a full charge.
•
If there is no activity, after 15 minutes the unit will time-out and shut off
automatically. It will have to be restarted.
WARNING: Use only the charger supplied to recharge the battery.
Care and Use of Nickel-Metal Hydride
(NiMH) Batteries
•
NiMH battery packs last longer when charged and stored in a temperature
range between 50°F to 86°F (10°C to 10°C) away from heat, sunlight and
humidity.
•
Always charge batteries to full capacity before long-term storage
(approximately 30 days) to prevent aging. After storing they must be
charged, which may require conditioning (two or three charge/discharge
cycles) to reach full capacity.
•
Do not subject these batteries to repeated deep discharges that run the
batteries down completely on a regular basis as this will greatly shorten
battery life.
•
NiMH batteries generally have no voltage sag until the last 10% of charge.
The unit usually will operate for better than 90% of the battery’s rated
capacity.
•
NiMHs have no toxic lead or mercury and a life expectancy of 500 charge/
discharge cycles, or more, provided the battery is not overcharged or
heavily discharged. Recycle according to local disposal laws. Do not
dispose of in fire. They will explode.
Battery
Charging Cradle
127212
Connect to Battery Cradle
Battery
Charger
127214
NiMH
Battery
127211