manuals.online logo
Brands
  1. Home
  2. •
  3. Brands
  4. •
  5. Spectrum Brands
  6. •
  7. Door Lock
  8. •
  9. Spectrum Brands BALDWIN ESTATE SD004 User manual

Spectrum Brands BALDWIN ESTATE SD004 User manual

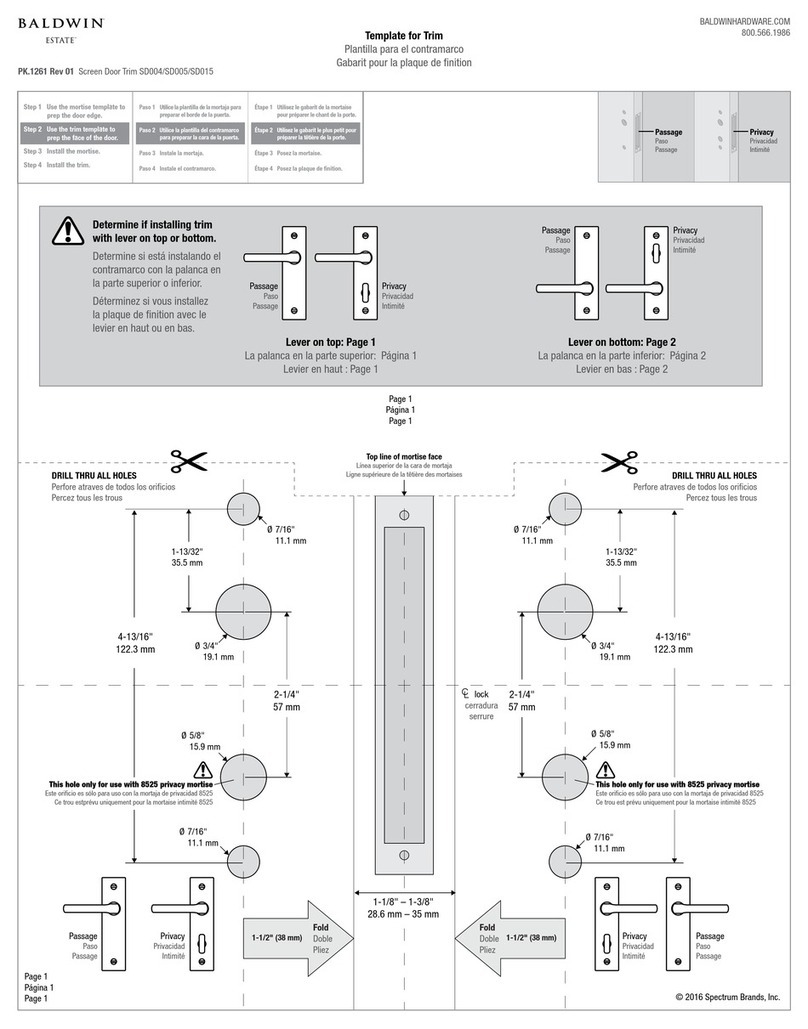
BALDWINHARDWARE.COM
800.566.1986
PK.1271 Rev 02 Screen Door Trim SD004/SD005/SD015
Step 1 Use the mortise template to
prep the door edge.
Step 2 Use the trim template to
prep the face of the door.
Step 3 Install the mortise.
Step 4 Install the trim.
Paso 1 Utilice la plantilla de la mortaja para
preparar el borde de la puerta.
Paso 2 Utilice la plantilla del contramarco
para preparar la cara de la puerta.
Paso 3 Instale la mortaja.
Paso 4 Instale el contramarco.
Étape 1 Utilisez le gabarit de la mortaise
pour préparer le chant de la porte.
Étape 2 Utilisez le gabarit le plus petit pour
préparer la têtière de la porte.
Étape 3 Posez la mortaise.
Étape 4 Posez la plaque de finition.
A B
F
G
H
CD
Parts in the box
Piezas en la caja
Contenu de la boîte
Required Tools
Herramientas necesarias
Outils nécessaires
Make sure door is 1-1/8" – 1-3/8"
(28.6 – 35 mm) thick.
Asegúrese de que la puerta tenga un grosor
de 28.6 – 35 mm (1-1 / 8 "- 1-3 / 8").
Assurez-vous que la porte a une épaisseur
de 28,6 à 35 mm (1 1/8 po à 1 3/8 po).
Install trim plates
Instale los contramarcos
Posez les plaques de nition
Insert spindle
Inserte el husillo
Insérez l’axe
Insert the spindle from the
exterior and center the
spindle in the door. Orient the
spindle so that the groove
faces down and away from
the door edge.
Inserte el husillo del exterior y
coloque el husillo para que
quede centrado con la puerta.
Oriente el husillo de manera que
la ranura queda hacia abajo y
lejos del borde de la puerta.
Insérez l’axe depuis l’extérieur
en le centrant dans la porte.
Orientez l’axe de façon à ce que
la rainure soit tournée vers le
bas et dans le sens opposé au
chant de la porte.
groove
ranura
rainure
exterior
exterior
extérieur
Install levers
Instale las palancas
Posez les becs-de-cane
Insert and tighten set screws
Inserte y je los tornillos de jación
Insérez et serrez les vis de pression
exterior
exterior
extérieur
interior
interior
intérieur
1 2 3
4
A
G (2x)
C (2x)
F (2x)
B
D
H
Installation Guide for Trim — Passage (Privacy: See page 2)
Guía de instalación para el contramarco — Paso (Privacidad: Vea la página 2)
Guide de pose de la plaque de nition — Passage (Intimité : Voir page 2)
Page 1
Página 1
Page 1
© 2017
Spectrum Brands, Inc.
BALDWINHARDWARE.COM
800.566.1986
PK.1271 Rev 02 Screen Door Trim SD004/SD005/SD015
Step 1 Use the mortise template to
prep the door edge.
Step 2 Use the trim template to
prep the face of the door.
Step 3 Install the mortise.
Step 4 Install the trim.
Paso 1 Utilice la plantilla de la mortaja para
preparar el borde de la puerta.
Paso 2 Utilice la plantilla del contramarco
para preparar la cara de la puerta.
Paso 3 Instale la mortaja.
Paso 4 Instale el contramarco.
Étape 1 Utilisez le gabarit de la mortaise
pour préparer le chant de la porte.
Étape 2 Utilisez le gabarit le plus petit pour
préparer la têtière de la porte.
Étape 3 Posez la mortaise.
Étape 4 Posez la plaque de finition.
A B
F
G
H
CD
Parts in the box
Piezas en la caja
Contenu de la boîte
Required Tools
Herramientas necesarias
Outils nécessaires
Make sure door is 1-1/8" – 1-3/8"
(28.6 – 35 mm) thick.
Asegúrese de que la puerta tenga un grosor
de 28.6 – 35 mm (1-1 / 8 "- 1-3 / 8").
Assurez-vous que la porte a une épaisseur
de 28,6 à 35 mm (1 1/8 po à 1 3/8 po).
The turnpiece aligns with
the smaller hole in the
door surface.
La perilla se alinea con el
oricio más pequeño en la
supercie de la puerta.
Le tourniquet s'aligne avec
le trou plus petit dans la
surface de la porte.
turnpiece
perilla
tourniquet
smaller hole
oricio más
pequeño
trou plus
petit
Install trim plates
Instale los contramarcos
Posez les plaques de nition
Insert spindle
Inserte el husillo
Insérez l’axe
Insert the spindle from the
exterior and center the
spindle in the door. Orient the
spindle so that the groove
faces down and away from
the door edge.
Inserte el husillo del exterior y
coloque el husillo para que
quede centrado con la puerta.
Oriente el husillo de manera que
la ranura queda hacia abajo y
lejos del borde de la puerta.
Insérez l’axe depuis l’extérieur
en le centrant dans la porte.
Orientez l’axe de façon à ce que
la rainure soit tournée vers le
bas et dans le sens opposé au
chant de la porte.
groove
ranura
rainure
exterior
exterior
extérieur
exterior
exterior
extérieur
interior
interior
intérieur
Install levers
Instale las palancas
Posez les becs-de-cane
Insert and tighten set screws
Inserte y je los tornillos de jación
Insérez et serrez les vis de pression
1 2 3
4
A
G (2x)
C (2x)
F (2x)
B
D
H
Installation Guide for Trim — Privacy (Passage: See page 1)
Guía de instalación para el contramarco — Privacidad (Paso: Vea la página 1)
Guide de pose de la plaque de nition — Intimité (Passage : Voir page 1)
Page 2
Página 2
Page 2
© 2017
Spectrum Brands, Inc.

This manual suits for next models

2

Other Spectrum Brands Door Lock manuals

Spectrum Brands SD004: SD005 User manual

Spectrum Brands

Spectrum Brands SD004: SD005 User manual

Spectrum Brands Kwikset Home Connect 620 User manual

Spectrum Brands

Spectrum Brands Kwikset Home Connect 620 User manual

Spectrum Brands Kwikset User manual

Spectrum Brands

Spectrum Brands Kwikset User manual

Spectrum Brands Kwikset Passage User manual

Spectrum Brands

Spectrum Brands Kwikset Passage User manual

Spectrum Brands WEISER 62835 User manual

Spectrum Brands

Spectrum Brands WEISER 62835 User manual

Popular Door Lock manuals by other brands

M-LOCKS MiniTech User instructions

M-LOCKS

M-LOCKS MiniTech User instructions

Sargent P2 PASSPORT 1000 installation instructions

Sargent

Sargent P2 PASSPORT 1000 installation instructions

Xenon SM-SL608 manual

Xenon

Xenon SM-SL608 manual

Olympus Lock 100DR installation instructions

Olympus Lock

Olympus Lock 100DR installation instructions

ZKTeco LH7000 installation guide

ZKTeco

ZKTeco LH7000 installation guide

Schlage VIP 5100 series installation manual

Schlage

Schlage VIP 5100 series installation manual

Iseo Zero1 Aries Smart installation guide

Iseo

Iseo Zero1 Aries Smart installation guide

Gianni GK760 Series installation instructions

Gianni

Gianni GK760 Series installation instructions

Assa Abloy Yale YDM3115A user manual

Assa Abloy

Assa Abloy Yale YDM3115A user manual

Schlage PC60 Use and care guide

Schlage

Schlage PC60 Use and care guide

Ava BQT YD25 Installation and operating instructions

Ava

Ava BQT YD25 Installation and operating instructions

Longleaf Collection 20 FUNCTION installation instructions

Longleaf Collection

Longleaf Collection 20 FUNCTION installation instructions

Austral Lock Gainsborough YARRA HORIZON FLAT OUTER PULL installation instructions

Austral Lock

Austral Lock Gainsborough YARRA HORIZON FLAT OUTER PULL installation instructions

GATEMAN S10-FD instruction manual

GATEMAN

GATEMAN S10-FD instruction manual

BSS Audio EasyBlocker 108320 Installation instruction

BSS Audio

BSS Audio EasyBlocker 108320 Installation instruction

Austral Lock ELEGANCE ILLUSTRATED FITTING INSTRUCTIONS

Austral Lock

Austral Lock ELEGANCE ILLUSTRATED FITTING INSTRUCTIONS

Solarcanopy MK7 user manual

Solarcanopy

Solarcanopy MK7 user manual

Cyberlock Touchpad TukTuk operating instructions

Cyberlock

Cyberlock Touchpad TukTuk operating instructions

manuals.online logo
manuals.online logoBrands
  • About & Mission
  • Contact us
  • Privacy Policy
  • Terms and Conditions

Copyright 2025 Manuals.Online. All Rights Reserved.