Spice M-5363 User manual

1
A L L R I G H T S R E S ER V ED
S Mobility Ltd ©2012. All rights are reserved. No part of this document can
be reproduced without permission. All trademarks and brand names
mentioned in this publication are property of their respective owners.
While all the efforts have been made to ensure the accuracy of contents in
this manual, we presume no responsibility for errors or omissions or
statements of any kind, whether such errors are omissions or statements
resulting from negligence, accidents, or any other cause. We operate a policy
of continuous development and reserve the right to make changes,
modifications and improvements to the device, device features/specifications
or any of its parts without prior notice.
The limited warranty does not cover user manuals or any third party
software, settings, content, data or links, whether included/downloaded in
the product, whether included during installment, assembly, shipping or any
other time in the delivery chain or otherwise and in any way acquired by you.
To the extent permitted by applicable law(s), Spice does not warrant that
any Spice software will meet your requirements, will work in combination
with any hardware or software applications provided by a third party, that
the operations of the software will be uninterrupted or error free or that any
defects in the software are correctable or will be corrected.

2
User’s Manual is provided just to guide the user about the functionality of the
device. This does not seem to be any certificate of technology. Some functions may vary
due to modifications and up-gradations of software or due to printing mistake.

3
T A B L E O F C O N T EN T S
A L L R I G HT S R E S E R VE D .......................................................... 1
T A B L E O F C O N T E N T S ............................................................. 3
S A F ET Y PR E C A U T I O N S ........................................................... 4
U N D E R S T A N D I N G Y O U R D E V I C E ............................................ 7
G E T T I N G S T A R T E D .............................................................. 11
B A S I C O P E R A T I O N S ............................................................. 13
M A I N M E N U ......................................................................... 15
C O N T A C T S ........................................................................... 16
M E S S A G E S ............................................................................ 17
C A L L L O G S ........................................................................... 20
M U L T I M E D I A ....................................................................... 22
S L I F E .................................................................................. 30
PR O F I L ES ............................................................................ 31
S T O R A G E ............................................................................. 32
B L U E T O O T H ........................................................................ 33
S E T T I N G S ............................................................................ 34
G A M E S ................................................................................. 38
O R GA N I Z E R ......................................................................... 39
S E R V I C E S ............................................................................. 46
U S I N G P H O N E A S M O D E M .................................................... 47
S U P P O R T A N D C O N T A C T ...................................................... 53
E N V I R O N M E N T A L C O N C E R N ................................................. 54

4
S A F E T Y P R E C A U T I O NS
Please read the following safety guidelines before using the phone.
• Do not use the phone while you are driving.
• Do not place magnetic storage media near your phone. Radiation
from the phone may erase the information stored on them.
• Keep your phone and its accessories away from children.
• Mobile phones can interfere with the functioning of medical
devices such as hearing aids or pacemakers. People having
active medical implants should keep their cell phone at least
15 cm away from the implant.
• Permanent hearing loss may occur if you use earphones or
headphones at high volume.
• Use a wireless hands-free system (headphone/ headset) with a
low power Bluetooth emitter.
• Make sure the cell phone has a low SAR.
• Keep your calls short or send a text message (SMS) instead. This
advice applies specially to children adolescents and pregnant
women.
• Use cell phone when the signal quality is good.
Notice:
• Do not dismantle the device or accessories otherwise,
manufacturer is not liable to pay for damages as the device and
accessories are not covered by warranty.
• Use only original batteries and charging devices.

5
• Please back up your important data timely and keep them
properly. The company is not liable for any failure to call or loss of
data due to mis-operation, poor signal or power cut, etc.
• All the screens in this manual are for reference only, and some
contents actually displayed may depend upon the presetting of
the service provider or the network operator, or the SIM card. If
any functions referred to in this manual are different from those of
your phone, please follow your phone.
• Improper use will invalidate the guarantee! These safety
instructions also apply to original accessories.
• Do not put your phone in a high-temperature place or use it in a
place with flammable gas such as a petrol pumps.
• Do not touch the charger, power cable or socket with wet hands.
This may cause an electric shock.
• Do not use the phone in an environment of extremely high or low
temperature, or an environment of high humidity. The
temperature recommended for using the phone is 5-35℃.
• If you have difficulties installing the battery, do not force the
installation. This may cause battery leakage, overheating,
explosion or even fire.
If your phone or any of its accessories do not function normally, then please visit
your nearest authorized service facility. The qualified personnel will assist you, and if
necessary, will arrange for the service.

6
SAR (Specific Absorption Rate)
Your device conforms to the Indian guidelines for exposure to radio waves.
The limits are given in terms of a unit referred to as the Specific Absorption
Rate (SAR), which is a measure of the amount of radio frequency energy
absorbed by the body when using a mobile phone. The SAR value as per the
Indian guidelines standard is 1.6 watts per kg (Watt/kg), averaged over a 6
minutes period and taken over a volume containing a mass of 1 gram of
human tissue. The highest SAR value of this device when tested is 0.650
Watt/kg. You can check it by dialing *727# on your device.

7
U N D E R S T A N D I N G Y O U R D E V I C E
General Device Information
Your device encloses features, such as FM, 1.3 MP Camera, Audio Player,
Bluetooth, Video Player etc. The device is provided with two SIM slots, the
SIM inserted in slot1 is Master SIM, and the one in the slot2 is Slave SIM.
Technical Specifications
Battery
1
800mAh
Charger
Input:100
-
240V Output:5V
Dimensions
100 x 60.6 x 13 mm
Weight
102g
Screen
Size:
6cm
, Resolution: 320x240, C
olo
r:
65k
Standby Time*
780
minutes
Maximum Talk Time*
300 minutes
*The standby time and maximum talk time depends upon the network signals and
settings.
8
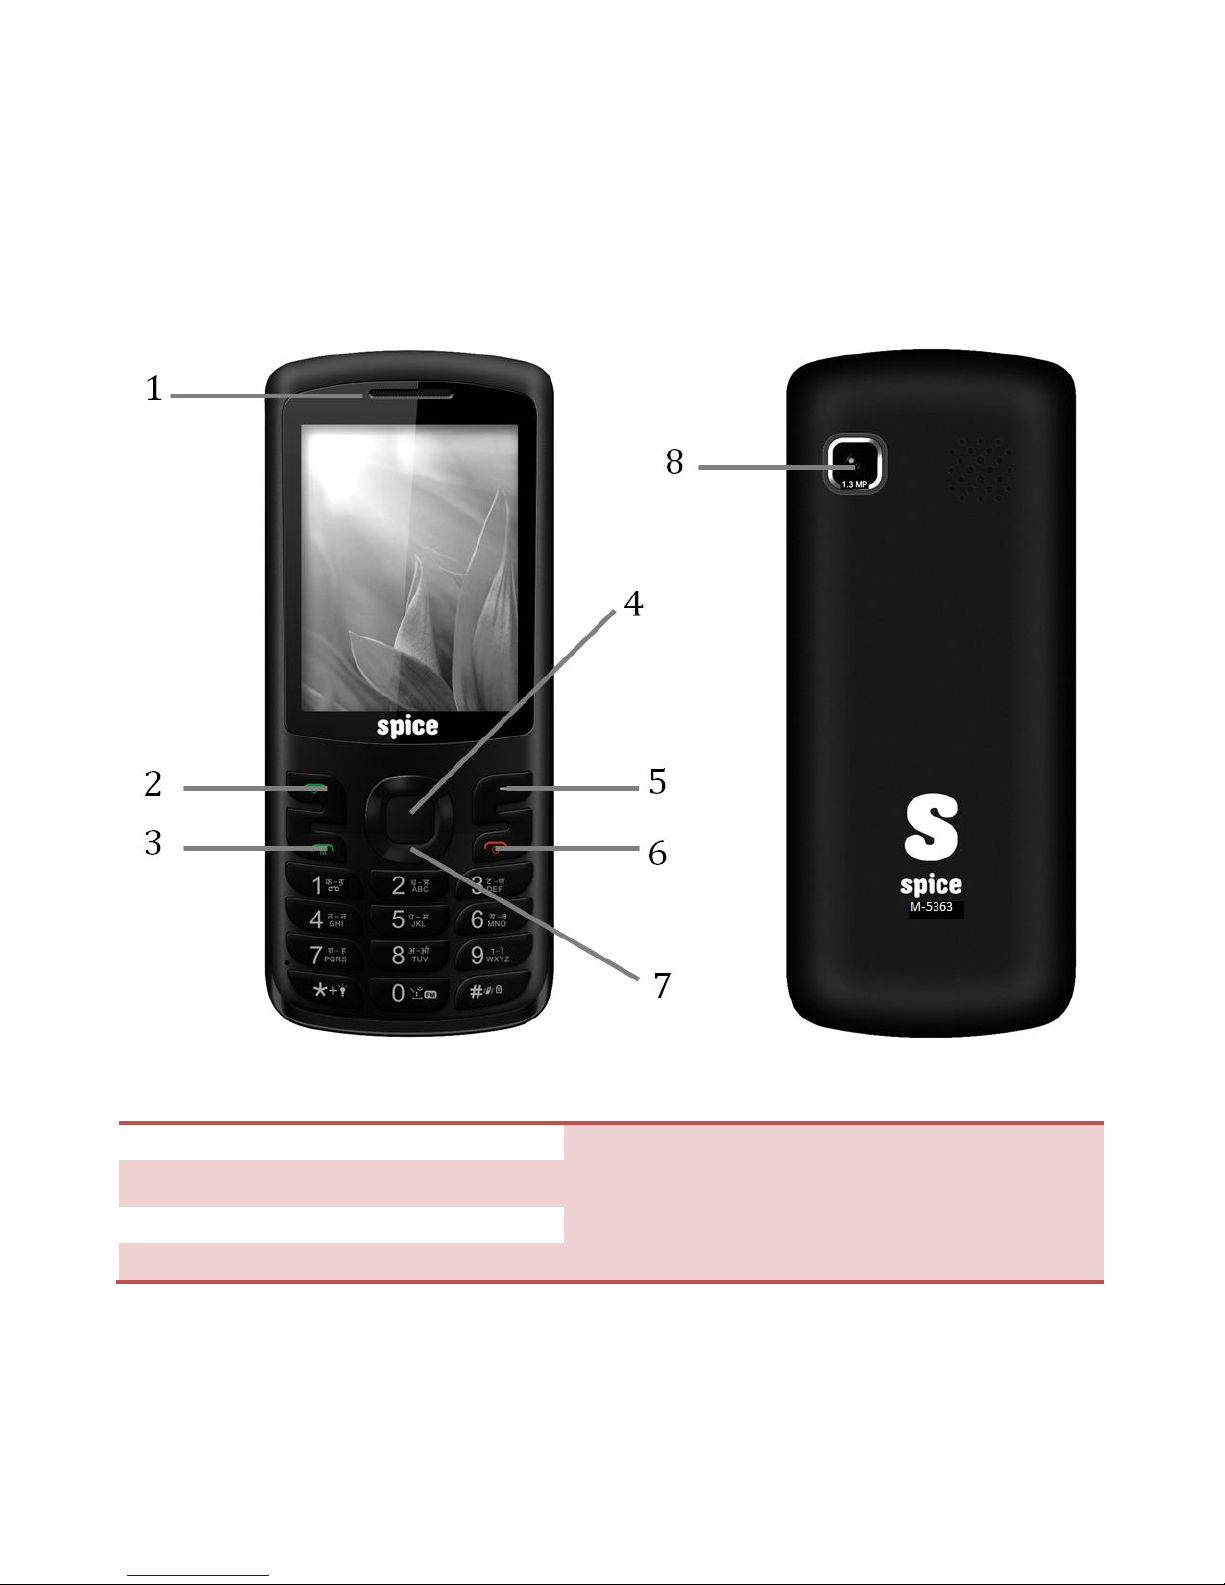
Device Overview
Position of Keys
1.
Earpiece
2.
LSK/Menu/Slave SIM Key
3.
Master/Call Key
4.
Ok/Center Ke
y
5.
RSK/Right Soft Key
6.
End/Power Key
7.
Navigation Keys
8.
Camera

9
Function of Keys
Key
Function
Master SIM Key
To make/an
swer a call
.
In the standby mode, press this key to view Call
Logs.
End/Power Key
End an ongoing call.
In the menu mode, press this key to quit the
current menu and return back to the standby
mode.
Long press the key to switch on/off the device.
Right Soft
Key(RSK)
Use RSK to execute the functions indicated at the
right of the prompt bar on the screen.
Left Soft Key
(LSK)
Use
LSK
to execute the functions indicated at the
left of the prompt bar on the screen.
In the standby mode, use to access Main Menu.
After entering a no, use this key to make a call
from Slave SIM.
Numeric Keys
Use to enter numbers, letters and special
characters.
In the edit mode, press the * key to enter
symbols.
In the standby mode, long press 0 key to switch
on/off the FM, long press * key to switch
on/off the torch.
In the standby mode, Press RSK and # key to
10
lock/unlock keypad.
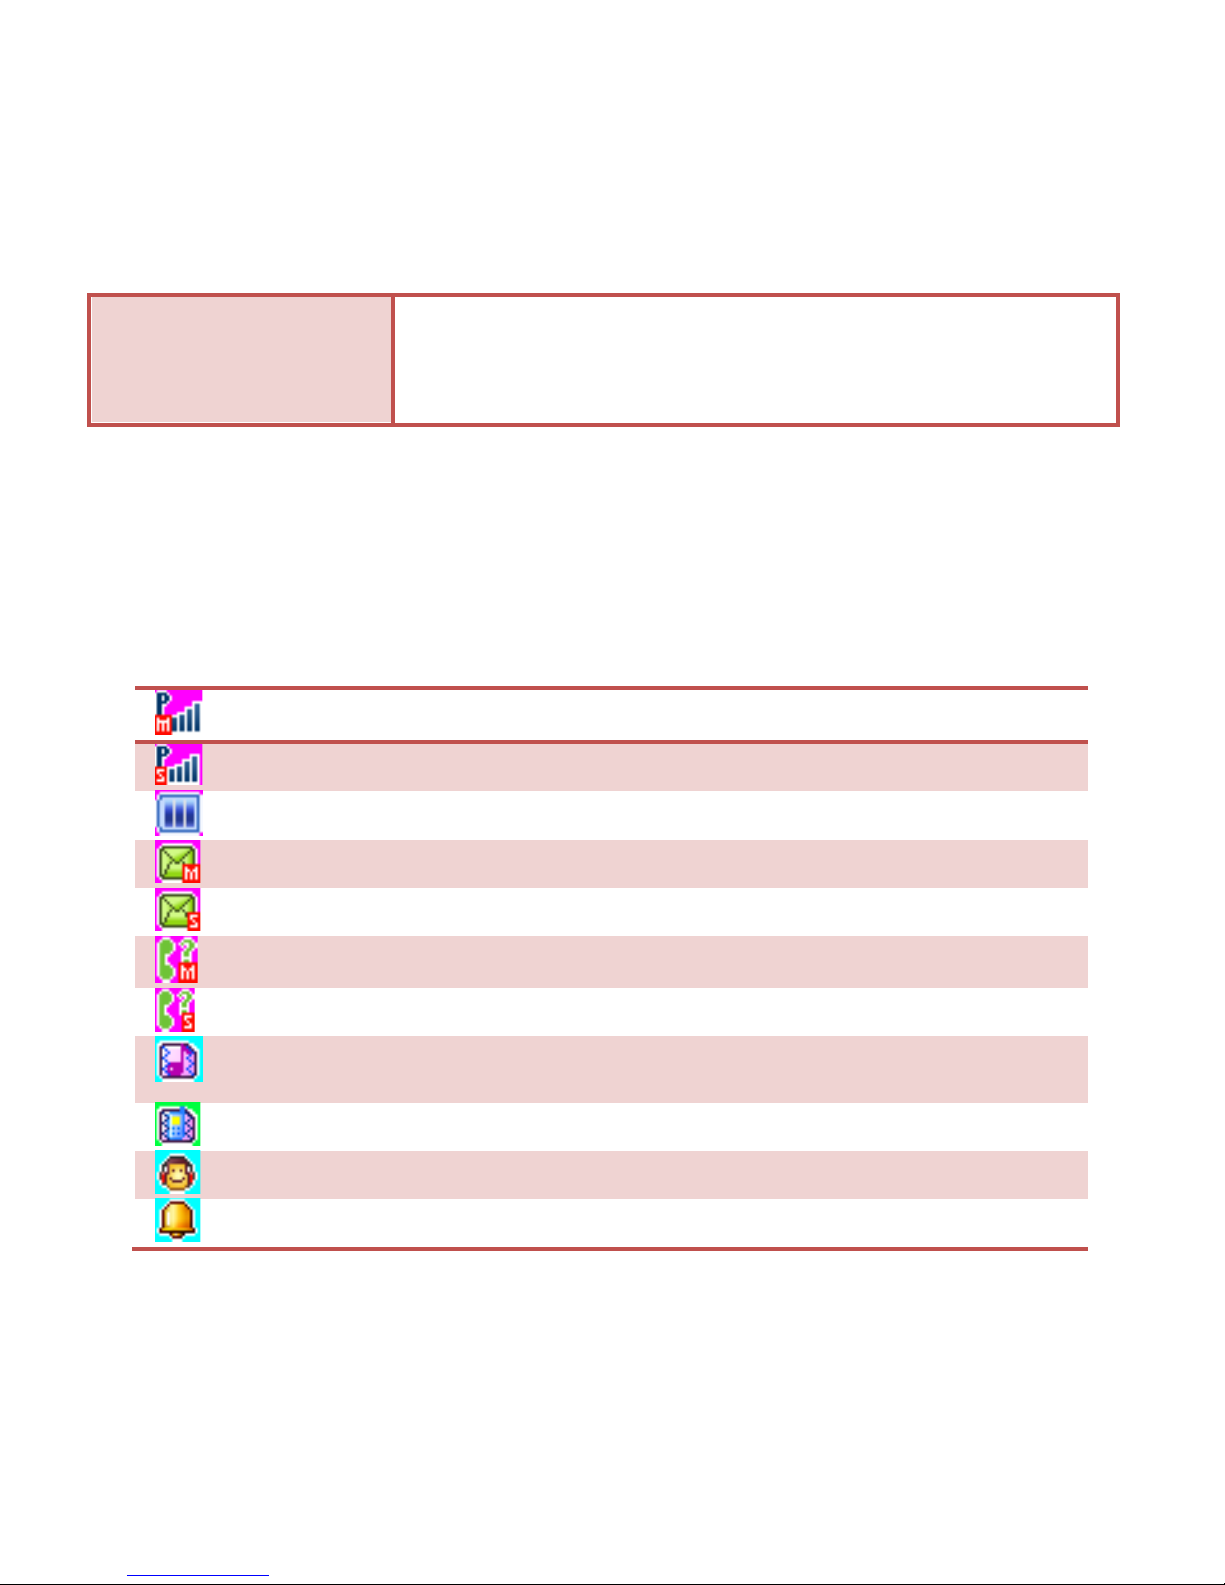
Status Icons
The table below lists various icons that might appear on the status bar while
using the device. Apart from the icons for signal strength level and the power,
other icons are displayed as per the current mode and priority of the device.
Indicates the network sig
nal strength of Master SIM.
Indicates the network signal strength of Slave SIM.
Indicates the current battery capacity.
Indicates that there is an unread message in Master SIM.
Indicates that there is an unread message in Slave SIM.
Indicate
s that there is a missed call in Master SIM.
Indicates that there is a missed call in Slave SIM.
Indicates that the current Sound Status is the Vibrate and Ring.
Indicates that the current Sound Status is the Vibrate only.
Indicates that the cu
rrent profile mode is the Headset mode.
Indicates that the current alarm clock is set as activated.

11
Indicates that the audio player is running.
Indicates the current keypad
-
locked state.
Indicates that the Bluetooth is turn on.
G E T T I N G S T A R T E D
Please switch off your device before inserting or removing the battery/SIM
card or memory card.
Installing SIM Card and Battery
Your device is provided with two SIM slots for two different SIM cards. The
SIM card inserted in the slot1 is called Master SIM, and the other one in the
slot2 is known as Slave SIM.
Remove the back cover of the device.
Hold the device with the front facing downwards; pull the battery
cover.
Insert the SIM cards in the device.
Attach the battery.
Push the battery cover until it clicks into place.
Installing Memory Card
Your device supports T-Flash card, which is a multimedia memory card used
to multiply the memory of the device. The T-flash card is small and should be

12
pulled out/installed carefully and prudently in order to avoid any kind of
damage.
Switch off your device.
Remove the battery cover.
Slide the T-Flash card into the slot.
Attach the battery.
Push the battery cover until it clicks into place.
Charging the Battery
The device prompts a warning tone and message stating insufficient battery
when the battery power of your device is low.
Please follow the instructions mentioned below to charge your device:
Plug the connector of the charger into the jack of the device.
Plug the charger into a standard AC wall outlet.
When is shown on the screen, it indicates that there is not enough power
and you should now charge your device. When charging is complete, the
battery icon will stop flashing.
Charging……. Fully Charged…….
You must fully charge the battery before using the device for the first time. It
is recommended to charge the battery for four hours before using the device
for the first time.
If the device is turned on during charging, you can still make or answer calls,
but this will consume battery power, thus will extend the charging time of
the device.

13
Switching On/Off the Device
To turn on/off the device, press and hold the End/Power Key.
If you have enabled the SIM Lock function then enter the PIN code (the 4 to
8 digits secret code of your SIM card). It is preconfigured and provided to
you by your network operator or retailer. If you enter an incorrect PIN code 3
times in succession, your SIM card will be locked. To unlock it, you must
obtain a code from your network operator.
Automatic Customer Registration
After 4 hours of usage a SMS from the device will be sent automatically for
the customer registration.
Standard SMS charges apply.
B A S I C O P E R A T I O N S
To Make Calls
If the icon / appears on the screen, then you can make or answer
calls. In order to make a call, please follow the steps mentioned below:
Input the phone number (should affix the international/national/regional
code or district code if necessary) and then press [M/S] in the standby
mode.
In the idle mode, press Master SIM Key to dial a phone number listed
in the recent call log.
Press and hold numeric keys [2]-[9] to dial the speed dial number

14
assigned to the numeric keys.
You can select a contact number from the phonebook and call the
contact person.
The signal strength may influence the quality of connection.
To Dial International Number
Your device supports dialing the international emergency phone number,
such as 112 and 911. With the device, you can dial an emergency call in any
country or region under the normal situation regardless of SIM card inserted
when the device is located within the coverage of the GSM network. Input
the emergency phone number and press [M/S] to dial.
The device will select the main network automatically after powered on if it is
located within the coverage of the main network. The device can use other
network, called as roaming, if the device is not located within the coverage of
the main network when the network operator protocol permits.
You can dial or answer a call when the symbol of the network operator
appears on the screen.
Answer/Reject an Incoming Call
Press Master SIM Key to receive the incoming call. You can use
the earphone to answer the call when the generic headset is
inserted in the device.
Press [End Key] to reject an incoming call.

15
Options During a Call
Press <Options> to use the following functions during the call:
Volume settings: adjust the call volume.
Hold single call: temporarily hold the current call.
End Single Call: end the current call.
New call: make a new call.
Phonebook: access the Contacts menu.
Call logs: access the Call Logs menu.
Messages: access the Messages menu.
Mute: select to mute the current call.
DTMF: Dual Tone Multi Frequency.
M A I N M E NU
Menu guides you to the various applications, features and utilities available in
your device. In the idle mode, press Left Soft Key (LSK) to access the Main
Menu. Use the navigation keys to select the desired menu and press
center/ok key to enter that menu.
Contacts
Messa
ges
Call
Logs
Multimedia
S Life
Profiles
Storage
Bluetooth
Settings
Games
Organizer
Services

16
C O N T A CT S
Contacts refer to the directory wherein all the contacts are stored in an
alphabetical order. You can view, edit, delete, send message and perform
various other functions on each contact.
Press LSK in the standby mode and then select contacts.
Add New Contact
Go to Main Menu > Contacts > Add new contact
Press Ok Key and select the desired storage
After selecting the desired storage, press ok and enter the contact
details

17
Search Contact
Input the initials of a name to be searched.
Select a desired entry from the list.
M E S S A GE S
Your device features, sending and receiving of SMS (Short Message Service)
Press LSK (Left Soft Key) to access Main Menu and then select Messages.
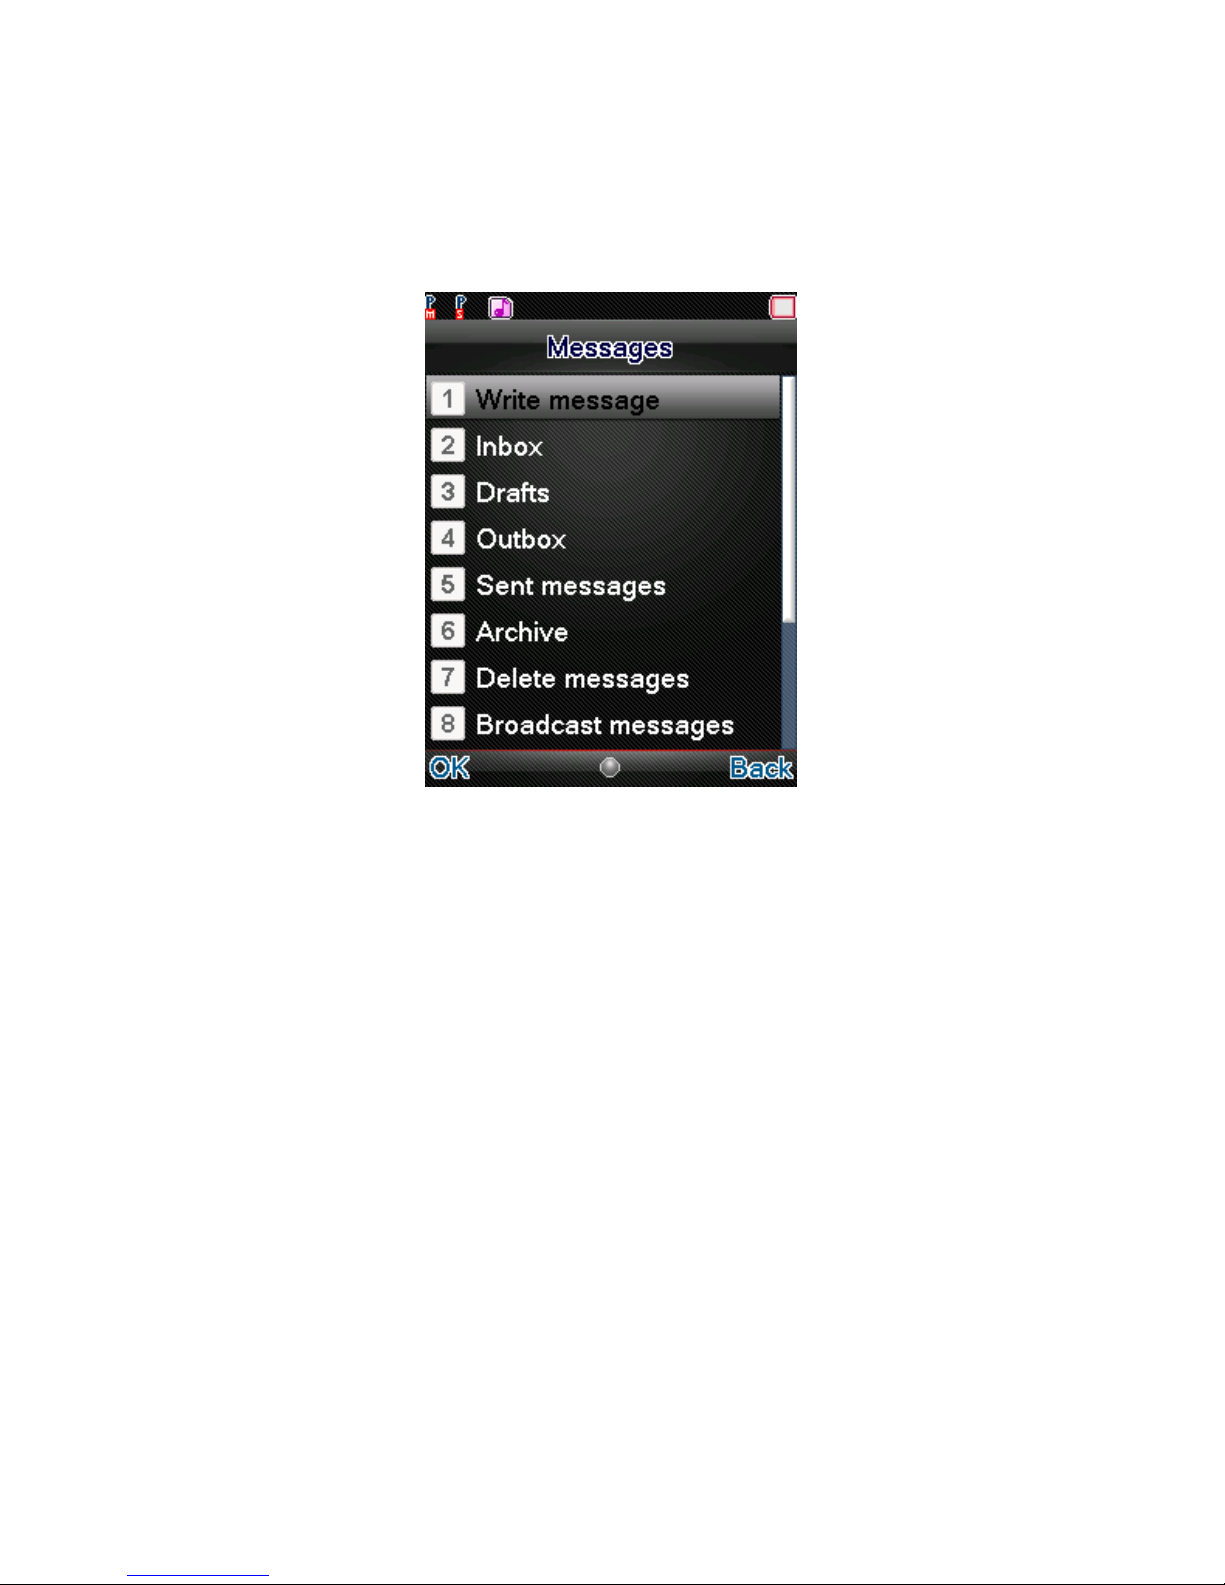
18
Write message
You can create and send message to a particular contact using this sub-menu.
Inbox
Inbox sub-menu enables you to view all the messages received on your
Master/Slave SIM.
Drafts
The created messages can be saved to drafts folder for future use. After
selecting a message from the Drafts folder, select Options to edit/delete or
send the saved message from the desired SIM.
Outbox

19
The messages that are not sent successfully get stored in the Outbox folder.
Sent Message
All the messages that are sent successfully get stored in the Sent Messages.
Archive
You can move messages into the Archive
Delete messages
Delete all of the messages in the Inbox, Drafts, Outbox, Sent messages,
archive.
Broadcast Message
This network service enables you to receive all kind of text messages, such
as weather reports or transportation information. There are several
networks who afford this service in this world. Please consult your network
operator for more reference.
Receive mode: Turn on or off the Cell Broadcast.
Channel settings: You can choose Select, Add, Edit or Delete to
receive the Broadcast information.
Languages: Select the desired language to display the broadcast
message.
Read messages: Scroll the Up/Down Key to select the message.
Your network operator decides whether the language is supported or not.
SMS Templates

20
Your device is provided with some commonly used pre-defined messages.
These messages can be edited and send instantly.
SMS Settings
You can view/change the SMS settings, such as profile, voicemail server,
delivery report etc by accessing this sub-menu.
SMS backup
You can export/import messages by accessing this sub-menu.
Schedule SMS
This service allows you to send a message to a particular contact at a time
pre-defined by you.
C A L L L O G S
Call Logs sub-menu lets you view the call details i.e. the missed, received &
dialed call logs. In the standby mode, press left soft key to access Menu >
Call Logs > Call Logs. Scroll up/down to select a call and then press OK key
to view the details and perform operations, such as View, Call, Send SMS,
Add to blacklist, Delete etc.
Table of contents
Other Spice Cell Phone manuals


