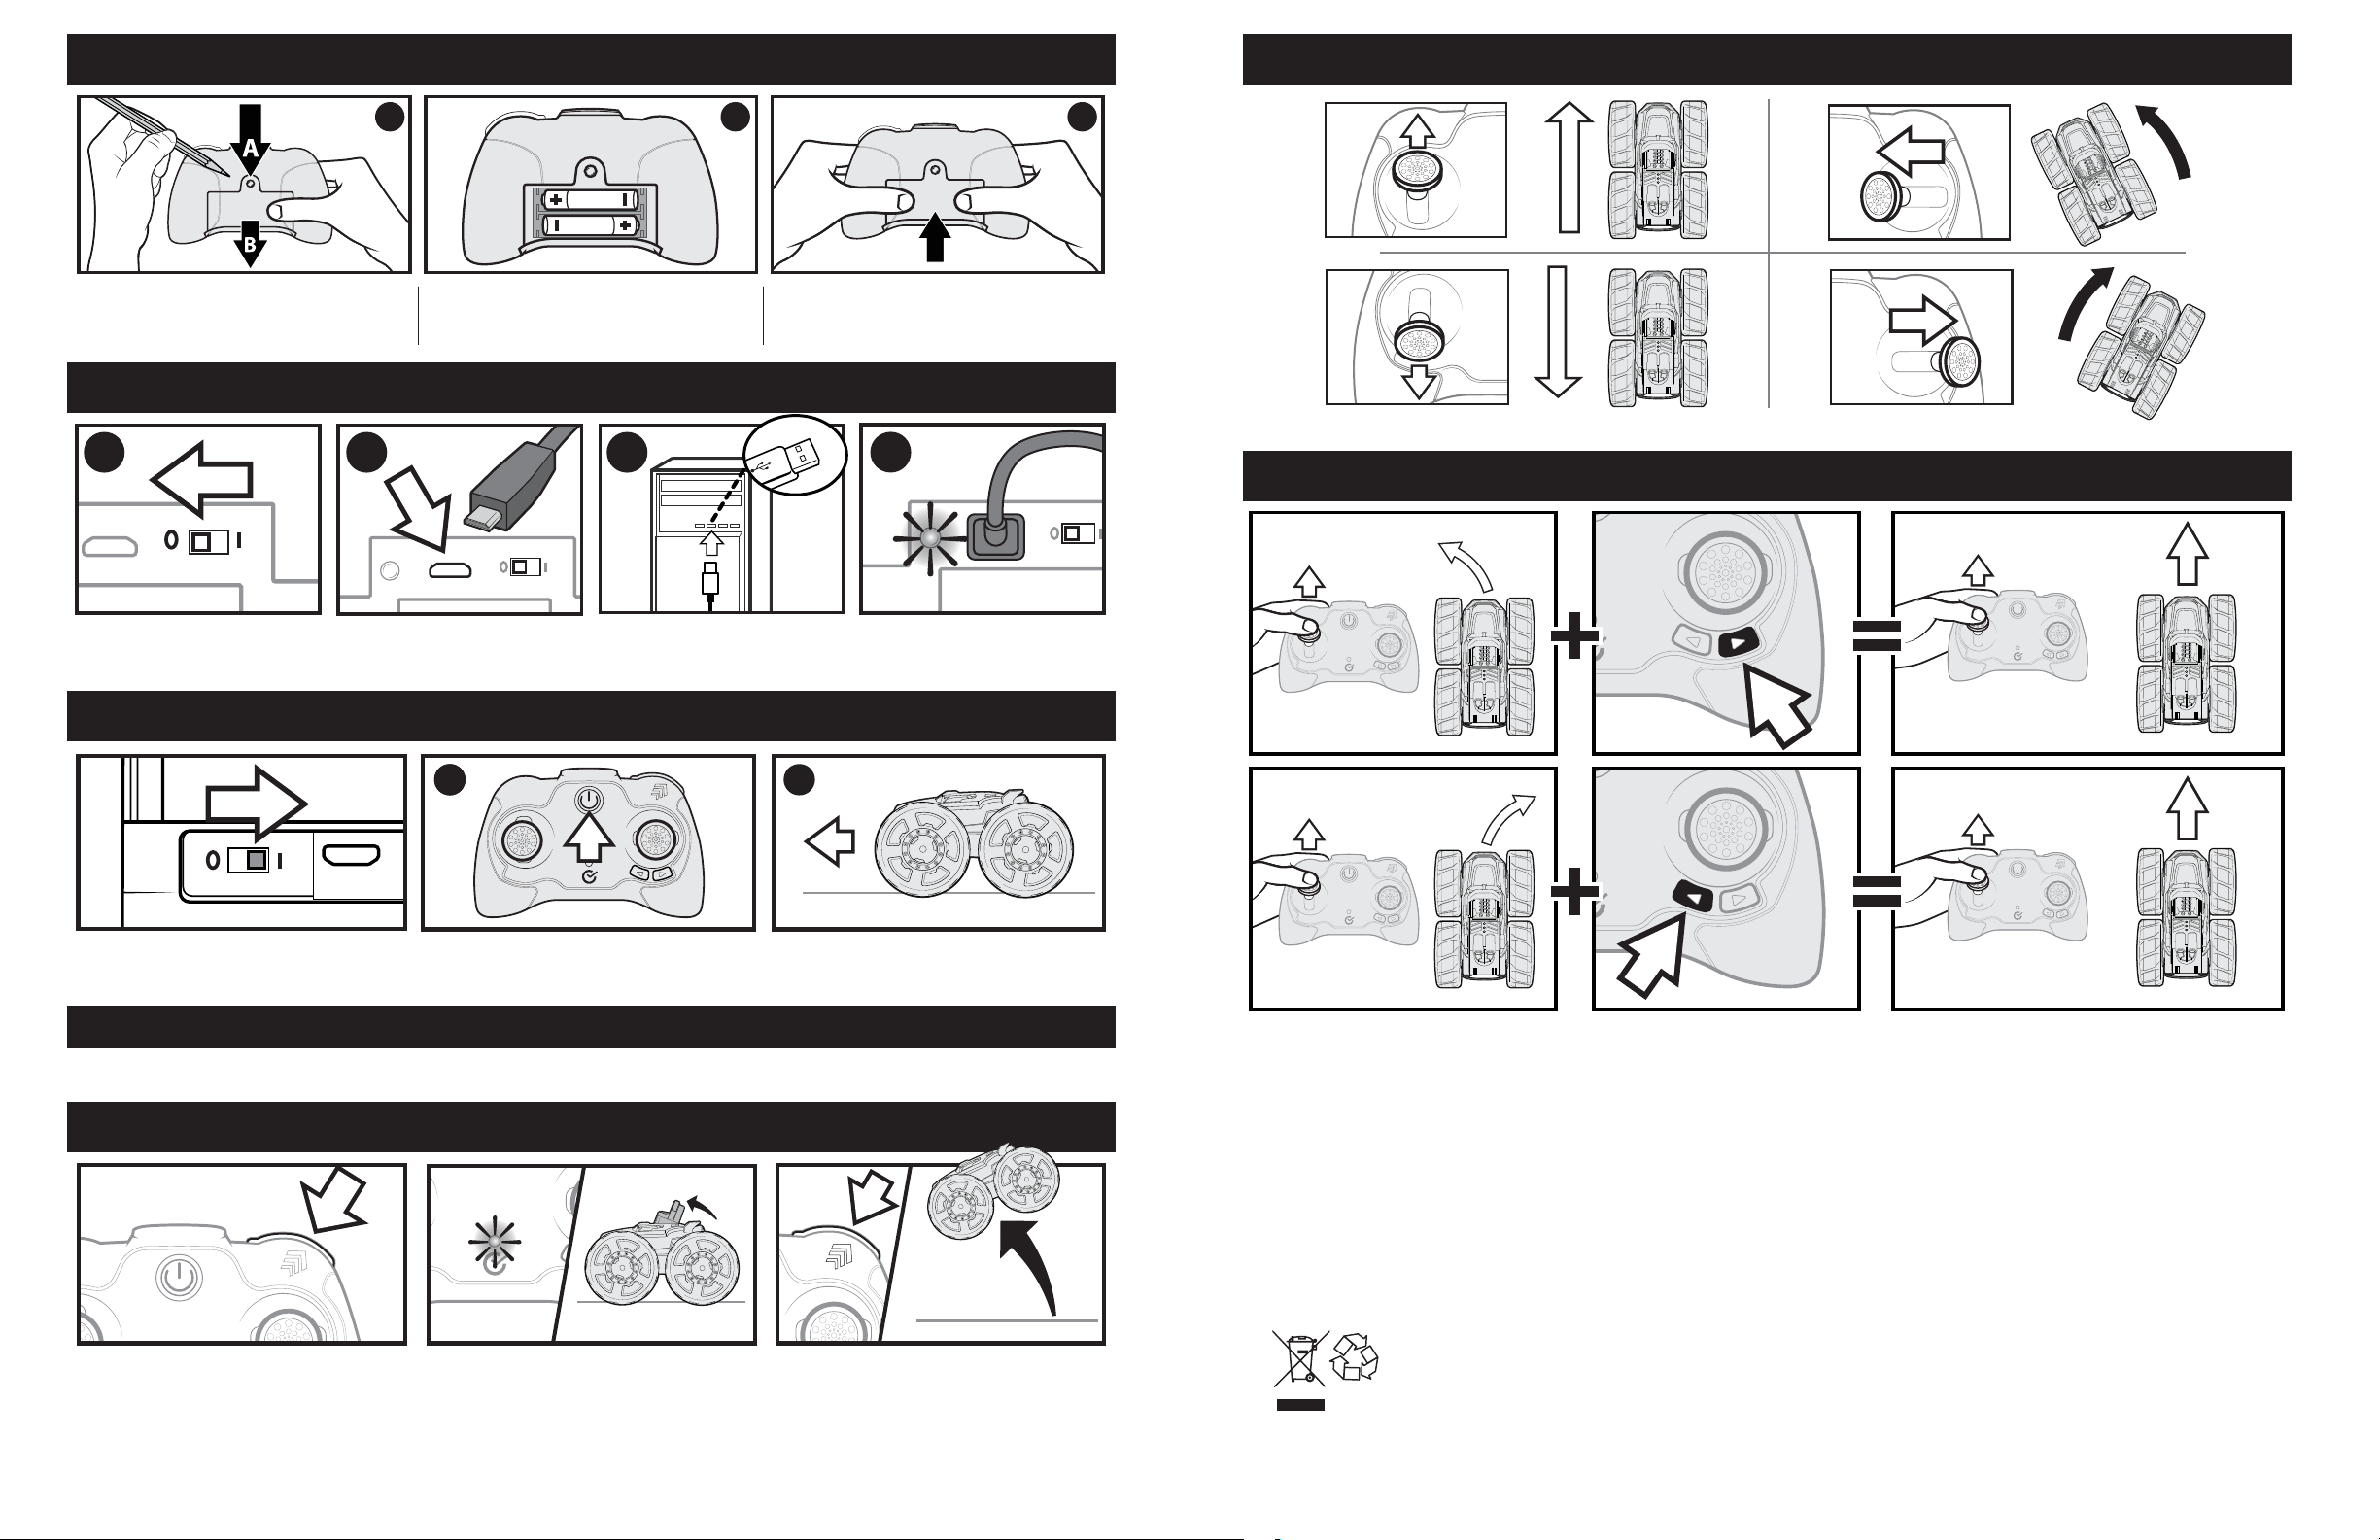
manuals.online logo
Brands
  1. Home
  2. •
  3. Brands
  4. •
  5. Spinmaster
  6. •
  7. Motorized Toy Car
  8. •
  9. Spinmaster AIRHOGS JUMP FURY SERIOUSLY SOFT RC! User manual

Spinmaster AIRHOGS JUMP FURY SERIOUSLY SOFT RC! User manual

INDOOR USE ONLY
CAUTION:
HAIR ENTANGLEMENT
—
Tie back and cover hair and secure
loose clothing prior to play.
!
Not Included
xAAA
(LR03)
1.5 V
2
NORTH AMERICA – 1-800-622-8339
customercare@spinmaster.com
UK – 0800 206 1191, serviceuk@spinmaster.com
IRELAND – 1800 992 249
AUSTRALIA –1800 316 982, customercare@spinmaster.com
WWW.SPINMASTER.COM
YRS
4+
CONTENTS
1 Jump Fury™
1 USB
Charging
Cable
1 Controller
Frequency Band(s): 2.422 – 2.467 GHz
Maximum radio frequency power transmitted: < 10dBm
BATTERY SAFETY INFORMATION: Batteries are small objects. Replacement of batteries must be done by adults. Follow the polarity (+/-) diagram in the
battery compartment. Promptly remove dead batteries from the toy. Dispose of used batteries properly. Remove batteries for prolonged storage. Only
batteries of the same or equivalent type as recommended are to be used. DO NOT incinerate used batteries. DO NOT dispose of batteries in fire, as batteries
may explode or leak. DO NOT mix old and new batteries or types of batteries (i.e. alkaline/standard/rechargeable). Using rechargeable batteries is not
recommended due to possible reduced performance. Rechargeable batteries are only to be charged under adult supervision. Replaceable-rechargeable
batteries are to be removed from the toy before being charged. DO NOT recharge non-rechargeable batteries. DO NOT short-circuit the supply terminals.
SPECIAL LiFe BATTERY INSTRUCTIONS: Never charge battery unattended. - Charge battery in an isolated area. Keep away from flammable materials. -
Do not expose to direct sunlight. There is a risk of the batteries exploding, overheating, or igniting. - Do not disassemble, modify, heat, or short-circuit the
batteries. Do not place them in fires or leave them in hot places. - Do not drop or subject to strong impacts. - Do not allow the batteries to get wet. - Only
charge the batteries with the specified Spin Master™ battery charger. - Only use the batteries in the device specified by Spin Master™. - Carefully read the
instruction guide and use the batteries correctly. - In the unlikely event of leakage or explosion use sand or a chemical fire extinguisher for the battery. -
Batteries must be recycled or disposed of properly.
PRODUCT BATTERY REMOVAL INSTRUCTIONS: Internal battery is factory installed and non-replaceable. Product disassembly and battery removal must
be performed by an adult. Do not puncture, cut, tear, compress or deform product during disassembly. Ensure product is turned off, then use a screw driver
to remove all screws. Separate product body halves to expose internal electronics. When battery is visible in its entirety, use scissors to cut a single battery
wire, immediately wrap the cut wire end with tape to isolate it, repeat until all battery wires are cut and isolated, and the battery is free from the rest of the
product. Dispose of battery in accordance with your local battery recycling or disposal laws.
FCC STATEMENT: This device complies with Part 15 of the FCC rules. Operation is subject to the following two conditions: (1) This device may not cause
harmful interference, and (2) This device must accept any interference received, including interference that may cause undesired operation. This equipment
has been tested and found to comply with the limits for Class B digital devices pursuant to Part 15 of the FCC rules. These limits are designed to provide
reasonable protection against harmful interference to radio communications. This equipment generates, uses and can radiate radio frequency energy and, if
not installed and used in accordance with the instruction, may cause harmful interference to radio communication. However, there is no guarantee that
interference will not occur in a particular installation. If this toy does cause interference to radio or television reception (you can check this by turning the toy
off and on while listening for the interference), one or more of the following measures may be useful:
• Reorient or relocate the receiving antenna.
• Increase the separation between the toy and the radio or the TV.
• Consult the dealer or an experienced TV-radio technician for help.
NOTE: Changes, adjustments or modifications to this unit, including but not limited to, replacement of any transmitter component (crystal, semiconductor,
etc.) could result in a violation of FCC rules under part 15 and/or 95 and must be expressly approved by Spin Master Ltd or they could void the user’s
authority to operate the equipment. Spin Master Inc., PMB #10053, 300 International Drive, Suite 100, Williamsville, NY 14221. To contact the responsible
party please visit fcc.spinmaster.com.
-----------------------------------------------------------------------------------------------------------------------------------------------------------------------------
Do not change or modify anything on the toy.
BEFORE FIRST USE: Read the user's information together with your child.
Spin Master Ltd., 225 King Street West, Toronto ON M5V 3M2 Canada
Spin Master Inc., PMB #10053, 300 International Drive, Suite 100, Williamsville, NY 14221
Spin Master International B.V., Kingsfordweg 151, 1043 GR Amsterdam, NL
Spin Master Australia Pty Ltd, Suite 101, Level 1, 18-24 Chandos Street, St Leonards, NSW 2065; 1800 316 982
Spin Master Toys UK Ltd. Secure Trust House, Boston Drive, Bourne End, Buckinghamshire, SL8 5YS, UK
Spin Master logo & © Spin Master Ltd. All rights reserved. Retain this information, addresses and phone numbers for future reference. Content may vary
from pictures. Keep away from obstacles and electrical hazards. Spin Master Ltd. reserves the right to discontinue the www.AIRHOGS.com/JUMPFURY
website at any time.
MADE IN CHINA For TROUBLESHOOTING questions and solutions, please visit our website:
AIRHOGS.COM/JUMPFURY
NOTE: If normal function of the product is disturbed or interrupted, strong electromagnetic interference may be causing the issue. To reset product, turn it
completely off, then turn it back on. If normal operation does not resume, move the product to another location and try again. To ensure normal performance,
change the batteries, as low batteries may not allow full function.
Safety Precautions: - Keep hands, hair and loose clothing away from the motor / wheels when power switch is turned ON. - Remove batteries when not in
use. - Parental guidance is recommended for the play. - Keep your toy in your sight so that you can supervise it all the time. - New alkaline batteries are
recommended to obtain maximum performance. - Users should keep strict accordance with the instruction manual while operating the product.
Note: Parental guidance is recommended when installing or replacing batteries. Under the environment with electrostatic discharge, the toy may malfunction
and require user to reset the toy.
CARE AND MAINTENANCE: Always remove batteries from the controller when it is not being used for a long period of time. Wipe the toy gently with a clean
damp cloth. Keep the toy away from direct heat. Do not submerge the toy in water. This can damage the electronic assemblies.
CONTAINS 1 X 3.2V LiFe 500mAh BATTERY PACK AND
REQUIRES 2 x 1.5V AAA (LR03) ALKALINE BATTERIES (not included).
Batteries or battery packs must be recycled or disposed of properly. When this product has reached the end of its useful life, it should not
be disposed of with other household waste. The Waste Electrical and Electronic Equipment Regulations require it to be separately
collected so that it can be treated using the best available recovery and recycling techniques. This will minimize the impact on the
environment and human health from soil and water contamination by any hazardous substances, decrease the resources required to make
new products and avoid using up landfill space. Please do your part by keeping this product out of the municipal waste stream! The
“wheelie bin” symbol means that it should be collected as “waste electrical and electronic equipment”. You can return an old product to your retailer when
you buy a similar new one. For other options, please contact your local council.
NORTH AMERICA – 1-800-622-8339
customercare@spinmaster.com
UK – 0800 206 1191, serviceuk@spinmaster.com
IRELAND – 1800 992 249
AUSTRALIA –1800 316 982, customercare@spinmaster.com
WWW.SPINMASTER.COM
Spin Master International BV hereby declares that the radio equipment type
JUMP FURY™ is in compliance with Directive 2014/53/EU. The full text of the EU
declaration of conformity is available at the following internet address:
http://doc.spinmaster.com
a
WARNING: CHOKING HAZARD – Small parts. Not for children under 3 years.
T44648_0001_20130279_GEN_IS_R2
AIRHOGS.COM/JUMPFURY
For in-depth video instructions go to
AIRHOGS.COM/JUMPFURY
For in-depth video instructions go to
14
CHARGING
PORT
POWER
SWITCH
JUMP
READY LIGHT
JUMP BUTTON
DRIFT ADJUSTER
BUTTONS
CHARGING
LED
1 Instruction
Guide
1
INDOORUSE ONLY
CAUTION:
HAIRENTANGLEMENT
—
Tieback and cover hair and secure
loose clothing prior to play.
!
NotIncluded
x
AAA
(LR03)
1.5V
2
NORTHAMERICA – 1-8 00-622- 8339
[email protected]
UK– 0800 206 1191,serviceu[email protected]
IRELAND– 180 0 992 249
AUSTRALIA –1800316 982, customerc[email protected]
WWW.SPINMA STER.COM
YRS
4+
CONTENTS
1Jumpfury™1 USB Charging Cable 1Instruction Guide1Sticker Sheet1Controller
CHARGING
PORT
POWER
SWITCH
LOADJUMP
BUTTON
JUMPTRIGGER
DRIFTADJUSTER
BUTTONS
CHARGING
LED
This toy is only to be connected to equipment bearing either of the following symbols:
or
a WARNING: Do not aim at eyes or face.
23
HOW TO JUMP
1
HOW TO INSTALL BATTERIES
1. Press down on release button (A) to
slide down battery cover (B).
2. Install new batteries as shown in the
polarity diagram (+/-) inside the battery
compartment.
3. Replace battery door securely. Check
your local laws and regulations for
correct recycling and/or battery disposal.
1 2 3
HOW TO DRIVE
HOW TO CHARGE
HOW TO CORRECT WHEEL ALIGNMENT
If your vehicle does not connect to the controller the first time, turn the vehicle off, remove batteries from the controller, put the batteries back
in and repeat the HOW TO CONNECT THE CONTROLLER instructions.
CONTROLLER NOT CONNECTING
HOW TO CONNECT THE CONTROLLER
1. Turn on the vehicle and place it on a flat
surface.
2. Hold the controller near your Jump Fury™,
press the power button and wait until the
power light stops flashing.
3. You are ready to drive.
4. Use the remote control to drive.
2 32
BATTERY SAFETY INFORMATION: Batteries are small objects. Replacement of batteries must be done by adults. Follow the polarity (+/-) diagram in the
battery compartment. Promptly remove dead batteries from the toy. Dispose of used batteries properly. Remove batteries for prolonged storage. Only
batteries of the same or equivalent type as recommended are to be used. DO NOT incinerate used batteries. DO NOT dispose of batteries in fire, as batteries
may explode or leak. DO NOT mix old and new batteries or types of batteries (i.e. alkaline/standard/rechargeable). Using rechargeable batteries is not
recommended due to possible reduced performance. Rechargeable batteries are only to be charged under adult supervision. Replaceable-rechargeable
batteries are to be removed from the toy before being charged. DO NOT recharge non-rechargeable batteries. DO NOT short-circuit the supply terminals.
SPECIAL LiFe BATTERY INSTRUCTIONS: Never charge battery unattended. - Charge battery in an isolated area. Keep away from flammable materials. -
Do not expose to direct sunlight. There is a risk of the batteries exploding, overheating, or igniting. - Do not disassemble, modify, heat, or short-circuit the
batteries. Do not place them in fires or leave them in hot places. - Do not drop or subject to strong impacts. - Do not allow the batteries to get wet. - Only
charge the batteries with the specified Spin Master™ battery charger. - Only use the batteries in the device specified by Spin Master™. - Carefully read the
instruction guide and use the batteries correctly. - In the unlikely event of leakage or explosion use sand or a chemical fire extinguisher for the battery. -
Batteries must be recycled or disposed of properly.
PRODUCT BATTERY REMOVAL INSTRUCTIONS: Internal battery is factory installed and non-replaceable. Product disassembly and battery removal must
be performed by an adult. Do not puncture, cut, tear, compress or deform product during disassembly. Ensure product is turned off, then use a screw driver
to remove all screws. Separate product body halves to expose internal electronics. When battery is visible in its entirety, use scissors to cut a single battery
wire, immediately wrap the cut wire end with tape to isolate it, repeat until all battery wires are cut and isolated, and the battery is free from the rest of the
product. Dispose of battery in accordance with your local battery recycling or disposal laws.
FCC STATEMENT: This device complies with Part 15 of the FCC rules. Operation is subject to the following two conditions: (1) This device may not cause
harmful interference, and (2) This device must accept any interference received, including interference that may cause undesired operation. This equipment
has been tested and found to comply with the limits for Class B digital devices pursuant to Part 15 of the FCC rules. These limits are designed to provide
reasonable protection against harmful interference to radio communications. This equipment generates, uses and can radiate radio frequency energy and, if
not installed and used in accordance with the instruction, may cause harmful interference to radio communication. However, there is no guarantee that
interference will not occur in a particular installation. If this toy does cause interference to radio or television reception (you can check this by turning the toy
off and on while listening for the interference), one or more of the following measures may be useful:
• Reorient or relocate the receiving antenna.
• Increase the separation between the toy and the radio or the TV.
• Consult the dealer or an experienced TV-radio technician for help.
NOTE: Changes, adjustments or modifications to this unit, including but not limited to, replacement of any transmitter component (crystal, semiconductor,
etc.) could result in a violation of FCC rules under part 15 and/or 95 and must be expressly approved by Spin Master Ltd or they could void the user’s
authority to operate the equipment. Spin Master Inc., PMB #10053, 300 International Drive, Suite 100, Williamsville, NY 14221. To contact the responsible
party please visit fcc.spinmaster.com.
-----------------------------------------------------------------------------------------------------------------------------------------------------------------------------
Do not change or modify anything on the toy.
BEFORE FIRST USE: Read the user's information together with your child.
Spin Master Ltd., 225 King Street West, Toronto ON M5V 3M2 Canada
Spin Master Inc., PMB #10053, 300 International Drive, Suite 100, Williamsville, NY 14221
Spin Master International B.V., Kingsfordweg 151, 1043 GR Amsterdam, NL
Spin Master Australia Pty Ltd, Suite 101, Level 1, 18-24 Chandos Street, St Leonards, NSW 2065; 1800 316 982
Spin Master Toys UK Ltd. Secure Trust House, Boston Drive, Bourne End, Buckinghamshire, SL8 5YS, UK
Spin Master logo & © Spin Master Ltd. All rights reserved. Retain this information, addresses and phone numbers for future reference. Content may vary
from pictures. Keep away from obstacles and electrical hazards. Spin Master Ltd. reserves the right to discontinue the www.AIRHOGS.com/JUMPFURY
website at any time.
MADE IN CHINA For TROUBLESHOOTING questions and solutions, please visit our website:
AIRHOGS.COM/JUMPFURY
NOTE: If normal function of the product is disturbed or interrupted, strong electromagnetic interference may be causing the issue. To reset product, turn it
completely off, then turn it back on. If normal operation does not resume, move the product to another location and try again. To ensure normal performance,
change the batteries, as low batteries may not allow full function.
Safety Precautions: - Keep hands, hair and loose clothing away from the motor / wheels when power switch is turned ON. - Remove batteries when not in
use. - Parental guidance is recommended for the play. - Keep your toy in your sight so that you can supervise it all the time. - New alkaline batteries are
recommended to obtain maximum performance. - Users should keep strict accordance with the instruction manual while operating the product.
Note: Parental guidance is recommended when installing or replacing batteries. Under the environment with electrostatic discharge, the toy may malfunction
and require user to reset the toy.
CARE AND MAINTENANCE: Always remove batteries from the controller when it is not being used for a long period of time. Wipe the toy gently with a clean
damp cloth. Keep the toy away from direct heat. Do not submerge the toy in water. This can damage the electronic assemblies.
CONTAINS 1 X 3.2V LiFe 500mAh BATTERY PACK AND
REQUIRES 2 x 1.5V AAA (LR03) ALKALINE BATTERIES (not included).
Batteries or battery packs must be recycled or disposed of properly. When this product has reached the end of its useful life, it should not
be disposed of with other household waste. The Waste Electrical and Electronic Equipment Regulations require it to be separately
collected so that it can be treated using the best available recovery and recycling techniques. This will minimize the impact on the
environment and human health from soil and water contamination by any hazardous substances, decrease the resources required to make
new products and avoid using up landfill space. Please do your part by keeping this product out of the municipal waste stream! The
“wheelie bin” symbol means that it should be collected as “waste electrical and electronic equipment”. You can return an old product to your retailer when
you buy a similar new one. For other options, please contact your local council.
1 2 3
1. Turn the vehicle off.
1. Press the JUMP BUTTON once to load
a jump. The JUMP FURY™ will begin
loading a jump. (Loading take
approximately 7 - 10 seconds).
2. When the JUMP READY LIGHT is solid
ON the JUMP FURY™ is ready to jump.
NOTE: If the Jump Ready Light is
blinking and the mechanism is fully
loaded but not jumping, move the
vehicle to a flatter surface.
3. Press the JUMP BUTTON on the
controller to launch the JUMP FURY™.
2. Plug the small end of the
charging cable into the
charging port.
3. Plug the charging cable into a
5V DC computer outlet.
4. Blinking LED indicates battery
is charging, solid ON for fully
charged.
4

Other Spinmaster Motorized Toy Car manuals

Spinmaster AIRHOGS SUPER SOFT User manual

Spinmaster

Spinmaster AIRHOGS SUPER SOFT User manual

Spinmaster MECCANO AUTOCROSS RC User manual

Spinmaster

Spinmaster MECCANO AUTOCROSS RC User manual

Spinmaster MONSTER JAM MEGA El Toro Loco User manual

Spinmaster

Spinmaster MONSTER JAM MEGA El Toro Loco User manual

Spinmaster BATMAN TURBO BOOST BATMOBILE User manual

Spinmaster

Spinmaster BATMAN TURBO BOOST BATMOBILE User manual

Spinmaster DC Flash 1989 Batmobile RC User manual

Spinmaster

Spinmaster DC Flash 1989 Batmobile RC User manual

Spinmaster DC BATMOBILE RC User manual

Spinmaster

Spinmaster DC BATMOBILE RC User manual

Spinmaster Meccano Erector SUPERCAR 25 IN 1 User manual

Spinmaster

Spinmaster Meccano Erector SUPERCAR 25 IN 1 User manual

Spinmaster Air Hogs 43020 User manual

Spinmaster

Spinmaster Air Hogs 43020 User manual

Spinmaster Monster Jam MEGA EI Toro Loco User manual

Spinmaster

Spinmaster Monster Jam MEGA EI Toro Loco User manual

Spinmaster MECCANO EVOLUTION 2 IN 1 User manual

Spinmaster

Spinmaster MECCANO EVOLUTION 2 IN 1 User manual

Spinmaster MECCANO RACE BUGGY User manual

Spinmaster

Spinmaster MECCANO RACE BUGGY User manual

Spinmaster Crash Force Regenerator User manual

Spinmaster

Spinmaster Crash Force Regenerator User manual

Spinmaster MECCANO OFF-ROAD RACER 27 IN 1 User manual

Spinmaster

Spinmaster MECCANO OFF-ROAD RACER 27 IN 1 User manual

Spinmaster FINN MCMISSILE MISSILE FIRING User manual

Spinmaster

Spinmaster FINN MCMISSILE MISSILE FIRING User manual

Spinmaster Meccano Steam 18303 User manual

Spinmaster

Spinmaster Meccano Steam 18303 User manual

Spinmaster DC BATMOBILE User manual

Spinmaster

Spinmaster DC BATMOBILE User manual

Spinmaster Meccano RACE CAR User manual

Spinmaster

Spinmaster Meccano RACE CAR User manual

Spinmaster MECCANO RODSTER CABRIOLET 5 IN 1 User manual

Spinmaster

Spinmaster MECCANO RODSTER CABRIOLET 5 IN 1 User manual

Spinmaster Meccano 19205 User manual

Spinmaster

Spinmaster Meccano 19205 User manual

Spinmaster AIRHOGS SUPER SOFT STUNT SHOT User manual

Spinmaster

Spinmaster AIRHOGS SUPER SOFT STUNT SHOT User manual

Spinmaster THE BATMAN BATMOBILE User manual

Spinmaster

Spinmaster THE BATMAN BATMOBILE User manual

Spinmaster MONSTER JAM GRAVE DIGGER VS MEGALODON User manual

Spinmaster

Spinmaster MONSTER JAM GRAVE DIGGER VS MEGALODON User manual

Spinmaster MECCANO PAGANI Huayra Roadster User manual

Spinmaster

Spinmaster MECCANO PAGANI Huayra Roadster User manual

Spinmaster Monster Jam Grave Digger 66802TX2G4 MJD RDC User manual

Spinmaster

Spinmaster Monster Jam Grave Digger 66802TX2G4 MJD RDC User manual

Popular Motorized Toy Car manuals by other brands

Kyosho Inferno MP9e TKI instruction manual

Kyosho

Kyosho Inferno MP9e TKI instruction manual

Team Losi XXX Kiwald Edition owner's manual

Team Losi

Team Losi XXX Kiwald Edition owner's manual

Yokomo YD-2Z manual

Yokomo

Yokomo YD-2Z manual

XCell Fury Extreme Assembly manual

XCell

XCell Fury Extreme Assembly manual

3DVIA Racing 3DV-X1 Operation manual

3DVIA Racing

3DVIA Racing 3DV-X1 Operation manual

ZEROTRIBE T4 MID Conversion Kit instruction manual

ZEROTRIBE

ZEROTRIBE T4 MID Conversion Kit instruction manual

LaTrax 76054-5 quick start guide

LaTrax

LaTrax 76054-5 quick start guide

REVELL KIT 2014 Assembly manual

REVELL

REVELL KIT 2014 Assembly manual

Fisher-Price POWER WHEELS H4804 Owner's manual with assembly instructions

Fisher-Price

Fisher-Price POWER WHEELS H4804 Owner's manual with assembly instructions

Carrera RC 370240001 Assembly and operating instructions

Carrera RC

Carrera RC 370240001 Assembly and operating instructions

Team Losi 22S Maxxis manual

Team Losi

Team Losi 22S Maxxis manual

Kyosho inferno DX 4WD user manual

Kyosho

Kyosho inferno DX 4WD user manual

Our Generation OG Ride Along Scooter Instructions for use

Our Generation

Our Generation OG Ride Along Scooter Instructions for use

DHK Hobby OPTIMUS 8383 User instruction manual

DHK Hobby

DHK Hobby OPTIMUS 8383 User instruction manual

HOMCOM BMW S1000 RR owner's manual

HOMCOM

HOMCOM BMW S1000 RR owner's manual

Traxxas TRX4 BRONCO RANGER XLT owner's manual

Traxxas

Traxxas TRX4 BRONCO RANGER XLT owner's manual

Associated Electrics Element RC Enduro Bushido RTR Owners build manual

Associated Electrics

Associated Electrics Element RC Enduro Bushido RTR Owners build manual

Schumacher COUGAR SV2 instruction manual

Schumacher

Schumacher COUGAR SV2 instruction manual

manuals.online logo
manuals.online logoBrands
  • About & Mission
  • Contact us
  • Privacy Policy
  • Terms and Conditions

Copyright 2025 Manuals.Online. All Rights Reserved.