Splicecom IP 530 User manual

IP 530
User Manual

IP 530 User Manual
Document No. 099
Version No. V5.51/1210/1
© Copyright SpliceCom Ltd
SpliceCom Ltd
The Hall Business Centre, Berry Lane
Chorleywood, Herts WD3 5EX
Tel: 01923 287700
Website: www.splicecom.com

IP 530 User Manual
V5.51/1210/1 i Contents
IP 530 User Manual
Contents
Introduction................................................................................................................. 3
About this manual............................................................................................................................................................3
How your IP 530 will operate...........................................................................................................................................3
Feature Highlights ............................................................................................................................................................3
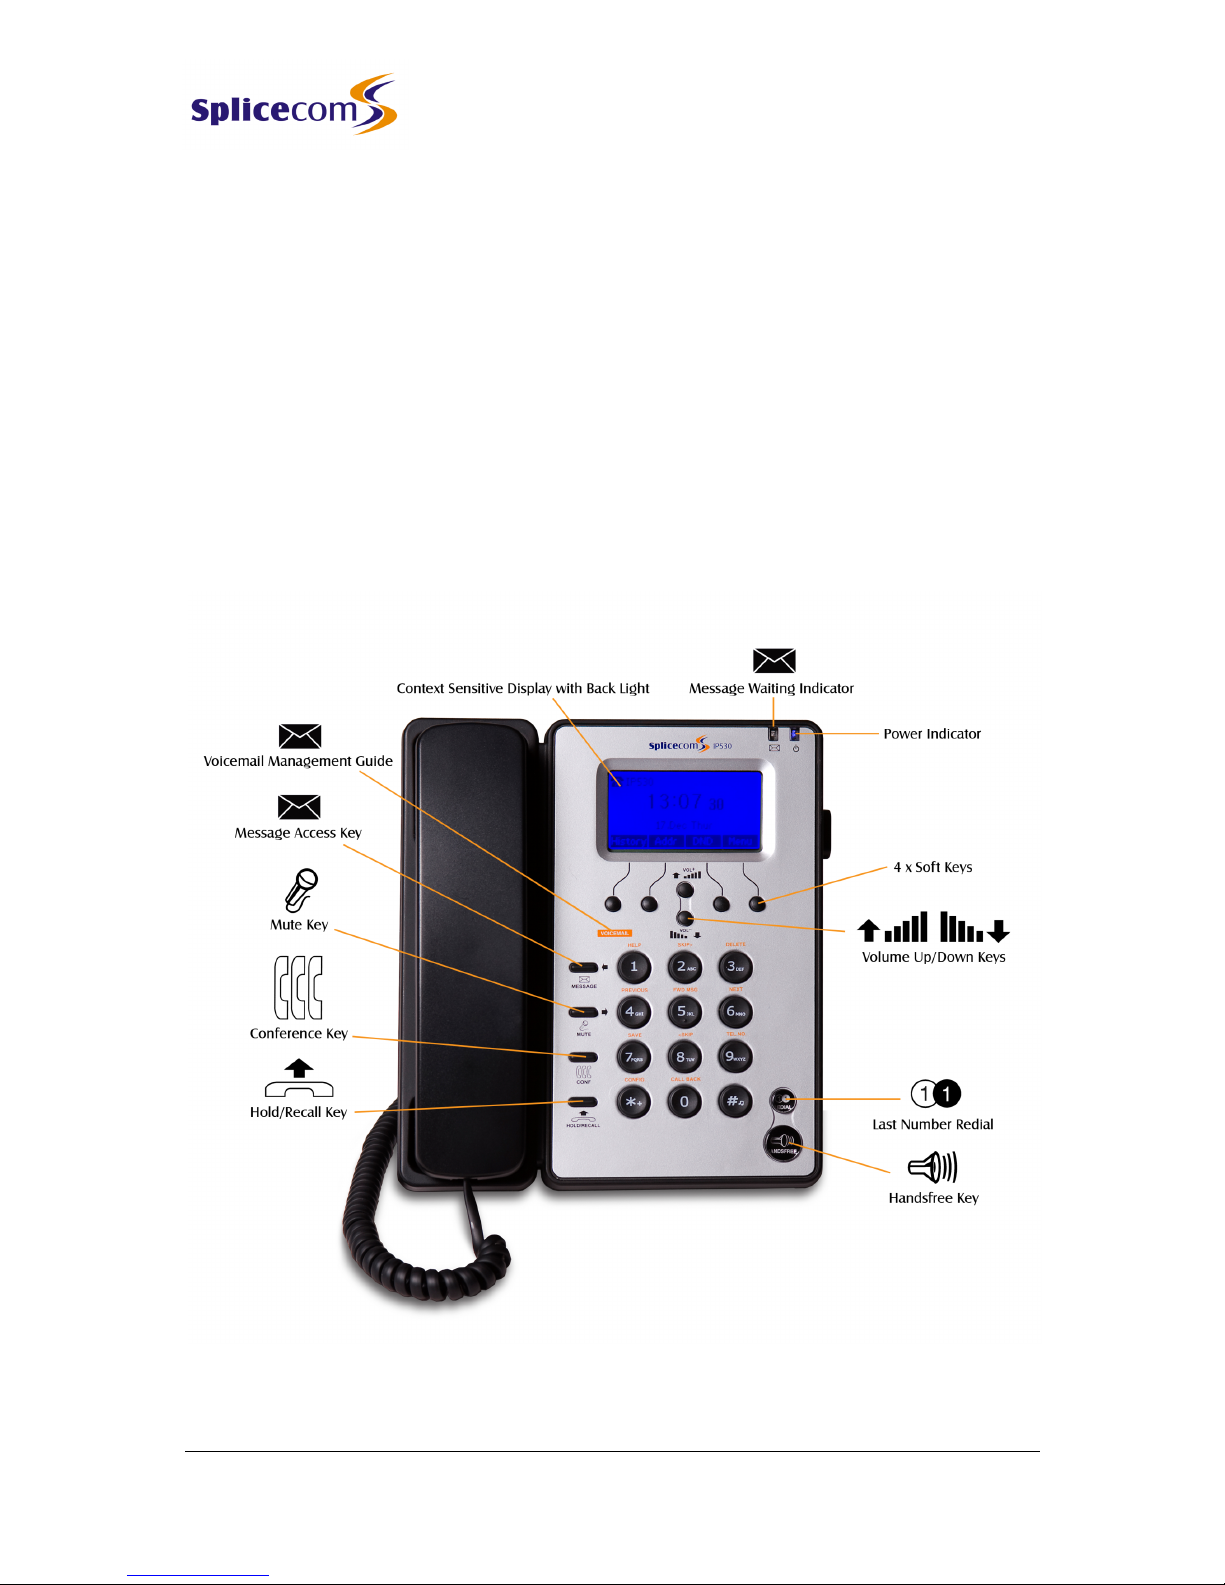
Your IP 530................................................................................................................... 4
Basic Call Handling ...................................................................................................... 6
Making a call ....................................................................................................................................................................6
Redialling a previously dialled number...........................................................................................................................6
Answering a call ...............................................................................................................................................................6
Rejecting a call .................................................................................................................................................................7
Ending a call .....................................................................................................................................................................7
Placing a call on hold .......................................................................................................................................................7
Transferring a call .............................................................................................................................................................7
Parking a call.....................................................................................................................................................................8
Conference Calls ..............................................................................................................................................................9
Call Waiting .....................................................................................................................................................................10
Switching to and from Hands-free ................................................................................................................................10
Muting a call ...................................................................................................................................................................11
Changing the volume ....................................................................................................................................................11
Do Not Disturb ...............................................................................................................................................................12
Call History ................................................................................................................ 13
View the contents of your Call History ..........................................................................................................................13
Viewing details of a call .................................................................................................................................................14
Redialling a number.......................................................................................................................................................14
Ringing back a caller ......................................................................................................................................................14
Deleting a call.................................................................................................................................................................14
Internal Contacts Directory ........................................................................................ 16
Using The Internal Directory..........................................................................................................................................16
Blacklisting a number.....................................................................................................................................................18
Voicemail ................................................................................................................... 22
Receiving a message .....................................................................................................................................................22
Diverting an incoming call to voicemail........................................................................................................................22
Listening to a message ..................................................................................................................................................22
Message Management..................................................................................................................................................22
Recording a Greeting.....................................................................................................................................................24
Using an Assistant telephone number .........................................................................................................................25
Leaving a message for a colleague ..............................................................................................................................25
Transfer a call to a colleague’s voicemail .....................................................................................................................26
Adding a name tag to a caller’s telephone number....................................................................................................26
Mobility...................................................................................................................... 28
Follow Me .......................................................................................................................................................................28
Call Forwarding...............................................................................................................................................................29
Extension Anywhere ......................................................................................................................................................30

IP 530 User Manual
V5.51/1210/1 ii Contents
IP 530 User Manual
IP 530 Administration.................................................................................................31
Setting the time on your IP 530.....................................................................................................................................31
Phone Information.........................................................................................................................................................31
Partnering your IP 530 with your PC or laptop ........................................................... 33
Appendix 1................................................................................................................. 34
Voice Processing, Voicemail & Call Forwarding Options..............................................................................................34

IP 530 User Manual
V5.51/1210/1 3 Your IP 530
IP 530 User Manual
Introduction
About this manual
This manual contains all that you need to know to operate your IP 530 connected to a SpliceCom
maximiser system using version 3.2 software. This manual assumes that the IP 530 terminal has been
connected and configured by your System Administrator, and is ready for use. If this is not the case
please refer to your System Administrator for further assistance.
How your IP 530 will operate
Your User Account
You are a “User” of the SpliceCom maximiser telephone system and as such you have a User account
on the system. Your User name will be used to identify you as you make, receive and transfer calls.
Each of your colleagues will also have a User account and will be identified in the same way, by their
User name.
Logging On
In all implementations the IP 530 will be your permanent desktop phone and as such it will have been
automatically allocated to you by your System Administrator therefore there will be no need for you to
log in or log out.
Idle Display
The default display on your telephone when idle will display the time and date, together with your
User Name in the top LH corner.
Feature Highlights
Context Sensitive Display and Soft Keys
You can use your IP 530 to do far more than just making and taking telephone calls. Six pre-
programmed keys are provided for the most frequently used telephony tasks – Hold/Transfer,
Handsfree, Last Number Redial , Voicemail, Conference and Mute – whilst all other features are
managed through a backlit, monochrome Context Sensitive Display, with four soft keys whose
function changes depending on the task. This makes the IP 530 both functional and easy-to-use.
Internal Directory
Your IP 530 offers an internal contact directory for up to 100 different people, companies or
departments. This directory allows you to store multiple telephone numbers against each entry,
making it easy to make or transfer telephone calls to those that you regularly speak to
Voicemail
The SpliceCom maximiser system provides easy-to-use voicemail functionality allowing your callers to
leave a message and via your IP 530, makes it easy for you to manage these messages.
Conference Calls

IP 530 User Manual
V5.51/1210/1 4 Your IP 530
IP 530 User Manual
Your IP 530 offers an easy to use 3-way conference call facility, enabling you to quickly add a third
party when your already on a telephone call.
Intercom
Your IP 530 supports an Intercom facility which, when enabled on the maximiser Unified
Communication system that your IP 530 is connected to, allows colleagues to call and speak to you
without the need for you to answer the call.
Parking a Call
All calls received can be put on hold and the call remains in your control. However another way to
place a call on hold is to park the call into one of the system areas that allow your colleagues to easily
pick up the call and in the meantime you are able to continue with other calls.
Your IP 530

IP 530 User Manual
V5.51/1210/1 5 Your IP 530
IP 530 User Manual
MUTE
The Mute key will enable you to turn on or off this facility. Please refer to page 11
for further details.
The Volume Down button will enable you to reduce the handset or hands-free or
ringing volume on your IP 530. Please refer to 11 for further details.
The Volume Up button will enable you to increase the handset or hands-free or
ringing volume on your IP 530. Please refer to page 11 for further details.
The Speaker button will place your phone off-hook and enable you to use hands-
free mode. Please refer to page 10 for further details.
HOLD/RECALL
The Hold/Recall key is used place calls on hold and/or transfer them. Please refer
to page 7for further details.
MESSAGE
The Message key will provide you with direct access to your voicemail messages.
Please refer to page 22 for further details.
CONF
The Conference key allows 3-way conference calls to be easily set-up. Please refer
to page 8for further details.
The Last Number Redial key allows the last number dialled from the IP 530 to be
automatically re-dialled. Please refer to page 6 for further details.
The Volume Up button can also be used to scroll up through entries on the
display. Please refer to page 13 for further details.
The Volume Down button can also be used to scroll down through entries on the
display. Please refer to page 13 for further details.
The blue Message Waiting Indicator will light if you have received a new voicemail
message. Please refer to page 22 for further details.
The blue Power Indicator shows that the IP 530 is active.

IP 530 User Manual
V5.51/1210/1 6 Basic Call Handling
IP 530 User Manual
Basic Call Handling
Making a call
1
Lift the handset or press the Handsfree key. You will hear dial tone.
2
Dial the number (internal or external) required using the alpha-numeric
keypad
Send
3
Press the “Send” Soft Key (extreme LHS), or wait for the number to be dialled.
4
The Context Sensitive Display screen will show the number you are calling.
Context Sensitive Display
Call Status will display the name of the person you have called (if known by the system), the number
you have dialled and the length of time of the call.
Cancel
1
If you have started to make a call, have changed your mind and wish to stop
the call press the Soft Key underneath “Cancel” (extreme RHS) or replace your
handset.
If you are required to enter further digits once the call has been made, for example, when presented
with an auto attendant use the alpha-numeric keypad to enter the digits.
Redialling a previously dialled number
1
Press the Redial key. You will be presented with you Dialled Calls list.
2
Use the Scroll Up/Down keys to select the number (or name) that you wish
to dial.
Send
3
Press the soft key underneath “Send” to dial the number.
Answering a call
On receiving a call your handset will ring and Context Sensitive Display will show the details of the call:
First line - the caller’s name (if recognised by the system)
Second line - the caller’s number (if presented)
This information enables you to answer the call in the required manner.
Answer
1
To answer the call lift your handset, or press the Handsfree key, or press
the Soft Key under “Answer” (extreme LHS).

IP 530 User Manual
V5.51/1210/1 7 Basic Call Handling
IP 530 User Manual
Once the call has been answered the Context Sensitive Display will change to show:
First line - the caller’s name (if recognised by the system), or the caller’s
number
Second line - the length of time that the call has been in progress
Rejecting a call
Reject
1
If you do not wish to answer the call press the Soft Key underneath
“Reject” (extreme RHS).
The call will be passed to your Forward on Busy number (if set), or passed to voicemail (if enabled), or
cancelled. (Please refer to your System Administrator for further information on your Forward on Busy
number).
Ending a call
Cancel
1
Replace your handset, or press the Handsfree key, or press the Soft Key
underneath “Cancel” (extreme RHS).
Please note:
•The Handsfree key will only end the call if used in hands-free mode, otherwise this key will switch
from handset to hands-free mode.
Placing a call on hold
Hold
1
Press the “Hold” Soft Key (extreme LHS).
2
External callers will be played “music on hold” if configured. (Please refer
to your System Administrator for further details).
Resume
3
To retrieve the call, press the “Resume” Soft Key (extreme LHS).
Transferring a call
Announced Transfer
HOLD/RECALL
1
Place the call on hold by pressing the HOLD/RECALL key.
2
Enter the number to be dialled (internal or external number).
3
Wait for the call to be answered and announce the caller
HOLD/RECALL
4
To transfer the original call, press the HOLD/RECALL key.

IP 530 User Manual
V5.51/1210/1 8 Basic Call Handling
IP 530 User Manual
Alternatively,
Tran
1
Place the call on hold by pressing the soft key underneath “Tran” (2nd from
LHS)
2
Enter the number to be dialled (internal or external number).
3
Wait for the call to be answered and announce the caller.
Tran
4
To transfer the original call, press the soft key underneath “Tran” (2nd from
LHS).
Unannounced Transfer (Blind Transfer)
Tran
1
Place the call on hold using the HOLD/RECALL key, or the soft key
underneath “Tran” (2nd from LHS).
2
Enter the number to be dialled (internal or external number).
Tran
3
To complete the transfer, once the called number is ringing, press the
HOLD/RECALL key, or the soft key underneath ”Tran” (2nd from LHS).
Parking a call
The Park facility allows calls to be put on hold in a system area so that the call can be picked up by any
other extension on the system. maximiser provides four Park Slots (1, 2, 3 and 4) by default. If a call
is parked in one of these Park Slots users of PCS 580, 570, 560, 410 and 100 IP 530s or PCS 60 and PCS
50 IP Softphones or Phone Partners, with access to these park slots, will see the parked call and can
retrieve it if required.
To park a call
Hold
1
Once on the call press the soft key underneath “Hold” (extreme LHS).
*51
2
Dial *51 to Park the call. The Park Slot on which the call is now held will be
announced to you.
To pick up a parked call
*52 to *55
1
Dial *52 - *55 to pickup up calls in Park Slots 1 – 4 respectively.
Answer
2
Your phone will ring as the Parked call is presented to you. Press the
“Answer” Soft Key to pick-up the call.
Please note:

IP 530 User Manual
V5.51/1210/1 9 Basic Call Handling
IP 530 User Manual
•If a parked call is not picked up within 5 minutes (the default Park Timeout) the call will be
represented to you and can be answered in the normal way.
•If you are unable to pick up a call parked by a colleague you may be operating within a different
“Company” to your colleague. Please refer to your System Administrator for further details.
•If you belong to a “Company” this Company may be configured with a different Park Timeout to
the default 5 minutes described above. Please refer to your System Administrator for further
details.
Conference Calls
The conferencing facility allows you to create a 3-way conversation between yourself and two internal
and/or external calls. (Please note that this feature must be enabled on your telephone system.
Please refer to your System Administrator for further information.)
Creating a conference call
1
Make a call to the first number required (internal or external)
CONF
2
During the call press the CONF key to put the call on hold.
3
Using the alpha-numeric keypad enter the internal or external number of
the person you wish to join the conference.
CONF
4
When the person you have called answers press the CONF key again and
all three parties will be conferenced together. The two parties’ names or
numbers will be shown on the Context Sensitive Display.
5
Please note: If you hang up the call, the other two parties will be
disconnected.
To end a conference call
Cancel
1
Replace your handset, or press the Handsfree key, or press the soft key
underneath “Cancel” (extreme RHS) to end the conference. All calls will be
cleared.
Please note that pressing the Speaker button will only end the conference if the IP 530 is used in
hands-free mode otherwise this button will switch from handset to hands-free mode.
Cancelling a conference call
You may wish to cancel the conference and return to a 2-way conversation with your calls as follows.
Split
1
Press the soft key underneath “Split” (2nd from RHS).
2
Both calls will be placed on hold. The first call you made to create the
conference will be shown on the Context Sensitive Display.
Switch
3
Press the soft key underneath “Switch” (2nd from RHS) to toggle between the
two held calls on the display.

IP 530 User Manual
V5.51/1210/1 10 Basic Call Handling
IP 530 User Manual
Resume
4
Press the soft key underneath “Resume” (extreme LHS) to continue with the
call to the party shown on the display.
CONF
1
Whilst on a call to any one of the two parties, you can return to a 3-way
conference at by pressing the CONF key (providing the other party is still on
Hold).
If one of the conference members ends their call you will return to a 2-way conversation with the
other member of the conference.
Call Waiting
Call Waiting is a facility that allows you to receive a second call while still connected to another call.
The use of this feature is controlled by your System Administrator who will inform you whether this
facility has been enabled on your extension.
Handling a waiting call
1
When a second call is presented you will hear a beep in your handset (or
speaker if using handsfree and a Incoming call message will appear on your
screen, along with the name or number of the person calling you.
Reject
2
If you do not wish to answer the call press the context sensitive key
underneath Reject (2nd from RHS). The call will be passed to your Forward on
Busy number (if set) or passed to voicemail (if enabled) or cancelled.
(Please refer to your System Administrator for further information on your
Forward on Busy number.)
Alternatively,
Answer
2
If you wish to answer the 2nd call press the context sensitive key underneath
Answer (2nd from LHS). The original call will be put on hold.
Alternatively,
Cancel
2
If you wish to answer the 2nd call press the context sensitive key underneath
Cancel (extreme RHS). The original call will be terminated and your IP 530
will ring with the 2nd call.
Switching to and from Hands-free
You may wish to switch between hands-free and handset operation without interrupting the call.
1
From handset to hands-free –press the Handsfree key and replace the
handset. From hands-free to handset – lift the handset.
Please note that if you press the Handsfree key whilst in hands-free mode you will end the call.

IP 530 User Manual
V5.51/1210/1 11 Basic Call Handling
IP 530 User Manual
Muting a call
The Mute facility will allow you to prevent a caller from hearing, for example, your conversation with
another colleague.
MUTE
1
Press the Mute key to mute your call.
2
The Muted message will appear in the centre of the Context Sensitive
Display.
3
Press the Mute key again to turn this feature off.
Changing the volume
You can change the ringing volume and conversation volume at any time during or before a call.
Changing the Volume before a call
Hands-free volume
1
Press the Handsfree key.
2
Press the Volume Up or Down keys as required.
3
Press the Handsfree key when finished.
Handset volume
1
Lift your handset.
2
Press the Volume Up or Down keys as required.
3
Replace the handset when finished.
Changing the Ringing Volume
1
Press the Volume Up or Down keys as required. The ringing volume will
increase or decrease appropriately.
Changing the Volume during a call
Hands-free volume
If you have answered the call using the Handsfree key:

IP 530 User Manual
V5.51/1210/1 12 Basic Call Handling
IP 530 User Manual
1
Press the Volume Up or Down keys as required. The hands-free volume will
increase or decrease appropriately.
Handset volume
If you have answered the call using the handset:
1
Press the Volume Up or Down buttons as keys. The volume of your handset
will increase or decrease appropriately.
Do Not Disturb
The Do Not Disturb facility allows you set your extension as permanently busy. This is useful if, for
example, you are holding a meeting in your office and do not wish to be disturbed.
Turning on Do Not Disturb
DND
1
Press the soft key underneath DND (2nd from RHS).
2
The DND icon will appear in the top RHS of the Context Sensitive Display to
indicate that this feature has been set.
When DND is enabled:
•Your calls will be automatically passed to your Forward on Busy number, if configured, or to
voicemail, if enabled. (For further information on your Forward on Busy Number please refer to
your System Administrator.)
•Your entry in the Contacts Directory will display the blue DND icon to inform your colleagues
that your extension has Do Not Disturb set. Your colleagues who are using a PCS 50, 60, 100,
410 or PCS 570 will also be informed that you have Do Not Disturb set via their respective
directories.
Turning off Do Not Disturb
DND
1
Press the soft key underneath DND (2nd from RHS).
2
The DND icon will no longer appear in the top RHS of the Context Sensitive
Display to indicate that this feature is no longer active.

IP 530 User Manual
V5.51/1210/1 13 Call History
IP 530 User Manual
Call History
The History soft key (extreme LHS) allows you to view and manage a historical list of your outgoing
and incoming calls - internal & external answered & missed. (For further information on voicemail
please refer to page Error! Bookmark not defined..)
View the contents of your Call History
History
1
Press the soft key underneath History (extreme LHS).
•A list of calls in historical order will be displayed.
•Entries are listed in date and time order with the newest at the top.
Each entry will display the number or name (if recognised by the system) of the caller or the number
or name (if recognised by the system) you called.
1
Use the Scroll Up/Down keys to display the entry required.
Back
2
Use the soft key underneath Back (extreme LHS) to return to the default
Context Sensitive Display view.
Identifying the type of call
Signifies an incoming call
Signifies an outgoing call
Signifies an un-answered incoming call
Missed Calls
An incoming call received by your phone that is not answered will be registered (even if a voicemail is
subsequently left) as an un-answered call in your Call History.
1
The un-answered call icon will flash in the top RH corner of the context
sensitive display and the text “1 New Missed Call” will also appear directly
underneath the time. If a voicemail has been left the text “New Voice Mail”
appears instead of the Missed Call message.
View
2
Press the soft key underneath View (extreme LHS) to view this call.
Back
3
Use the soft key underneath Back (extreme LHS) to return to the default
Context Sensitive Display view.
When you return to the default Context Sensitive Display, the un-answered call icon and text relating
to it will no longer be displayed.

IP 530 User Manual
V5.51/1210/1 14 Call History
IP 530 User Manual
Viewing details of a call
Option
1
Whilst viewing the Call History list press the soft key below Option (2nd from
RHS).
2
Use the Scroll Up/Down keys to select Detail.
OK
3
Use the soft key underneath OK (extreme RHS) to view further details of the
call.
Call details include:
•The name of the caller (if known by the system).
•The number of the caller (if presented to the system).
•The day, date and time of the call.
Redialling a number
You may wish to redial a number that you have previously dialled, this can be done by selecting the
original call from the Call History.
History
1
Press the soft key underneath History (extreme LHS).
2
Use the Page Down and Page Up buttons to display the entry required.
Send
3
Use the soft key underneath Send (extreme RHS) to call this number.
Ringing back a caller
You may wish to call the number of a previous caller; this can be done from the Calls History in exactly
the same manner
History
1
Press the soft key underneath History (extreme LHS).
2
Use the Page Down and Page Up buttons to display the entry required.
Send
3
Use the soft key underneath Send (extreme RHS) to call this number.
Please note that if the caller’s number has been withheld or not received by the system this facility will
not be available.
Deleting a call
To manually delete an entry from your Call History;
History
1
Press the soft key underneath History (extreme LHS).
2
Use the Page Down and Page Up buttons to display the entry required.

IP 530 User Manual
V5.51/1210/1 15 Call History
IP 530 User Manual
Delete
3
Use the soft key underneath Delete (2nd from LHS) to permanently remove
this entry.
Back
4
Use the soft key underneath Back (extreme LHS) to return to the default
Context Sensitive Display view.
Deleting everything in Call History
To you wish to manually delete every entry in your Call History;
History
1
Press the soft key underneath History (extreme LHS).
Option
2
Press the soft key below Option (2nd from RHS).
3
Use the Scroll Up/Down keys to select Delete All.
OK
4
Use the soft key underneath OK (extreme RHS) to delete all entries in your
Call History.
OK
5
You will be presented with a warning screen – Delete all records? – Cancel
or OK. Press the soft key under OK (extreme RHS) for 2nd time to complete
the deletion of all entries in your Call History.
Back
6
Use the soft key underneath Back (extreme LHS) to return to the default
Context Sensitive Display view.

IP 530 User Manual
V5.51/1210/1 16 Internal Directory
IP 530 User Manual
Internal Contacts Directory
Your IP 530 provides you with an Internal Directory of up to 100 entries, which provides you with a list
of Contacts and telephone numbers, enabling you to make calls quickly and easily; and to match
incoming telephone numbers so that you can identify callers and handle the calls in the appropriate
manner.
Your IP 530 utilises this directory to enable to you quickly and easily call a colleague, an external
customer or supplier, for example, and an internal department.
The directory enables you to call or transfer a call to a colleague without having to remember their
extension number. Each of your colleagues will have a User account on the maximiser telephone
system and you can enter a list of your names making it easier for you to phone either their extension
number, mobile or another (typically home) number.
The directory enables you to call or transfer a call to an external contact such as a customer, supplier,
partner, etc. that you have entered
The directory will also enable you to enter phone numbers, place phone calls and transfer calls to an
internal Department where the call can be answered by any one of a group of people, such as Sales,
Support, Accounts etc.
The directory will display your list of numbers alphabetically once you have created them enabling you
to call or transfer calls to regularly used numbers.
(Please note that the IP 530’s Internal Directory is completely separate from the system wide
maximiser Unified Directory, access to which is not available via the IP 530. This Internal Directory also
replaces the need for maximiser Favourites, which again are not supported on the IP 530.
Using The Internal Directory
Adding Contacts to your Internal Directory
Dir
1
Press the soft key underneath Dir (2nd from LHS).
2
Use the Scroll Up/Down keys to select Contacts.
Enter
3
Press the soft key underneath Enter (extreme RHS).
Add
4
Press the soft key underneath Add (2nd from LHS).
5
Enter Contact’s name using the alpha-numeric keypad.*
6
Use the Scroll Up/Down keys to toggle between the other fields (Office,
Mobile and Other (Home) and enter the relevant telephone numbers.
Save
7
When you’ve finished press the soft key underneath Save (extreme RHS).
*Please note, once entering a name and numbers from the alpha-numeric keypad, different entry
modes are available to you depending on your preference. These can be changed using the soft key

IP 530 User Manual
V5.51/1210/1 17 Internal Directory
IP 530 User Manual
that is 2nd from the LHS. Options are; 2aB (numeric, upper and lower case text), abc (lower case text
only), ABC (upper case text only), or 123 (numeric only).
Adding Contacts from your Call History
History
1
Press the soft key underneath History (extreme LHS).
2
Use the Page Down and Page Up buttons to highlight the entry required.
Option
3
Press the soft key below Option (2nd from RHS).
4
Use the Scroll Up/Down keys to select Add to Contacts.
OK
5
Press the soft key underneath OK (extreme RHS) to create a contact with
this name and/or telephone number.
6
Enter Contact’s name using the alpha-numeric keypad.*
7
Use the Scroll Up/Down keys to toggle between the other fields (Office,
Mobile and Other (Home) and enter the relevant telephone numbers.
Save
8
When you’ve finished press the soft key underneath Save (extreme RHS).
Viewing your Directory entries
Dir
1
Press the soft key underneath Dir (2nd from LHS).
2
Use the Scroll Up/Down keys to select Contacts.
Enter
3
Press the soft key underneath Enter (extreme RHS).
4
Use the Scroll Up/Down keys to view your Contacts.
Option
5
Once you have highlighted the Contact you require, press the soft key
below Option (2nd from RHS).
6
Use the Scroll Up/Down keys to highlight Detail.
OK
7
Press the soft key underneath OK (extreme RHS) to display further details on
your chosen Contact.
8
Use the Scroll Up/Down keys to view your Contact’s office, mobile and
other/home telephone numbers.
Searching for Directory entries
Dir
1
Press the soft key underneath Dir (2nd from LHS).
2
Use the Scroll Up/Down keys to select Contacts.
Search
3
Press the soft key underneath Search (2nd from LHS).
4
Search for a particular entry using the alpha-numeric telephony keypad. e.g.
In ‘ABC” or “abc” mode, If an entry starts with A press “2” once, if it starts
with B press “2” twice, etc. Any part of the Contact name can be searched
for.
OK
5
Once you have entered your search string using the alpha-numeric keypad
press the soft key underneath OK (extreme RHS).

IP 530 User Manual
V5.51/1210/1 18 Internal Directory
IP 530 User Manual
6
All the Contacts that match your search will be shown on the Context
Sensitive Display. Use the Scroll Up/Down keys to further refine this list if
necessary.
Making calls via the Directory
Dir
1
Press the soft key underneath Dir (2nd from LHS).
2
Use the Scroll Up/Down keys to select Contacts.
Enter
3
Press the soft key underneath Enter (extreme RHS).
4
Use the Scroll Up/Down keys to view your Contacts.
Send
5
Once you have highlighted the Contact you wish to call, press the soft key
below Send (extreme RHS).
6
Use the Scroll Up/Down keys to highlight the number you wish to call
(Office, Mobile or Other (Home).
Dial
7
Press the soft key underneath Dial (extreme RHS) to make the call.
Transferring calls via the Directory
Hold
1
Place the call on hold by pressing the soft key under Hold (extreme LHS).
Dir
2
Press the soft key underneath Dir (2nd from LHS).
3
Use the Scroll Up/Down keys to select Contacts.
Enter
4
Press the soft key underneath Enter (extreme RHS).
5
Use the Scroll Up/Down keys to select the desired Contact.
Send
6
Once you have highlighted the Contact you wish to call, press the soft key
below Send (extreme RHS).
7
Wait for the call to be answered and announce the caller.
Tran
8
To transfer the original call, press the soft key underneath “Tran” (2nd from
LHS).
9
You will be prompted by the display to connect the call to your Contact to
the number of the call you currently have on hold, or to a new call. Use the
Scroll Up/Down keys to highlight the call on hold.
Select
10
Press the soft key under Select (extreme RHS) to complete the Transfer.
Blacklisting a number
Your IP 530 gives you the ability to Blacklist entries in your Internal Directory. Calls placed to you from
any phone numbers you have stored against these Contacts will not ring your phone. Instead their call
will be passed to your Forward on Busy number (if set), or passed to voicemail (if enabled), or
cancelled. (Please refer to your System Administrator for further information on your Forward on Busy
number).
Other manuals for IP 530
1
Table of contents
Other Splicecom IP Phone manuals

Splicecom
Splicecom Yealink T57W User manual

Splicecom
Splicecom PCS 560 User manual

Splicecom
Splicecom PCS 570/G User manual

Splicecom
Splicecom PCS 100 User manual

Splicecom
Splicecom PCS 582G Installation and operating manual

Splicecom
Splicecom PCS 520 User manual

Splicecom
Splicecom Yealink CP920 User manual

Splicecom
Splicecom PCS 552 User manual

Splicecom
Splicecom PCS 410 User manual

Splicecom
Splicecom IP 530 User manual