Splicecom PCS 10 Instruction Manual

12
SpliceCom PCS 10
Operating Instructions & User Guide
3C933001-SP A9330-24_2.p65 27/10/2004, 9:1512

General Note: When power is switched on or batteries are inserted the display will
be blank until the Handset is lifted or the Handsfree button is pressed.

Figure One


1
Contents
INTRODUCTION......................................................................................................................3
INTENDED USE........................................................................................................................4
SAFETY......................................................................................................................................5
INSTALLATION........................................................................................................................6
TELEPHONE FEATURES........................................................................................................7
OPERATING INSTRUCTIONS..............................................................................................10
DISPLAY ..................................................................................................................................16
SETTING THE CLOCK..........................................................................................................17
MEMORY FUNCTION............................................................................................................18
DIRECTORY............................................................................................................................18
Programming Directory memory.............................................................................................18
Dialling a Directory memory ..................................................................................................19
To delete a Directory memory .................................................................................................19
DIRECT ACCESS MEMORY .................................................................................................19
Programming Direct Access memory buttons ..........................................................................20
Dialling Direct Access memory buttons...................................................................................21
Pre-programmed Direct Access memory buttons .....................................................................21
CALLS MEMORY...................................................................................................................22

2
DISPLAYING CALLS RECEIVED.........................................................................................22
To store a Call memory to Directory Memory..........................................................................22
To store a Call Memory to Direct Access memory....................................................................23
Deleting the Calls memory......................................................................................................23
REDIAL MEMORY .................................................................................................................24
Viewing the Redial memories..................................................................................................24
SERVICE..................................................................................................................................25
HEARING AID COMPATIBLE...............................................................................................25
WARRANTY TERMS & SERVICE/RETURNS PROCEDURE............................................25

3
Introduction
The SpliceCom PCS 10 telephone has been designed for use with the SpliceCom
maximiser business telephone system.
The telephone is able to show caller display information provided that this option
has been switched on by your installer.
When a call is received at the telephone, it will display the number of the person
calling you (there are some exceptions to this like withheld numbers). This
information is stored together with information about the time/date of the call and
whether you answered the call or not. Information on the last 80 calls is retained in
the telephone memory and it is possible to scan through these calls and dial
someone back by simply pressing one button.
There is an independent directory for you to store the telephone numbers and
names of 100 entries. If one of your directory “Names” calls you, then the display
will show not only the number calling you but the name, as stored in your directory
or the maximiser business telephone system memory.
As well as a directory of numbers it is possible to store up to 10 names and
numbers using ten two-touch memory buttons.
It is also possible to use this telephone in combination with a headset. There is a
universal interface in the telephone which will allow connection of most headsets,
providing that they have an RJ11 plug for connection to the headset socket
situated at the back of the telephone.

4
Intended Use
The SpliceCom PCS 10 telephone supports Touch-Tone Dialling (DTMF) only.
The telephone has been designed for use with the SpliceCom maximiser
business telephone system.
Declaration of Conformity
SpliceCom declares that this product SpliceCom PCS 10 is in conformity
with the following harmonised standards.
Health & Safety EN60950
Electromagnetic Compatibility EN55022 : 1998 & EN55024 : 1998
Telecom EN301437 : 1999 & TBR38 : 1998
Following the provisions of Council Directive on radio equipment and
telecommunications terminal equipment.
October 2004

5
Safety
When using your telephone equipment, the following safety precautions should
always be followed to reduce the risk of fire, electric shock and injury to persons.
Read and understand all instructions. Follow all warnings and instructions marked
on the telephone. This telephone can be hazardous if immersed in water.
If you suspect a natural gas leak, report it immediately, but use a telephone away
from the area in question.
Never push objects of any kind into the equipment through housing slots. To
reduce the risk of electric shock, do not disassemble this telephone. There are no
user serviceable parts.
Avoid using the telephone during thunderstorms in your immediate area.

6
Installation
Please refer to Figure One at the front of this user guide
25 DC 9V This telephone requires either a power supply or batteries in order
to operate correctly. When using the adaptor, it should be
connected to the socket at the rear of the telephone.
23 Alternatively, the telephone will operate utilizing 3 AA batteries (not
provided). To insert the batteries, first ensure that the telephone is
disconnected from the telephone line.
22 This jack is used to connect a line cord to your telephone.
24 The handset cord plugs in here.
20 A headset plugs in here.
21 The jack labelled is used to connect a device such as a modem to
your Telephone.
18 A 3-position switch is used to control the volume of the ring tone.
Select from loud ring, quiet ring or ringer off.
19 Turn the pitch control to adjust the pitch of the ringer.
17 Wall mounting - An additional wall bracket is required - Using the
template supplied with the bracket, position where you want to fix
your telephone. Drill two holes and fix roundhead screws. Attach
the telephone to the bracket. Slide the bracket into place on the
screws. Remove the handset retainer by pushing up out of the slot.
Turn the retainer through 180° and place back in its slot.
Wall brackets can be obtained from your distributor.
7
Telephone Features
Please refer to Figure Oneat the front of this user guide
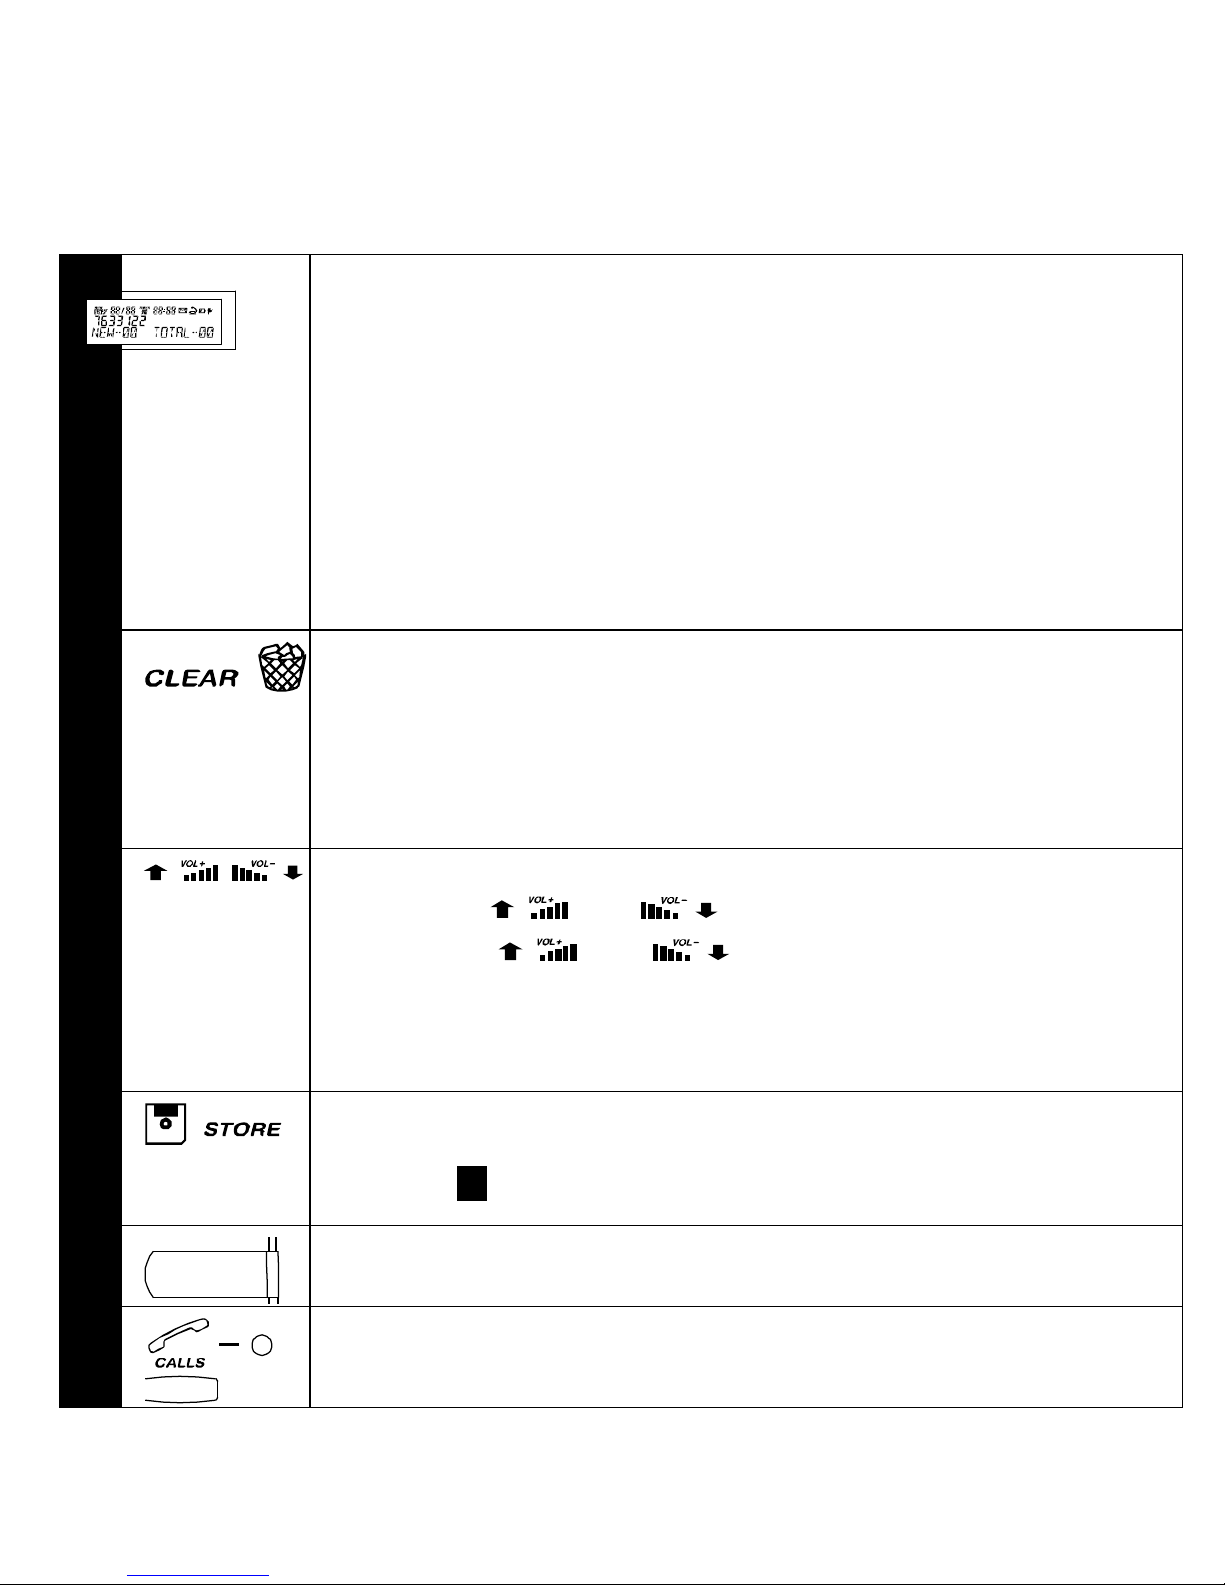
1The telephone is supplied with a protective cover over the
display. Carefully peel this off before using the telephone.
The large LCD panel normally shows the time of day and the
number of new calls that you have not yet viewed. With
incoming calls or when viewing the directory or viewing the calls
list it will show the date, the number and the name of the caller
(if programmed into the directory or the maximiser business
telephone system). There are several prompts that also tell you
what state the telephone is in at a particular moment in time (see
detailed instructions on page 16).
2Use this button to delete a Directory memory.
Access the Directory memory to be deleted and press this
button TWICE in quick succession.
“ERASE” will appear on the display and the memory will be
deleted.
3To adjust the volume of the Handset, Headset and Handsfree,
Press the and volume buttons.
Note: The and can also be used as Scroll Up or
Down buttons to review the Redial, Directory and the Caller
memory list. The Scroll buttonsalso serve as Edit buttons during
memory storage.
4Use this button to program the 100 telephone numbers and
names in your Directory and the 10 Direct Access memory
buttons 11.
5The red call indicator light flashes when your telephone rings.
6This light is to let you know that new calls have been received
which have not been reviewed.

8
7Pressing this button will bring the calls information on the display
and, at the same time, cause the LED to stop flashing and reset
the NEW CALLS counter to 0.
8You can store up to 100 telephone numbers and names in your
personal directory.
Use this button to access a memory; a call can be made by
pressing the button.
9Use this button to dial a number on the display. This can be a
call from your Directory or an incoming call stored in the Call
memory or one of the calls in the Last Number Redial
memory.
10 Press this button to insert a pause.
11 The Direct Access memory buttons have been pre-programmed
with the 10 most frequently used maximiser System Access
Codes. These are accessed via the one-touch memory buttons.
A further 10 memory locations have been provided and can
each be programmed with a maximum of 32 digits and 16 alpha
characters. These can be accessed by pressing the memory
keys twice. (see detailed instruction on page 20)
12 Press this key during a call to place it on hold. This will enable
you to transfer the call to another party.
13 Press this button to redial the last number you dialled from the
keypad. Using the and buttons, you can scroll
through the last five numbers you dialled. To call any of the
numbers press the button when the correct number is
displayed on the screen.
9
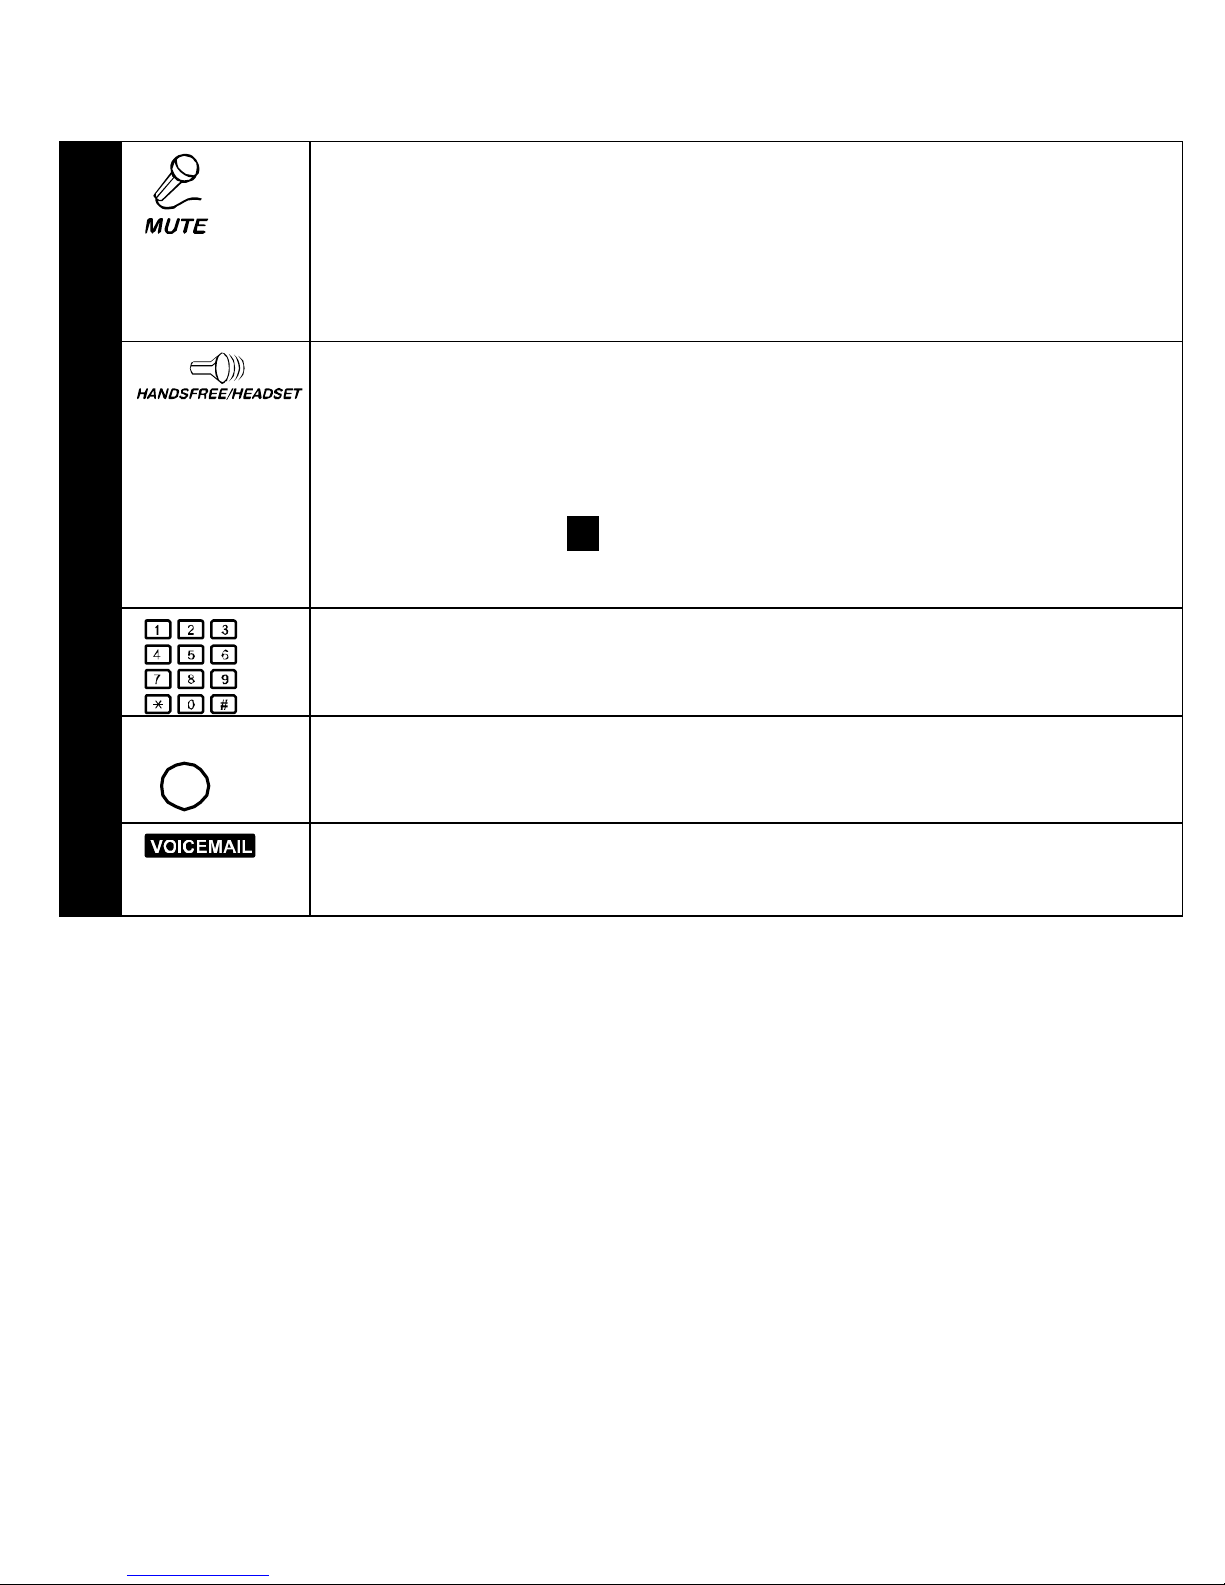
14 This button mutes the microphone so the other person on the
call cannot hear you. A red lamp indicates the mute is on.
Pressing it a second time releases the mute and returns you to
normal conversation. It works in Handset, Handsfree and
Headset mode.
15 This button will activate the two-way Handsfree speech circuit.
Lifting the Handset will revert to Handset working. Pressing the
button when in Handset mode will switch to Handsfree, allowing
you to replace the Handset in the cradle without disconnecting
the call in progress. When a Headset is plugged in to the
Headset socket 20 the Handsfree function is disabled to allow
the button to operate the Headset.
16 A standard telephone keypad with the number “5” having a
raised dot for visually impaired users.
26
RESET
If the telephone appears not to function correctly pressing this
button will reset the telephone.
27 Integrated Voicemail Management allows you to easily manage
the contents of your voicemail box.

10
The following section explains how to use your SpliceCom PCS 10 with the
SpliceCom maximiser business telephone system.
Operating Instructions
Basics
To make a call: Pick up handset and dial the number e.g. 02087654321 - there is
no need to dial a 9 prefix but if you do, the call will still get through. Both 999 and
9999 will call the emergency services.
Holding a call: Press the button on the PCS 10. You will hear dial tone, the
other end will hear a hold message/music (for external calls) or a comfort
tone/beep (for internal calls). The call will remain on hold until you pressthe
again, or hang up.
Transferring a call: Answer the call, then press the button – you should
hear the dial tone. Dial the internal/external number required.
If you hear ringing you can then replace your handset and the caller will be
immediately connected to the destination – this is known as blind transfer.
OR
For an announced transfer.
You hear ringing and wait till the destination answers.
If the destination is willing to take the call – replace the handset to complete the
transfer.
If the destination is unwilling to take the call – press the button to clear that
call and talk to the caller again. You will be returned to the original caller if/when
the destination hangs up.

11
Call Waiting: During a call you hear a beep in your ear – this indicates you have
another call waiting. If you ignore it, the beep will repeat every few seconds for 20
seconds.
You can press the button to put the original caller on hold and talk to the
new call. Once you have finished, you can press the button to clear the call
and return to the original call.
OR
Conclude the original call and put the handset down, the original call will clear and
the new one will ring.
Voicemail: SpliceCom’s maximiser business telephone system features
integrated voicemail, which is available to answer your telephone when you are
busy or unavailable. Typically your voicemail will answer any call that has rung for
20 seconds.
Using Voicemail: If you have new voicemail messages, the envelope icon will be
shown on the caller display of your PCS 10. To check or listen to your messages,
press Direct Access memory button 1 (or dial 1571 using the PCS 10 keypad) –
messages are then played in the order recorded. Messages are stored until you
listen to them. Once you have listened to a message, it is automatically deleted
after 3 days, unless you choose to save it. While listening to a message, you can
press “3” to delete it. A message is marked as heard once you have listened to the
first 10 seconds. The integrated Voicemail Management Guide 27 will enable you
to manage your Voicemail messages effectively.

12
Leaving a message for a colleague: After dialling their extension and being
transferred to voicemail, press to cut the greeting and start recording. Press 0
during the greeting/recording to be transferred to reception or a nominated
departmental/personal alternative (if configured).
Collecting a message: Messages can be collected by pressing Direct Access
memory button 1, dialling 1571 from your PCS 10 keypad, dialling a general
number configured by your administrator, dialling the external DDI number for the
Voicemail, or dialling your extension number, then pressing during the greeting.
Dependent on your system configuration, you may be prompted for an account
(extension) number and/or access code (pin/password). The voicemail will then
automatically play your new messages in time order and then any old messages.

13
Navigation: You can navigate your way through messages if required by pressing
buttons on the PCS keypad. It is probably easier to remember them by referring to
the chart below which is also provided on the PCS 10 keypad:
Play help Skip forward 2
seconds >
Play previous
message << Forward this
message... Play next
message >>
Save this
message
Configuration
options... Return this
call
Skip back 2
seconds < This caller's
number
Delete this
message
5 - Forwarding options:
1 – Copy to another voicemail user with a message from you
2 – Copy to another mailbox
3 – Copy to your email address
0– Abandon

14
- Configuration options:
1 – Play help
2 – Record a new greeting
1 – Options
2 – Record a new greeting
3 – Delete any new recording or restore default greeting
7 – Save new greeting (hanging up will do the same)
0 – Abandon
3 – Set forwarding
1 – Options
2 – Cancel forwarding
3 – Forward personal/direct calls to home number
4 – Forward personal/direct calls to mobile number
5 – Forward personal/direct calls to spare1 number
6 – Forward personal/direct calls to spare2 number
7 – Forward personal/direct calls to your current number
0– Abandon
4 – Add a voice tag/name to number (which will then be played immediately
before messages)
1 – Options
2 – Record new tag
3 – Delete tag
7 – Save tag
0 – Abandon

15
PCS 50 and PCS 10: Even greater personal productivity can be realised when
you partner your PCS 10 phone with SpliceCom’s PCS 50 application. This
desktop productivity application delivers all of the functionality associated with the
top of the range PCS 400 and is available for Windows, Mac OS X and Linux PCs
and laptops. Some of the extra features you can gain access to when using the
PCS 50 in conjunction with the PCS 10 include:
•Access to company wide, Contact, User and Departmental directories.
•A Personal Favourite/ Speed Dials/ Direct Station Select/ Busy Lamp Field
area
•Last Number Redial and Incoming/ Missed Call Lists
•Visual Call Pickup
•Visual Message Box management
•Visual Park Slots
•Conference Calls
•Personal Call Recording
•Integrating your PCS 10 with the company Intranet or Web-enabled
applications.
For further details on installing the PCS 50 and how to use it in conjunction with
your PCS 10 please see SpliceCom’s User Guide for the PCS 400, PCS 200 &
PCS 50.

16
Display
NEW
REPEAT
CALL# DATE TIME ENVELOPE
BATTERY
ADAPTOR
Numeric Field
Alpha-Numeric
Field
ANSWERED
UNANSWERED
TIMER
AM / PM
Note: Changing the display contrast, press , then or to
select LCD contrast.
Please refer to the drawing above
This is the received calls indicator.
NEW denotes calls not previously reviewed.
REPEAT - indicates multiple calls from the same caller; only the
Date and Time from the most recent attempt will be displayed.
CALL # - indicates received Caller List entry number.
This is the Date field showing date in MONTH/DAY format; it
shows the current date or date of received call.
This field indicates Time mode status.
TIMER - indicates Call Timer or Stop Watch mode is active.
AM/PM - for clock display (only displays in 12 hour mode).
Displays the current time or the time of the received call in
HOUR : MINUTE format. It also displays the call timer and stop
watch in MINUTE : SECOND format.
These symbols are used in conjunction with Caller list.
indicates the call was answered;
indicates call was not answered.
Table of contents
Other Splicecom IP Phone manuals

Splicecom
Splicecom PCS 563 User manual

Splicecom
Splicecom IP 530 User manual

Splicecom
Splicecom PCS 560 User manual

Splicecom
Splicecom PCS 580 User manual

Splicecom
Splicecom PCS 520 User manual

Splicecom
Splicecom PCS 582G Installation and operating manual

Splicecom
Splicecom PCS 570/G User manual

Splicecom
Splicecom PCS 552 User manual

Splicecom
Splicecom Yealink T57W User manual

Splicecom
Splicecom PCS 520 User manual


