SPM IPRO Kit Autofill Pre-Mix Instructions for use

Data di emissione: Luglio, 2013 Revisione: 1 Pag. : 1/15
MANUALE D’USO E
MANUTENZIONE
KIT AUTOFILL PRE-MIX
PER IPRO
Data di emissione: Luglio, 2013 Revisione: 1 Pag. : 2/15
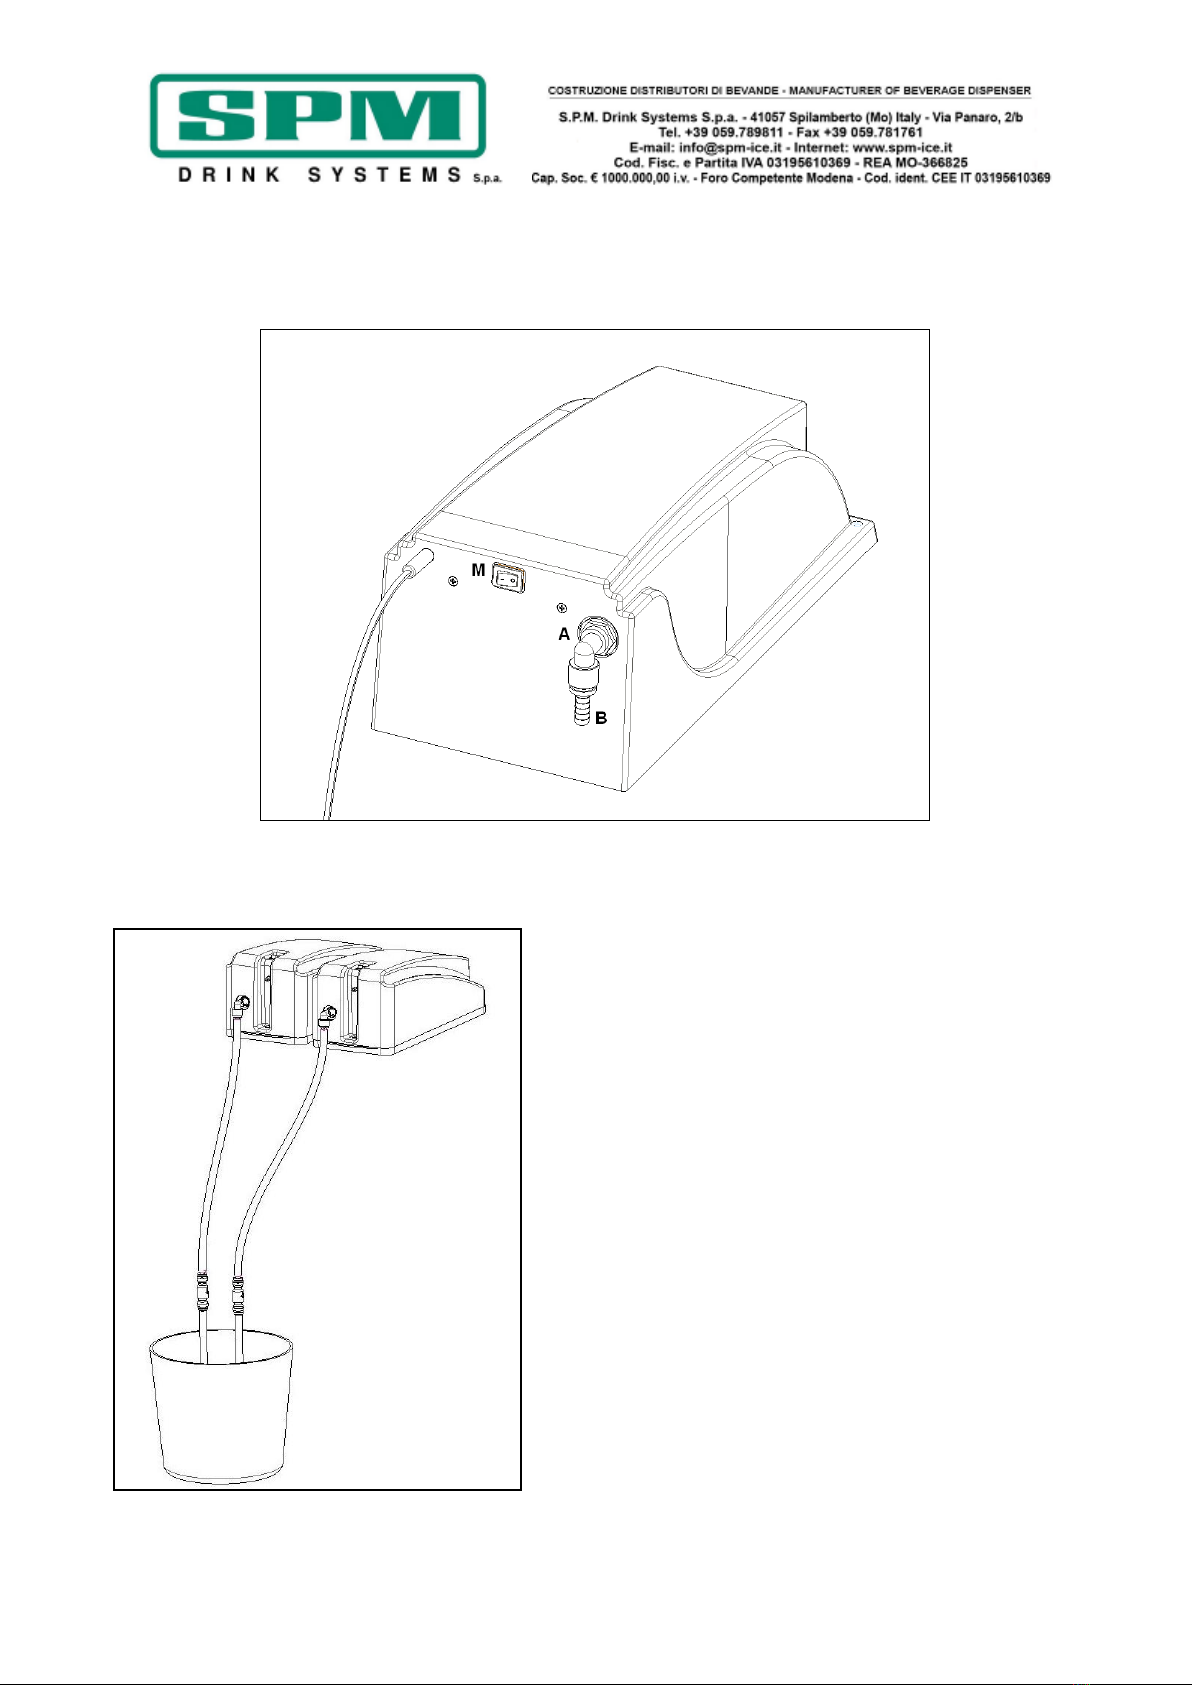
1. INSTALLAZIONE E FUNZIONAMENTO
Dopo aver sostituito il coperchio standard della macchina con il coperchio autofill è necessario
collegare correttamente il sistema di riempimento automatico.
Collegare a ciascun coperchio il raccordo a gomito (A) e quello porta gomma (B).
COLLEGAMENTO TUBI PRODOTTO
Collegare una delle due estremità al porta gomma
ed inserire la rimanente all’interno del contenitore
prodotto avendo cura di sistemare la valvola di non
ritorno E appena fuori dal contenitore come indicato
in figura.
!ATTENZIONE!
È necessario eseguire le operazioni di
sanitizzazione del circuito almeno una volta
alla settimana ed ogni volta che viene cambiato
il tipo di prodotto.
Sostituire il contenitore pieno di prodotto con
uno pieno di liquido sanitizzzante ed eseguire
alcuni cicli di erogazione;
Eseguire altri 3 o 4 cicli sostituendo il liquido
sanitizzante con l’acqua calda in modo di
risciacquare il tutto;
Il sistema è pronto per erogare prodotto.
E

Data di emissione: Luglio, 2013 Revisione: 1 Pag. : 3/15
COLLEGAMENTO ELETTRICO E AVVIAMENTO DELLA MACCHINA
Riempire la vasca con del prodotto ben
mescolato;
Posizionare il coperchio sulla vasca in
modo che risulti ben inserito su di essa
lungo tutto il perimetro;
Collegare a ciascun coperchio il
connettore I del relativo alimentatore H;
Collegare la spina G di ciascun
alimentatore alla rete elettrica; il kit è
ora pronto per funzionare;
Accendere il kit attraverso l’interruttore
M posto nella parte superiore del
coperchio;
Il kit inizierà a riempire le vasche
automaticamente fino al
raggiungimento del livello imposto dalle
sonde.
Il coperchio è munito di un micro di
sicurezza che ne impedisce il
funzionamento sia qualora venga
sollevato durante la fase di carica sia
qualora non sia posizionato
correttamente.
SEGNALAZIONI
Qualora il prodotto dovesse finire il
kit per autofill è munito anche di un
sistema di segnalazione
acustico/visivo; il LED frontale
inizierà a lampeggiare emettendo
contemporaneamente un segnale
acustico di avvertimento.
Qualora le sonde di livello non funzionino ed il prodotto raggiunga la sonda corta di sicurezza, il
LED si accenderà e la macchina emetterà un segnale acustico fino a quando non verrà spenta
ed il problema non verrà risolto.
I
H
G

Data di emissione: Luglio, 2013 Revisione: 1 Pag. : 4/15
IPRO KIT AUTOFILL PRE-MIX
INSTRUCTION AND
MAINTENANCE MANUAL

Data di emissione: Luglio, 2013 Revisione: 1 Pag. : 5/15
1. INSTALLATION AND OPERATION PROCEDURES
After replacing the machine standard lid by the Autofill cover, it is necessary to precisely
connect the automatic filling system.
Connect to each cover the JG elbow (A) and the connection for hose stem (B).
CONNECTION TO THE HOSE FOR THE PRODUCT
Join one of the two ends to the connection and fit
the other end into the product container; insert a
single check valve E just outside the container as
indicated in the picture.
!WARNING!
It is essential to effect the sanitization
procedures of the syrup circuit at least once
a week and every time the type of product is
changed.
Replace the tank full of product by a tank
full of sanitizing liquid and execute some
dispensing cycles;
Execute some additional 3 or 4 cycles
replacing the sanitizing liquid by hot water
in order to rinse the whole system;
The system is ready to dispense the syrup.
E

Data di emissione: Luglio, 2013 Revisione: 1 Pag. : 6/15
ELECTRONIC CONNECTION AND MACHINE START UP
Fill the bowl with the product carefully
mixed;
Position the tap on the bowl in order to
have it well inserted along all the
perimeter;
Join each power supplier connector to
its lid;
Connect the plug G of each feeder to
electricity mains, the kit is now ready to
work;
Switch the kit on by using the main
switch M located in the upper part of
the lid;
The kit will automatically start to fill the
bowl, till the reaching of the level fixed
by the probes.
The tap is provided with a security
micro that avoids the functioning
both if the tap is lifted during the
charging phase and if the tap is not
well positioned on the bowl before
starting it.
SIGNALLING
In case the product finishes the
autofill kit is equipped with a system
of acoustic and visual signals: the
frontal LED starts flashing and
uttering and, at the same time, an
acoustic warning signal.
In case the level probes are not working properly and the product reaches the short security
probe, the LED will turn on and the lid will utter an acoustic warning signal until the machine
will be switched off and the level issue will be solved.
I
H
G

Data di emissione: Luglio, 2013 Revisione: 1 Pag. : 7/15
BETRIEBS- UND
WARTUNGSANLEITUNG
BAUSATZ AUTOFILL
PRE-MIX FÜR IPRO

Data di emissione: Luglio, 2013 Revisione: 1 Pag. : 8/15
1. INSTALLATION UND BETRIEB
Nachdem der Standardaufsatz der Maschine durch den Autofill-Aufsatz ersetzt wurde, muss
das automatische Füllsystem richtig angeschlossen werden.
An jedem Aufsatz die Winkelverschraubung (A) und die Gummitülle (B) anschließen.
ANSCHLUSS DER PRODUKTLEITUNGEN
Ein Leitungsende an der Gummitülle anschließen und
das andere Ende in den Sirupbehälter einführen,
wobei dafür gesorgt werden muss, dass unmittelbar
außerhalb des Kanisters ein Rückschlagventil E
angebracht wird, wie in der Abbildung dargestellt.
!ACHTUNG!
Die Desinfizierung des Kreislaufs muss
mindestens einmal pro Woche vorgenommen
werden, sowie bei jedem Wechsel des
Produkts.
Den Produkt-Behälter durch einen mit
Desinfektionsmittel gefüllten Behälter
ersetzen und mehrere Ausgabezyklen
ausführen;
Danach weitere 3 oder 4 Zyklen mit heißem
Wasser anstelle des Desinfektionsmittels
ausführen, um den gesamten Kreislauf zu
spülen;
Das System ist nun zum Abgabe von Produkt
bereit.
E

Data di emissione: Luglio, 2013 Revisione: 1 Pag. : 9/15
STROMANSCHLUSS UND START DER MASCHINE
Die Wanne mit gut gemischtem Produkt
füllen;
Den Aufsatz auf der Wanne derart
anbringen, dass er ringsum einwandfrei
eingesetzt ist;
An jedem Aufsatz den Stecker I des
jeweiligen Netzgeräts H anschließen;
Den Stecker G der jeweiligen
Netzgeräte am Stromnetz anschließen.
Der Bausatz ist nun betriebsbereit;
Den Bausatz mithilfe des Schalters M an
der Oberseite des Aufsatzes
einschalten;
Der Bausatz beginnt automatisch die
Wannen zu füllen, bis der von den
Sonden bestimmte Füllstand erreicht
ist.
Der Aufsatz ist mit einem
Sicherheits-Mikroschalter
ausgestattet, der den Betrieb
verhindern, wenn der Aufsatz
während des Füllvorgangs
abgehoben wird oder wenn er nicht
einwandfrei angebracht wurde.
MELDUNGEN
Für den Fall, dass das Produkt
verbraucht ist oder die Versorgung
durch das Wassernetz ausfällt, ist
der Autofill-Bausatz mit einem Sicht-
und Tonmeldesystem ausgestattet.
Die frontale LED beginnt zu blinken
und gleichzeitig wird ein Warnton
abgegeben.
Sollten die Füllstandsonden nicht funktionieren und das Produkt die kurze Sicherheitssonde
erreichen, leuchtet die LED auf und die Maschine gibt ein Tonsignal ab, bis sie abgeschaltet
und das Problem behoben wird.
I
H
G

Data di emissione: Luglio, 2013 Revisione: 1 Pag. : 10/15
EXPLOITED VIEW

Data di emissione: Luglio, 2013 Revisione: 1 Pag. : 11/15

Data di emissione: Luglio, 2013 Revisione: 1 Pag. : 12/15
NOTES:___________________
_________________________
_________________________
_________________________
_________________________
_________________________
_________________________
_________________________
_________________________
_________________________
_________________________
_________________________
_________________________
_________________________
_________________________
_________________________

Data di emissione: Luglio, 2013 Revisione: 1 Pag. : 13/15
NOTES:___________________
_________________________
_________________________
_________________________
_________________________
_________________________
_________________________
_________________________
_________________________
_________________________
_________________________
_________________________
_________________________
_________________________
_________________________
_________________________


Data di emissione: Luglio, 2013 Revisione: 1 Pag. : 15/15
Conforme alla normativa RoHS
Questo apparecchio è conforme alla direttiva europea 2002/95/CE e successive modifiche per quanto riguarda la restrizione all’uso di
sostanze pericolose nella produzione di apparecchiature elettriche ed elettroniche.
Smaltimento
Ai sensi della direttiva RAEE 2002/96/CE e successiva modifica 2003/108/CE questa apparecchiatura viene contrassegnata con il
seguente simbolo del contenitore di spazzatura con ruote barrato. “ INFORMAZIONE AGLI UTENTI: Ai sensi dell’art. 13 del Decreto
Legislativo 25 Luglio 2005 n. 151 - Attuazione delle Direttive 2002/95/CE e 2002/96/CE, relative alla riduzione dell’uso di sostanze
pericolose nelle apparecchiature elettriche ed elettroniche, nonché allo smaltimento dei rifiuti. Il simbolo del cassonetto barrato indica
che il prodotto, alla fine della sua vita utile, deve essere raccolto separatamente dagli altri rifiuti. L’utente deve conferire
l’apparecchiatura giunta a fine vita ad idonei centri di raccolta differenziata dei rifiuti elettrici ed elettronici, oppure consegnarla al
rivenditore al momento dell’acquisto di nuova apparecchiatura di tipo equivalente, in ragione di uno ad uno. L’adeguata raccolta
differenziata per l’avvio successivo al trattamento e allo smaltimento ambientalmente compatibile contribuisce ad evitare possibili effetti
negativi sull’ambiente e sulla salute e favorisce il reimpiego e il riciclo dei materiali di cui è composta l’apparecchiatura. Lo smaltimento
abusivo del prodotto da parte dell’utente comporta l’applicazione delle sanzioni amministrative di cui al D.Lgs. n.22/1997.”
Company
with certified quality
management system
UN EN ISO 9001
Table of contents
Languages:
Other SPM Kitchen Appliance manuals


