Xplova X5 Evo User manual

Smart Video Cycling Computer
User Manual

Safety Laws and Regulations 1
Important Safety Instructions 3
Welcome 6
Warning . . . . . . . . . . . . . . . . . . . . .6
Download apps . . . . . . . . . . . . . . .6
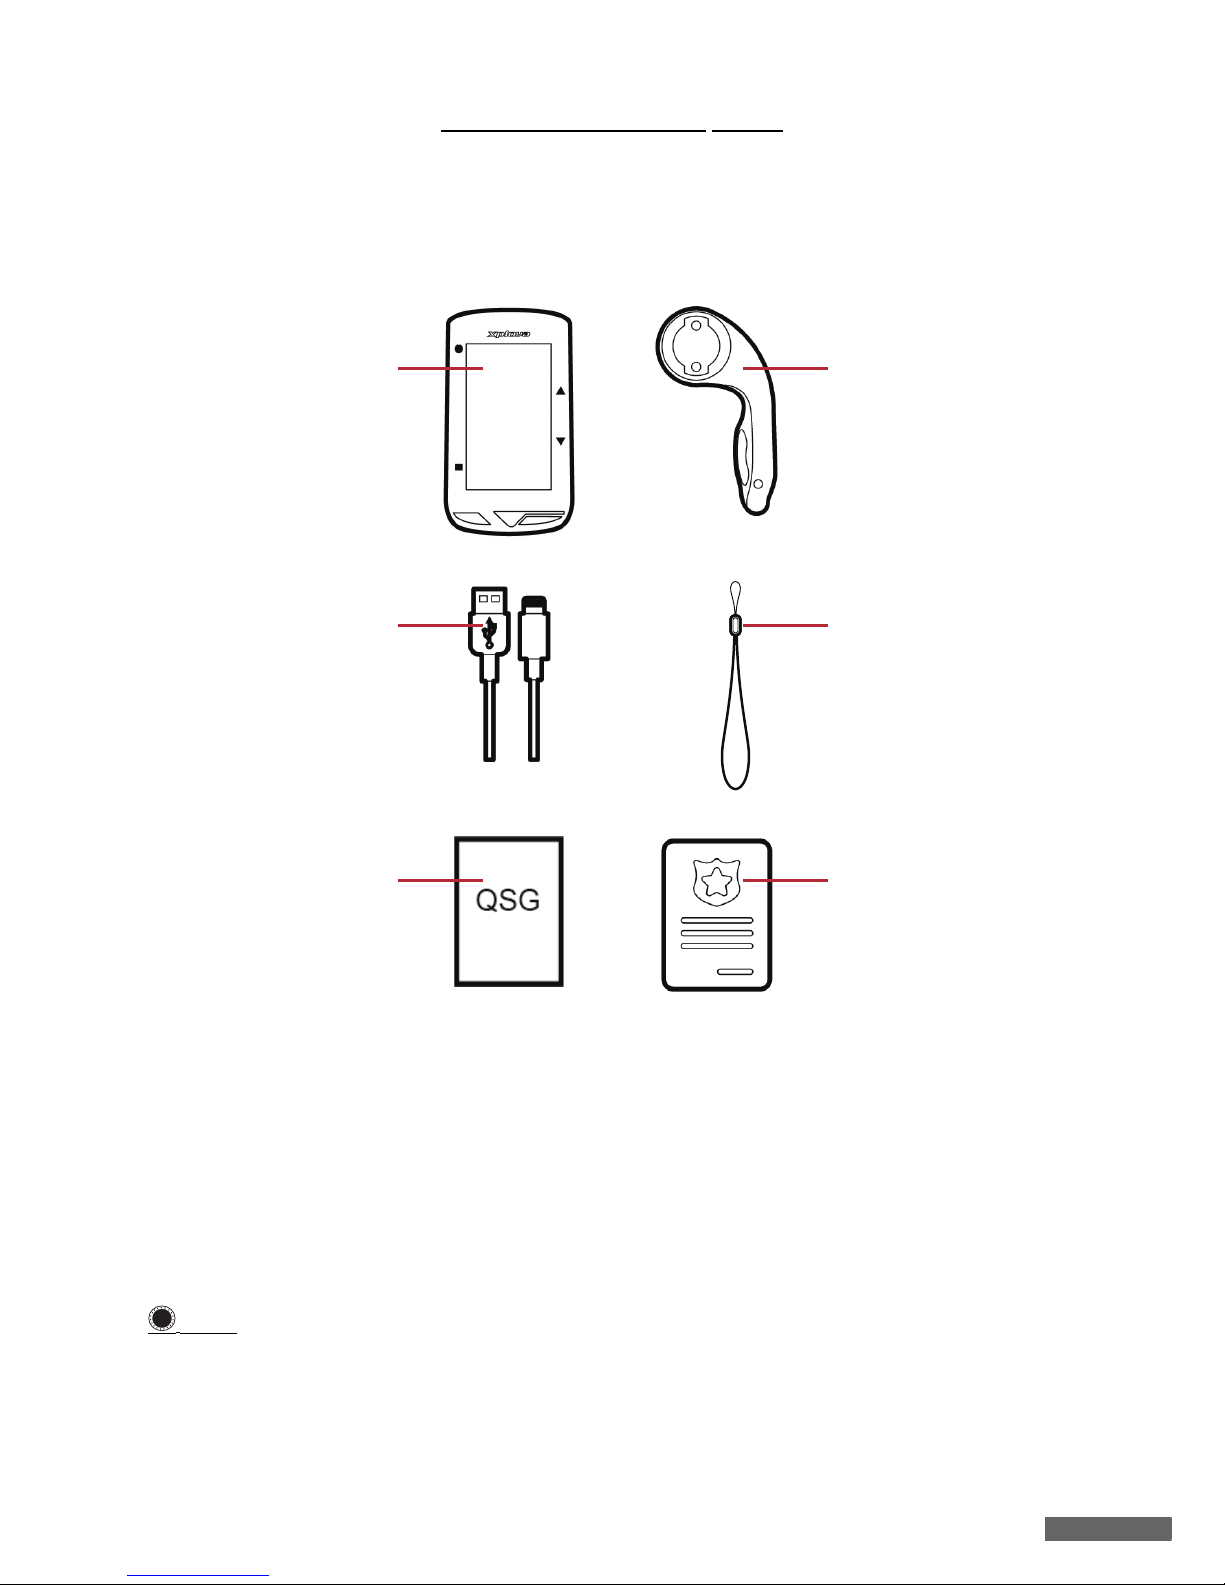
Meet your X5 Evo 7
Package contents . . . . . . . . . . . . .7
Getting to know your X5 Evo . . . .8
Setting Up 9
Charging X5 Evo to 100% . . . . . . .9
Installing X5 Evo on the bike . . . .9
Turning on X5 Evo . . . . . . . . . . . . .9
Performing the initial setup. . . . . .9
Home screen overview . . . . . . . .11
Status bar icon . . . . . . . . . . . . . . .11
Cycling with X5 Evo 12
Preparations . . . . . . . . . . . . . . . .12
Start a free ride . . . . . . . . . . . . . .13
Page introduction . . . . . . . . . . . .14
Dashboard . . . . . . . . . . . . . . . . . . .14
Map page . . . . . . . . . . . . . . . . . . . .15
Data and Chart pages. . . . . . . . . .15
Quick Access Menu. . . . . . . . . . . .16
Data field customization . . . . . . .16
Alert settings . . . . . . . . . . . . . . . .18
Activity settings . . . . . . . . . . . . . .18
Auto Lap. . . . . . . . . . . . . . . . . . . . .18
Auto Pause . . . . . . . . . . . . . . . . . .19
Map download . . . . . . . . . . . . . . .19
Download maps . . . . . . . . . . . . . .19
Delete maps . . . . . . . . . . . . . . . . .20
Activities 21
View activity . . . . . . . . . . . . . . . . .21
Delete activity . . . . . . . . . . . . . . .21
Challenge mode . . . . . . . . . . . . .21
Unfinished activity . . . . . . . . . . . .22
Upload activity . . . . . . . . . . . . . . .22
Video 23
Choose record mode . . . . . . . . . .23
Setup record mode . . . . . . . . . . .23
Mute recording . . . . . . . . . . . . . .25
View video . . . . . . . . . . . . . . . . . .25
Delete video . . . . . . . . . . . . . . . . .25
Record preview mode . . . . . . . . .26
Upload video . . . . . . . . . . . . . . . .26
Training 27
Start a training plan . . . . . . . . . .27
Stop a training plan . . . . . . . . . . .28
Delete a training plan . . . . . . . . . 28
Route 29
Download a route . . . . . . . . . . . . 29
Start a route . . . . . . . . . . . . . . . . 29
Stop a route . . . . . . . . . . . . . . . . . 29
Delete a route . . . . . . . . . . . . . . . 29
ANT+ Sensors 30
Heart Rate Monitor . . . . . . . . . . . 30
Combo Sensors . . . . . . . . . . . . . . 30
Shimano Di2. . . . . . . . . . . . . . . . . 31
App Tutorial 32
Xplova Connect . . . . . . . . . . . . . . 32
How to pair/unpair devices. . . . . 32
Route Planning . . . . . . . . . . . . . . 33
Activity . . . . . . . . . . . . . . . . . . . . . 34
Training . . . . . . . . . . . . . . . . . . . . 35
Settings . . . . . . . . . . . . . . . . . . . . 35
Xplova Video . . . . . . . . . . . . . . . . 36
How to pair devices . . . . . . . . . . . 36
Play a video . . . . . . . . . . . . . . . . . 37
Crop a video . . . . . . . . . . . . . . . . . 37
Edit a video. . . . . . . . . . . . . . . . . . 37
Share a video . . . . . . . . . . . . . . . . 38
Delete a video . . . . . . . . . . . . . . . 38
Side menu settings . . . . . . . . . . . 38
General Settings 40
Profile . . . . . . . . . . . . . . . . . . . . . 40
Bike mode . . . . . . . . . . . . . . . . . . 40
Bike . . . . . . . . . . . . . . . . . . . . . . . 40
Device . . . . . . . . . . . . . . . . . . . . . 40
My Map . . . . . . . . . . . . . . . . . . . . . 40
Record Settings . . . . . . . . . . . . . 40
ANT+ sensors . . . . . . . . . . . . . . . 40
Network . . . . . . . . . . . . . . . . . . . . 40
System . . . . . . . . . . . . . . . . . . . . . 40
GPS . . . . . . . . . . . . . . . . . . . . . . . . 40
Display . . . . . . . . . . . . . . . . . . . . . 40
Hibernate . . . . . . . . . . . . . . . . . . . 41
Sounds . . . . . . . . . . . . . . . . . . . . . 41
Time . . . . . . . . . . . . . . . . . . . . . . . 41
Units . . . . . . . . . . . . . . . . . . . . . . . 42
Language . . . . . . . . . . . . . . . . . . . 42
Clear User Data. . . . . . . . . . . . . . 42
About . . . . . . . . . . . . . . . . . . . . . . 42
Appendix 43
Descriptions of customized data
fields . . . . . . . . . . . . . . . . . . . . . . 43
Specifications . . . . . . . . . . . . . . . 47
Declaration of Conformity . . . . . 48
CONTENTS

Safety Laws and Regulations
1
SAFETY LAWS AND REGULATIONS
Laws and Regulations Information
Governing Wireless Internet Card
Use the Unit on Aircraft
Warning: FCC and FAA regulations prohibit
radio-frequency wireless devices (including
wireless network cards) from operating in
the air because their wireless signals can
cause serious interference to flight
equipment.
The wireless network card included in this
Unit, like any other radio devices, emits
radio frequency electromagnetic waves.
However, a wireless network card emits
much less energy level than the
electromagnetic waves emitted from other
wireless devices (such as mobile phones).
Wireless network card operates under the
radio frequency safety standards and
recommended codes of practice. These
standards and recommendations reflect the
consensus of the scientific community, as
well as the results of a panel of scientists
from the discussions and ongoing review
and interpretation of a wide range of
research literature. In certain situations or
circumstances, the use of wireless network
may be limited by the owner of the building
or the responsible representative of the
applicable organization.
The examples of such situations include:
• Use wireless network while on an
airplane, or
• Use of wireless network in any other
environment where the risk of harmful
interference to other devices or services
is known or determined.
• If you are unsure of the policies that
apply to a particular organization or
environment (such as airport) ask for
authorization before you turn on your
wireless network.
Limited Warranty
Warranty:
1. This product unit, battery not included,
has a one-year limited warranty com-
mencing on the date of purchase (War-
ranty Period Varies by Region). Free
after-sales repair service will be pro-
vided in case of failure under normal
use condition. Warranty for the accesso-
ries apart from the product unit is six
months. In case the aforementioned
warranty period is different from that on
the product warranty card, the warranty
period recorded on the product war-
ranty card will supersede. The service
does not apply to:
a. Appearance damage (such as
scratches, dents, and other manmade
marks).
b. Accessories apart from the product
unit are consumables, but if caused by
material or manufacturing defects are
not subjects to this restriction.
c. Damages to the unit due to accidental
abuse, misuse, flooding, fire or other
natural disasters or accidents and other
external causes.
d. Damages caused by unauthorized
modification of software and hardware
devices.
e. The product serial number cannot be
identified.
f. Product degradation due to normal
wear and tear.
2. When request for warranty repair, it is
necessary to present the original pur-
chase invoice or receipt/proof of pur-
chase. Please contact the distributor
when you made the purchase. The
Xplova Repair and Maintenance Depart-
ment will provide the warranty service
according to the proof of purchase and
the condition of device, or will provide a
quote for repair.

Safety Laws and Regulations
2
* Note: If you do not bring or present a valid
proof of purchase, and the warranty period
can only be estimated by the unit
manufacturing date from the serial number
inquiry. This may result in the situation of
outside the warranty period and need to pay
for repair, therefore, please be sure to safe
keep the proof of purchase.
Declarations
Please read this Instruction Manual
carefully and safe keep this Instruction
Manual for future reference. Please follow
all the warnings and instructions specified
on the product.

Important Safety Instructions
3
IMPORTANT SAFETY INSTRUCTIONS
• Please do not attempt to repair X5 Evo
by yourself. Opening the case or
removing the back cover may result in
electrical shock or other hazards.
• Call Xplova before you send your X5 Evo
for repair.
• X5 Evo can only be repaired by the
qualified service personnel.
• If X5 Evo is physically damaged or
malfunction, please stop using it. The
physical damage is not limited to the
examples listed as below: - Case is
Broken or Cracked. - Button Fell Off. -
Screen is Broken or Cracked. - Rubber
Seal Fell Off. - Damage to parts of the
Unit and other damages caused by the
destruction of device seal.
• Overuse may damage your eyes.
Battery Warning
Please follow the instructions below, if
those guidelines are not followed, then the
usage life of the lithium ion battery installed
in the device may be abnormally shortened
or cause fire resulted in risk of burns,
battery electrolyte leakage, damage to the
device, or cause personal injury.
• Please do not expose the device directly
to heat or place it in high-temperature
location, such as placing the unit
unattended in the place under exposure
of direct sunlight. To prevent loss of or
damage to the device, remove the device
from the bike or store it in a well-
shielded carrying bag to avoid exposure
to direct sunlight.
• Do not puncture or set fire to the device
or battery.
• Do not remove the battery with any
special tool.
• Other types of devices may use a
replaceable coin battery. Make sure to
follow the original manufacturer
instructions to replace the battery to
ensure safety.
• For long-term storage, please store the
device within the specified temperature
range (-10 ° C to 50 ° C).
• Discard your device in accordance with
local regulations or contact your local
waste disposal authority.
Copyright
The copyright ownership of this Instruction
Manual belongs to Xplova Inc. This
Instruction Manual, including all
photographs, graphics and software, is
protected by the International Copyright
Laws and all rights are reserved. This
Instruction Manual or any material, in
whole or in part, contained herein shall not
be reproduced in any form without prior
written permission of the manufacturer /
Xplova.
Disclaimer
The information in this Instruction Manual
is subject to change without notice. The
Company does not claim nor guarantee the
contents, and expressly refuse to assume
any guarantee of the applicability for any
specific purpose. The Company reserves
the right to revise this document and to
change its contents from time to time, and
the Company undertakes no obligation to
notify any person in advance of such
revision of document or any information
changed in the contents.
Trademark Identification
Xplova and Xplova logo are the company
name and registered trademarks of Xplova
Inc. Smart-Sign, Smart-Sign™ Guidance
are the Trademarks of Xplova. All product
names or trademarks of other company
used in this Instruction Manual are for
reference only and are the property of their
respective owners.

Important Safety Instructions
4
European Union Declaration of
Conformity
Xplova is here declared, this product is in
compliance with the essential requirements
and other relevant provisions or Directive
2015/53/EU.
Safety and comfort
Safety Instructions
Read these instructions carefully. Keep this
document for future reference. Follow all
warnings and instructions marked on the
product.
Turning the product off before cleaning
Unplug this product from the wall outlet
before cleaning. Do not use liquid cleaners
or aerosol cleaners. Use a damp cloth for
cleaning.
Warnings
Accessing the power plug
Be sure that the power outlet you plug the
power cord into is easily accessible and
located as close to the equipment operator
as possible. When you need to disconnect
power to the equipment, be sure to unplug
the power plug from the electrical outlet.
Mark sure the power plug is fixed at right
position with the adaptor before plugging to
the socket on the wall.
Input rating: Refer to the rating label on the
device and ensure that your power adapter
complies with the specified rating.
Under no circumstances should the user
attempt to disassemble the power supply.
The power supply has no user-replaceable
parts. Inside the power supply are
hazardous voltages that can cause serious
personal injury.
A defective power supply must be returned
to your dealer.
Using electrical power
• If an extension cord is used with this
product, make sure that the total
ampere rating of the equipment plugged
into the extension cord does not exceed
the extension cord ampere rating. Also,
make sure that the total rating of all
products plugged into the wall outlet
does not exceed the fuse rating.
• Do not overload a power outlet, strip or
receptacle by plugging in too many
devices. The overall system load must
not exceed 80% of the branch circuit
rating. If power strips are used, the load
should not exceed 80% of the power
strip's input rating.
General
• Do not use this product near water.
• Do not place this product on an unstable
cart, stand or table. If the product falls,
it could be seriously damaged.
• Slots and openings are provided for
ventilation to ensure reliable operation
of the product and to protect it from
overheating.
These openings must not be blocked or
covered. The openings should never be
blocked by placing the product on a bed,
sofa, rug or other similar surface. This
product should never be placed near or
over a radiator or heat register, or in a
built-in installation unless proper
ventilation is provided.
• Never push objects of any kind into this
product through cabinet slots as they
may touch dangerous voltage points or
short-out parts that could result in a fire
or electric shock. Never spill liquid of
any kind onto or into the product.
• To avoid damage of internal components
and to prevent battery leakage, do not
place the product on a vibrating surface.
• Your device and its enhancements may
contain small parts. Keep them out of
the reach of small children.
Product servicing
Do not attempt to service this product
yourself, as opening or removing covers
may expose you to dangerous voltage points
or other risks. Refer all servicing to
qualified service personnel.
Unplug this product from the wall outlet and
refer servicing to qualified service
personnel when:

Important Safety Instructions
5
• The power cord or plug is damaged, cut
or frayed.
• Liquid was spilled into the product.
• The product was exposed to rain or
water.
• The product has been dropped or the
case has been damaged.
• The product exhibits a distinct change in
performance, indicating a need for
service.
• The product does not operate normally
after following the operating
instructions. Note: Adjust only those
controls that are covered by the
operating instructions, since improper
adjustment of other controls may result
in damage and will often require
extensive work by a qualified technician
to restore the product to normal
condition.
SAR information
RF exposure information (SAR)
This device meets the EU requirements
(2014/53/EU) on the limitation of exposure
of the general public to electromagnetic
fields by way of health protection. The limits
are part of extensive recommendations for
the protection of the general public. These
recommendations have been developed and
checked by independent scientific
organizations through regular and thorough
evaluations of scientific studies. To
guarantee the safety of all persons,
regardless of age and health, the limits
include a significant safety buffer.
Before radio devices can be put in
circulation, their agreement with European
laws or limits must be confirmed; only then
may the CE symbol be applied.
The unit of measurement for the European
Council's recommended limit for mobile
devices is the "Specific Absorption Rate"
(SAR). This SAR limit is 2.0 W/kg, averaged
over 10 g of body tissue. It meets the
requirements of the International
Commission on Non-Ionizing Radiation
Protection (ICNIRP). The maximum SAR
value is calculated at the highest output
level in all frequency bands of the mobile
device. The highest SAR value reported
under this standard during product
certification for use of the device at a
distance of 0 cm from the body.
During use, the actual SAR level is usually
much lower than the maximum value,
because the mobile device works in
different output levels. It only transmits with
as much output as is required to reach the
network. In general the following applies:
The closer you are to a base station, the
lower the transmission output of your
device.
Disposal Instructions
Do not throw this electronic device into the
trash when discarding. To minimize
pollution and ensure utmost protection of
the global environment, please recycle.
For more information on the Waste from
Electrical and Electronics Equipment
(WEEE) regulations, please visit:
www.acer-group.com/public/Sustainability/
sustainability01.htm

Welcome
6
WELCOME
X5 Evo is a versatile cycling computer with an integrated action camera. A compact, efficient
and rigid design makes it well-suited for a variety of indoor and outdoor bike activities.
Designed with both “touch” and “button” functionalities, X5 Evo enables you to operate it
under various weather and sports conditions. To obtain the best user experience, please read
this manual carefully. It contains complete operating instructions and several useful tips. We
hope you enjoy your cycling experience with X5 Evo.
Warning
Before you start or modify any exercise or
training plan, please always consult your
physician or other qualified health
professional first. Please read details in
section Important Safety Instructions.
Download apps
To maximize your X5 Evo's availability/
functionality, it is strongly recommended
that you install our two apps on your
smartphone:
The Xplova Connect is a handy cycling
app which helps you:
- View/store activities from X5 Evo.
- Download routes from websites.
-Create and send routes/training
plans to X5 Evo.
- Upload your activities/routes on dif-
ferent platforms (e.g., Xplova, Strava
and others).
The Xplova Video is a video editing app
which provides you with easy-to-use
functions. It enables you to:
- View/store videos from X5 Evo.
- Video editing and production.
- Overlay activity stats onto videos.
- Post videos on social networks.
Open your smartphone’s application store
(Google Play or App Store) and search for
"Xplova Video" or "Xplova Connect", then
download and install the applications.
Alternatively, you can scan the QR Codes
below to download them.
[insert QR code screenshoot]
NOTE
• The Xplova Connect and Xplova Video
require Android 5.0 (or later)/iOS 10 (or
later) which supports Bluetooth 4.0 with
BLE. Please check that your
smartphone meets these requirements
before downloading and installing the
applications.
!

Meet your X5 Evo
7
MEET YOUR X5 EVO
Package contents
X5 Evo comes with the following items. Contact your authorized dealer or distributor if any
item is missing or damaged.
Optional accessories:
• Heart Rate Monitor
• Speed/Cadence Combo Sensor
NOTE
• Only use approved accessories.
• Accessories may vary by country or region.
• Please contact Xplova retailers if you need to purchase any optional accessories.
A. Smart Video Cycling Computer X5 Evo D. Extended out-front Bike Mount Kit
B. Micro USB Cable E. Strap
C. Quick Start Guide F. Warranty Card
A
B
C
D
E
F
!

Meet your X5 Evo
8
Getting to know your X5 Evo
•Frontview
•Topview
• Back view
START
STOP
REC
POWER
Touchscreen
UP/DOWN
Slot
REC
•Shortpress:
suspend/wakeup
screen
• Long press:
power on/off
• Zoom in/out in Map
mode
• Change datasheet
in Data mode
(not supported)
• Short press start/stop
video recording
• Long press: switch to
Record mode
•Shortpress:start/
stop riding
• Long press: switch
to Bike mode
START/STOP
BACK/LAP
•BACK:pressto
return to previous
page when not in
riding mode
• LAP: press to start
a new lap during
riding mode
Camera
Micro USB port
Bike mount latch
Strap hole
Tighten the weather cap
for the USB port to ensure
water resistance
Fasten the strap to the
handlebars to enhance
security during riding

Setting Up
9
SETTING UP
Charging X5 Evo to 100%
For initial use, you need to charge the built-
in battery (by the provided USB cable) for at
least 5 hours. To prevent corrosion,
thoroughly dry the Micro USB port, weather
cap and the surrounding area before
charging or connecting to a computer.
Please pull out the weather cap from the
Micro USB port with care to avoid breakage.
When charging process is completed,
please ensure to put it back in snuggly.
NOTE
• X5 Evo can be charged while using.
Please be aware that the Micro USB
port is not water-resistant. Do not
attempt to charge X5 Evo in the rain or
excessive moisture conditions.
Installing X5 Evo on the bike
To attach X5 Evo on your bike is quick and
easy. Please follow the steps as below:
1. Attach the Extended out-front Bike
Mount on the bike handlebar. Align it
with the bike stem and tighten the
screw. Ensure that the mount is
securely locked and parallel with the
ground level toward the front.
2. Hold X5 Evo firmly and turn it toward the
right. Place it horizontally on the mount
notch and press downward slightly.
3. Turn 90-degrees counterclockwise to
lock it on the bike mount.
4. Eventually, X5 Evo is parallel to your
stem. You can operate with ease.
Turning on X5 Evo
Performing the initial setup
Press and hold the [POWER] button to
activate X5 Evo and follow the on-screen
instructions to configure system settings.
1. Select display language.
2. Select your time zone.
It is recommended to select Set Auto-
matically to set the date and time based
on your time zone.
!

Setting Up
10
3. Select your preferred unit of measure-
ment.
4. Create an Internet connection.
Enable Wi-Fi function and select
SEARCH FOR WI-FI NETWORK. Choose
a safe network and enter the password
using the on-screen keyboard. Then
select CONNECT.
After reading and understanding the
Warning message on the screen, select OK
to finish the initial setup. Then you'll be
brought to the Home screen.
NOTE
• You can change these settings later in
Settings menu.
!

Setting Up
11
Home screen overview
The Home screen is visually intuitive and
user-friendly, with large size tiles and icons
to quickly access to features and settings.
* About Bike icon
From the Home screen, you may find a small
bike icon on the [RIDE] button. It shows
which bike mode is currently being
used.
Specifically tap on the bike icon (or long press
[START/STOP] button) to bring up the Bike
mode menu.There are four different bike
modes for selection: Road (default), Off-
Road, Leisure ride and Indoor.
Status bar icon
NOTE
• Only the active icons are displayed on
the status bar.
A. Routes E. Status bar
B. Training F. Activities
C. Settings menu G. Video
D. Bike mode menu* H. Ride mode (Start)
A
B
C
D
E
G
F
H
Road Off-Road
Indoor
Leisure ride
Icon Description
Status bar is full
Paired with Heart Rate Monitor
Paired with Speed/Cadence Combo
Sensor
Paired with Shimano Di2 Sensor
Timer is paused
Timer is running
Paired with Power Meter
Lap count
USB connected
GPS is located
GPS is locating
GPS is on
BLE is on
Audio is muted
Wi-Fi is on
Battery status
Current time
!

Cycling with X5 Evo
12
CYCLING WITH X5 EVO
WARNING: before you start or modify any
exercise or training plan, please always
consult your physician or other qualified
health professional first.
NOTE
• The operating temperature range for
X5 Evo is from -10°C to 50°C.
• Do not leave X5 Evo in high temperature
(over 60°C) or damp environments.
Preparations
Please set some basic configurations to get
more accurate ride information from
X5 Evo.
1. Locate your GPS.
Go to Settings > System > GPS. Turn
GPS switch to ON.
It may take several seconds to receive
signals depending on the location. It is
recommended to locate your GPS in an
open area. Note that a weak GPS signal
may cause your route and other activity
data to be inaccurate.
* About GPS:
The number on the screen indicates the
satellite number, and the color indicates
signal strength.
- Grey: Weak
- Orange: Average
- Yellow: Good
- Green: Strong
The signal strength is also indicated in the
bar chart, as shown in the image above.
In case of any abnormal positioning, such as
locating at an open area for more than five
minutes, please select RESET GPS.
2. Pair your X5 Evo with optional ANT+
Sensors (if available). (See ANT+ Sen-
sors on page 30)
3. Determine the wheel size and gears.
Go to Settings > Bike. In Bike Setting
page, you can configure Wheel Size,
Front Gear Setting and Rear Gear Set-
ting.
4. Calibrate your altitude.
Go to Settings > Device > Altitude Cali-
bration.
By default, it is set as Auto calibration.
You can disable it and perform manual
calibration.
!

Cycling with X5 Evo
13
Start a free ride
1. From the Home screen, specifically tap
on the bike icon on the [RIDE] but-
ton* (or long press the [START/STOP]
button) to bring up Bike Mode menu.
Choose the most applicable one to your
need.
2. Tap [RIDE] button (or short press
[START/STOP] button) to start riding.
* About RIDE button:
The color of [RIDE] button changes
depending on the riding status.
- When not in the riding mode, the
[RIDE] button is green.
- When in the riding mode and the
timer is running, the [RIDE] button is
red.
- When the timer is paused, the [RIDE]
button is orange.
3. A Dashboard appears and the timer starts running. Swipe right or left to cycle through dif-
ferent pages to view cycling data in real time during riding or training.
NOTE
• Pages may vary depending on which Bike mode you choose.
42.5
127
66
155 202
188 149
76
83
50
57
188
149
42.5
42.5
40.5
Map page Data page Chart pageDashboard
!

Cycling with X5 Evo
14
4. During riding, you can:
- tap on the touchscreen and select
STOP TIMER to pause timer or LAP to
start a new lap.
You can also:
- short press [LAP] button to lap. Or
- short press [START/STOP] button to
pause timer and then select CON-
TINUE, SAVE or DISCARD.
- If you select DISCARD, a pop-up dia-
log box will appear on the screen to
confirm the discard.
5. When timer is stopped, you can:
- short press [START/STOP] button to
resume timer. Or
- tap on the touchscreen to select CON-
TINUE, SAVE or DISCARD.
• Select CONTINUE to resume timer.
• Select SAVE to save the riding data
into Activities (See Activities on page
21).
• Select DISCARD, a pop-up dialog box
will appear on the screen to confirm
the discard.
Page introduction
Dashboard
The Dashboard provides plenty of cycling
data at a glance.
NOTE
• The heart rate, power and cadence data
will not display if you have unpaired
those optional accessories.
• It is not allowed to customize any data
or edit layout in the Dashboard.
A. Altitude E. Trip time
B. Speed F. Slope
C. Heart rate* G. Cadence*
D. Power* H. Total distance
A
B
C
D
F
H
G
E
!

Cycling with X5 Evo
15
Map page
Support offline maps, find your current
location, obtain route-related details and
etc.
Data and Chart pages
Depending on your choice of Bike mode,
X5 Evo provides a range of data on different
pages, including distance, speed, time and
more.
NOTE
• You can press [UP/DOWN] button to
increase or decrease the number of
data fields.
A. Toggle between (lock map) and
(unlock map).
B. Fit your current location on the center
of map.
C. Show your riding track in Map mode.
Or show your route in Navigation mode.
D. Data field.
E. Toggle between (Track Up view) and
(North Up view).
F. Zoom in/out the map.
G. Data field.
A
B
C
D
E
G
F
!

Cycling with X5 Evo
16
Quick Access Menu
Swipe down from the top of the screen to
access the Quick Access Menu. You can
adjust brightness/volume and configure the
advanced settings of GPS, altitude and
network. Tap to close the Quick Access
Menu.
Data field customization
X5 Evo allows you to customize data fields
on specific pages before starting the ride or
on mid-ride to get important data and
numbers.
• To change the data fields on Map page:
1. From Settings > Bike mode, select one
of Bike modes, for example “Road”.
2. Select what data you would like to see
on Map page.
- Select Map > Edit.
- Two data fields under the Map can be
customized according to your prefer-
ence.
- Select a data field to enter Select con-
tent page. Select the desired data to
see on Map page.
• To change the data fields on Data page:
1. Select a Data page, for example “Data
1”.
- Select Change layout and choose a
desired grid number of data field.

Cycling with X5 Evo
17
- Select Edit and a data field you want
to change. In Select content page,
select the desired data to see on Data
page.
2. Repeat the steps above for other data
fields.
• To change the data fields on Chart
page:
1. Select a Chart page, for example “Chart
1”.
- Select Change layout and choose a
desired grid number of data field.
- Select Edit and a data field you want
to change. In Show Settings page,
select the desired data to see on
Chart page.
2. Repeat the steps above for other data
fields.
• To change the data fields during riding
Tap on the touchscreen, then two icons
appear at the top of the screen: Home
and Settings .
- Tap Home icon to go back to the
Home screen.
- Tap Settings icon to enter its page
overview of the current bike mode.
From here, the layout of the Data/
Chart pages can be customized or
add/delete a page.
NOTE
• You can long press a data field directly
to change it even if the timer is running.
• Your X5 Evo can display up to:
- 4 custom Data pages (3 - 11 fields of
data for each).
- 3 custom Chart pages (3 - 5 fields of
data for each).
!

Cycling with X5 Evo
18
• If the maximum number of pages have
been reached, a prompt message will
pop up to remind you to delete one of
the pages before adding a new page.
Alert settings
X5 Evo allows you to set different alerts to
notify you with an alert message when
you’ve exceeded the pre-specified value or
interval in riding mode.
• Setting Time, Distance and Calorie
alerts:
1. Go to Settings > Device > Alert Settings.
2. In Alerts page, select Time, Distance or
Calories.
3. Turn Time,Distance or Calories switch
to ON.
4. Enter a value using the on-screen key-
board.
For example, you can set the Time alert to
remind you every 10 minutes repeatedly.
• Setting advanced alerts:
If you have optional ANT+ sensors, you
can set up advanced alerts.
1. Go to Settings > Device > Alert Settings.
2. In Alerts page, select HR, Speed,Power
or Cadence.
3. Turn HR, Speed,Power or Cadence
switch to ON.
4. Enter a value using the on-screen key-
board.
NOTE
• The alert message will pop up at the
bottom of the screen. Tap Xto close it. If
you want to disable any alert setting, go
to Settings and turn them OFF.
• To adjust audible tones for alert
messages, please see Sounds on page
41.
Activity settings
Auto Lap
This feature automatically creates a new lap
at a pre-specified distance in riding mode,
so that you can accurately track how many
laps you have done over a ride without
having to press [LAP] button.
1. Go to Settings > Device > Activity Set-
tings.
!
Other manuals for X5 Evo
1
Table of contents
Other Xplova Bicycle Accessories manuals