Stagg EcoParXS User manual
Please read the instructions carefully before use
USER MANUAL
EcoParXS
SLT-ECOPARXS

SAFETY INSTRUCTIONS
Please read the instructions carefully as they include important
information about the installation, operation and maintenance.
• Please keep this user’s guide for future consultation. If you sell the unit to another
user, be sure that they also receive this instruction booklet.
• All fixtures leave the manufacturer intact. Please note that any damages incurred
by the user is not covered by the guarantee.
• Unpack and check carefully that there is no transportation damage before using
the unit.
• The unit is for indoor use only. Use only in a dry location.
• Use a safety bond when attaching the fixture to a lighting rig. Handle by the
hanging bracket when fixing.
• The unit must be installed in a location with adequate ventilation at least 50 cm
(19.7”) from adjacent surfaces.
• Make sure that no ventilation slot is blocked, otherwise the unit will overheat.
• Before operating, ensure that the voltage and frequency of the power supply
match the power requirements of the unit.
• Make sure all equipment is properly earthed.
• Do not operate the unit if the ambient temperature is higher than 40°C.
• Do not hardwire to any mains dimmer.
• On the first run there may be some normal operational start-up smell.
• Make sure that there is no flammable material close to the unit while operating, as
it is a fire hazard.
• Look over power wires carefully and replace immediately if there is any damage.
• Never run on for a long time lest shortening lifespan. Avoid any inflammable
liquids, water or metal objects entering the unit. In case it happens, cut off the
mains power immediately.
• Do not operate in a dirty or dusty environment. Clean fixtures regularly.
!

• Do not allow children unsupervised to operate the fixture.
• Do not touch any wire during operation as there might be a hazard of
electric shock.
• Avoid placing power wires next to other cables.
• Disconnect the mains power before replacing or servicing the fusewires
or the lamp.
• Replace fuse only with the same type.
• In the event of a serious operating problem, stop using the unit immediately.
• Never turn on and off the unit time after time.
• The housing and the lenses, must be replaced if they are visibly damaged.
• Do not open the unit as there is no user serviceable part inside.
• Never try to repair the unit by yourself. Repairs carried out by unskilled people can
lead to damage or malfunction. Please contact the nearest authorized technical
assistance centre.
• Disconnect the mains power if the fixture is not used for a long time.
• Use the original packaging to transport regarding any warranty issue.
• Do not look directly at the LED light beam while the fixture is on.
• Do not connect more than 7 units to the same power source.
INSTALLATION
The unit should be mounted via its screw holes on the bracket. Always ensure that
the unit is firmly fixed to avoid vibration and slipping while operating. Always ensure
that the structure to which you are attaching the unit is secure and able to
support 10 times the unit’s weight. Also always use a safety cable that can hold
12 times the unit’s weight when installing the fixture.

TECHNICAL SPECIFICATIONS
- LED: 12 x 1-watt (3 x red, 3 x green, 3 x blue, 3 x white)
- Beam angle: 15°
- Protocol: DMX-512, 7 channels
- Functions: DMX, Auto, Sound, RGBW colour changing, LightTheme™
- Display: 4-digit
- Housing: ABS
- Fixation: 1 adjustable bracket (to hang or lay the spotlight)
- Input and output: 3-pin DMX
- Compatibility: Commandor 4 and 10 or any DMX device
- Cooling: Silent fan
- Use: Indoor
- Power consumption: 25 watts
- Dimensions: 12 x 11.5 x 9 cm (4.7 x 4.5 x 3.5»)
- Weight: 0.4 kg (0.88 lb)
BACK PANEL
1. Function display (displays the menu and the selected function)
2. Menu button
3. DMX signal output
4. DMX signal input
4
2
1
3

SETTING THE FIXTURE
Addr
Chan
Auto
Soun
A001-A542
CH-2/5/7/8
Th01..T09 Sn-0..Sn-9
Su02/2/3
Colo
CO01.CO15
ATF
Slav
SL-A
SL-b
P-01..P-09
SE-1..SE-9
g000..g255
r000..r255
b000..b255
w000..w255

LightTheme™ Mode
Create a professional light show in just a few minutes – no programming time, plug-
and-play, suitable for any moment of your event!
Imagine a remote with buttons corresponding to different moods, dance styles,
events, and more.
Press a button and all LightTheme™ compatible lights connected by a DMX cable
start their show, creating a complex and complete lighting presentation.
Dance style themes synchronize to the music. An event style like “wedding,” while
transforming slowly, creates a fairy-tale atmosphere.
And where do you fit in?
If you are a DJ, concentrate on your music. Add accents, blackouts and flashes, or
just let the program run until you choose another button.
If you are hosting an event, concentrate on your guests and let the show run itself.
There’s no programming necessary! The lights are self-sufficient and are completely
synchronized. Best of all, you don’t need to understand how a DMX mixer works.
LightTheme™ compatible lights can handle standard DMX mixers, work as a
standalone device in colour mode, or by using LightTheme™.
LightTheme™ compatible fixtures include Pars, Ecopars, Moving heads, Effect lights,
LED bars, and more.
Using one LightTheme™ fixture
Press the menu button, use the up and down buttons to select the Auto mode and
press the enter key to confirm. Then, use the up and down buttons to choose the
theme that best fit your mood (Th-1 to 13). Press enter again to control the sensibility
to the music thanks to the up and down buttons (se-1 to 9).
Using several LightTheme fixtures
1. Connect LightTheme-compatible fixtures using a standard DMX cable
(see the DMX 512 connections section).
2. Choose the first light as a controller (see the One Light Theme fixture procedure)
or connect the LightTheme remote control (sold separately) with a DMX cable..
3. On the other lights, select either theme slave A or B, which are complementary
presets specifically programmed for each theme. To do that, with the menu
button, select the slave mode (SLAv) and press the enter key to confirm.
Then use the up and down buttons to select Slave A or B (SL-A or B).
4. Select the theme that best fits your mood on the first fixture or on the remote control.
5. Enjoy!

Themes list
1. Wedding Dinner: A smooth blend of blue and purple illuminates
the dining room like a fairy tale castle.
2. Ballad: A slow mix of colours brings love to the dancefloor.
3. Pop: Everybody dances when blue and red are your party colours.
4. Electro: Feel the deep bass with high-energy flashes and strobes.
5. Disco: Get down and get funky with these upbeat colours from the 1970s.
6. Colourful: From reggae to salsa, move your feet with red, pink, yellow and blue.
7. Band: Feel like a star with these classy stage colours.
8. Rainbow: The unicorn is near with all the colours of the rainbow.
9. Strobe: Flash, blind, flash, blind, flash, blind, repeat!
10. Warm White 10%: A warm spot in the darkness.
11. Warm White 25%: Cosy! Isn’t it?
12. Warm White 50%: Just enough.
13. Warm White 100%: Full Power! Now it’s clear!
…And much more...
For more info and updates, scan the QR code:

DMX Mode
With the menu button, select the DMX mode (Addr). Then use the up and down
buttons to choose the desired DMX channel (A001 to A512) and press the enter key
to confirm. Press the menu button to return to the main menu.
Channel mode
With the menu button, select the channel mode (Chan). Then use the up and down
buttons to choose the desired Channel configuration (CH-2/5/7/8) and press the
enter key to confirm. Press the menu button to return to the main menu.
Automatic mode
In this mode, you can play LightTheme’ s lightshows directly from a master fixture.
With the menu button, select the automatic mode (Auto). Then use the up and down
buttons to choose the desired Theme (Th01 to Th09) and press the enter key to
confirm. You can now use the up and down buttons to select the theme page
(P-01 to P-09) or the sensibility (SE-1 to SE-9) and press the enter key to confirm.
Press the menu button to return to the main menu. Please refer to the LightTheme™
section of this manual for more details
Sound control mode
With the menu button, select the sound mode (Soun). Then use the up and down
buttons to choose the desired lightshow (su01 / 02 / 03) and press the enter key to
confirm. You can now select the microphone sensibility level (sn-0 to sn-9) and press
the enter key to confirm. Press the menu button to return to the main menu.
Fixed color mode
With the menu button, select the color mode (Colo). Then use the up and down
buttons to choose the desired Color configuration (co01 to co15 or ALF) and press
the enter key to confirm. If you choose the alternative tones function (ALF), you can
adjust the RGBW levels separately. r000 to r255 for red, G000 to G255 for green,
b000 to b255 for blue and w000 to w255 for white. Press the enter button to switch
from a color to another and adjust the level thanks to the up and down buttons. Press
the menu button to return to the main menu.
Slave mode
With the menu button, select the Slave mode (Slav). Then use the up and down
buttons to choose the desired Channel configuration (SL-A or SL-B) and press
the enter key to confirm. Press the menu button to return to the main menu.
Please refer to the LightTheme™ section of this manual for more details
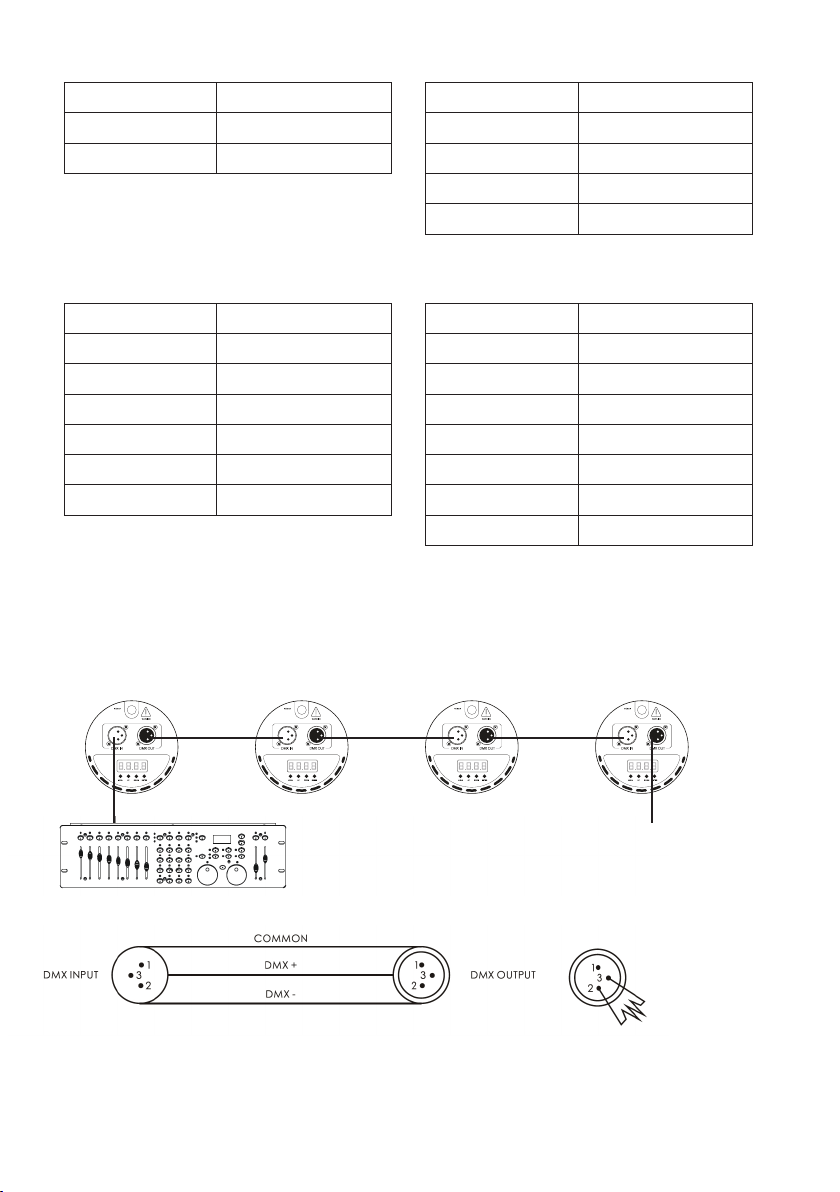
DMX512 CONNECTIONS
The DMX512 is widely used in intelligent lighting control, with a maximum of 512
channels.
Warning
To avoid signal transmission problems and interferences when using fixtures in chain,
use a Stagg N-series professional 3-pin DMX terminator (resistance: 120 ohms;
pin2: DMX-; pin3:DMX+).
DMX channel Function
CH1 Macros
CH2 Strobe
DMX channel Function
CH1 Red
CH2 Green
CH3 Blue
CH4 White
DMX channel Function
CH1 Dimmer
CH2 Red
CH3 Green
CH4 Blue
CH5 White
CH6 Strobe
DMX channel Function
CH1 Dimmer
CH2 Red
CH3 Green
CH4 Blue
CH5 White
CH6 Strobe
CH7 Macros
2 Channels 4 Channels
6 Channels 7 Channels

FIXTURE CLEANING
An internal cleaning must be carried out periodically to optimize the light output.
The cleaning frequency depends on the environment in which the fixture operates:
a damp, smoky or particularly dirty surrounding can cause greater accumulation
of dirt on the fixture’s optics. Clean the fixture with a soft cloth and normal
glass cleaning fluid. Always dry the parts carefully. Clean the external optics at
least every 20 days.


This manual suits for next models
1
Table of contents
Other Stagg Lighting Equipment manuals

Stagg
Stagg TAGGER 30 User manual

Stagg
Stagg EcoPar6 User manual

Stagg
Stagg HEADBANGER10 MK3 User manual

Stagg
Stagg SLI-MHBHH10 User manual

Stagg
Stagg HeadHunter10 SLI-MHBHH10 User manual

Stagg
Stagg TRITON SDJ-TRITON User manual

Stagg
Stagg KINGPAR 1 User manual

Stagg
Stagg FlatPar 4 User manual

Stagg
Stagg Hyperion 5R User manual

Stagg
Stagg HEADBANGERXT SLI MHW HBXT User manual


