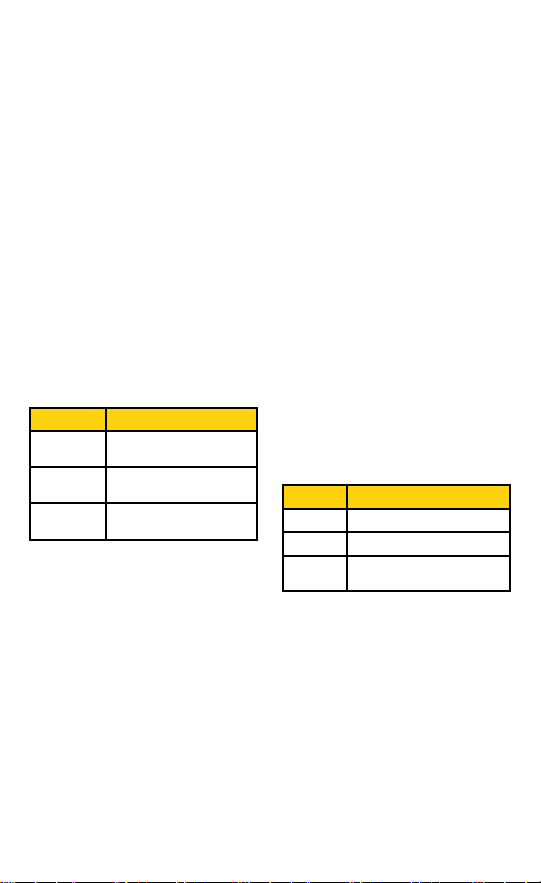
manuals.online logo
Brands
  1. Home
  2. •
  3. Brands
  4. •
  5. Stanley
  6. •
  7. Accessories
  8. •
  9. Stanley TIMERMAX SELECT TRIO User manual

Stanley TIMERMAX SELECT TRIO User manual

TIMERMAX™ SELECT TRIO
Programmable 3 Outlet Remote
Customer Service
1-800-730-3707 • 10AM - 6PM, EST
Monday to Friday
Model# 28499
TIME
RESET
ON/OFF/AUTO MODE PROG
PAIRING
ON OFF
WARNING
INSTRUCTIONS
THIS DEVICE COMPLIES WITH PART 15 OF
THE FCC RULES. OPERATION IS SUBJECT
TO THE FOLLOWING TWO CONDITIONS:
(1) THIS DEVICE MAY NOT CAUSE
HARMFULINTERFERENCE, AND (2) THIS
DEVICE MUST ACCEPT ANY INTERFERENCE
RECEIVED, INCLUDING INTERFERENCE THAT
MAY CAUSE UNDESIRED OPERATION.
INITIAL USE: Before initial use, please plug
in your timer for at least 1 hour to charge the
internal battery. After the LCD display appears,
your unit will be ready for programming.
RESET: Press the “+” and “-” buttons at the
same time to reset your timer. This will clear all
programmed settings.
SET CURRENT TIME
1. Press and hold the “TIME” button to enter
the current time. First, set the day
of the week: press “+” or “-” button to set
today’s day.
2. Press the “TIME” button to enter the hour
setting. Press the “+” or “-” buttons
to set the current hour. Be sure that AM or
PM appears correctly.
3. Press the “TIME” button to enter the
minute setting, Press the “+” or “-”
buttons to set the current minute.
4. Press the “TIME” button to finish setting
the current time and return to normal
display.
SET MODE
Press & hold the “MODE” button to scroll
between the different mode settings:
SET PROGRAM
After choosing your mode, set the timer
program by holding the “PROG” button for
3 seconds, and then follow the appropriate
section below.
SET PROGRAM: DIGITAL TIMER
1. Set the desired day of the week setting
for your timer using the “+” or “-” button
to scroll between choices. You can select
each day individually, Monday to Friday,
Saturday/Sunday, or the entire week. To
have your timer turn On/Off at the set
times every day of the week, be sure to
push “+” until all 7 days of the week are
lit up.
2. Press “ON/OFF/AUTO” to enter the “PROG
1 ON” hour setting. Press the “+” or “-” to
choose the desired hour for your timer to
turn ON. Be sure to cycle through until AM
or PM appears correctly.
3. Press “ON/OFF/AUTO” to enter the “PROG
1 ON” minute setting. Press the “+” or “-”
to choose the desired minute for your timer
to go on.
4. Press the “PROG” button to enter the
“PROG 1 OFF” setting. Repeat steps 2 & 3
to set your desired Off time.
DISPLAY MODE EXPLANATION
Digital Timer On/off at your exact
programmed times
Photocell
Countdown
Timer
On at Dusk or On
immediately, Off after
1-12 hours
Digital Timer
+ Photocell
On at dusk, off at your
exact programmed
times
DISPLAY EXPLANATION
dDusk to Dawn –ON at sundown,
OFF at sunrise
d:01 to d:12 ON at Dusk, OFF 1 to 12 hours later
S:01 to S:12 ON immidiately, OFF 1 to 12
hours later
5. You may now either press the “PROG”
button to enter additional programs,
or press the “TIME” button (or wait 15
seconds) to store your program. Your timer
will now show the current set time and is
ready for use.
SET PROGRAM: PHOTOCELL COUNTDOWN
TIMER
1. Set the desired day of the week program
by pressing the “+” or “-” buttons. You
can select each day individually, Monday
to Friday, Saturday/Sunday, or an entire
week. To have your timer turn ON and
dusk OFF at the set time every day of the
week, be sure to push “+” until all 7 days
of the week are lit up.
2. Press “ON/OFF/AUTO” to enter the hour
setting. Press the “+” or “-” to set:
3. You may now either press the “PROG”
button to enter additional programs,
or press the “TIME” button (or wait 15
seconds) to store your program. Your timer
will now show the current set time and is
ready for use.
SET PROGRAM: DIGITAL TIMER +
PHOTOCELL
1. Set the desired day of the week program
by pressing the “+” or “-” buttons. You
can select each day individually, Monday
to Friday, Saturday/Sunday, or an entire
week. To have your timer turn ON at dusk
and OFF at the set time every day of the
week, be sure to push “+” until all 7 days
of the week are lit up.
2. Press the “ON/OFF/AUTO” button to enter
the “OFF” time hour setting. Press the “+”
or “-” to set. Be sure to cycle through until
AM or PM appears correctly.
3. Press the “ON/OFF/AUTO” button to enter
the “OFF” time minute setting. Press the
“+” or “-” to set.
4. You may now either press the “PROG”
button to enter additional programs,
or press the “TIME” button (or wait 15
seconds) to store your program. Your timer
will now show the current set time and be
ready for use.
MANUAL ON/OFF REMOTE OVERRIDE
You can manually override your set programs
and turn your devices on/off with the included
wireless hand-held remote. Simply press the
ON/OFF buttons on the remote for instant
control. The timer will stay on or off until the
next program setting.
MANUAL OVERRIDE
Press the “ON/OFF/AUTO” button to choose
the timer status:
PAIRING
To pair Tri-mode timer with remote
1. Press and hold “On/Off/Auto”+”PROG”
Button for 3 seconds simultaneously
2. “PAr” will flash continuously on the screen.
3. Press “On” button with the transmitter
and “PAr” will disappear.
4. This Tri-mode timer is now paired with
your remote
Remark: When you reset the timer, you have to
pair the remote once again.
DISPLAY EXPLANATION
ON Continuously ON
OFF Continuously OFF
AUTO Timer will turn ON/OFF according to
program settings
Article# 56459 / 58459-AHR
3 grounded outlets and plug
6in AWG 14/3 SJTW vinyl cord
Rated: 125VAC / 60Hz
15A/1875W Resistive
8A/1000W Tungsten
SPECIFICATIONS
THREE YEAR LIMITED WARRANTY: IF WITHIN THE FIRST YEAR FROM DATE OF PURCHASE, THIS
UNIT FAILS DUE TO A DEFECT, EXCHANGE WHERE PURCHASED, OR SHIP IT PREPAID WITH PROOF
OF PURCHASE TO THE NCC, 1840 MCDONALD AVENUE BROOKLYN, NY 11223. UNITS THAT FAIL
TO OPERATE DURING THE SECOND OR THIRD YEAR FROM DATE OF PURCHASE MUST BE SHIPPED
PREPAID WITH PROOF OF PURCHASE TO THE NCC. WE WILL REPLACE UNIT. THIS GUARANTEE
EXCLUDES NORMAL WEAR AND TEAR AND DAMAGE RESULTING FROM ACCIDENT, ALTERATION,
OR MISUSE. THIS WARRANTY GIVES YOU SPECIFIC LEGAL RIGHTS, AND YOU MAY ALSO HAVE
OTHER RIGHTS WHICH VARY FROM STATE TO STATE. FOR WARRANTY REPLACEMENT UNIT MUST
BE PURCHASED FROM AN AUTHORIZED RETAILER.
©2017 Stanley Black & Decker, Inc.
Manufactured and distributed by:
The NCC, Brooklyn, NY
112231.800.730.3707
www.stanleyacpower.com
MADE IN CHINA
Stanley and the Stanley logo are
registered trademarks of Stanley Black
& Decker, Inc., or one of its affiliates,
and are used under license.

This manual suits for next models

1

Other Stanley Accessories manuals

Stanley SXAE00135 User manual

Stanley

Stanley SXAE00135 User manual

Stanley 77-075 User manual

Stanley

Stanley 77-075 User manual

Stanley FORESITE Mobile Depth Sensor User manual

Stanley

Stanley FORESITE Mobile Depth Sensor User manual

Stanley SLP1 User manual

Stanley

Stanley SLP1 User manual

Stanley S150 User manual

Stanley

Stanley S150 User manual

Stanley S150 User manual

Stanley

Stanley S150 User manual

Stanley S300 User manual

Stanley

Stanley S300 User manual

Stanley SLP1 User manual

Stanley

Stanley SLP1 User manual

Stanley FATMAX PPS200S User manual

Stanley

Stanley FATMAX PPS200S User manual

Stanley SXAE00125 User manual

Stanley

Stanley SXAE00125 User manual

Popular Accessories manuals by other brands

ASL INTERCOM PS 260 user manual

ASL INTERCOM

ASL INTERCOM PS 260 user manual

Honeywell TC846E1005 Installation and maintenance instructions

Honeywell

Honeywell TC846E1005 Installation and maintenance instructions

AND AD-4430B instruction manual

AND

AND AD-4430B instruction manual

Automation Technology MCS 1280 Series user manual

Automation Technology

Automation Technology MCS 1280 Series user manual

Oregon Scientific RTGN129 user manual

Oregon Scientific

Oregon Scientific RTGN129 user manual

Sygonix SY-4744194 operating instructions

Sygonix

Sygonix SY-4744194 operating instructions

Tatung TiMS user manual

Tatung

Tatung TiMS user manual

Bergstrom H020 instructions

Bergstrom

Bergstrom H020 instructions

TOPPOINT LT91135 user manual

TOPPOINT

TOPPOINT LT91135 user manual

ReVIVE Pebble operating instructions

ReVIVE

ReVIVE Pebble operating instructions

Balboa 59060 Installation Instructions and Maintenance Manual

Balboa

Balboa 59060 Installation Instructions and Maintenance Manual

Philips WelcomeBell 300 AddPush user manual

Philips

Philips WelcomeBell 300 AddPush user manual

Gimenez Ganga Saxun FULVIA Assembly instructions

Gimenez Ganga

Gimenez Ganga Saxun FULVIA Assembly instructions

Hama 50413 Operating	 instruction

Hama

Hama 50413 Operating instruction

Trilux LMS DIM PICO 1 Mounting and operating instructions

Trilux

Trilux LMS DIM PICO 1 Mounting and operating instructions

Hydrolevel Company HydroStat OS-100 manual

Hydrolevel Company

Hydrolevel Company HydroStat OS-100 manual

BEGA 13 567 Instructions for use

BEGA

BEGA 13 567 Instructions for use

ACM 3907 Installation and operating instructions

ACM

ACM 3907 Installation and operating instructions

manuals.online logo
manuals.online logoBrands
  • About & Mission
  • Contact us
  • Privacy Policy
  • Terms and Conditions

Copyright 2025 Manuals.Online. All Rights Reserved.