10
ENGLISH (Original instructions)
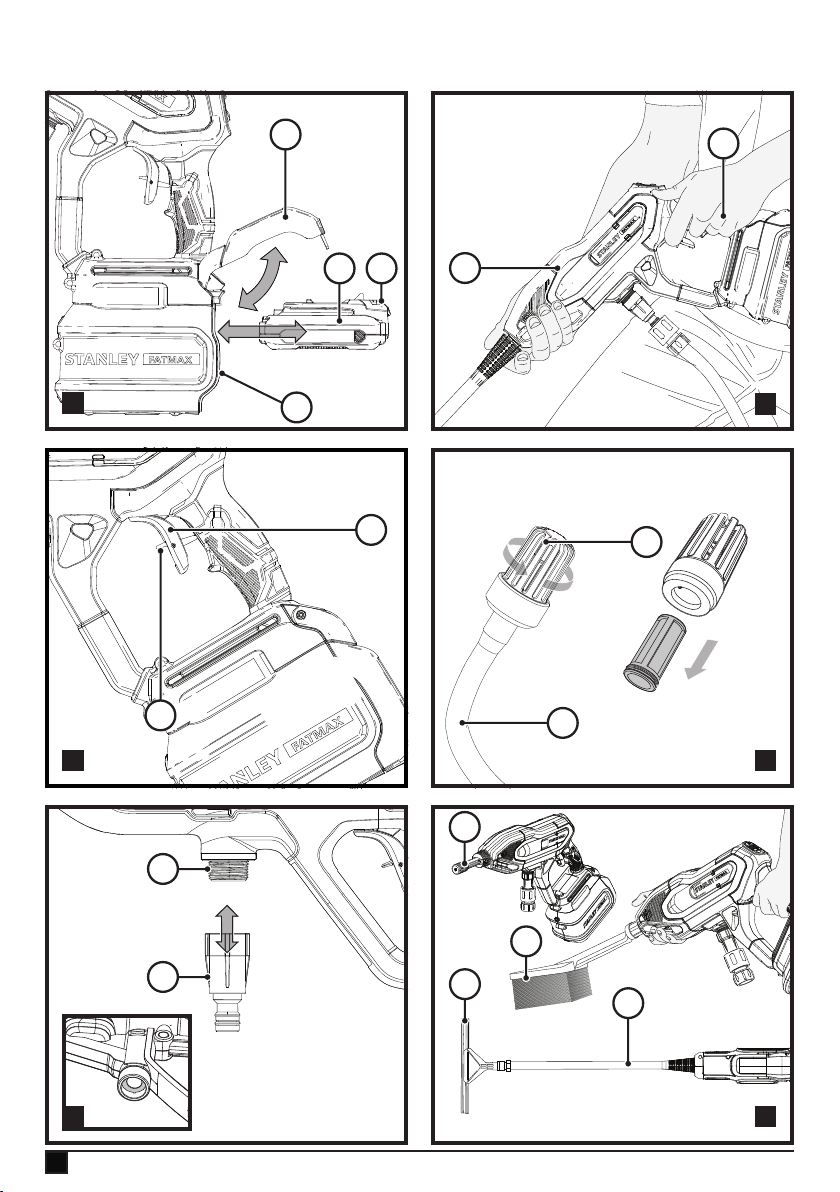
uClose the battery port cover (6b). Ensure thecover is fully
latched into position before starting the tool.
To remove battery pack (g. G)
uLift and hold the battery port cover (6b) up to expose the
battery pack (6).
uPress the battery release button (6a) on the battery pack
(6) and rmly pull the battery pack out of tool.
uInsert the battery into the charger as described in the
charger section of this manual.
Assembly
Warning! To reduce the risk of serious personal injury, turn
unit off and remove the battery pack before making any ad-
justments or removing/installing attachments or accessories.
An accidental start‑up can cause injury.
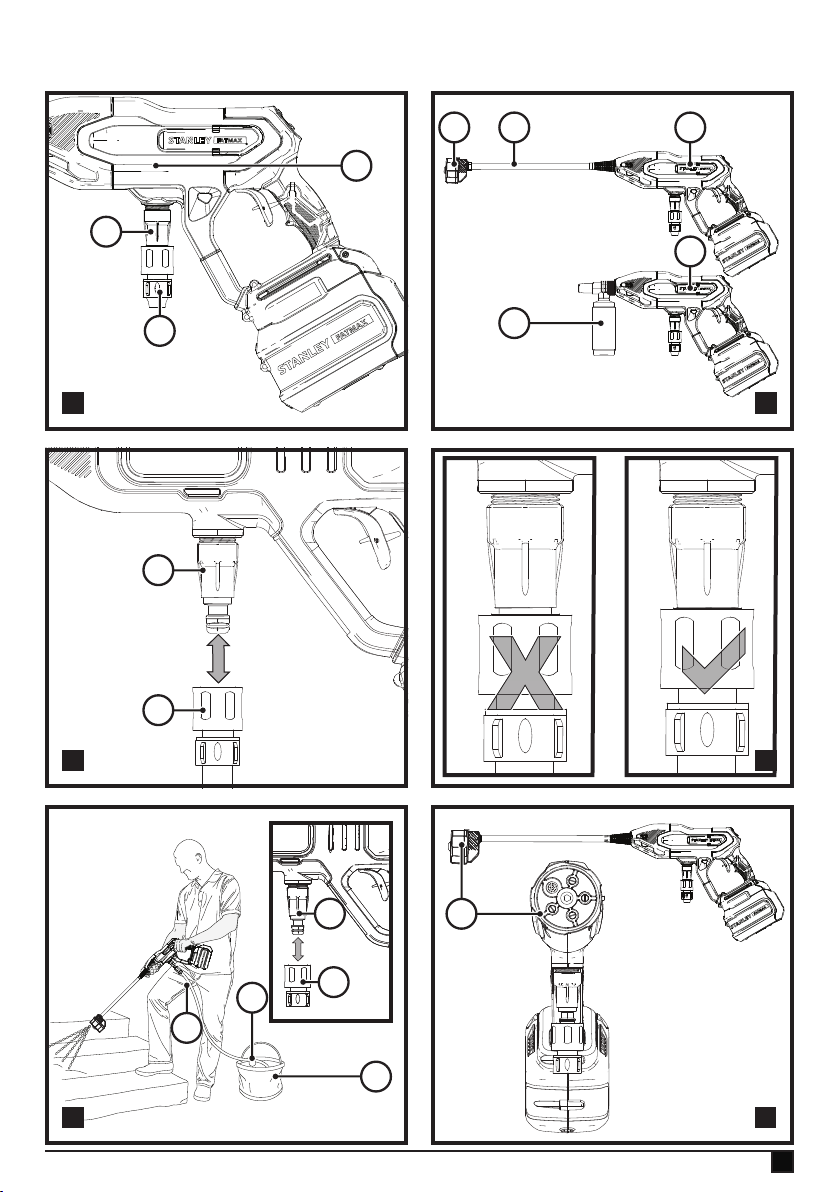
Attaching quick connect lter (Fig. A)
This pressure cleaner must be used with the quick connect
adapters. The garden or suction hose can only be attached
when the quick connect lter (8) is installed.
u To connect the quick connect lter (8) to the pressure
cleaner (2), place the end of the quick connect lter onto
the water intake (3). Tighten the quick connect lter by
hand.
Note: Avoid cross threading when installing the hose. Cross
threading will cause leaks.
To attach the spray wands, soap bottle or
other attachment (Fig. B)
The spray wand, soap bottle bottle and other attachments
(sold seperately) connect to the pressure cleaner. To connect
the spray wands (9) (16) and soap bottle (11) to the pressure
cleaner (2):
uInsert the end of the attachment into the opening on the
pressure cleaner (2). Push in and turn the attachment
clockwise until its secured into working position.
uTo remove the attachment, push in and turn the attach-
ment counterclockwise and pull from the pressure cleaner
(2).
Note: Other accessories are available for use with this pres-
sure cleaner, refer to the Accessories section.
To attach the garden or suction hose
(Fig. C, D)
Connecting the garden hose or suction hose will depend on
the job to be performed.
To attach garden hose (Fig. C)
This pressure cleaner must be used with the quick connect
adapters.
uTo connect the quick connect hose adapter (13) to a
garden hose, thread the quick connect hose adapter onto
the end of the garden hose. Tighten the garden hose by
hand.
Note: Avoid cross threading when installing the hose. Cross
threading will cause leaks.
Note: Before connecting the garden hose to the pressure
cleaner, run water through the garden hose for thirty seconds
to clear any debris from the mouth of the garden pressure
hose.
uTo connect the quick connect hose adapter (16) to the
quick connect lter (3) on the pressure cleaner (2), push
the quick connect hose adapter rmly onto the quick con-
nect lter.
Note: Before use, gently tug on the garden hose to ensure
the connection is secured. Make sure the quick connect
hose adapter is ush with the quick connect lter as shown in
Figure D.
uAlways disconnect the garden hose after usage. To
disconnect, pull back the collar on the quick connect hose
adapter and remove from the quick connect lter.
To attach the suction hose (Fig. C, E)
Use the suction hose to pull water from a bucket or other fresh
water source.
Note: Do not use to suction soap, chemicals, dirty or corrosive
liquids, such as window cleaner, plant food, fertilizers or
bleach. Do not use salt water.
uTo connect the quick connect hose adapter (13) on the
end of the suction hose to the quick connect lter (3) on
the pressure cleaner (2), push the quick connect hose
adapter rmly onto the quick connect lter.
Note: Before use, gently tug on the garden hose to ensure
the connection is secured. Make sure the quick connect hose
adapter on the end of the suction hose is ush with the quick
connect lter as shown in the Figure E inset.
u Place other end of suction hose with lter on it into
container of fresh water or a fresh water source. Adjust the
oat on the suction hose so the lter stays covered in the
liquid.
uSelect the correct nozzle to be used. See How to Use the
Multi-Spray Nozzle paragraph.
u After the job being performed is complete, place the suc-
tion hose into container of clean water and draw the clean
water through the system to rinse.
How to attach 5in1 nozzle to spray wand
Warning! Risk of uid injection. Do not direct discharge
stream toward persons, unprotected skin, eyes or any pets or
animals. Serious injury will occur.
Warning! Flying objects could cause risk of serious ijury. DO
NOT attempt to change nozzles while pressurecleaner is run-
ning. Turn pressure cleaner off before changing nozzles.