Starline Roldeck User manual

User Manual
Anleitung
Gebruikershandleiding
Member of the Starline Group, Leaders in Pools & Equipment

RDCM – V012
© Starline Pools & Equipment is a member of the Starline Group.
All rights reserved.
The information issued may not be multiplied and/or disclosed in any way, by whatever means
(electronically or mechanically), without explicit, prior written permission from Starline Group
Netherlands. The information provided is based on the data that were known the moment of the
product’s issuance. Starline pursues a policy of continuous product improvement, therefore,
changes are reserved.
The information provided applies for the product as it was produced by Starline.
Therefore, Starline cannot be held liable for possible damages resulting from deviations from the
original product specifications.
The available information was compiled with all possible care, however, Starline cannot be held
liable for possible errors in the information or for their consequences.Starline cannot be held
liable for damages resulting from activities that were performed by third parties.
The usage names, trade names, trade marks etc., used by Starline, cannot be considered free in
virtue of legislation concerning the protection of trade marks.
EN User Manual p.2
DE Anleitung p.26
NL Gebruikershandleiding p.50
User manual Starline Roldeck

RDCM – V01 3
Table of Contents
1 General................................................................................................4
1.1 This manual................................................................................................................ 4
1.2 Icons in this manual ................................................................................................... 4
1.3 Disposal and Environment......................................................................................... 4
1.4 Service and Maintenance .......................................................................................... 4
1.5 Warranty Provisions................................................................................................... 4
2 Overview..............................................................................................4
3 Safety..................................................................................................6
3.1 Emergency Shutdown ............................................................................................... 6
3.2 Operation ................................................................................................................... 6
3.3 Child Lock.................................................................................................................. 6
3.4 Roldeck...................................................................................................................... 7
3.5 Descaling ................................................................................................................... 7
3.6 Preparing for Winter................................................................................................... 7
4 Operation............................................................................................8
4.1 RD 2006 Roldeck Control.......................................................................................... 8
4.2 Key Switch.................................................................................................................9
4.3 Remote Control (optional).......................................................................................... 9
5 Roldeck Control Programming ........................................................10
5.1 Roldeck Control ....................................................................................................... 10
5.2 Fine Tuning............................................................................................................... 12
5.3 Remote Control (optional)........................................................................................ 13
6 Cleaning and Maintenance ..............................................................15
6.1 Slats ......................................................................................................................... 15
6.2 Debris....................................................................................................................... 15
6.3 Housing....................................................................................................................15
6.4 Disassembling slats ................................................................................................. 16
6.5 Assembling slats...................................................................................................... 17
6.6 Clips and brackets .................................................................................................. 18
6.7 Descaling ................................................................................................................. 20
7 Failures .............................................................................................21
7.1 RD 2006 Failure Messages...................................................................................... 21
7.2 Failure Prevention .................................................................................................... 22
7.3 Water Level Control ................................................................................................. 23
7.4 Manual Roldeck Operation ...................................................................................... 24
8 Technical Specifications..................................................................25
9 Supplement ......................................................................................74
User manual Starline Roldeck

RDCM – V014
1 General
1.1 This manual
This manual describes the Starline Roldeck’s daily use.
Read the manual carefully. Every user must be acquainted with the contents of this manual.
Follow meticulously the instructions in the manual.
Always perform the operations in the correct order.
Keep the manual in a fixed spot near the operation cabinet. If the manual gets lost, order a new
copy through your supplier.
1.2 Icons in this manual
The following icons and symbols are used in this manual:
CAUTION!
Procedures that demand additional attention.
WARNING!
Don’t step on it!
1.3 Disposal and Environment
If the Roldeck is discarded, it must be disposed of according to locally valid regulations.
Enquire at the local recycling centre for possibilities for reuse and for environment-friendly
processing of the product and the packing.
1.4 Service and Maintenance
Have the Roldeck installation checked by the installer at least once a year.•
Report Roldeck failures always to your installer.•
Protect unused slats from direct sunlight•
The slats can become deformed. The synthetic material can become soft. As a result, a failure
can occur.
1.5 Warranty Provisions
Refer to the Starline Warranty booklet.
User manual Starline Roldeck

RDCM – V01 5
A
F
G
B
CD
E
2 Overview
A Roldeck
B Key Switch
C Roldeck Control
D Programming Plug
E Optional Level Control
F Optional Level Measurement Point
G Optional Remote Control
User manual Starline Roldeck
RDCM – V016
3 Safety
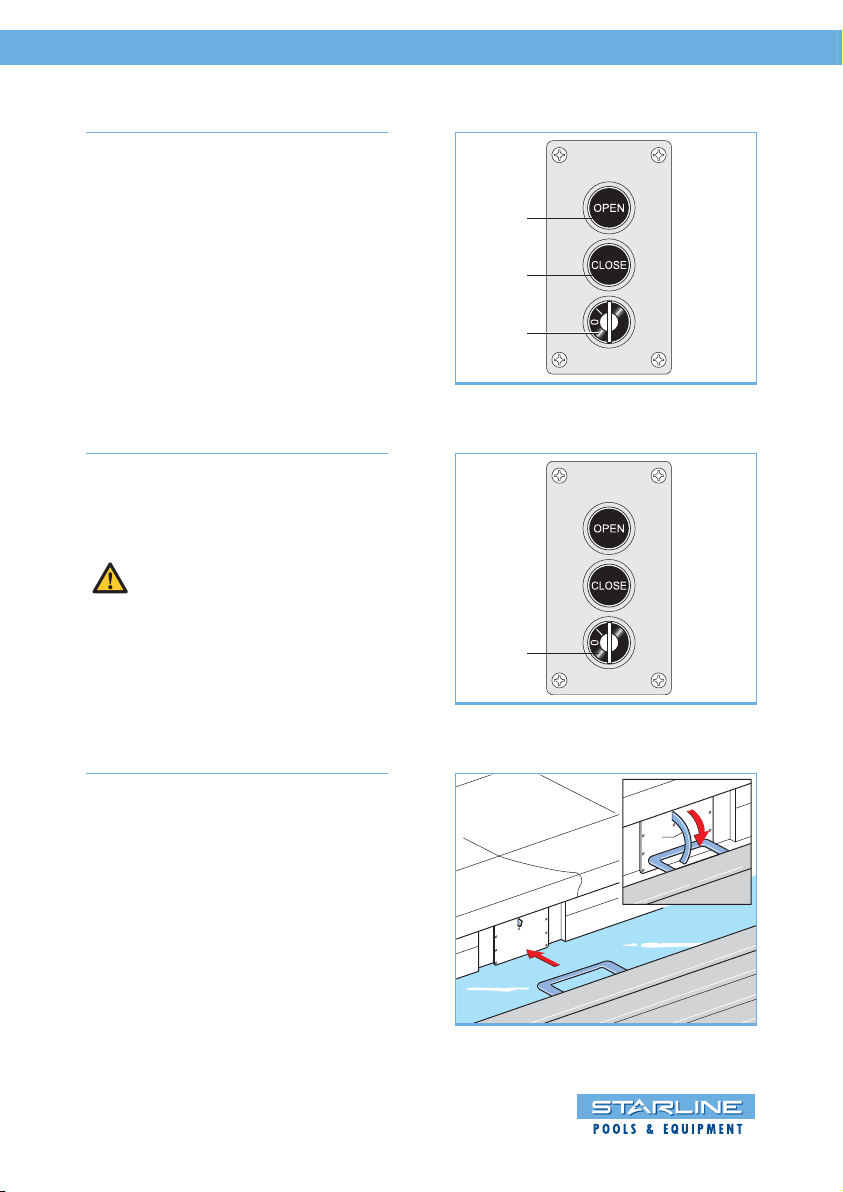
3.1 Emergency Shutdown
If the key switch (C) is in the 0 position,
it will function as emergency shutdown
and the Roldeck cannot be controlled by
unauthorized persons. Pressing the Open
(A) and Close (B) buttons will work as
emergency shutdown as well if the motor is
running.
A
B
C
A
3.3 Child Lock
The child lock (A) is an automatical
safety lock that prevents children from
being able to push open - consciously or
unconsciously – the Roldeck.
Check operation every time you close the
cover. The water level is very important for
it to function correctly, if too high or too low
the latch hook won’t engage correctly with
the safety lock.
A
3.2 Operation
Set the key switch (A) to the 0 position if
the Roldeck has been opened.
Make sure that there aren’t any
persons or objects in the pool when
closing the Roldeck.
User manual Starline Roldeck

RDCM – V01 7
3.4 Roldeck
Always make sure that the Roldeck has
been fully opened when the pool is being
used. Use of the pool while the Roldeck
has been closed partially or completely may
result in injury and/or Roldeck damage.
Don’t stand/walk on the Roldeck.
1 L 5 L
3.5 Descaling
For use, refer to the instructions on the
packing.
3.6 Preparing for Winter
The benefits of the Roldeck will be•
lost if a winter cover is used and the
Roldeck left in the open position
It is true that the Roldeck may become•
dirtier if a winter cover is used with the
Roldeck in the closed position but the
pool will be safer.
User manual Starline Roldeck

RDCM – V018
4 Operation
B
A
CH
M
K
D
E
IF
G
L
J
4.1 RD 2006 Roldeck Control
A On/Off switch
B LED indicator (ON) Control was enabled.
C LED indicator (AUTO) Control has been programmed.
D LED indicator (ROLDECK) Roldeck motor is running (LED is flashing).
E LED indicator (PANEL) Pit Cover motor is running.
F LED indicator (ERROR) System failure (LED will flash a number of times).
G LED indicator (CLOSE) Roldeck is closing (LED is flashing)/is closed
(LED will light continuously).
H LED indicator (OPEN) Roldeck is opening (LED is flashing)/is open
(LED will light continuously).
I MODE key (Programming) Switching between various operation functions.
J PROG key (Programming) Programming of start and end positions of
Roldeck motor and Pit Cover motor.
K OPEN key Opening of the Roldeck.
L CLOSE key Closing of the Roldeck.
M Connector For the programming plug and accessory connection.
User manual Starline Roldeck
RDCM – V01 9
A
B
C
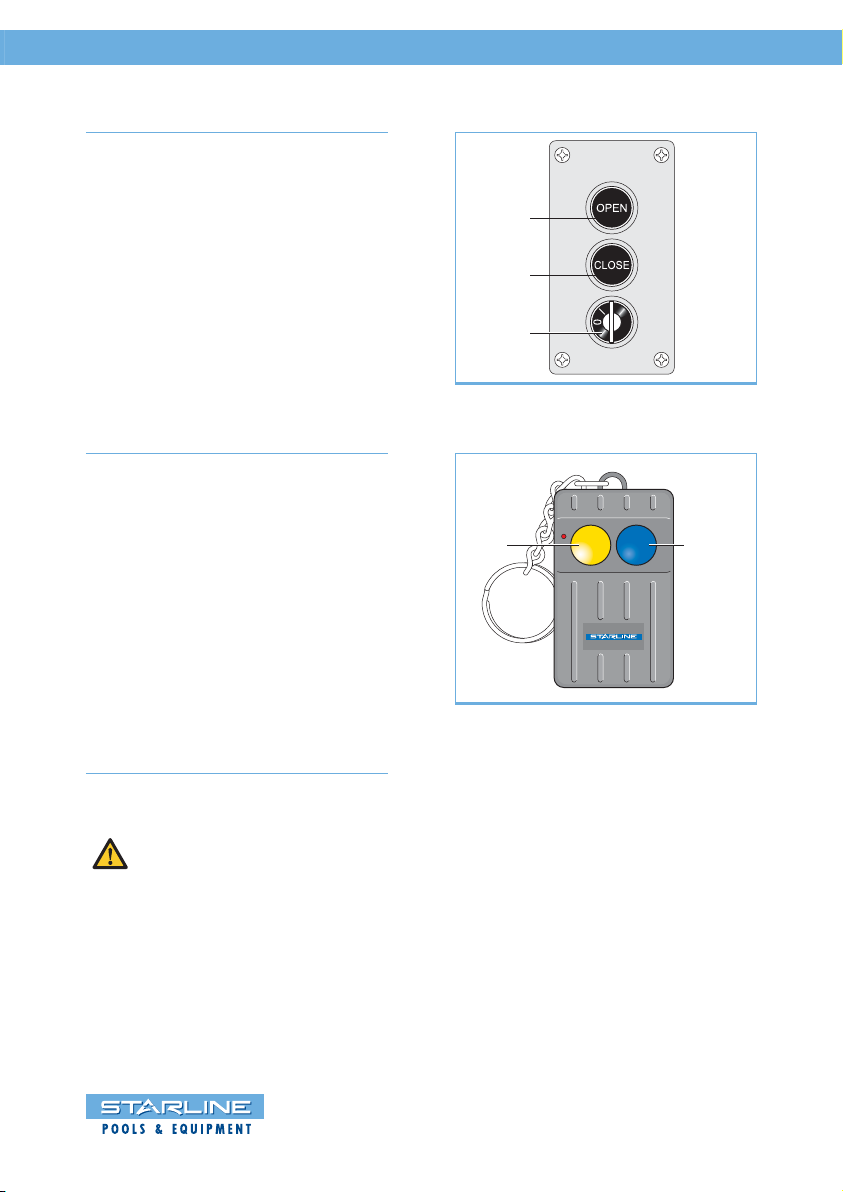
4.3 Remote Control (optional)
A Open
B Close
C LED: will indicate that the sender is
functioning. AB
4.2 Key Switch
A Open
B Close
C Key Switch
To be able to operate the Roldeck with
the control, the key switch, or the remote
control, the key switch (C) must be in
the 1 position. Open: press the Open (A)
button for 1 second. The Roldeck will open
and stop automatically in the fully open
position.
Notes
• Be sure you can see the
swimming pool when opening
and closing;
• A delay was built into the closing
function.
User manual Starline Roldeck
RDCM – V0110
5 Roldeck Control Programming
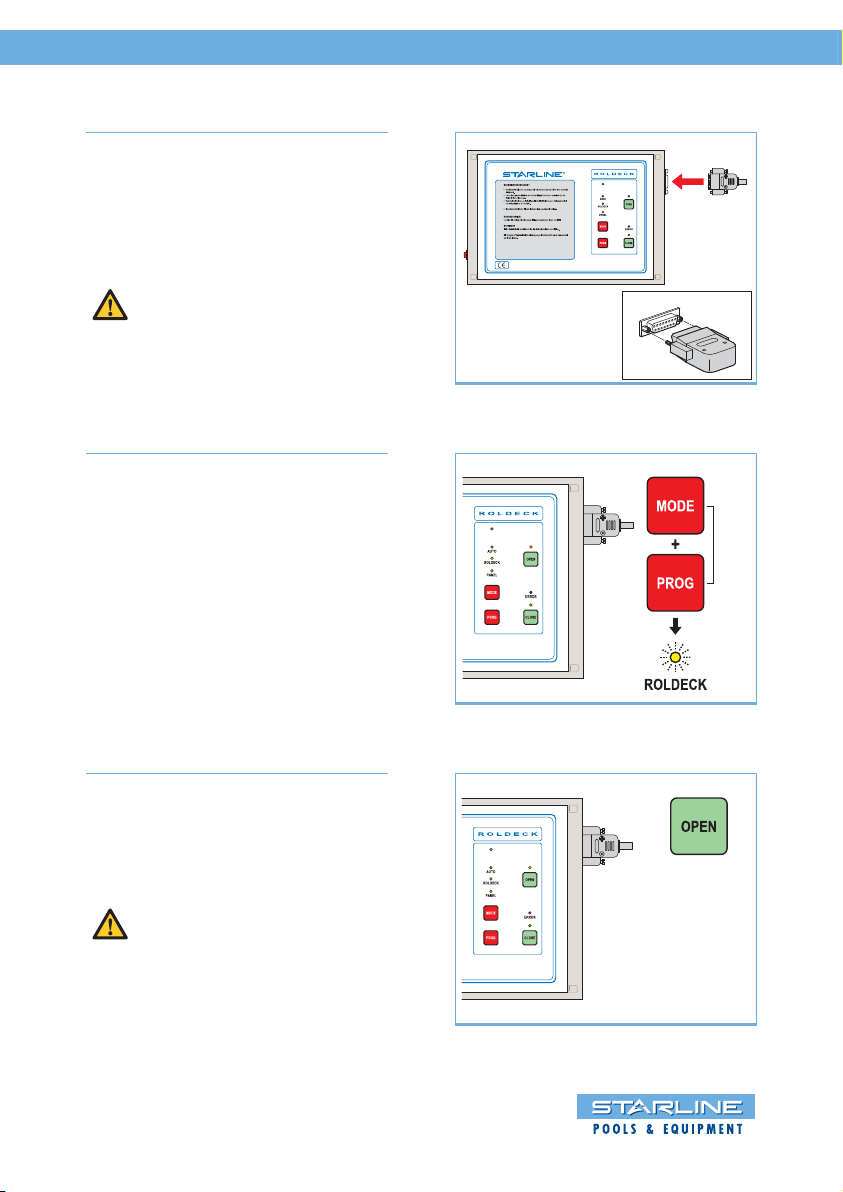
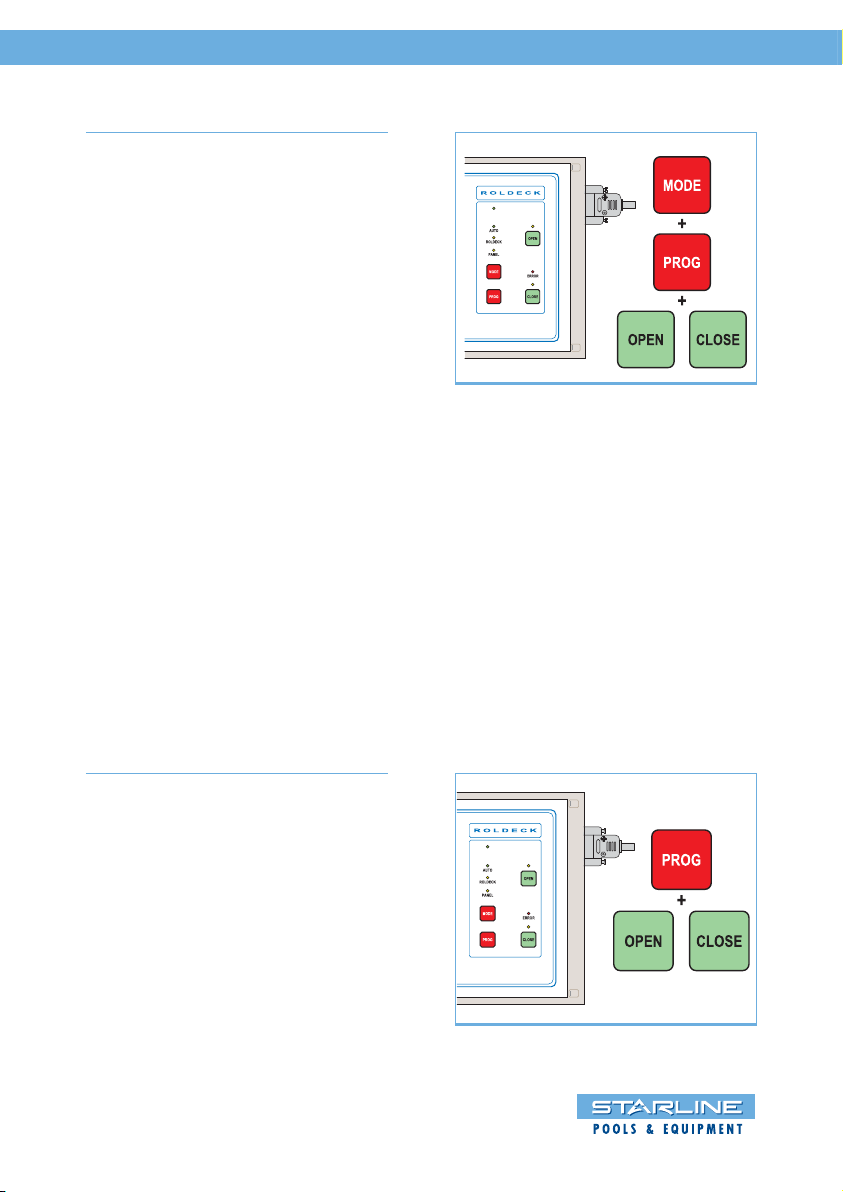
5.1 Roldeck Control
Programming of the Roldeck control occurs
with the help of the operational control
panel on the programming cabinet.
• Place the programming plug in the
programming cabinet’s connector.
Leave the programming plug
connected during use.
Press simultaneously PROG and•
MODE for 5 seconds. The yellow LED
(ROLDECK) will flash. Control has been
reset.
Press OPEN to bring the Roldeck to the•
desires ‘fully open’ position.
If the motor (you have moter at present).
Caution:
If the moter has an incorrect rotational•
direction, the polarity must be switched.
The motor will start with a reduced
rotational speed. The rotational
speed will increase after 5 seconds.
± 5 sec.
User manual Starline Roldeck
RDCM – V01 11
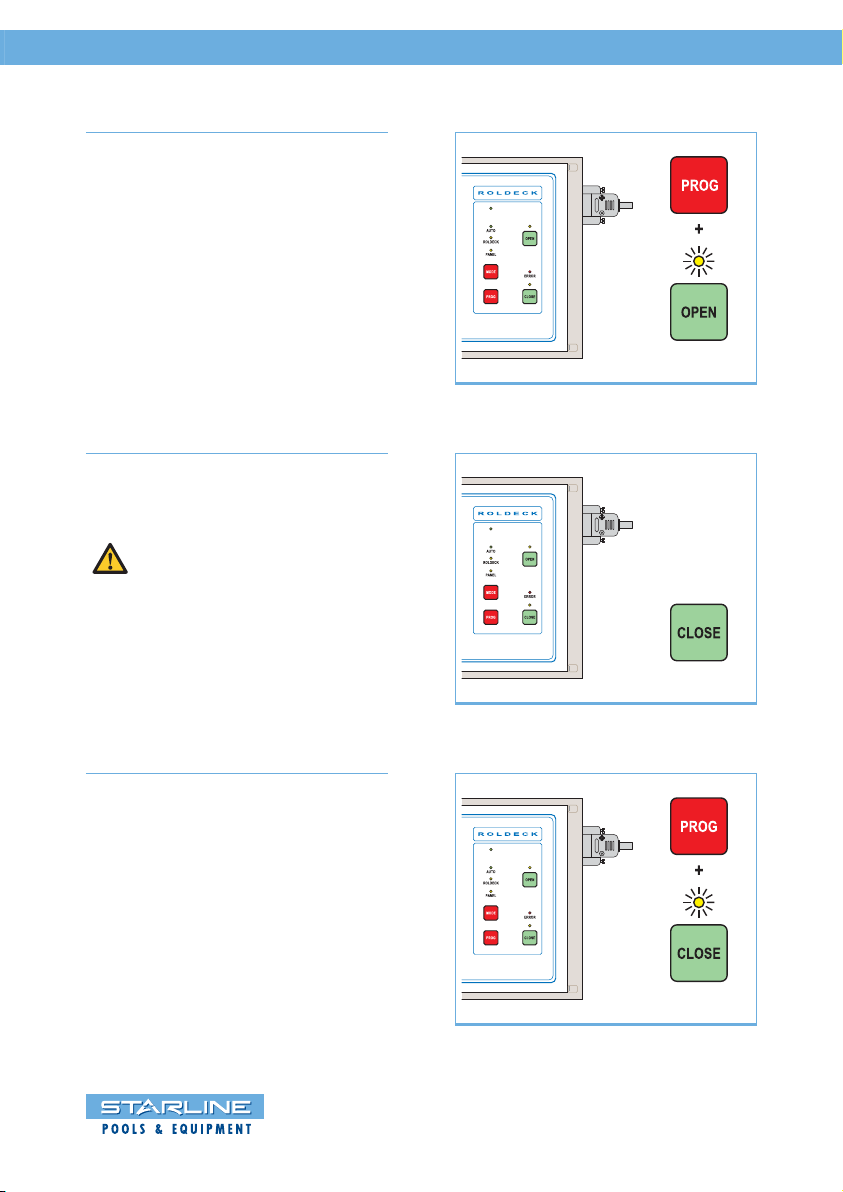
Press simultaneously PROG and OPEN.•
The yellow LED (OPEN) will light. The
set position has been stored in the
memory.
Press CLOSE to bring the Roldeck•
to the desired closed position. The
Roldeck will move as long as the key
remains pressed.
The motor will run permanently with
a reduced rotational speed.
Press simultaneously PROG and•
CLOSE. The yellow LED (CLOSE) will
light. The set position has been stored
in the memory.
Control will automatically switch to the user
position. The green LED (AUTO) will light.
User manual Starline Roldeck
RDCM – V0112
5.2 Fine Tuning
Fine tuning the Roldeck control occurs with
the help of the operational control panel on
the programming cabinet.
Press simultaneously PROG and•
MODE in combination with either OPEN
or CLOSE. The program will open,
depending on what must be adjusted.
OPEN: Fine tuning in the OPEN end position
Press OPEN to bring the¬ Roldeck to•
the desired ‘fully open’ position.
The Roldeck will move as long as the
key remains pressed.
CLOSE: Fine tuning in the CLOSE end position
Press CLOSE to bring the Roldeck to•
the desired ‘fully closed’ position.
The Roldeck will move as long as the
key remains pressed.
Press simultaneously PROG in•
combination with either OPEN or
CLOSE. The adjusted end position has
been confirmed.
Control will automatically switch to the user
position. The green LED (AUTO) will light.
User manual Starline Roldeck

RDCM – V01 13
AB
5.3 Remote Control (optional)
The remote control transmitter is pre-
programmed.
If the transmitter is replaced, or if the
number of transmitters is expanded, follow
the procedure below.
Make sure that the transmitter and
the receiver will not be more than
50 meter distance from each other
during programming.
First transmitter programming:
Keep the programming key (B) pressed•
for about 1 second. The LED (C) on the
receiver will flash.
Press the transmitter key (A) within 20•
seconds and hold it until the LED won’t
light anymore. The transmitter has been
programmed.
Second transmitter programming:
Keep the programming key (B) pressed•
for about 0.5 second. The LED (C) on
the receiver will flash.
Press the transmitter key (A) within 20•
seconds and hold it until the LED won’t
light anymore. The second transmitter
has been programmed.
Deleting old settings:
Press and hold the programming key•
(B) until the LED (C) on the receiver
will light. The LED will light until all old
settings have been deleted (about 10
seconds).
Deleting the settings from a single
transmitter is not possible. The
settings from all transmitters will be
deleted.
C
User manual Starline Roldeck
RDCM – V0114
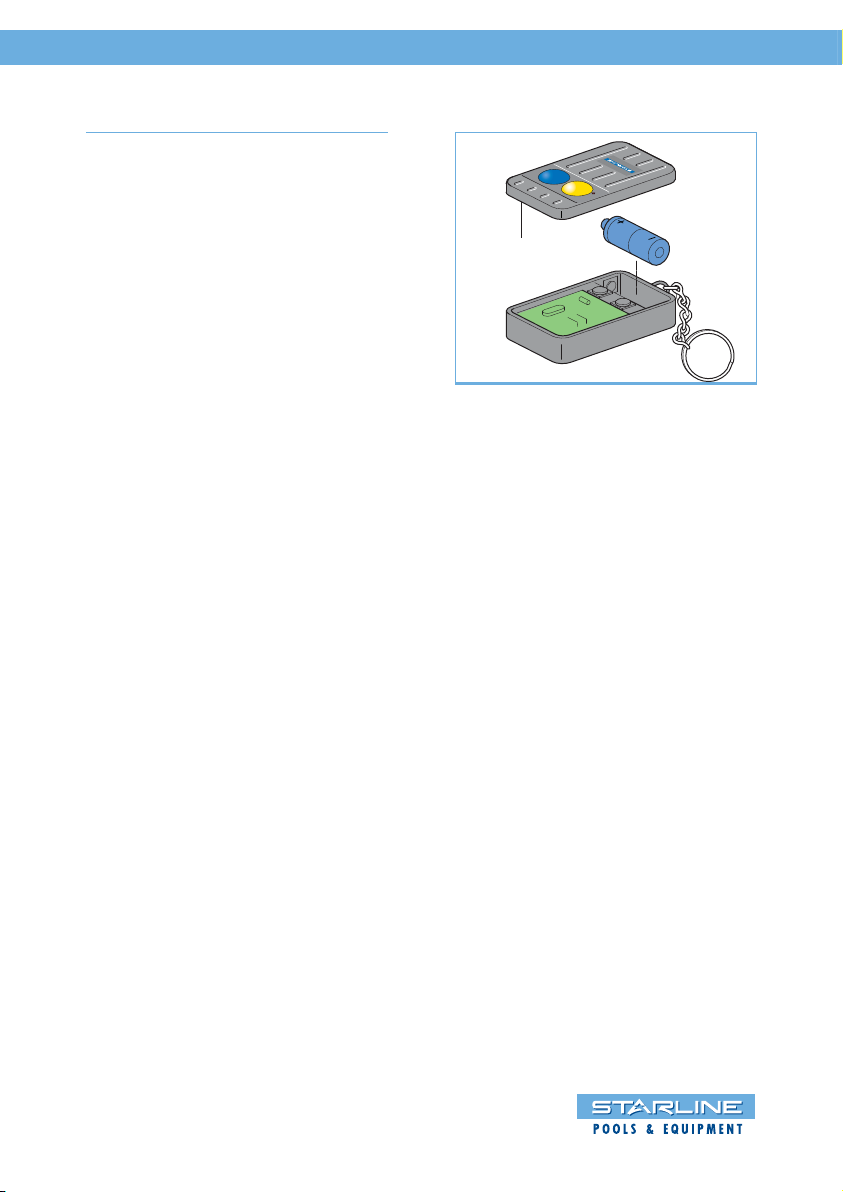
Frequency: 868300 MHz.
Battery replacement
Remove the cover plate (A).•
Replace the battery with the same item•
(x V / y Ah).
Watch the polarity.•
A
User manual Starline Roldeck
RDCM – V01 15
6 Cleaning and Maintenance
6.1 Slats
Clean the slatted cover at least twice a year with
a high-pressure cleaner and a hard brush. Algae
growth on the slats can develop itself both on
the top side and the bottom side of the Roldeck.
• The water circulation system (filter
system) must run during daytime when
solar or transparent slats are being used.
Because with these types of slats heat will
concentrate underneath the cover which
will cause the slats to wear more quickly
or even cause deforming of the slats.
• Use a high pressure cleaner carefully.
• The slats may not be exposed to
sunshine for any length of time when they
are not in contact with the water.
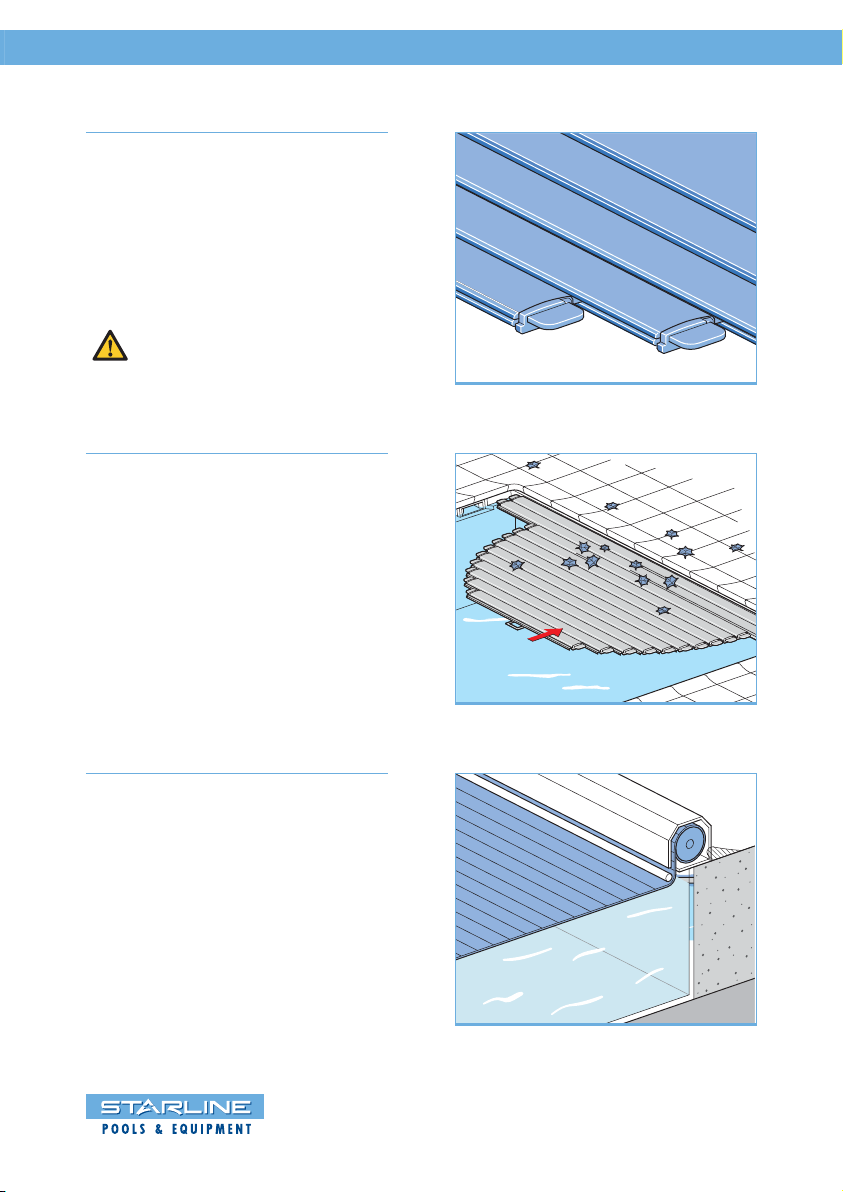
6.2 Debris
Remove leafs and other debris before
closing. This will prevent the cover pit from
getting too dirty.
6.3 Housing
Clean the housing with a high pressure
cleaner and a soft brush or sponge.
User manual Starline Roldeck
RDCM – V0116
3
2
1
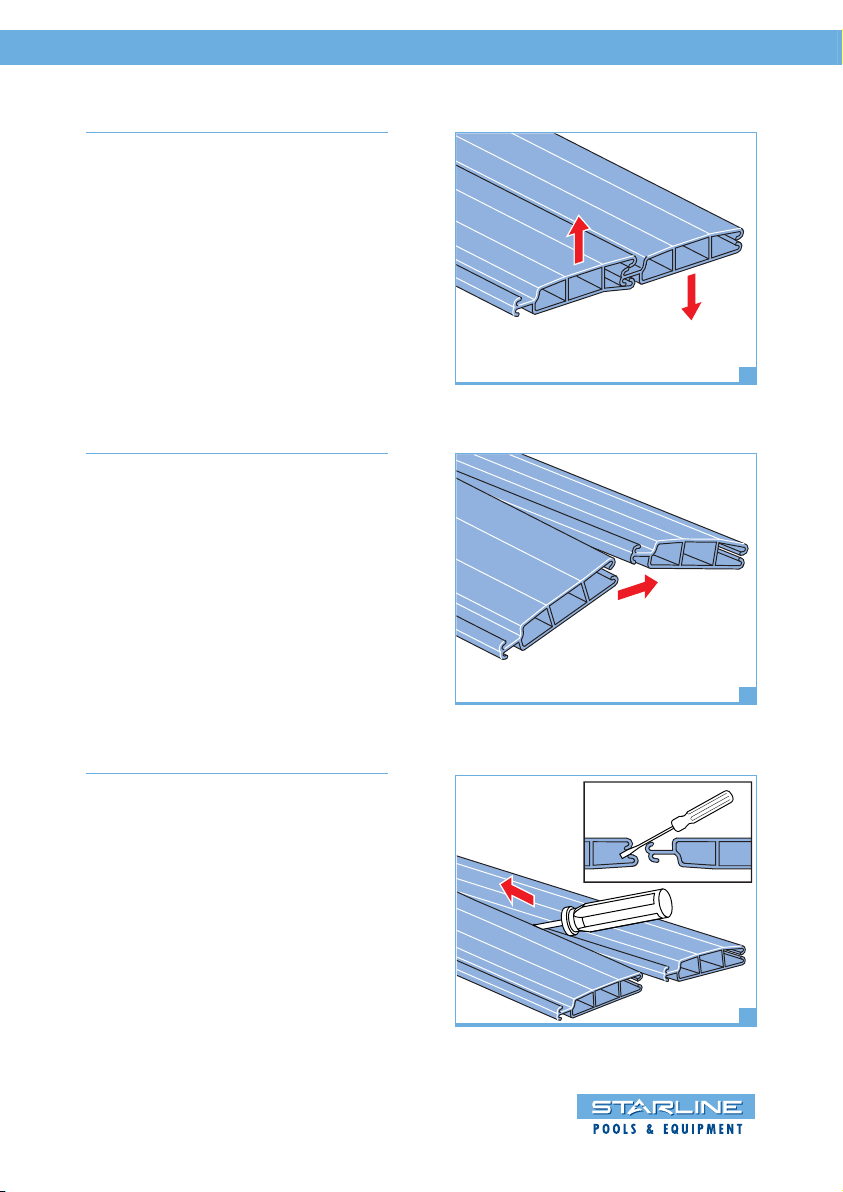
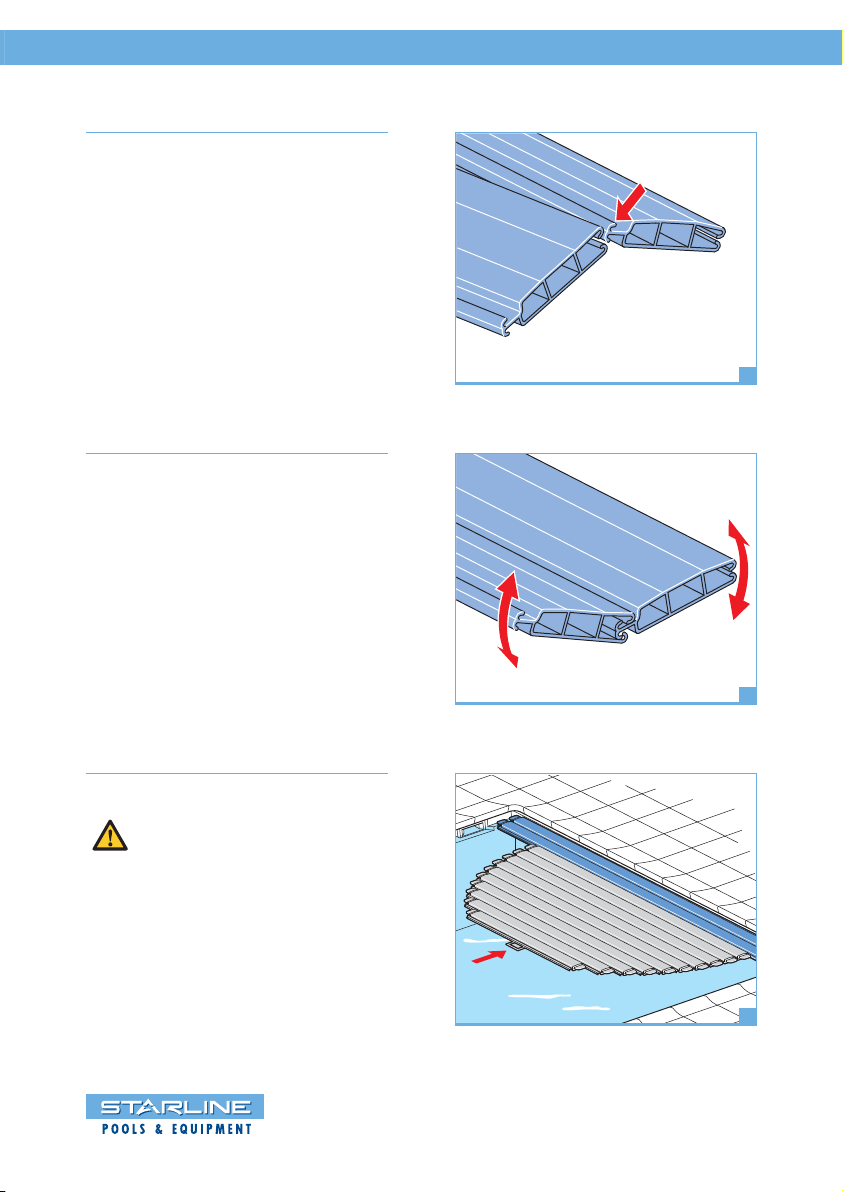
6.4 Disassembling slats
Upward the left slat in relation to the right
slat (this can be reversed), the upper hook
latch of the right slat can come out of the
lock. Next, the lower hook latch can be
taken out of the lock.
The slats can now be divided across a
length of about 10 cm.
Use a screwdriver to divide the slats across
the entire length.
User manual Starline Roldeck
RDCM – V01 17
3
2
1
6.5 Assembling slats
Bring the slats together. Latch the hook
latches together, starting with the lower
hook latch of the right slats (this can be
reversed).
Try to make the connection across the
entire length of the slats by moving up and
down.
Note
Slide the Roldeck towards the
edge as close as possible. This will
simplify replacement of the slats.
User manual Starline Roldeck

RDCM – V0118
Child Safety Handle
The child safety handle has been mounted
onto the first slats and it serves as locking
hole for the child safety lock’s hook latch,
in order that the roldeck cannot be pushed
open.
Non-slip Clip
The non-slip clip is intended to prevent
sliding of the slats into the recess in case
of a roldeck with extremely shaped walk-
in stairs. If the end customer finds it, he
should warn the installer to reposition the
clips. It is very hard for the end customer to
determine the correct position.
3
2
1
6.6 Clips and Brackets
Directional Guide Handle
The purpose of the directional guide handle
is to have the slats, when these go into the
water based on an assembly instruction,
go in the right direction. The first slats will
be under an angle in relation to the second
slats due to the clip, so that a bow will be
formed like with a boat.
User manual Starline Roldeck

RDCM – V01 19
4
Directional Guide Handle Fitting
The function of the directional guide handle
fitting is to guide the slats that come
upward out of the water into the correct
direction. As the clip was mounted onto the
second slats, the rounded part will ensure
that the first slats can only pivot one way.
User manual Starline Roldeck

RDCM – V0120
6.7 Descaling
Slat scale can develop itself on the top side
of the slats.
Moisten the cover slats by spraying the•
descaler across the cover with a sprayer
(1 liter per 10 m2).
Let the descaler act on the surface for•
about 1 or 2 hours.
Spray the roldeck in bands from left to•
right in order to spray all calcium out of
the cavities. Brush the slats first with a
scrubber if necessary.
Vacuum the swimming pool to remove•
debris that has formed due to the
cleaning.
After this, backwash the filter.•
Recover the water pH value by adding•
Starline pH+.
The decalcifier with disappear from the
water in a day.
Handle the pressure washer with
care
WARNING:
First read the instructions on the packing before using.•
Keep descaler out of the reach of children.•
Keep descaler away from food, drink and animal feeding stuffs.•
Avoid contact of descaler with the skin.•
Avoid contact of descaler with the eyes. In case of eye contact, immediately rinse with plenty•
of water and get expert medical advice.
Make sure when using a sprayer that the swimming pool terrace will not be corroded by•
descaler.
After descaler use, wait at least two hours before putting the swimming pool into use again.•
If descaler is used repeatedly, use an intermediate period of about 1 or 2 days on account of•
water economy.
Dispose of both the material and the packing as chemical waste.•
1 L 5 L
User manual Starline Roldeck
Other manuals for Roldeck
2
Table of contents
Languages:
Other Starline Lighting Equipment manuals


Popular Lighting Equipment manuals by other brands

Global
Global Model 812410 instruction manual

AES
AES PROTEAM iX30T Installation & operation manual

Malibu Boats
Malibu Boats LZ314 quick start guide

BION TECHNOLOGIES
BION TECHNOLOGIES PS | tellus po rd xs user manual

Star Headlight & Lantern
Star Headlight & Lantern Star Mini Phantom ULB9LDC Series operating manual

BEMKO
BEMKO ST41-104-PIR Security instructions


