manuals.online logo
Brands
  1. Home
  2. •
  3. Brands
  4. •
  5. START International
  6. •
  7. Dispenser
  8. •
  9. START International LD3000 User manual

START International LD3000 User manual

Features
Spanish
Italian
German
Notes
Polish
Spanish
French
Italian
German
French
• Distribue des équees à découpe en bout ou au poinçon
• Photodétecteur précis et paramétrable
• Déchets faciles à rerer
• Paramétrable sans oul
• Peut être accroché avec LDHANGER disponible en opon (avec fixaon conforme et sûre)
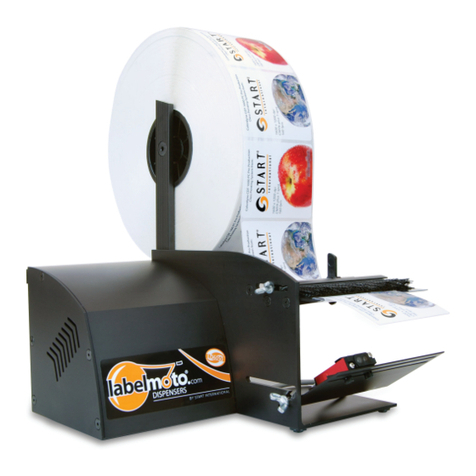
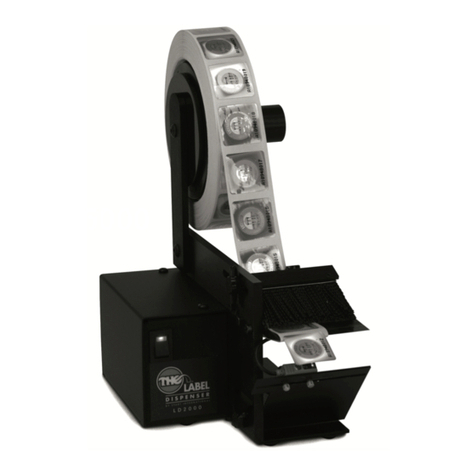
• Will dispense bu-cut and die-cut material.
• Adjustable photosensor for pinpoint accuracy.
• Handled lock rod makes scrap removal easy.
• No tools required for adjustment.
• Hanging capability with oponal LDHANGER (Needs to be secured properly)
• Dispensa materiales troquelados y estampados.
• Sensor ajustable de alta precision.
• Facil almacenamiento de residuos.
• Ajuste simple y sin herramientas.
• Opcion de colgar el equipo con el accesorio opcional LD Hanger (debe ser fijado adecuadamente)
• Uscita di echee con taglio a stampo e taglio terminale
• Fotosensore impostabile in modo preciso
• Semplice rimozione di residui
• Impostazione senza arezzi
• Opzione di sospensione con LDHANGER opzionale (deve essere fissato appropriatamente).
• Spendet Ekeen mit End- und Stanzschni.
• Präzise einstellbarer Fotosensor.
• Leichtes Enernen von Abfallmaterial
• Werkzeugfreie Einstellung
• Auängemöglichkeit mit oponalem LDHANGER (muss sachgemäß gesichert werden).
• Do etykiet ciętych/ perforowanych
• Precyzyjna regulacja czujnika fotosensor
• Łatwe usuwanie pozostałości
• Regulacja bez używania narzędzi
• Możliwość zawieszenia urządzenia za pomocą opcjonalnego LDHANGER
(z odpowiednim zabezpieczeniem).
• Keep strip plate free of adhesive build-up.
• Clean photosensor with compressed air or dry cloth.
• Do not drop the dispenser or subject it to heavy shock.
• Make sure machine is switched OFF during loading and unloading of material.
• Mantenga la plataforma principal limpia y sin restos de adhesivo.
• Limpie el sensor con aire comprimido o con un paño seco.
• No deje caer el dispensador o permita que reciba golpes fuertes.
• Asegure que el equipo esta apagado durante la carta y descarga del material.
• Rerez les éventuels résidus de colle du disposif de décollage.
• Neoyez le photodétecteur à l'air comprimé ou avec un chiffon sec.
• Ne laissez pas tomber le distributeur d'équees.
• Assurez-vous que l'appareil est éteint avant d'y placer ou de rerer des consommables.
• Rimuovete eventuali residui di adesivo dal disposivo di separazione.
• Pulite il fotosensore con aria compressa o un panno asciuo.
• Non lasciate cadere il dispenser di echee.
• AssicurateVi che il disposivo sia disavato prima di inserire o rimuovere il materiale di consumo.
• Enernen Sie eventuelle Klebstoffrückstände von der Ablösevorrichtung.
• Reinigen Sie den Fotosensor mit Drucklu oder einem trockenen Tuch.
• Lassen Sie den Ekeenspender nicht fallen.
• Stellen Sie sicher, dass das Gerät ausgeschaltet ist, bevor Sie Verbrauchsmaterial einlegen
oder enernen.
• Usuń pozostałości kleju z przyrządu do odklejania
• Wyczyść czujnik fotosensor sprężonym powietrzem lub suchą szmatką.
• Chroń urządzenie przed upadkiem
• Upewnij się, że urządzenie zostało wyłączone zanim wymienisz lub włożysz elementy.
Polish
QS01.20
INSTRUCCIONES
DE PUESTA EN MARCHA
®
4270 Airborn Dr | Addison, TX 75001, USA
972.248.1999 | service@starnternaonal.com
www.STARTinternaonal.com
7
Plug In & Turn On
Mise en service
Enchufe y apriete el botón de encendido
Avazione
Inbetriebnahme
Uruchomienie B
A
A: Connect power cord (in back).
B: Press power switch (on back) to turn on machine.
A : Branchez le câble d'alimentaon (à l'arrière).
B : Appuyez sur la touche de mise en marche (à l'arrière).
A: Conecte el cable de alimentacion
B: Apriete el boton de encendido
(en la parte trasera del equipo)
A: Collegate il cavo alimentatore (sul retro).
B: Azionate l'interruore (sul retro).
A: Schließen Sie das Stromkabel an (rückseig).
B: Betägen Sie die Einschalaste (rückseig).
A: Podłącz kabel zasilania (z tyłu).
B: Naciśnij przycisk zasilania (z tyłu).
! Warning: Turn on the machine only aer correctly
compleng steps 1–6!
! Aenon : l'appareil ne peut être mis en
fonconnement que si les étapes 1 à 6 ont été
correctement exécutées.
! ATENCION: Encienda la maquina unicamente cuando
haya completado los pasos 1 al 6.
! Aenzione: il disposivo deve essere messo in funzione
solo, se i passi 1 - 6 sono sta esegui completamente
e in modo correo.
! Achtung das Gerät darf nur in betrieb genommen
werden, wenn Schri 1-6 vollständig und korrekt
ausgeführt wurde.
! Uwaga: urządzenie może zostać dopiero wtedy
uruchomione, kiedy kroki od 1 do 6 zostały
prawidłowo wykonane.
8
Remove labels
Décollage des équees
Rere las equetas
Rimuovere le echee
Ekeen abnehmen
Usuwanie etykiet
A: Remove the label with your hand.
A : Décollez l'équee à la main.
A: Tome la equeta
A: L'echea viene rimossa con la mano.
A: Das Eke wird mit der Hand abgenommen.
A: Etykiety należy wyjmować ręką.
! The device must be turned off immediately when the label roll is empty to prevent connuous operaon.
! Lorsque le rouleau d'équees est vide, éteignez l'appareil sans aendre au risque de le faire fonconner
en connu.
! El equipo debe apagarse de inmediato cuando el rollo de equetas se ha terminado para evitar
el funcionamiento connuo.
! Se il rotolo echee è vuoto, il disposivo deve essere disavato immediatamente, altrimen il disposivo
va in funzionamento connuo.
! wenn die Ekeenrolle leer ist, muss das Gerät unverzüglich ausgeschaltet werden, da ansonsten das Gerät in
Dauerlauf geht.
! Jeśli rolka etykiet jest pusta należy niezwłocznie wyłączyć urządzenie, w przeciwnym razie urządzenie
przechodzi do pracy ciągłej.
SECURITY
Turn power OFF and unplug the device while loading and unloading.
Turn power OFF and unplug the device before touching the lock rod.
Beware of loose or dangling objects (i.e. lanyard, bracelet, hair) while machine is powered on.
Operate the device in a dry environment only. Do not expose to moisture (splashes, fog, etc.).
MAINTENANCE
Remove power cord when not in use. Remove liner material from take-up hub at
approximately
Do not operate machine without covers in
Do not operate if inspecon reveals a damaged power or sensor cord.
Débranchez le câble d'alimentaon en cas de non-ulisaon. Rerez le rouleau
de la ge d'enroulement dès qu'il aeint
un diamètre de 7,5 cm environ ou si les performances du moteur déclinent.
N'ulisez pas l'appareil tant que les protecons ne sont pas en place.
N'ulisez pas l'appareil si le câble d'alimentaon ou le câble du détecteur sont
abîmés.
Rere el cable de alimentación cuando no el equipo no este en uso. Rere la bobina
cuando no este en uso o el diámetro sea inferior a 7.5 cm.
No ulice el equipo si existe un defecto o daño en el cable de alimentación o del sensor.
Éteignez l'appareil et débranchez-le avant de le charger ou décharger.
Éteignez l'appareil et débranchez-le avant de toucher le disposif de blocage.
Veillez à ce qu'aucun objet ne vienne se glisser dans l'appareil pendant le fonconnement (clés, bracelet, cheveux etc.).
Ulisez l'appareil dans un environnement sec et ne l'exposez pas à l'humidité (éclaboussures, brouillard etc.).
Durante la operación de carga y descarga, el botón de encendido debe estar apagado y la corriente eléctrica desconectada del equipo.
Al operar el equipo, tenga precaucion con los objetos colgantes y/o sueltos (collares, pelo)
Ulice el equipo en lugar seco. No lo exponga a la humedad (espray, salpicados…)
Disavate il disposivo e staccate la spina elerica, prima di caricarlo/scaricarlo.
Disavate il disposivo e staccate la spina elerica, prima di toccare il disposivo di bloccaggio.
Prestate aenzione che nessun oggeo giunga nel disposivo durante il funzionamento (portachiavi, bracciale, capelli, ecc.)
Ulizzate questo disposivo solo in un ambiente secco e non in condizioni di bagnato (spruzzi d'acqua, nebbia, ecc.)
Schalten Sie das Gerät aus und ziehen den Netzstecker, bevor Sie es be- oder entladen.
Schalten Sie das Gerät aus und ziehen den Netzstecker, bevor Sie die Sperrvorrichtung berühren.
Achten Sie darauf, dass keine Gegenstände in das Gerät gelangen, während es in Betrieb ist (Schlüssel- oder Armbänder, Haare, etc.)
Das Gerät darf nur in einer trockenen Umgebung betrieben und keiner Nässe (Spritzwasser, Nebel, etc.) ausgesetzt werden.
Wyłącz urządzenie i wyciągnij wtyczkę z kontaktu, zanim włożysz bądź wymienisz elementy.
Wyłącz urządzenie i wyciągnij wtyczkę z kontaktu, zanim dotkniesz blokady.
Upewnij się, że żadne przedmioty nie znajdują się w urządzeniu, podczas jego uruchamiania (klucz, bransoletka, włosy, itp).
Urządzenie może być używane tylko w suchym otoczeniu i nie może być narażone na działanie wilgoci (spray, mgły, itp).
Staccate il cavo alimentatore quando il disposivo non viene ulizzato. Rimuovete il
carrier dalla bobina di avvolgimento
non appena raggiunge un diametro di ca. 7,5 cm o si verifica un peggioramento della potenza
del motore.
Non ulizzate il disposivo con coperture rimosse.
Non ulizzate il disposivo con cavo alimentatore o cavo sensore danneggia.
Ziehen Sie den Netzstecker, wenn Sie das Gerät nicht benutzen. Enernen Sie
die Parkel nach dem Erreichen aus dem Retraktor etwa 7,5 cm Durchmesser
oder wenn die Motorleistung immer geringer wird.
Verwenden Sie das Gerät nicht, wenn die Abdeckung fehlt.
Verwenden Sie das Gerät nicht, wenn das Netzkabel oder der Sensor beschädigt sind
Odłącz przewód zasilania, gdy nie używasz urządzenia. Usuń cząstki ze zwijacza, po osiągnięciu
średnicy około 7,5 cm
lub gdy wydajność silnika staje się coraz mniejsza.
Nie korzystaj z urządzenia, gdy brakuje osłony.
Nie korzystaj z urządzenia, jeśli przewód zasilający bądź czujnik jest uszkodzony.
LD3000
LD3000FDA
LD3000ESD
A
B
2
Load Label Roll
Insérer le rouleau d'équees
Cargue el rollo de equetas
Inserire il rotolo echee
Ekeenrolle einlegen
Włóż rolkę z etykietami
A: Insert core holders (2) into each side of your label roll.
B: Slide loaded roll into reel hanger bar.
C: The label roll may not exceed a diameter of 18 cm.
A : Placez les deux côtés du rouleau d'équees sur le porte-rouleau (2).
B : Faites coulisser le porte-rouleau sur l'axe.
C: Le diamètre du rouleau d'équees ne doit pas être supérieur à 18 cm.
A: Inserte las guías de rollo (2) en ambos lados del rollo.
B: Coloque el rollo sobre la barra horizontal del brazo sujeta-bovina.
C: El diámetro del rollo no puede exceder de 18 cm.
A: Inserite entrambi i la del rotolo echee sui suppor rotolo (2).
B: Spostate i suppor rotolo sulla sospensione.
C: Il rotolo echee deve avere un diametro max. di 18 cm.
A: Setzen Sie beide Seiten der Ekeenrolle auf die Rollenhalter (2).
B: Schieben Sie die Rollenhalter über die Auängung.
C: Die Ekeenrolle darf max. einen Durchmesser von 18 cm haben.
A: Umieść obie strony rolki etykiety na uchwycie (2).
B: Przesuń uchwyt rolki nad zaczep.
C: Średnica rolki etykiet nie może przekraczać 18 cm.
3
A
B
Material Guide
Engager le rouleau
Guiando el rollo
Guidarullo
Rollenführung
instalacja rolki
A: Coloque el bloqueador grande de rollo en la barra horizontal
B: Gírelo en sendo de las agujas del reloj hasta el bloqueo.
A: Muovete il grande bullone anespulsione sulla sospensione rulli per impedire lo scivolamento
del rotolo echee.
B: Girate il grande bullone anespulsione leggermente in senso orario finché scaa in posizione.
A: Schieben Sie die große Spindelsicherung über die Rollenauängung, um ein Verrutschen der
Ekeenrolle zu verhindern.
B: Drehen Sie die große Spindelsicherung leicht im Uhrzeigersinn, bis sie einrastet.
A: Przesunąć duże zabezpieczenie nad zaczep rolki, aby zapobiec ślizganiu się rolki z etykietami.
B: Przekręć duże zabezpieczenie lekko w kierunku wskazówek zegara, aż zaskoczy.
A: Slide large hub lock into reel hanger
bar to secure label roll.
B: Rotate the large hub lock lightly
clockwise unl it locks into place.
A : Glissez la grande plaque de mainen sur l'axe
du rouleau pour empêcher le rouleau
d'équees de glisser.
B : Tournez légèrement la grande plaque de
mainen dans le sens des aiguilles d'une
montre jusqu'à ce qu'elle s'enclenche.
4
5
A
Remove Lock Rod
Rerer la plaque de mainen
Extraiga la vara cóncava de soporte
Rimuovere il bullone anespulsione
Spindelsicherung enernen
Usuń zabezpieczenie
A: Slide lock rod off take-up hub.
A : Rerez le disposif de blocage de la ge
d'enroulement.
A: Extraiga la vara cóncava de soporte de la barra de rebobinado.
A: Estraete il disposivo di bloccaggio dalla
bobina di avvolgimento.
A: Ziehen Sie die Sperrvorrichtung aus der
Aufrollspindel.
A: Wyciągnij blokadę ze zwijacza.
Load Dispenser
Alimenter le distributeur
Cargue el dispensador
Caricare il dispenser
Spender laden
Ładowanie dozownika
A: Feed label liner under guide rod and brush.
B: Bend liner around strip plate and take-up hub (label will hang slightly over edge for liing)
C: Slide lock rod back into take-up hub to secure liner.
D: Slide small hub lock into guide rod and rotate clockwise lightly unl it locks into place.
A : Glissez le ruban d'équees sous le rail de guidage et le peigne.
B : Faites passer le ruban d'équees sous la plaque de décollage jusqu'à la ge d'enroulement
(l'équee déborde légèrement du bord pour être décollée facilement).
C : Repoussez le disposif de blocage dans la ge d'enroulement pour fixer le ruban d'équees.
D : Glissez la pete plaque de mainen sur la baguee de guidage et tournez-la dans le sens
des aiguilles d'une montre jusqu'à ce qu'elle s'enclenche.
A: Deslice el carrete de la bobina bajo la barra-guia y el cepillo.
B: Enrolle el carrete en la barra de rebobinado
C: Coloque la vara cóncava de soporte entre el carrete y la barra de rebobinado para asegurar el papel.
D: Coloque el bloqueador de carrete en la barra-guia, para evitar que el carrete se mueva. Asegúrelo girando
en el sendo de las agujas del reloj.
A: Fate passare il carrier di echee soo la guida e la spazzola.
B: Fate passare il carrier di echee intorno al disposivo di separazione alla bobina di avvolgimento
(l'echea sporge leggermente dal bordo per poter essere staccata)
C: Spingete il disposivo di bloccaggio nella bobina di avvolgimento per fissare il carrier di echee.
D: Muovete il piccolo bullone anespulsione sulla guida e giratelo in senso orario finché scaa in posizione.
A: Führen Sie den Ekeenträger unter Führungsschiene und Bürste hindurch.
B: Führen Sie den Ekeenträger um die Ablösevorrichtung zur Aufrollspindel (Eke hängt leicht über die
Kante, um es abzulösen)
C: Schieben Sie die Sperrvorrichtung zurück in die Aufrollspindel, um den Ekeenträger zu fixieren.
D: Schieben Sie die kleine Spindelsicherung über den Führungsstab und drehen Sie sie im Uhrzeigersinn,
bis sie einrastet.
A: Przeprowadź nośnik etykiet pod szyną prowadzącą i pod szczoteczką
B: Przeprowadź nośnik etykiet pod przyrządem do odklejania (etykieta wystaje nieco ponad krawędź,
by można ją odkleić)
C: Przesuń blokadę do zwijacza, by umocować nośnik etykiet.
D: Wciśnij małe zabezpieczenie nad drążek prowadzący i obrócić w prawo, aż do usłyszenia kliknięcia.
6
Remove Lock Rod
Rerer la plaque de mainen
Ajuste el sensor
Rimuovere il bullone anespulsione
Spindelsicherung enernen
Usuń zabezpieczenie
A
CB
Point sensor toward
A: Loosen wingscrew to adjust sensor plate.
B: Point sensor towards front edge of label.
C: Tighten wingscrew to secure sensor plate in place.
A : Dévissez la vis à ailees pour pouvoir orienter le détecteur.
B : Orientez le détecteur vers le bord de l'équee.
C : Resserrez la vis à ailees pour maintenir le détecteur en place.
A: Afloje la mariposa para ajustar la plataforma del sensor.
B: Apunte el sensor hacia el bode frontal de la equeta.
C: Apriete la mariposa para asegurar nuevamente la plataforma
del sensor.
A: Allentate la vite ad alee per allineare la piastra sensore.
B: Orientate il sensore verso il bordo dell'echea
C: Stringete la vite ad alee per fissare il sensore.
A: Lockern Sie die Flügelschraube, um die Sensorplae auszurichten.
B: Richten Sie den Sensor auf den Rand des Ekes.
C: Ziehen Sie die Flügelschraube an, um den Sensor zu fixieren.
A: Odkręć śrubę motylkową, aby ustawić płytkę czujnika.
B: Ustaw czujnik na krawędź etykiety
C: Dokręć śrubę motylkową, aby zamocować czujnik.
Input: 100V - 240V AC 50-60 Hz
Output: 12V DC
1.5A
ELECTRICAL RATINGS
Core Holders (2)
Porte-rouleau (2)
Guía de rollo (2)
Guidarullo (2)
Rollenhalter (2)
Uchwyt rolki (2)
Power Cord
Câble d'alimentaon
Cable de alimentación
Cavo alimentatore
Stromkabel
Kabel zasilający
A
SET-UP INSTRUCTIONS
ITEMS INCLUDED
Hex Wrench
Clé Allen
Llave Allen
Chiave esagonale
Sechskantschlüssel
Klucz imbusowy
Large Hub Lock
Grande plaque de mainen
Bloqueador de rollo grande
Grande bullone anespulsione
Große Spindelsicherung
Duże zabezpieczenie
Small Hub Lock
Pete plaque de mainen
Bloqueador de carrete pequeño
Piccolo bullone anespulsione
Kleine Spindelsicherung
Małe zabezpieczenie
* Machine must be unplugged from power supply from Steps 1 - 6.
* Lors des étapes 1 à 6, l'appareil doit rester débranché.
* La maquina debe estar desconectada de la corriente eléctrica para los pasos 1 - 6
* per i pun 1–6 il disposivo deve essere staccato dall'alimentazione.
* Das Gerät muss für die Schrie 1–6 von der Stromversorgung getrennt sein.
* Urządzenie należy odłączyć od zasilania, aby wykonać czynności od 1 do 6.
1
Li Reel Holder Arm
Fixer le bras de mainen
Levante el brazo que sujeta la bovina.
Fixer le bras de mainen
Fissare il braccio di sostegno
Halterarm fixieren
Umieść uchwyt
A: Li reel holder arm slightly past 90º angle and lock into posion using provided hex wrench.
A: Fixez le bras de mainen du rouleau dans un angle d'un peu plus de 90° à l'aide de la clé
Allen incluse.
A: Levante algo mas de 90 el brazo sujeta-bovina y proceda a bloquearlo usando la llave Allen.
A: Fissate il braccio guidarullo in un angolo di poco più di 90° con la chiave esagonale in
dotazione.
A: Fixieren Sie den Rollenhalterarm in einem Winkel von etwas über 90° mit dem beigelegten
Sechskantschlüssel.
A: Przymocuj uchwyt pod kątem około 90 ° za pomocą dołączonego klucza imbusowego.

This manual suits for next models

2

Other START International Dispenser manuals

START International TDA025 User manual

START International

START International TDA025 User manual

START International Tape TDH2O1 User manual

START International

START International Tape TDH2O1 User manual

START International Label LD2000 User manual

START International

START International Label LD2000 User manual

START International LD3500 User manual

START International

START International LD3500 User manual

START International LD8025 User manual

START International

START International LD8025 User manual

START International Label LD5000 User manual

START International

START International Label LD5000 User manual

START International LD2000 User manual

START International

START International LD2000 User manual

START International Labelmoto LD6025 User manual

START International

START International Labelmoto LD6025 User manual

START International Tape TDA150 User manual

START International

START International Tape TDA150 User manual

START International THE LABEL DISPENSER LD2000 User manual

START International

START International THE LABEL DISPENSER LD2000 User manual

START International LR4500 User manual

START International

START International LR4500 User manual

START International TAPE DISPENSER TDA150 User manual

START International

START International TAPE DISPENSER TDA150 User manual

START International THO DC5100 User manual

START International

START International THO DC5100 User manual

START International TDH2O5 User manual

START International

START International TDH2O5 User manual

START International Label LD7500 User manual

START International

START International Label LD7500 User manual

START International LDX8000 Series User manual

START International

START International LDX8000 Series User manual

START International LD3000 FDA User manual

START International

START International LD3000 FDA User manual

START International Tape TDH2O5 User manual

START International

START International Tape TDH2O5 User manual

START International TDH2O1 User manual

START International

START International TDH2O1 User manual

START International ZCM1000 Series User manual

START International

START International ZCM1000 Series User manual

START International Tape TDA080-NM User manual

START International

START International Tape TDA080-NM User manual

START International LD6000 Series User manual

START International

START International LD6000 Series User manual

Popular Dispenser manuals by other brands

San Jamar TEAR-N-DRY manual

San Jamar

San Jamar TEAR-N-DRY manual

Veneer Tape Dispenser instructions

Veneer

Veneer Tape Dispenser instructions

KBT breeze Instructions for use

KBT

KBT breeze Instructions for use

NUTRICHEF PKBRFMSR22 user manual

NUTRICHEF

NUTRICHEF PKBRFMSR22 user manual

Star SPDE1ARB Installation and operation instructions

Star

Star SPDE1ARB Installation and operation instructions

Vollrath Stoelting CBD127-37 Operator's manual

Vollrath

Vollrath Stoelting CBD127-37 Operator's manual

Bunn Silver Series Service & repair manual

Bunn

Bunn Silver Series Service & repair manual

ITALTINTO i253C user manual

ITALTINTO

ITALTINTO i253C user manual

Dolphin BC 360 user manual

Dolphin

Dolphin BC 360 user manual

Cosmos CWD 1300 instruction manual

Cosmos

Cosmos CWD 1300 instruction manual

Sealey POWER PRODUCTS CT01 instructions

Sealey

Sealey POWER PRODUCTS CT01 instructions

Tokheim QUANTIUM 410 installation manual

Tokheim

Tokheim QUANTIUM 410 installation manual

Vollrath SLC-1 instruction sheet

Vollrath

Vollrath SLC-1 instruction sheet

OPHARDT HYGIENE SanTRAL Plus TTU 4 Instructions for use

OPHARDT HYGIENE

OPHARDT HYGIENE SanTRAL Plus TTU 4 Instructions for use

corob EVOPWR CX user manual

corob

corob EVOPWR CX user manual

Restroomdirect Bobrick SureFlo B-850 Instructions for installation, operation, maintenance

Restroomdirect

Restroomdirect Bobrick SureFlo B-850 Instructions for installation, operation, maintenance

KS BAIONA N KSL00927 Installation and maintenance guide

KS

KS BAIONA N KSL00927 Installation and maintenance guide

Ecolab ALLIGATOR ALLOCATOR 100 Installation and operation manual

Ecolab

Ecolab ALLIGATOR ALLOCATOR 100 Installation and operation manual

manuals.online logo
manuals.online logoBrands
  • About & Mission
  • Contact us
  • Privacy Policy
  • Terms and Conditions

Copyright 2025 Manuals.Online. All Rights Reserved.