Status PROVAC 360 User manual

STATUS PROVAC 360
PROFESSIONAL VACUUM PACKING MACHINE
USER MANUAL
EN
innovations


3
1.1. OPERATING CONDITIONS
Maximum ambient temperature in
normal use is +40°C; the average of
temperatures over a 24-hour period
should not exceed +35°C. Minimum
ambient temperature allowed is -5°C.
Surrounding air should be clean;
relative humidity should not exceed
50 % at the maximum temperature
of +40°C. Higher relative humidity is
allowed at lower ambient temperature
(e.g. 90 % at +20°C).
If the machine is not operational for
5 minutes, it goes into standby mode
and the mode of operation has to be
chosen again – Auto or Manual.
1.2. IMPORTANT SAFETY INSTRUCTIONS
a.) Working surface must be dry,
normal temperature (not hot) and
clear from obstructions.
b.) Before connecting the appliance
to mains socket, check the power
cord, plugs and socket. If you
observe any defect, contact our
repair service listed below.
c.) Machine should be cleaned only
with a dry or slightly damp cloth.
d.) Never touch the Sealing Strip when
using the machine (Item 17 in
Figure 1) – it may be hot.
e.) Use the machine only for the purpo-
ses described in the User Manual.
f.) If the supply cord is damaged, it
must be replaced by the manufac-
turer, its service agent or similarly
qualied persons in order to avoid a
hazard.
g.) This machine can be used by chil-
dren aged from 8 years and above
and persons with reduced physical,
sensory or mental capabilities or
lack of experience and knowledge
only if they have been given super-
vision or instruction concerning use
of the machine in a safe way and
understand the hazards involved.
h.) Children shall not play with the
machine. Cleaning and user
maintenance shall not be made by
children without supervision.
i.) Warranty is invalid if:
• The machine has been tampered
with.
• The machine has been used for
unintended purposes.
• Safety regulations and instructi-
ons in the User Manual were not
respected and followed.
1. SAFETY INSTRUCTIONS AND INTRODUCTION

4
1.3. MAINTENANCE AND CLEANING
a.) Unplug the machine.
b.) Use a soft, damp cloth to clean
the machine. Do not use anything
which could scratch or damage
the surface. Never submerge the
machine in water or place it
under running water. Never squirt
detergent directly onto or into the
machine.
c.) Before using the machine make
sure that it is completely dry.
d.) The Sealing Strip is covered with
Teon. Remove any plastic residu-
es using a soft cloth.
e.) You can only clean the Sealing
Strip when the machine has
cooled down. Never try to clean the
sealing strip using a sharp object.
f.) If the black foam seals become
contaminated with grease or liquid,
then you can wash them in soapy
water, rinse and dry them before
replacing them. This will increase
the lifespan of the foam seals.
The manufacturer will not accept
responsibility for any damage that may
occur as a result of not following the
User Manual or improper use.

5
Status Provac 360 is the rst machine for professional
use from Status Innovations. It is intended for long-term
storage of foodstuffs in vacuum and for vacuum packing
of foods in bags or vacuum containers. It was developed
especially for professional kitchens, butcheries, chee-
series, and other production facilities, which store large
quantities of foods daily. It can also be used by those
who want only the best and have large quantities of
foods they want stored quickly and efciently.
This machine represents the new generation of Status
vacuum packing machines, designed to be even more
user-friendly. It is developed and produced by Status
d.o.o. Metlika, Slovenia.
It features unprecedented NEW FUNCTIONS:
• Status Smart Seal: A sealing process, which
ensures remarkably fast vacuum packing cycles
and what is more it is energy efcient.
• The machine automatically adjusts sealing time
according to the temperature of the sealing
mechanism (the longer the machine is active,
the less time is needed to complete the sealing
process).
• During the sealing process the machine is com-
pletely silent and energy-efcient. Since it has
two sealing bars Provac 360 does not need to
be preheated before operation. The double seal
acts as an additional safeguard when vacuum
packing moist and delicate foodstuffs in case
liquid would seep through the rst seal.
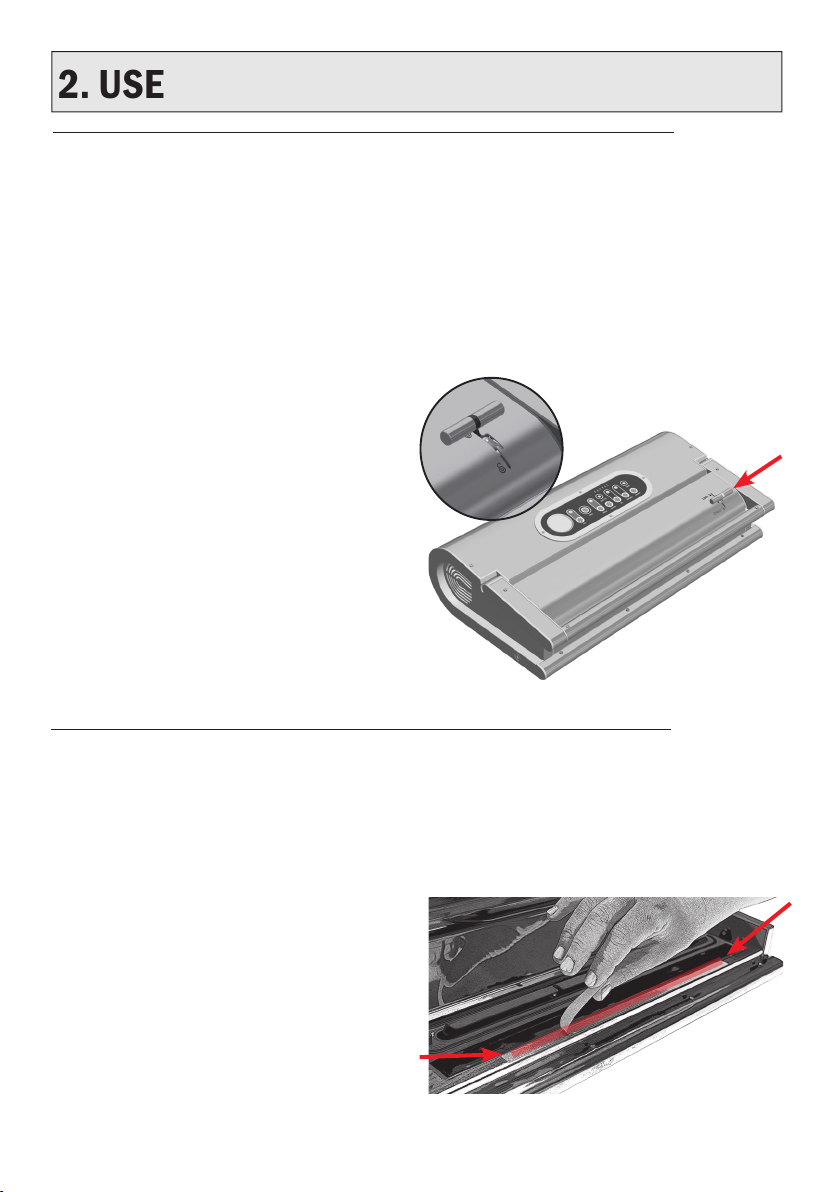
• Status Smart Open/Lock:
• The lid of the machine opens automatically in
the Auto mode.
• Exceptionally easy locking/unlocking due to the
readily accessible handle on the lid.
• A pivoted locking system enables the lock to be
operated quick and easy and does not require
great force. The construction is designed to lock
securely and without undue wear to the materi-
als, which ensures the longevity of the product.
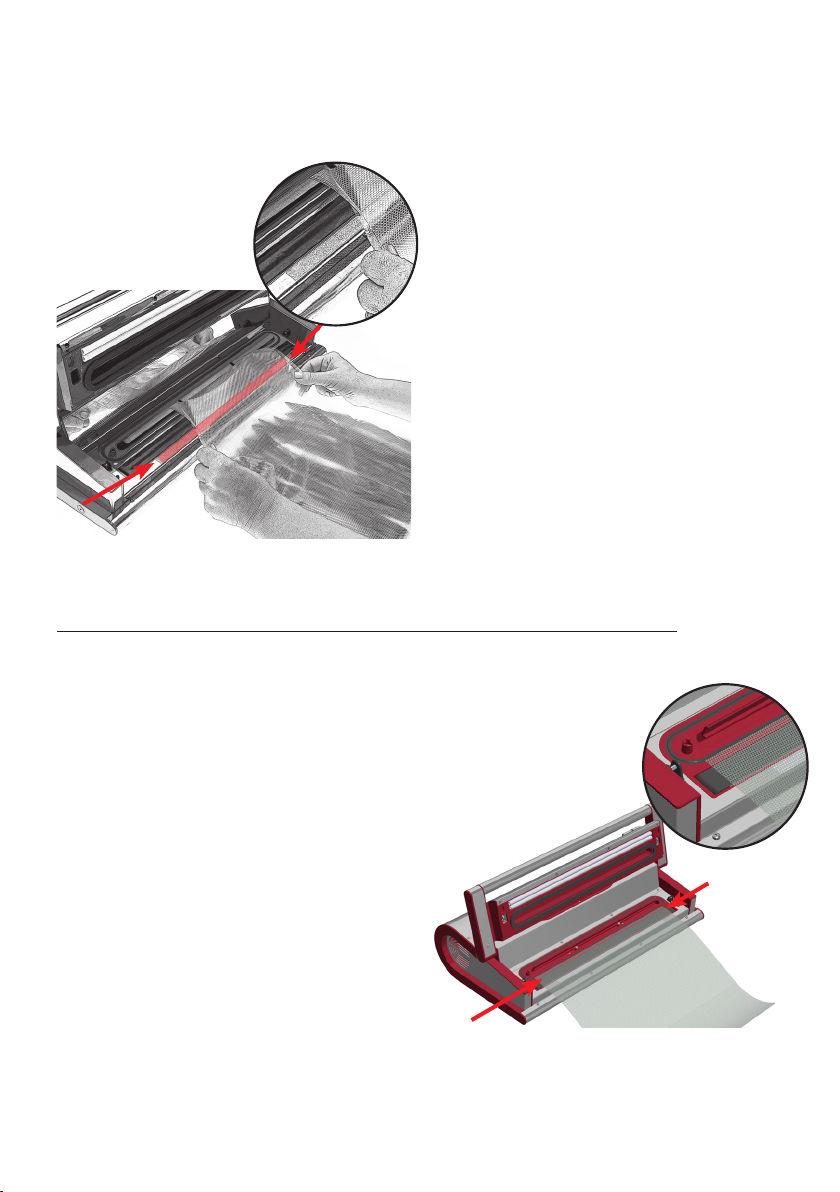
• Status Stiki: A reusable and easily detachable
double-sided adhesive tape for the easiest vacuum
packing in the world. Attach the adhesive tape to
the designated position, remove the top protective
layer and simply tape the bag to the Stiki adhesive
1.4. GENERAL INFORMATION
tape before vacuum packing. The bag is perfectly
straight and without creases, while the accuracy of
bag placement on the sealing strip ensures the most
economical use of the bag. The machine comes with
ve Status Stiki adhesive tapes, which allow for up to
1000 vacuum packing cycles.
Most signicant advantages of vacuum storage:
• Preserves vitamins, minerals, nutrients, and the
aroma of foodstuffs.
• Protects foodstuffs from the spread of mould and
bacteria.
• Prolongs the shelf life of foodstuffs.
• Prevents the unpleasant mixing of odours in
a refrigerator and freezer.
You can also prolong the freshness and shelf life of
foodstuffs by using Status vacuum containers, lids, a
canning jar sealer and a jug, which can all be vacuum
sealed with a manual or an electric vacuum pump. All
these products can also be vacuum sealed with Provac
360 which comes equipped with a special tube for this
type of vacuum packing.
We also have to mention that Status' Provac 360 helps
you save money, since you can buy in bulk, repackage
your purchase in portions and then vacuum package.
Food can be divided into smaller serving portions,
vacuum packaged and stored in the refrigerator for a
longer period of time.
The serial number is located on the technical label of
each individual machine.
Before rst use please read the user manual thoroug-
hly and follow the instructions.
Contact us if you have additional questions, opinions or
comments.
For more explicit directions visit our website
http://innovations.status.si/shop/vacuum-packing-
-machines. Use the same address to locate an online
version of this user manual.
The use of the machine is simple and efcient. You will
store food in an entirely natural and healthy way, the
food will remain fresh longer, and you will save time and
money.

6
1.5. COMPONENTS AND FUNCTION BUTTONS
Figure 1 below shows components of the vacuum
packing machine. Numbers in explanations of machine
operation are used in the same manner as in the Figure
throughout the user manual.
2
1
11
Figure 1: STATUS PROVAC 360 – components are marked with numbers.
34
5 6 7 8
9
15
12
12
12
16
13
14
17
18
19
10

7
LABEL
1. Power (On/Off)
An On/Off indicator. When the machine is on and in standby mode the light is green.
2. Auto (automatic vacuum packing process)
Press Auto button, adjust the foodstuff in the bag, lower the lid and press it down for a few seconds.
The machine operates the task automatically. After the process is complete the lid opens.
3. Cancel
The machine cancels an operation and reverts to the beginning of a selected programme.
4. Manual
Used in the following two situations:
• In the process of vacuum packing delicate, soft and moist foodstuffs (followed by the use of
Pulse Vac and Seal buttons).
• In the process of turning foil rolls into bags.
5. Pulse Vac (pulse vacuum)
Used in the manual operating mode or with manual vacuum packing. When you hold Pulse Vac down the
machine is creating vacuum (vacuum pump is running), when you release the button the operation stops.
The process can be repeated until the desired amount of air has been removed.
6. Seal
Used in two situations (both in the manual operating mode):
• In the process of turning foil rolls into bags.
• With manual vacuum packing.
7. Marinator (marinating)
Begins the marinating programme in a vacuum container. This a fully automated process that lasts for
18 minutes. The light switches off indicating that the process has ended.
A vacuum container and a marinating attachment are accessories that are sold separately.
8. Container
For the vacuum sealing of Status vacuum products (containers, lids, jug, and stopper) by using an
attachment and a tube. The vacuum sealing process stops automatically when pre-adjusted pressure
is reached.
9. Liquid trap
The light turns on to indicate that during the vacuum packing process the machine drew liquid from
the foods out of the vacuum bag and into the vacuum channel.
10. Manometer
Displays the established level of vacuum.
COMPONENTS
11. On/Off Switch
The machine is switched on by moving the button to position I.
12. Gaskets
Gaskets for vacuum packing and gaskets for sealing.
13. Vacuum Channel
If the liquid from a foodstuff enters the machine, the machine stops operating and the Liquid Trap light
turns on. After cleaning the vacuum channel you can continue vacuum packing.
14. Status Stiki ™
A reusable and easily detachable double-sided adhesive tape for the easiest vacuum packing in the
world. Stiki’s main purpose is facilitating the vacuum packing process and ensuring the most economical
use of the bag. The set includes 5 double-sided Status Stiki adhesive tapes.

8
15. Lock/Unlock Handle
• Lock: locking in manual mode and for sealing the bag when turning foil rolls into bags.
• Unlock: operational position with the lid opening automatically
16. Attachment for vacuum sealing of Status vacuum containers and the marinating container.
Used with a tube and connects a vacuum container to the vacuum packing machine.
17. Sealing Strip
It is coated in teon foil and it double seals a bag.
18. Position Marker/Barrier
Indicates where to position the bag during the vacuum packing process.
19. Grip on the Lid
1.6. TECHNICAL INFORMATION
Dimensions length: 510 mm (with the cord attached: 570 mm)
width: 288 mm
height: 137 mm
Weight approximately 8.9 kg
Material stainless steel (external casing)
Pump double piston pump
Vacuum pressure up to - 900 mbar
Electric motor 230V ~, 50/60Hz
Automatic shutdown in case of overheating
Maximum electric motor revolutions per
minute
2900 rev/min
Transformer 230V~, 50Hz / 16V~, 6A (100VA)
Automatic shutdown in case of overheating
Pump volume 30 litres/min
Controls Electronic
Max. length of the sealing area Dual sealing at 360 mm length
Rated power and voltage of the machine 400 W, 220-240 V~, 50/60Hz

9
2.2.1. ATTACH THE STATUS STIKI
DOUBLE-SIDED ADHESIVE TAPE
a.) Clean the surface of the area where the Status
Stiki tape will be attached with alcohol or acetone.
See Item 14 in Figure 1.
b.) Peel off one side of the double-sided tape and
attach it to the cleaned surface. Press rmly to
allow for the glue to adhere.
c.) Before using the machine peel off the upper side of
the tape and Stiki is ready for use.
d.) When operating the machine the vacuum bag is
adhered to the Stiki tape (the bag adheres on con-
tact – there is no need to press) and there is no
need to worry about the bag moving.
e.) Removal: When Stiki gets dirty or no longer adheres to
the bag, remove it manually and attach a new one. The
double-sided
Status Stiki tape does not leave marks
on the machine.
Figure 3: Make sure to always clean the surface before
attaching Stiki.
2.1. GENERAL INSTRUCTIONS
a.) When removing the machine from the packa-
ging ensure that all the components are included
and that the machine and its accessories are in
pristine condition.
b.) It is essential that you read the User Manual
before rst use.
c.) Place the machine on a level smooth surface with
enough room to allow for placing foodstuffs into the
bags.
When vacuum packing foodstuffs the machine has
two basic modes of operation:
• The Auto mode is intended for automatic vacuum
packing of solid and rm foodstuffs; this function is
almost entirely automated – Button 2.
• The Manual mode is intended for vacuum packing
more delicate, soft, and moist foodstuffs or for
turning foil rolls into bags – Button 4.
NOTE: Cover of the machine has to be lifted when
choosing Auto or Manual mode.
Handle on the lid:
The handle on the lid of the machine can be set in two
positions. Place it in the appropriate position before
2.2. PREPARING THE MACHINE FOR USE
2. USE
using the machine.
• Lock – the locked position is used for vacuum
packing in manual mode and for sealing the bag
when turning foil rolls into bags.
• Unlock for auto function, in this position the lid opens
automatically.
In order to move the handle Lock/Unlock, press rmly
on middle of the grip of the machine.
Figure 2: Handle.

10
Status foil rolls come in four widths: 200, 280 and 120
mm (for salami) and 350 mm.
a.) Determine the correct length of the foil by adding
some extra centimetres to the length of the foods
you intend to vacuum pack.
b.) Cut the foil with the attached blade.
c.) Using the Status Stiki tape, place the foil onto the
wide sealing strip aligning it with the gasket (see
detailed Figure 3).
d.) Press the Manual button. It will only work if the cover
of the machine is lifted.
e.) Press the Seal button (Item 6 in Figure 1). During
the sealing process the Seal button blinks and
remains lit towards the end of the process.
f.) Once the light turns off, unlock the machine and
open the lid.
During the sealing process the machine is completely
silent and energy-efcient. Since it has two sealing
bars Provac 360 does not need to be preheated before
operation.
RECOMMENDATION: Stiki tape allows you to
freely vacuum seal several narrower bags at a time; the
maximum bag-width (a single one or several together)
is 36 cm. Furthermore, because the bag is attached far
less of it is used than if it were merely positioned in
place.
Figure 4: Always put the bag on the Status Stiki for
easier placement of the bag.
2.2.2. TURN ON THE MACHINE
Turn the machine on by pressing the button on the
right side of the machine (Item 11 in Figure 1). Make
sure that the control light marked Power is on (Item 1
in Figure 1).
2.3. TURNING FOIL ROLLS INTO BAGS: SEAL BUTTON
Figure 5: When sealing, position the bag on the sealing
strip precisely and all the way to the gasket.

11
*RECOMMENDATION: When vacuum packing greasy
cured meat products (particularly bacon), we advise
that you rst fold the edges of the bag outwardly before
placing the foodstuff into the bag and then unfold the
edges back into place. This will ensure that the edges
do not become greasy.
HOW TO ACT IF THE MACHINE BEGINS TO DRAW
LIQUID WHILE VACUUM PACKING?
If you notice that the machine is drawing liquid
IMMEDIATELY stop the vacuum packing process by
pressing the Cancel button (Item 3 in Figure 1). If the
vacuum packing process is not stopped in time and
the liquid enters the vacuum channel, the machine will
automatically stop the vacuum packing process. The
control light Liquid Trap will turn on.
a.) Open the lid. There is a container between the
gaskets that must be lifted directly upwards.
b.) Pour the liquid out and thoroughly wipe the contain-
er in its entirety.
c.) Put the container back and continue with vacuum
packing. If the liquid made its way into the channel
container, wipe and dry the channel as well.
Figure 7: When liquid nds its way into the container, lift
the container directly upwards, pour the liquid out, and
dry the container thoroughly.
a.) Press the Auto button (Item 2 in Figure 1) to run the
full cycle and achieve maximum negative pressure.
Make sure the cover of the machine is lifted.
b.) Place the foods into a bag. The bag should always
be longer than the length of the foodstuff, which is
to be vacuum packed.
c.) Position the bag between the sealing gaskets; the
position marker in the vacuum channel delineates
where to position the bag.
d.) Use the Status Stiki tape to ensure that the bag
remains in the correct place and without creases –
see User Manual, 2.2.1..
e.)
The handle on the lid should be in the Unlock position.
f.) Hold the grip on the lid, lower the lid and hold it in
place for a few seconds.
When the lid is lowered the machine will:
• start automatically,
• take control of the lid after a few seconds (when it
reaches negative pressure of -300 mbar you can
let go),
• seal the bag (with a double seal),
• after the sealing process is complete the lid will lift
automatically.
g.) The foods in the bag is vacuum packed and
sealed with a double seal. To be removed, the
bag needs to be detached from the Status Stiki
double-sided adhesive tape.
Figure 6: During the vacuum packing process the edge
of the bag needs to reach all the way to the barrier in
the middle of the vacuum channel.
2.4. AUTO MODE: VACUUM PACKING SOLID AND FIRM
FOODSTUFFS (CURED MEAT PRODUCTS, HARD CHEES-
ES …)

12
Foods sensitive to pressure, moist foods and foodstuffs
that contain high levels of moisture (fresh fruit, bread,
cakes, mushrooms), should be conserved using lower
levels of vacuum pressure (from 0 to -300 mbar).
Manual vacuum packing allows you to stop the process
of suction when you determine that enough air has
been extracted from the bag, before the tender foods
incurs damage.
When vacuum packing soft and moist foodstuffs,
keep in mind that you must pay particular attention
to what is happening inside the bag.
To control how much negative pressure is introduced
– i.e. the manual vacuum packing process – press the
Manual button (Item 4 in Figure 1).
a.) Place the bag between the gaskets all the way to the
barrier in the middle of the vacuum channel (use
the Status Stiki self-adhesive tape to ensure the bag
will remain in the correct position).
b.) Take the lid by the grip, lower the lid, and
move the handle on the lid in the Lock position
(simultaneously).
c.) Vacuum pack by pressing the Pulse Vac button
(Item 5) and nish the process by pressing the Seal
button (Item 6):
• When you hold Pulse Vac down the vacuum pump
is running, when you release the button the
operation stops. The intention is that we are able
to achieve a specic negative pressure in the
bag with several consecutive pushes. When you
estimate that enough air has been extracted
(observe what is happening to the foodstuff and
when liquid is beginning to seep towards the ma-
chine, or when the soft foodstuff could become
damaged) stop pressing the button (Item 5 in
Figure 1).
2.5. MANUAL MODE : VACUUM PACKING DELICATE
AND SOFT FOODS (FRESH MEAT, FISH, VEGETABLES,
FRUIT, CAKES, SOFT CHEESES …)
• Once the desired negative pressure has been
achieved, press the Seal button to begin the
sealing process (the Seal light turns on and the
machine remains silent).
• When the sealing process is concluded (the Seal
light turns off), unlock the machine using the
handle (Unlock) and the lid returns to its original
position.
Figure 8: While in manual mode, handle has to be in
lock position.
RECOMMENDATION: The simplest way to vacuum pack
almost all sorts of fruit and most vegetables, fresh
meats, mushrooms and the like, is to keep them in a
freezer for a few hours before vacuum packing. This
way foods, for example strawberries, will retain their
shape completely and there will be no risk of liquid
seeping into the vacuum channel.

13
Meat and sh are marinated faster in vacuum, since
vacuum opens the pores of the food and allow the
marinade to quickly and thoroughly penetrate deep
into the food. By performing a series of consecutive
vacuum packing and unpacking operations it is
possible to achieve great effect in 18 minutes that
would otherwise take several hours to attain.
NOTE: The tube with the vacuum packing attachment
is not included and needs to be purchased separately.
Any Status container can be used for marinating,
though we recommend the 2-litre square or 2-, 3-, or
4.5 litre rectangular vacuum containers.
a.) Connect the tube aperture to the attachment
on the extreme left edge of the vacuum channel
(Item 16 in Figure 1).
b.) Connect it to the container for marinating
(see Figure 9).
c.) Press Marinator to start the marinating programme.
The programme is entirely automated and lasts
18 minutes all together. While the process of marina-
ting "is running" the light Marinator blinks (Item 7 in
Figure 1). Once the light turns off, the programme is
concluded. 150 seconds of vacuum and 60 seconds of
rest equals one cycle that is repeated ve times.
2.6. MARINATING
While the process of marinating "is running" the ligh
Marinator blinks.
After it is concluded, the machine enters stand by mode
– the Power light turns on.
Figure
9: Marinating process.
A tube with an attachment for the vacuum sealing of
Status vacuum accessories (containers, lids and jug) is
included in the set.
a.) Connect the aperture of the tube to the
attachment located on the extreme left edge of the
vacuum channel.
b.) Slide the attachment at the other end of the tube
onto the valve of the chosen vacuum container (the
valve is the round part at the centre of the lid).
c.) Press Container (Item 8 in Figure 1). Once the pre-
set negative pressure is achieved inside the contai-
ner, the process ends automatically.
When using the vacuum containers to store liquid food-
stuffs (soups, sauces, and similar), they should not be
lled to the top. There should be a minimum of 1.5 cm
distance between the surface of the liquid and the lid.
Figure
10: A depiction of the vacuum sealing of
vacuum containers.
2.7. VACUUM SEALING OF STATUS' VACUUM
CONTAINERS AND LIDS

14
3. VACUUM PACKING DIFFERENT TYPES OF FOOD
Vacuum packing is not a substitute for freezing or refri-
geration. Despite being vacuum packed foods still have
to be stored in the refrigerator or freezer or in a cool
place (e.g. dried meat products in a cellar).
Do not use bags or rolls for packing foods which
contain a lot of liquid.
Soups, sauces and liquids should be either pre-frozen
before packing in a vacuum bag or vacuum packed in a
vacuum container.
Boiled meat, raw meat and sh: For best results we
recommend you to pre-freeze meat and sh for 1-2
hours prior to vacuum packing to ensure the retenti-
on of juices and shape, and to help guarantee a good
seal. If pre-freezing is not possible, place a folded
paper towel between the meat and the top of the bag,
avoiding the area to be sealed. Leave the paper towel
in the bag when vacuum packing to absorb excess
moisture and juices.
Note: Beef may appear darker after vacuum packing
due to the removal of oxygen. However, this does not
indicate it is spoiled.
Vegetables: When storing in the refrigerator vegetables
should be blanched prior to vacuum packing. When
freezing the blanching is optional. The process of blan-
ching stops the enzyme action and preserves avour,
colour and texture. One to two minutes in boiling
water is enough for fresh leaf vegetables or beans.
For chopped zucchini or broccoli and other cruci-
ferous vegetables allow 3 to 4 minutes, for carrots
allow 5 minutes. After blanching, submerge the
vegetables in cold water to stop the process then dry
them with a paper towel prior to vacuum packing.
We recommend you to store leaf vegetables in vacuum
containers. They should rst be washed and dried with
a paper towel, and then stored in a vacuum container.
This way, spinach and lettuce will stay fresh up to 2
weeks when refrigerated.
Herbs: Herbs containing a high portion of essential oils,
such as sage, thyme, rosemary or peppermint are not
suitable for vacuum packing but only for drying. Basil,
tarragon, garden dill, parsley and chive should be fro-
zen. If dried, they lose too much avour.
Mushrooms, raw garlic and raw potatoes: We stron-
gly recommend the "manual vacuum packing" function.
Only hard, meaty and fresh mushrooms are suitable
for vacuum packing and freezing. First wash and dry
the mushrooms, then chop them with a ne knife and
store them in small quantities. Almost all types of mu-
shrooms should be blanched. We recommend that you
put them in the freezer for half an hour before vacuum
packing. Do not thaw the mushrooms before preparing
them. Boil frozen mushrooms in hot salty water or add
them to sauces.
Coffee: If you want to properly vacuum package coffee
or other ground food with Provac 360, leave the items in
their original packaging and place them into the Status'
bag. If you do not have the original packaging, use a
regular bag and insert it in the Status' bag. This way you
can prevent beans or ground items from being sucked
into the machine.
Thawing of vacuum packaged foods: Foods should
always be thawed in the refrigerator to preserve quality.
4. BENEFITS OF VACUUM PACKING
4.1. WHAT IS VACUUM?
Oxygen provokes a chemical change on food and is
an important factor in the formation of moulds and
bacteria. As a consequence, grease can go
rancid, food colour changes, moulds and bacteria
multiply, and avour, vitamins, aroma and minerals
are lost. Vacuum packing holds up such undesired
effects, prolongs shelf life and preserves food quality.
Only with the help of vacuum packing, i.e. removing
air from packing using manual or pump, a suitable
environment required to extend food freshness can
be established. The process of vacuum packing in
containers or bags creates negative pressure.

15
The advantage of storing deep frozen food is in
preserving its essence – vitamins, minerals and
taste. Besides, at temperatures between -30° C
and -40° C the texture of raw food changes only to a
minimum extent (e.g. meat). Freeze food as quickly as
possible.
Reason: When you are freezing food slowly, big ice
crystals are formed on the surface. They overgrow
food cells and subsequently damage their structu-
re. When you are freezing food quickly, small ice cry-
stals are formed, which do not damage the food to
such an extent. If possible, freeze food at constant
temperature (–18 °C at the most). Only food of the
highest quality should be frozen. Some foods have
to be blanched (scalded) in order to avoid unwan-
ted changes when freezing or deeply refrigerating
(enzyme activation, ceased germination). Blan-
ched or in any other way heat treated foods must be
chilled before freezing. Otherwise, already stored
food can start thawing and become damaged or
vacuum can be lost when storing food in vacuum con-
tainers. To ensure better quality of stored fruit, use su-
gar as additive. This also preserves aroma and colours.
In the freezer, containers should be kept together as
close as possible. The rest of them can be kept in the
refrigerator.
Signs of freezer burn are rancid meat, rotten
vegetables and tasteless fruit. Freezer burn appears,
when the packaging is permeable to air (common 1
ply PE bags) and frozen food comes into contact with
oxygen. Consequently, water evaporates and the surface
of frozen food dries out. Oxygen penetrates through the
porous cracks and initiates oxidation. As a consequence,
food loses its aroma and fresh taste. We can recognize
freezer burn by the white and dun stains on the food.
4.3. DEEP FROZEN OR CHILLED
Thawing should be a slow (the most suitable way of
thawing is in the refrigerator) and natural process. It
should not be forced (as it is when putting a bag into hot
water or thawing food in the microwave). Once the food
is defrosted, it should not be refrozen. When refree-
zing, mechanical damages occur and food can perish
more quickly. Taste, colour and aroma are decompo-
sed. Micro-organisms (bacteria, mould) multiply much
faster. These consequences cannot be eliminated
by refreezing. It is therefore recommended that once
the foods are thawed, they should be used as soon as
possible.
4.4. THAWING
Vacuum packing is also suitable for picnics, sailing and
camping. Food, equipment and documents stay dry and
protected. Batteries, mobile phones and cameras can
also be vacuum packaged to keep them from getting
wet. Vacuum packing prevents mixing of odours and
keeps food from perishing due to moisture. This is
particularly important in small spaces.
4.6. SAILING, CAMPING AND PICNICKING
4.2. WHAT IS FREEZER BURN?
Cooking Sous Vide is a modern cooking technique
where we cook food in vacuum packed bags immer-
sed in hot water. The Sous Vide technique provides a
superior avour of your home-cooked food, where foods
optimally retain their natural taste, colour and texture.
Make sure to use Pulse vac function for vacuum
packing and to use high quality Status vacuum bags.
The best Sous Vide vacuum bags on the market are the
ones that have the perfect combination of materials
(airtight polyamide and food-grade polyethylene) and
where the thickness of materials is just right. Status'
bags perfectly fulll both of this characteristics.
Food for Sous Vide cooking can also be prepared in
advance before freezing, for example adding spices
and herbs into the vacuum bag together with meat.
4.5. SOUS VIDE COOKING

16
Foil roll 4 ply foil (PA/PE)
• length 3000 mm x width 200 mm, 4-piece set
• length 3000 mm x width 280 mm, 3-piece set
• length 3000 mm x width 120 mm (for salami), 5-piece set
• length 3000 mm x width 350 mm, 3-piece set
Bags for vacuum
packing
4 ply foil (PA/PE)
• length 280 mm x width 200 mm, 40-piece set and 100-piece set
• length 360 mm x width 280 mm, 25-piece set and 100-piece set
• length 550 mm x width 120 mm (for salami), 30-piece set and 100-piece set
• length 400 mm x width 350 mm, 25-piece set and 100-piece set
Thickness of the foil 100 μm (smooth, unribbed part) and 130 μm (structured ribbed part of the foil)
Quality of the foil Impermeable, two-ply, food-grade, neutral in taste and smell, reusable, microwave safe,
appropriate for Sous Vide cooking.
5. WHY USE STATUS’ BAGS AND FOIL ROLLS?
Status vacuum bags are impermeable, food safe, neu-
tral in taste and smell, reusable, BPA free and suitable
for Sous Vide cooking. The foodstuffs stored in them
will remain the same at least half a year after you have
stored it.
The quality of a bag and a foil roll is determined by the
thickness of the bag, the combination of materials and
the height of the ribbed prole.
The thickness of the bag Status’ bags are characteri-
zed by a 100 μm thick smooth foil and a 130 μm thick
ribbed foil. Their embossed criss-cross pattern helps
that the air is removed more effectively during the
vacuum sealing process.
The combination of materials, of polyamide and
polyethylene, affects the (im)permeability of the bag.
Polyamide is the material that affects the permeability
of a bag the most, while the passage of oxygen through
the bag affects the quality of stored food. Compared
to competing brands Status’ bags and foils boast the
thickest layer of polyamide (30 μm) which makes them
the most quality option for storing food.
The height of the ribbed prole determines the qua-
lity of vacuum packing. Status’ bags feature at least
0.2 mm high ribbed layer which enables them all to
be vacuum sealed uniformly whether it be the rst of
the 50th vacuum cycle. Thinner bags can be vacuum
sealed well during the initial few cycles (maximum of
10 bags) but later even the quality vacuum packing
machines cannot establish vacuum or generate
enough negative pressure.
Bags and foil rolls are compatible with all brands of
vacuum packing machines.
BAG STRUCTURE
VACUUM BAGS AND FOIL ROLL SETS
outer impermeable layer, polyamide - thickness 30 µm
inner layer, polyethylene - thickness 70 µm
inner ribbed layer, polyethylene - thickness 100 µm

17
6.1. COMPARATIVE TABLE OF FOOD STORAGE
IN THE REFRIGERATOR
6. COMPARATIVE STORAGE TABLES
Source: Status' Development Dept. manufacturer
Type of food Regular storage Vacuum storage
Boiled food 2 days 10 days
Fresh meat 2 days 6 days
Fresh poultry 2 days 6 days
Boiled meat 4-5 days 8-10 days
Fresh sh 2 days 4-5 days
Cold meats 3 days 6-8 days
Smoked sausages 90 days 365 days
Hard cheeses 12-15 days 50-55 days
Soft cheeses 5-7 days 13-15 days
Fresh vegetables 5 days 18-20 days
Fresh herbs 2-3 days 7-14 days
Washed lettuce 3 days 6-8 days
Fresh fruit 3-7 days 8-20 days
Desserts 5 days 10-15 days
Tip: Before vacuum packing properly chill the food.
6.2. COMPARATIVE TABLE OF FOOD STORAGE
IN CUPBOARDS AND ON SHELVES
Type of food Regular storage Vacuum storage
Bread/rolls 2-3 days 7-8 days
Pastry 120 days 300 days
Dried food 10-30 days 30-90 days
Raw rice/pasta 180 days 365 days
Coffee/tea 30-60 days 365 days
Wine 2-3 days 20-25 days
Non-alcoholic drink (sealed) 7-10 days 20-25 days
Non-alcoholic drink in a vacuum jar 2-3 days 7-10 days
Baking goods 2-3 days 7-10 days
Hazelnuts, walnuts etc. 30-60 days 120-180 days
Crackers/potato chips 5-10 days 20-30 days

18
6.3. COMPARATIVE TABLE OF FOOD STORAGE
IN THE FREEZER
Type of food Regular storage Vacuum storage
Fresh meat 6 months 18 months
Ground meat 4 months 12 months
Poultry 6 months 18 months
Fish 6 months 18 months
Fresh vegetables 8 months 24 months
Mushrooms 8 months 24 months
Herbs 3-4 months 8-12 months
Fruit 6-10 months 18-30 months
Cold meats 2 months 4-6 months
Baking goods 6-12 months 18 months
Coffee beans 6-9 months 18-27 months
Ground coffee 6 months 12-34 months
Bread/rolls 6-12 months 18-36 months
Only approximate time of duration is indicated in the tables, as it depends on the initial state (freshness)
and way of preparing food. We have considered storage of food at +3 °C / +5°C in the refrigerator and
at –18 °C in the freezer.
7. TROUBLESHOOTING
PROBLEM: WHAT TO DO:
Provac 360 does not
respond when
I press the buttons.
• Make sure the machine is switched on and plugged in.
• If socket is on but you have no power, check the socket with another machine that you
know works.
• Check the power cord for any damage – cracks or splitting.
Seal function
does not work.
• Check if the Manual button is on (indicated by a light).
• Check if the handle is in the Lock position.
Pulse Vac function
does not work.
• Check if the Manual button is on (indicated by a light).
• Check if the handle is in the Lock position.
You pressed
the wrong button.
• Use the Cancel button to stop all the operations and the machine will revert to standby
mode.
• Start the process from the beginning (choose between Auto/Manual, set the handle in
the appropriate position Lock/Unlock) and press the button of your choosing.
Air remains
in the bag.
• Make sure you have placed the entire open end of the bag in the middle of the vacuum
channel.
• Ensure that the bags you are using have at least 100/130 μm thickness.
• Check your bag for any damage – splits, perforations or bubbles.
• Test: Seal bag and submerge it in water. Bubbles will appear if the bag is damaged.
• When using foil rolls make sure that the rst sealing edge is rmly sealed.

19
PROBLEM: WHAT TO DO:
The vacuum doesn’t
hold on the bags.
• Check if the sealing areas of the lid are free from any dirt, grease, or food particles,
and that they are rmly in place.
• Ensure that the edges of the bag are perfectly clean – thoroughly remove any food
particles or liquid and ensure that the bag is completely dry.
• If you are sealing anything with sharp edges (e.g. bones) make sure they cannot pierce
the bag during the vacuum process.
• Note: cover sharp edges with a paper towel, or similar, prior to sealing.
Bag melts or
cannot be sealed
completely.
• Make sure you are using bags that are at least 100/130 μm thick and two-ply.
• Before sealing ensure that the edges of the bag are clean and dry.
Provac 360 sealed
several bags (up to
5 items) and it
seems it is not
working anymore.
Important note
about vacuum bags:
• We strongly recommend vacuum bags at least 100/130 µm thick. There are many
different types of vacuum bags available on the market so pay special attention to
quality. Our recommendation is to use original vacuum bags from Status, which are
two-ply and 100/130 µm thick.
The vacuum doesn’t
hold when using a
container.
• Ensure that your Hose is correctly inserted as shown in Figures 9 and 10.
• Make sure your container lid is clean and dry and in the correct position.
• Make certain that your container valve is clean and dry.
How do I know the
marinating process
is completed?
• Observe the light on the machine.
• When the process ends, the Marinator light stops blinking and the machine goes into
standby mode (green Power light turns on).
8. WARRANTY
This warranty is valid for ve years from the date of
purchase. Evidence of original purchase is required for
warranty services, so it is important to keep your sales
receipt.
This warranty only covers breakdown caused by electri-
cal or mechanical failure. It does not cover damage ca-
used by liquid entering the machine or breakdown cau-
sed by failure to follow the manufacturers instructions.
If you have any comments or questions concerning the
functioning of the machine or warranty, please contact
us:
STATUS d.o.o. Metlika
Ulica Belokranjskega odreda 19, 8330 Metlika,
Slovenia
Customer phone: +386 736 91 228
E-mail: [email protected]
For more information visit our website
http://innovations.status.si/.

20
9. DECLARATION OF CONFORMITY
The machine complies with all European directives:
a.) Rules on Electrical Equipment Designed for Use
within Certain Voltage Limits
(Ofcial Journal of RS, Nos. 27/2004, 17/2011,
71/2011)
LVD Directive 2014/35, 2006/95/EC
b.) Rules on Electromagnetic Compatibility
(Ofcial Journal of RS, Nos. 84/2001, 32/2002,
132/2006)
EMC Directive 2014/30, 2004/108/EC
EC declaration of conformity guarantees that the
machine is safe and has been inspected and tested to
meet all the requirements specied in the applicable
standards, directives and regulations.
EC Declaration of conformity for CE marking is loca-
ted at the seller and can be provided per customer’s
request.
10. CORRECT DISPOSAL OF YOUR VACUUM
MACHINE
When the equipment or parts of the device are no
longer t for use they must be disposed of at the
industrial waste landll in accordance with applicable
regulations:
• Decree on the Management of Waste Electrical and
Electronic Equipment (WEEE) (Ofcial Journal of RS,
no. 107/2006)
Directive 2012/19/EU on Waste Electrical and Elec-
tronic Equipment (WEEE)
• Rules on the Restriction of the Use of Certain
Hazardous Substances in Electrical and Electron-
ic Equipment (RoHS) (Ofcal Journal of RS, no.
102/2012)
• Rules amending the Rules on the Restriction
of the Use of Certain Hazardous Substances
in Electrical and Electronic Equipment (Ofcial
Journal of RS, no. 20/2014)
Directive 2011/65/EU on the Restriction of the Use
of Certain Hazardous Substances in Electrical and
Electronic Equipment
Environmentally hazardous components and parts that
were built into the device have to be disposed of at spe-
cialized sites.
The symbol on the product or
its packaging indicates that at
the end of its life, the product
may not be treated as ordinary
household waste and must
be disposed of in accordance
with your local authority’s
instructions and at properly
designated sites. You can also
use an ofcial WEEE collection service provider in
accordance with directive 2002/96/EC.
Separate collection of individual components of EE
equipment prevents negative effects of environmen-
tal pollution and minimizes danger to human health,
which may occur as a result of improper product
disposal. In addition, it enables reuse and recov-
ery of the material, thus saving energy and raw
materials. For detailed information on collecting,
sorting, reuse and recycling of the product contact the
provider of WEEE collection services or the shop where
you bought the equipment.
The date of manufacture can be found on the
warranty sheet which you received at purchase.
Table of contents
Other Status Packaging Equipment manuals