manuals.online logo
Brands
  1. Home
  2. •
  3. Brands
  4. •
  5. Steren
  6. •
  7. Headset
  8. •
  9. Steren TEL-210 User manual

Steren TEL-210 User manual

Product / Producto: HEADSET
TELEPHONE SYSTEM / DIADEMA
MANOS LIBRES CON TELÉFONO
INTEGRADO
Model / Modelo: TEL-210
Brand / Marca: Steren
CONDICIONES
1. Para hacer efectiva esta garantía se requiere: La presentación de esta póliza y del producto, en el lugar en donde fue adquirido o en ELECTRONICA STEREN S.A. DE C.V.
2. ELECTRONICA STEREN S.A. DE C.V. se compromete a reparar el producto en caso de estar defectuoso sin ningún cargo al consumidor.
3. El tiempo de reparación en ningún caso será mayor a 30 días contados a partir de la recepción del producto en cualquiera de los sitios en donde pueda hacerse efectiva la
garantía.
4. El lugar donde puede adquirir partes, componentes, consumibles y accesorios, así como hacer válida esta garantía es: En cualquiera de las direcciones arriba mencionadas.
ESTA GARANTIA NO ES VALIDA EN LOS SIGUIENTES CASOS:
1. Cuando el producto ha sido utilizado en condiciones distintas a las normales.
2. Cuando el producto no ha sido operado de acuerdo con el instructivo de uso.
3. Cuando el producto ha sido alterado o reparado por personas no autorizadas por ELECTRONICA STEREN S.A. DE C.V.
Nota: El consumidor podrá solicitar que se haga efectiva la garantía ante la propia casa comercial, donde adquirió el producto. Si la presente garantía se extraviara, el
consumidor puede recurrir a su proovedor para que le expida otra póliza de garantía, previa presentación de la nota de compra o factura respectiva.
DATOS DEL DISTRIBUIDOR
DISTRIBUTION / NOMBRE / DISTRIBUIDOR:
ADDRESS / DOMICILIO:
PRODUCT / PRODUCTO: BRAND / MARCA:
MODEL / MODELO: SERIAL NUMBER / No. DE SERIE:
DATE OF DELIVERY / FECHA DE ENTREGA:
Call Center / Centro de Atención a Clientes
del Interior 01 800 500 9000
Mexico City / Cd. de México: 53 54 22 90
Warranty
CONDITIONS:
1. This warranty card with all the required information, the invoice or purchase ticket, the packing or package, must be presented with the product when warranty
service is required.
2. If product hasn’t exceed warranty period, the company will repair it free of charge including transportation charges.
3. The repairing time will not exceed 30 natural days, from the day the claim was received.
4. Steren sells parts, components, consumables and accessories to customer, as well as warranty service, at any of the following addresses:
THIS WARRANTY IS VOID ON THE NEXT CASES:
If the product has been damage by an accident, acts of God, mishandling, leaky batteries, failure to follow enclosed instructions, improper repair by unauthorized
personnel, improper safe keeping.
Notes:
a) The customer can also claim the warranty service on the purchase establishment.
b) If you lose the warranty card, we can reissue it just showing the invoice or purchase ticket.
Póliza de Garantía
This Steren product is guaranteed under
normal usage against defects in
workmanship and materials to the original
purchaser for one year from the date of
purchase.
Garantiza este producto por el término de
un año en todas sus partes y mano de obra
contra cualquier defecto de fabricación y
funcionamiento, a partir de la fecha de
entrega.
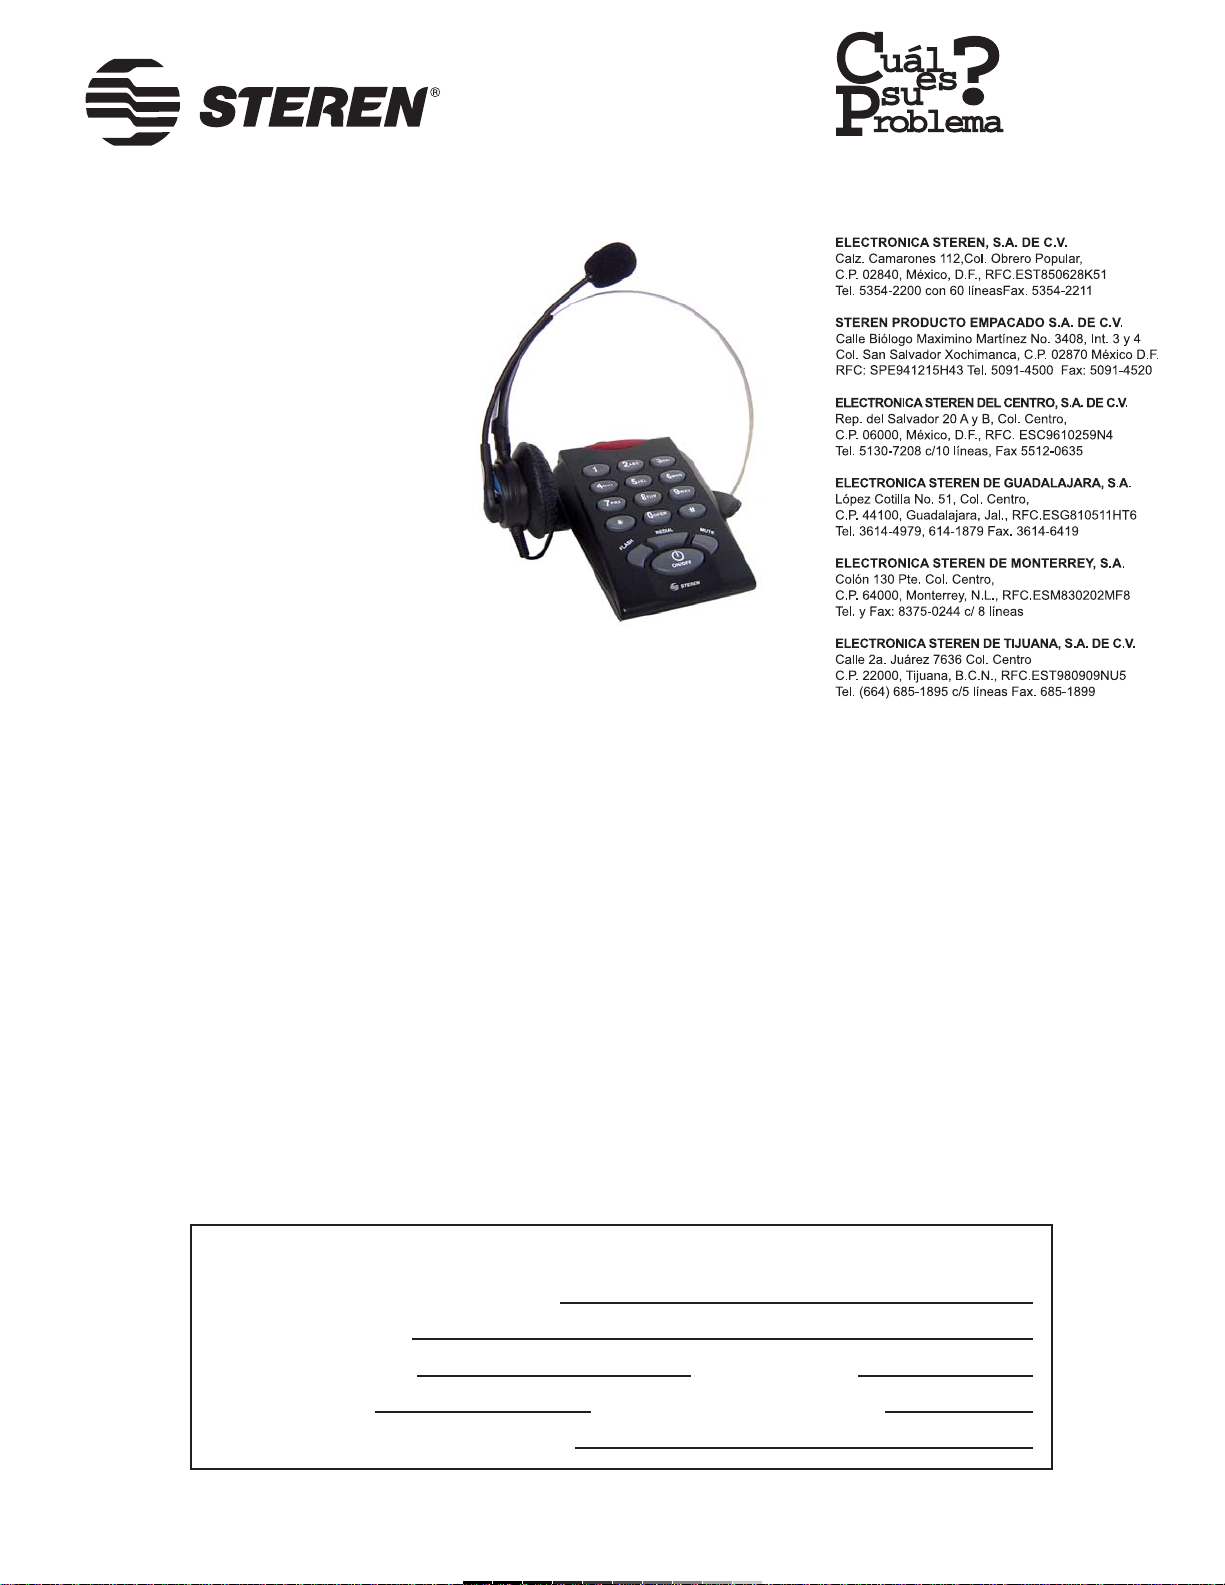
INSTRUCTIVO DE USO DE DIADEMA MANOS LIBRES CON
TELÉFONO INTEGRADO
Modelo: TEL-210
Marca: Steren
Antes de utilizar su nueva Diadema Manos Libres con teléfono
integrado lea este instructivo para evitar cualquier mal
funcionamiento. Guárdelo para futuras referencias.
Su nueva diadema con teléfono integrado, le ofrece la libertad de poder
realizar otra actividad mientras habla por teléfono. Algunas de las
funciones principales son: remarcado de llamada, flash, modo silenciado y
control de volumen. Es cómoda y el largo de su cable le permite moverse
con libertad, incluye un gancho autoadherible para colocar la diadema en
su lugar preferido.
IMPORTANTE
Utilice sólo en líneas analógicas.
Puede utilizar dos audífonos a la vez (conector de teléfono y conector de
2,5mm) pero se recomienda solamente utilizar uno a la vez.
El equipo se debe colocar en un lugar ventilado y seco.
Limpie con un paño seco. No utilice solventes.
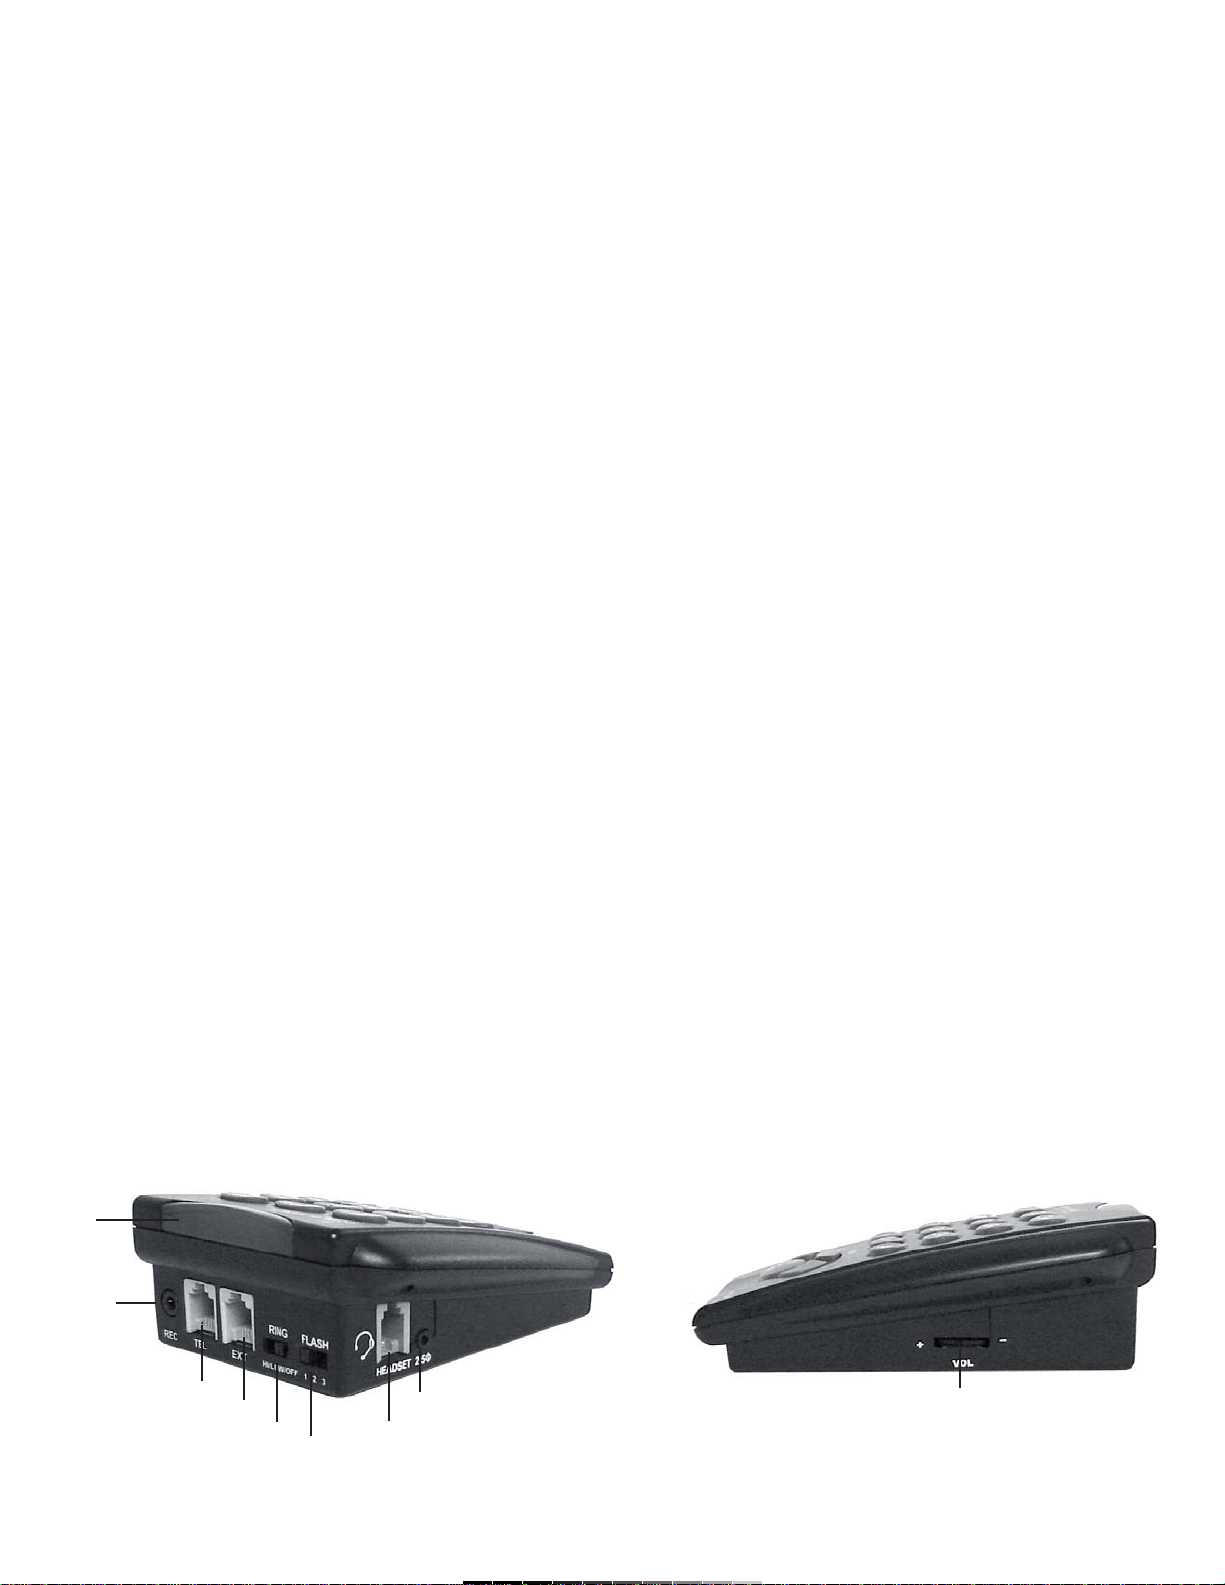
CONTROLES
1.- Teclado numérico
2.- Flash .............................................. Transferencia de llamada a otro
equipo u otro número telefónico
3.- Remarcado (Redial) ....................... Remarca el último número
4.- Silenciar (Mute) .............................. Permite poner una llamada en
espera mientras se escucha una
música de fondo
5.- Encendido / Apagado (On / Off) .... Enciende / Apaga el equipo
6.- Indicador de uso ............................ Se enciende cuando el equipo
está en uso / se recibe una
llamada
7.- Grabación (Rec) ............................ Permite conectar una grabadora
independiente y registrar todas
las llamadas telefónicas que se
realicen
8.- Línea telefónica
9.- Extensión ....................................... Permite conectar la diadema a un
teléfono independiente
10.- Volumen de timbrado ................... Permite cambiar el volumen del
timbrado: Alto, Bajo o Apagado
11.- Tiempo de flash ............................ Permite ajustar el tiempo para
que se realice la transferencia de
llamadas, ideal para
conmutadores
12.- Conector de diadema
13.- Conector de diadema de 2,5mm
14.- Volumen de diadema ................... Ajusta el nivel de volumen de la
diadema
INSTRUCTION MANUAL FOR HEADSET TELEPHONE SYSTEM
Model: TEL-210
Brand: Steren
Before using your new Headset telephone system, please read this
instruction manual to prevent any damage. Put it away in a safe place
for future references.
With your new headset telephone system you can answer the phone while
you are doing something else. Some of the main features are: redial, flash,
mute and volume level control. The headset is comfortable and you can
move it freely thanks to the length of the cable. A sticky holder is provided
in the package, use it to put the headset on it, while is not in use.
IMPORTANT
Only for analogical phone lines.
You are able to use both Headset and earphone at the same time but we
recommend that you use only one.
Phone must be placed in a cool dry and ventilated place.
Clean only with a soft, dry cloth. Do not use solvents.
CONTROLS
1.- Numeric keyboard
2.- Flash ........................................... Allows one to transfer a call to
another equipment or another
phone number
3.- Redial ......................................... Redial the last dialed number
4.- Mute …………………………….… Press this button to put a call in
hold, while a background music
is on
5.- On / Off …………………………… Power On / Off the equipment
6.- In-Use indicator …………………. Lights on when the equipment is
in use / the equipment receive
a call
7.- Rec ……………………………….. Plug an external recorder if you
want to record all the phone
calls
8.- Phone line
9.- Extension ………………………… Allows one to plug the equipment
to an independent phone set
10.- Ringer volume …………………. Allows one to set the ringer
volume level: High, Low or Off
11.- Flash time control ……………… Allows one to set the time
when transferring calls between
two equipments, great for
PBX
12.- Headset connector
13.- 2,5mm headset connector
14.- Headset volume control ........... Set the headset volume level
6
7
891011 1213 14
COMO REALIZAR UNA LLAMADA
1.- Colóquese la diadema en la cabeza, de tal forma que coincida el
audífono en el oído y el micrófono esté a una distancia de 5 centímetros
de su boca.
2.- Presione el botón de Encendido / Apagado (5). Escuchará el tono de
marcado y el indicador de uso (6) se encenderá.
3.- Marque el número al que desee llamar.
4.- Durante la conversación puede ajustar el volumen de la diadema (14)
de acuerdo a sus necesidades.
5.- Una vez que haya terminado su conversación, presione el botón el
botón de Encendido / Apagado (5) una vez más.
6.- Si ya no va a utilizar la diadema, colóquela en el gancho.
REMARCADO (REDIAL)
1.- Colóquese la diadema en la cabeza, de tal forma que coincida el
audífono en el oído y el micrófono esté a una distancia de 5 centímetros
de su boca.
2.- Presione el botón de Encendido / Apagado (5) para encender el
equipo. Escuchará el tono de marcado y el indicador de uso (6) se
encenderá.
3.- Presione el botón de Remarcado (Redial) (3). El último número
guardado en memoria se ejecutará y comenzará a llamar.
4.- Una vez que haya terminado su conversación, presione el botón de
Encendido / Apagado (5) una vez más.
5.- Si ya no va a utilizar la diadema, colóquela en el gancho.
CÓMO CONTESTAR UNA LLAMADA
1.- Cuando el teléfono comience a timbrar y el LED indicador se encienda,
presione el botón de Encendido / Apagado (5) y comience a hablar.
2.- Cuando termine la conversación, presione el botón de Encendido /
Apagado (5) una vez más.
Nota:
El volumen de timbrado puede ajustarse de acuerdo a sus necesidades,
utilice el botón de Volumen de Timbrado (10) para ajustar a timbre alto
(Hi), timbre bajo (Low) o apagarlo (Off).
MÚSICA DE ESPERA
Si durante una conversación necesita hacer algo y tiene que dejar en
espera la llamada, presione la tecla de Silenciar (Mute) (4) de esta forma
no se cortará la llamada y la otra persona escuchará la música de fondo.
Cuando requiera continuar con la llamada, presione el botón de
Encendido / Apagado (5).
MAKING A CALL
1.- Place the headset on the head, the earphone must be placed on the
ear and the microphone must be in a distance of 5cm from your mouth.
2.- Press On / Off (5) button. You will hear the dial tone and the In-Use (6)
indicator will light on.
3.- Enter the desired number to call.
4.- During conversation, you can set the volume level on the headset (14)
in accord to your necessities.
5.- Once you have finished the conversation, press On / Off (5) button
once again.
6.- If you don’t use the headset for a while, place it on the holder.
REDIAL
1.- Place the headset on the head, the earphone must be placed on
the ear and the microphone must be in a distance of 5cm from your
mouth.
2.- Press On / Off (5) button to power the equipment on. You will hear the
dial tone and the In-Use indicator lights on.
3.- Press Redial button (Redial) (3). The last number stored on memory
will be automatically dialed.
4.- Once you have finished the conversation, press On / Off (5) button
once again.
5.- If you don’t use the headset for a while, place it on the holder.
ANSWERING AN INCOMING CALL
1.- When the phone starts to ring, press On / Off (5) button and start to
speak.
2.- Once you have finished the conversation, press On / Off (5) button
once again.
Note:
Ringer volume level can be adjusted in accord to your necessities, use
Ringer Volume button (10) to set to High tone, Low tone or turn it off.
HOLD-ON MUSIC
If you need to do something during a conversation, and you don’t want to
cut the current call, press Mute (4). Making this you don’t cut the call and
the other person will hear a background music. When you need to resume
the call, just press the On / Off (5) button .
1
2
34
5
GRABACIÓN DE LLAMADAS TELEFÓNICAS
Mediante el uso de una grabadora externa conectada al teléfono podrá
grabar sus conversaciones telefónicas.
Simplemente utilice un cable de 3,5mm estéreo en la entrada
correspondiente (7) y conecte el teléfono a una grabadora externa.
Consulte el manual del usuario de la grabadora externa para conocer la
forma de grabar.
TRANSFRENCIA DE LLAMADAS (FLASH)
Mediante esta función podrá transferir una llamada a otro equipo u otro
número telefónico.
1.- Mientras este en una llamada, presione el botón de Flash (2) . La
llamada se queda en modo de espera.
2.- Marque el número al que desee transferir la llamada.
3.- Una vez que el otro equipo haya contestado presione el botón de
Encendido / Apagado (5) para apagar el equipo.
Notas:
Si encuentra problemas al momento de transferir una llamada, configure
el tiempo de Flash: 1:100ms para un teléfono de auto o teléfono especial,
2: 300ms para un interfon, 3: 600ms para la línea telefónica normal.
La función de Flash únicamente funciona si tiene contratado el servicio de
Transferencia de Llamadas o en conmutadores.
CONEXIÓN DE UNA EXTENSIÓN
Utilice esta entrada para conectar un teléfono adicional, un FAX o un
MODEM.
ESPECIFICACIONES
Entrada: -48V
Dimensiones: 115 x 90 x 40mm
Peso: 239g
Nota:
El diseño del producto y las especificaciones pueden cambiar sin previo
aviso.
HOW TO RECORD PHONE CALLS
If you want to record your incoming and outgoing phone calls, you can do
it using an external recorder and plug it into the phone.
Just plug a 3,5mm stereo cable into the corresponding input jack (7) and
plug the phone to an external recorder.
Refers to the external record user’s manual in order to know how to
record.
TRANSFERRING CALLS (FLASH)
Using this function you can transfer a call to other equipment or other
phone number.
1.- During a call, press Flash (2) button. The current call now is in waiting
mode.
2.- Dial the phone number where you want to transfer the call.
3.- Once the other machine has been answered, press On / Off (5) button
to turn the equipment off.
Notes:
If you found some troubles when you try to transfer a call, set the Flash
Time: 1:100ms for a car phone or special phone, 2: 300ms for an
interphone, 3: 600ms for the normal phone line.
Flash function only works if you have subscribed for the service with your
local telecom company or in PBX.
MAKING A EXTENSION CONNECTION
Use this input to plug an additional phone set, a FAX or a MODEM.
SPECIFICATIONS
Input: -48V
Dimensions: 4,5 x 3,5 x 1,5in
Weight: 0,526lb
Note:
Product design and specifications are subject to change, without notice.
Teléfono
Phone Set
Modem Fax
A la línea telefónica
To phone line

Other Steren Headset manuals

Steren AUD-781 User manual

Steren

Steren AUD-781 User manual

Steren 300-595 User manual

Steren

Steren 300-595 User manual

Steren AUD-784 User manual

Steren

Steren AUD-784 User manual

Steren AUD-027 User manual

Steren

Steren AUD-027 User manual

Steren AUD-771 User manual

Steren

Steren AUD-771 User manual

Steren TEL-110 User manual

Steren

Steren TEL-110 User manual

Steren AUD-780 User manual

Steren

Steren AUD-780 User manual

Steren AUD-1300 User manual

Steren

Steren AUD-1300 User manual

Steren TEL-200 User manual

Steren

Steren TEL-200 User manual

Steren AUD-560 User manual

Steren

Steren AUD-560 User manual

Steren AUD-780 User manual

Steren

Steren AUD-780 User manual

Steren AUD-555 User manual

Steren

Steren AUD-555 User manual

Steren AUD-770 User manual

Steren

Steren AUD-770 User manual

Popular Headset manuals by other brands

Exsound Tropical II user guide

Exsound

Exsound Tropical II user guide

Syba OG-AUD63032 user manual

Syba

Syba OG-AUD63032 user manual

Plantronics DA45 user guide

Plantronics

Plantronics DA45 user guide

Jabra PRO 935 user manual

Jabra

Jabra PRO 935 user manual

Plantronics M2500 quick start guide

Plantronics

Plantronics M2500 quick start guide

Jabra GN1900 datasheet

Jabra

Jabra GN1900 datasheet

Omnitronic NCH-1000 user manual

Omnitronic

Omnitronic NCH-1000 user manual

LG TONE-FP5 owner's manual

LG

LG TONE-FP5 owner's manual

Varjo VR-1 Product and Safety Guide

Varjo

Varjo VR-1 Product and Safety Guide

Goji GTCIMBT19 instruction manual

Goji

Goji GTCIMBT19 instruction manual

HyperX Cloud Core quick start guide

HyperX

HyperX Cloud Core quick start guide

LG TONE ULTRA HBS-810 user manual

LG

LG TONE ULTRA HBS-810 user manual

Plantronics Savi W740A-M quick start guide

Plantronics

Plantronics Savi W740A-M quick start guide

Nokia HS 36W user guide

Nokia

Nokia HS 36W user guide

MRHANDSFREE Blue Wave Quick reference guide

MRHANDSFREE

MRHANDSFREE Blue Wave Quick reference guide

Nokia 9232254 user guide

Nokia

Nokia 9232254 user guide

Sigtronics SE-48RVC Series instructions

Sigtronics

Sigtronics SE-48RVC Series instructions

Roccat KAVE user manual

Roccat

Roccat KAVE user manual

manuals.online logo
manuals.online logoBrands
  • About & Mission
  • Contact us
  • Privacy Policy
  • Terms and Conditions

Copyright 2025 Manuals.Online. All Rights Reserved.