STONEX R180 User manual

<<
(March 2023) - Ver.1-Rev.1 www.stonex.it
STONEX R180
Total Station
User Manual

Stonex R180 – User Manual 2
Contents
1. Introduction .................................................................................................................................................. 4
2. Instrument Presentation........................................................................................................................... 5
2.1. Hardware Description........................................................................................................................... 6
2.2. Touchscreen Display ............................................................................................................................. 8
2.3. HW Technologies................................................................................................................................... 8
3. Preparation & instrument setting up................................................................................................10
3.1. Battery and Charger............................................................................................................................10
3.2. Power on / off........................................................................................................................................13
3.3. Instrument setting up.........................................................................................................................14
3.4. Focusing and Collimating .................................................................................................................17
3.5. Tribrach assamble/disassemble......................................................................................................18
4. Android Operative System....................................................................................................................19
4.1. Android Useful Options.....................................................................................................................19
4.2. Android App...........................................................................................................................................22
4.2.1. Android default app............................................................................................................................23
4.2.2. R180 Technical App.............................................................................................................................25
4.3. Android Data Exchange Mode........................................................................................................32
5. R180 Configurations................................................................................................................................36
5.1. On-Board Configuration....................................................................................................................36
5.2. Remote Configuration........................................................................................................................36
5.3. One-Pole Solution................................................................................................................................37
6. Calibration ...................................................................................................................................................38
6.1. About Calibration.................................................................................................................................38
6.2. HA calibration........................................................................................................................................38
6.3. VA calibration ........................................................................................................................................39
6.4. TILT calibration......................................................................................................................................39
6.5. Mechanical Check and Adjust .........................................................................................................40
7. Technical Data............................................................................................................................................42
8. Carrying Case .............................................................................................................................................44
9. Precautions for safety..............................................................................................................................45

Stonex R180 – User Manual 3
9.1. Laser damage.........................................................................................................................................45
9.2. Glare damage ........................................................................................................................................46
9.3. Fire risk.....................................................................................................................................................46
9.4. Electric shock risk .................................................................................................................................47
9.5. EMC ...........................................................................................................................................................47
9.6. Mechanical injury .................................................................................................................................48
9.7. Other saftety items..............................................................................................................................48
9.8. General Notes........................................................................................................................................48
9.9. Disclaimer................................................................................................................................................49
10. Care and Transport...................................................................................................................................50
10.1. Storage.....................................................................................................................................................50
10.2. Transport .................................................................................................................................................50
10.3. Cleaning and Drying ...........................................................................................................................51
11. Environmental recycling.........................................................................................................................52
12. Appendix......................................................................................................................................................53
12.1. Atmospheric Correction.....................................................................................................................53
12.2. Refraction and Earth Curvature Correction................................................................................54

Stonex R180 – User Manual 4
1. Introduction
Thank you for purchasing R180 Stonex total station.
This manual includes important safety directions and instructions for setting up and using the product.
Please read this manual carefully before using the instrument, so that our products can serve you better.
When you begin to use the product, we assume that you are a competent user who has read through
and understood the contents of this manual and is fully aware of the necessary dangers, warnings and
cautions. In the event of any discrepancy between the information contained in this manual and the
actual, the actual information shall prevail, and the Company reserves the right to make further revisions
or changes to this manual without notice.
Basic operating instructions
•This product must be operated by professional. The user must be a professional measurer or
a person with equivalent knowledge of measurement in order to be able to accurately
understand this user manual and the relevant safety instructions and to use, check and
calibrate the instrument correctly.
•Always use the instrument in a safe environment and wear the necessary safety equipment
(e.g., helmet, reflective vest, safety shoes, etc.) properly.
The scope of using this instrument
•Operate instruments to observe, indicate, or direct the displacement of a specific target.
•Measure horizontal and vertical angles.
•Measure the distance to a specific target.
•Record, store and edit measurement data.
•Calculate data using built-in applications.
•Data exchange using USB storage devices or internet connection via WI-FI or Bluetooth
module.
•Communication with the instrument using Bluetooth.
•The necessary calibration.
•Other operations guided by this manual.
The scope of this instrument does not apply to
•Perform instrument operation in unsafe environments or where instrument weathering
requirements are exceeded.
•Do not follow the Dangers and Warnings in the manual.
•Do not operate the instrument in accordance with the manual.
•Use the instrument beyond its capabilities.
•Adjustment, disassembly of instruments beyond what is specifically allowed.
•Repair or modification of instruments.

Stonex R180 – User Manual 5
2. Instrument Presentation
The R180 is a highly accurate and fast Android robotic station. It features a rotation speed of 180°/sec
and an EDM accuracy of 1 mm + 1 ppm, with a range of up to 1000 m without a prism. The R180 is
available in two versions, 0.5″ and 1″ second. For both models, the quietness and smoothness in prism
searches and rotations are among the most observed and appreciated features.
Equipped with the Android operating system, the R180 has Cube-a as onboard software. This enables
users to navigate online and interact with the touch screen in an easy and familiar way.
The Cube-a onboard software includes all the classic functions of the program, as well as the integration
of jobs done with GNSS and surveys done with the total station. This allows operators to achieve complex
and professional work in a short time and with high accuracy. Additionally, the R180 has a camera and
a guide light to further facilitate field work.
For more details about R180 technical features see (7 Technical Data) or contact your local dealer.

Stonex R180 – User Manual 6
2.1. Hardware Description
Instrument
Height Mark
Spherical Level
Battery Box
Tribrach
Clamp
Handle
Handle Screw
ViewFinder
Touchscreen
Display
Touchscreen
Display
Eyepiece
Focusing Knob
Tribrach
Leveling Screw
USB port
Micro USB port
9 Pin Serial Port

Stonex R180 – User Manual 7
Measure Trigger
Button
Telescope
Tribrach
Leveling Screw
Tribrach
Handle
Handle Screw
ViewFinder
BT Long Range
Antenna
Guidelight
Horizontal Motion
Micrometric Screw
Vertical Motion
Micrometric Screw
Touchscreen
Display
On-Board Camera
FAST360° sensor
Touchscreen
Display

Stonex R180 – User Manual 8
2.2. Touchscreen Display
R180 total station is equipped with two color Touchscreen displays, usable to manage the instrument in
all of its functions. Do not touch the screen with ball-pen, pencil or other sharp things to avoid damage
on instrument.
There are also some physical keys, located on the lateral part of the touchscreen display of Face 1
(spherical bubble side). Here below their description:
2.3. HW Technologies
Thanks to Tdrive motor, R180 Robotic total station boasts a rotation speed
of 180°/sec, making it one of the fastest in its product category. Not only
is it speedy, but it is also impressively quiet, with noise levels among the
lowest in its class. Additionally, the Tdrive technology, with a very high-
speed motor, allows for high-speed pursuit, even with a prism installed
on moving vehicles. Not using gear technology ensures frictionless
movement, greater durability, and less maintenance.
The innovative robotic total station is designed with automatic prism
centering technology that takes the guesswork out of surveying. With this
advanced system, users can easily and quickly center their prism with
minimal effort until 1000 m. Thanks to the total station's automatic
centering feature, surveying processes can be streamlined and made
more efficient. APC technology is configured to manage multiple prism
situation collimating the one closer to the telescope optical axis. When
the station loses the prism due an obstacle, if the prism remains in
telescope field of view, the station re-center it immediately.
Key
Function
[ ]
Power key. Press and hold for power on/off the
station.
Volume up and Volume Down

Stonex R180 – User Manual 9
Meas
The state-of-the-art robotic total station features a cutting-edge 360° prism
search technology that allows users to locate their target quickly and
accurately from any angle. This advanced capability enables surveys to be
completed with greater speed and precision, all while enjoying the
convenience of a fully automated system. If the lock is lost, the total station,
thanks to Fast360° technology, can quickly find the prism. This search method
can be used up to 600 meters to find the prism in any direction.
R180 is further enhanced by the addition of a built-in camera, which can be
used thanks to the presence of two 6-inch screens.
R180 is embedded with an electronic yellow/red guidelight. it could be
helpful to the surveyor to adjust prism position respect the telescope field of
view, mainly during the stake out.
R180 is equipped with long range BT module on board, that guarantees a
stable communication between instrument and an external device until 300
meters far from the total station.
R180 is characterized by a trigger key located on the side of total station
body. It can be used to perform measurements simply pressing it, without
touching the display.

Stonex R180 – User Manual 10
3. Preparation & instrument setting up
3.1. Battery and Charger
Installing / Replacing Battery
R180 carrying case contains two rechargable Li-ion (Li-64 model) batteries. Here below the description
of their technical features.
Follow the procedure below to mount/remove the battery:
Mount the Battery
a. Insert the battery in the battery box.
b. Insert the battery box with the battery
inserted, in the battery compartment
(Note. When inserting the battery, be
careful to put the electrodes on top as
visible in the picture on the right).
Battery Voltage/Capacity
14.4 v / 6400 mAh
Operating Time
6 hours
Battery Charger
4 hours

Stonex R180 – User Manual 11
Remove the Battery
a. Pull out the battery from the battery
compartment by pressing the clips.
b. Remove the battery from the battery box.
Note 1. Use only official Stonex batteries for R180. We can’t guarantee the correct works of the
instrument with different battery types.
Note 2. Batteries must be charged before first use. For new batteries a complete charge/discharge
operation can effectively improve battery performance. It is normal for the temperature of the battery
and charger to rise during the charging process. Battery operating temperature range: -20℃ to +50℃.
Low temperature will shorten the operating time of the battery, and too high temperature will shorten
the life of the battery. Remove the battery and unplug the charger after each battery charge. Keep the
battery and charger in a safe place. If you find that the battery level display is significantly inaccurate, it
is recommended that you perform a complete charge/discharge operation.
Note 3. The battery’s working time can be affected by many factors, such as environment temperature,
recharging time, recharging and discharging times. So, we suggest the users to fully recharge the battery
or prepare several full batteries before survey. For this reason, it is suggested to check the battery power
before field work.
Note 4. The power consumption in distance measurement mode is more than in angle mode, if the
instrument enters in distance measurement mode from angle mode, the power maybe auto-off because
of lower battery.

Stonex R180 – User Manual 12
Charging
Follow the instructions below to recharge R180 batteries.
Charge the Battery
a. Remove the charger and the cable from
the carrying case. Insert the charger cable
(A) in the battery hole (B).
b. Insert the cable plug (D) into the charger
(C)
c. Insert the plug (E) in the electrical outlet.
If the battery is not fully charged, the
charger will begin charging the battery
and the charger indicator will be in red
until the complete charge. When
charging is complete, the charger
indicator will be fixed green, disconnect
the battery from the charger, and then
you can install it or use it as a backup
battery.
Note. Please use charger and battery from STONEX. Store, use and charge at the specified temperature
conditions, taking care to avoid contact with liquids.

Stonex R180 – User Manual 13
3.2. Power on / off
Press and hold power on/power off button for more than 1 second, to switch on the total station. The
instrument automatically enters in the Android interface.
Press and hold for more than 2 seconds the power off key, the instrument prompt if the user wants to
turn off or restart the total station and save the current settings.
Stonex R180 – User Manual 14
3.3. Instrument setting up
Locate the total station on a stable tripod or on a concrete pillar to guarantee its correct use and follow
these guidelines for instrument setting up.
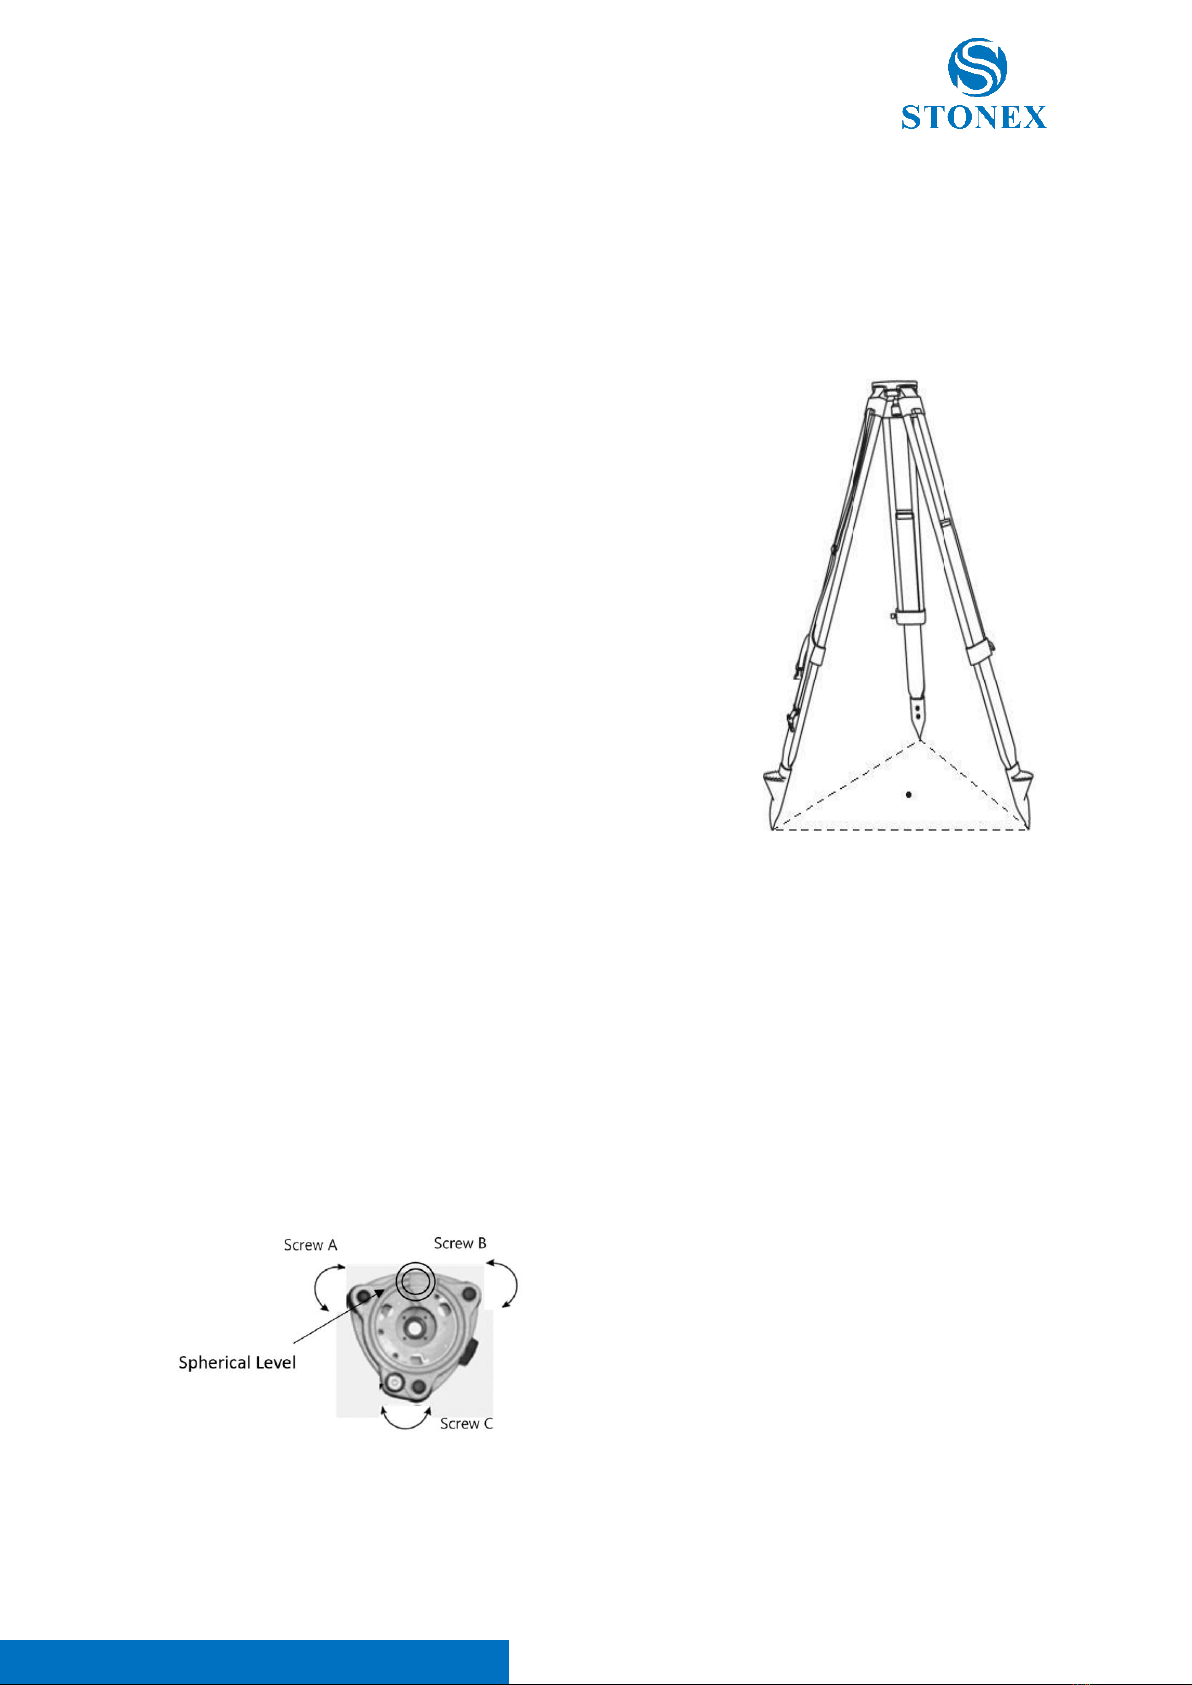
1. Setting up the Tripod and the Instrument
a. Adjust the tripod's three legs to nearly equal lengths that
meet the height requirements for comfortable measurement.
b. Position the tripod over the station point. The three toes are
firmly supported on the ground as equidistantly as possible,
the center of the circle formed by the toes is close to the
station point, and the tripod plate is nearly horizontal.
c. Take out the instrument and make sure that the instrument
and its tribrach are firmly connected. Place the instrument
onto the top plate of the tripod, fix the instrument with one
hand, align the central knob of the tripod with the center hole
of the tribrach with the other hand and tighten it.
d. Gently push the tribrach to make sure it is securely attached
to the tripod plate.
e. Refine the tripod’s three legs adjustment using the tribrach
spherical level as reference.
Note 1. The quality of the tripod setting up can affect the survey result. Remember to locate the
tripod on a stable surface sticking the metal tips in the ground.
Note 2. It is recommended to check the stability of the tripod before each survey.
2. Leveling up the Instrument
Use tribrach leveling screws to level up the instrument, taking the spherical level on the station as
reference.
Turn the instrument till the spherical level is parallel to
a line shaped with screws A and B. Adjust the screws A
and B to make the bubble in the center of the level.

Stonex R180 – User Manual 15
Turn the instrument approximately 90°. Adjust screw C,
till the bubble in the center of the level.
Repeat above steps until the bubble remains in the center of the spherical level while the instrument
is rotated to any position.
3. Accurate leveling-up with electronical level
Press and hold [] to power on the instrument. Enter in Cube-a -> Calibrate -> Tilt Compensator
to access to the electronical bubble page.
Use the tribrach leveling screws to level up the instrument, taking the electronical level on the screen
as reference. Adjust the screws to make the bubble, visible on the screen, in the center of the
electronical level, as visible in the image below.
If sperichal level is not centered when leveling up with electronical bubble, probably it’s necessary
to calibrate it (see 6 Calibration).

Stonex R180 – User Manual 16
Clicking on Tilt Compensator, it is possible to activate/deactivate the electronic compensator. This
function is very important to compensate the not perfect leveling up of the instrument, that could
bring errors in VA/HA readings. The enabling of this function allows to correct leveling up errors and
improve the quality of the readings.
There are two different options for this function:
a. OFF -> Electronic compensator not activated.
b. XY -> Electronic compensator activated in X and Y directions.
When the instrument is in operation, if the XY tilt compensation is on, the instrument will
compensate and correct the VA and HA readings.
Enabling the option “Show Compensator when tilt is Over Range”, Cube-a displays a message when
the instrument is not levelled, like in the image below, and returns in the electronical bubble page.
Note. To avoid accidental tilting of the instrument which may affect the measurement accuracy, it is
recommended that the user always switches on the Double Axis compensation option during normal
operation.
4. Centering with laser plummet
The centering operation is necessary to align total station vertical axis to reference station point. To
make easier this operation, it is possible to activate the instrument laser plummet. In electronical
bubble page of Cube-a, the option Laser Plummet can enable/disable, as visible in the image below.

Stonex R180 – User Manual 17
To center the instrument, follow this procedure:
a. Slightly loosen the central knob, observe the relative position of the laser spot and the station
point, slowly push the tribrach to slide on the tripod plate until the laser spot is precisely
aligned with the station point, and then tighten the central knob.
b. Verify the leveling of the instrument on electronical bubble page.
c. If the instrument is leveling up the procedure is completed, otherwise repeat the steps
described in 3.3 Instrument setting up.
3.4. Focusing and Collimating
General focus and collimate process:
a. Diopter adjustment -> Looking through telescope at a brigh monochromatic background.
Turn the eyepiece’s diopter ring clockwise to the end, observe the reticle, slowly turn the ring
counterclockwise until the reticle image is sharp and clear.
b. Rough targeting -> Rotate the telescope to aim for the target with the viewfinder, observe
from the eyepiece to confirm that the target is in the field of view.
c. Focusing -> Observe the target from the eyepiece, slowly turn the focusing ring until the
target image is sharp and clear.
d. Precisely
collimating -> Observe the target from the eyepiece, adjust the horizontal and
vertical drive to aim the reticle precisely at the center of the target.
e. Start measuring.

Stonex R180 – User Manual 18
3.5. Tribrach assamble/disassemble
Use the tribrach clamp to assemble or disassemble the instrument from the tribrach.
Disassemble
Rotate the tribrach clamp counterclockwise until the lever is loosen.
One hand holds up the tribrach, another hand holds the carry handle of the instrument and lift out the
instrument from the tribrach.
Assemble
Put the instrument into the tribrach lightly, let the communication port against in the indentation of the
tribrach. Rotate the tribrach clamp clockwise until the lever is tighten.
Note. If the instrument doesn’t need assembly or disassembly from tribrach frequently, it is possible to
fix the tribrach clamp by fixed screw to avoid the disassembly by accident. Screw out the fixed screw by
driver to fix the clamp.
Positing block
Positing groove
Tribrach clamp
Fixed screw

Stonex R180 – User Manual 19
4. Android Operative System
R180 is first Stonex robotic total station characterized by Android operative system on board. Using
Android on a total station provides a lot of advantages improving instrument functionality, simplicity
and usability from different points of view. The operative system is in fact the same one installed on a
Smartphone with the applications and the functions typical of a classical Android device. The user will
work using a familiar and already known interface, increasing its efficiency and decreasing working time.
4.1. Android Useful Options
Android Operative System offers many functions, useful to adapt the instrument to user needs and to
the different environment conditions typical of on-field works.
Here below the description of some useful functions, included in Android Operative System:
a. Change Device Language
Enter in Settings application -> System -> Languages & input -> Languages.
Click on “Add a language” to set the language of the device; then drag the added language to
the top of the page, holding down the icon in the red circle.
As visible in the image above, the device language was changing in Italian simply moving Italian
language at the top of the list.

Stonex R180 – User Manual 20
b. Screen Illumination
Scroll down the quick Android menu as visible in the image below. Use the screen illumination
adjustment bar to modify screen illumination and adapt the tablet to different light condition.
It’s also possible to access to display settings from Settings -> Display -> Brightness Level to
modify screen illumination.
c. Single Screen Mode
Enter in Settings -> Display to enable/disable single screen mode. In this way, it’s possible to
using one screen, reducing battery consumption. The active screen will be the one touched by
the user.
Table of contents
Other STONEX Measuring Instrument manuals


Popular Measuring Instrument manuals by other brands

Diy Kyoto
Diy Kyoto Wattson manual

Eilon Engineering
Eilon Engineering RON 2501 User guide and instruction manual

Dwyer Instruments
Dwyer Instruments DPGA Series Installation and operating instructions

Anritsu
Anritsu 56100A Operation and programming manual

Macnaught
Macnaught DM100-01 instruction manual

Simpson
Simpson 215 Operator's manual


