Strong SRT 8113 User manual

www.strong.tv
User Manual
Manuel d’utilisation
Manuale d'uso
Manual do Utilizador
Digital High Definition
Terrestrial Receiver SRT 8113
Picture similar

www.strong.tv
08 Sep 2014 16:56
HOTLINE
BG +359 32 634451
support_bg@strong.tv
DK support_dk@strong.tv
NL support_nl@strong.tv
AT 0820 400 150
support_at@strong.tv
€ 0,12/Min. österr. Festnetz
DE 0180 501 49 91
support_de@strong.tv
€ 0,14/Min. deutsches Festnetz
€ 0,42/Min. max. Mobilfunknetze
+36 1 445 26 10
support_hu@strong.tv
CEE
PL 801 702 017
support_pl@strong.tv
UA +380(44)228 24 73
support_ua@strong.tv
FR 0826 029 928
support_fr@strong.tv
€ 0,15 par mn poste fixe en France
IT 199 404 032
support_it@strong.tv
Da rete fissa 24,8 cent. al min.
12,5 cent. scatto alla risposta
Da rete mobile max 49 cent. al min.
15,6 cent. scatto alla risposta
Supplied by STRONG & Co, Japan
Represented by STRONG Ges.m.b.H.
Franz-Josefs-Kai 1
1010 Vienna
Austria
Email: [email protected]


1
1.1 Safety Instructions 2
1.2 Storage 2
1.3 Equipment Set-up 3
1.4 Accessories 3
1.5 Usage of external USB devices 3
2.1 PIN-CODE DEFAULT: 1234 3
2.2 Front Panel 3
2.3 Rear Panel 4
2.4 Remote Control 4
3.1 Connecting to a Terrestrial Antenna 5
3.2 Connecting to TV with HDMI cable 5
3.3 Connecting to TV with SCART cable 5
3.4 Connecting to a Digital Audio Amplifier with S/PDIF 5
3.5 Connecting to a Digital Audio Amplifier and TV using HDMI 6
3.6 Connecting a USB storage device 6
3.7 Connecting to a TV using modulator output 6
6.1 Changing channels 7
6.2 Info Banner 8
6.3 Selection of audio language 8
6.4 Teletext 8
6.5 Subtitles 8
6.6 Timeshift 8
6.7 EPG (Electronic Programme Guide) 9
6.8 Instant Recording 9
7.1 Media 9
7.2 Edit Channel 12
7.3 Installation 14
7.4 System Setup 15
7.5 Tools 17
Subject to alterations. In consequence of continuous research and development technical specifications, design and appearance of products may
change. Manufactured under license from Dolby Laboratories. Dolby and the double-D symbol are registered trademarks of Dolby Laboratories. HDMI,
the HDMI logo and High-Definition Multimedia Interface are trademarks or registered trademarks of HDMI Licensing LLC in the United States and other
countries. All other product names are trademarks or registered trademarks of their respective owners.
© STRONG 2014. All rights reserved.
02 Sep 2014 17:49

1.0
1.1
In a closed or poorly ventilated cabinet; directly on top of or under any other
equipment; on a surface which might obstruct the ventilation slots.
To direct sunlight or any other equipment that generates heat; to rain or intense
moisture; to intense vibration and to any shock which may cause permanent damage
to your receiver or to any magnetic objects, such as loudspeakers, transformers, etc.
Do not use a damaged power cord. It may cause a fire or an electric shock. Do not
touch a power cord with wet hands. It may cause an electric shock.
When the receiver is not used for a long period of time, you should unplug the power
cord from the wall socket.
Do not use alcohol or ammonia based liquids to clean the receiver. If you wish, you
may clean your receiver with a soft lint-free cloth slightly made damp with a mild soap
solution, and only after disconnecting from the mains voltage supply. Make sure no
foreign objects fall through the ventilation slots because this could cause fire or an
electric shock.
Do not place any objects on top of the receiver because this might prevent proper
cooling of the components inside.
Never try to open the receiver. It is dangerous to touch the inside of the receiver due to
high voltages and possible electrical hazards. Opening the receiver will void the warranty of
the product. Refer all maintenance or servicing to suitably qualified personnel.
When you are connecting cables, be sure that the receiver is disconnected from the
mains supply voltage. Wait a few seconds after switching off the receiver before you
move the receiver or disconnect any equipment.
It is a necessity that you only use an approved extension and compatible wiring that
is suitable for the electrical power consumption of the installed equipment. Please
ensure that the electrical power supply corresponds with the voltage on the electrical
identification plate at the back of the receiver.
If the receiver does not operate normally even after strictly following the instructions in this user
manual, it is recommended to consult your dealer.
Your receiver and its accessories are stored and delivered in a packaging designed to protect against
electric shocks and moisture. When unpacking it, make sure that all the parts are included and keep
the packaging away from children. When transporting the receiver from one place to another or
if you are returning it under warranty conditions, make sure to repack the receiver in its original
packaging with its accessories. Failing to comply with such packaging procedures could damage the
product and void your warranty.

We recommend you consult a professional installer to set up your equipment. Otherwise, please
follow the instructions below:
Refer to the user manual of your TV and antenna.
Make sure that the HDMI cable and outdoor components are in a good condition.
If you use TV SCART connection, use then well shielded SCART cable.
This manual provides complete instructions for installing and using this receiver. The following
symbols will serve as follow.
Indicates warning information.
Indicates any other additional important or helpful information.
Represents a button on the remote control or the receiver.
Move to Represents a menu item within a window. (Italic Character)
1.4
User manual
1 remote control unit
2x batteries (AAA type)
Male/Female antenna cable
1 active indoor antenna with cable
The batteries should not be recharged, disassembled, electrically short-
circuited, be mixed or used with other types of batteries.
It is recommended to use USB 2.0 storage devices or higher. If your device is not
compatible to USB 2.0 specifications, recording, playback and other multimedia
functions of the receiver might not work properly.
To ensure best performance of your USB storage device please format it by this
receiver (menu “Media, DVR Storage Information”) to FAT32 system. Other file systems
are not supported by the receiver. However, it is possible to use already NTFS
formatted disks. STRONG cannot guarantee compatibility with all types of USB storage
devices.
It is advised not to store important information on USB storage devices used with
the receiver. Always make backups of data on your USB storage device before using
it with this receiver. STRONG will not take responsibility for any loss of information or
circumstances caused by loss of information.
Fig. 1
1. RED indicates that the receiver is in STANDBY mode.
GREEN indicates that the receiver is in OPERATING mode.

4
2. Point your remote control towards this sensor.
3. Connector for USB devices.
Fig. 2
1. To connect to your antenna for the reception of broadcast signal.
2. To connect to the terrestrial antenna input of your TV set.
This connection will allow you to watch analogue terrestrial
programmes if they are available via the tuner in your TV.
3. To connect to a TV using a coaxial cable. This connection
(modulator) will allow you to watch channels from this receiver
on an UHF channel on your TV.
4. To connect your receiver to a digital audio amplifier.
5. To connect your receiver with your TV set using a HDMI cable.
6. To connect your receiver with your TV set using a SCART cable.
7. Your receiver requires a voltage of 220~240V AC (Auto-
selectable), 50/60 Hz +/-5%. Check the local power specification
before connecting your receiver to the wall outlet.
Fig. 3
1. qTurns the receiver On/Standby
2. Shows the current channel information
3. Turns the receiver to Standby after time selection
4. !Mutes audio output of the receiver
5. 5Fast rewind
6. 6Fast forward
7. Channel up/down in channel list mode
8. 7Jump backwards
9. 8Fast forwards
10. Opens the main menu, in menu you will get one step back
11. Exits from the menu or sub-menu
12. pqMenu Off: Change channel to previous/next.
Menu On: Moves the cursor up/down.
13. tuMenu Off: Increases/decreases the volume level.
Menu On: Change settings for specific Menus
14. Menu Off: Displays the current channel list
15. To call up the multi-screen
16. Favourite group selection
17. Toggles between TV or RADIO mode
18. Back to previous shown channel
19. Channel selection or value input
20. Sets the current audio channel to left, right or stereo
21. Shows list of subtitled languages
22. Shows Teletext on OSD (On Screen Display)

23. Shows the EPG (Electronic Programme Guide) in TV mode
Menu On: Activates the highlighted menu item.
24. 1Start playback from selected file or resume Timeshift
25. 2Start Timeshift mode or pause
26. 3Stop of playback
27. 4Start Records the TV programme to the connected storage device
28. To zoom in to the video on screen
29. Change aspect modes: 4:3 LB, 4:3PS, 16:9 and to Auto.
30. Change video resolution modes: 480i up to 1080p
31. Call directly Timer menu to view or set timers
32. Multimedia and Teletext functions
Fig. 4
To receive broadcast signal, your terrestrial indoor antenna must be connected to the ANT IN
connector on the back of the receiver.
The ANT OUT connector allows you to loop the antenna signal to a second receiver or TV set.
If the signals at your location are too weak to receive proper signals with the
included indoor antenna, we recommend using an outdoor antenna which
can be pointed to transmission tower. Ask your local dealer for more advice.
Fig. 4
The TV set shall be connected with the receiver using a good quality HDMI cable. This connection
gives the highest possible quality.
Fig. 4
SRT 8113 is also equipped with a SCART connector; alternatively, the TV set can be connected to the
receiver using a good quality SCART cable.
Fig. 5
By connecting your receiver to a digital amplifier or home theatre system, you can enjoy the best
possible sound quality and multi-channel audio (depending on broadcast). Connect your Digital
Audio Amplifier or home theatre system with a suitable cinch cable to the S/PDIF connector on the
back of the receiver.

Fig. 5
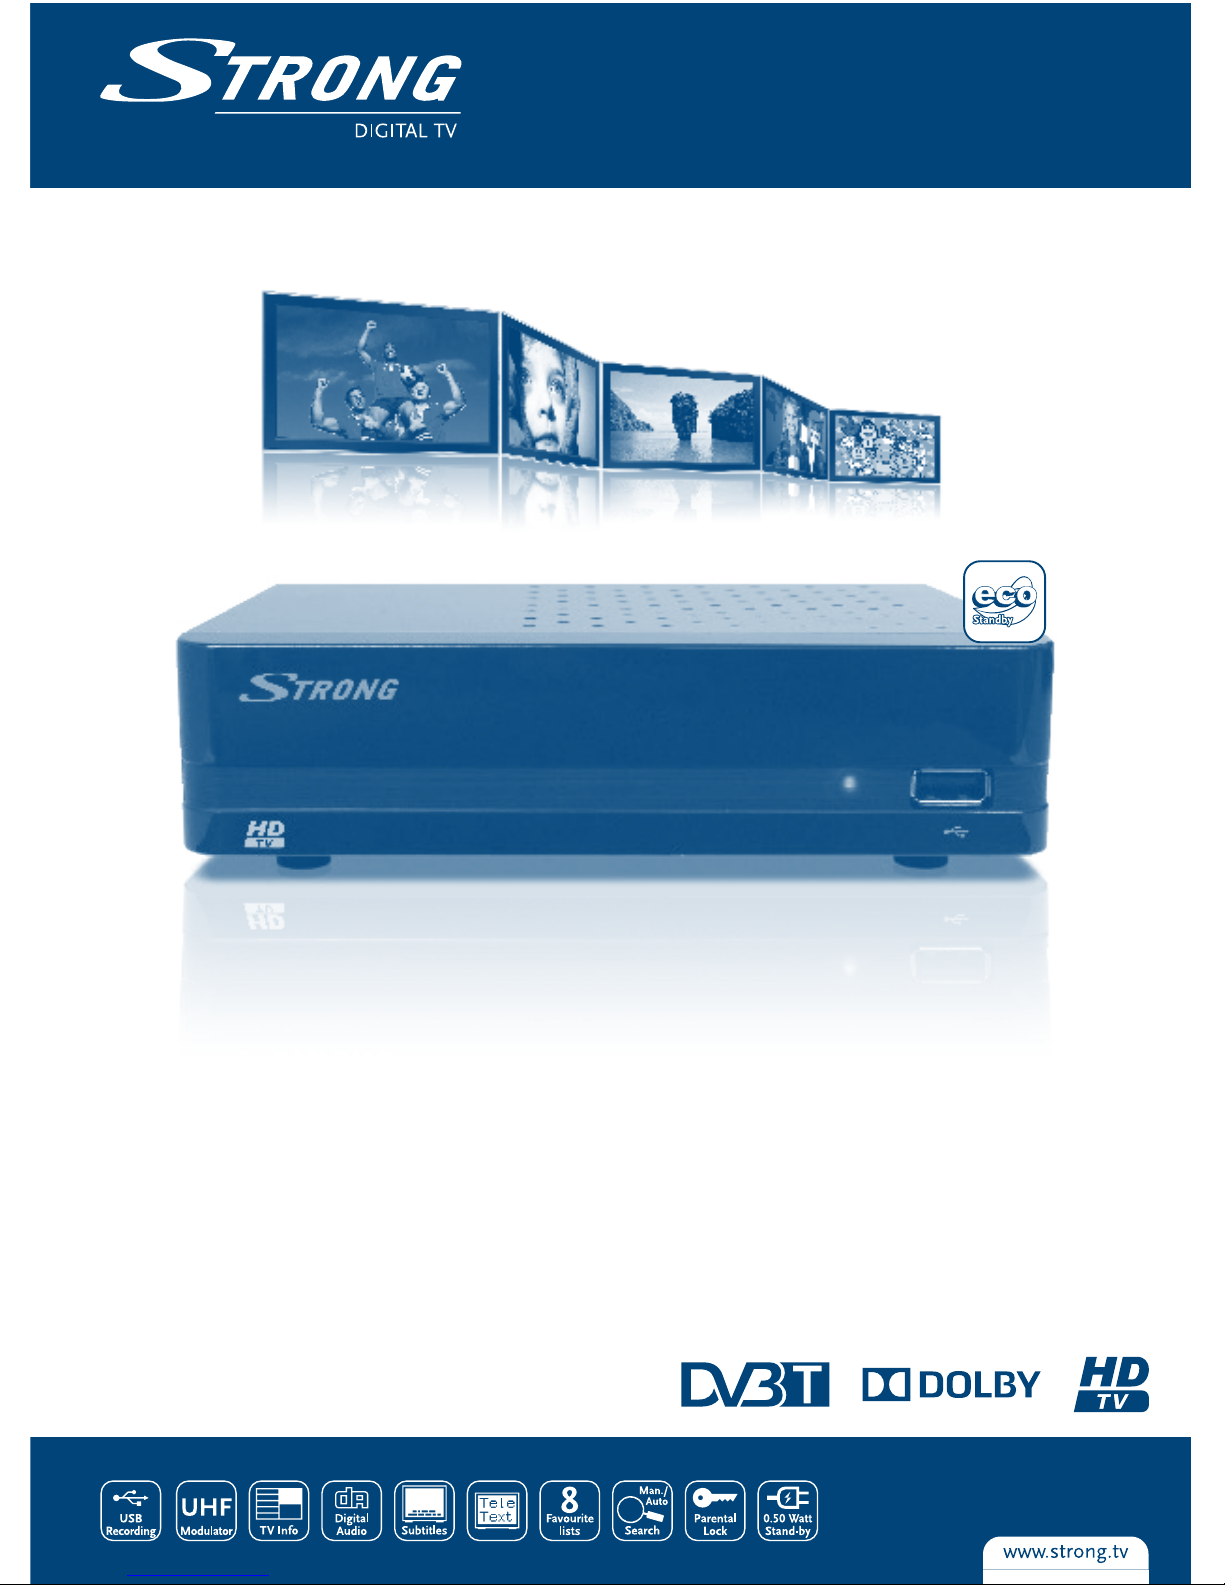
By connecting your receiver to the latest digital amplifiers or Home Cinema systems you will enjoy
the best possible sound quality and multi-channel audio (depending on broadcast). Connect the
HDMI output of the receiver to an input of your amplifier, and then connect the HDMI output of the
amplifier to your TV set. Select the correct input on your amplifier to watch and listen to programmes.
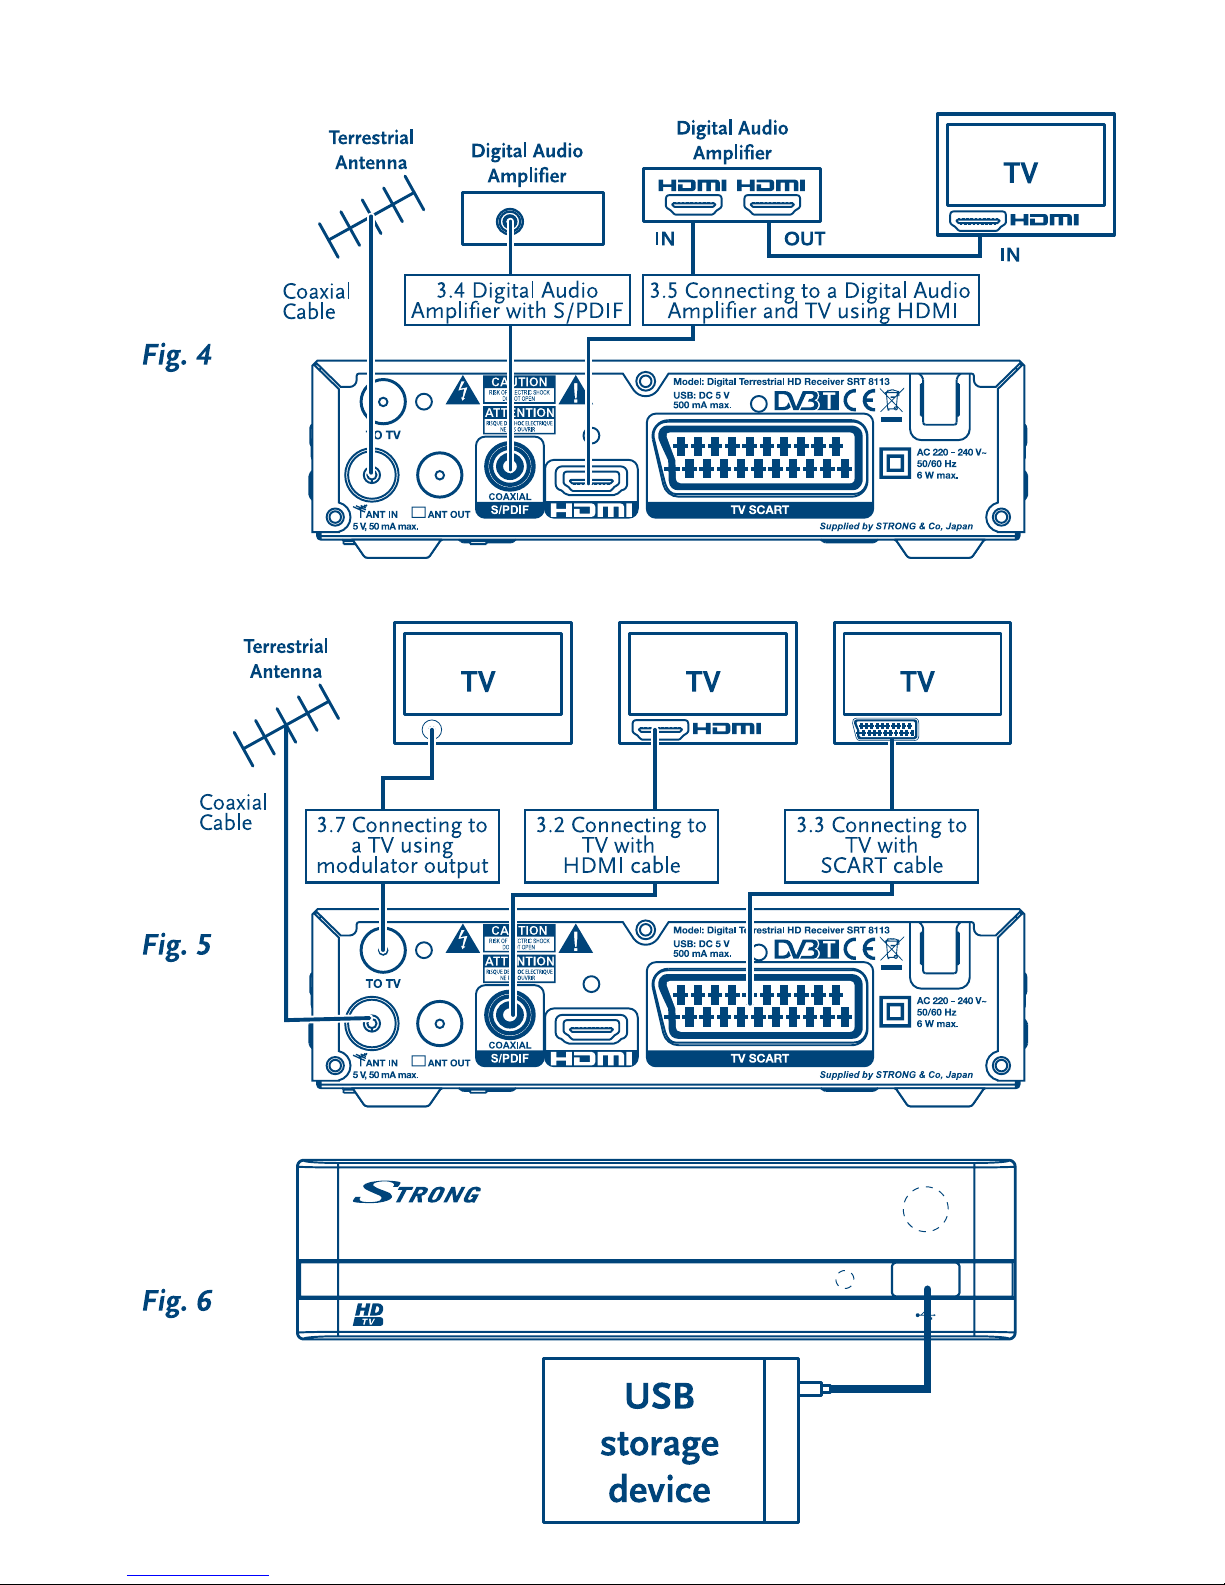
Fig. 6
We recommend the use of a hard disk drive USB 2.0 or higher for recording
and play back of TV events.
For proper functioning of Timeshift and recording functions, a fast USB device (such as a hard
disk drive) is needed. Interrupted playback or distorted pictures during playback or Timeshift are
indications for a low device speed. STRONG cannot guarantee proper functioning of recoding and or
Timeshift functions with all USB devices.
Fig. 4
To view a TV channel on your TV (or a TV set in another room), alternatively you can use the UHF
analogue modulator output (TO TV) and connect it with a coaxial cable to the (other) TV set. You must
let the (other) TV set search or scan for the RF signal out of the modulator. (Refer to the manual of your
TV set.) Default channel is 38, PAL-BG, but it is adjustable in the System setup menu in the TV system.
Choose a channel which is not occupied by TV transmitters in your region to avoid interference.
Please note, when other connection options are available on your TV set, those are preferable.
4.0
If you use your receiver for the first time, the Welcome “Easy install” menu appears. Use pqto move
the highlight to the setting you wish to alter and use tuto change values. Start by selecting your
language using tu. Once you have selected your language, press qto move the highlight to the
next item and use tuto change.
Language Select your language.
Region: Select your region where this receiver is used.
Video Resolution: Use this option to select the video resolution of your TV screen. Press to
call a list with all possible resolutions. The options are: By Source (automatic
detection of video resolution offered to the receiver), By Native TV (automatic
detection of maximal resolution of TV screen), and manual selections 480i,
576i up to 1080p Please use a setting that matches your TV’s specifications.
After a selection is made, you will be asked to confirm.
Aspect Mode: Use this option to select the aspect ratio of your TV and the preferred
conversion method. Options are: Auto (automatic detection of aspect ratio),
4:3 Panscan (Displays 16:9 widescreen broadcasts full screen on your 4:3 TV),
4:3 letterbox (black bars on top and under the picture on a 4:3 TV) and 16:9
(use this setting for 16:9 TV sets).

Antenna Power: Set to On if you use an active antenna. When set to On, 5 V will be present
on the ANT IN connector of the receiver. Select Off for passive antennas. The
included antenna is a active type. If you using this antenna keep it selection
to On.
Wrong region selection can lead to missing channels or channels being
stored on wrong positions in the channel list. All default selections above are
most common to use.
Once all settings are made, move the highlight to OK press to start scanning.
The receiver will now search for all available channels. Once scanning is finished, the receiver switches
to viewing mode.
If the Welcome “Easy install” menu does not appear after switching on the
receiver the first time, reset the receiver to factory settings by pressing the
button and selecting Factory Setting in the submenu Tools. (
We at STRONG understand that you can’t wait to enjoy your new high definition digital terrestrial
receiver. The following quick guide will make you familiar with the basic operation of this device. We
do, however, advice you to read the full manual to get the best performance from your receiver.
To turn your receiver ON or to Standby, use the qbutton on the remote control.
Choose the desired channel with the pqbuttons. Alternatively, you can digit the channel number
with the buttons on the remote control. Or press in viewing mode to display the channel list.
The volume can be adjusted with the tubuttons.
Your new receiver is equipped with several features to make watching TV a true pleasure. This
paragraph describes these features. Please also read chapter to get familiar with the menu of your
receiver.
Your new receiver is equipped with four ways to change channels.
Via direct access using the buttons.
Via the channel list trough button.
Via the and keys.
Via the pqkeys.
To gain direct access to a certain channel, simply input its number with the buttons on the
remote control. Channel numbers can be up to four digits long. Entering a number with less than
four digits is possible. Just wait a few seconds and your receiver will switch to the selected channel or
press immediately after selecting the channel number.

8
Press in viewing mode to display the Channel List. Use pqin the Channel List to highlight your channel
of choice and press once to select the highlighted channel. Press again to leave the Channel List.
Use tuto toggle between the All Channel list, Channel List and favourite
lists or press for a list of available favourite lists.
pq
pswitches to the next channel.
qswitches to the previous channel.
switches to the next 10 channels.
switches to the previous 10 channels.
While watching TV you can press the button any time to get information about the current
channel and event*. Press twice for technical details about the current channel. If you have
connected an USB device then it will also call the Record list or Timeshift banner when you press the
button once more.*Event information is displayed when available. Availability depends on
broadcast.
Some channels support a choice of audio formats and/or languages. To select another audio stream,
press in viewing mode. A list with available audio streams will now be displayed. Use pqto
select the desired stream and confirm with . The audio channel as stereo, mono, left and right can
be selected with the tubuttons.
Your receiver includes a fully featured Teletext. To access Teletext, press the button in viewing
mode and use the buttons to input the number of the page you wish to see. The coloured
buttons of the remote control allow you to jump to selected pages directly, as indicated on the
bottom of the teletext screen. Use the pqbuttons to select one page up or down, use tubuttons
to select subpages. Press or to get back to viewing mode.
If characters are not displayed correctly then check if your Teletext language
is set to the correct language. See chapter .
Some channels support a choice of subtitle languages. Press in viewing mode to display a list of
available subtitle languages. Select your subtitle of choice with pqand press to confirm. Press
to leave without making changes.
Timeshift allows you to pause live broadcasts and resume playback later. Connect your USB storage
device and make sure that Timeshift is set to ON in the menu DVR Settings. Press /2in

viewing mode to activate this mode. On screen the time shift info banner appears. Press 1to resume
Timeshifted playback.
Press 56for fast rewind/fast forward. Press 3to return to live TV.
Timeshift needs a connected USB storage device with sufficient free space
and sufficient speed in order to work properly.
The Electronic Programme Guide is a very useful function that allows you to view event schedules
and information and to mark programmes for recording. To access the EPG, press the button in
viewing mode. Use pqto select a channel and tuto select an event. Press to display detailed
information on the selected event. Use to quit the detailed information screen. Press to
get to the Step Time function. Use tuto select the desired step and to execute it. Press to
quit the Step Time function. Press to set a timer for a selected event. Refer to section for
details on the timer function.
Availability of EPG data depends on broadcast.
Your new receiver allows you to make an instant recording of the programme you are watching.
Simply press 4to start the recording. To enter the duration for the recording, press 4again. Use the
keys to input the desired recording time.
During the start of recording a recording sign will be shown on the upper right of your TV screen. To
stop the recording, press 3. Select Yes and press again to stop the recording.
You can access the Record Manager directly via the 3button in viewing
mode to select a recording for playback.
*Please connect an USB storage device with sufficient free space before you start a recording.
The main menu gives you access to settings, multimedia functions and in-built games. To access the
main menu, press in viewing mode. The main menu consists of the following sub menus:
Media, Edit Channel, Installation, System Setup and Tools.
Throughout the main menu, or can be used to get back to the previous screen.
The Media menu consists of the following submenus: Media Player, DVR Storage Information, DVR
Settings and Games (Othello and Sudoku). Use pq to highlight the menu of choice and press to
enter. Press to quit.
This function allows you to play MPEG, AVI, MP3, JPG many other type files from connected storage
device (see details in technical part). You can also playback music and images at the same time.
Select Media Player from the Media menu and press to proceed.
When you enter media player window, the highlight is on the USB/HDD device.

10
Use the button to select between DVR, Video, Music or Image. Press the qbutton to move
the highlight to the directory and the file field.Press to confirm the selection. The help banner at the
bottom of the screen explains all buttons used in the Media player. Press to quit or more times to exit.
: Press the "Red" Play List button to show the Play List.
: This is only possible if a Play List has been created.
: Move the highlight to the music file that you want to add to the Play List, then
press the “Green” FAV button to add it. It will mark a favourite icon on the file.
: Press the "Yellow" FAV All button to add all files of the current directory to the play
list. Press again to delete all files of the current directory from the play list.
: Press the "Blue" Edit button to enter the edit sub-menu.
You can Rename/Copy/Delete/Create a folder.
: Press 2 x times to exit.
1: Press number 1Repeat button to set the repeat mode. The option is Repeat
Folder/Random Folder/Repeat One.
Press to start the play mode.
: Return, Stop or one step back.
: Press the "Red" Play List button to show the Play List.
: This is only possible if a Play List has been created.
: Move the highlight to the Image file that you want to add to the Play List, then
press the “Green” FAV button to add. It will mark a favourite icon on the file.
: Press the “Yellow" FAV All button to add all files of the current directory to the play
list. Press again to delete all files of the current directory from the play list.
: Press the "Blue" Edit button to enter the edit sub-menu
You can Rename/Copy/Delete/Create a folder.
: Press 2 x times to exit.
1: Press number 1button to open the Image setup. Here you can select time of
Slide show and Repeat mode On or Off.
: Press MultiView button to view images in multi view mode
Press to start the play mode.
: Return, Stop or one step back.
: Press the "Blue" Edit button to enter the edit sub-menu.
You can Rename/Copy/Delete/Create Folder.
1: Press number 1Repeat button to set the repeat mode. The option is Repeat
Folder/Random Folder/Repeat One.
Press to start the play mode. During the play mode you can use the and buttons to
select other audio tracks or the way how subtitles are displayed, if available.
: Return, Stop or one step back.

11
: Press the "Red" Rename button to open the rename window to rename a
recording.
: Move the highlight to the programme that you want to lock. When pressing
the "Green" Lock button, it will ask you to input password. The default
password is "1234". After input of correct password, the programme is locked.
If you want to unlock the programme, press the "Green" Lock button again.
: Move the highlight to the program me that you want to delete. When
pressing the “Yellow” Delete button, it will ask you to input password. The
default password is "1234". After input of correct password, the programme is
marked with a lock.
If you want to unlock the programme, press the “Yellow” Delete button again
or press to delete the selected recording(s).
: Return, Stop, one step back or press to start play mode.
This option shows relevant information about the connected USB storage device.
Also you can format your USB storage device into FAT32.
Select DVR Storage Information from the Media menu and press to enter.
Now you will see all details as Free and used Recoding Sizes and used file system.
Press the button Format menu to format the connected USB device.
Please, enter the PIN to access this menu and press to start formatting.
Select Cancel or press to leave without formatting.
Formatting will permanently delete ALL data stored on the connected device.
Please make a backup copy of all data you wish to keep before entering the
Format menu. STRONG cannot be held responsible for loss of data from USB
devices used with this receiver.
It is possible to use already NTFS formatted USB disks.
Press to leave.
The DVR Settings menu allows you to setup the Timeshift, Jump function for playback and type
recordings. Select DVR Settings from the Media menu and press to enter.
Timeshift: On/Off. Select On if you like to activate Timeshift by pressing the
button. Timeshift will already start in the background directly after you tune
into a channel. Select Off to disable Timeshift. The button will now
only freeze the TV screen.
Jump: 30 sec to 30 min. Set the time step you like to jump forward or backwards with
the buttons 8or 7during playback of recorded files.
Timeshift to Record: On/Off. Select On if you like to keep a copy of the last made Timeshift by
pressing the 4button. Select Off to disable.
PS Record: On/Off. Select On if you like to reduce recording data. The recording will not
record TXT, extra Subtitles or Audio channels on SD channels. Select Off to
disable and all data of recorded channel will stored to the record.

Press to leave.
Your receiver is equipped with two games which can be played on your TV screen using the receiver
remote control.
Select one of the available games (Othello or Sudoku) using pqand press to start the game.
Follow the directions on screen.
Press to quit a game.
Use pqto select Edit Channel and press or uto enter.
Use pqto highlight the submenu of choice and press to select.
Press or tto get back to the main menu.
In Edit Channel menu select TV Channel List with pqand press to enter.
Use tuto change the channel group (assumed you have already set up favourite groups).
Select the channel of choice with pq. Press to view the selected channel in the preview box.
Channels from the TV Channel List can be added to up to 8 different favourite groups. Press
while in TV Channel List to access this function. The FAV sign on the top of the screen will move up
to indicate that the favourite function is selected. Use pqto select a channel you wish to add to a
favourite group. When the highlight is on the channel of your choice, press . A list with all available
favourite lists will now pop up. Use pqto select the favourite list you wish to add the channel to
and press , press to finalize the process. Favourite channels will be marked with a heart
symbol. When all changes have been made, press twice. A confirmation banner will pop up.
Select Yes to save the changes or No to discard.
Locked channels can only be watched after entering the pin code.
To lock or unlock a channel, press while in TV Channel List. The red sign on the top of the
screen will move up to indicate that the Lock function is selected. Use pqto select a channel and
press to lock or unlock it. You are asked to input the pin code. Locked
channels will be marked with the symbol. Locking/unlocking multiple channels in one session
is possible. When all changes have been made, press twice. A confirmation banner will pop up.
Select Yes to save the changes or No to discard.
Channels marked with Skip will be skipped when zapping channels with the pqbuttons. The
channels will still be available from the channel list.
To mark channels for skipping, press while in TV Channel List. The Skip symbol on the top of
the screen will move up to indicate that the Skip function is selected. Use pqto select a channel
and press to mark or unmark it for skipping. Channels set for skipping will be marked with the

symbol. When all changes have been made, press twice. A confirmation banner will pop up.
Select Yes to save the changes or No to discard.
To enable the Move function, press while in TV Channel List. The Move symbol on the top of
the screen will move up to indicate that the Move function is selected. Use pqto select a channel
and press to select it. You can now move the selected channel up or down the channel list using
pq. When the channel is on the position of your choice, press again. The channel is now fixed
on its new position. When all changes have been made, press twice. A confirmation banner will
pop up. Select Yes to save the changes or No to discard.
The Edit function allows you to Sort, Rename or Delete channels. To enter the Edit menu, press
while in TV Channel List. The Edit Channel menu will appear.
If you made changes in the previous menu, but not saved them yet, you will be asked to do so now.
Press to enter the Sort menu.
Use pqto select sorting method and press to confirm.
Possible methods are:
Name (A-Z): Sorting in alphabetical order from A to Z.
Name (Z-A): Sorting in alphabetical order from Z to A.
Free/Scramble: First in the list will be Free-To-Air channels.
Lock: All unlocked channels will be placed first in the list.
Default: Sorting by searched Order (from lowest to highest frequency or by LCN
numbering).
Press in Edit Channel to enable the Rename function. The Rename sign will move up to
indicate that Rename is selected. Use pqto highlight a channel and press to select it. A text field
will now pop up at the right of the screen. Use tupqto select characters and enter them with
. When you have finished editing, press to enter the changes. When all changes have been
made, press twice. Select Yes to save the changes or No to discard.
Press in Edit Channel to enable the Delete function. The Delete sign will move up to indicate
that Delete is selected. Use pqto highlight a channel and press to mark it for deletion. When
you have marked all channels you wish to delete, press twice. A confirmation banner will be
displayed. Select Yes to delete the marked channels or No to cancel.
Basically, the operation of the Radio Channel List is the same as in the TV Channel List. The only
difference is that in Radio Channel List there is no video information, so it will always display the radio
logo at the right preview screen.

14
Use this menu to delete all stored channels. Select Delete All with pqand press . The receiver
asks you to enter the pin code. . In the confirmation window select Yes with t
uand press to delete or select No to cancel.
The Delete all function will permanently delete all current channels and all
favourite lists from your receiver, and you are not able to leave the menu until
you search for channels again.
Use pqto select Installation, press or uto advance.
Use pqto select Channel Scan and press to enter.
Use tuto toggle between available scan modes: By Channel and By Frequency.
If By Channel is selected, use the cursor buttons to select Scan Band and Channel No. If By Frequency is
selected, use the cursor buttons to select Frequency and Bandwidth. Highlight Search and press to
start scanning. Newly found channels will be stored in the channel list.
Use pqto select Installation and press or uto advance.
Select Auto Scan with pqand press to enter.
Use tuto toggle between FTA Only Yes or No. When FTA Only is set to Yes, scrambled channels won’t
be stored in the channel list. Use pqto highlight Search. Now press to start auto scan.
The receiver will store all newly found channels in the channel list.
If LCN (Logical Channel Numbering) is activated and an LCN signal is provided by the operator,
channels will be stored in an operator defined order. Set LCN to On to activate operator defined
channel numbering or Off to store channels in found order.
Use this menu to setup Antenna Power, Power saving mode and usage of signal to Antenna loop out.
Set to On if you use an active antenna. When set to On, 5 Volt with a maximum current of 50 mA will
be present on the ANT IN connector of the receiver. Select Off for passive antennas. The included
antenna is an active type. If you use this antenna, keep the selection to On.
Auto Standby is a new feature that helps you reducing power consumption. When set to On, the
receiver will turn to standby if it doesn’t receive any commands for three hours. Set Auto Standby to
Off to avoid the automatic switch down.

Set this option to On if you connect a second receiver or TV to the loop out (ANT OUT) of this
receiver. This will allow passing antenna signals if the receiver is in standby mode. To reduce power
consumption is default set to Off.
The Antenna Power supplies (5 Volt) switch off in standby mode. If you are
using an active antenna then the option RF Loop in Standby is not usable.
This menu allows you to manage the system settings of your receiver. It consists of the following
sub-menus: Language, TV System, Display Setting, Local Time Setting, Timer Setting, Parental Lock, OSD
Setting, Favourite List Rename and Multiview Setting.
Press pqto highlight the menu of choice and press advance to the next screen. Use pqto
move the highlight to the setting of choice. Values can be changed with tu. Press to leave.
This menu allows you to set up your language preferences.
Language: Use tuto select the language for the On Screen Display.
First Audio: Use tuto select Audio language.
Second Audio: Use tuto select a language that will be played when the language selected
at First Audio isn’t available.
Teletext: Use tuto select the preferred teletext language (when available.)
Use this menu to match your receiver to your TV set. The following settings are available:
Video Resolution: Use this option to select the video resolution of your TV screen. The options
are: By Source (automatic detection of video resolution offered to the
receiver), By Native TV (automatic detection of maximal resolution of TV
screen) and manual selections 480i, 576i up to 1080p. Please use a setting that
matches your TV’s specifications. After a selection is made, you will be asked
to confirm. Selection above 576i is only applicable on HDMI output.
Aspect Mode: Use this option to select the aspect ratio of your TV and the preferred
conversion method. The options are: Auto (automatic detection of aspect
ratio), 4:3 Panscan (Displays 16:9 widescreen broadcasts full screen on your
4:3 TV), 4:3 letterbox (black bars on top and under the picture on a 4:3 TV) and
16:9 (use this setting for 16:9 TV sets).
Video Out: Use this option to select which video quality you like to have on the TV SCART
output. Select CVBS or RGB for best quality. If you using a HDMI cable then
select CVBS. This selection allow you to select behind Video Resolution also the
high resolutions up to 1080p.
RF System: When using the TO TV connector on the rear panel (the built-in RF
modulator), you can select here your TV set’s analogue reception system.
Default is PAL-BG.
RF Channel: Set the RF channel of the modulator. Default is channel 38.

Digital Audio Output: Toggles between PCM and Bitstream output. When PCM is selected, all digital
audio will be converted to stereo audio. Bitstream enables multi-channel
audio on HDMI for use with a Home Cinema Set.
Here you can setup and adjust your video output if you do not like the colours in the playback of
some media files or you want to change the colours for the TV screen.
Here you can set up your region and time zone.
Region: Use tuto select the region you live in.
GMT Usage: Set to On for broadcaster defined time or to Off to input time and date manually.
GMT Offset: Allows you to adjust the time zone you live in. This option is only available
when GMT Usage is set to On. The GMT Offset range is “-11:30 ~ +12:00”,
increasing by half hours progressively. The cities matching the set GMT Offset
are displayed at the bottom of the screen.
Summer Time: Select Off or On to add one hour extra for summer time during the summer.
Date: Date and Time settings are available only when GMT Usage is set to Off. Use
the buttons to enter the date. Press to proceed.
Time: Date and Time settings are available only when GMT Usage is set to Off. Use
the buttons to enter the time. Press to proceed.
Time Display Select On to display time on screen, Off to remove.
This menu allows you to set up to 8 timed events for recording or waking up the receiver.
Use pqto select Timer Setting from the System Setup menu and press to enter.
The receiver will display a list with 8 timers, followed by their respective status. Select the timer you
wish to set or change with pqand press to proceed.
The timer setup menu will now be displayed.
The following settings are available:
Timer Mode: Choose between Off (Timer inactive), Once or Daily (Timer will be executed
every day, same time).
Timer Service: Choose between Channel (Timer will wake up the receiver) or Record (Timer
will start to record the scheduled event).
Wakeup Channel: Use tuto select the channel the timer will wake up with.
Wakeup Date: Use the buttons to input the date for the timed event.
On Time: Use the buttons to input the start time.
Duration: Use the buttons to input the timer duration.
When all settings are according to your wishes, use pqto move the highlight to Save and press
to confirm. To quit the timer without saving your settings, move the highlight to Cancel.
This menu allows you to protect the installation menu and/or channels with a password. You can also
enter a new password in the Parental Lock menu.
Table of contents
Other Strong TV Receiver manuals

Strong
Strong SRT 4935II User manual

Strong
Strong SRT 7504 User manual

Strong
Strong SRT 5011 User manual

Strong
Strong SRT 5406 User manual

Strong
Strong SRT 5855 User manual

Strong
Strong SRT 5410 User manual

Strong
Strong SRT 5405 User manual

Strong
Strong SRT 8109 User manual

Strong
Strong SRT 8903 User manual

Strong
Strong SRT 7004 User manual

Strong
Strong SRT 5005 User manual

Strong
Strong SRT 5020X User manual

Strong
Strong SRT 8215 User manual

Strong
Strong SRT 5001 ECO User manual

Strong
Strong SRT 8526 User manual

Strong
Strong SRT 8202 User manual

Strong
Strong SRT5431 User manual

Strong
Strong SRT 8205 User manual

Strong
Strong SRT 5302 User manual

Strong
Strong SRT 2400 User manual