FC-6S+
Applicable fiber φ0.25 & 0.9mm & Drop cable (Width of groove of
single fiber adapter: 3.5mm)
Cladding diameter
125μm
Fiber count
Single fiber
Cleave length 5~20mm (φ0.25mm)
5~12mm (Drop cable)
10~20mm (φ0.9mm)
Blade return function Automatic return
Dimensions
93(W) x 76(D) x 63(H) mm
Weight
Approx. 390g
Items Qty.
Optical fiber cleaver FC-6S+ 1 pc
Carrying case 1 pc
Fiber off-cut box FB-FC6SA 1 pc (pre-fitted)
Single fiber adapter AP-FC6SA 1 pc (pre-fitted)
Items Name
Fiber off-cut box FB-FC6SA
Single fiber adapter AP-FC6SA
Spare blade FCP-20BL
OME2126008-4
Optical Fiber Cleaver
FC-6S+
Operation Manual
IMPORTANT SAFETY PRECAUTIONS
This symbol indicates explanations about dangerous matters.
If users ignore this symbol and handle the cleaver the wrong
way, bodily injury and damage to the cleaver could result.
Caution
1. General
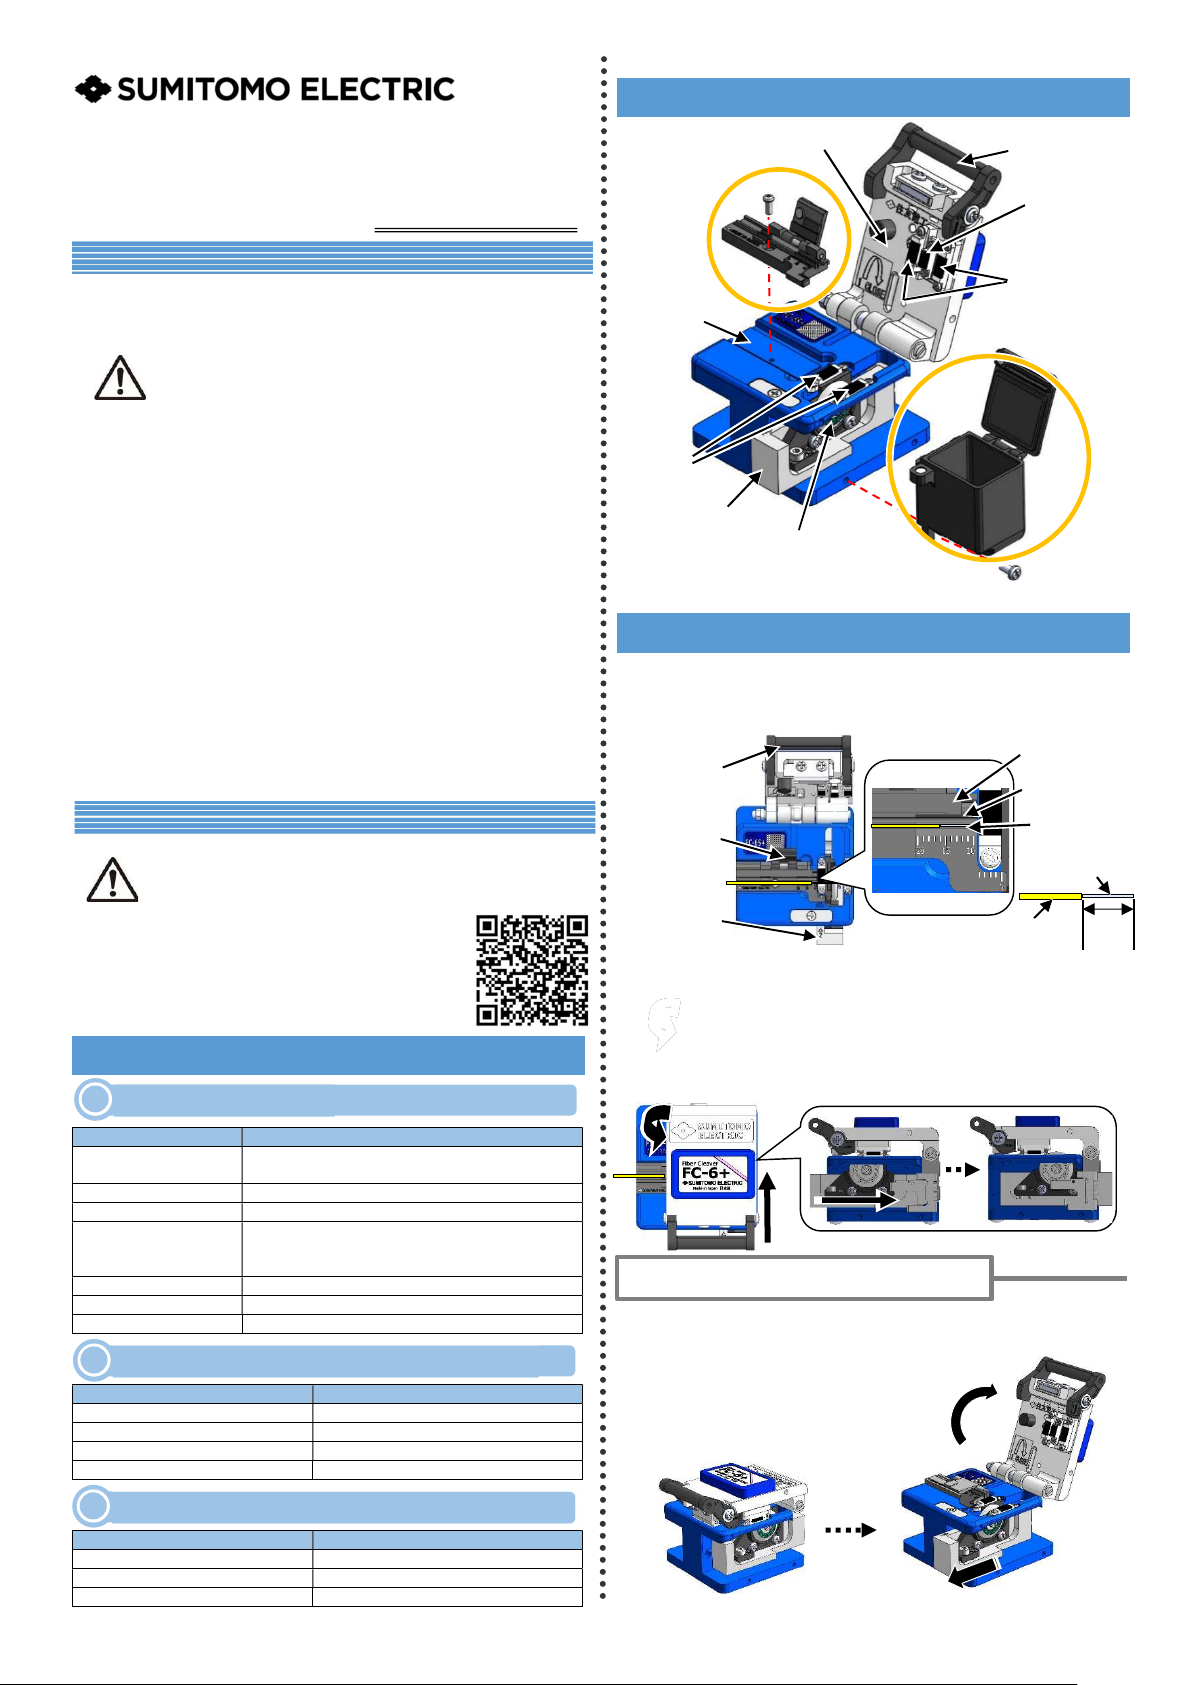
2. Structure
This product has been designed and manufactured to assure personal safety.
Improper use can result in bodily injury and serious damage to the fiber cleaver.
Please read and observe all warnings instructions given in this operation manual.
1. Do not disassemble or lubricate any parts of the cleaver. Doing so can cause
serious damage to the cleaver.
2. The FC-6S+ is a precision tool. Do not impact the cleaver by hitting or dropping
it. Doing so can cause personal injury and loss of cleaving performance.
3. Glass fiber fragments are extremely sharp. Handle with care. Wear safety
glasses at all times during cleaving operation for protection from glass fibers.
4. Dispose of glass fiber fragments properly. After use, please empty the off-cut
box and then store the cleaver in the case. There is a possibility that fiber offcuts
could spill out of the box during transportation if remain in the box.
5. The blade of the cleaver is extremely sharp. Do not touch it with bare hands.
6. The FC-6S+ has the “automatic blade return” function. When the clamp cover
is opened after cleaving, the blade carriage returns automatically to the forward.
Be careful not to be hit your fingers by the blade or blade carriage.
7. Do not impact the top clamp lever and switching lever. Doing so can cause
damage to the levers and loss of cleaving performance.
8. If the cleaver is damaged or a problem occurs, please contact our service
department.
Specification
Standard package
Optional accessories / Consumables
3. Operating procedures
Single fiber adapter
AP-FC6SA
Blade carriage
Blade
Clamp
Fiber holder
receptacle
Clamp cover Top clamp lever
Clamp
< Fiber cleaver FC-6S+ >
1: Open the top clamp lever and the
lid of the single fiber adapter. The blade carriage
should be in the forward position. Lower the
fiber straight into the correct groove
with the end of the fiber coating at a mark to get a correct cleave length.
Top clamp lever
2: Close the lid of the single fiber adapter. Lower the top clamp
carriage to the rear of the cleaver. The fiber will be cleaved.
fiber of drop cable, hold the cable not to move around.) Open the top clamp lever
and the lid of the single fiber adapter. Lift the newly cleaved fiber. Lift the off-
and dispose it properly. The blade carriage returns
automatically after cleave,
please refer "Automatic blade return function".
Cleave
length
Fiber
coating
Bare fiber
Notice on Sumitomo genuine products
Caution
Please be very cautious of copy products that pretend Sumitomo
genuine products.
For more information about counterfeit warning, please visit
following website;
https://global-sei.com/sumitomo-electric-
splicers/counterfeit_warning/warning01.html
with single fiber adapter AP-FC6SA
Fiber off-cut box
FB-FC6SA
Lid of single
fiber adapter
Blade carriage
For drop cable
For 0.9mm
coated fiber
For 0.25mm
coated fiber
Automatic blade return function
The FC-6S+ has the “automatic blade return” function. When the clamp cover is
opened after cleaving, the blade carriage returns automatically to the forward.


