Sureguard Pingg-String User manual


2
3
How does the Pingg-String work?
The Pingg-String Energiser applies an electronic pulse to the barrier wires. The pulse feels
like common static electricity. As the animal pushes into the wires, it is repelled by the
pulse. The animal learns not to repeat the experience.
Sureguard invented the Pingg-String System in 1997 as a safe, effective & humane barrier
for small animals.
Is this like an electric farm fence? No, because the power level is far less.
There are two types of Pingg-String installation:
•Ground Barrier (for Dogs)
•Fence-Top Barrier (for Cats & Possums)
Both are powered by this Pingg-String Energiser. The barrier kits are sold separately, so you
only need to buy what you need. For details, refer to the Pingg-String Installation Guide.
Solar Powered Fence Energiser
4
Specifications
•Maximum Distance Rating for Ground Kit (1-Wire): 400m (1300ft)
•Maximum Distance Rating for Fence-Top (4-Wire): 200m (650ft)
•Weight: 0.7kg (25oz)
•Dimensions: 195mm Wide. 100mm High. 220mm Deep. (4.95" x 3.95" x 8.65").
•Battery Life: 5 to 8 years, under typical operating conditions. Battery Technology LiFePO4.
•Running Time in Cloud: Continuous.
Mounting Location
The Energiser is solar powered so must have an uninterrupted view of the sky from east to
west. The Energiser should face towards the equator; in Australia, that means northward. In
the northern hemisphere, the equator is southward. The solar panel will charge quickly in
full sunlight. In cloudy conditions, the solar panel collects power from the full view of the
cloudy sky (east to west). The intensity is lower, and the charge time is longer. If the battery
power indicates low, you should check to validate your solar setup. Low battery is not
typical. NOTE: The Solar Panel only charges while the Energiser is switched ON.
Mounting Options
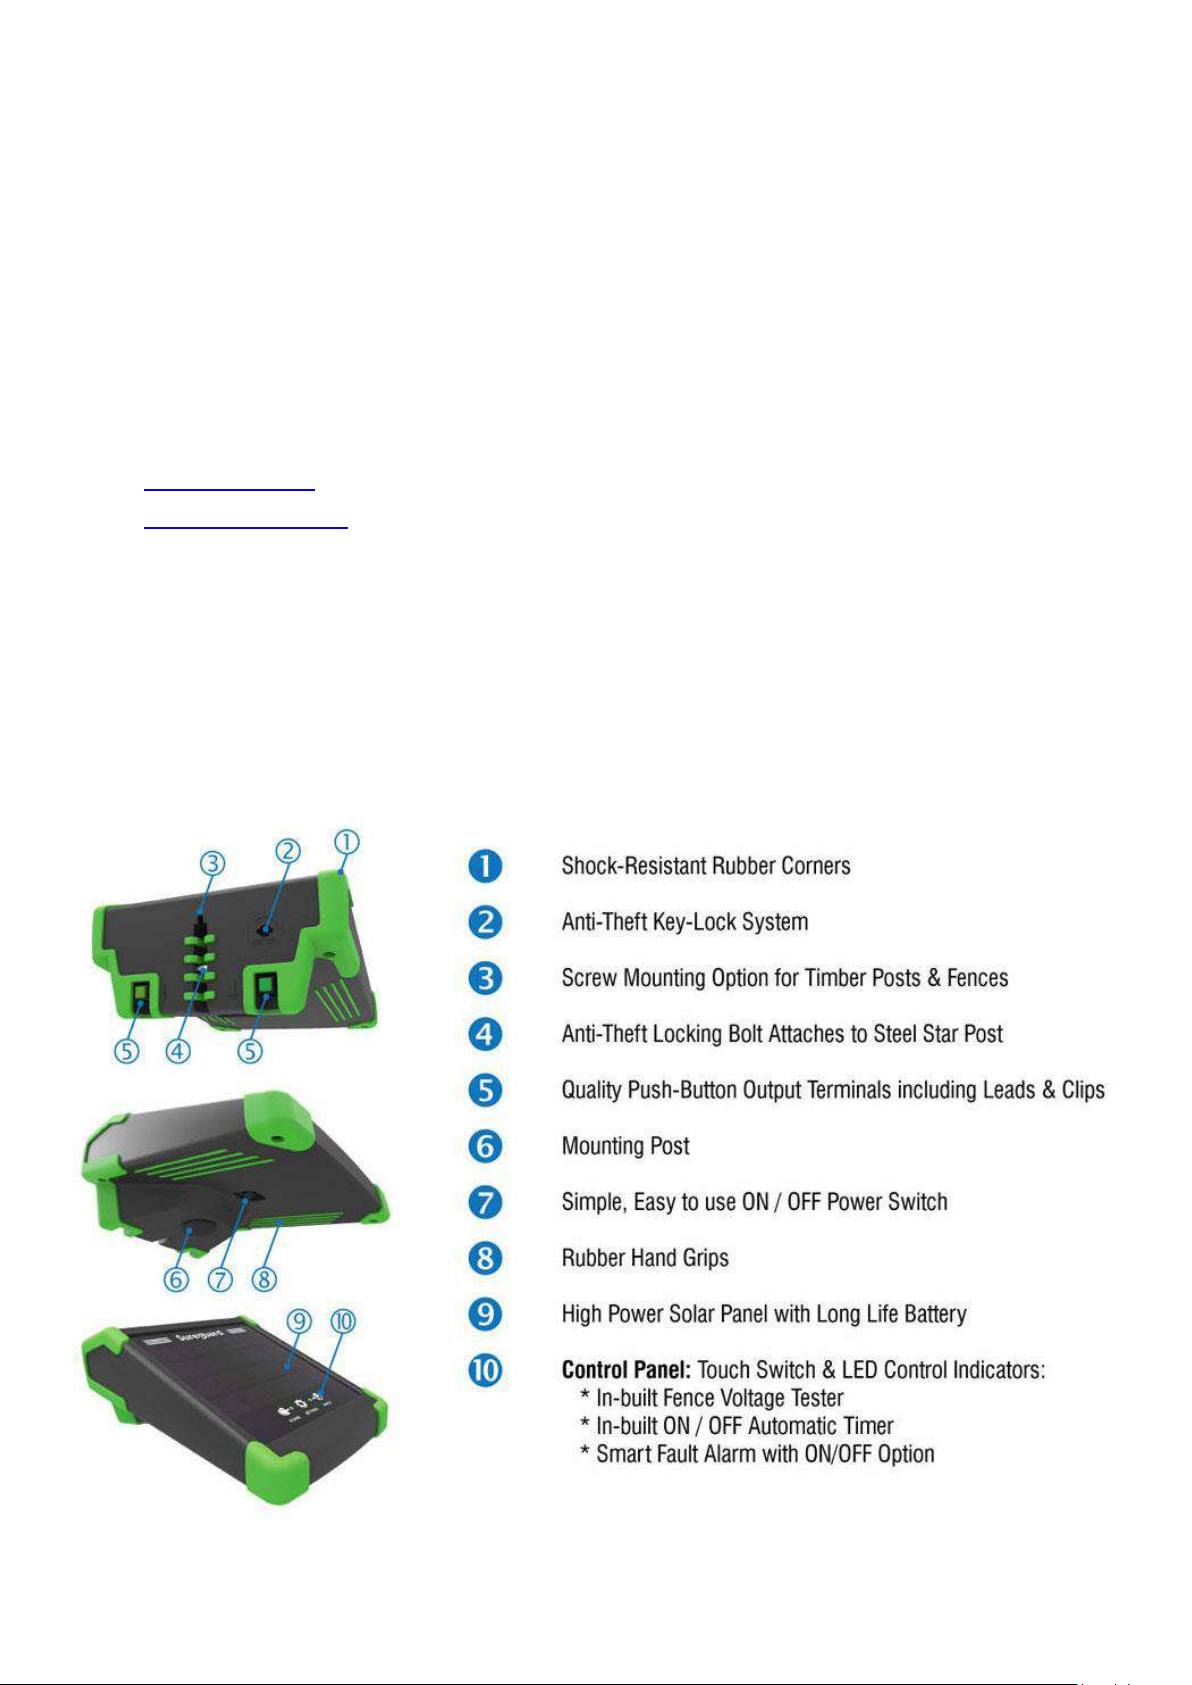
The Energiser has several mounting options –see Key #3, #4 & #6 illustrated on page 3.
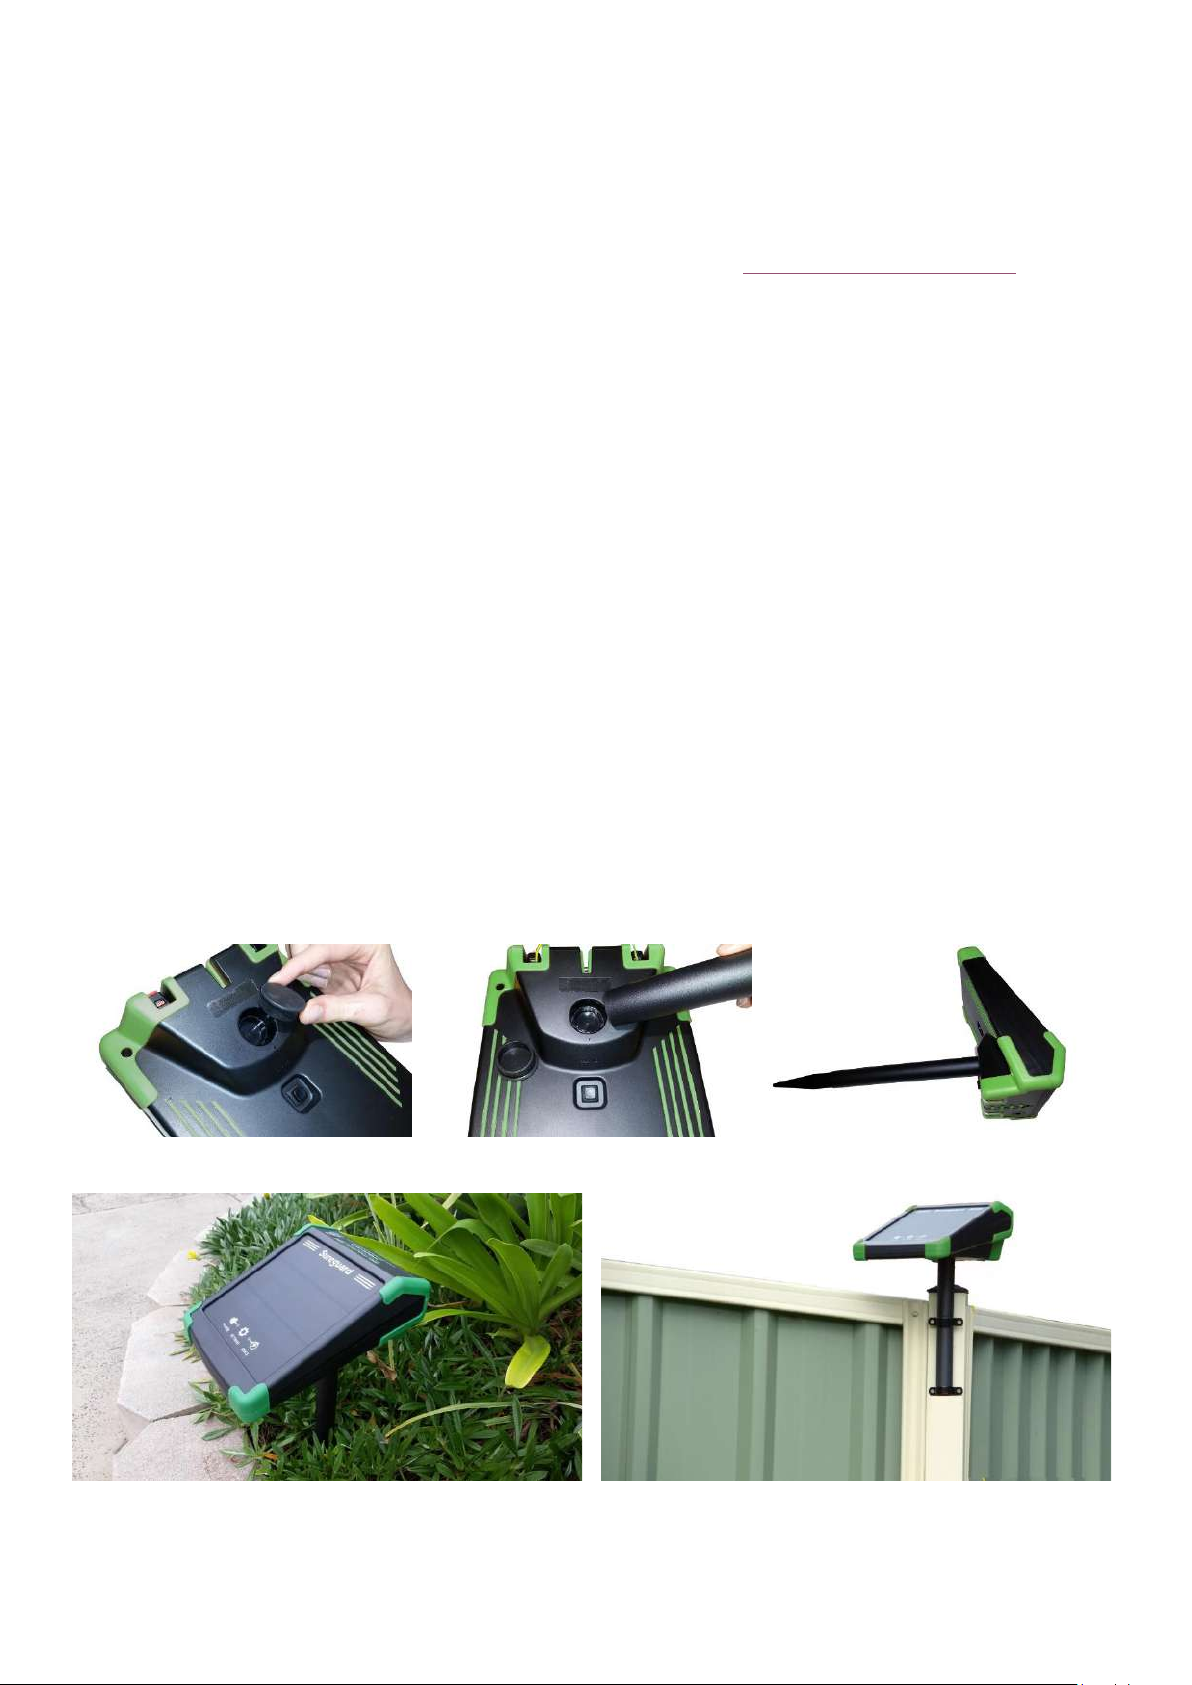
Plastic Mounting Post
To use the plastic Mounting Post, assemble its three parts. Remove the protective rubber
bung (see #6 on page 3) and push the post into the base of the Energiser. Push the other
end of the post into the soil or screw it to an existing fence using two 25mm Saddle Clamps,
as illustrated below-right (clamps not included).

5
Screw Mounting
Insert a single M4 screw (4mm with head no more than 9mm) into timber, steel or plastic
fencing or posts to hang the Energiser using the screw mounting option (Key #3 on page 3).
Steel Post Anti-Theft Mounting
You can mount the Energiser on top of most
sizes of steel posts (Key #4 & #2 page 3). The
Energiser locks to the post using the supplied
key to open the internal mounting bolt.
Locking Procedure: 1/ Remove the rubber
sealing plug and insert the supplied key (see
Key #2). 2/ Align the mounting bolt (see Key
#4) with the top hole in the post. 3/ Rotate
the key anticlockwise to open the mounting
bolt. 4/ Push the Energiser onto the post. 5/ Rotate the key clockwise to lock. 6/ Make sure
the mounting bolt is passing through the top hole in the steel post. The Energiser should
not come off. Remove the key. 7/ Put the rubber sealing plug back into the keyhole as a
weather seal.

6
Connecting Energiser to Pingg-String Fence
Use the Pingg-String Insulated Cable that you purchased in your fence kit to connect the
Energiser to the Pingg-String fence. Please refer to Figure 24 of the Pingg-String Installation
Guide for wiring details.
Cut two pieces of Pingg-String Cable of suitable length to connect each Terminal of your
Energiser to your Pingg-String fence. Remove at least 12mm of insulation. Twist the copper
wires together. Fold the
copper wires back over
themselves 5mm then
insert this doubled wire
into the Terminal. Push
Red or Green Terminal
button to open the metal
jaws of the Terminal,
insert the wire then
release the button to hold
the wire.
Switch Energiser ON
Using the Energiser is as simple as pressing the ON/OFF button on the underside of the
case (see Key #7 page 3).
When the Energiser is switched ON,
you will typically see two LED lights
(POWER and FENCE) glow
continuously green. GREEN means
you are good to go! The lights may
also glow RED or BLUE (refer to the
Table on page 7).
NOTE: Critical issues will cause the
LED to flash RED & alarm buzzer
sound (if active).
7
What the LED Colours Mean:
NOTE: For troubleshooting procedures, please refer to Rectifying Power Faults and
Rectifying Fence Faults on page 9.
POWER
LED
GREEN
Normal operation. The internal battery has plenty of power.
RED
Internal battery is low. Check solar panel is clean and setup correctly.
RED FLASHING
Critically low battery. Rectify immediately!
BLUE
Displayed while using the advanced option setting switch.
FENCE
LED
GREEN
Normal operation. The Pingg-String Wire is active.
RED
Pingg-String fence wire has low power.
RED FLASHING
Pingg-String fence wire has very low power. Rectify immediately!
BLUE
You have selected the ON/OFF Timer. The fence is currently inactive.
BLUE FLASHING
Only happens when switched ON. Energiser is analysing the fence voltage.
NOT LIT
Power LED flashes RED: Device is in Standby (no output)
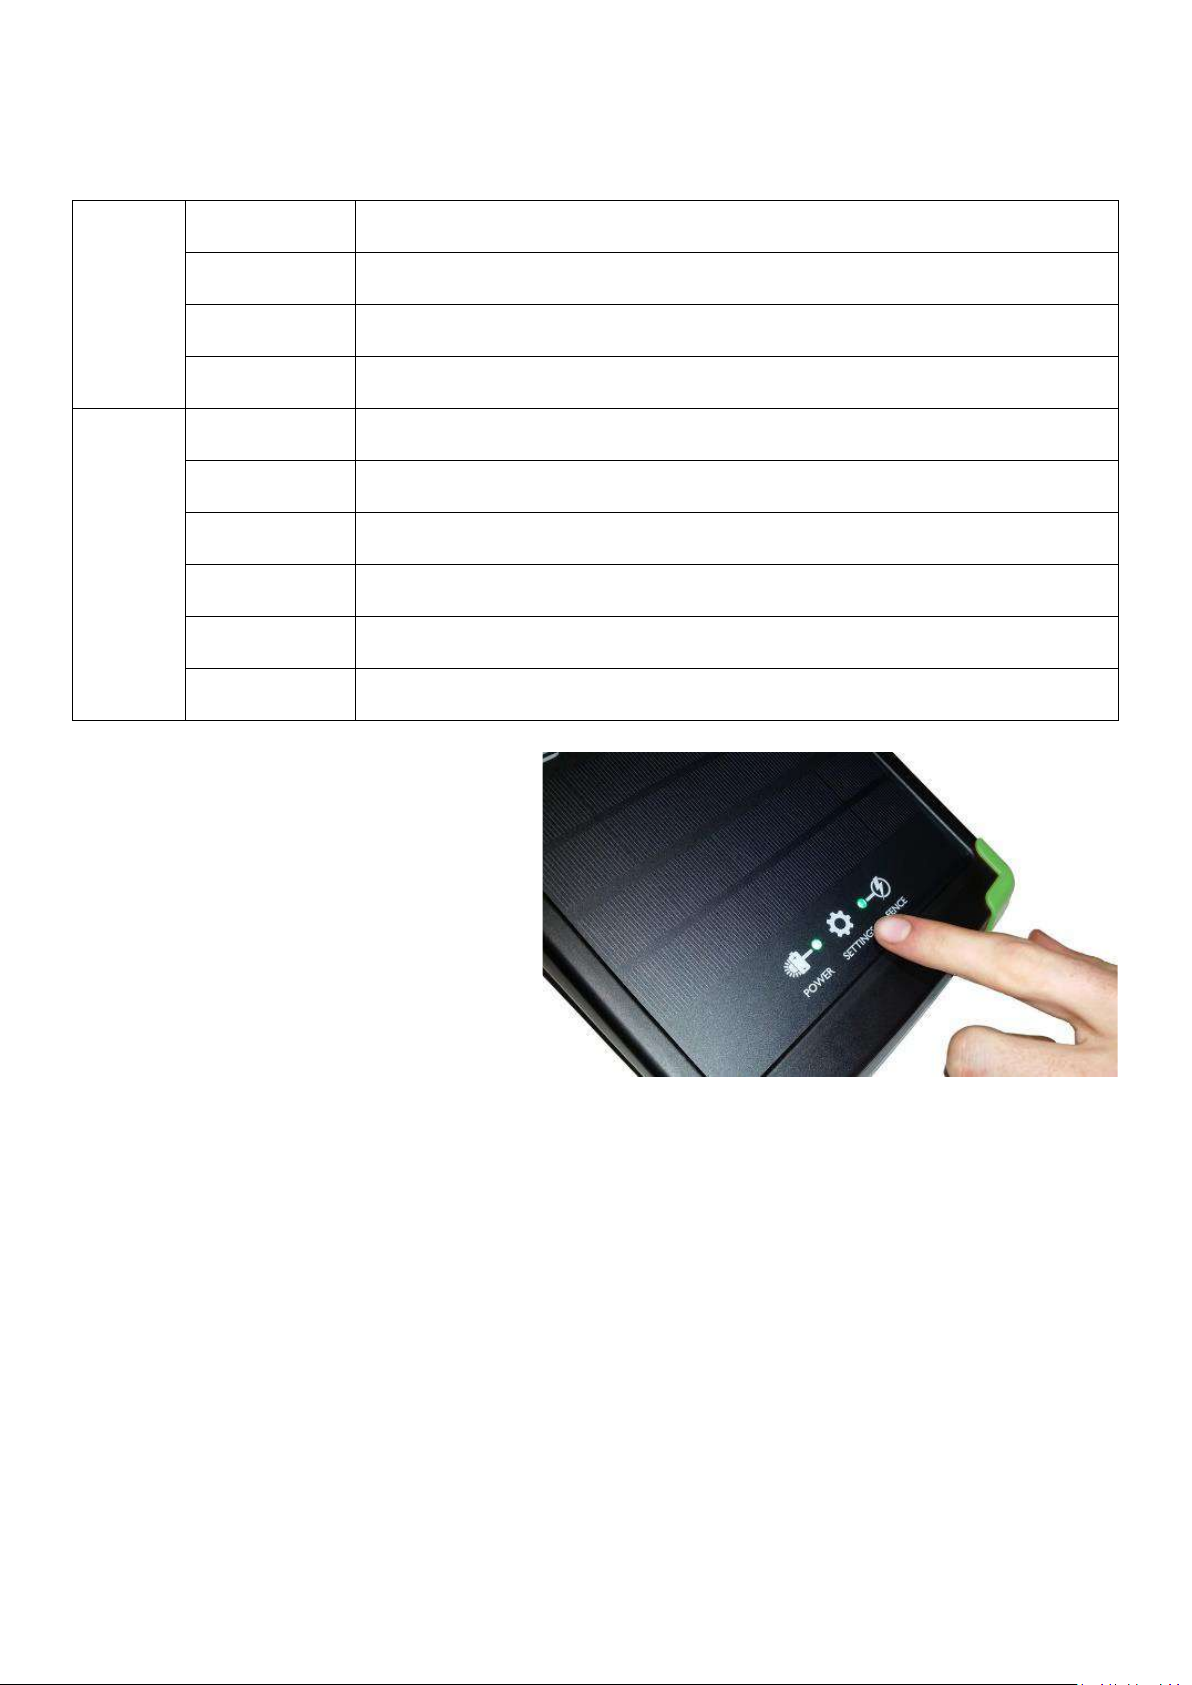
Advanced User Features
The cog icon on the solar panel is a
touch switch (similar to some mobile
phones). The touch switch is activated
for up to 45 seconds whenever the
Energiser is switched ON. During this
time, you can customise the operation
of the Energiser.
How to Use the Touch Switch
1. Touch the cog icon for about 1 second until you see both LED lights glow BLUE.
TIPS: Touch lightly, don’t press hard. If your finger is small, use your thumb.
2. As soon as you see both LEDs glow BLUE, remove your finger off the cog.
3. Wait a moment until the BLUE LEDs switch OFF.
4. Momentarily touch & release the cog icon. The number of times you touch and
release the cog determines the function you select, as per the meanings on page 8.
TIP: You’ll find the switch responds better when you press and release by moving
your finger at least 2cm away from the cog.

8
❖Touch once (Function #1):
Reset all functions to factory default and perform tests in the following order:
1/ LED’s light in sequence RED-GREEN-BLUE
2/ Alarm Buzzer sounds.
3/ Solar panel, in sunlight, is linked to the POWER LED. It will flicker BLUE to verify power
is going into the battery. NOTE: If the battery is fully charged, the POWER LED will not
flicker BLUE. This is normal. Try again first thing in the morning.
4/ Energiser reboots automatically after 20 seconds.
❖Touch twice (Function #2):
Timer is switched OFF. Energiser will operate 24-hours a day. (Factory default setting).
❖Touch 3 times:
Timer is switched onto Night Mode. The Energiser will operate at night, starting about
15-minutes after sunset. During the day the Energiser is OFF, and the FENCE LED glows
BLUE. Using this mode increases battery life. NOTE: Set the Alarm Buzzer using Function
#5, #6 or #7.
❖Touch 4 times:
Timer is switched onto Day Mode & will only operate during the day, starting about 15
minutes after sunrise. At night the Energiser is OFF, and the FENCE LED glows BLUE.
Using this mode increases battery life. NOTE: Set the Alarm Buzzer using Function #5, #6
or #7.
❖Touch 5 times:
Switch the Alarm Buzzer OFF.
❖Touch 6 times:
Switch the Alarm Buzzer ON only during daylight hours. (Factory default setting).
❖Touch 7 times:
Switch the Alarm Buzzer ON for day or night operation.
Touch 8 times:
Report the current fence voltage in kilo-volts (0.5 to 9.9kV). This is useful for fence
diagnostics. Count the number of flashes of POWER LED; this is the first digit.
Count the number of flashes of the FENCE LED; this is the second digit.
Normal voltage range is at least 3.5kV
NOTE: If necessary, select Function #2 to put the Energiser into the 24-hour mode.
❖Touch 9 times:
Reports the lowest fence voltage since mid-night. (Useful for diagnostics).

9
❖Touch 10 times:
Reports the highest fence voltage since mid-night.
❖More than 10:
Does nothing. Beeps an error.
Rectifying Power Faults
POWER LED Continuously RED:
The internal battery needs more charge. The Energiser will automatically lower its power
consumption to continue operation. It will pulse less frequently. Check the following:
1. Clean the solar panel with water; remove bird droppings and dust.
2. Confirm your solar setup is as described on page 6 “Mounting Location”.
3. Confirm the panel is facing toward the equator (not east or west), not experiencing
shadowing and can see as much of the sky in all directions as possible.
4. A temporary low power state may occur during prolonged dark cloudy conditions.
POWER LED Flashing RED:
In addition to the above points, select Function #1 to test the hardware and solar panel.
POWER LED is OFF:
The Energiser has entered a low power Stand-by Mode to avoid the battery becoming fully
depleted. This condition might happen if you forgot to switch the Energiser OFF when
putting it into storage. To rectify this, switch the Energiser OFF for at least 24-hours. Then
place the Energiser in FULL sun and switch ON. As it commences charging, the POWER LED
should flash briefly every few seconds. If it doesn’t, switch OFF for another 24-hours then
try charging again. If the battery still does not come good, replace it. IMPORTANT: Once
charging begins, do not switch the Energiser OFF. After a few hours (or next day if it is
cloudy) you should see the Power LED go GREEN and the fence commence working.
Rectifying Fence Faults
FENCE LED Continuously RED:
The Energiser is functional, but the output voltage is medium to low. Possible reasons:
1. Total length of Live wire is too long.
2. Excessive foliage touching the Live wire is draining power.
3. Electrical breakdown of materials due to age, damage, or substituting incorrect
materials.
FENCE LED Flashing RED:
The output voltage is very low. Perform the following self-test of the Energiser:
1. Switch OFF the Energiser.
2. Disconnect both cables from the terminals.

10
3. Switch ON the Energiser. If the Energiser now displays a GREEN FENCE LED, you have
a normal output. This result implies you have excessive power loss somewhere on
the fence wires. If the Energiser doesn’t pass this self-test, then call Sureguard for
advice.
FENCE LED is OFF:
The Energiser has entered a low power Stand-by mode. Read above “POWER LED is OFF”.
Maintenance
1. Regularly check and clean the solar panel for dust and bird droppings.
2. Every three months, use a damp cloth with a little soap to clean the external rubber
corners. This stops mould taking hold and damaging the case.
Comprehensive Troubleshooting Guide:
Please visit Sureguard’s troubleshooting webpage for more help with fence and animal
control issues.: www.sureguard.com.au/page/troubleshooting
Full Terms and Conditions at www.sureguard.com.au/terms
Other manuals for Pingg-String
1
Table of contents
Other Sureguard Pet Care Product manuals


