Sureshotgps Micro 300X User manual
1
300x user manual.indd 1 21/09/2012 4:23:36 PM

2
is manual is version 1.0 and the most up to date version
at the time of printing. For any updates please visit our
website www.sureshotgps.com
300x user manual.indd 2 21/09/2012 4:23:36 PM

3
Quick Start Guide to the SureshotgpsTM Micro 300X
Thank you for purchasing the Sureshotpgs Micro 300X. For
your convenience the 300X is preloaded with maps and ready
for immediate use. It is highly recommended that you register
the device for warranty purposes and software upgrades.
What’s included:
■ Micro300X
■ Quick start guide
■ Mini USB cable
■ AC/DC adaptor
300x user manual.indd 3 21/09/2012 4:23:36 PM

4
Tabe of Contents
Front page 1
Manual version 1.0 2
Quick Start Guide to the SureshotgpsTM Micro 300X 3
Getting to know your Sureshotgps TM 6
1.0 Prior to use 7
1.1 Charging 7
1.2 Registering 7
2.0 Ready to Play 8
3.0 Main Menu 9
3.1 Automatic Course Recognition 10
4.0 Hole Selection
4.1 Automatic hole advance (AHA) 11
4.2 Selecting your start hole 11
4.3 Play Golf (Green View) 11
5.0 Page information 12
5.1 Scorecard 12
5.2 Editing Par and Score 12
5.3 Shot Distance 13
5.4 Edit Course 14
6.0 Settings Menu 15
6.1 Metre/Yard Option 15
6.2 ResetRound Time 16
6.3 Backlight Value 16
6.4 Auto Shuto 17
6.5 Auto Hole Advance 17
6.6 Set Time Zone 18
6.7 Set Time Format 18
6.8 Odometer 19
6.9 Device Info 19
7.0 Sureanalysis Soware 21
7.1 System Requirements 21
8.0 FAQ’s 22
9.0 Limited Warranty 23-25
10.0 Declaration of Conformity 26
11.0 Soware Licensing 27
300x user manual.indd 4 21/09/2012 4:23:36 PM

5
Tabe of Contents
Front page 1
Manual version 1.0 2
Quick Start Guide to the SureshotgpsTM Micro 300X 3
Getting to know your Sureshotgps TM 6
1.0 Prior to use 7
1.1 Charging 7
1.2 Registering 7
2.0 Ready to Play 8
3.0 Main Menu 9
3.1 Automatic Course Recognition 10
4.0 Hole Selection
4.1 Automatic hole advance (AHA) 11
4.2 Selecting your start hole 11
4.3 Play Golf (Green View) 11
5.0 Page information 12
5.1 Scorecard 12
5.2 Editing Par and Score 12
5.3 Shot Distance 13
5.4 Edit Course 14
6.0 Settings Menu 15
6.1 Metre/Yard Option 15
6.2 ResetRound Time 16
6.3 Backlight Value 16
6.4 Auto Shuto 17
6.5 Auto Hole Advance 17
6.6 Set Time Zone 18
6.7 Set Time Format 18
6.8 Odometer 19
6.9 Device Info 19
7.0 Sureanalysis Soware 21
7.1 System Requirements 21
8.0 FAQ’s 22
9.0 Limited Warranty 23-25
10.0 Declaration of Conformity 26
11.0 Soware Licensing 27
300x user manual.indd 5 21/09/2012 4:23:36 PM

6
Getting to know your Sureshotgps TM
Menu/Power Key: To power on/o Micro300X and access main menu.
Page Switching Key: To switch between displayed page, set starting
point of shot distance and correct course data.
Navigation 5-way key
1
2
3
Satellite Signal
Hole & Par
Time
Timer
Relative distance between
current position (from
satellite) and putting green
(centre, front and back)
Battery Status
1
2
3
300x user manual.indd 6 21/09/2012 4:23:37 PM
7
1.0 Prior to use
1.1 Charging
It is important that the battery has been charged before use.
Using the USB cord provided, plug the USB connection
into the charging port on the back of the unit [under rubber
cover]. Now plug the other end into the wall adaptor. You can
now plug the wall adaptor into a power outlet to begin charg-
ing. Full charging will take at least 4 hours.
1.2 Registering
It is recommended that you register your Micro 300X for
warranty purposes. Follow the easy instructions at
www.sureshotgps.com/register.Upgrades to soware will
only be possible if you have registered.
300x user manual.indd 7 21/09/2012 4:23:37 PM

8
2.0 Ready to Play
Your Micro 300Xcomes preloaded with Australian & New
Zealand Golf Courses. To make it easy to nd courses, the
unit will automatically display the ve closest golf courses
to your location. You can then select the course you want to
play. NOTE: this feature only works once you arrive at the
golf course and has GPS reception.
300x user manual.indd 8 21/09/2012 4:23:37 PM
9
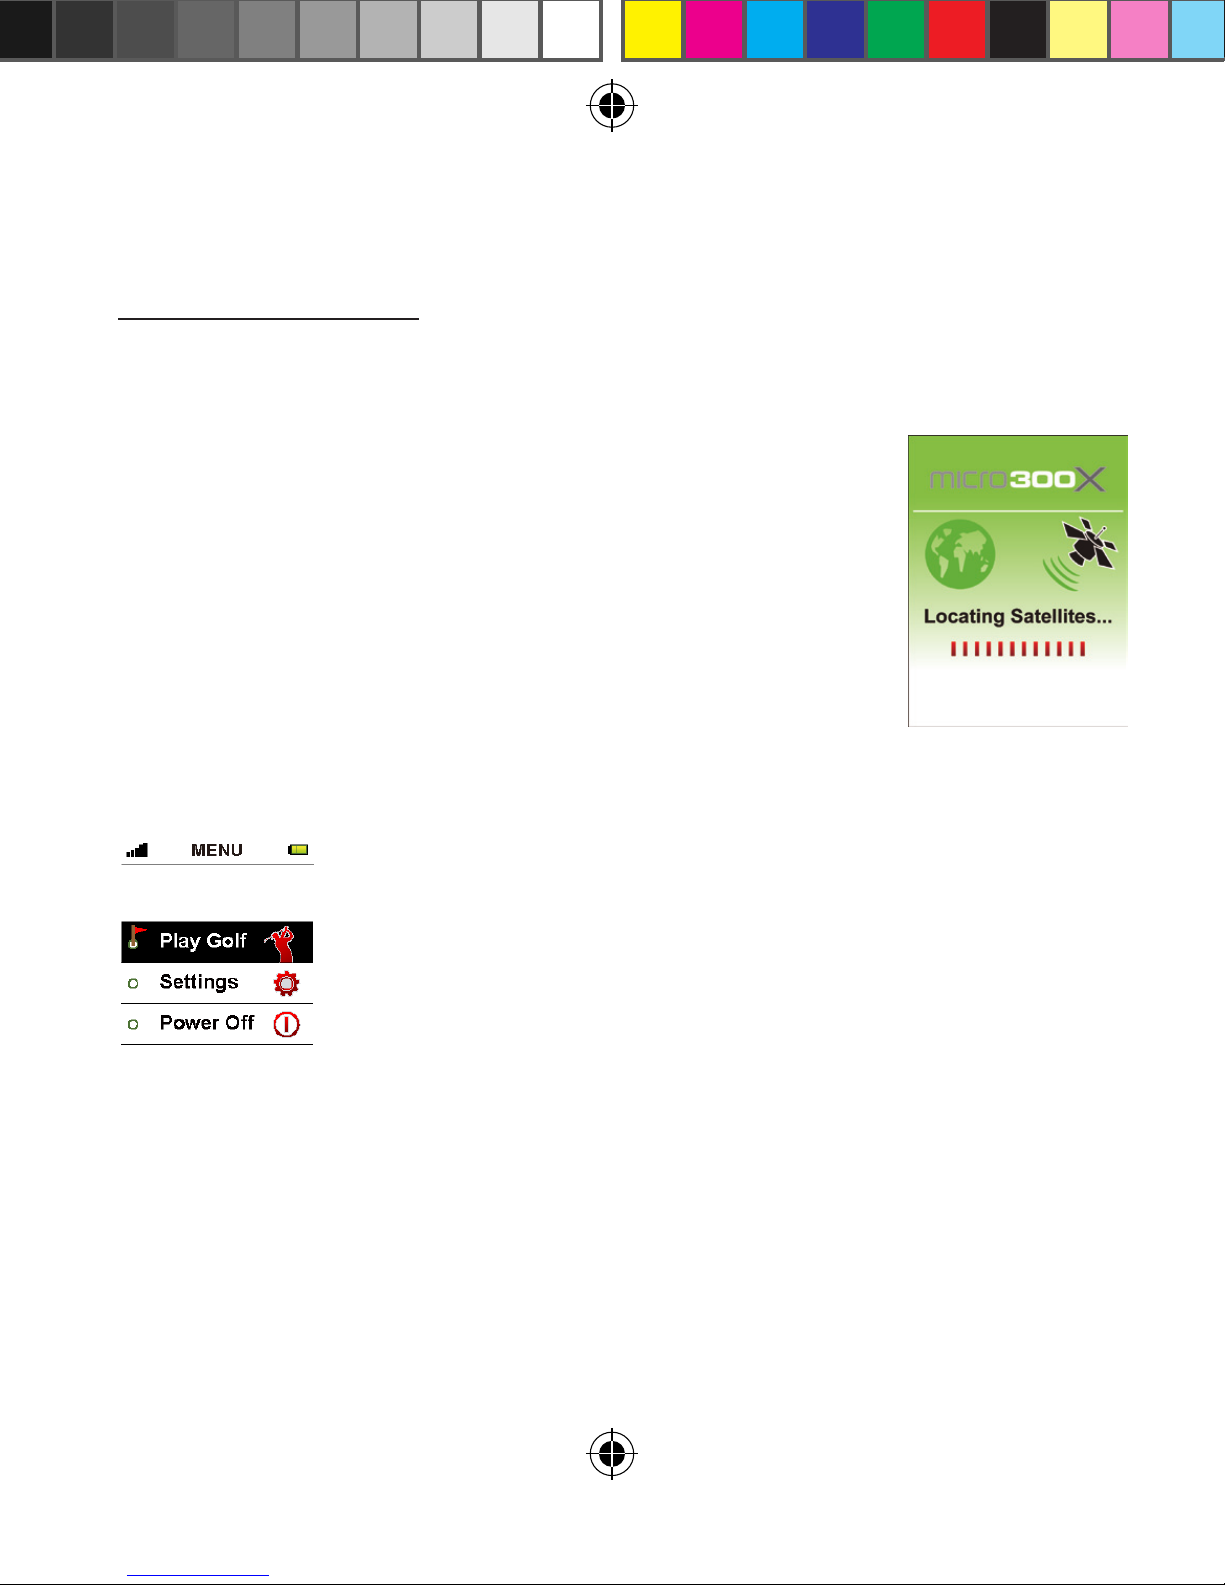
3.0 Main Menu
Hold the Menu button down for 3 seconds until the
unit is turned on.
e GPS will begin searching for satellites as shown
in the picture. To skip this and go straight to the main
menu press the Menu button.
In the main menu you will see 3 options:
<Play Golf>, <Settings> and <Power o>, use the
5-way key to move from one option to another. To
enter push down on the Middle of the 5-way key.
300x user manual.indd 9 21/09/2012 4:23:37 PM
10
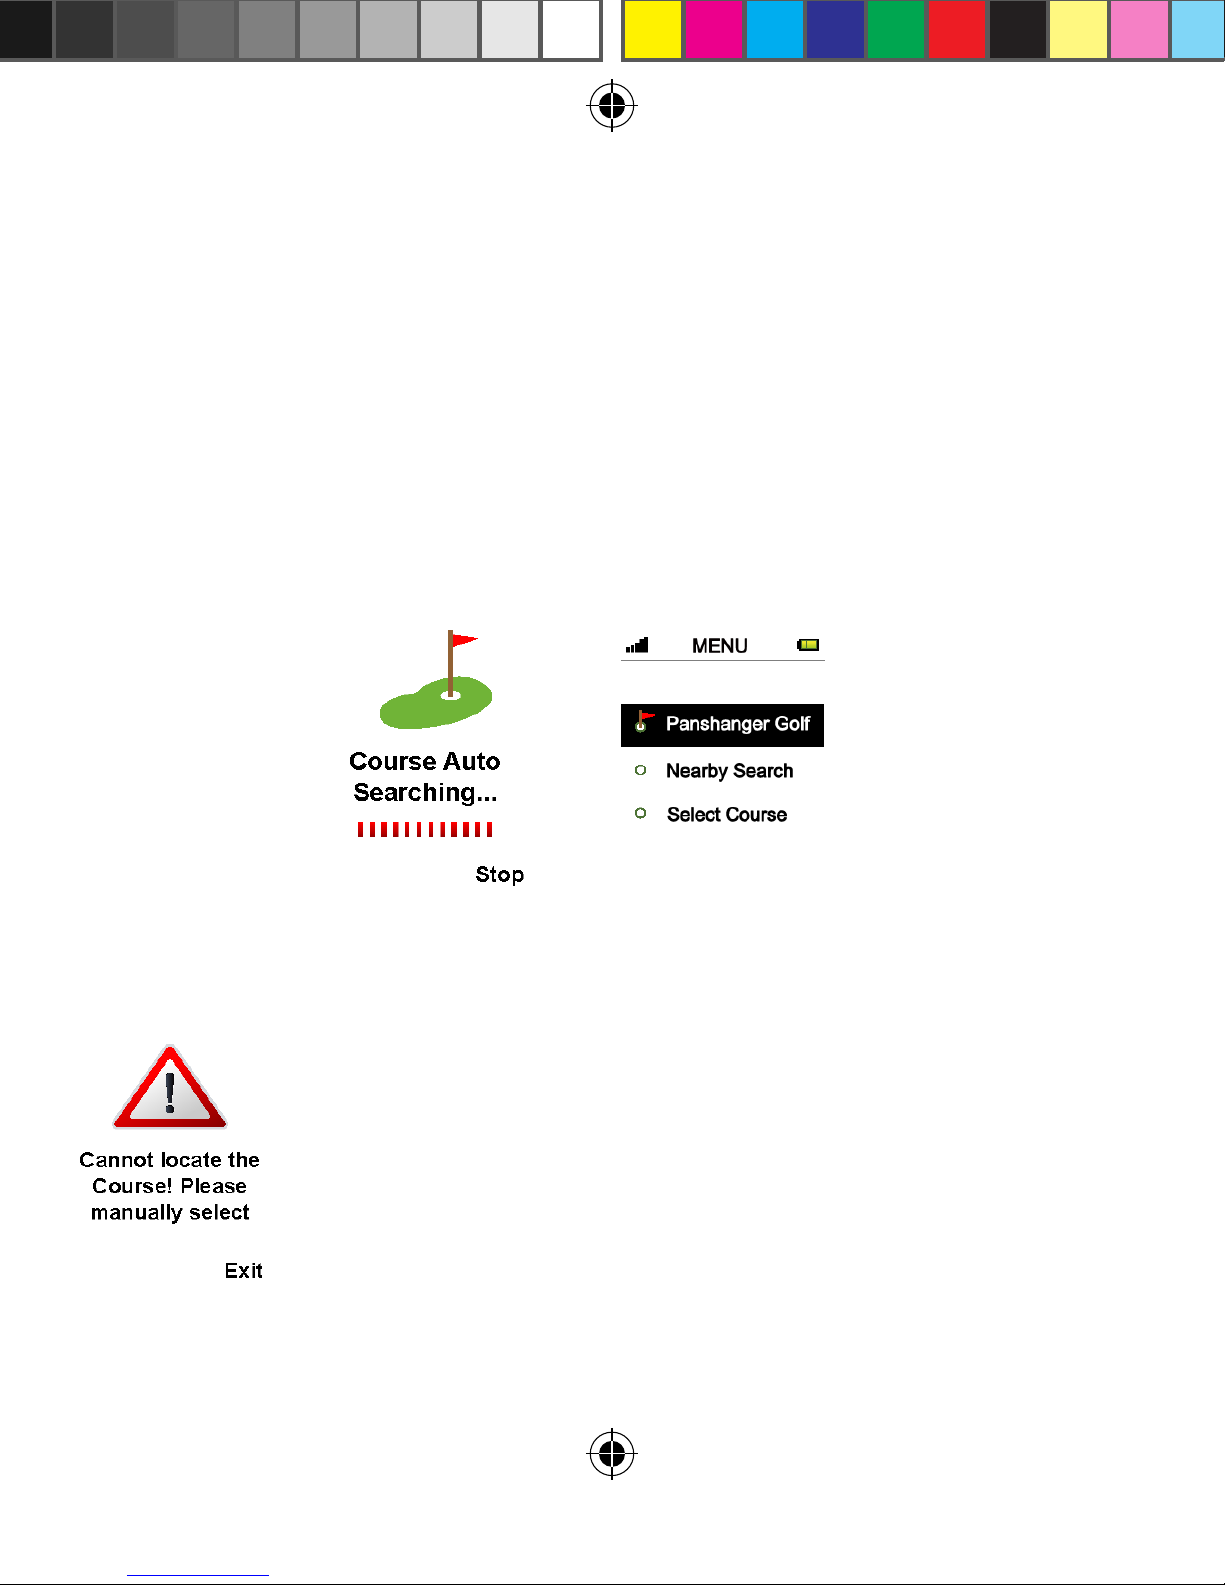
3.1 Automatic Course Recognition
For best GPS reception always ensure you are in an open area.
When you are at the course select Play Golf.
The Micro 300X’s Auto Course Recognition will highlight the
closest 5 courses to you. You can choose from the courses displayed,
or < Select Course > to choose your own course from the course list.
If there are no courses located, the device willl show
the error message shown on the left. Please press the
Middle of the 5-way key to get into the courses list
where you will be able manually select a course you
are interested in. After you select a course, you willl
automatically move to the Play Golf page.
300x user manual.indd 10 21/09/2012 4:23:37 PM
11
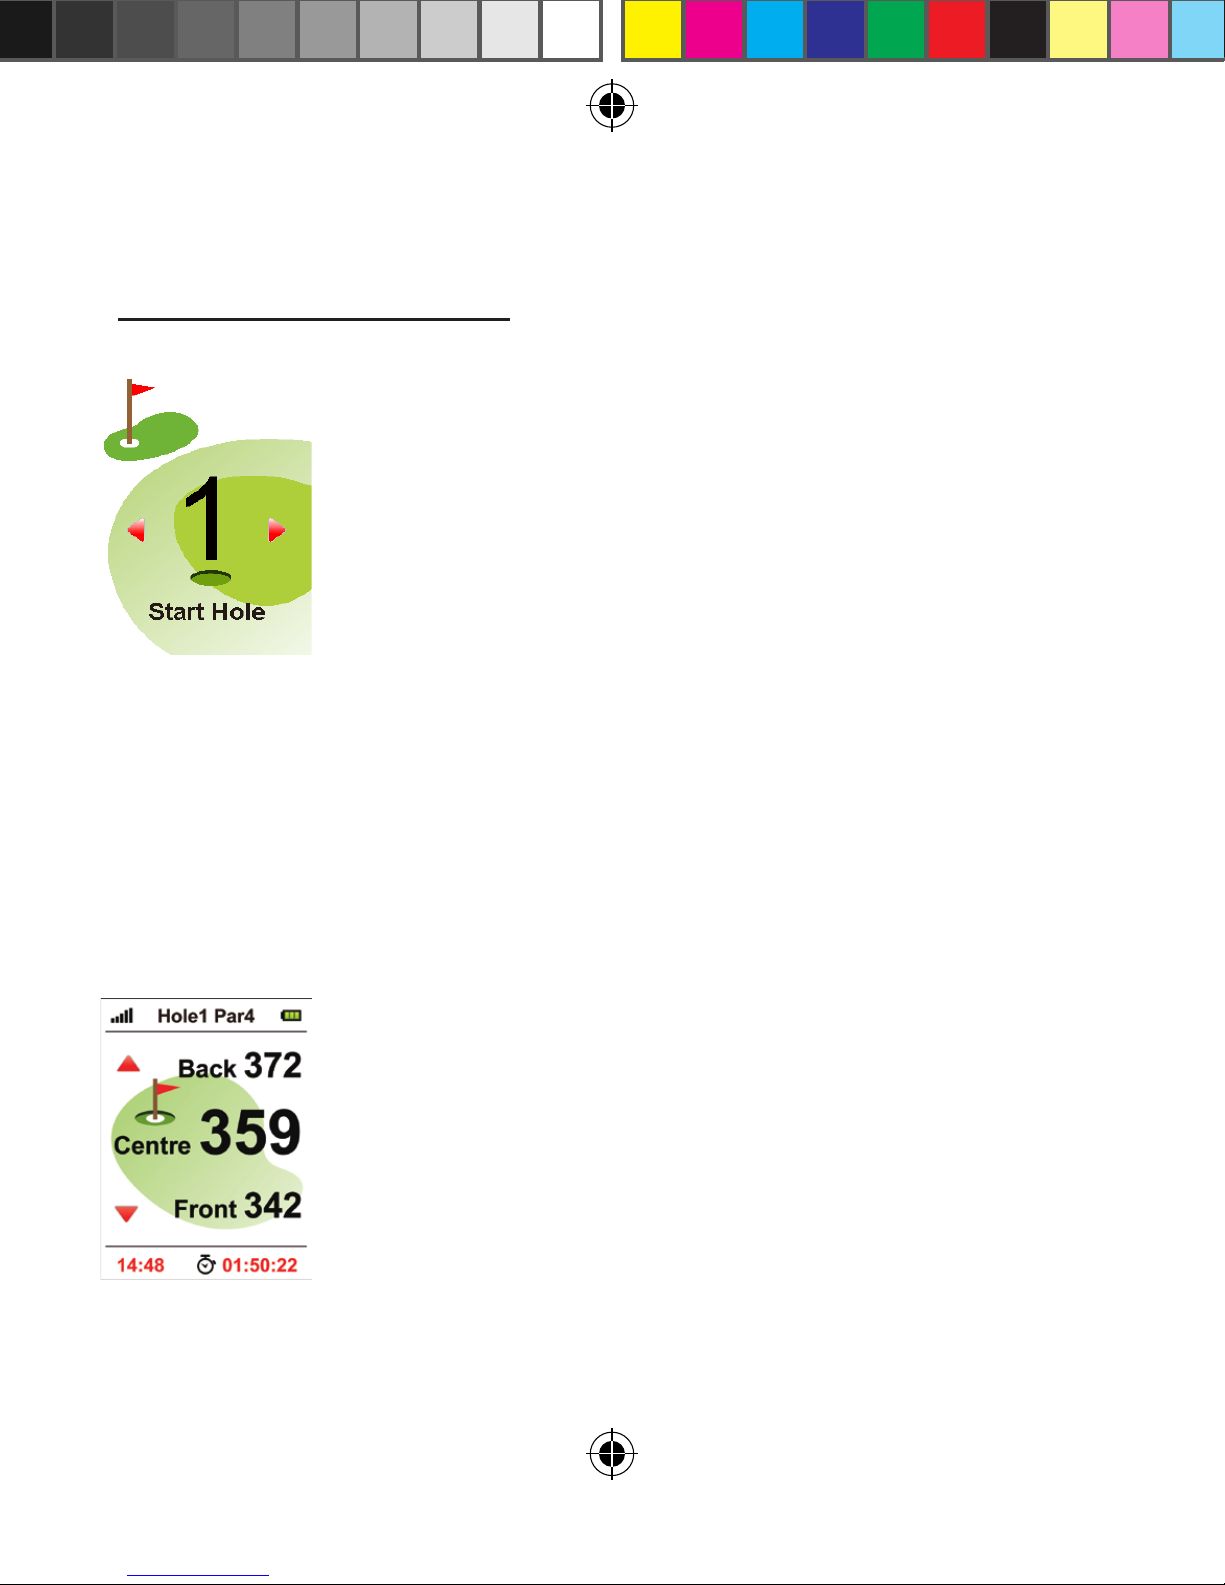
4.0 Hole Selection
4.2 Manually selecting your start hole
Please choose the hole that you would like to start at. You
can do this by pressing Right/Le on the 5-way key. Press
the Middle key to see information about the hole.
4.3 Play Golf (Green View)
is display willl show you the relative distances between
you and the Front, Centre and Back side of the putting
green. Press Up/Down on the 5-way key to switch holes.
4.1 Automatic hole advance (AHA)
is feature allows you to move around the golf course
without having to change the hole you are viewing. It
can be turned on or o. e AHA requires the unit to go
within 29m of the centre of the gree and then move away
31m from the centre of the green- the Micro 300X will
then advance to the next hole. You can manually select a
hole by turning o this feature o in the Auto Hole
Advance option in settings.
300x user manual.indd 11 21/09/2012 4:23:38 PM

12
5.0 Page Information
In Play Golf, press right of the 5 way key to access Scorecard at
any time throughout the round.
5.1 Scorecard
Scorecards provide relevant information to
the fairway. It will display hole number, par
and scores. e Micro 300X automatically
calculates total value and the dierences
between par and your score. Press Le on
the 5 way key to go back to Play Golf.
5.2 Editing Par and Score
Press the Middle of the 5-way key to edit Par and
Score. Use Up/Down key to switch between the two
and the Right/Le key to edit the score.
Once you have entered your par and score press the
middle key again to return to Scorecard. To return
to Play Golf press Le of the 5 way key.
Press Up/ Middle key to hold the distance calculation for <End>.
To start a new measurement, press Up/ Middle key to release from
<HOLD> and press Page to reset for a new start point. You can use the
pointer of swing distance function to make an easy measurement on the
distance between any two points on the course.
300x user manual.indd 12 21/09/2012 4:23:38 PM

13
5.3 Shot distance
In Play Golf press right twice on the 5 way key to
access the Shot Distance page. The Shot Distance
function can let you measure your shot distance
easily and precisely. When starting your shot,
press the Page key to set your current position,
the value will be reset to 0. While walking to your
ball the screen will display the distance from the
start point to your current position instantly.
Press Up/ Middle key to hold the distance calculation for <End>.
To start a new measurement, press Up/ Middle key to release from
<HOLD> and press Page to reset for a new start point. You can use the
pointer of swing distance function to make an easy measurement on the
distance between any two points on the course.
300x user manual.indd 13 21/09/2012 4:23:38 PM
14
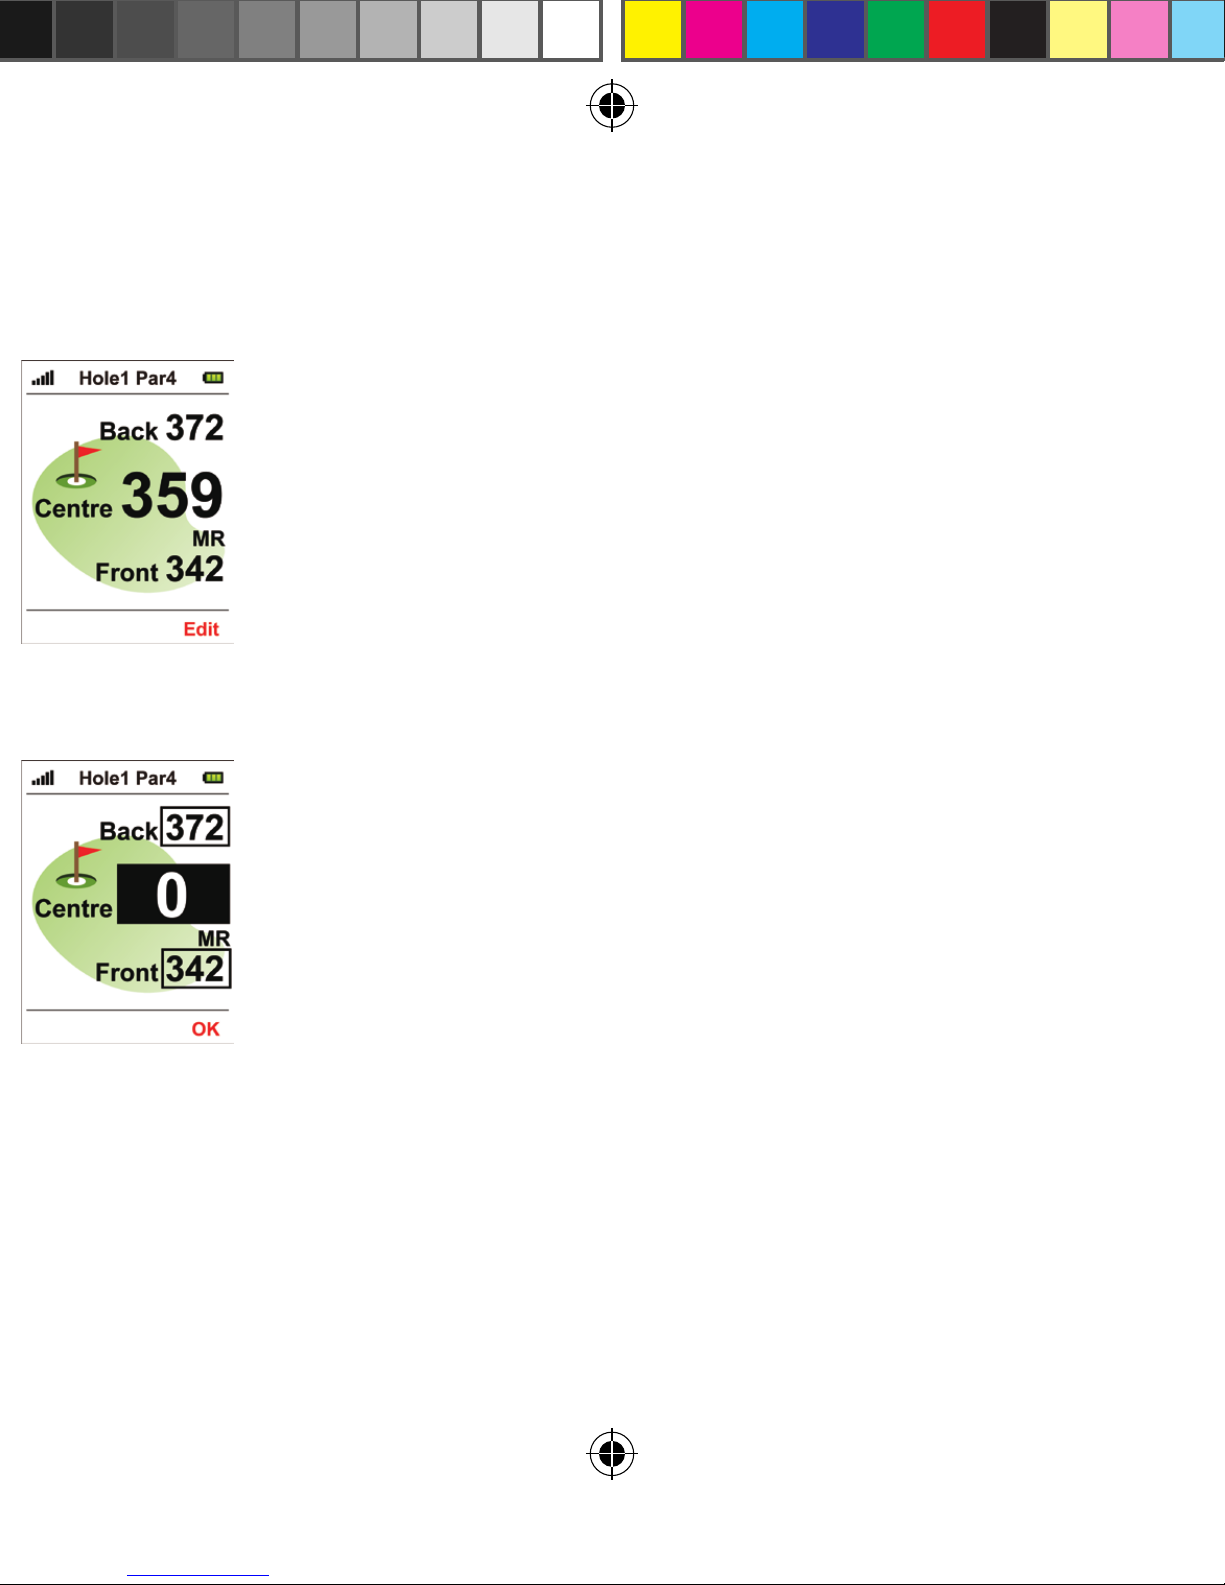
5.4 Edit Course
GPS green location information is determined on the actual course
situation when the information is collected. In the event the green
location has had some changes, you can use this function to edit
it. In the Edit Course page, please press the PAGE key and select
<Edit>, you should see a black mark on the screen. Press the
Up/Down key to switch focus to the location you would like to
calibrate, then press PAGE key to conrm the change.
For example, if you are going to correct the distance of the green
centre on the rst hole, please press the Up/Down key to choose
the rst hole on the Green View page aer you get to the green
center; then press Up/Down key to switch the focus to the green
center column, and press PAGE to reset as <0>, which means the
distance between you and the green center is 0.
You can also use Up/Down key to choose the Front or Back side
of the green to mark corrections continuously aer nishing the
correction on green center distance.
e above method is available when you want to correct the Front,
Center and Back side of putting green of any course. However you
need to move to the Front, Center and Back side of green prior to
corresponding corrections. To return to Play Golf press Right of
the 5 way key.
In Play Golf press le on the 5 way key to access the Edit Course page
300x user manual.indd 14 21/09/2012 4:23:39 PM

15
5.4 Edit Course
GPS green location information is determined on the actual course
situation when the information is collected. In the event the green
location has had some changes, you can use this function to edit
it. In the Edit Course page, please press the PAGE key and select
<Edit>, you should see a black mark on the screen. Press the
Up/Down key to switch focus to the location you would like to
calibrate, then press PAGE key to conrm the change.
For example, if you are going to correct the distance of the green
centre on the rst hole, please press the Up/Down key to choose
the rst hole on the Green View page aer you get to the green
center; then press Up/Down key to switch the focus to the green
center column, and press PAGE to reset as <0>, which means the
distance between you and the green center is 0.
You can also use Up/Down key to choose the Front or Back side
of the green to mark corrections continuously aer nishing the
correction on green center distance.
e above method is available when you want to correct the Front
,
Center and Back side of putting green of any course. However you
need to move to the Front, Center and Back side of green prior to
corresponding corrections. To return to Play Golf press Right of
the 5 way key.
6.0 Settings Menu
From the Main Menu, select
Settings by pressing the Middle
button on your 5-ways key.
6.1 Metre/Yard Option
e distance unit is preset to Metre. If you want
to change it, you can choose <Yard/Metre>
on the settings menu and use the Right/ Le
key to change the unit setting. Press Menu to
return to the Main Menu.
300x user manual.indd 15 21/09/2012 4:23:39 PM

16
6.2 Reset Round Time
e device provides you a simple timer to help you
record the time spent in the Play Golf section aer
locating a satellites. You can reset the timer to zero
at any time by selecting < Reset Round Time > and
pressing the Page key, the timer will then return to
zero. If you want to know present play time during a
play, please go to the Green View page. Press Menu to
return to the Main Menu.
6.3 Backlight
is device provides an <Auto Backlight O> function
to save power. If any key is not touched for a specic time
period the screen will turn to dark automatically. Using
the Right/Le key you can increase or decrease the
backlight duration. ere are several selections to choose
from: 1min, 3min, 10min, 30min and on
(backlight always on). Press Menu to return to the
Main Menu.
300x user manual.indd 16 21/09/2012 4:23:39 PM
17
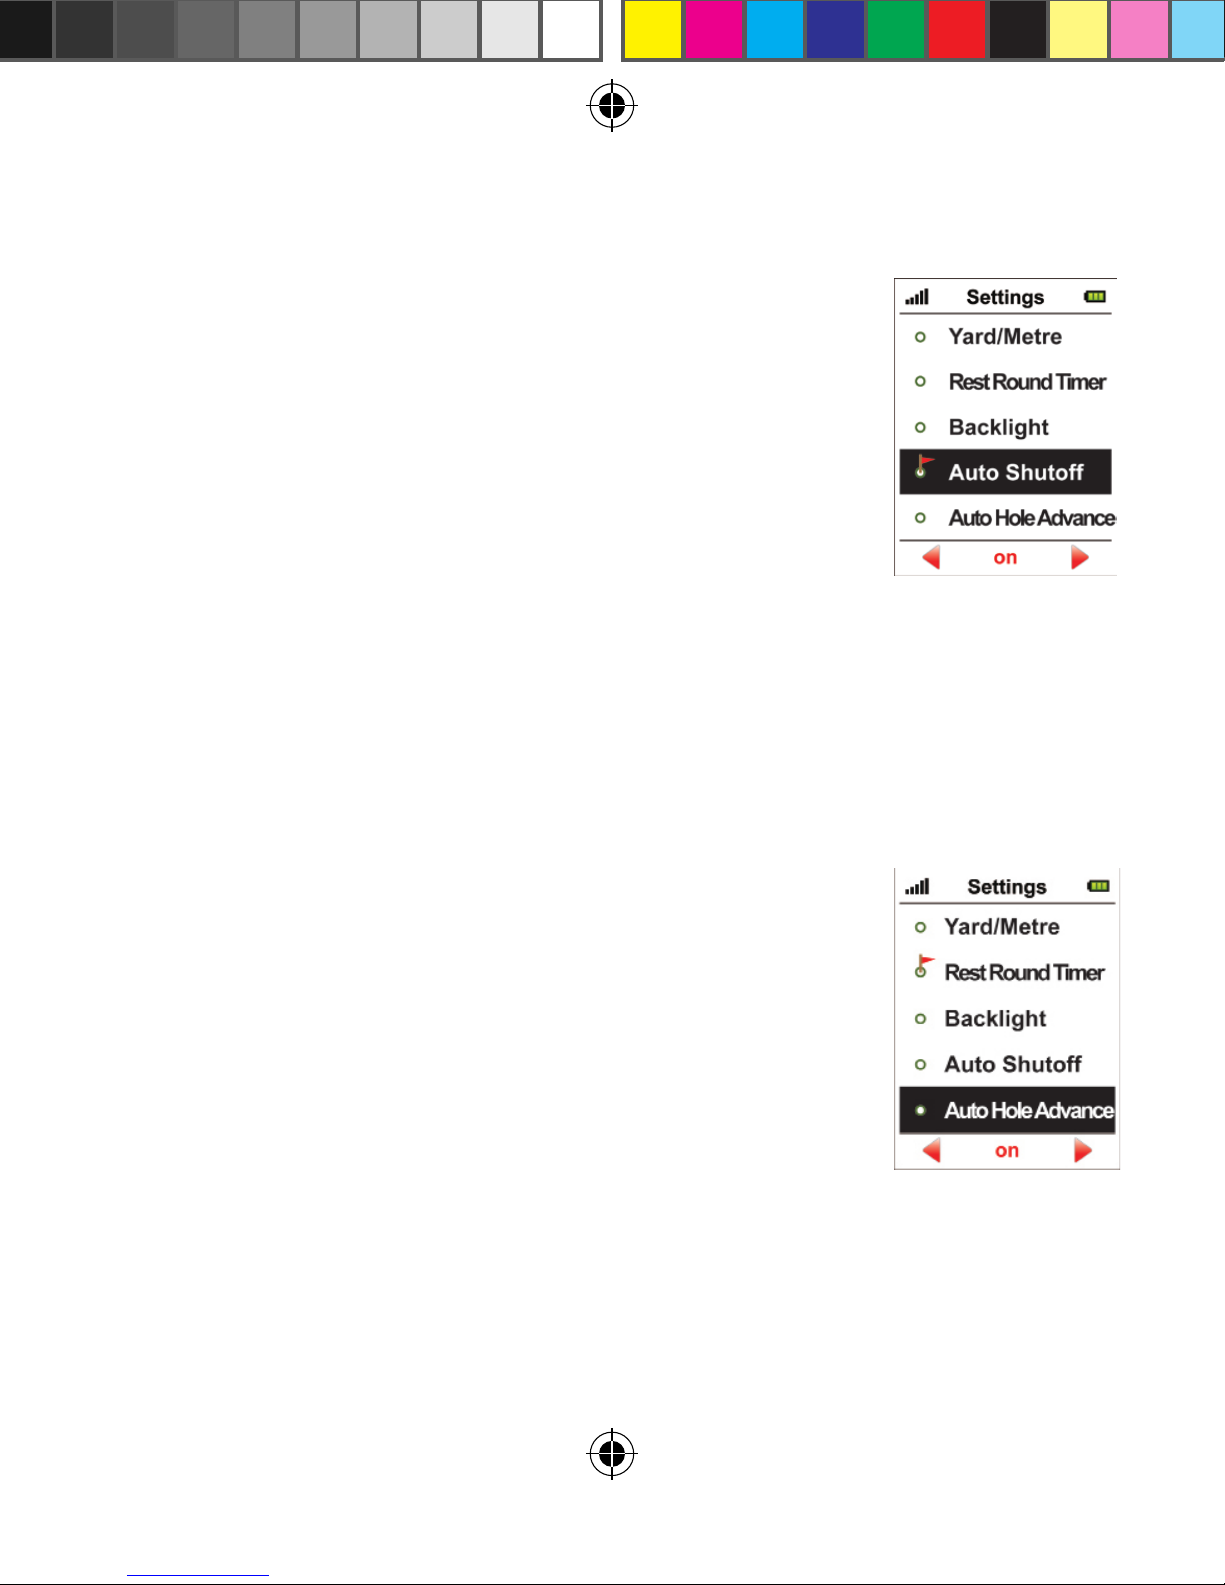
6.4 Auto Shuto
is device provides an <Auto Shuto> function to
save power. If you set the power timeout, the device
will turn o automatically aer the timer if you don’t
touch any key for the set time period.
To set press the Right/Le key to change the settings.
You will have several selections to choose from: On,
30min, 40min, 50min, 60min,70min, 80min, 90min,
100min, 110min ad 120min. Press Menu to return to
the Main Menu.
6.5 Automatic Hole Advance
Once you have nished putting and are walking to
the next hole, the device will automatically advance
on to the next sequent hole as you move around the
course. You can turn on/o this function by pressing
the Right/ Le key in <Auto Hole Avance> under set-
tings. You can then manually select the hole as you are
golng. Press Menu to return to the Main Menu.
300x user manual.indd 17 21/09/2012 4:23:39 PM
18
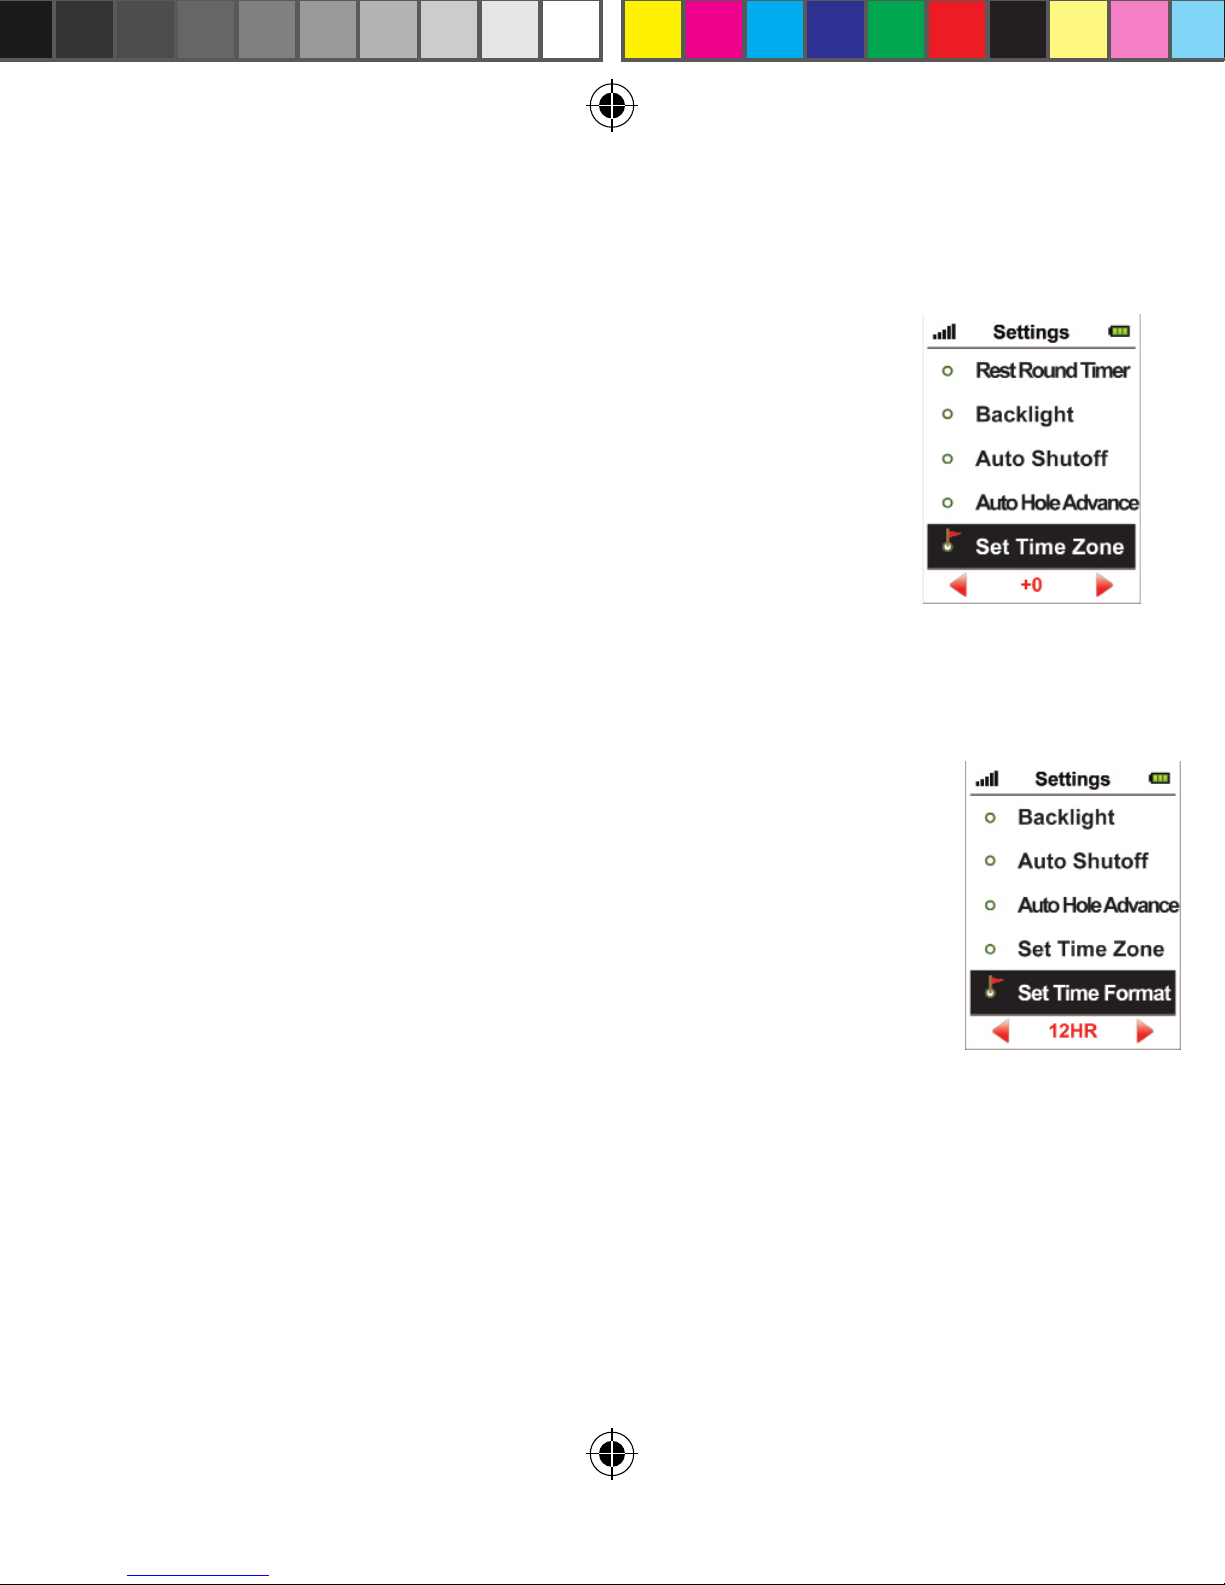
6.6 Set time Zone
e device will set the present time zone automatically
according to relevant data of GPS satellites. You can
adjust the time zone of your location if needed by
entering <Time Set Zone> and using the Right/Le key
to increase or decrease the times. Press Menu to return
to the Main Menu.
6.7 Set Time Format
Directly under <Time Set Zone> you will see the <Set
Time Format>. Change the time format from 12 or 24
hours by using the Right/ Le buttons on the 5-way key.
Press Menu to return to the Main Menu.
300x user manual.indd 18 21/09/2012 4:23:39 PM
19
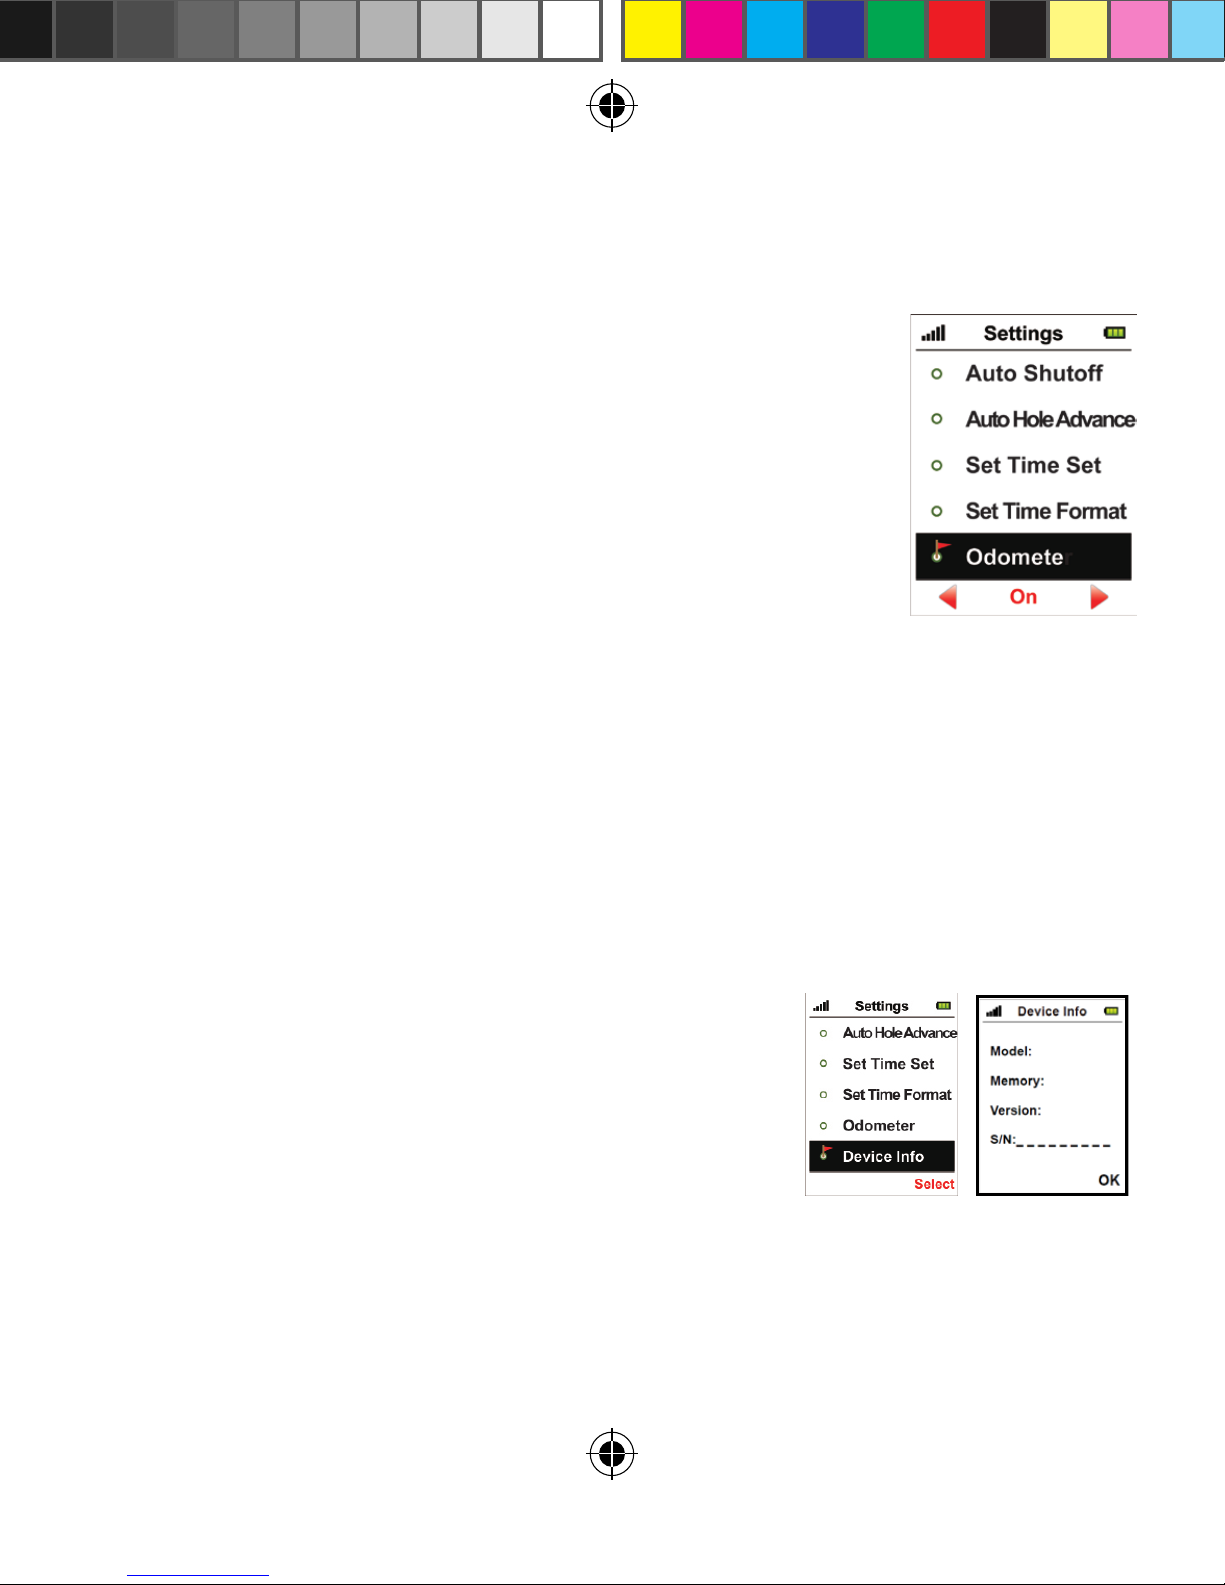
6.9 Device Info
You can check model, soware/ hardware version and product
serial number (S/N) of the Micro 300X by selecting <Device
Info> and then pressing Page. You can go back to the Setting
Menu by pressing Page again.
6.8 Odometer
e device provides an odometer option so you can
track the distance you cover. You can turn this function
on or o by pressing Right/Le on your 5 way key.
300x user manual.indd 19 21/09/2012 4:23:40 PM
20
7.0 Sureanalysis Soware
Sureanalysis (300X soware) allows you to update the course
library on your Micro 300X. Even though the Micro 300X comes
with courses pre-loaded, we are continually updating our course
library by adding new courses and updating existing ones.
Sureanalysis allows you to keep your 300X updated with the
latest course data.
You can also perform rmware upgrades to ensure that your unit
is functioning at its optimal level. Download the Sureanalysis
soware by visiting our website and go to the Download Soware
page. Follow the easy instructions: www.sureshotgps.com/downloads
7.1 System Requirements
Compatible with Windows XP, Vista (32 & 64 bit) and Windows 7.
Micro 300X is currently not compatible with Apple Mac as at
October 2012. Please check our website for any updates of this status.
Otherwise please use one of the above systems.
300x user manual.indd 20 21/09/2012 4:23:40 PM
Table of contents
Other Sureshotgps GPS manuals

Sureshotgps
Sureshotgps SS9000X User manual

Sureshotgps
Sureshotgps Hero 750x User manual

Sureshotgps
Sureshotgps 8850 User manual

Sureshotgps
Sureshotgps Micro v2 User manual

Sureshotgps
Sureshotgps 200x User manual

Sureshotgps
Sureshotgps 8800 User manual

Sureshotgps
Sureshotgps SS9000X V2.0 User manual

Sureshotgps
Sureshotgps Micro 700X User manual

Sureshotgps
Sureshotgps Micro User manual

Sureshotgps
Sureshotgps HERO 150X User manual


