PARASOL Zenith a
6Swegon reserves the right to alter specications 20180813
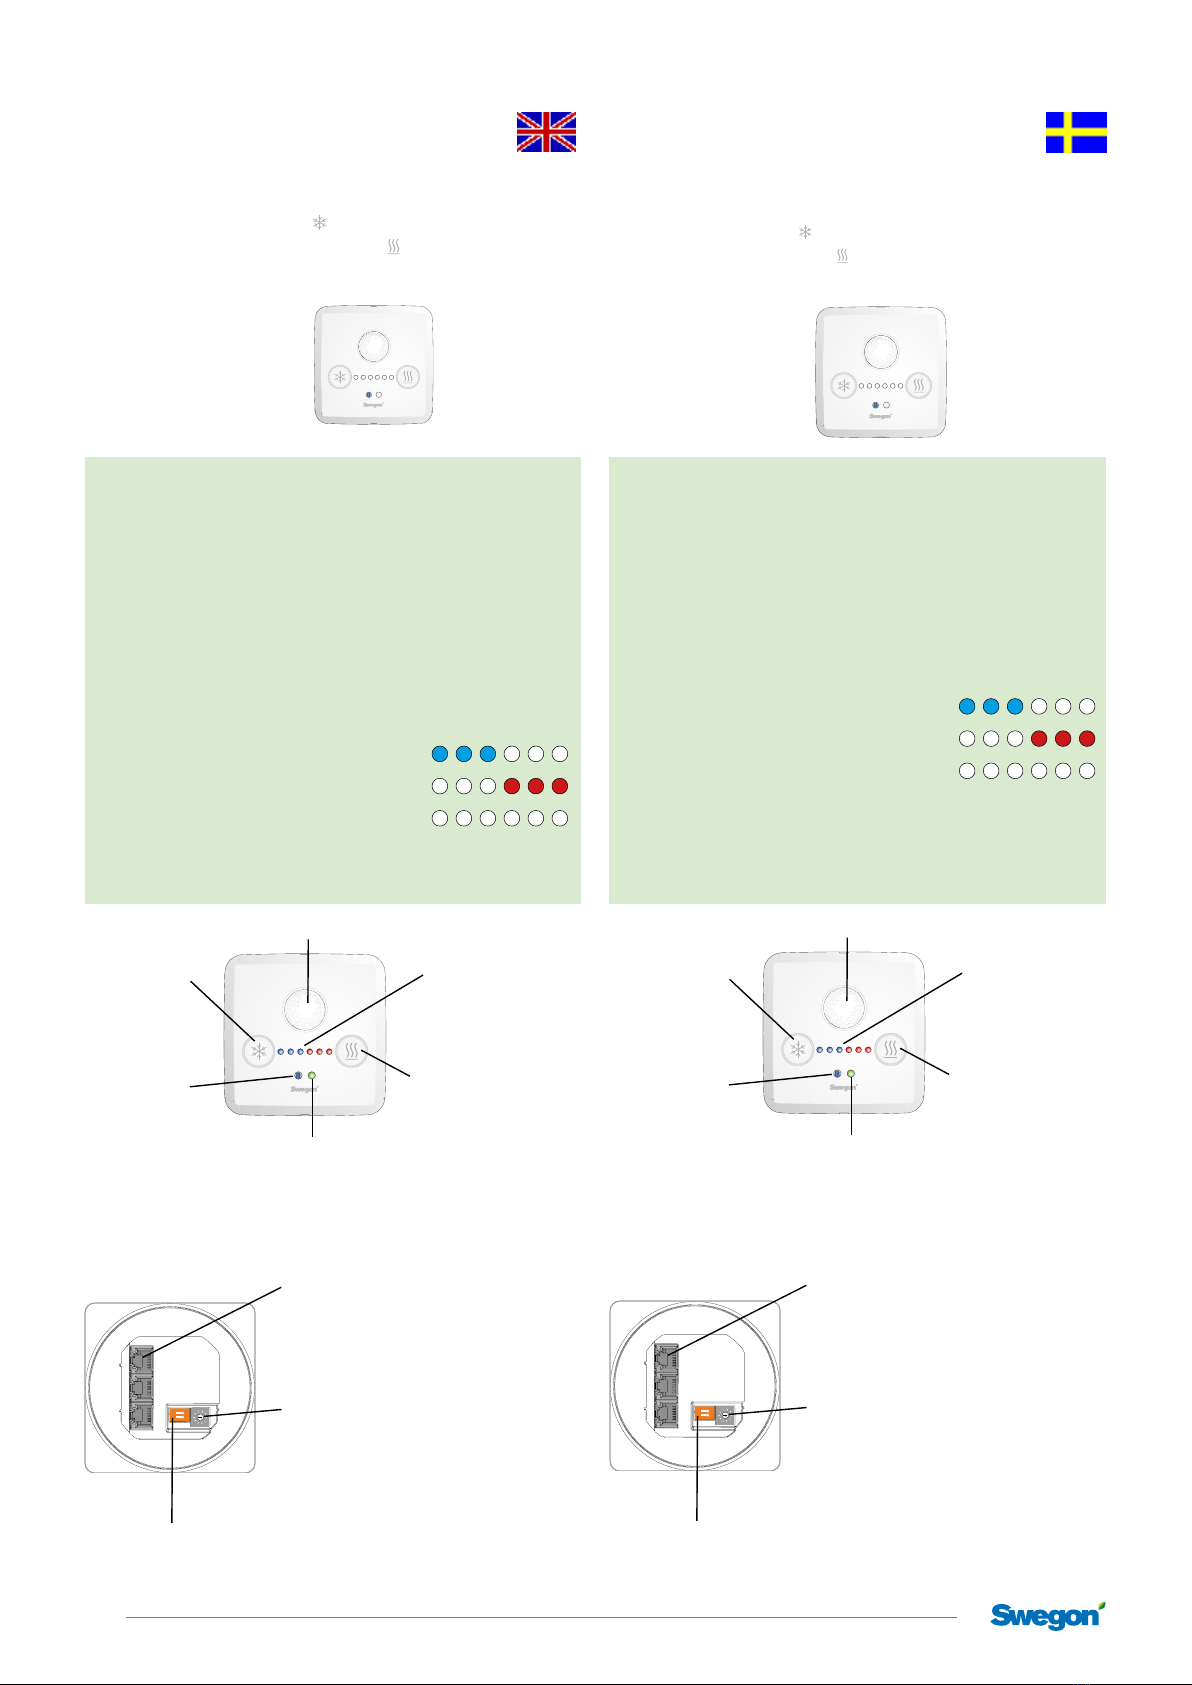
Menu:
To reach the menu, hold the left-hand and right-hand
buttons down for five seconds.
With the left-hand button ( ) you advance through the
menus. With the right-hand button ( ) you confirm your
selection.
Press the left-hand
button and select:
1. Alarm list
2. Commissioning air
3. Commissioning water
6. Return to menu
Press the right-
hand button to
confirm your
selection
ON
1 2
3 parallel RJ12 ports (Modbus) for
connecting a controller, another
sensor module or a computer, for
example, by means of a Cable
converter USB-RJ12
Switch/Termination resistance. Switch 1 should
be ”on” for the last sensormodule in the loop.
Dial for addressing the appro-
priate sensor module if several are
used in the same loop.
10 senormodules can be connec-
ted to the same master, and each
and one of them need an unique
address.
1. Alarm list: See the complete alarm list to the right.
In the commissioning menus:
• Navigate between the menus by pressing the left-hand
button
• Confirm selections by pressing the right-hand button
• When a selection has been confirmed, the blue LED
will flash for about 60 seconds.
• In order to return to normal operation, select "no
adjustment"
3. Commissioning, Water:
3.1. Open the chilled water valve
3.2. Open heated water valve
3.3. No adjustment
6. Return to menu
2, 4 and 5 are not used
Presence detector
Diodes for
temperature,
commissioning or
alarm indication
Function button
Diode-indicating function
- Green = Ok
- Flashing Green = Condensation alarm
- Yellow = Alarm
- Green/Yellow=Comfort alarm, (not acute)
Temperature
sensor
Function button
Meny sensormodul:
Genom att hålla ned vänstra och högra knappen i fem
sekunder når man menyn.
Med vänster knapp ( )stegar man sig igenom meny-
erna. Med höger knapp ( ) bekräftar man sitt val.
Tryck vänster knapp
och välj:
1. Alarmlista
2. Injustering luft
3. Injustering vatten
6. Återgå till meny
Bekräfta val med
högerknappen
1. Alarmlista:
Se komplett alarmlista till höger.
I injusteringsmenyerna:
• Stega mellan menyer med vänster knapp
• Bekräfta val med höger knapp
• När ett val bekräftats blinkar blå diod i ca 60 s.
• För att återgå till normaldrift, välj "ingen injustering"
3. Injustering vatten:
3.1. Öppna kylventil
3.2. Öppna värmeventil
3.3. Ingen injustering
6. Återgå till meny
2, 4 och 5 används ej
Närvarogivare
Dioder för
temperatur,
injustering eller
larmindikering
Funktionsknapp
Diod indikerande funktion
- Grön = Ok
- Blinkande Grön = kondenslarm
- Gul = Larm
- Grön/Gul = Komfortlarm (ej akut)
Tempera-
turgivare
Funktionsknapp
ON
1 2
3 parallella RJ12 portar (modbus)
för anslutning av tex regulator, yt-
terligare sensormodul eller dator
med hjälp av Cable converter
USB-RJ12
Switch för termineringsmotstånd. Switch 1 sätts
till on på sista sensormodulen i slingan.
Adressering av sensormodul.
Till varje masterenhet kan 10 st
sensormoduler vara kopplade, var
och en måste ha sin unika adress
för att fungera.