SwiftColor SCC-2000D Assembly instructions

SCC-2000D
Basic Operation Guide
Please read this guide before operating this product.
After nish reading this guide, store it in a safe place for future reference.

About Instruction Manuals
The following manuals come with this product. Use them depending on the situation where you use this product.
⨋Setup Guide
• This manual describes the procedures for installing and making preparations for using this product.
• Read this manual rst.
⨋Basic Operation Guide (This Manual)
• This manual describes precautions for using this product safely.
Be sure to read this manual before using this product.
•
This manual also describes basic functions and operations of this product.
Also read this manual when you want to know the troubleshooting procedure in addition to the
basic procedures for printing and changing paper.
⨋User’s Guide
• This manual is available in PDF format and provides a detailed description of how to operate this
product. *1
- Basic Operations
- Printing
- Maintenance
- Troubleshooting
- Appendix (About Moving the Printer, About Setting the Network Utility, etc.)
- Specications
• The User’s Guide is stored on the supplied “Printer Software CD-ROM.”
*1 Adobe Reader is required to read the User’s Guide.
If Adobe Reader is not installed in your computer, download it from the website of Adobe Systems Inc.
and install it in your computer.

i
Table of Contents
Before You Begin ........................................... 1
Conventions .............................................................. 1
Sample Screens ....................................................... 1
Trademarks ................................................................. 2
Abbreviations ........................................................... 2
Request to the Customer .................................. 2
Legal Notice .............................................................. 2
Important Safety Instructions ..... 4
Names and Functions of Components
...11
External View ..........................................................11
Internal View ...........................................................12
Transport Unit ........................................................13
Operation Panel ....................................................14
Turning on/o Printer ..............................16
Turning on the Printer .......................................16
Turning o the Printer .......................................17
Setting Paper .................................................18
How to Print ...................................................28
Making Prints ..........................................................28
Cancelling Printing..............................................34
Checking the Printer Status .................35
Troubleshooting ..........................................36
Status Lamp Lights up Orange ...................36
Status Lamp Is Flashing Orange .................38
Power Does not Turn on ..................................39
Printing Does not Start/Complete ............39
Paper Does not Feed Properly .....................42
Improving the Print Quality ...........................43
Paper Is Jammed ..................................................47
Specications ................................................52

1
Before You Begin
Thank you for purchasing the Swiftcolor SCC-2000D.
Please read this guide before you use the printer so you can fully understand the printer features and learn how to
use the printer most eciently. This guide provides all the information you need to use this printer.
Conventions
WARNING
Indicates a warning concerning operations that may lead to death or injury to persons if not performed correctly.
To use the machine safely, always pay attention to these warnings.
CAUTION
Indicates a caution concerning operations that may lead to injury to persons if not performed correctly. To use the
machine safely, always pay attention to these cautions.
IMPORTANT
Indicates operational requirements and restrictions. Be sure to read these items carefully to operate the machine
correctly, and avoid damage to the machine or property.
NOTE
Indicates a clarication of an operation, or contains additional explanations for a procedure. Reading these notes
is highly recommended.
Indicates an operation that must not be performed. Read these items carefully, and make sure not to perform the
described operations.
Sample Screens
The sample screens of the printer driver settings in this guide were created with Swiftcolor SCC-2000D in Windows 7.

2
Before You Begin
Trademarks
• Microsoft and Windows are trademarks of Microsoft Corporation in the United States and/or other countries.
• Other brand and product names may be trademarks or registered trademarks of their respective companies.
Abbreviations
Throughout this document the following abbreviations are used in text.
• Microsoft Windows 8 is abbreviated as “Windows 8”
• Microsoft Windows 7 is abbreviated as “Windows 7”
• Microsoft Windows is abbreviated as “Windows”
Request to the Customer
• Copying this guide or any part of this guide without permission is strictly forbidden.
• The specications for this printer as well as the software provided with the printer are subject to change
without prior notice.
• We have done our best to make this guide as complete and accurate as possible, and we ask you to contact the
dealer where you purchased the printer if you nd any omissions or mistakes in this document.
• We can accept no responsibility for loss or damages resulting from the use of this printer or its software; please
accept this before you use the printer.
Legal Notice
■Legal Limitations on the Usage of Your Product and the Use of Images
• It is illegal to reproduce currency, bills, negotiable securities and other documents prohibited by law.
Reproduction of such items may be subject to criminal prosecution.
• It is illegal to reproduce legal certicates, licenses, and certain public and private documents prohibited from
reproduction by law. Reproduction of such items may be subject to criminal prosecution.
• Please note that intellectual property protected by copyright may not be reproduced without the express
permission of the copyright holder except for personal or household use under limited circumstances.

3
Before You Begin
■Product Name
SCC-2000D
■CE
This equipment conforms with the essential EMC requrements of EC Directive. We declare that this product
conforms with the EMC requirements of EC Directive at nominal mains input 230V, 50 Hz although the rated input
of the product is 100 to 240 V, 50/60 Hz. Use of shielded cable is necessary to comply with the technical EMC
requirements of EC Directive.
■FCC (Federal Communications Commission)
FCC Part 15 Compliance
NOTE: This equipment has been tested and found to comply with the limits for a Class B digital device, pursuant
to part 15 of the FCC rules. These limits are designed to provide reasonable protection against interference in a
residential installation. This equipment generates, uses, and can radiate radio frequency energy and, if not installed
and used in accordance with the instruction manual, may cause interference to radio communications.
However, there is no guarantee that interference will not occur in a particular installation. If this equipment does
cause interference to radio or television reception, which can be determined by turning the equipment o and on,
the user is encouraged to try to correct the interference by one or more of the following measures:
• Reorient or relocate the receiving antenna.
• Increase the separation between the equipment and receiver.
• Connect the equipment into an outlet on a circuit dierent from that to which the receiver is connected.
• Consult the dealer or an experienced radio/TV technician for help.
CAUTION: Changes or modications to this equipment not expressly approved by the party responsible for
compliance could void the user’s authority to operate the equipment.

4
Important Safety Instructions
Before using this printer, please read this section (“Important Safety Instructions”) thoroughly. Warnings and
important matters are described here to prevent damages to the user and other persons. Do not attempt to
operate this printer in any way other than those mentioned in the manual.
■Installation
• Make sure that there is sucient space around the printer.
180 mm
860 mm
310 mm
400 mm
WARNING
• Do not place the following objects on the printer:
-Necklaces and other metal objects
-Cups, vases, owerpots, and other containers lled with water or liquids
If such an object is brought into contact with the electrical parts inside the printer, this could cause a re
or electrical shock. If it enters inside of the printer, turn the printer o immediately, disconnect the power
plug from the power outlet and contact the dealer.
• The electrical contacts inside the printer become extremely hot during normal operation. To avoid
causing a re, do not store ammable substances like alcohol, thinner, etc. near the printer.

5
Important Safety Instructions
CAUTION
• Do not install the printer in the following locations:
-A damp or dusty location
-A location exposed to oily smoke or steam; e.g., near a countertop or humidier.
-A location exposed to rain or snow.
-A location exposed to salty wind.
-A location subject to high temperatures
-A location near open ames
• Do not place the printer in an unstable location; e.g., on a wobbling or inclined table, or a location
subject to frequent vibrations. The printer could fall down or fall over, resulting in personal injury.
• Never place the printer where it will be exposed to rapid changes in temperature, such as in direct
sunlight, near an air conditioner, or in a car on a hot day. This could cause a re or damage to the printer.
IMPORTANT
• Use the printer in the following operating environment:
Operating environment: 15 degrees Celsius - 30 degrees Celsius, RH 10% - 80% (with no condensation)
• If the printer is carried into a warm room on a cold day, this could cause condensation inside the printer. If this
happens, allow the printer to sit for at least 1 hour at room temperature to adapt to the ambient temperature
and humidity.
• To ensure normal operation of the printer and avoid possible damage, do not install the printer near large oce
equipment or any other type of electrical device that emits a strong magnetic eld.
■Power Supply
WARNING
• Do not use any power cord and AC adapter other than those supplied with the printer. Do not use the
supplied AC adapter for any other product. This could cause a re or electric shock.
• Do not bring the power cord and AC adapter close to heating appliance. This could melt the cable
sheath and cause a re or electric shock.
• To avoid a re or electrical shock, do not use an extension cord.
• To avoid a re or serious electrical shock, connect the printer power cord to an independent power
outlet that is not shared by other equipment or appliances.

6
Important Safety Instructions
• To avoid causing a re or serious electrical shock, make sure that the power plug is securely and
completely inserted into the power outlet.
• Do not damage, break, or modify the power cord and AC adapter. Do not place a heavy object on, heat,
or pull the AC cord and the AC adapter. This could cause power leakage from the damaged portion,
resulting in a re or electric shock.
• Do not stress the base of power cord such as wrapping it around the AC adapter. This could cause power
leakage from the damaged portion, resulting in a re or electric shock.
• To avoid personal injury from an electrical shock, do not handle the power cord or plug when your hands
are wet.
• To avoid a re or serious electrical shock, do not knot the power cord or wrap it around itself.
• Disconnect the printer power cord during severe electrical storms. Lightning could cause a re or severe
electrical shock or damage to the printer.
CAUTION
• To avoid damaging the power plug, which could cause a short circuit and cause a re or electrical
shock, do not pull on the power cord to unplug the cord from the power supply. Always grip the plug to
remove it from the power supply.
• When disconnecting the AC adapter from the printer, be sure to remove the power plug from the power
outlet rst. If the connection terminal of the AC adapter is brought into contact with any metallic part
when the power plug is still connected to the power outlet, a re or electric shock could result.
• Always keep the area around the power plug free of obstacles so you can unplug it easily. This allows you
to unplug the power cord quickly in an emergency.
• Do not use any power outlet other than the one rated for the printer. This printer is designed to be used
in the region where you purchased. Also, make sure that the power outlet can supply sucient power for
the printer. This could cause a re or serious electrical shock, or damage the printer.
■Handling
WARNING
• There are high voltage points inside the printer. To avoid a re or electrical shock, do not attempt to
disassemble or repair the printer.
• Do not insert any metal objects into the printer. Also, do not let a metallic piece (clip, staple, etc.), or
7
Important Safety Instructions
water and a ammable solvent (alcohol, benzene, thinner, etc.) into the printer. If it is brought into
contact with the electric parts inside the printer, a re or electric shock could result. If such an object
enters inside of the printer, turn the printer o immediately, disconnect the power plug from the power
outlet and contact the dealer.
• When abnormal sound, smoke, excessive heat, or strange odor is detected, turn the printer o
immediately, disconnect the power plug from the power outlet and contact the dealer. Using the printer
continuously could cause a re or electric shock. Do not attempt to repair the printer by yourself. This
could cause a re or serious electrical shock.
• Do not use a ammable spray near the printer. If the sprayed gas is brought into contact with the electric
parts inside the printer, a re or electric shock could result.
CAUTION
• If the printer is dropped and damaged, turn the printer o immediately, disconnect the power plug from
the power outlet, and contact the dealer. If you continue to use the printer, this could cause a re or
serious electrical shock.
• If the printer will not be used for a long period, for your safety disconnect the power cord from the power
outlet.
• Do not place a heavy object on the printer. It could fall down or fall over, resulting in personal injury.
• Keep the power cord, cables, gears, belts, rollers, and electric parts inside the printer out of the reach of
children. Otherwise, a personal injury or printer failure could result.
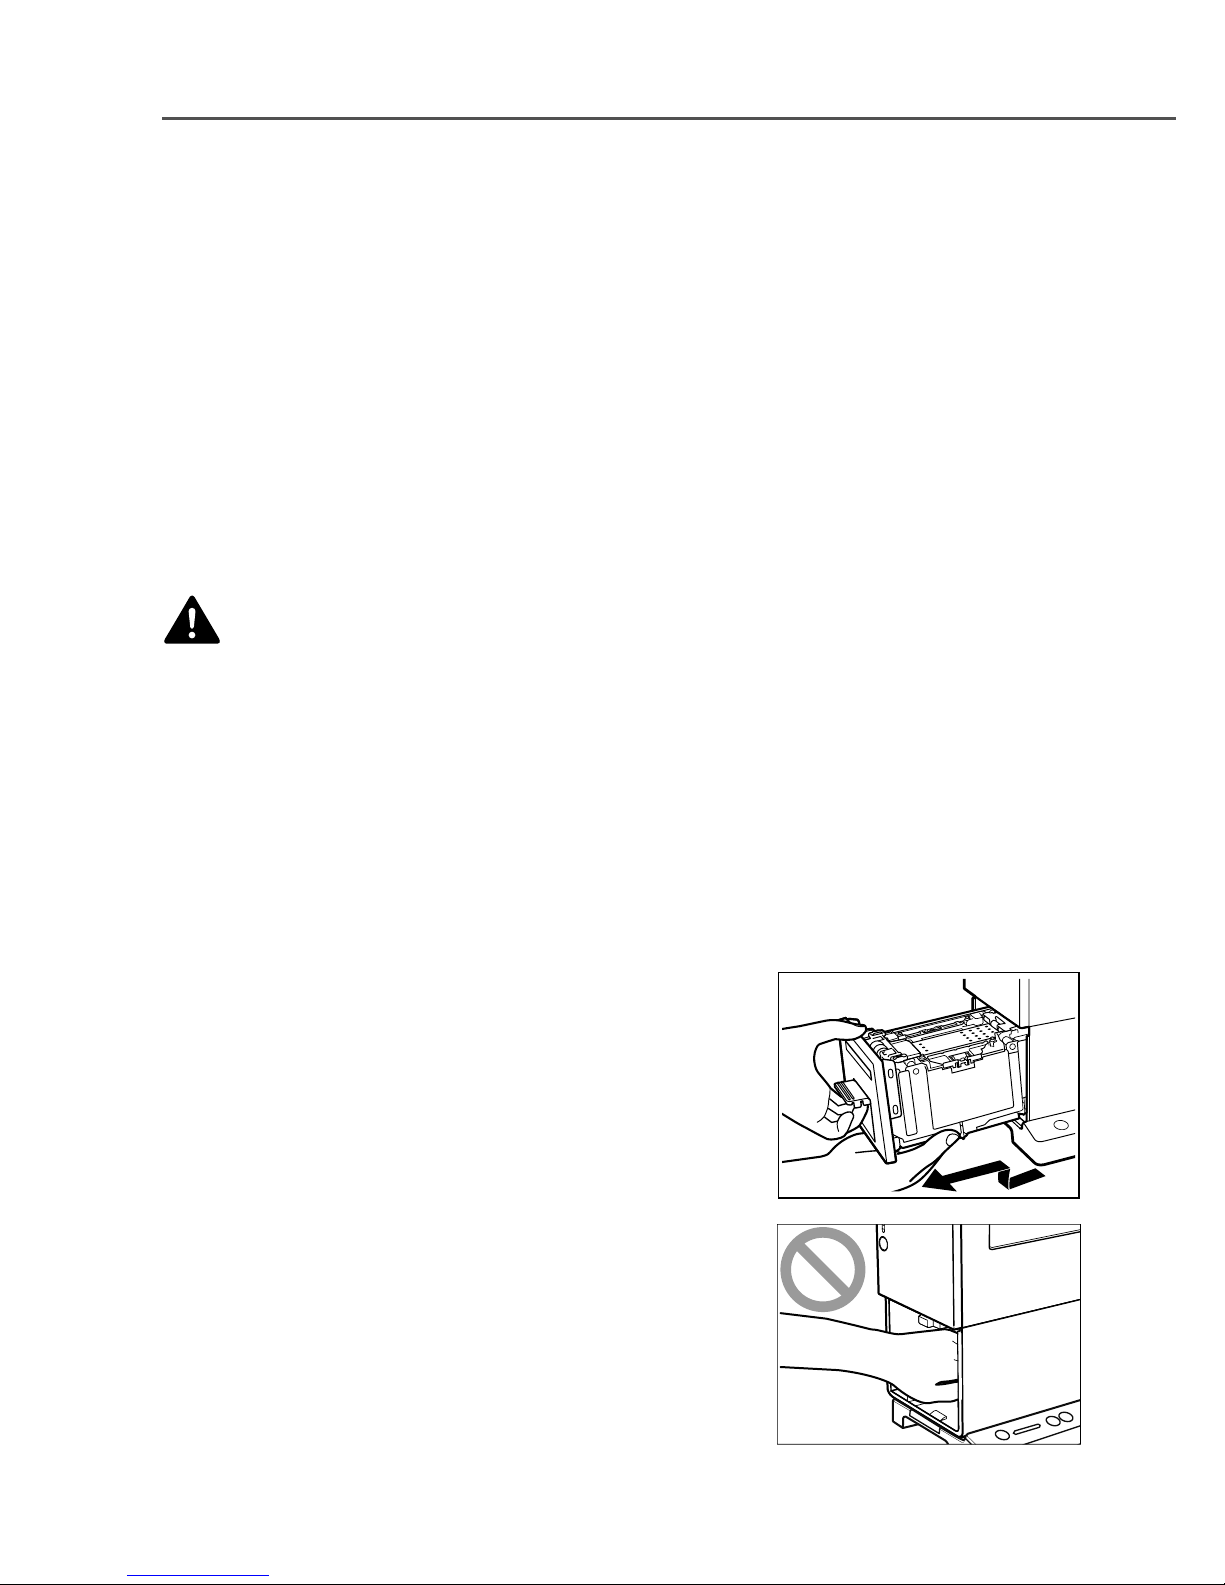
• When pulling the transport unit out of the printer, hold it rmly
with both hands so that it does not fall.
• Do not put your hands into inside of the printer. Failures or
physical injury could result. Further, your hands or clothing may
get dirty with ink adhered inside of the printer.
Other manuals for SCC-2000D
2
Table of contents
Other SwiftColor Printer manuals

SwiftColor
SwiftColor SCC-4000D Reference guide

SwiftColor
SwiftColor SCC-2000D User manual

SwiftColor
SwiftColor SCL-2000P User manual

SwiftColor
SwiftColor SCL-4000D Guide

SwiftColor
SwiftColor SCL-8000P User manual

SwiftColor
SwiftColor SCC-4000D Guide

SwiftColor
SwiftColor SCL-4000D User manual

SwiftColor
SwiftColor SCC-2000D User manual


