SwiftColor SCC-2000D User manual

Read this guide rst.
Please read this guide before operating this product.
After nish reading this guide, store it in a safe place for future reference.
SCC-2000D
Setup Guide

■
■Conventions
WARNING
Indicates■a■warning■concerning■operations■that■may■lead■to■death■or■injury■to■persons■if■not■performed■correctly.■
To■use■the■machine■safely,■always■pay■attention■to■these■warnings.
CAUTION
Indicates■a■caution■concerning■operations■that■may■lead■to■injury■to■persons■if■not■performed■correctly.■To■use■the■
machine■safely,■always■pay■attention■to■these■cautions.
IMPORTANT
Indicates■operational■requirements■and■restrictions.■Be■sure■to■read■these■items■carefully■to■operate■the■machine■
correctly,■and■avoid■damage■to■the■machine■or■property.
NOTE
Indicates■a■clarication■of■an■operation,■or■contains■additional■explanations■for■a■procedure.■Reading■these■notes■
is■highly■recommended.
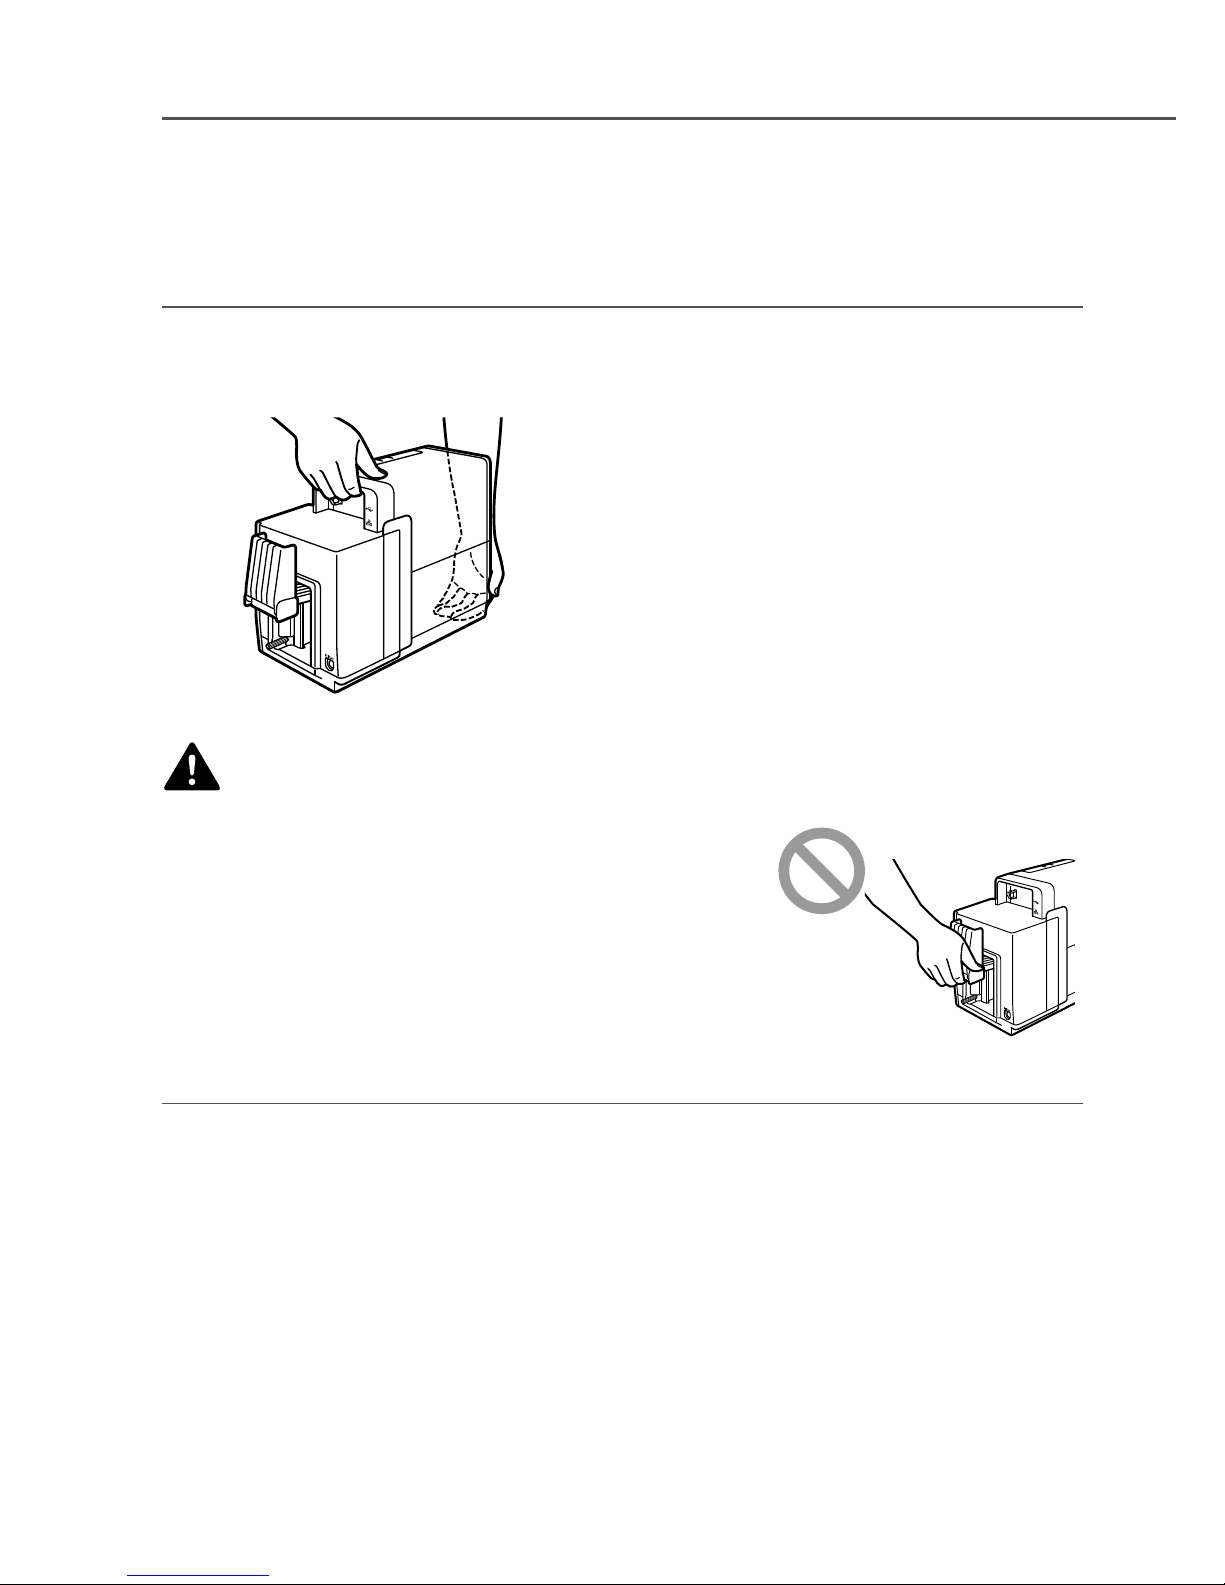
Indicates■an■operation■that■must■not■be■performed.■Read■these■items■carefully,■and■make■sure■not■to■perform■the■
described■operations.
■
■Sample■Screens
The■sample■screens■of■the■printer■driver■settings■in■this■guide■were■created■with■Swiftcolor■SCC-2000D■in■Windows■7.
■
■Trademarks
•■ Microsoft■and■Windows■are■trademarks■of■Microsoft■Corporation■in■the■United■States■and/or■other■countries.
•■ Other■brand■and■product■names■may■be■trademarks■or■registered■trademarks■of■their■respective■companies.
■
■Abbreviations
Throughout■this■document■the■following■abbreviations■are■used■in■text.
•■ Microsoft■Windows■8■is■abbreviated■as■“Windows■8”
•■ Microsoft■Windows■7■is■abbreviated■as■“Windows■7”
•■ Microsoft■Windows■is■abbreviated■as■“Windows”

2
Setup■Flow
Step1■■Preparation■for■Installation■(P.■3■)
Step2■■Installing■Printer■(P.■7■)
Step4■■Connecting■Power■Cord■(P.■12■)
Step6■■Installing■Software■(P.■14■)
■
USB■Connection■(P.■15■)
■
LAN■Connection■(P.■23■)
■
Installing■User’s■Guide■(P.■34■)
Step3■■■Installing■Ink■Tanks■(P.■9■)
Step5■■Turning■on■Printer■(P.■13■)
End■of■Setup

3
Step1.■Preparation■for■Installation
1 Checking■Installation■Site.
Check■the■following■conditions■to■determine■the■installation■site.
•■ Installation■space
180 mm
860 mm
310 mm
400 mm
•■ Temperature■and■humidity
Temperature:■15■degrees■Celsius■to■30■degrees■Celsius
Humidity:■10%■to■80%■(no■condensation)
•■ Power■supply
Use■a■1.5A■or■higher■outlet■cable.
WARNING
•■ Do■not■place■the■following■objects■on■the■printer:
■- Necklaces■and■other■metal■objects.
■- Cups,■vases,■owerpots,■and■other■containers■lled■with■water■or■liquids.
If■such■an■object■is■brought■into■contact■with■the■electrical■parts■inside■the■printer,■this■could■cause■a■re■
or■electrical■shock.■If■it■enters■the■inside■of■the■printer,■turn■the■printer■o■immediately,■disconnect■the■
power■plug■from■the■power■outlet■and■contact■the■dealer.

4
•■ The■electrical■contacts■inside■the■printer■become■extremely■hot■during■normal■operation.■To■avoid■
causing■a■re,■never■store■ammable■substances■like■alcohol,■thinner,■etc.■near■the■printer.
CAUTION
•■ Do■not■install■the■printer■in■the■following■locations:
■- A■damp■or■dusty■location.
■- A■location■exposed■to■oily■smoke■or■steam;■e.g.,■near■a■countertop■or■humidier.
■- A■location■exposed■to■rain■or■snow.
■- A■location■exposed■to■salty■wind.
■- A■location■subject■to■high■temperatures.
■- A■location■near■open■ames.
•■ Do■not■place■the■printer■in■an■unstable■location;■e.g.,■on■a■wobbling■or■inclined■table,■or■a■location■
subject■to■frequent■vibrations.■The■printer■could■fall■down■or■fall■over,■resulting■in■personal■injury.
•■ Never■place■the■printer■where■it■will■be■exposed■to■rapid■changes■in■temperature,■such■as■in■direct■
sunlight,■near■an■air■conditioner,■or■in■a■car■on■a■hot■day.■This■could■cause■a■re■or■damage■to■the■printer.

5
2 Open■the■shipping■box■and■check■that■all■of■the■following■accessories■are■supplied■with■
the■printer.
•■ Printer •■ Ink■tanks •■ AC■adapter
•■ Power■cord■for■120V■series
•■ Power■cord■for■230V■series
•■ Setup■Guide■(this■document)
•■ Basic■Operation■Guide
•■ Printer■Software■CD-ROM
IMPORTANT
•■ 2■types■of■Power■Cords■come■with■Printer.■Use■appropriate■Power■Cord■for■the■power■supply■used■at■the■
installation■site.
NOTE
•■ Keep■the■shipping■box,■packing■materials■and■protectors■for■future■use,■for■example,■storage■or■transportation■of■
the■printer.
•■ If■any■accessory■is■missing■or■damaged,■contact■the■dealer.
•■ USB■and■LAN■cables■are■not■supplied■with■the■printer.■Prepare■commercially■available■USB■and■LAN■cables■
suitable■for■the■printer.
•■ Use■a■Category■5■or■better■twisted■pair■LAN■cable.

6
•■ Cyan■ink■may■be■absorbed■in■the■ink■absorber■(A)■inside■the■
transport■unit.■This■is■due■to■ink■used■in■the■manufacturing■
process■and■does■not■signify■a■printer■problem.
•■ To■maintain■print■quality,■this■product■absorbs■excessive■ink■
produced■during■printing■in■an■ink■absorber.■As■such,■as■you■use■
the■printer,■ink■will■gradually■adhere■to■the■ink■absorber.
A

7
Step2.■Installing■Printer
1 Take■out■the■printer.
1.■ Open■the■plastic■bag.
2.■ Take■out■the■printer■from■the■plastic■bag.
■
As■shown■in■the■gure,■securely■hold■the■printer■
with■both■hands■when■taking■out■the■printer.
CAUTION
•■ Securely■hold■the■printer■with■both■hands■to■avoid■dropping■the■
printer.
•■ Do■not■hold■the■feeder■lift■tray.■Doing■so■may■break■the■tray■causing■
to■drop■the■printer.■This■may■lead■to■injury.
2 Remove■all■pieces■of■orange■tape.

8
3 Remove■all■orange■protectors.
1.■ Open■the■ink■tank■cover.
A
2.■ Move■the■lock■lever■(A)■in■the■direction■of■
the■arrow.
B
3.■ Remove■the■protectors.
■
Press■and■raise■the■lock■knob■(B)■to■remove■the■
protector.
■
Do■not■discard■the■protectors■and■store■them■
along■with■the■shipping■box■and■other■items■
from■the■time■of■purchase.■It■may■be■needed■for■
shipping■the■printer.
IMPORTANT
•■ Be■careful■not■to■stain■the■clothes■or■the■area■around■the■printer■with■the■ink■adhered■on■the■protectors.

9
Step3.■
Installing■Ink■Tanks
1 Have■ink■tanks■on■hand
1.■ Take■out■each■ink■tank■from■the■plastic■bag.
2.■ Remove■the■orange■protective■cap■as■shown■
in■the■gure.
■
Remove■the■protective■cap■while■holding■it■so■that■
the■ngers■are■not■stained■with■ink.
■
Do■not■discard■the■protective■caps■and■store■them■
along■with■the■shipping■box■and■other■items■from■
the■time■of■purchase.■It■may■be■needed■for■shipping■
the■printer.
IMPORTANT
•■ Do■not■press■on■the■sides■of■the■ink■tank.■Ink■could■come■out.

10
•■ Do■not■touch■the■ink■tank■electric■contacts.■The■printer■could■fail■in■
operation/printing.
•■ After■removing■the■protective■cap,■do■not■touch■the■ink■supply■opening.■
Ink■could■not■be■supplied■properly.
•■ After■removing■the■protective■cap,■do■not■shake■the■ink■tank■with■the■ink■
supply■opening■down.■Ink■leaking■from■the■ink■supply■opening■could■stain■
your■clothes■or■the■area■around■the■printer.
•■ Be■careful■not■to■stain■the■clothes■or■the■area■around■the■printer■with■the■ink■adhered■on■the■removed■protective■
cap.
2 Install■each■ink■tank■in■the■printer■according■to■the■color■indicated■on■the■label.
1.■ Insert■the■ink■tank■in■the■slot■in■the■printer■
with■the■ink■supply■opening■down.
■
Before■installing■each■ink■tank,■conrm■the■ink■
color■according■to■the■label.
2.■ Press■on■the■top■of■the■ink■tank■until■the■
ink■tank■clicks.

11
BKM CY
3.■ Install■other■ink■tanks■in■the■same■
manner.
■
Before■installing■each■ink■tank,■conrm■the■ink■
color■according■to■the■label.
■
Installation■positions■of■the■ink■tanks■are■as■
shown■in■the■gure.
IMPORTANT
•■ Install■the■ink■tanks■at■correct■positions■according■to■the■labels.■
If■any■ink■tank■is■installed■at■a■wrong■position,■the■printer■cannot■print.■In■addition,■Ink■colors■could■be■mixed,■
resulting■in■a■printing■failure.
•■ If■any■one■of■the■ink■tanks■is■not■installed,■the■printer■cannot■print.■Be■sure■to■install■all■ink■tanks.
3 Close■the■ink■tank■cover.

12
Step4.■Connecting■Power■Cord
1 Connect■the■power■cord■to■the■printer.
1.■ Joint■the■connector■of■the■power■cord■to■
the■inlet■of■AC■adapter.
2.■ Connect■the■plug■of■AC■adapter■to■the■
printer■inlet.
2 Insert■the■power■plug■of■the■power■cord■in■the■outlet.
CAUTION
•■ When■disconnecting■AC■adapter■from■the■printer,■be■sure■to■remove■the■power■plug■from■the■power■
outlet■rst.■If■the■connection■terminal■of■AC■adapter■is■brought■into■contact■with■any■metallic■part■when■
the■power■plug■is■still■connected■to■the■power■outlet,■a■re■or■an■electric■shock■could■result.

13
Step5.■Turning■on■Printer
1 Press■Power■Key.
■
When■the■printer■is■turned■on,■the■feeder■lift■
tray■lowers.
■
When■the■printer■is■turned■on,■initial■ink■lling■
starts.■It■takes■about■15■minutes■to■nish■the■
initial■ink■lling.
CAUTION
•■ When■the■feeder■lift■tray■is■moving,■do■not■touch■it.■Also,■do■not■insert■hand■or■place■objects■below■the■
tray.■Doing■so■can■cause■injury■or■malfunction.
IMPORTANT
•■ When■Status■Lamp■(green)■is■blinking,■the■printer■is■performing■the■initial■ink■lling.■Keep■the■following■
precautions■until■Status■Lamp■(green)■stops■blinking■and■lights■up:
■- Do■not■turn■o■the■printer.
■- Do■not■open/close■the■ink■tank■cover■and■the■transport■unit■lever.
■- Do■not■operate■other■controls■and■components■of■the■printer.
If■the■above■precautions■are■not■kept,■initial■ink■lling■may■have■to■be■performed■again.■In■such■a■case,■turn■o■
the■printer■and■turn■it■on■again.■Initial■ink■lling■will■start■again.
•■ After■completion■of■the■initial■ink■lling,■go■through■the■step■described■in■Step■6,■“Installing■Software.”
NOTE
•■ Initial■ink■lling■consumes■ink■to■allow■the■printer■to■be■ready■for■printing.

14
Step6.■Installing■Software
Install■the■printer■driver■in■the■computer.
The■printer■can■be■connected■to■the■computer■through■USB■connection■or■network■connection■(TCP/IP).■
Select■a■connection■method■suitable■for■the■operating■environment.■For■the■installation■procedure,■see■the■
following■pages:
●
●To●connect●the●printer●to●the●computer●with●USB●cable:● USB●Connection●(P.15)
●
●●To●connect●the●printer●to●the●computer●via●LAN●and●use●the●printer●in●the●network●environment:●
LAN●Connection●(P.23)
■
■Operating■Environment
The■printer■driver■and■User’s■Guide■can■be■used■in■the■following■environment:
•■ Operating■system■(OS)
Windows■8■■(64bit/32bit)
Windows■7■■(64bit/32bit)
•■ Computer
Computer■allowing■either■of■the■above■operating■systems■to■run
•■ Free■spaces■on■the■hard■disk
Free■spaces■on■the■hard■disk■which■are■necessary■for■installing■the■followings■(including■the■spaces■used■
temporarily)
Printer■driver:■30■MB■or■more
User’s■Guide:■15■MB■or■more

15
■
■USB■Connection
1 Turn■o■the■printer.
1.■ Press■and■hold■Power■Key■until■Status■Lamp■
goes■out.
■
When■Power■Lamp■stops■blinking,■the■printer■is■
turned■o.
IMPORTANT
•■ Do■not■connect■the■printer■to■the■computer■with■USB■cable■at■this■time.
2 Start■the■computer■and■log■on■to■the■computer■as■a■user■with■administrative■privileges.
IMPORTANT
•■ Log■on■to■the■computer■as■a■user■with■administrative■privileges.
•■ Terminate■in■advance■the■virus■detection■program■and■other■programs■resident■in■the■system,■if■any.

16
3 Set■the■supplied■CD-ROM■in■CD-ROM■drive.
2
1.■ Set■the■supplied■“Printer■Software■CD-
ROM”■in■CD-ROM■drive.
■
[Auto■Play]■screen■appears.
2.■ Click■[Run■autoplay.exe].
■
If■[User■Account■Control]■dialog■box■appears,■
click■[Yes].
NOTE
•● If●[Auto●Play]●screen●does●not●appear:
Carry■out■the■following■operation:
1.■ Double-click■CD-ROM■drive■icon■in■[Computer]■folder.
2.■ Double-click■[autoplay.exe■].
4 Install■the■printer■driver.
1
1.■ Click■[Install■the■printer■driver].

17
2
2.■ Click■[OK].
3
4
3.■ Select■[Agree].
■
Conrm■the■software■license■agreement■
carefully.
4.■ Click■[Next].
5
5.■ Click■[Next].
■
Conrm■the■cautions.

18
7
6
6.■ Select■[Connect■via■USB■or■existing■port.]
7.■ Click■[Next].
8
9
10
8.■ To■change■the■printer■name,■enter■a■new■
printer■name.
9.■ When■not■using■the■printer■as■the■default■
printer,■uncheck■[Set■as■the■default■
printer]■checkbox.
10.■■Click■[Next].
11
12
11.■Check■[Always■trust■software■from■
"CANON■FINETECH■INC."]■checkbox.
12.■■Click■[Install].

19
5 When■“Conrmation■of■the■connection■method”■screen■appears,■connect■the■printer■to■
the■computer■with■USB■cable.
■
To■select■a■connection■destination■port,■click■
[Select■manually...],■and■then■select■it.
■
The■selected■destination■port■can■be■changed■
after■completing■of■installation■of■the■printer■
driver.■
1.■ Connect■the■printer■to■the■computer■
with■USB■cable.
2.■ Fix■USB■cable■in■place■with■the■clamp■(A).
■
When■using■USB■cable■with■a■core,■it■may■not■
be■able■to■x■the■cable■with■the■clamp.■In■such■
a■case,■allow■some■slack■in■USB■cable,■and■t■it■
in■the■groove■on■the■rear■panel.
A1
2
Other manuals for SCC-2000D
2
Table of contents
Other SwiftColor Printer manuals

SwiftColor
SwiftColor SCL-8000P User manual

SwiftColor
SwiftColor SCL-4000D User manual

SwiftColor
SwiftColor SCC-2000D User manual

SwiftColor
SwiftColor SCL-4000D Guide

SwiftColor
SwiftColor SCL-2000P User manual

SwiftColor
SwiftColor SCC-4000D Reference guide

SwiftColor
SwiftColor SCC-2000D Assembly instructions

SwiftColor
SwiftColor SCC-4000D Guide