Sylvan SL37E User manual

SL37E
INSTALLATION INSTRUCTIONS
Version 2

2 3www.sylvan.co.nz www.sylvan.co.nz
SL37E INSTALLATION INSTRUCTIONS
Thank you for choosing Sylvan, this lock is for Residential use only, and its two year
warranty (mechanical and electronic) only applies for locks being used for residential use.
To ensure you get the best out of your purchase we ask that you follow the below:
• Please read these instructions fully before installation of this lock.
• We recommend this lock is installed by a professional installer or a serious DIYer to
ensure correct installation and operation.
• The supplied rubber boots must be installed; however, this smart lock requires a
smooth flat surface to hold its water tightness. This lock is not suitable for use on
a tongue and groove door, where water can penetrate the lock via a groove in the
door.
• We recommend that this lock is never fully exposed to direct weather for long
periods of time. For long lasting properties of the product, positioning the lock
under a eve or sheltered position is best.
• This lock is rated IP55, but only on the outward face of the lock. No warranty is
given if the lock gets damaged from water for the inside of the door.
• This lock is not suitable for use on a gate.
• This lock comes with a mechanical key override, this can be used in a situation
of complete battery loss. We recommend an override key is put somewhere safe
outside in case complete power loss.
• Replace batteries when they are showing low voltage on the app.
• All batteries used with this lock must be high quality
Alkaline (4 x AA batteries), to ensure long lasting use.
• Lithium or rechargeable batteries cannot be used with this lock.
Introduction
Installation Video
Scan this code:
App Setup Video
Scan this code:

4 5www.sylvan.co.nz www.sylvan.co.nz
SL37E INSTALLATION INSTRUCTIONS
Product specifications:
Model number SL37E Door thickness
range
35mm - 55mm
Material of
Manufacture
Aluminum alloy IP rating IP55
Weight 2 kg Type of use Residential use only
Options of
unlocking
Blue tooth
Finger print
Passcode
Card
Mechanical key
Gateway (optional)
Disc (optional)
Passcode
capacity
App unlocks infinite
Fingerprints: 200 max
Passcodes: 150 max
RFID Cards: 200 max
Working
temperature
-10 – + 55 degrees C Working
Humidity
0-95%
Normal voltage 6 volts (4 x Alkaline
batteries)
Warranty 2 years mechanical
2 years electronic
Low voltage Alarm Less than 4.8 Volts Lock Stainless steel front
Lock Dimensions
63mm
170mm
Anti Peeping Technology
This lock oers anti-peeping virtual passcode entry by inputting a random
passcode either before or after the proper passcode followed by the # key.

6 7www.sylvan.co.nz www.sylvan.co.nz
SL37E INSTALLATION INSTRUCTIONS
• Front panel
Qty x1
• Back panel
Qty x1
• User manual
Qty x1
• Installation template
Qty x1
• Mortice lock / latch
Qty x1
• Striker plate
Qty x1
• RFID cards
Qty x3
• Mechanical keys
Qty x 2
• Waterproof rubber boot
Qty x2
• Striker Plate Box
Qty x1
• Mortice screws
Qty x4 25mm
• Connection posts
Qty x1
(M4x30 - for
35-40mm Door thickness)
(M4x35 - for
40-60mm Door thickness)
• Various M6 machine
screws
Qty x4
(30mm, 50mm)
• Smart hub
Qty x1 (optional)
• Smart Disc
(optional)
• Backplate
• Backplate fixing M4
machine screws
Qty x4 (10mm)
SL37E Packing List Adjust Deadbolt Backset
Confirm Opening Direction (handing)
1. Retract deadbolt
completely by rotating
spindle cross thing
If required, the supplied deadbolt is adjustable from 60mm - 70mm depending on your backset.
Check if your door is a left or right hand opening door, you may need to make the below adjustments to suit.
2. The shorter backset
is 60mm
3. Twist the full assembly,
the deadbolt will
extend through the
center
4. The extended backset
is 70mm
LEFT HAND
OPENING
RIGHT HAND
OPENING
Check the
lock handing
as pictured
IMPORTANT
Make sure the
spindle is always
kept horizontal.
This may need
to be trimmed
to suit door
thickness.
IMPORTANT
Change the
L or R position
switch inside the
back panel.
IMPORTANT
Check the
deadbolt knob
position as
indicated for left
or right handed
operation.
Make sure the
Deadbolt is kept
retracted during
installation.
LL
RR
LL
RR

8 9www.sylvan.co.nz www.sylvan.co.nz
SL37E INSTALLATION INSTRUCTIONS
1. Mark and crop door using installation template provided
2. Ensure holes are clear of any sharp edges and clean of
swarf and wood dust.
3. Ensure deadbolt is fitted with TOP upwards.
1. Measure door thickness and install appropriate length
screw posts.
2. Attach rubber boot to front panel.
1. IMPORTANT
Plug in power cable ensuring the plug is around the
correct way for the plug to accept its receiver correctly.
2. Push excess cable back though the mounting plate and
align back panel onto mounting plate, securing with 3x
10mm machine screws.
3. Install the correct type of batteries into the lock
(4 x Alkaline AA batteries)
4. Re attach battery cover plate
5. Finally fit striker plate and striker box to the door frame
ensuring that the latch and bolts work freely when the
door is closed.
6. To test the correct operation of the deadbolt of the
lock test by turning the inside knob and ensuring it
runs freely into the striker plate without any resistance.
If binding occurs the striker plate might need a re
adjustment in position.
7. Installation of the lock is now complete
1. Feed power cable through door
2. Align spindle and posts to deadbolt
latch and mount front panel to door.
1. Attach rubber boot to mounting plate
2. Feed power cable through the mounting plate
3. Align the locating pins to the front panel and
attach to door using mounting screws.
Installation:
Step 1: Install deadbolt (see latch instructions included)
Step 2:
Install Screw Posts & Rubber Boot
Step 5:
Mount back panel and finish installation
Step 3:
Install front panel
Step 4:
Install mounting plate
IMPORTANT
Do not pull on the plug or cable with force or let the hardware
hang from the cable, damaged caused will void the warranty
IMPORTANT
Ensure spindle is horizontal and bolt is retracted.
1. Measure door thickness and install appropriate length
screw post.
2. Attach rubber boot to front panel.
Step 2:
Install Screw Posts & Rubber Boot

10 11www.sylvan.co.nz www.sylvan.co.nz
SL37E INSTALLATION INSTRUCTIONS
Manual reset:
If you are not admin of the Smart Lock, remove battery cover
and complete:
Long press the reset button beneath the battery case for 5
seconds or until you hear: “Please Input Initialisation Passcode”.
Now input code “000#” on the keypad.
The system reset will be complete. From here you can re-link the
SL37E Smart Lock to your phone via the TT App.
*Note: this will clear all previous users from the locks memory
1. Date Installed: / /
2. Installed By:
3. Pin: #
1. Holes drilled and aligned squarely as per drilling template.
2. Ensure bar on outer barrel is horizontal.
3. Ensure the rubber boot is aligned correctly with a good seal on
the door, also making sure the lugs are correctly seated in their
holes .
4. Ensure bolt is retracted when installing.
5. Ensure correct handing is set.
6. Ensure inner knob is correctly positioned.
7. Ensure all screws and bolts are correctly tightened.
8. Ensure power cable is installed and not bent or crimped in door.
9. Check batteries are Alkaline and installed correctly.
10. Check to see if the lock requires a software update via the TT App
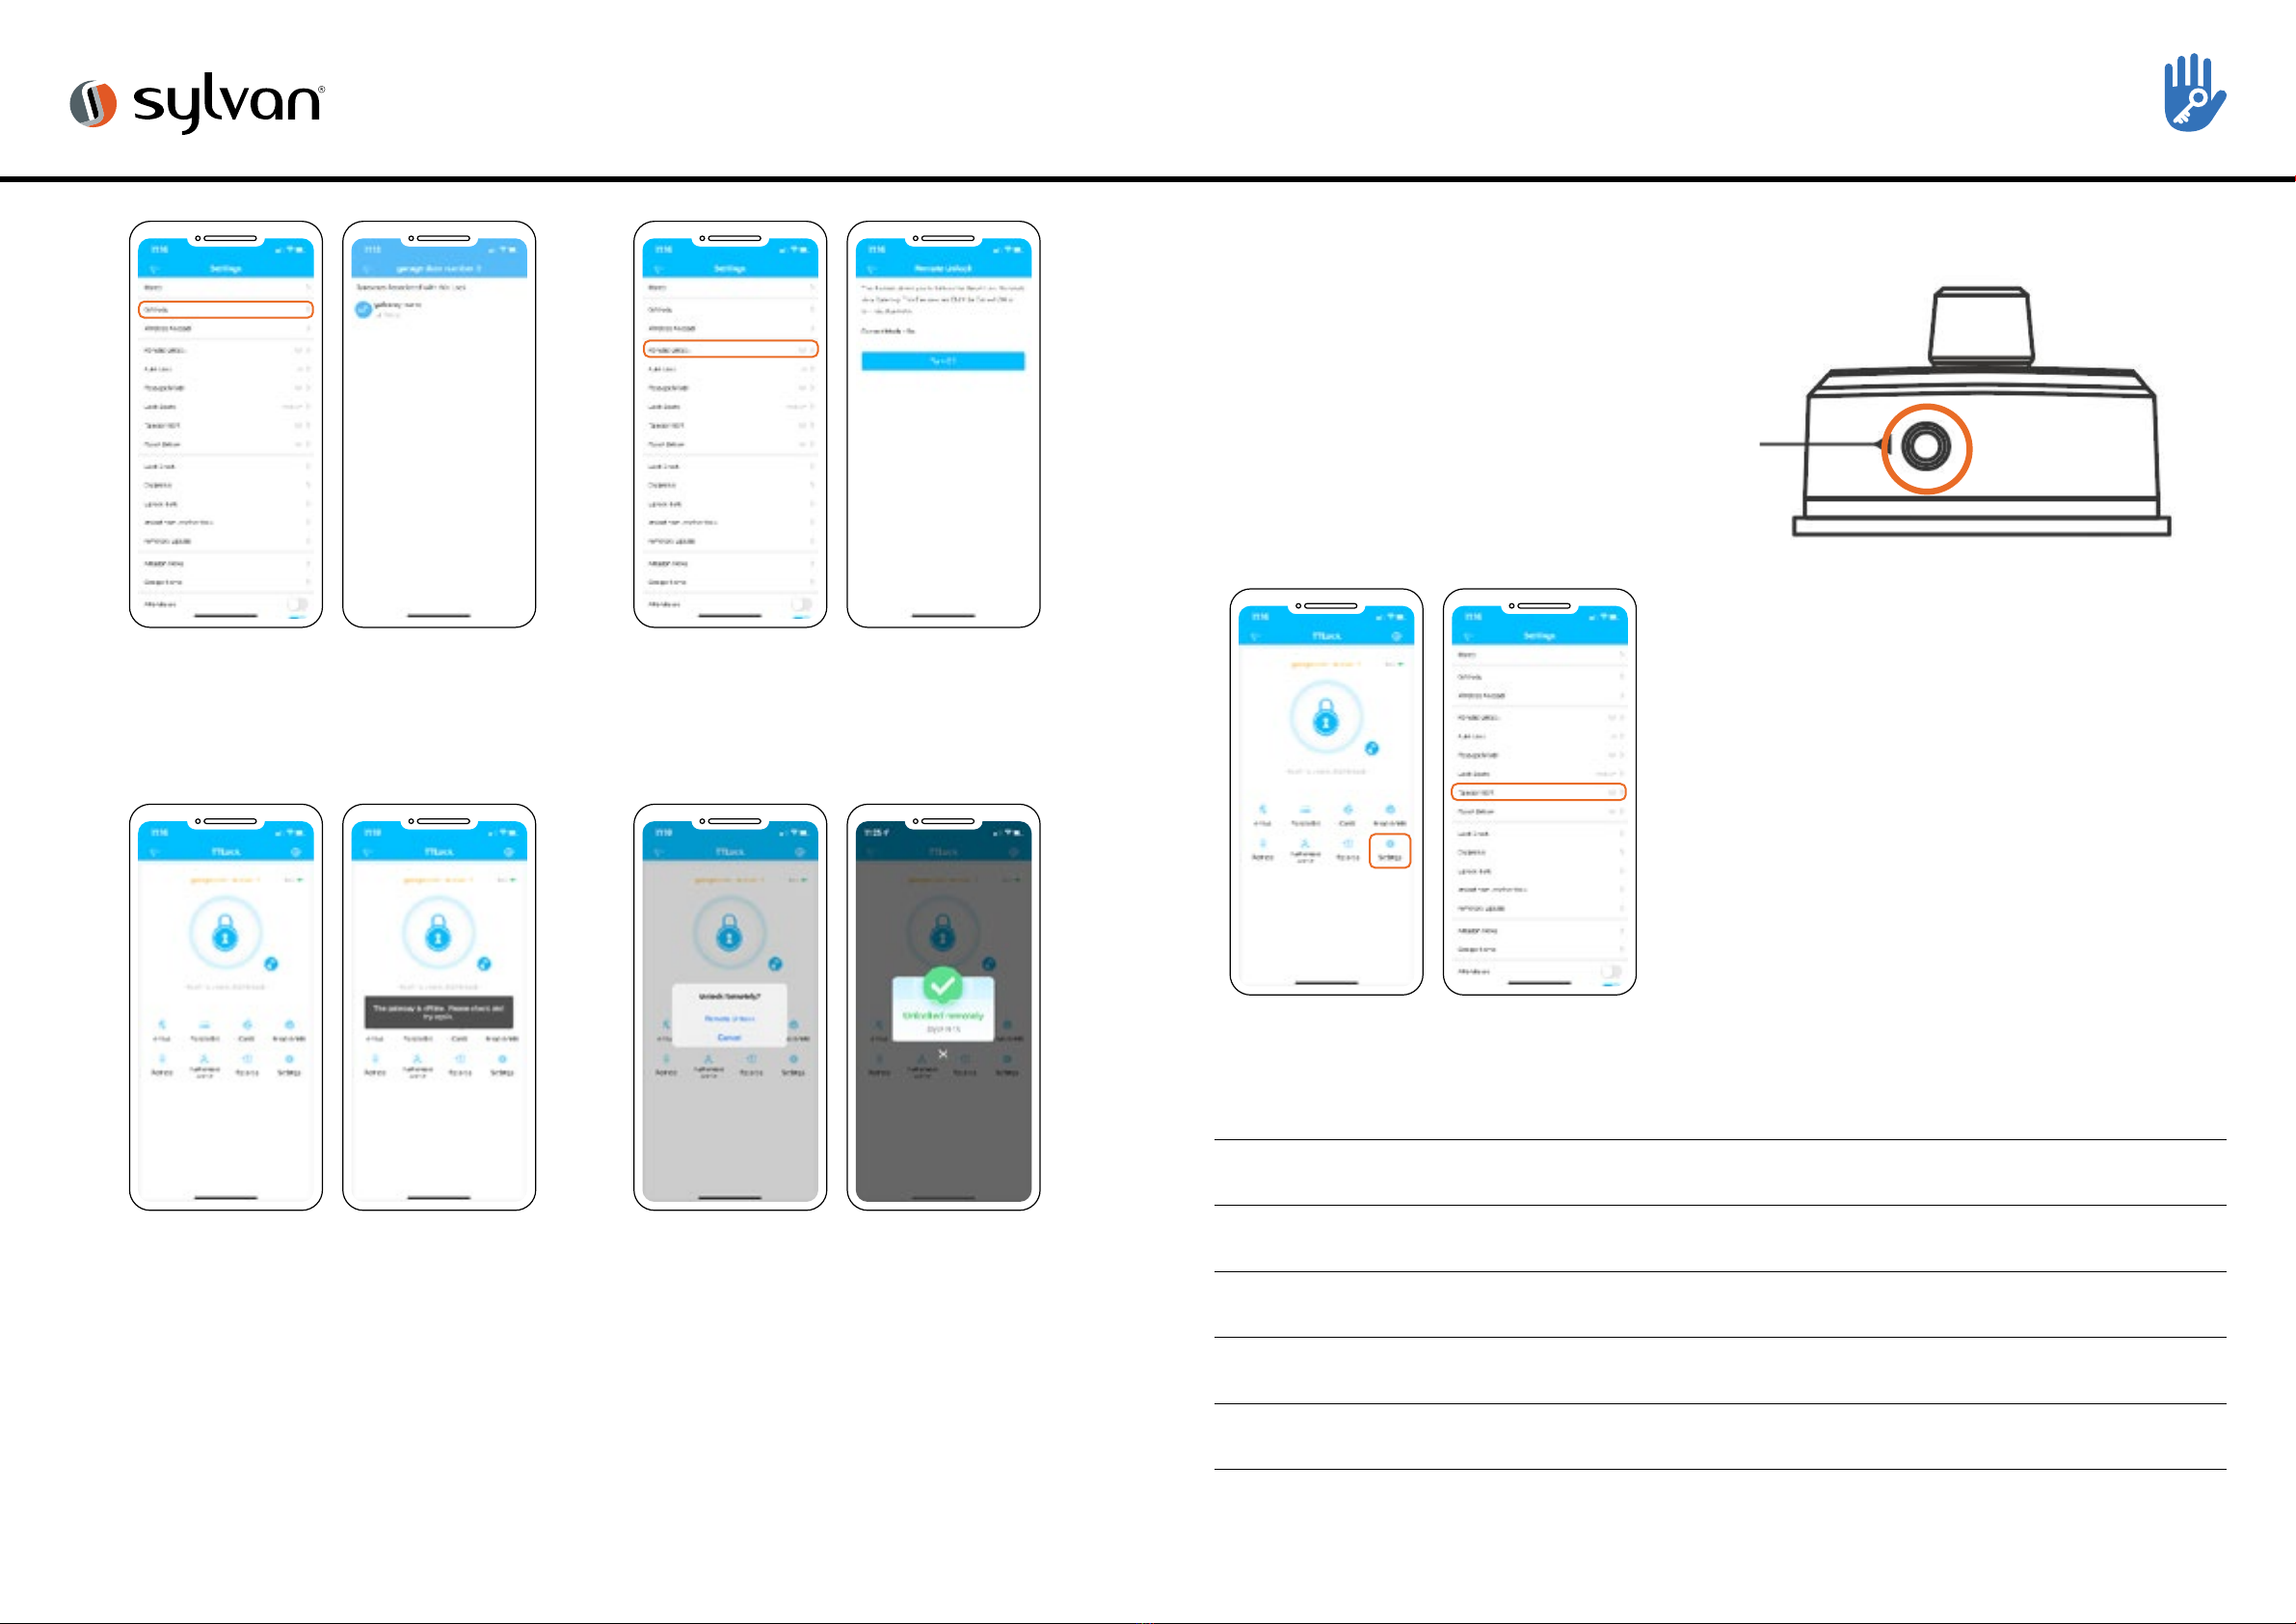
The SL37E Smart Lock has a mechanical key override to unlock it.
The key location is on the front panel.
Insert one of the included keys, turn to unlock.
Maintenance should be carried out on your lock every 6 months:
• Check that the screws fixing the mortice Lock are tight.
Check that the screws fixing the rear panel to the front panel are tight.
• Check if batteries need replacing. If battery percentage is low replace with four fresh
Alkaline 1.5V AA batteries.
• Wipe the surface of the Lock with a damp cloth, we recommend only water is used.
This will help remove any dust or micro contaminants from the surface.
• It is also recommended to do a full factory reset of the Smart Lock to ensure software
runs correctly.
• Check rubber boot to ensure the seal between lock and door is still good.
•
*Note: In settings on the app, the reset button can be switched on or o depending if you
want this feature available to anyone with access to the inside panel.
Lock Installation Checklist Using your Sylvan SL37E Smart Lock
Manually unlocking with Key
Maintenance Guide:

12 13www.sylvan.co.nz www.sylvan.co.nz
TTLock App Set-up instructions:
1. Download app
• Download the TTlock app onto your device
• Through Apple (IOS version) use app store to download TTlock
• Through Android version go through Google play (English version)
Otherwise use the below QR codes
TTlock App
• TTlock supports multiple types of locks and devices
• TTlock currently supports 200 countries
• Verification codes will be sent to users’ mobile phone or email depending on how you have
registered above.
TTLock App
2. With App open touch on
main screen + Add lock
3. While standing near the
lock (and with the 4 good
quality AA alkaline batteries
installed into the lock) wake
the lock up by touching the
key pad.
4. Your lock will appear on the
screen, then click +
5. Rename the lock. e.g. home
front door
6. The lock is now successfully
added to the app.
7. If you have downloaded the app and loaded your lock on your
device you are now the administrator of this lock, from here
you can now add or delete users / passcodes / RFID card etc.
1. Register a new account
(phone number or email)
or login with an existing
account if you already
have one.
IMPORTANT
By default, this lock comes standard with Autolock ‘o’. To lock from the outside,
hold the # button down and deadbolt will lock.

14 15www.sylvan.co.nz www.sylvan.co.nz
Bluetooth (lock and unlock)
• Make sure your phone has bluetooth and is switched on
• The app can be used to lock or unlock the door by using bluetooth
within a 5m range.
• Note: the lock will automatically re lock itself depending on the setup of
the auto lock function through the app.
• From the app push the (padlock) symbol to lock or unlock the device.
• Note: 5-meter Bluetooth range can vary depending on interference such
as steel, thick walls and micro wave interference etc.
• Passcodes are another way
of unlocking the device
• This lock can accept up to
150 unique PIN codes.
• Careful consideration should
be taken to ensure each
PIN is set up in a way that
they can be well managed
at a later time. We suggest
naming each PIN with the
name of the person using it.
E.g. Bobs PIN
• We suggest when setting
up passcodes to do it via
the custom setting to create
your own pin number. It
needs to be between 4-9
digits.
• Recurring PIN codes used
to give access to the user of
this code at certain time of
day and week.
Management of app and lock
Setting a passcode:
• You can also set up Pin
codes for One timed and
also timed access (for
example a tradesperson
working in your house for a
short period of time).
TTLock App
RFID cards
• This lock comes with three RFID cards and can store up to 200 unique RFID cards.
Passage mode
• The TT app can be used to put the lock into passage mode. NB: Passage mode is where the lock
can be opened without a passcode etc
• To add these to the lock,
touch RF Cards, then add
card
• Decide if a Permanent or
Timed or Recurring user
• Name the Card (we suggest
the users name) e.g. Bobs
RFID
• Then touch card against
keypad to accept card to
lock
• Under the setting tab of the lock, you can switch
passage mode on or o
• You can also set up a calendar so that the lock can
go into passage mode on certain days at certain
times.
• Note for security reasons the passage mode only
starts once a successful entry to unlock the lock
has been accepted.
• To lock the door when in passage mode, press
and hold the # key on the lock.

16 17www.sylvan.co.nz www.sylvan.co.nz
5. The app then prompts you
to present your finger or
thumb to the reader.
6. Watch and listen to the
prompt of the app and
lock you will see the image
of the finger print and be
asked to present yours to
the reader.
7. You will be asked to do this
a number of times until all
parts of the image on the
app turn from black to blue.
8. We suggest for convenience
and user speed to save your
finger print in a number of
dierent positions. EG Bobs
1 finger, Bobs 2 finger etc.
Finger Prints
• This lock can accept up to 200 Unique finger prints
1. From main screen click on
Finger print
2. Then add finger print
3. Decide if a Permanent,
Timed or Recurring user
4. Name the finger print
(we suggest the users
name) eg Bobs Finger
Remote unlock
• This can be done using a smart hub SLG02 (sold separately) see ‘sylvan.co.nz/smart-hub-slg02/’
1. Add the smart hub via the
first screen of the TTlock
app
5. Click next
6. Once seen it will ask for you
to name the gateway e.g.
(garage door gate way)
7. It will also ask for your Wi-Fi
password (Note this needs
to be a 2.4G) signal. 5G is
not supported
8. Then the gateway is
connected.
2. Click on add Gateway
3. Choose the G2 (Wi-Fi)
option
4. Connect power to the
gateway and the indicator
light will flash red, it’s now
in programming mode
9. Check that the gateway is
online under the gateway
link o the front page
10. Ensure the gate way is
within 10 meters of the lock
TTLock App

18 19www.sylvan.co.nz www.sylvan.co.nz
11. In the setting screen of the lock click
on gateway and you should see your
named gateway.
12. On the settings page select ‘Turn on
Remote Lock’.
13. On the main programming screen of
the lock a small Wi Fi symbol now
appear next to the padlock symbol of
the app.
14. By clicking on the Wi Fi symbol, then
clicking Remote unlock you will then
be able to remotely unlock your lock
from anywhere using the secure Wi
Fi connection.
15. The app will show when the lock has
been successfully unlocked.
TTLock App
Privacy Lock:
1. New feature with the SL37E is a privacy lock.
To use it, enable in the lock settings and use
button on underside of the inside panel of the
Smart Lock as shown. Red means only the
Key Override or Master Admin can enter, all
other pincodes and RFID cards won’t unlock
the SL37E. By pushing the button once and
holding, the lock goes into “secure lock is on”
if pushed the second time, the lock goes into
“secure lock is o”
Note: Privacy can be switched on or o from the
app. By switching the turn o feature, this will
disable the button on your lock.
NOTES

127 Diana Drive
Glenfield
Auckland 0627
Ph: +64 9 444 5359
Email: sales@gdrutter.co.nz
Web: www.sylvan.co.nz
PRODUCT WARRANTY
Customer Name:
Customer Phone:
Purchase Date:
Store name:
Receipt #:
Product Name:
Product Model:
Note:
Note:
1. Please keep this booklet and receipt so that you can use it when you need warranty service.
2. We provide you with a two-year warranty from the date of purchase.
Table of contents
Other Sylvan Door Lock manuals
Popular Door Lock manuals by other brands

ELFRI
ELFRI S2x05x Assembly instructions

Toledo
Toledo CV180BLEUS15 INSTALLATION AND PROGRAMING INSTRUCTIONS

Yale
Yale nexTouch Installation and programming instructions

Dormakaba
Dormakaba 630 Series installation instructions

uhlmann & zacher
uhlmann & zacher CX2162 Operating and assembly manual

Corbin Russwin
Corbin Russwin Access 700 TCPAC1 Series installation instructions