T&C TC36.NG03.C. User manual

PART#
TC36.NG03.C.
FOR TC36
TC36
BLACK DIAMOND
BURNER KIT
INSTRUCTIONS
010408-16 TC36.NG03.C 5056.427.C3
INSTALLER: Leave this manual with the appliance.
CONSUMER: Retain this manual for future reference.
These instructions are supplementary to the Installation and
Operating Instructions supplied with the replace and should be
kept together. Refer to the Installation and Operating Instructions
for proper gas supply, safety requirements and operating
instructions

TC36.NG03.C 010408-16
2
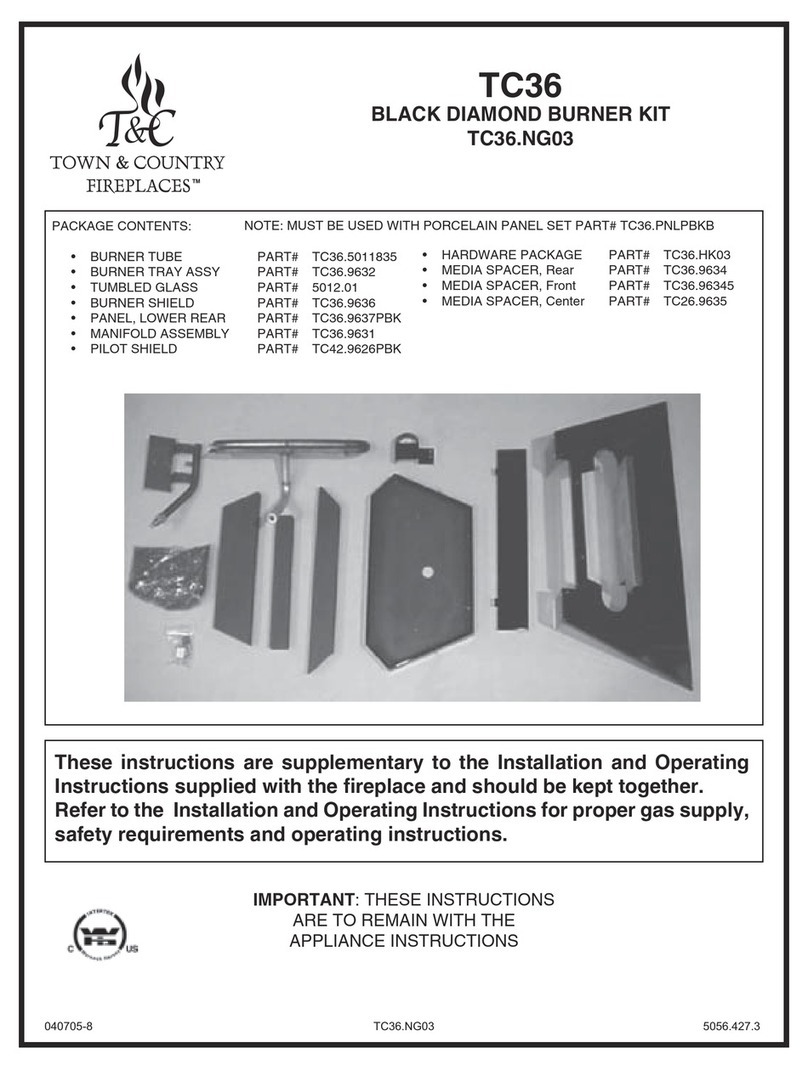
• BURNER TUBE
• MEDIA SPACER, Rear
• BURNER TRAY ASSY
• MEDIA SPACER, Front
• 5 lbs. TUMBLED GLASS
• MEDIA SPACER, Center
• BURNER SHIELD
• PANEL, LOWER REAR
• MANIFOLD ASSEMBLY
(including supply tube)
• PILOT SHIELD
(including pilot and supply tube)
• HARDWARE PACKAGE
NOTE: MUST BE USED WITH PORCELAIN PANEL SET PART# TC36.PNLPBKB
A porcelain panel set must be used in conjunction with
the installation of the burner assembly. See Installation
and Operating Instructions manual for details.
1) Remove 2 screws from the air channel and attach the lower
rear panel to the rebox with these screws. (Fig. # 1)
NOTE: The burner shield may need to be loosened and
re-tightned after positioning if the panel does not slip in
behind it.
Fig. # 1
Package Contents
Burner Installation

TC36.NG03.C 010408-16
3
Fig. # 4
2) Attach the manifold bracket to the oor shield in the bottom
of the rebox with one screw. (Fig. # 2)
3) Attach the manifold and pilot supply tubes to the bulk head
tting and tighten. (Fig. # 3) Ensure that all connections
are gas tight.
4) Attach spark electrode (ORANGE) and sensor leads to
the electrical bulk head. ( Fig. # 4) (The spark electrode
connection has a red dot above it)
NOTE: If converting to propane refer to the propane
conversion section before continuing. Pg. 9
Fig. # 3
Fig. # 2

TC36.NG03.C 010408-16
4
Fig. # 5
5) Remove panel retaining clips from the upper heat shield.
Install right side panel by placing the bottom into the rebox
and tipping the top into position. (Fig. # 5)
6) Position upper rear panel on top of lower rear panel and
slip in behind the right panel. (Fig. # 6)
7) While supporting the upper rear panel install the left side
panel in the same manner as the right side panel. Secure
both side panels with the previously removed panel
retaining clips. (Fig. # 7)
Fig. # 6
Fig. # 7

TC36.NG03.C 010408-16
5
Fig. # 8
Fig. # 9
Fig. # 10
8) Install burner shield by tipping the shield into the rebox,
feed the pilot assembly through the opening in the shield.
(Fig. # 8)
9) Attach pilot shield to burner tray with two screws.
(Fig. # 9)
10) Attach the burner tray to the burner shield using two screws
at the back of the tray. (Fig. # 10)

TC36.NG03.C 010408-16
6
Fig. # 11
Fig. # 12
11) Install front and rear media spacers. (Fig. # 11 & 12)
12) Install burner by tilting burner inlet through tray. Ensure
that the orice has entered the inlet tube.
(Fig. # 13 & 14)
Set the air shutter to fully open for Propane or fully
closed for Natural gas.
Fig. # 13

TC36.NG03.C 010408-16
7
13) Install the center media spacer. Secure the spacer and
burner with two long screws.(Fig. # 15) Four holes must
line up to set each screw. Some pressure may need to
be applied to the front tray support on the shield to align
the holes. (Fig. # 16)
Fig. # 14
Fig. # 15
Fig. # 16
ORIFICE
INLET TUBE

TC36.NG03.C 010408-16
8
Fig. # 17
14) Apply just enough glass media to cover the burner
assembly. (Fig # 17)
NOTE: Too much glass media over the burner will
cause sooting with the use of propane gas

TC36.NG03.C 010408-16
9
If the unit is to be used on propane convert as
follows using the components supplied with this
replace:
WARNING
This conversion kit shall be installed
by a qualied service agency in
accordance with the manufacturer's
instructions and all applicable codes
andrequirementsoftheauthorityhaving
jurisdiction. If the information in these
instructions is not followed exactly, a
re, explosion or production of carbon
monoxide may result causing property
damage, personal injury or loss of
life. The qualied service agency is
responsible for the proper installation
of this kit. The installation is not proper
and complete until the operation of
the converted appliance is checked
as specied in the manufacturer's
instructions supplied with the kit.
CAUTION
The gas supply and electrical power shall be shut
off before proceeding with the conversion.
Note: Factory supplied components must be used to
ensure correct input.
After conversion conrm proper manifold pressure.
1) Ensure the burner, pilot and gas supply are turned off,
and the appliance has cooled.
2) Using a 1/2” wrench, undo the natural gas burner orice,
(marked #30). (Fig. #18)
3) Apply a small amount of pipe joint compound to the threads
of the propane burner orice (marked #45) to ensure a
good seal, before screwing it into the tting.
4) Open primary air shutter fully.
5) With a 7/16” wrench loosen the pilot head on the pilot
assembly (Fig. #19)
Fig. # 18
Fig. # 19
Propane Conversion

TC36.NG03.C 010408-16
10
6) Slide the pilot adjustment band over and ensure that the
hole in the orice band is showing. (Fig. #20 indicates NG
position, Fig. #21 indicates LP position)
7) Remove access panel, 10 screws, and set aside
8) Remove the minimum rate screw located in the valve.
(Fig. #22)
Fig. # 20
Fig. # 21
MINIMUM RATE
MINIMUM RATE
SCREW
SCREW
9) Replace the minimum rate screw with the one provided
in the propane conversion kit supplied with this replace.
Ensure that the screw is fully installed. (Fig. #23)
10) Pull off the rubber cap from the top of the pressure
regulator. (Fig. #24)
11) Press down on the center post and rotate 90°. The center
post should stay down. (Fig. #25). Replace the rubber
cap.
Fig. # 24
Fig. # 25
Fig. # 23
Fig. # 22
MINIMUM RATE
MINIMUM RATE
SCREW
SCREW
Removing the Minimum Rate Screw
The minimum rate screw is sealed with an o-ring near the
bottom of the screw. Use a thin bladed screwdriver to back the
screw out to the limit of the threading. At this point, a groove
on the screw body will be visible just above the valve body.
Insert a thin tool (knife blade or ne screwdriver blade) into
the groove and gently pry the screw up.

TC36.NG03.C 010408-16
11
Fig. # 28
Fig. # 27
Fig. # 26
1) Remove the plug from the pressure test port. The plug is
located between the right side lintel and rebox side. (Fig.
# 27)
2) Thread the extension test tting into the open test port.
(Fig. # 28)
3) Attach a pressure gauge onto the tting
4) When testing is complete remove the extension piece and
replace the pipe plug. Thread sealant will be required to
ensure a gas tight connection.
Note: To test the gas pressure, turn off the gas supply before
removing the blanking plug from the supply pressure test
port or manifold pressure test port.
Verify gas pressures with the replace lit and on the
highest setting.
12) Fill in the date and the name of the person who performed the
conversion in the white area on the conversion label. Peel off
the protective backing and apply the conversion label directly
over the gas specications on the rating label.
13) Attach the access panel to the side of the rebox with the
previously removed screws. (Fig. #26)
Note: Gasket must be installed with access panel.
CORRECT GAS PRESSURE REQUIREMENT:
Supply Pressure Natural Gas Propane
Minimum 5.0” wc 12.5” wc
Maximum 13.9” wc 13.9” wc
Manifold Pressure
Maximum 3.8” wc 11.0” wc
Minimum 2.1” wc 5.5” wc
(For purpose of input adjustment)
Gas Pressure Test
SUPPLY
SUPPLY
MANIFOLD
MANIFOLD

TC36.NG03.C 010408-16
12
Fig. # 29
The air shutter at the end of the burner inlet tube controls the
primary combustion air to the gas burner and is preset closed
at the factory for natural gas fuel. Shutter must be fully open
for propane. See Fig. #29 for proper ame pattern.
The ame should be just orange and “lazy”. It should NEVER be set to create
sooting on internal parts and window glass.
Flame Adjustment

TC36.NG03.C 010408-16
13
ITEM.....DESCRIPTION.....................................PART NO.
1............BURNER TUBE ............................ TC36.5011835
2............ORIFICE, NG ........................................... 5022.13
..............ORIFICE, LP ............................................ 5021.34
..............MANIFOLD ASSEMBLY ..................... TC36.9788
3............MANIFOLD BRACKET.................................. 9631
4............MANIFOLD.................................. TC36.9788WLD
5............DORMONT FITTING.............................. 5019.221
6............MEDIA SPACER, REAR ............................... 9634
7............PILOT SHIELD ...................................... 9626.002
8............MEDIA SPACER, CENTER .......................... 9635
9............MEDIA SPACER, FRONT.......................... 9634.5
ITEM......DESCRIPTION ....................................PART NO.
10...........BURNER SHIELD ....................................... 9636
11...........SPRING NUT .............................................. 5044
12...........BURNER TRAY........................................... 9632
13...........PILOT ASSEMBLY, CONVERTIBLE .... 5005.025
14...........1/4” FLEX TUBE.................................... 5019.225
15...........1/2” FLEX TUBE................................... 5019.223
...............HARDWARE PACKAGE .................. TC36.HK03
Not sold separately
NOTE: FIREPLACE & VALVE REPLACEMENT PARTS ARE
LOCATED IN THE APPLIANCE INSTRUCTIONS
Replacement Parts
13
5
4
2
3
15
7
14
10
11
12
1
9
8
6

TC36.NG03.C 010408-16
14
NOTES

TC36.NG03.C 010408-16
15
NOTES

TECHNICAL SUPPORT: 1-877-715-2664
www.townandcountryreplaces.net
2975 Allenby Rd., Duncan, BC V9L 6V8
Printed in Canada
Table of contents
Other T&C Burner manuals
Popular Burner manuals by other brands
Bull
Bull 94008 Assembly and operating instructions

Riello
Riello GAS 3 Installation, use and maintenance instructions

Riello
Riello 40 Series Installation, use and maintenance instructions
Nu-Way
Nu-Way NOL18 Installation & maintenance manual

Riello
Riello 40 FSP20 Installation, use and maintenance instructions
Riello
Riello 40 G5R Installation, use and maintenance instructions
Ecoflam
Ecoflam Multicalor 170.1 manual
Kenmore
Kenmore 920.16203 Assembly instructions
Riello
Riello DB 16 SM C01 TC A0 FS1 T250 Installation, use and maintenance instructions
Bentone
Bentone BFG1 Installation and maintenance instruction
BRAHMA
BRAHMA TSM quick start guide

Riello
Riello RLS 310/EV O2 MX Modulating operation
