Taylor XPRESS FLEX L-XF011 User manual

™
QUICK
START
GUIDE

• Dipper spoon w/ paddle handle (#2235)
• Pipet (#4030)
• Cap for dipping vial (#6825)
(three included)
• Counter mat (#6849)
• 5 mL Syringe (#6858)
(three included)
• Test strip clips (#9001)
(three included)
• Test strip loader (#9002)
• Water sample dipping vials (#9003)
(three included; includes #6825 cap
for dipping vial)
• Iron Prep reagent (R-9103)
(includes #2235 dipper spoon
w/ paddle handle)
• Phosphate Prep reagent (R-9112-C)
• Flex Strips:
Flex 1 (S-1361)
Flex 2 (S-1362)
Flex 3 (S-1363)
Flex 4 (S-1364)
XPRESS FLEX™L-XF011
COMPONENTS
S-1362 S-1364
S-1363
S-1361
6849
9001
9003
6825 (included
with 9003)

9002
R-9103
4030
Xpress Flex Device
2235 (included
with R-9103)
6858
R-9112-C

1. Unpack components from the box
(see components list on previous page).
2. Youwillndfourperforatedholesonthe
counter mat. These align with the suction
cups on the bottom of the Xpress Flex™
device. Pop out the excess material and place the mat on the counter.
3. Place the Xpress Flex device on the counter mat aligning suction cups. Press
down on device.
4. Place Flex Strips and prep reagents in designated holders on top of the Xpress
Flex device.
5. Go to retail.sureTREAT.com. If you already have
a sureTREAT®account, please log in and proceed
to step 6. If you do not have a sureTREAT account,
please see the attached instructions to create
one. (Xpress Flex works with Windows 10 or 11.)
6. After logging into retail.sureTREAT.com,
downloadtheXFConnectsoftware.Youcannd
this by choosing Support on the bottom navigation bar and then selecting
Download XFConnect. Run the XF Connect Installer.
7. Ensure that the XFConnect software is running. Connect the USB cord from the
Xpress Flex device to your computer.
8. Xpress Flex is uniquely calibrated for each lot of Flex Strips. This calibration
ensures the highest level of accuracy. To match the lot of your Flex strips in the
sureTREAT software, follow these steps.
The lot code is the last three digits stamped on the bottom of your Flex Strip
bottle.This code will be an alpha character followed by two numbers. For
example, C06 (Fig. 1)
QUICK START INSTRUCTIONS
We are available at 877.TEST.KIT or
TechSupport@TaylorTechnologies.com
if you have any questions or need
support while setting up your device
and software.
Fig. 1 Fig. 2 Fig. 3

Thank you for choosing Xpress Flex, the next evolution of in-store water testing.
Xpress Flex is a cutting-edge testing system from the most trusted name in water
testing: Taylor®Water Technologies.
The Xpress Flex testing system consists of several components:
∙Xpress Flex device
∙Flex Strips (Flex 1, Flex 2, Flex 3, Flex 4)
∙Iron prep reagent
∙Dipper spoon w/ paddle handle
∙Phosphate prep reagent
∙Pipet (use with R-9112-C phosphate prep reagent)
∙Water sample dipping vials (3)
∙Cap for dipping vial (3)
∙Test Strip Loader
∙Test Strip Clips (3)
∙5 mL syringe (3)
∙Counter mat
At the core of the testing system is the Xpress Flex device.This is an advanced test
strip reader that utilizes sophisticated technology to provide high-quality test results.
XPRESS FLEX™INSTRUCTIONS
In the sureTREAT software, you will see the current setting for your Flex Strip lot code
on the Flex Strip Status screen when performing water tests with Xpress Flex™.
To change the code, click edit (Fig. 2) and select the proper code for each Flex Strip
(Fig.3) from the options on the screen.Click update when you complete.
9. Now that your system is set up, please watch this short video
to learn about the Xpress Flex testing process:
taylortechnologies.com/en/content/xpress-ex-support
10. You are ready to start Flexing! Thank you for trusting Taylor®
Water Technologies with your testing needs.
Your Xpress Flex device will be automatically registered for warranty when you
performyourrstwatertest.

Xpress Flex™strips are specifically engineered for use with the Xpress Flex device.
There are four test strips that can be used with Xpress Flex:
Flex 1 (S-1361) – 50 count: tests iron (use with R-9103 prep reagent)
Flex 2 (S-1362) – 50 count: tests salt, borate, and copper
Flex 3 (S-1363) – 100 count: tests free chlorine, total chlorine/total bromine, pH,
total alkalinity, total hardness, and cyanuric acid
Flex 4 (S-1364) –
50 count: tests phosphate (use with R-9112-C prep reagent)
Xpress Flex™gives you the freedom to use only the strips you need. You can run any
combination of strips, depending on the results you are targeting. For example,
iron may not be a common concern in your area, so the Flex 1 strip would mostly be
used to troubleshoot.
Pro Tip: The majority of Xpress Flex tests use only Flex 3 since sanitizer and water
balance are the most desired tests.
Next, let’s review performing a water test with Xpress Flex. This testing process was
designed with you, the tester, in mind.
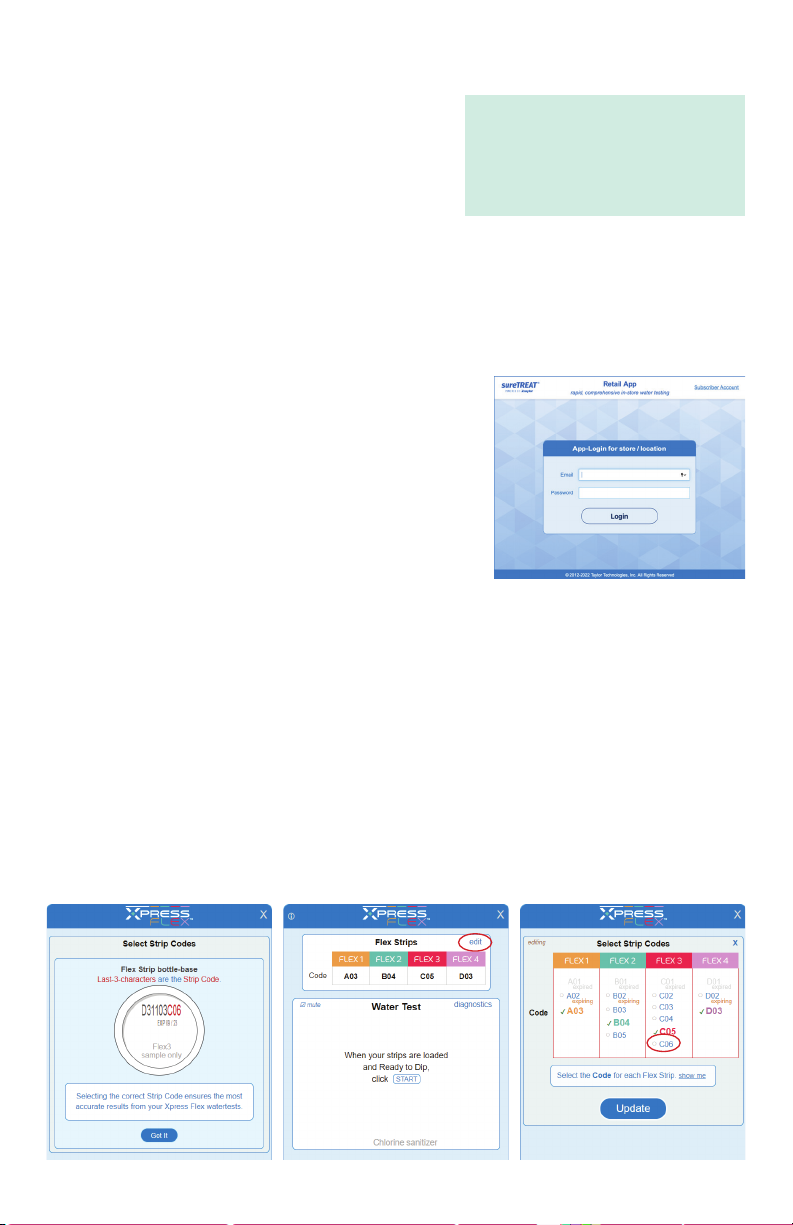
Xpress Flex testing is performed at retail.sureTREAT.com
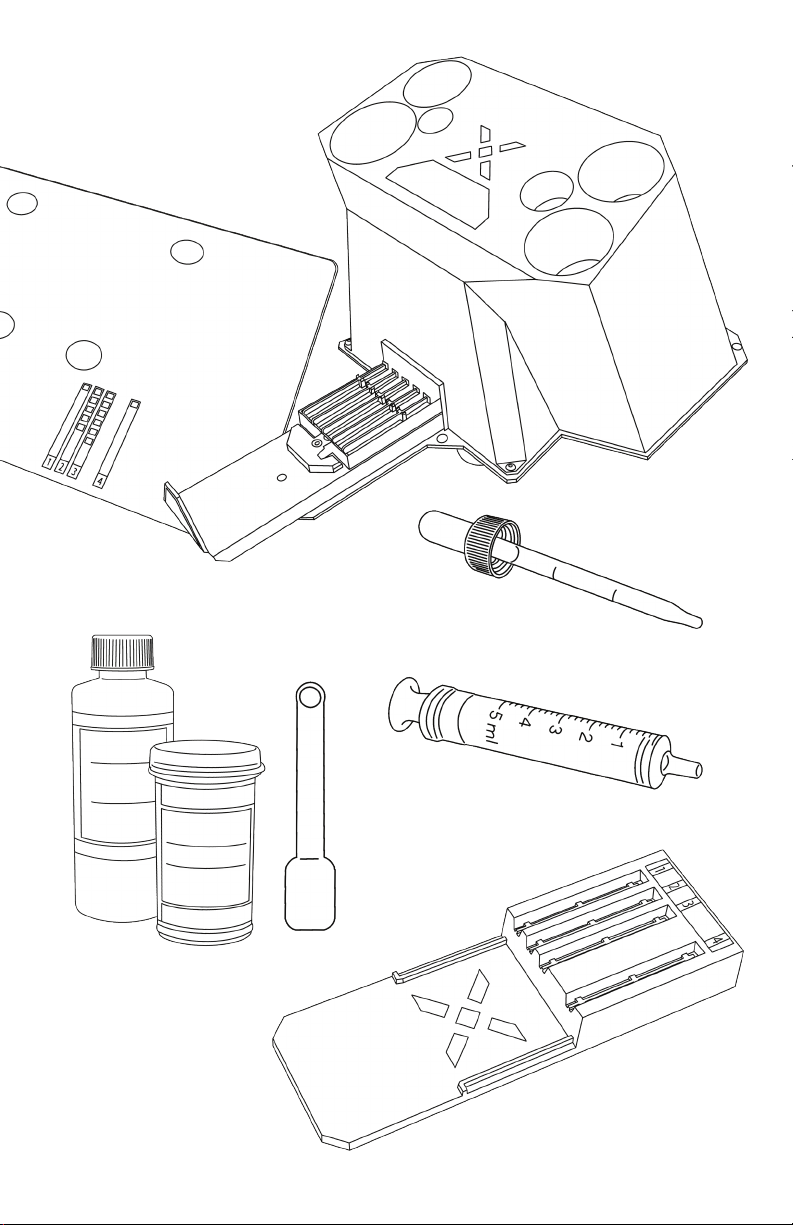
Sample prep:
1) Rinse water sample dipping vial with water to be tested.
2) Pour your sample water into the center chamber (fill to the top) of the
water sample dipping vial.
3) If you are performing iron and/or phosphate testing, prep reagents
MUST be used with both tests.The prep reagents ensure the highest
level of accuracy for these tests.
4) Cap the center chamber and swirl to mix prep reagents.
Pro Tip: Add the prep reagents to the empty chambers so that the addition of the
water helps mix the sample.
a. For Iron Prep, add one level scoop of R-9103 to chamber 1.
b. For Phosphate Prep, use pipet to add 0.5 mL of R-9112-C to
chamber 4.
c. Use the syringe to measure out the 5 mL of sample water from
the center chamber and add to the iron chamber. Repeat for
the phosphate chamber.

The Test Strip Clip and Test Strip Loader are color-coded and labeled to match with
corresponding strips to ensure proper readings.
The strip loader makes adding strips simple, and it ensures the strips are aligned
for accuracy.
Test:
1) Place the desired strip(s) onto the appropriate slots on the strip
loader and use the strip clip to pick them up.
2) Select “Start Test” in the sureTREAT®software. sureTREAT will provide
timers on the screen, as well as audio cues if you have speakers.
3) Dip the test strips into the vial for 2 seconds noting the correct
orientation of test strips to the vial, remove, do not shake off excess
water, and place the strip clip onto the shuttle. Press the shuttle into
the device.
4) After one minute of testing, your results are ready.
5) Empty and rinse water sample dipping vial after each test.
Pro Tip: If you have multiple samples to be tested, this is a great time to start the
process for your next test.
Pro Tips for handling test strips:
∙Be sure you have dry hands before opening the test
strip bottle.
∙Always handle strips from the bottom to avoid contact with the
test pads.
∙Keep lid securely closed after removing a strip to prevent
moisture from entering the bottle.
You will notice that the Flex 2 strip is packaged in an individually foil-wrapped
sleeve. This packaging helps protect the strip from sunlight which can degrade the
salt test pad.
Pro Tip: For best results, pour used sample water out of the vial by holding the vial
horizontally versus vertically. The iron and phosphate test prep reagents can cause
interference if they enter and contaminate the center chamber.

Thank you for choosing Xpress Flex™for your in-store testing needs.
We value the trust you have placed in Taylor®, and we trust that Xpress Flex
will help you confidently meet the needs of your customers.
Now, let’s start Flexing!
Taylor’s technical support team is available for additional questions,
feedback, and product support.
For Support: 1-877-TEST KIT (837-8548)
TechSupport@TaylorTechnologies.com
For Ordering: 1-800-TEST KIT (837-8548)
Taylor Water Technologies LLC
31 Loveton Circle
Sparks, MD 21152
#5010
rev. C
07/06/22
Table of contents
Other Taylor Test Equipment manuals