Team Kalorik TKG SKV 1004 User manual

PROLINE
REFRIGERATEUR
BRF40
Aspirateur balai
TKG SKV 1004
KALORIK
MANUEL D'UTILISATION
Besoin d'aide ? Rendez-vous sur https://sav.darty.com

Copies of the I/B. Please reproduce them without any changes
except under special instruction from Team International BELGIUM.
The pages must be reproduced and folded in order to obtain a
booklet A5 (+/- 148.5 mm width x 210 mm height). When folding,
make sure you keep the good numbering when you turn the pages
of the I/B. Don’t change the page numbering. Keep the language
integrity.
Front cover page (first page)
Assembly page 1/40
Fax +32 2 359 95 50
TKG SKV 1004
18 V DC 125 W
I/B Version
180329
2 in 1 Water Filtration Vacuum Cleaner
2 in 1 Akkubetriebener Hand- & Stielstaubsauger
Aspirateur 2 en 1 à Filtration à Eau
2 in 1 Waterfiltratie Steelstrofzuiger
Aspirador Vertical con Filtro de Agua 2 in 1
Odkurzacz z filtracją wody 2 w 1
Copies of the I/B. Please reproduce them without any changes
except under special instruction from Team International BELGIUM.
The pages must be reproduced and folded in order to obtain a
booklet A5 (+/- 148.5 mm width x 210 mm height). When folding,
make sure you keep the good numbering when you turn the pages
of the I/B. Don’t change the page numbering. Keep the language
integrity.
2 TKG SKV 1004 - 180329
Assembly page 2/40
Fax +32 2 359 95 50
Illustrations - Abbildungen - Illustraties
Ill. 1
Ill. 2
Ill. 3
Copies of the I/B. Please reproduce them without any changes
except under special instruction from Team International BELGIUM.
The pages must be reproduced and folded in order to obtain a
booklet A5 (+/- 148.5 mm width x 210 mm height). When folding,
make sure you keep the good numbering when you turn the pages
of the I/B. Don’t change the page numbering. Keep the language
integrity.
3 TKG SKV 1004 - 180329
Assembly page 3/40
Fax +32 2 359 95 50
Ill. 4
Ill. 5
Ill. 6
Ill. 7

Copies of the I/B. Please reproduce them without any changes
except under special instruction from Team International BELGIUM.
The pages must be reproduced and folded in order to obtain a
booklet A5 (+/- 148.5 mm width x 210 mm height). When folding,
make sure you keep the good numbering when you turn the pages
of the I/B. Don’t change the page numbering. Keep the language
integrity.
4 TKG SKV 1004 - 180329
Assembly page 4/40
Fax +32 2 359 95 50
Ill. 8 Ill. 9
Ill. 10
Copies of the I/B. Please reproduce them without any changes
except under special instruction from Team International BELGIUM.
The pages must be reproduced and folded in order to obtain a
booklet A5 (+/- 148.5 mm width x 210 mm height). When folding,
make sure you keep the good numbering when you turn the pages
of the I/B. Don’t change the page numbering. Keep the language
integrity.
5 TKG SKV 1004 - 180329
Assembly page 5/40
Fax +32 2 359 95 50
Ill. 11 Ill. 12
Ill. 13

Copies of the I/B. Please reproduce them without any changes
except under special instruction from Team International BELGIUM.
The pages must be reproduced and folded in order to obtain a
booklet A5 (+/- 148.5 mm width x 210 mm height). When folding,
make sure you keep the good numbering when you turn the pages
of the I/B. Don’t change the page numbering. Keep the language
integrity.
6 TKG SKV 1004 - 180329
Assembly page 6/40
Fax +32 2 359 95 50
EN
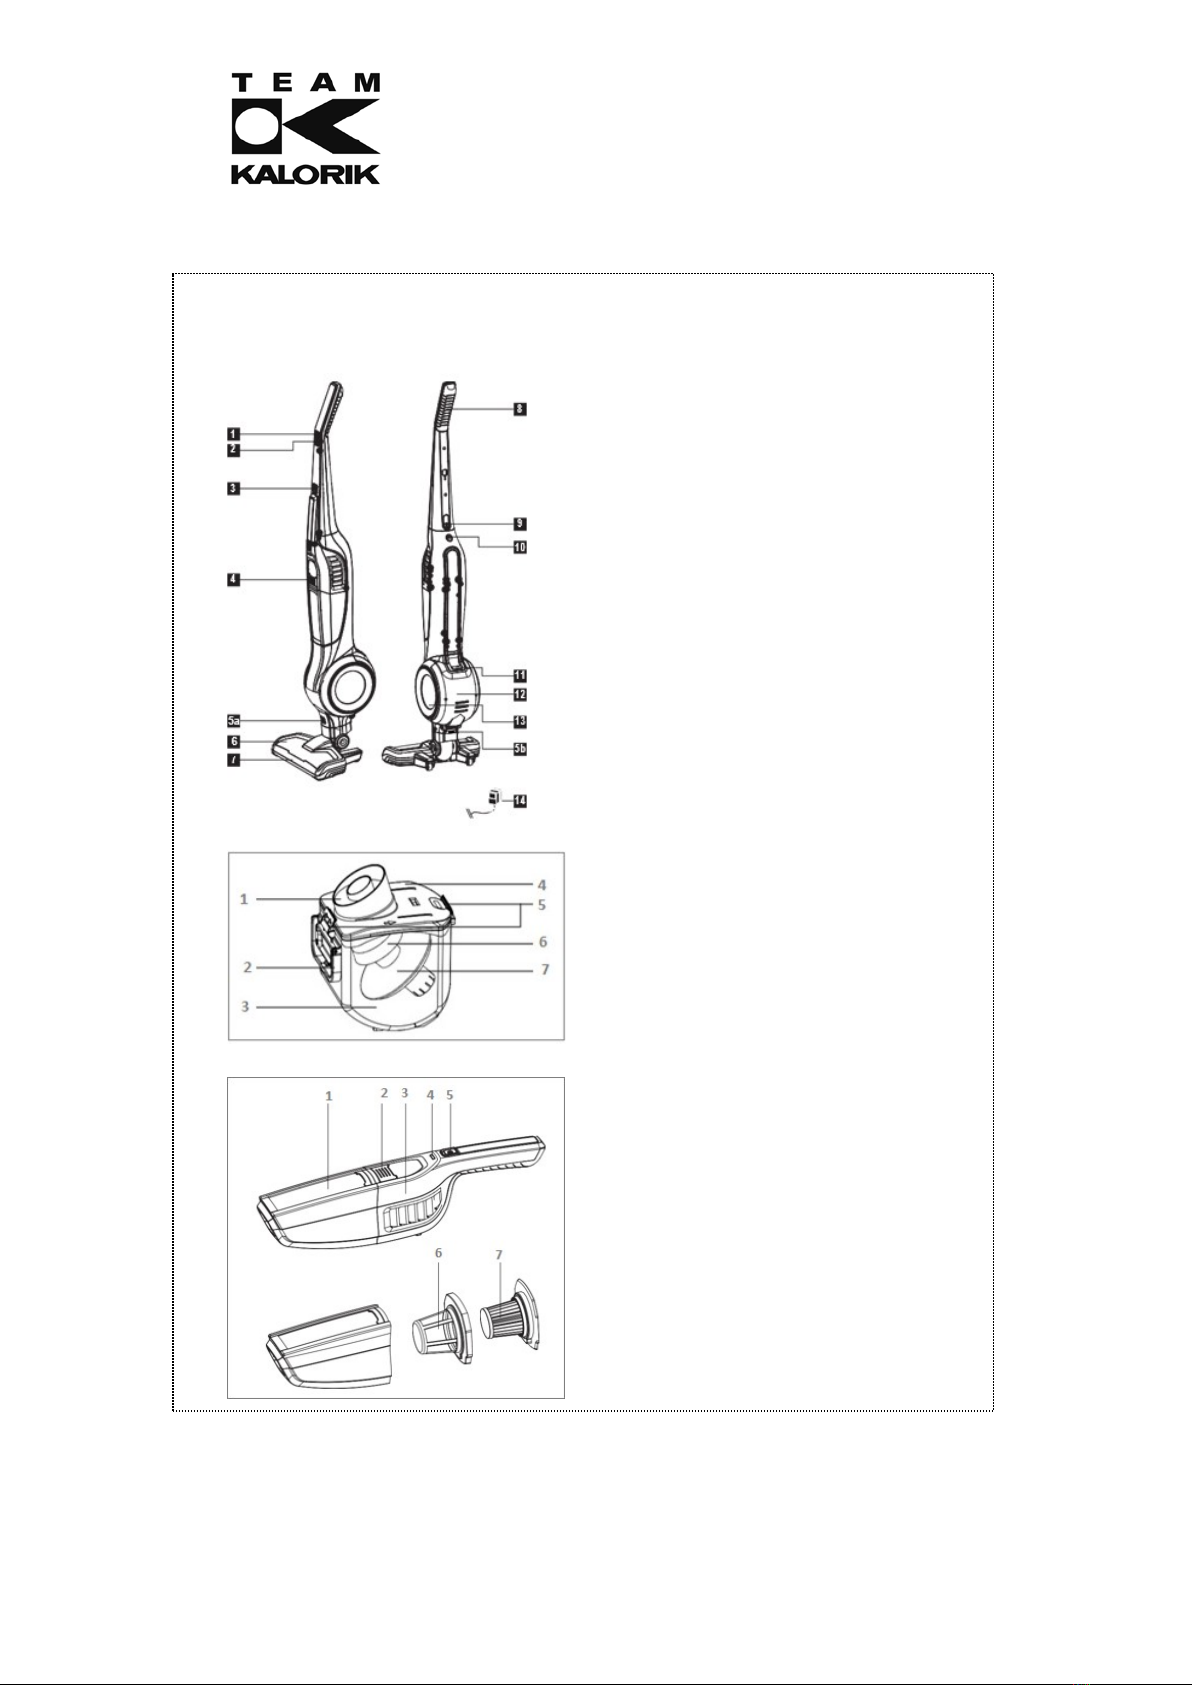
CONSTRUCTION AND COMPONENTS
Main Unit (Ill. 1)
1. On / Off switch
2. Switch for ECO mode
3. Switch for releasing the hand vacuum
cleaner
4. Hand vacuum cleaner
5. Button to detach the floor brush (Ill.
5a+5b)
6. Floor brush
7. LED-Light indicator
8. Handle
9. Handle locking screw
10. Connection charging cable
11. Switch for releasing the water tank
12. Water tank casing
13. Water tank
14. Power supply
Water tank (Ill. 2)
1. Textile-permanent filter
2. Handle
3. Water tank
4. Water tank lid
5. Lid locking clips
6. Inner tube
7. Tube end caps
Hand vacuum cleaner (Ill. 3)
1. Dust container
2. Dust container release
3. Exhaust air slots with textile filter
4. Charge indicator
5. On-/ Off switch
6. Filter Holder
7. HEPA filter cartridge
D
AUFBAU UND BESTANDTEILE
Hauptgerät (siehe Abb. 1)
1. Ein-/Ausschalter
2. Schalter für ECO-Modus
3. Schalter zum Lösen des Handteils
4. Handstaubsauger
5. Knopf zum Lösen der Bodendüse (siehe
5a+5b)
6. Bodendüse
7. LED-Beleuchtung
8. Griff
9. Feststellschraube Griff
10. Anschluss Ladekabel
11. Schalter zum Lösen des
Wasserbehälters
12. Ummantelung Wasserbehälter
13. Wasserbehälter
14. Netzteil
Wasserbehälter (siehe Abb. 2)
1. Textil-Dauerfilter
2. Griff
3. Wasserbehälter
4. Behälterdeckel
5. Deckelverschlussclips
6. Innenrohr
7. Rohrabschluss
Handteil (siehe Abb. 3)
1. Staubbehälter
2. Staubbehälterfreigabe
3. Abluftschlitze mit Textilfilter
4. Ladeanzeige
5. Ein-/Ausschalter
6. Filterhalter
7. HEPA-Filtereinsatz
FR
CONSTRUCTION ET COMPOSANTS
Unité principale (Ill. 1)
1. Interrupteur marche / arrêt
2. Interrupteur pour mode ECO
3. Bouton pour détacher l’aspirateur à
main
4. Aspirateur à main
5. Bouton pour détacher la brosse à
plancher (Ill. 5a + 5b)
6. Brosse pour sol
7. Indicateur LED
8. Poignée
9. Vis d’attache de la poignée
10. Connexion pour le câble de charge
11. Bouton pour détacher le réservoir
d'eau
12. Boîtier du réservoir d'eau
13. Réservoir d'eau
14. Alimentation
Réservoir d'eau (Ill. 2)
1. Filtre textile permanent
2. Poignée
3. Réservoir d'eau
4. Couvercle du réservoir d'eau
5. Clips de fermeture du couvercle
6. Tuyau intérieur
7. Embouts de tuyau

Copies of the I/B. Please reproduce them without any changes
except under special instruction from Team International BELGIUM.
The pages must be reproduced and folded in order to obtain a
booklet A5 (+/- 148.5 mm width x 210 mm height). When folding,
make sure you keep the good numbering when you turn the pages
of the I/B. Don’t change the page numbering. Keep the language
integrity.
7 TKG SKV 1004 - 180329
Assembly page 7/40
Fax +32 2 359 95 50
Aspirateur à main (Ill. 3)
1. Bac à poussière
2. Bouton pour détacher le bac à
poussière
3. Fentes de sortie d’air avec filtre textile
4. Indicateur de charge
5. Interrupteur marche / arrêt
6. Porte-filtre
7. Filtre HEPA
NL
CONSTRUCTIE EN COMPONENTEN
Hoofdtoestel (Ill. 1)
1. Aan / uit-schakelaar
2. ECO-modus schakelaar
3. Knop om het handstuk los te maken
4. Handstofzuiger
5. Knop om de vloerborstel los te maken
(Ill. 5a + 5b)
6. Vloerborstel
7. LED-lichtindicator
8. Handvat
9. Handvat fixatieschroef
10. Aansluiting laadkabel
11. Knop om de watertank los te maken
12. Deksel van de watertank
13. Watertank
14. Electriciteitsaansluiting
Watertank (Ill. 2)
1. Permanent textielfilter
2. Handvat
3. Watertank
4. Watertankdeksel
5. Vergrendelklemmen van het deksel
6. Binnenbuis
7. Eindkappen van de buis
Handstofzuiger (Ill. 3)
1. Stofcontainer
2. Knop om de stofcontainer los te
maken
3. Uitlaatluchtsleuven met textielfilter
4. Oplaadindicator
5. Aan- / uitschakelaar
6. Filterhouder
7. HEPA filter
PL
BUDOWA I KOMPONENTY
Jednostka główna (il. 1)
1. Włącznik/Wyłącznik
2. Przycisk modułu ECO
3. Przycisk zwalniania odkurzacza
ręcznego
4. Odkurzacz ręczny
5. Przycisk odczepiania szczotki/ssawy (il.
5a+5b)
6. Szczotka/Ssawa
7. Lampka kontrolna LED
8. Uchwyt
9. Śruba blokująca uchwyt
10. Wejście na kabel ładujący
11. Przycisk zwalniania pojemnika na
wodę
12. Obudowa pojemnika na wodę
13. Pojemnik na wodę
14. Przewód zasilający
Pojemnik na wodę (il. 2)
1. Filtr tekstylny
2. Uchwyt
3. Zbiornik wody
4. Pokrywa zbiornika wody
5. Zatrzaski blokujące pokrywę
6. Rurka wewnętrzna
7. Końcówki rurki
Odkurzacz ręczny (il. 3)
1. Pojemnik na kurz
2. Zwolnienie pojemnika na kurz
3. Szczeliny wentylacyjne z filtrem
tekstylnym
4. Wskaźnik naładowania
5. Włącznik / wyłącznik
6. Uchwyt filtra
7. Wkład filtra HEPA
SP
CONSTRUCTION AND COMPONENTS
Main Unit (Ill. 1)
1. On / Off switch
2. Switch for ECO mode
3. Switch for releasing the handpiece
4. Hand vacuum cleaner
5. Button to detach the floor brush (Ill.
5ª+5b)
6. Floor brush
7. LED-Light indicator
8. Handle
9. Handle locking screw
10. Connection charging cable
11. Switch for releasing the water tank
12. Water tank casing
13. Water tank
14. Power supply

Copies of the I/B. Please reproduce them without any changes
except under special instruction from Team International BELGIUM.
The pages must be reproduced and folded in order to obtain a
booklet A5 (+/- 148.5 mm width x 210 mm height). When folding,
make sure you keep the good numbering when you turn the pages
of the I/B. Don’t change the page numbering. Keep the language
integrity.
8 TKG SKV 1004 - 180329
Assembly page 8/40
Fax +32 2 359 95 50
Water tank (Ill. 2)
1. Textile-permanent filter
2. Handle
3. Water tank
4. Water tank lid
5. Lid locking clips
6. Inner tube
7. Tube end caps
Hand vacuum cleaner (Ill. 3)
1. Dust container
2. Dust container release
3. Exhaust air slots with textile filter
4. Charge indicator
5. On-/ Off switch
6. Filter Holder
7. HEPA filter cartridge

Copies of the I/B. Please reproduce them without any changes except
under special instruction from Team International BELGIUM. The pages
must be reproduced and folded in order to obtain a booklet A5 (+/-
148.5 mm width x 210 mm height). When folding, make sure you keep
the good numbering when you turn the pages of the I/B. Don’t change
the page numbering. Keep the language integrity.
Back cover page (last page)
Assembly page 9/40
Fax +32 2 359 95 50
IMPORTANT SAFEGUARDS
Please read these instructions carefully before using the appliance,
and always follow the safety and operating instructions.
Important:
This appliance can be used by children over 8 years old and people
with reduced physical, sensory or mental capacities or with a lack of
experience or knowledge if they have been given supervision or
instructions concerning the safe use of the appliance and the risks
involved. Children shall not play with the appliance. Cleaning and user
maintenance shall not be made by children unless they are older than 8
years and supervised. Never leave the appliance and its cord
unsupervised and within reach of children less than 8 years old or
irresponsible persons, especially when it is plugged into the wall or
when it is cooling down.
•Check that the mains voltage matches the voltage noted on the
appliance before using the appliance.
•Only use the supplied charging cable and power adapter to charge
the appliance. Do not use the power adapter with other devices.
•If the power supply and / or charging cables are damaged, they
must be repaired by the manufacturer, the customer service or a
qualified specialist to avoid any possible hazard.
•Use the appliance for household purposes only as described in this
manual.
•Never immerse the appliance, the charging cable or the mains plug
in water or other liquids.
•Never use the appliance and the power supply near hot surfaces.
•Never use the appliance outdoors and always store it in a dry
place.
•Only suitable for dry vacuuming. Never soak up water or other
liquids.

Copies of the I/B. Please reproduce them without any changes except
under special instruction from Team International BELGIUM. The pages
must be reproduced and folded in order to obtain a booklet A5 (+/-
148.5 mm width x 210 mm height). When folding, make sure you keep
the good numbering when you turn the pages of the I/B. Don’t change
the page numbering. Keep the language integrity.
Back cover page (last page)
Assembly page 10/40
Fax +32 2 359 95 50
•Never vacuum toxic materials, as vapors and dust can be
hazardous to your health.
•Never use the appliance to vacuum mortar, cement or other
substances that harden on contact with water and may interfere
with normal operation of the vacuum cleaner.
•Do not use the appliance on pets.
•Sparks within the motor can ignite flammable vapors or dust. Never
use it near flammable or explosive liquids (such as gasoline, oil
paints, detergents), near gases, explosive substances (such as
coal dust, magnesium, gunpowder), smoke or fire sources.
•Use only accessories recommended by the supplier. Other
accessories pose a danger to the user and could damage the
appliance.
•Always unplug the AC adapter from the wall outlet by pulling on the
plug itself. Never pull on the charging cable.
•Regularly remove blockages caused by hair, dust fluff and the like
in order not to reduce the suction power.
ASSEMBLING THE VACUUM CLEANER
•Unpack the device and all accessories.
•Make sure that all parts mentioned in the manual are present and undamaged.
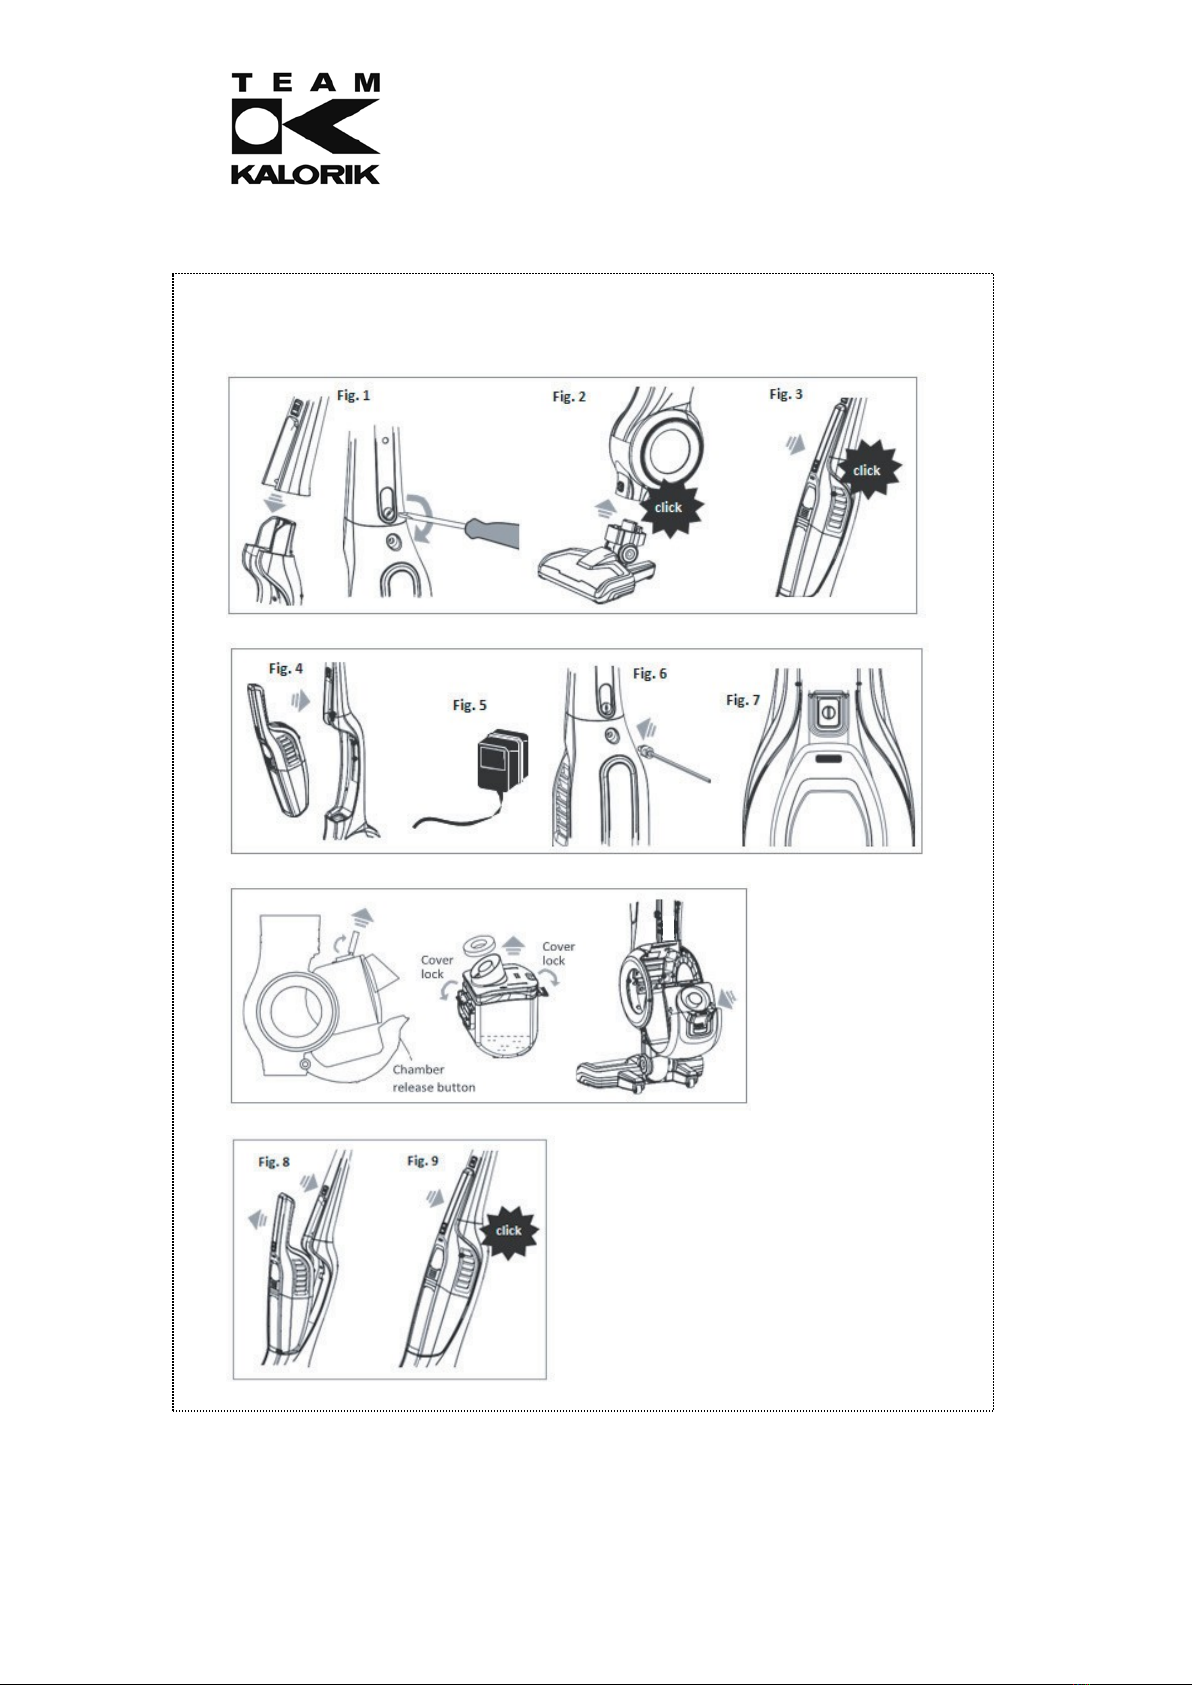
•Carefully secure the handle (8) to the main unit. To do this, carefully pull on the supplied
locking screw (9) (Ill. 4, Fig. 1).
•Insert the hand vacuum cleaner (4) into the main unit. For this, the device must always be
switched off. Pay attention to the "click" sound when snapping in (Ill. 4, Fig. 3). Make sure that
there are no substances between the contacts of the handpiece (4) and the main unit,
•Charge the battery in the following situations:
-Before first use; in this case, the battery must be fully charged (6-8 hours).
-After a long period without use. (For optimal battery life, we recommend charging
the device at least every three months.)
•To load, the hand vacuum cleaner (4) must be inserted in the main unit (Ill. 5, Fig. 4).
•Plug the mains adapter of the charging cable (14) into a socket (Ill. 5, Fig. 5). Connect the
charging cable (14) to the charging port (10) of the main unit (Ill. 5,Fig. 6). Make sure that the
contacts on the charging cable and the vacuum cleaner are clean. If necessary, remove the
charging cable and clean the connectors.
•The charge indicator (4) turns red while the battery is charging (Ill. 5, Fig. 7) and turns to blue
when the battery is fully charged.
•Both the charging cable and the vacuum cleaner may become warm while charging. This is
completely normal.

Copies of the I/B. Please reproduce them without any changes except
under special instruction from Team International BELGIUM. The pages
must be reproduced and folded in order to obtain a booklet A5 (+/-
148.5 mm width x 210 mm height). When folding, make sure you keep
the good numbering when you turn the pages of the I/B. Don’t change
the page numbering. Keep the language integrity.
Back cover page (last page)
Assembly page 11/40
Fax +32 2 359 95 50
•If you use the hand vacuum cleaner for a long period of time, the batteries can also warm up
here. This is also completely normal.
Note: For best performance, it is recommended to charge the vacuum cleaner after each use.
USE
•DANGER! Do not use the product while it is charging.
•DANGER! Never touch the rotating parts of the floor brush during operation.
•Remove the water tank (Ill. 6) by first using the switch (11) and opening the water tank casing
(12). Remove the water tank (3) using the handle (2). Open the locking clips (5) and remove
the lid (4).
•Pour clean water in the tank, up to the mark.
•Close the lid (4) again and put the water tank (3) back into the main unit.
•Press the on / off switch (1) on the handle (8) of the main unit to switch on the device. Use the
ECO switch (2) to change the speed levels.
Note:
1. During cleaning, foam may form in the water tank. The performance of the device is not
affected by slight foaming.
2. Detergent, soap powder, bleach and the like MUST NOT be added to the water tank.
•Press the on / off button (1) again to switch off the appliance.
•During short breaks, you can stop the vacuum cleaner by tilting the appliance slightly
forward.
Note: Make sure that the vacuum cleaner is on a level, non-slip surface before releasing it, to
prevent it from falling over and causing possible damage to the unit or floor.
ATTENTION! Turn off the vacuum cleaner before each shutdown, otherwise the rotating bristles may
permanently damage your (carpet) floor.
•The floor brush is suitable for the daily cleaning of larger surfaces, hard and smooth floors or
carpets.
•The hand vacuum cleaner is suitable for mattresses, sofas, curtains and wallpapers. Press the
release button (3) on the main unit to remove the handle (4) (Ill. 7, Fig. 8). Switch on the
device by pressing the on / off switch (5) on the hand vacuum cleaner.
•Never use the hand vacuum cleaner to vacuum water or other liquids.
BATTERY WARNING
•Blue - Battery full
•Blinking blue - Less than 20% battery remaining
•Blinking red - Low battery status
CLEANING AND CARE
•Switch off the appliance before each cleaning.
•Wipe the housing of the hand vacuum cleaner and the main unit with a soft, dry cloth.
•Persistent stains can be removed with a damp cloth and some detergent. Dry the cleaned
area completely afterwards.
•Change the water in the tank while using the vacuum cleaner as soon as it is dirty and after
each use at the latest. To do this, press the release switch (11) and remove the water tank (Ill.
Copies of the I/B. Please reproduce them without any changes except
under special instruction from Team International BELGIUM. The pages
must be reproduced and folded in order to obtain a booklet A5 (+/-
148.5 mm width x 210 mm height). When folding, make sure you keep
the good numbering when you turn the pages of the I/B. Don’t change
the page numbering. Keep the language integrity.
Back cover page (last page)
Assembly page 12/40
Fax +32 2 359 95 50
10, Fig. 13). Proceed as for filling the water tank. Empty the water tank and clean it thoroughly
with water.
•Turn the inner tube (6) counterclockwise to remove it (Ill. 10, Fig. 15); you can also refer to the
marking. Clean the lid, tube, inner tube and textile filter with cleanwater and let everything
dry thoroughly before reassembling and installing the water tank.
•Lay the vacuum cleaner flat on the floor to disassemble the floor brush (6). To do this, press
the release switches (5a, 5b) simultaneously (Ill. 11, Fig. 16).
•Clean the dust container of the hand vacuum cleaner after each use. Remove the dust
container from the engine block by pressing the release button (2). We recommend that you
do this over a trash can (Ill. 9, Fig. 10).
•Remove the filter holder (6) and filter cartridge (7) by turning it counterclockwise (Ill. 9, Fig. 11).
Tap the filter cartridge and clean the filter holder under running water (Ill. 9, Fig. 12). Allow all
parts to dry before reassembling.
•Cleaning the filter and the dust container is very important, as it allows the device to operate
optimally and eliminates unpleasant odors.
•Manually rotate the mobile element of the floor brush regularly to remove any foreign objects
that may be stuck (Ill. 12).
•If the moving element does not rotate (Ill. 13), pull back the switch on the left side of the brush
(a) and remove the roller (b). (Ill. 13, Fig. 18). Remove dirt and grime. When using a pair of
scissors, be careful not to injure yourself or cut off the brushes (Ill. 13, Fig. 19 & 20). Put the roller
back in and check if it can be easily moved manually (Ill. 13, Fig. 21)
Note: After each use, check that the brush still rotates smoothly.
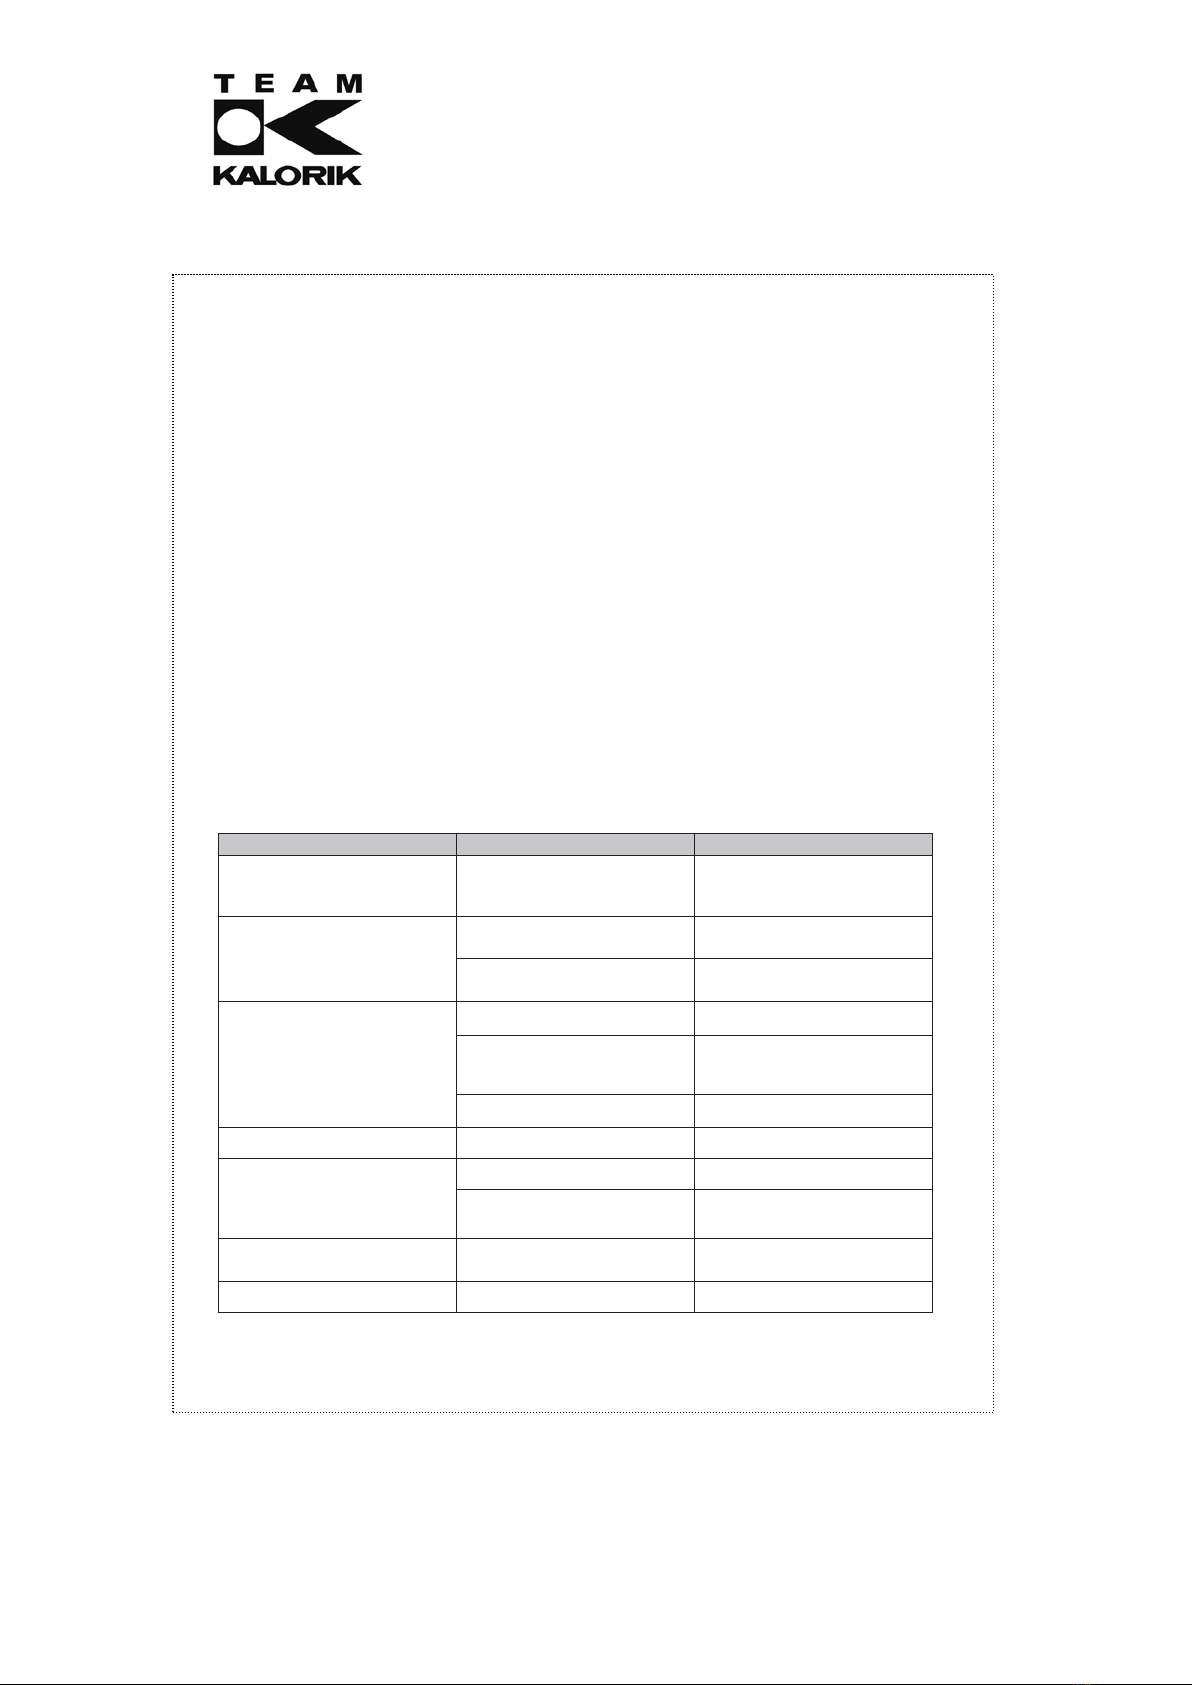
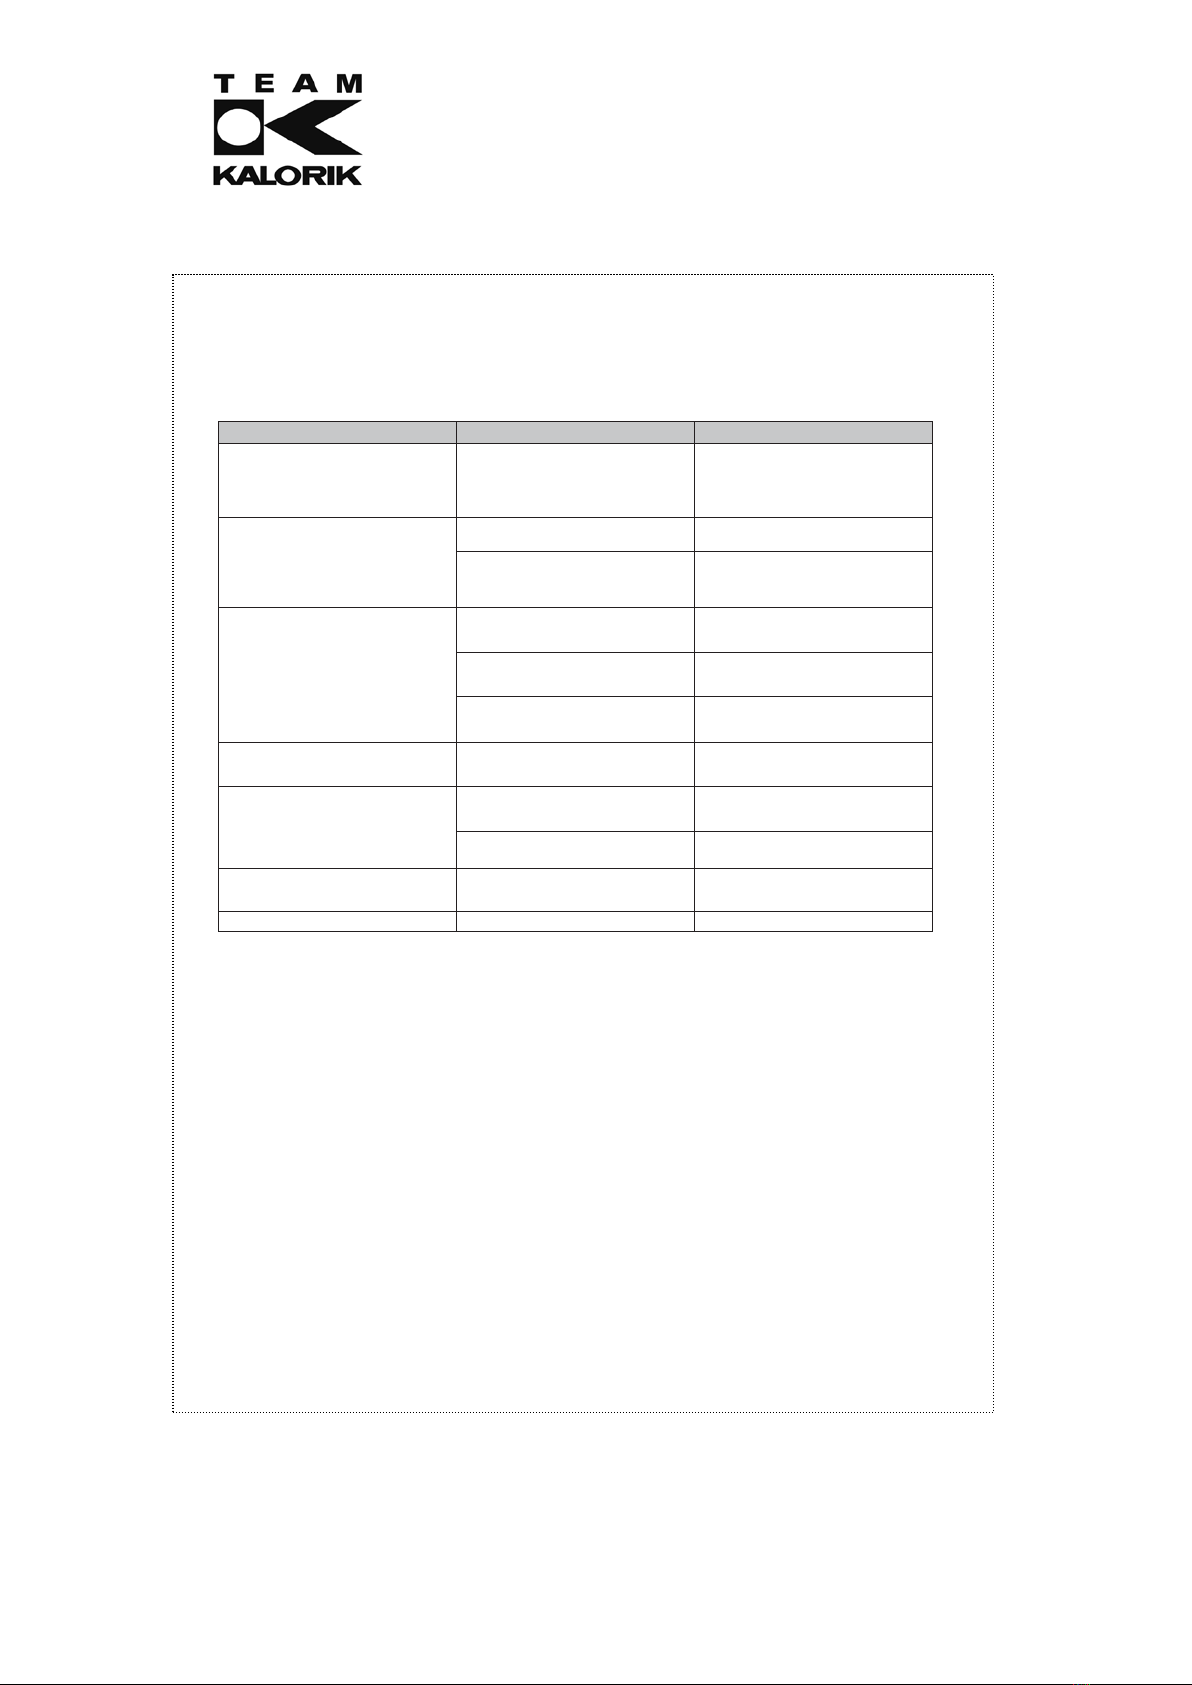
TROUBLESHOOTING
Problem Possible cause Solution
The vacuum cleaner does not
turn on
The vacuum cleaner has not
been charged
Make sure the vacuum cleaner
has been fully charged before
first time use or if it has not been
used for a long time
The vacuum cleaner is not
charging The power switch is not turned
on Make sure the power switch of
the main power supply is turned
on
The power cord is damaged Do not use a damaged power
cord. Please contact the
customer service center
The suction power is decreasing The crevice tools or extension
hose may be blocked Check for any blockages and
clear them
The water in the water tank is
very dirty Regularly replace the water in
the reservoir by clean water and
empty the water tank after each
use
The filter is dirty Check with the supplier for
replacement parts
Vacuum cleaner is overheating The filter is dirty Check the filter and clean off any
dirt
The air coming out of the
vacuum cleaner smells bad The filter is dirty Check the filter and clean off any
dirt
The filter is not dry
Make sure the filter is dry before
inserting it back into the hand
vacuum cleaner. Replace the
water with clean water if needed.
The battery/ charging indicator
light is blinking The vacuum cleaner is out of
power Recharge the vacuum cleaner to
its full capacity. The light will
stop blinking.
The brush does not turn
anymore
The brush is dirty Clean the brush

Copies of the I/B. Please reproduce them without any changes except
under special instruction from Team International BELGIUM. The pages
must be reproduced and folded in order to obtain a booklet A5 (+/-
148.5 mm width x 210 mm height). When folding, make sure you keep
the good numbering when you turn the pages of the I/B. Don’t change
the page numbering. Keep the language integrity.
Back cover page (last page)
Assembly page 13/40
Fax +32 2 359 95 50
PROTECTION OF THE ENVIRONMENT – DIRECTIVE 2012/19/EU
In order to preserve our environment and protect human health, the waste electrical and
electronic equipment should be disposed of in accordance with specific rules with the implication
of both suppliers and users. For this reason, as indicated by the symbol on the rating label or
on the packaging, your appliance should not be disposed of as unsorted municipal waste. The
user has the right to bring it to a municipal collection point performing waste recovery by means of
reuse, recycling or use for other applications in accordance with the directive.
ErP Declaration – Regulation 1275/2008/EC
We, Team Kalorik SA/NV, hereby confirm that our product meets the requirements of regulation
1275/2008/EC. Admittedly, our product does not dispose of a function to minimize the power
consumption, which should according to regulation 1275/2008/EC put the product in off or
standby mode after finishing the main function, but this is practically impossible, as it would
compromise the main function of the product so strongly, that using the product would no longer
be possible!
For this reason we always tell the customer in our instruction manual to unplug the appliance
immediately after use.
The user manual is also available in electronic format from the after-sales service by simple request
(see warranty card).

Copies of the I/B. Please reproduce them without any changes except
under special instruction from Team International BELGIUM. The pages
must be reproduced and folded in order to obtain a booklet A5 (+/-
148.5 mm width x 210 mm height). When folding, make sure you keep
the good numbering when you turn the pages of the I/B. Don’t change
the page numbering. Keep the language integrity.
Back cover page (last page)
Assembly page 14/40
Fax +32 2 359 95 50
Vor Inbetriebnahme die Gebrauchsanleitung sorgfältig lesen,
danach handeln und aufbewahren! Bei Weitergabe des Gerätes die
Gebrauchsanleitung beilegen.
WICHTIGE SICHERHEITSVORSCHRIFTEN
Wichtig: Das Gerät kann von Kindern ab 8 Jahren und von
Personen mit einer körperlichen, sensorischen, geistigen oder
motorischen Behinderung oder einem Mangel an Erfahrung und
Kenntnissen verwendet werden, sofern diese Personen
beaufsichtigt oder über den sicheren Gebrauch des Geräts
unterrichtet wurden und die damit verbundenen Gefahren
verstanden haben. Kinder dürfen nicht mit dem Gerät spielen.
Reinigung und Benutzer-Wartung dürfen nicht durch Kinder
durchgeführt werden, es sei denn, sie sind älter als 8 Jahre und
beaufsichtigt. Lassen Sie Ihr Gerät und sein Netzkabel nie
unbeaufsichtigt und in Reichweite von Kindern jünger als 8
Jahre oder unverantwortlichen Personen, wenn es an der
Steckdose hängt oder wenn es abkühlt.
•Kontrollieren Sie, ob die Netzspannung mit der auf dem Gerät
vermerkten Spannung übereinstimmt, bevor Sie das Gerät
benutzen.
•Benutzen Sie ausschließlich das mitgelieferte Ladekabel und
Netzteil zum Aufladen des Gerätes. Verwenden Sie das Netzteil
nicht für andere Geräte.
•Weisen Netzteil und/oder Ladekabel Beschädigungen auf,
müssen sie vom Hersteller, seinem Kundendienst
oder einer qualifizierten Fachkraft ersetzt werden, um eine
mögliche Gefährdung auszuschließen.

Copies of the I/B. Please reproduce them without any changes except
under special instruction from Team International BELGIUM. The pages
must be reproduced and folded in order to obtain a booklet A5 (+/-
148.5 mm width x 210 mm height). When folding, make sure you keep
the good numbering when you turn the pages of the I/B. Don’t change
the page numbering. Keep the language integrity.
Back cover page (last page)
Assembly page 15/40
Fax +32 2 359 95 50
•Verwenden Sie das Gerät ausschließlich zu Haushaltszwecken
wie in dieser Anleitung beschrieben.
•Tauchen Sie das Gerät, das Ladekabel oder den Netzstecker
niemals in Wasser oder andere Flüssigkeiten.
•Benutzen Sie das Gerät und das Netzteil niemals in der Nähe
heißer Oberflächen.
•Benutzen Sie das Gerät niemals im Freien und bewahren Sie
es stets an einem trockenen Platz auf.
•Nur zum Trockensaugen geeignet. Saugen Sie damit niemals
Wasser oder andere Flüssigkeiten auf.
•Saugen Sie niemals toxische Materialien auf, da Dämpfe und
Staub gesundheitsgefährdend sein können.
•Benutzen Sie das Gerät niemals zum Aufsaugen von Mörtel,
Zement oder anderen Stoffen, die bei Kontakt mit Wasser
aushärten und entsprechend den normalen Betrieb des
Staubsaugers stören können.
•Verwenden Sie das Gerät nicht an Haustieren.
•Funken innerhalb des Motors können brennbare Dämpfe oder
Staub entzünden. Verwenden Sie das Gerät daher niemals in
der Nähe entzündlicher oder explosiver Flüssigkeiten (z.B.
Benzin, Ölfarben, Reinigungsmittel), in der Nähe von Gasen,
explosiven Substanzen (z.B. Kohlenstaub, Magnesium,
Schießpulver) oder Rauch- bzw. Feuerquellen.
•Benutzen Sie nur Zubehör, welches vom Lieferanten empfohlen
wurde. Anderes Zubehör stellt eine Gefahr für den Benutzer dar
und das Gerät könnte dadurch beschädigt werden
•Entfernen Sie das Netzteil stets aus der Steckdose, indem Sie
am Stecker selbst ziehen. Ziehen Sie niemals am Ladekabel.
•Entfernen Sie regelmäßig Verstopfungen durch Haare,
Staubflusen und ähnliches, um die Saugleistung nicht zu
verringern.
ZUSAMMENBAUEN DES STAUBSAUGERS
•Packen Sie das Gerät und alle Zubehörteile aus.
•Stellen Sie sicher, dass alle in der Anleitung genannten Teile vorhanden und
unbeschädigt sind.
•Befestigen Sie den Stielgriff (8) vorsichtig an der Haupteinheit. Ziehen Sie dazu die
mitgelieferte Feststellschraube (9) vorsichtig an (Abb. 4, Fig. 1).
•Setzen Sie den Handstaubsauger (4) in die Haupteinheit ein. Dafür muss das Gerät
stets ausgeschaltet sein. Achten Sie auf das „Klick“-Geräusch beim Einrasten (Abb. 4,

Copies of the I/B. Please reproduce them without any changes except
under special instruction from Team International BELGIUM. The pages
must be reproduced and folded in order to obtain a booklet A5 (+/-
148.5 mm width x 210 mm height). When folding, make sure you keep
the good numbering when you turn the pages of the I/B. Don’t change
the page numbering. Keep the language integrity.
Back cover page (last page)
Assembly page 16/40
Fax +32 2 359 95 50
Fig. 3). Achten Sie darauf, dass sich keine Substanzen zwischen den Kontakten des
Handteils (4) und der Haupteinheit befinden,
•Laden Sie in den folgenden Sitautionen den Akku:
-Vor dem ersten Gebrauch; in diesem Fall muss der Akku voll aufgeladen
werden (6-8 Stunden).
-Nach längerer Nichtbenutzung. (Für die optimale Batterielebensdauer
empfehlen wir, dass Gerät mindestens alle drei Monate zu laden.)
•Zum Laden muss das Handteil (4) in die Haupteinheit eingesetzt sein (Abb. 5, Fig. 4).
•Stecken Sie den Netzadapter des Ladekabels (14) in eine Steckdose (Abb. 5, Fig. 5).
Verbinden Sie das Ladekabel (14) mit dem Ladeanschluss (10) der Haupteinheit (Abb.
5, Fig. 6). Achten Sie darauf, dass die Kontakte an Ladekabel und Staubsauger sauber
sind. Wenn nötig, entfernen Sie das Ladekabel und reinigen Sie die Anschlüsse.
•Die Ladeanzige (4) leichtet rot, während der Aku lädt (Abb. 5, Fig. 7) und wechselt zu
blau, wenn der Akku voll aufgeladen ist.
•Sowohl das Ladekabel als auch der Staubsauger können während des Ladens warm
werden. Dies ist völlig normal.
•Wenn Sie das Handteil über einen längeren Zeitraum benutzen, können sich auch hier
die Akkus erwärmen. Das ist ebenfalls völlig normal.
Hinweis: Für die bestmögliche Leistung empfiehlt es sich, den Staubsauger nach jeder
Nutzung zu laden.
GEBRAUCH
•ACHTUNG! Benutzen Sie das Produkt nicht, während es lädt.
•ACHTUNG! Berühren Sie niemals die drehenden Teile der Bodendüse während des
Betriebs.
•Entnehmen Sie den Wasserbehälter (Abb. 6), indem Sie zunächst den
Entriegelungsschalter (11) betätigen und die Ummantelung (12) öffnen. Entfernen Sie
den Behälter (3) mit Hilfe des Griffs (2). Öffnen Sie die Verschlussclips (5) und entfernen
Sie den Deckel (4).
•Gießen Sie frisches Wasser bis zu Markierung in den Behälter.
•Verschließen Sie den Deckel (4) wieder und setzten Sie den Behälter (3) wieder in die
Haupteinheit ein.
•Drücken Sie den Ein-/Ausschalter (1) am Stiel (8) der Haupteinheit um das Gerät
einzuschalten. Mithilfe des ECO-Schalters (2) wechseln Sie die Geschwindigkeitsstufen.
Hinweis:
1. Während des Reinigens kann sich Schaum im Wasserbehälter bilden. Die Leistung
des Gerätes wird durch leichte Schaumbildung jedoch nicht beeinflusst.
2. Reiniger, Seifenpulver, Bleichmittel und ähnliches dürfen NICHT in den Wassertank
gegeben werden.
•Drücken Sie den Ein-/Ausschalter (1) erneut, um das Gerät auszuschalten.
•Während kurzer Pausen können Sie den Staubsauger abstellen, indem Sie das Gerät
leicht nach vorne neigen.
Hinweis: Achten Sie darauf, dass sich der Staubsauger auf einem ebenen, rutschsicheren
Untergrund befindet, bevor Sie ihn loslassen, um ein Umfallen und mögliche Schäden am
Gerät oder dem Boden zu vermeinden.
ACHTUNG! Schalten Sie den Staubsauger vor jedem Abstellen aus, da die rotierenden
Borsten andernfalls auf Dauer Ihren (Teppich-)Boden beschädigen können.

Copies of the I/B. Please reproduce them without any changes except
under special instruction from Team International BELGIUM. The pages
must be reproduced and folded in order to obtain a booklet A5 (+/-
148.5 mm width x 210 mm height). When folding, make sure you keep
the good numbering when you turn the pages of the I/B. Don’t change
the page numbering. Keep the language integrity.
Back cover page (last page)
Assembly page 17/40
Fax +32 2 359 95 50
•Die Bodendüse eignet sich zum täglichen Reinigen von größeren Flächen, harten und
glatten Böden oder Teppichböden.
•Das Handteil eignet sich für Matratzen, Sofas, Gardinen und Tapeten. Drücken Sie den
Entriegelungsschalter (3) an der Haupteinheit, um das Handteil (4) zu entnehmen
(Abb. 7, Fig. 8). Schalten Sie das Gerät durch Drücken des Ein-/Ausschalters (5) am
Handteil ein.
•Nutzen Sie den Handstaubsauger niemals, im Wasser oder andere Flüssigkeiten
aufzusaugen.
BATTERIEANZEIGE
•Blau – Akku voll
•Blinkt Blau – weniger als 20 % Akku verbleiben
•Blinkt Rot – Niedriger Akkustatus
REINIGUNG UND PFLEGE
•Schalten Sie das Gerät vor jeder Reinigung aus.
•Wischen Sie das Gehäuse von Handteil und Haupteinheit mit einem weichen,
trockenen Tuch ab.
•Hartnäckige Flecken können Sie mit einem feuchten Tuch und etwas
Spülmittelentfernen. Trocknen Sie die betroffene Stelle anschließend vollständig.
•Wechseln Sie das Wasser im Behälter während des Saugens, sobald es schmutzig ist
und spätestens nach jeder Benutzung. Drücken Sie dafür den Freigabeschalter (11)
und entnehmen Sie den Wasserbehälter (Abb. 10, Fig. 13). Gehen Sie wie beim
Befüllen des Behälters vor. Entleeren Sie den Behälter und reinigen Sie ihn gründlich mit
Wasser.
•Drehen Sie das Innenrohr (6) entgegen den Uhrzeigersinn, um es zu Entnehmen (Abb.
10, Fig. 15); beachten Sie dazu auch die angebrachte Markierung. Reinigen Sie
Deckel, Rohrabschluss, Innenrohr und Textilfilter mit klarem Wasser und lassen Sie alles
gründlich trocknen, bevor Sie den Behälter wieder zusammen- und einbauen.
•Legen Sie den Staubsauger flach auf den Boden, um die Bodendüse (6) zu
demontieren. Halten Sie dafür die Entriegelungsschalter (5a, 5b) gleichzeitig gedrückt
(Abb. 11, Fig. 16).
•Reinigen Sie den Staubbehälter des Handteils nach jeder Benutzung. Entfernen Sie den
Staubbehälter vom Motorblock, indem Sie auf die Entriegelungstaste (2) drücken. Wir
empfehlen Ihnen, das über einem Mülleimer zu machen (Abb. 9, Fig. 10).
•Entnehmen Sie den Filterhalter (6) und Filtereinsatz (7) durch Drehen entgegen des
Uhrzeigersinns (Abb. 9, Fig. 11). Klopfen Sie den Filtereinsatz aus und reinigen Sie den
Filterhalter unter fließendem Wasser (Abb. 9, Fig. 12). Lassen Sie alle Teile trocknen,
bevor Sie sie wieder zusammenbauen.
•Die Reinigung des Filters und des Staubbehälters ist sehr wichtig, da sie den optimalen
Betrieb des Gerätes ermöglicht, und unangenehme Gerüche eliminiert.
•Rotieren Sie das bewegliche Element der Bodendüse regelmäßig manuell, um
klemmende Fremdkörper zu entfernen (Abb. 12).
•Sollte sich das bewegliche Element nicht rotieren lassen (Abb. 13), ziehen Sie den
Schalter links an der Unterseite der Bürste zurück (a) und entnehmen Sie die Rolle (b).
(Abb. 13, Fig. 18). Entfernen Sie Verschmutzungen und Dreck. Achten Sie bei der
Verwendung einer Schere darauf, nicht sich selbst zu verletzen oder die Bürsten
Copies of the I/B. Please reproduce them without any changes except
under special instruction from Team International BELGIUM. The pages
must be reproduced and folded in order to obtain a booklet A5 (+/-
148.5 mm width x 210 mm height). When folding, make sure you keep
the good numbering when you turn the pages of the I/B. Don’t change
the page numbering. Keep the language integrity.
Back cover page (last page)
Assembly page 18/40
Fax +32 2 359 95 50
abzuschneiden (Abb. 13, Fig. 19 & 20). Setzen Sie die Rolle wieder ein und überprüfen
Sie, ob sich diese problemlos manuell bewegen lässt (Abb. 13, Fig. 21)
Hinweis: Überprüfen Sie die problemlose Rotation der Bürste nach jedem Einsatz.
PROBLEMLÖSUNG
Problem Mögliche Ursache Lösung
Staubsauger schaltet nicht ein Staubsauger ist nicht geladen Stellen Sie sicher, dass der
Staubsauger vor der ersten
Benutzung oder nach längerer
Nichtbenutzung voll aufgeladen
wird.
Staubsauger lädt nicht
Sicherung ist deaktiviert
Sicherung überprüfen
Ladekabel ist beschädigt Verwenden Sie niemals ein
beschädigtes Ladekabel.
Wenden Sie sich an den
Kundendienst.
Saugkraft lässt nach Verstopfung innerhalb des
Gerätes Überprüfen Sie alle Teile und
entfernen Sie mögliche
Verstopfungen.
Hohe Verschmutzung im
Wassertank Wechseln Sie das Wasser
regelmäßig und spätestens nach
jeder Benutzung.
Verschmutzter Filter Wenden Sie sich an den
Verkäufer oder Hersteller für
mögliche Ersatzteile.
Staubsauger überhitzt Verschmutzter Filter Überprüfen Sie den Filter und
entfernen Sie eventuelle
Verschmutzungen.
Abluft riecht unangenehm Verschmutzter Filter Überprüfen Sie den Filter und
entfernen Sie eventuelle
Verschmutzungen.
Filter ist nicht vollständig
abgetrocknet
Lassen Sie die Filter vor dem
Wiedereinsetzen vollständig
trocknen.
Ladeanzeige blinkt Akku leer Laden Sie den Staubsauger
vollständig auf. Das Blinken
stoppt.
Bürste rotiert nicht Verschmutzte Bürste Bürste reinigen

Copies of the I/B. Please reproduce them without any changes except
under special instruction from Team International BELGIUM. The pages
must be reproduced and folded in order to obtain a booklet A5 (+/-
148.5 mm width x 210 mm height). When folding, make sure you keep
the good numbering when you turn the pages of the I/B. Don’t change
the page numbering. Keep the language integrity.
Back cover page (last page)
Assembly page 19/40
Fax +32 2 359 95 50
UMWELTSCHUTZ – RICHTLINIE 2012/19/EU
Zum Schutz unserer Umwelt und unserer Gesundheit sind Elektro- und Elektronik-Altgeräte
nach bestimmten Regeln zu entsorgen. Dies fordert den Einsatz sowohl des Herstellers bzw.
Lieferanten als auch des Verbrauchers.
Aus diesem Grund darf dieses Gerät, wie das Symbol auf dem Typenschild bzw. auf
der Verpackung zeigt, nicht in den unsortierten Restmüll gegeben werden. Der
Verbraucher hat das Recht, dieses Gerät über kommunale Sammelstellen zu entsorgen;
von dort aus wird die spezifische Behandlung, Verwertung bzw. das Recycling gem. den
Erfordernissen der Richtlinie sichergestellt.
ErP Deklaration – VO 1275/2008/EG
Wir, die Team Kalorik Group GmbH bestätigen hiermit, dass unser Produkt den
Anforderungen der VO 1275/2008/EG entspricht. Unser Produkt verfügt zwar nicht über eine
Funktion zur Minimierung des Verbrauchs, welche laut VO 1275/2008/EG das Produkt nach
Beendigung der Hauptfunktion in den Aus- oder Bereitschaftszustand versetzen soll, aber
dies ist aus Sicht des Gebrauchswertes nicht möglich, da dies die Hauptfunktion des
Produktes so stark beeinträchtigen würde, dass eine Benutzung des Produktes nicht mehr
möglich sein würde!
Aus diesem Grund weisen wir in unserer Bedienungsanleitung den Kunden stets darauf hin,
das Gerät sofort nach dem Gebrauch vom Netz zu trennen.
Table of contents
Languages:
Other Team Kalorik Vacuum Cleaner manuals

Team Kalorik
Team Kalorik TKG SKV 1000 User manual

Team Kalorik
Team Kalorik TKG SKV 1006 User manual

Team Kalorik
Team Kalorik TKG VC 1021 User manual

Team Kalorik
Team Kalorik TKG VC 1001 User manual

Team Kalorik
Team Kalorik TKG VC 1022 User manual

Team Kalorik
Team Kalorik TKG HSS 1003 R User manual

Team Kalorik
Team Kalorik TKG SKV 1004 N User manual

Team Kalorik
Team Kalorik TKG VC 1014 User manual

Team Kalorik
Team Kalorik TKG KS 1000 User manual

Team Kalorik
Team Kalorik TKG RVC 1004 AB PB User manual


