IST-2255.CB01.01 Istruzione / User’s Manual / Manuel d’utilisation Pag.6/11
TECNOCONTROL S.r.l. Via Miglioli 47 SEGRATE ( MI )
as sprays, detergents, ammonia, glues and paints. However, in case of products containing substances in great
quantity, these could cause false alarms. We recommend ventilating the room when products like these are used.
Alcohols, Hydrogen and volatile organic solvents in great quantity cause false alarms, and then the sensors needs
one or more hours in clean air to reco er the normal sensiti ity conditions.
SAFETY: THE PETROL VAP. SENSOR (S2) IS A CATALYTIC SENSOR that operates only in presence of Oxygen. Do not
use pure gases or a lighter directly on the sensor since they could damage it irremediably. Consider that the sensor
life can be reduced, in polluted environments, or with flammable vapours (especially sol ents and in great quantity
can cause false alarms. Some substances cause a permanent reduction in sensitivity. Avoid contacts of the sensor
with vapours of Silicone compounds, Tetra-ethyl Lead (petrol antiknock additi e and Phosphate esters, since they can
reduce irremediably its sensitivity. Some substances produce a temporary loss of sensitivity. This “inhibitors”
include Hydrogen sulphides, Chlorine, Chlorinated hydrocarbons and halogenated compounds. The sensitivity is
recovered after a short period of running in clear air.
TEST and CALIBRATION
PAY ATTENTION: This procedure has to be made with attention by authorized and trained people; starting this
procedure it will increase mA Outputs causing the activation of connected alarm devices to the Gas Central Unit.
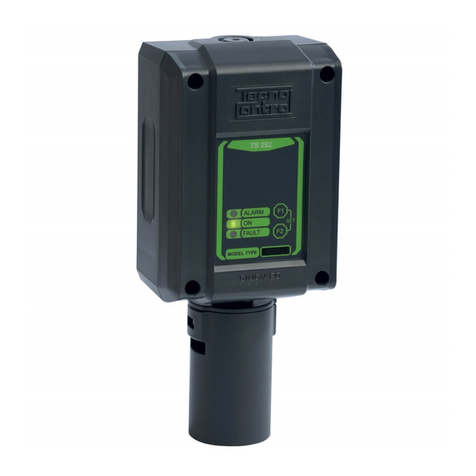
OPERATION CHECK, ZERO ADJUST, CALIBRATION AND CALIBRATION CHECKS (only for sensor S1): are different code
protected functions. To access these functions is necessary to insert the rele ant “Code" through the keys F1 and
F2. These two buttons are touching sensiti e, to enable the procedure, touch the key with the tip of a finger. To
ha e the key pressure recognized, hold pressing it for around a second (until the Green LE doesn't switch off for a moment
with one Buzzer beep for F1 and two Buzzer beeps for F2). Then the next key can be pressed. Then buzzer beeps along to
confirm the alidity of the inserted code. In case of error, it is enough to wait around 10 seconds, and the
sequence, signalled by three Beeps, will be automatically erased.
CALIBRATION KIT, SAMPLE GAS BOTTLES (for Calibration Check and Calibration) please, only using two mixture 300ppm
CO in Nitrog n and 0.88%v/v (20%LEL) M than in Air. It is possible to use either the disposable one litre
cylinders with adjust al e or the high pressure ones with reduction gear. Is also necessary the Tecnocontrol
Calibration Kit model TC011.
“INSTRUMENT OPERATION CHECK” (Check Code: F2, F2, F1, F1): this function allows to effect a functional
test of the equipment. After ha ing put the system in safety and inserted the "Code est", all LED are switched off.
Then they will switch on in sequence, the LED, from the yellow up to the red. The two 4÷20mA outputs remain
unchanged. At the end all the LED will remain lighted for around 5 seconds, then the central returns at the
conditions of normal operation. It is ad isable to perform this operation e ery 6-12 months according to the use.
Note: this function is not working if one or both the red LED has already turned on
“ZERO ADJUST” (Zero Code: F2, F1, F1, F2): This function is used to manually adjust the Zero of both sensors
and can be done in clean air only (en ironment without the presence of toxic gas or other pollutants). Immediately
after ha ing inserted the "Zero Code", as a confirmation of the operation carried out there will be 1 flash of the two
red LED and both the outputs will become 4,0 mA. We suggest performing this operation after the installation or
after the change of the cartridge and periodically based on the en ironmental conditions.
Note: This function is not working if mA out ut S1 is more than 4.8 mA (15 m CO) or S2 is more than
12mA (10%LEL Petrol Va ours) and/or one or both Red LED are already been switched on. In this case, it
will be necessary to recalibrate the unit and/or re lacing the corres onding “Cartridge”
“CALIBRATION” this function allows completely recalibrate the sensors, e eryone with their own code and gas
as explain up in the box.
Warning: to guarantee that no errors of elaboration happen, the possibility exists that during the Calibration the
corresponding yellow LED switch off every 8 seconds, in this case interrupt the procedure, switch off and switch on
the instrument and repeat the Calibration. If condition persists it will be necessary to send the detector to the supplier
for the reparation.
Im ortant note: during Calibration routine the mA output is 0mA. The “Calibration” can be done in clean air only
(environment without the presence of toxic or other polluting gas). With the keys perform the respecti e “Calibration Code".
The Calibration Code for the Sensor 1 (placed on the housing) to CO gas is: __ F2, F2, F2, F1, F2, F1.
The Calibration Code for the Sensor 2 (located below) to Petrol Va ours is: __ F2, F1, F1, F1, F2, F1.
Wait until the respecti e Yellow and Green LED switch on fix and the red LED starts to flash. Insert the TC011 into
the respecti e sensor holder to regulate the influx of the gas the way that the flow meter indicates around 0.3
l/mins (see Fig.3). Wait around 3 minutes, then when the red LED switch on (and while it's SWITCHE ON), press the
key F2 on the instrument and hold it pressed until the Red LED is switched off for at least 2 seconds and the
Buzzer beeps (if the Red LE continue to flash, repeat the operation). Then, close the gas cylinder and remove TC011. At
this point we can ha e two possibilities:
Y llow and Gr n LED illuminat s: the calibration routine has correctly been performed. Wait 8 seconds, until
the instrument automatically restores the normal working conditions. (See “Operational Description > Preheating”)
Y llow LED illuminat s: the routine has failed. In this case, wait 8 seconds, until the instrument automatically
repeat Preheating, then repeat the “Calibration” routine without inserting again the code. If condition still persists after
the replacement of the “Cartridge”, it will be necessary to send the detector back to the manufacturer for reparation.


